
4
Front-End and Back-End Interactions
Now that we have a minimalistic—yet fully working—Angular web app up, running, and connected with our ASP.NET Core API, we can start to build some stuff. In this chapter, we’re going to learn the basics of client-side and server-side interactions: in other words, how the front-end (Angular) can fetch some relevant data from the back-end (ASP.NET Core) and display it on screen, in a readable fashion.
As a matter of fact, we should’ve already got the gist of how it works in Chapter 3, Looking Around, when we worked with Angular’s FetchDataComponent and ASP.NET Core’s WeatherForecastController.cs classes and files. The Angular component (front-end) pulls data from the ASP.NET controller (back-end) and then puts it on the browser screen (UI) for display.
However, controllers aren’t the only way for our ASP.NET Core back-end to serve data to the front-end: we can also serve static files, or use any other middleware designed to handle requests and output a response stream or content of some sort, as long as we add it into our application pipeline. Such a highly modular approach is one of the most relevant concepts of ASP.NET Core. In this chapter, we’ll make use of that by introducing (and playing with) a built-in middleware that has little or nothing to do with .NET controllers, although it is able to deal with requests and responses just like they do: HealthChecksMiddleware.
Here’s a quick breakdown of what we’re going to cover:
- Introducing ASP.NET Core health checks: What they are and how we can use them to learn some useful concepts about ASP.NET Core and Angular interactions
- HealthCheckMiddleware: How to properly implement it within our ASP.NET Core back-end, configure it within our web application’s pipeline, and output a JSON-structured message that can be used by our Angular app
- HealthCheckComponent: How to build an Angular component to fetch the
HealthCheckstructured data from the ASP.NET Core back-end and bring it all to the front-end in a human-readable fashion - Restyling the UI: How to improve the look and feel of our Angular app using Angular Material, a user interface component library containing a lot of reusable and beautiful UI components
Are you ready? Let’s do this!
Technical requirements
In this chapter, we’re going to need all the technical requirements listed in the previous chapters, with no additional resources, libraries, or packages.
The code files for this chapter can be found here: https://github.com/PacktPublishing/ASP.NET-Core-6-and-Angular/tree/master/Chapter_04/.
Introducing ASP.NET Core health checks
We called our first project HealthCheck for a reason: the web app we’re about to build will act as a monitoring and reporting service that will check the health status of a target server—and/or its infrastructure—and show it on screen in real time.
In order to do that, we’re going to make good use of the Microsoft.AspNetCore.Diagnostics.HealthChecks package, a built-in feature of the ASP.NET Core framework first introduced in 2.2, refined and improved for the ASP.NET Core 3 release and still available up to the current .NET version. This package is meant to be used to allow a monitoring service to check the status of another running service—for example, another web server—which is precisely what we’re about to do.
For additional information about ASP.NET Core health checks, we strongly suggest reading the official MS documentation at the following URL: https://docs.microsoft.com/en-us/aspnet/core/host-and-deploy/health-checks?view=aspnetcore-6.0.
Adding the HealthChecks middleware
The first thing we need to do is to add the HealthChecks middleware to our web app. This can be done by opening the Program.cs file and adding the following lines:
var builder = WebApplication.CreateBuilder(args);
// Add services to the container.
builder.Services.AddHealthChecks();
builder.Services.AddControllers();
// Learn more about configuring Swagger/OpenAPI at https://aka.ms/aspnetcore/swashbuckle
builder.Services.AddSwaggerGen();
var app = builder.Build();
// Configure the HTTP request pipeline.
if (app.Environment.IsDevelopment())
{
    app.UseSwagger();
    app.UseSwaggerUI();
}
app.UseHttpsRedirection();
app.UseAuthorization();
app.UseHealthChecks(new PathString("/api/health"));
app.MapControllers();
app.Run();
The /api/health parameters we passed to the UseHealthChecks middleware will create a server-side route for the health checks. It’s also worth noting that we added that middleware right before MapControllers, so that our new route won’t be overridden by any controller that could share that same name in the future.
We can immediately check out the new route by doing the following:
- Press F5 so that our web application will run in debug mode
- Navigate to the
https://localhost:40443/api/healthURL and hit Enter
As soon as we do that, we should be able to see something like this:

Figure 4.1: Checking our health check
As we can see, our system is Healthy: that’s rather obvious since we have no checks defined yet.
How about adding one? That’s what we’re going to do in the next section.
Adding an Internet Control Message Protocol (ICMP) check
The first check we’re going to implement is one of the most popular ones: an Internet Control Message Protocol (ICMP) request check to an external host, also known as PING.
As you most likely already know, a PING request is a rather basic way to check the presence—and therefore the availability—of a server that we know we should be able to reach within a local area network (LAN) or wide area network (WAN) connection. In a nutshell, it works in the following way: the machine that performs the PING sends one or more ICMP echo request packets to the target host and waits for a reply. If it receives one, it reports the round-trip time of the whole task; otherwise, it times out and reports a host not reachable error.
The host not reachable error can be due to a number of possible scenarios, as listed here:
- The target host is not available
- The target host is available, but actively refuses TCP/IP communications of any kind
- The target host is available and accepts incoming connections, but it has been configured to explicitly refuse ICMP requests and/or not send ICMP echo replies back
- The target host is available and properly configured to accept ICMP requests and send echo replies back, but the connection is very slow or hindered by unknown reasons (performance, heavy load, and so on), so the round-trip time takes too long—or even times out
As we can see, this is an ideal scenario for a health check: if we properly configure the target host to accept the PING and always answer it, we can definitely use it to determine whether the host is in a healthy status or not.
Possible outcomes
Now that we know the common scenarios behind a PING test request, we can put down a list of possible outcomes, as follows:
Healthy: We can consider the hostHealthywhenever the PING succeeds with no errors or timeoutsDegraded: We can consider the hostDegradedwhenever the PING succeeds, but the round-trip takes too longUnhealthy: We can consider the hostUnhealthywhenever the PING fails—that is, the check times out before any reply
Now that we’ve identified these three statuses, we just need to properly implement them within our health check.
Creating an ICMPHealthCheck class
The first thing we have to do is create a new ICMPHealthCheck.cs class in our project’s root folder.
Once done, fill it with the following content:
using Microsoft.Extensions.Diagnostics.HealthChecks;
using System.Net.NetworkInformation;
namespace HealthCheckAPI
{
    public class ICMPHealthCheck : IHealthCheck
    {
        private readonly string Host = $"10.0.0.0";
        private readonly int HealthyRoundtripTime = 300;
        public async Task<HealthCheckResult> CheckHealthAsync(
            HealthCheckContext context,
            CancellationToken cancellationToken = default)
        {
            try
            {
                using var ping = new Ping();
                var reply = await ping.SendPingAsync(Host);
                switch (reply.Status)
                {
                    case IPStatus.Success:
                        return (reply.RoundtripTime > HealthyRoundtripTime)
                            ? HealthCheckResult.Degraded()
                            : HealthCheckResult.Healthy();
                    default:
                        return HealthCheckResult.Unhealthy();
                }
            }
            catch (Exception e)
            {
                return HealthCheckResult.Unhealthy();
            }
        }
    }
}
As we can see, we implemented the IHealthCheck interface since it’s the official .NET way to deal with health checks: such an interface requires a single async method—CheckHealthAsync—which we used to determine if the ICMP request was successful or not.
In the preceding code, the ping variable has been declared with the using keyword: this technique is called a using declaration and was introduced in C# version 8 as a convenient replacement for the using statements/blocks to reduce nesting and produce more readable code.
For further info regarding the using declaration feature, take a look at the following URL:
https://docs.microsoft.com/en-us/dotnet/csharp/language-reference/proposals/csharp-8.0/using
Those who want to use it are strongly advised to also read this great post by Steve Gordon (Microsoft MVP) to better understand how using declarations work under the hood:
https://www.stevejgordon.co.uk/csharp-8-understanding-using-declarations
The code is very easy to understand and handles the three possible scenarios we defined in the previous section. Let’s go over what the host can be considered to be:
Healthy, if the PING request gets a successful reply with a round-trip time of 300 ms or lessDegraded, if the PING request gets a successful reply with a round-trip time greater than 300 msUnhealthy, if the PING request fails or anExceptionis thrown
One final notice regarding the single line of code that we used to set the Host value:
Private readonly string Host = $"10.0.0.0";
As we can see, we’ve set Host to a non-routable IP address—which might seem rather awkward. We did that for demonstration purposes, so that we’ll be able to simulate an “unhealthy” scenario: we’re definitely going to change it later on.
That’s pretty much it. Our health check is ready to be tested—we just need to find a way to load it into our web application’s pipeline.
Adding the ICMPHealthCheck
In order to load our ICMP health check into the web application pipeline, we need to add it to the HealthChecks middleware. To do that, open the Program.cs class again and change the first line we previously added in the following way:
// ...existing code...
builder.Services.AddHealthChecks()
    .AddCheck<ICMPHealthCheck>("ICMP");
// ...existing code...
That’s it.
The // ...existing code... comment is just a way to tell us to leave the already-existing code as it is, without altering it. We’re going to use that keyword whenever we need to add a few lines of code to an existing block instead of rewriting the unmodified lines.
It’s worth noting that, since we added a reference to the ICMPHealthCheck class, which we’ve just created within the HealthCheckAPI namespace, we must add a reference to that namespace as well. Here we’ll take the chance to use another handy C# 10 feature called Global Using: as the name suggests, this feature allows us to define some common using statements that will automatically be available for use within the entire project.
To do that, we just need to add the global keyword before the using statement that we want to make global. Since the HealthCheckAPI happens to be our API project’s namespace, it seems the perfect candidate for that.
Here’s the single line we need to add at the top of the Program.cs file:
global using HealthCheckAPI;
Now, we can hit F5 and try it out. Here’s what we should be able to see:

Figure 4.2: Checking our health check
As expected, the hardcoded ICMP request to 10.0.0.0 has failed, hence we get the Unhealthy status. That’s great, right?
Well, actually, it’s not that great. Our health check does indeed work, but comes with the following three major flaws:
- Hardcoded values: The
HostandHealthyRoundtripTimevariables should be passed as parameters so that we can set them programmatically - Uninformative response:
HealthyandUnhealthyare not that great—we should find a way to have a custom (and better) output message instead - Untyped output: The current response is being sent in plain text—if we want to fetch it with Angular, a JSON content type would definitely be better (and way more usable, as we’ll see in the Health checks in Angular section later on)
Let’s fix these issues, one at a time.
Improving the ICMPHealthCheck class
In this section, we’ll improve our ICMPHealthCheck class by adding the host and healthyRoundtripTime parameters, a custom outcome message for each possible status, and a JSON-structured output.
Adding parameters and response messages
Open the ICMPHealthCheck.cs class file and perform the following changes (added/modified lines are highlighted):
using Microsoft.Extensions.Diagnostics.HealthChecks;
using System.Net.NetworkInformation;
namespace HealthCheckAPI
{
    public class ICMPHealthCheck : IHealthCheck
    {
        private readonly string Host;
        private readonly int HealthyRoundtripTime;
        public ICMPHealthCheck(string host, int healthyRoundtripTime)
        {
            Host = host;
            HealthyRoundtripTime = healthyRoundtripTime;
        }
        public async Task<HealthCheckResult> CheckHealthAsync(
            HealthCheckContext context,
            CancellationToken cancellationToken = default)
        {
            try
            {
                using var ping = new Ping();
                var reply = await ping.SendPingAsync(Host);
                switch (reply.Status)
                {
                    case IPStatus.Success:
                        var msg =
                            $"ICMP to {Host} took {reply.RoundtripTime} ms.";
                        return (reply.RoundtripTime > HealthyRoundtripTime)
                            ? HealthCheckResult.Degraded(msg)
                            : HealthCheckResult.Healthy(msg);
                    default:
                        var err =
                            $"ICMP to {Host} failed: {reply.Status}";
                        return HealthCheckResult.Unhealthy(err);
                }
            }
            catch (Exception e)
            {
                var err =
                    $"ICMP to {Host} failed: {e.Message}";
                return HealthCheckResult.Unhealthy(err);
            }
        }
    }
}
As we can see, we changed a couple of things, as follows:
- We added a constructor accepting the two parameters we’d like to set programmatically:
hostandhealthyRoundtripTime. The old hardcoded variables are now set by the constructor upon initialization and then used within the class afterward (such as within the main method). - We created various different outcome messages containing the target host, the PING outcome, and the round-trip duration (or the runtime error), and added them as parameters to the
HealthCheckResultreturn objects.
In the preceding code, we’ve used string interpolation, a powerful text formatting feature released in C# version 6 to replace the previous string.Format approach. For further info regarding this feature, go to the following URL:
https://docs.microsoft.com/en-us/dotnet/csharp/tutorials/string-interpolation
That’s pretty much it. Now, we just need to set the host name and healthyRoundtripTime programmatically since the old hardcoded defaults are now gone. In order to do that, we have to update our middleware setup in the Program.cs file.
Updating the middleware setup
Open the Program.cs file again and change the existing HealthChecksMiddleware implementation in the following way:
// ...existing code...
builder.Services.AddHealthChecks()
    .AddCheck("ICMP_01",
        new ICMPHealthCheck("www.ryadel.com", 100))
    .AddCheck("ICMP_02",
        new ICMPHealthCheck("www.google.com", 100))
    .AddCheck("ICMP_03",
        new ICMPHealthCheck($"www.{Guid.NewGuid():N}.com", 100));
// ...existing code...
Here we go: as we can see, another advantage of being able to programmatically configure the host is that we can add the ICMP health check multiple times—once for each host we’d like to actually check. In the preceding example, we’re taking the chance to test three different hosts: www.ryadel.com, www.google.com, and the same non-existing host we used before, which allows us to emulate an Unhealthy status as well as the Healthy ones.
Now, we could be tempted to hit F5 and try it out... However, if we were to do that, we would face a rather disappointing outcome, as shown in the following screenshot:

Figure 4.3: Checking our health check
The reason for this is quite obvious: even if we’re running multiple checks, we’re still relying on the default outcome message, which is nothing more than a Boolean sum of the statuses returned by all the checked hosts. For that very reason, if at least one of them is Unhealthy, the whole check will be flagged as Unhealthy as well.
Luckily enough, we can avoid that sum—and get a much more granular output—by dealing with the third flaw of our ICMPHealthCheck: implementing a custom, JSON-structured output message.
Implementing a custom output message
To implement a custom output message, we need to override the HealthCheckOptions class. To do that, add a new CustomHealthCheckOptions.cs file to the project’s root folder and fill it with the following content:
using Microsoft.AspNetCore.Diagnostics.HealthChecks;
using System.Net.Mime;
using System.Text.Json;
namespace HealthCheckAPI
{
    public class CustomHealthCheckOptions : HealthCheckOptions
    {
        public CustomHealthCheckOptions() : base()
        {
            var jsonSerializerOptions = new JsonSerializerOptions()
            {
                WriteIndented = true
            };
            ResponseWriter = async (c, r) =>
            {
                c.Response.ContentType =
                 MediaTypeNames.Application.Json;
                c.Response.StatusCode = StatusCodes.Status200OK;
                var result = JsonSerializer.Serialize(new
                {
                    checks = r.Entries.Select(e => new
                    {
                        name = e.Key,
                        responseTime =
                             e.Value.Duration.TotalMilliseconds,
                        status = e.Value.Status.ToString(),
                        description = e.Value.Description
                    }),
                    totalStatus = r.Status,
                    totalResponseTime =
                       r.TotalDuration.TotalMilliseconds,
                }, jsonSerializerOptions);
                await c.Response.WriteAsync(result);
            };
        }
    }
}
The code is quite self-explanatory: we override the standard class—which outputs the one-word output we want to change—with our own custom class so that we can change its ResponseWriter property, in order to make it output whatever we want.
More specifically, we want to output a custom JSON-structured message containing a lot of useful stuff from each of our checks, listed here:
name: The identifying string we provided while adding the check to the HealthChecks middleware within theProgram.csfile:"ICMP_01","ICMP_02", and so onresponseTime: The whole duration of that single checkstatus: The individual status of a check, not to be confused with the status of the wholeHealthCheck—that is, the Boolean sum of all the inner checks’ statusesdescription: The custom informative message we configured earlier on when we refined theICMPHealthCheckclass
All these values will be properties of the array items contained in the JSON output: one for each check. It’s worth noting that the JSON file, in addition to that array, will also contain the following two additional properties:
totalStatus: The Boolean sum of all the inner checks’ statuses—Unhealthyif there’s at least anUnhealthyhost,Degradedif there’s at least aDegradedhost, andHealthyotherwisetotalResponseTime: The whole duration of all the checks
That’s a lot of useful information, right? We just have to configure our middleware to output them, instead of those one-word responses we’ve seen before.
About health check responses and HTTP status codes
Before going further, it’s worth noting that—in the preceding CustomHealthCheckOptions class—we set ResponseWriter’s HTTP status code to a fixed StatusCodes.Status200OK. Is there a reason behind that?
As a matter of fact, there is, and it’s also quite an important one. The HealthChecks middleware’s default behavior returns either HTTP status code 200, if all the checks are OK (Healthy), or HTTP status code 503, if one or more checks are KO (Unhealthy). Since we’ve switched to a JSON-structured output, we don’t need the 503 code anymore, as it would most likely break our front-end client UI logic—unless properly handled. Therefore, for the sake of simplicity, we just forced an HTTP 200 response, regardless of the end result. We’ll find a way to properly emphasize the errors within the upcoming Angular UI.
Configuring the output message
Open the Program.cs file and change the following lines accordingly (the updated code is highlighted):
// ... existing code
app.UseHealthChecks(new PathString("/api/health"),
    new CustomHealthCheckOptions());
// ... existing code
Once done, we can finally hit F5 and properly test it out. This time, we won’t be disappointed by the outcome, as shown in the following screenshot:

Figure 4.4: A more detailed health check output message
That’s a pretty nice response, isn’t it?
Now, each and every check is properly documented, as well as the total outcome data, in a structured JSON object. This is just what we need to feed some Angular components that we can show on screen in a human-readable (and fashionable) way, which we’re just about to do, starting with the next section.
Health checks in Angular
It’s now time to build an Angular component that is capable of fetching and displaying the structured JSON data we managed to pull off in the previous sections.
As we know from Chapter 3, Looking Around, an Angular component is commonly made of four separate files, as follows:
- The component (
.ts) file, written in TypeScript and containing thecomponentclass, together with all the module references, functions, variables, and so on - The template (
.html) file, written in HTML and extended with the Angular template syntax, which defines the UI layout architecture - The style (
.css) file, written in CSS and containing the Cascading Style Sheets rules and definitions for drawing the UI - The test (
.spec.ts) file, written in TypeScript and containing the tests that will be run by Karma
Although the aforementioned four-files approach is arguably the most practical one, the only required file is the component one, as both the template and the style files could also be embedded as inline elements within the component file. The choice between using separate files or going inline is a matter of taste; however, since the Angular CLI adopts the four-files approach, we strongly suggest following this good practice. Such an approach will also enforce the separation of concerns embodied within the component/template duality featured by Angular.
Let’s now use the Angular CLI to generate the first three files for a new HealthCheck component (skipping the test file), just like we did in Chapter 3, Looking Around.
Creating the Angular component
Open a Command Prompt, navigate through the /src/app folder of our Angular project, and type the following command:
> ng generate component HealthCheck --module=app --skip-tests
As always, the CLI will create the component files and add the required references to the AppModule for us.
It’s worth noting that, since our app has multiple modules (AppModule and AppRoutingModule), every time we create a new module, we need to specify which module to add the component’s references to using the --module switch (as explained in Chapter 3, Looking Around).
As soon as the CLI generates the new component files, we can fill them with the following content.
Health-check.component.ts
Here’s the /src/app/health-check/health-check.component.ts source code:
import { Component, OnInit } from '@angular/core';
import { HttpClient } from '@angular/common/http';
import { environment } from ' ./../../environments/environment';
@Component({
    selector: 'app-health-check',
    templateUrl: './health-check.component.html',
    styleUrls: ['./health-check.component.css']
})
export class HealthCheckComponent implements OnInit {
  public result?: Result;
  constructor(private http: HttpClient) {
  }
  ngOnInit() {
    this.http.get<Result>(environment.baseUrl + 'api/health').subscribe(result => {
      this.result = result;
    }, error => console.error(error));
  }
}
interface Result {
    checks: Check[];
    totalStatus: string;
    totalResponseTime: number;
}
interface Check {
    name: string;
    responseTime: number;
    status: string;
    description: string;
}
If you’re curious about what we did there, here’s a breakdown of the most relevant stuff:
- At the start of the file, we made sure to
importall the Angular directives, pipes, services, and components—in one word, modules—that we need throughout the whole class. - In the class declaration, we’ve explicitly implemented the
OnInitinterface by adding theimplements OnInitinstruction to add type-safety: this way, we won’t risk typing or spelling mistakes within thengOnInitlifecycle hook. - In the component’s constructor, we instantiated the
HttpClientservice using dependency injection (DI). - Last but not least, we defined two interfaces to deal with the JSON request we’re expecting to receive from the
HealthChecksMiddleware:ResultandCheck, which we designed to host the whole JSON resulting object and each element of the internal array, respectively.
Before going further, it could be useful to spend some valuable time expanding on some very important topics we’ve just met by implementing the preceding code, as follows:
- Imports and modules
- Dependency injection
- ngOnInit (and other lifecycle hooks)
- Constructor
- HttpClient
- Observables
- Interfaces
Since we’re going to see them all throughout this book, it’s definitely advisable to review them now.
Imports and modules
The static import statement that we used multiple times in the preceding HealthCheckComponent is used to import bindings that are exported by other JavaScript modules.
The concept of working with modules started with ECMAScript 2015 and has been thoroughly adopted by TypeScript and, therefore, Angular. A module is basically a collection of variables, functions, classes, and so on, grouped within a class: each module is executed within its own scope, not in the global scope, meaning that all the elements declared within it are not visible from the outside unless they are explicitly exported using the export statement.
Conversely, to consume a variable, function, class, interface, and so on contained (and exported) within a module, that module has to be imported using the import statement. This is quite similar to what we do with namespaces in most programming languages (C# has using statements, for example).
As a matter of fact, all the Angular directives, pipes, services, and components are also packed into collections of JavaScript modules, which we have to import into any TypeScript class whenever we want to use them. These collections are basically libraries of modules: we can easily recognize them since their name begins with the @angular prefix. Our packages.json file (the NPM package file), which we’ve seen in previous chapters, contains most of them.
To know more about ECMAScript modules and better understand the module resolution strategy in TypeScript, check out the following URLs:
TypeScript modules: https://www.typescriptlang.org/docs/handbook/modules.html
Module resolution: https://www.typescriptlang.org/docs/handbook/module-resolution.html
JavaScript modules should not be confused with Angular’s own modularity system, which is based upon the @NgModule decorator. As we already know from previous chapters, Angular’s NgModules are building blocks—that is, containers for a cohesive block of code dedicated to an application domain, a workflow, or a common feature set. We know from the aforementioned chapters that each Angular app has at least one NgModule class, called the root module, which is conventionally named AppModule and resides in the app.module.ts file in the application root; additional NgModules will be added in the upcoming chapters.
Unfortunately, the JavaScript module system and the Angular NgModule system use a rather similar vocabulary (import versus imports, export versus exports), which might lead to confusion—especially considering that Angular apps require the developer to use both of them at the same time (and often in the same class file). Luckily enough, although being forced to intertwine these two systems might be a bit tricky at first, eventually, we’ll become familiar with the different contexts in which they are used.
Here’s a sample screenshot, taken from our HealthCheck app’s AppModule class file, which should help you distinguish between the two different systems:

Figure 4.5: Inspecting the AppModule class file
For additional information regarding the Angular module system and the NgModule decorator, check out the following URLs:
NgModule: https://angular.io/guide/ngmodules
Angular architecture: NgModules and JavaScript modules: https://angular.io/guide/architecture-modules#ngmodules-and-javascript-modules
Dependency injection (DI)
We’ve talked about DI a number of times already, and with good reason, because it’s an important application design pattern for both ASP.NET Core and Angular, with both frameworks making extensive use of it to increase their efficiency and modularity.
To explain what DI actually is, we must first talk about what dependencies are in a class: these can be defined as services or objects that a class needs to instantiate into variables or properties, in order to perform one or more tasks.
In a classic coding pattern, those dependencies are instantiated on the fly within the class itself—for example, during its initialization phase, such as within the constructor method. Here’s a typical example of that:
public MyClass() {
    var myElement = new Element();
    myElement.doStuff();
}
In the preceding example, the myElement variable is an object instance of the Element type, and also a (local) dependency of MyClass: as we can see, it gets instantiated in the constructor because we most likely need to use it there. From there, we can either use it as a local variable (and let it die at the end of the constructor’s scope) or assign it to a class property to further extend its life span and scope.
DI is an alternative software design pattern in which a class asks for dependencies from external sources rather than creating them itself. To better understand this concept, let’s try to rewrite the same code as before with a DI approach, like this:
public MyClass(Element myElement) {
    myElement.doStuff();
}
As we can see, there’s no need to instantiate the myElement variable because this task is already handled by the dependency injector—external code that is responsible for creating the injectable objects and injecting them into the classes.
The whole DI coding pattern is based upon the concept of Inversion of Control (IoC), to resolve dependencies. Such a concept revolves around the basic idea that, formally, if ObjectA depends on ObjectB, then ObjectA must not create or import ObjectB directly, but provide a way to inject ObjectB instead. In the preceding code block example, ObjectA is obviously MyClass, while ObjectB is the myElement instance.
For additional information about the DI software design pattern, check out the following links:
DI in ASP.NET Core: https://docs.microsoft.com/en-us/aspnet/core/fundamentals/dependency-injection
DI in Angular: https://angular.io/guide/dependency-injection
In Angular, the DI framework provides declared dependencies to a class when that class is instantiated.
In the preceding HealthCheckComponent class, we used DI in the component’s constructor method to inject an HttpClient service instance; as we can see, we also took the chance to assign the private access modifier to both of them. Thanks to that modifier, those variables will be accessible through the whole component class.
As per Angular conventions, a parameter injected without an access modifier can only be accessed within the constructor; conversely, if it gets an access modifier such as private or public, it will be defined as a class member, hence changing its scope to the class. Such a technique is called variable scoping, and we’re going to use it a lot in our Angular components from now on.
ngOnInit (and other lifecycle hooks)
The ngOnInit method that we used in the HealthCheckComponent class is one of the component’s lifecycle hook methods: in this section, we’ll try to shed some light on them, since we’re going to use them a lot throughout this book.
Each Angular component has a lifecycle, which is managed by Angular. Each time a user visits a view within our app, the Angular framework creates and renders the required components (and directives) along with their children, reacts to their changes whenever the user interacts with them, and eventually destroys and removes them from the Document Object Model (DOM) when the user navigates elsewhere. All these “key moments” trigger some lifecycle hook methods that Angular exposes to the developers so that they can perform something when each one of them actually occurs.
Here’s a list of the available hooks, in order of execution (when possible, since some of them are called multiple times during the component’s lifecycle):
ngOnChanges(): Responds when Angular (re)sets data-bound input properties. The method receives aSimpleChangesobject of current and previous property values. Called beforengOnInit(), and whenever one or more data-bound input properties changes.ngOnInit(): Initializes the directive/component after Angular first displays the data-bound properties and sets the directive/component’s input properties. Called once, after the firstngOnChanges()method.ngDoCheck(): Detects and acts upon changes that Angular can’t, or won’t, detect on its own. Called during every change detection run, immediately afterngOnChanges()andngOnInit().ngAfterContentInit(): Responds after Angular projects external content into the component’s view/the view that a directive is in. Called once after the firstngDoCheck()method.ngAfterContentChecked(): Responds after Angular checks the content projected into the directive/component. Called after thengAfterContentInit()method and every subsequentngDoCheck()method.ngAfterViewInit(): Responds after Angular initializes the component’s views and child views/the view that a directive is in. Called once after the firstngAfterContentChecked()method.ngAfterViewChecked(): Responds after Angular checks the component’s views and child views/the view that a directive is in. Called after thengAfterViewInit()method and every subsequentngAfterContentChecked()method.ngOnDestroy(): Cleans up just before Angular destroys the directive/component. UnsubscribesObservablesand detaches the event handlers to avoid memory leaks. Called just before Angular destroys the directive/component.
The preceding lifecycle hook methods are available for all Angular components and directives. To make use of them, we can just add them to our component class—which is precisely what we did in the preceding HealthCheckComponent.
Now that we have understood the role of ngOnInit(), we should take a moment to explain why we put the HttpClient source code in the ngOnInit() lifecycle hook method instead of using the component’s constructor() method: shouldn’t we have used that instead?
The next section should greatly help us to understand the reason for such a choice.
Constructor
As we most likely already know, all TypeScript classes have a constructor() method that will be called whenever we create an instance of that class: since TypeScript is, by all means, a superset of JavaScript, any TypeScript constructor() method will be transpiled into a JavaScript constructor() function.
The following code block shows an example of a TypeScript class:
class MyClass() {
  constructor() {
    console.log("MyClass has been instantiated");
  }
}
This will be transpiled into the following JavaScript function:
function MyClass() {
  console.log("MyClass has been instantiated");
}
If we omit the constructor in TypeScript, the JavaScript transpiled function will be empty; however, whenever the framework needs to instantiate it, it will still call it in the following way, regardless of whether it has the constructor or not:
var myClassInstance = new MyClass();
Understanding this is very important because it greatly helps us to understand the difference between the component’s constructor() method and its ngOnInit() lifecycle hook, and it’s a huge difference, at least from the perspective of the component initialization phase.
The whole Angular Bootstrap process can be split into two major (and subsequent) stages:
- Instantiating the components
- Performing change detection
As we can easily guess, the constructor() method is called during the former phase, while all the lifecycle hooks—including the ngOnInit() method—are called throughout the latter.
If we look at these methods from this perspective, it’s pretty easy to understand the following key concepts:
- If we need to create or inject some dependencies into an Angular component, we should use the
constructor()method; as a matter of fact, this is also the only way we can do that since the constructor is the only method that gets called in the context of the Angular injector. - Conversely, whenever we need to perform any component initialization and/or update task—such as performing an HTTP request or updating the DOM—we should definitely do that by using one of the lifecycle hooks.
The ngOnInit() method, as its name implies, is often a great choice for the component’s initialization tasks, since it happens right after the directive’s and/or component’s input properties are set. That’s why we have used this to implement our HTTP request, using the Angular built-in HttpClient service.
HttpClient
Being able to efficiently send and receive JSON data from our ASP.NET Core controllers is probably the most important requirement for our single-page application (SPA). We chose to do that using the Angular HttpClient service, first introduced in Angular 4.3.0-RC.0, which is among one of the best answers the framework can give to get the job done. For this very reason, we will use it a lot throughout this book; however, before doing that, it might be advisable to properly understand what it is, why it is better than the former implementation, and how to properly implement it.
The new HttpClient service was introduced in July 2017 as an improved version of the former Angular HTTP client API, also known as @angular/http, or, simply, HTTP. Instead of replacing the old version in the @angular/http package, the Angular development team has put the new classes in a separate package—@angular/common/http. They chose to do that to preserve the backward compatibility with the existing code bases, and also to ensure a slow, yet steady, migration to the new API.
Those who used the old Angular HTTP service class at least once will most likely remember its main limitations, listed here:
- JSON was not enabled by default, forcing the developers to explicitly set it within the request headers—and
JSON.parse/JSON.stringifythe data—when working with RESTful APIs. - There was no easy way to access the HTTP request/response pipeline, thus preventing the developer from intercepting or altering the request and/or response calls after they were issued or received by using some ugly and pattern-breaking hacks. As a matter of fact, extensions and wrapper classes were basically the only way to customize the service, at least on a global scope.
- There was no native strong-typing for request and response objects, although that could be addressed by casting JSON as interfaces as a workaround.
The great news is that the new HttpClient does all of this and much more; other features include testability support and better error handling via APIs entirely based on Observables.
It’s worth noting that putting the HttpClient service within the component itself is not good practice because it will often lead to unnecessary code repetition among the various components that need to perform HTTP calls and handle their results. This is a known issue that greatly affects production-level apps, which will likely require post-processing of the received data, handling errors, adding retry logic to deal with intermittent connectivity, and so on.
To better deal with those scenarios, it’s strongly advisable to separate the data access logic and the data presentation role by encapsulating the former in a separate service, which can then be injected into all the components that require it, in a standardized and centralized way. We’ll talk more about that in Chapter 8, Code Tweaks and Data Services, where we’ll eventually replace multiple HttpClient implementations and centralize their source code within a couple of data services.
Observables
Observables are a powerful feature for managing async data; they are the backbone of the ReactiveX JavaScript (RxJS) library, which is one of the Angular required dependencies. Those who are familiar with ES6 Promises can think of them as an improved version of that approach.
An observable can be configured to send literal values, structured values, messages, and events, either synchronously or asynchronously: the values can be received by subscribing to the observable itself using the subscribe method hook, meaning that the whole data flow is handled within it—until we programmatically choose to unsubscribe. The great thing about this approach is that, regardless of the chosen approach (sync or async), streaming frequency, and data type, the programming interface for listening to values and stopping listening is the same.
The great advantages of observables are the reason why Angular makes extensive use of them when dealing with data. If we take a good look at our HealthCheckComponent source code, we can see how we use them as well when our HttpClient service fetches the data from the server and stores the result in the this.result local variable. Such a task is performed by calling two consecutive methods: get<Result>() and subscribe().
Let’s try to summarize what they do, as follows:
get<Result>(): As the name suggests, this method issues a standard HTTP request to our ASP.NET CoreHealthChecksmiddleware to fetch the resulting JSON response object. This method needs a URL parameter, which we create on the fly by adding thehcliteral string (the same string that we set early on within theProgram.csfile) to the base Web API URL.subscribe(): This method invokes the observable returned by thegetcall, which will execute two very different actions right after a result and/or in case of an error. Needless to say, all this will be done asynchronously, meaning that the app won’t wait for the result and keep executing the rest of the code.
Those who want to get additional information can take a look at the following URLs, taken from the RxJS official documentation:
ReactiveX Library—Observables guide: http://reactivex.io/rxjs/class/es6/Observable.js~Observable.html
Angular.io—Observables guide: https://angular.io/guide/observables
It’s very important to understand that we’re only scratching the surface of what an observable can do. However, this is all we need for now: we’ll have the chance to talk more about them later on.
Interfaces
Now that we know how the Angular HttpClient service works, we have every right to ask ourselves a couple of questions: why are we even using these interfaces? Can’t we just use the raw JSON data sent by the ASP.NET Core HealthChecks middleware that we defined early on, consuming them as anonymous JavaScript objects?
Theoretically speaking, we can, just as we can output raw JSON from the controllers, instead of creating all the ViewModel classes like we did instead. In a well-written app, though, we should always resist the temptation to handle raw JSON data and/or to use anonymous objects for a number of good reasons:
- We have chosen TypeScript over JavaScript because we want to work with type definitions: Anonymous objects and properties are the exact opposite; they lead to the JavaScript way of doing things, which is something we wanted to avoid in the first place.
- Anonymous objects (and their properties) are not easy to validate: We don’t want our data items to be error-prone or forced to deal with missing properties.
- Anonymous objects are hardly reusable: In other words, they won’t benefit from many handy Angular features—such as object mapping—that require our objects to be actual instances of an interface and/or a type.
The first two arguments are very important, especially if we’re aiming for a production-ready application; no matter how easy our development task might seem at first, we should never think that we can afford to lose that level of control over our application’s source code.
The third reason is also crucial, as long as we want to use Angular to its full extent. If that’s the case, using an undefined array of properties—such as raw JSON data—is basically out of the question; conversely, using a structured TypeScript interface is arguably the most lightweight way to work with structured JSON data in a strongly typed fashion.
It’s worth noting that we’ve not added the export statement to our interface: we did that on purpose since we’re only going to use this within the HealthCheckComponent class. Should we need to change this behavior in the future—for example, to create an external data service—we’ll have to add this statement (and, arguably, move each one of them into a separate file) to enable us to import them into other classes.
health-check.component.html
Here’s the /src/app/health-check/health-check.component.html source code:
<h1>Health Check</h1>
<p>Here are the results of our health check:</p>
<p *ngIf="!result"><em>Loading...</em></p>
<table class='table table-striped' aria-labelledby="tableLabel" *ngIf="result">
  <thead>
    <tr>
      <th>Name</th>
      <th>Response Time</th>
      <th>Status</th>
      <th>Description</th>
    </tr>
  </thead>
  <tbody>
    <tr *ngFor="let check of result.checks">
      <td>{{ check.name }}</td>
      <td>{{ check.responseTime }}</td>
      <td class="status {{ check.status }}">{{ check.status }}</td>
      <td>{{ check.description }}</td>
    </tr>
  </tbody>
</table>
As we already know from Chapter 3, Looking Around, the template part of our Angular component is basically an HTML page, containing a table with some Angular directive. Before moving on, let’s have a closer look, as follows:
ngIf: This is a structural directive that conditionally includes the container HTML element, based on the Boolean expression value specified after the equals (=) sign: when such an expression evaluates to true, Angular renders the element; otherwise, it doesn’t. It can be chained with anelseblock that—if present—will be shown when the expression evaluates to false or null. In the preceding code block, we use it within the<table>element so that it only appears when theresultinternal variable (which we defined in the component class earlier on) stops being undefined, which will happen after the data has been fetched from the server.ngFor: Another structural directive that renders a template for each item contained in a given collection. The directive is placed on an element, which becomes the parent of the cloned templates. In the preceding code block, we use it inside the main<table>element to create and show a<tr>element (a row) for eachcheckitem within theresult.checksarray.{{ check.name }},{{ check.responseTime }}, and so on: These are called interpolations and can be used to incorporate calculated strings into the text between HTML element tags and/or within attribute assignments. In other words, we can use them as placeholders for our class variables’ property values. As we can see, the interpolation default delimiters are the double curly braces,{{and}}.
To understand more about ngIf, ngFor, interpolations, and other Angular UI fundamentals, we strongly suggest taking a look at the official documentation:
Displaying data: https://angular.io/guide/displaying-data
Template syntax: https://angular.io/guide/template-syntax
Structural directives: https://angular.io/guide/structural-directives
health-check.component.css
Here’s the /src/app/health-check/health-check.component.css source code:
.status {
  font-weight: bold;
}
.Healthy {
  color: green;
}
.Degraded {
  color: orange;
}
.Unhealthy {
  color: red;
}
There’s not much to note here; just some vanilla CSS to style out the component template. Notice how we played a bit with the styling of the table cell, which will contain the status of the various checks. It’s strongly advisable to highlight them as much as we can, so we made them bold and with a color matching the status type: green for Healthy, orange for Degraded, and red for Unhealthy.
Due to space limitations, we won’t be able to talk much about CSS styling in this book: we will just take it for granted that the average web programmer knows how to handle the simple definitions, selectors, and styling rules we will use in our examples.
Those who want (or need) to understand more about CSS and CSS3 are encouraged to take a look at this great online tutorial: https://developer.mozilla.org/en-US/docs/Web/CSS.
A word on Angular component styling
As a matter of fact, Angular gives us at least two ways to define custom CSS rules for our components:
- Setting them within a
stylesproperty in the component metadata - Loading styles from external CSS files by adding a
styleUrlsproperty in the component metadata
Both of the preceding approaches rely upon properties that need to be added to the component’s @Component decorator; the latter is the one used by the default template we reviewed back in Chapter 3, Looking Around, and is preferable in most cases, since it allows us to separate the HTML structure from the CSS styling.
If we wanted to migrate to the former, here’s how we should set the styles property instead:
@Component({
  selector: 'app-health-check',
  templateUrl: './health-check.component.html',
  styles: ['
    .status { font-weight:bold; }
    .Healthy { color: green; }
    .Degraded { color: orange; }
    .Unhealthy { color: red; }
  ']
})
The only real advantage of such an approach is that it doesn’t need the addition of a separate CSS file, which could make it viable enough for small and lightweight components that require little styling: that said, in the vast majority of cases, the styleUrls property is definitely the way to go.
It goes without saying that we’ve only scratched the surface of a huge and complex topic; however, for obvious reasons of space, we won’t go much further than this for the rest of the book.
Those who want to know more about component styling are strongly encouraged to take a look at the Angular official guide: https://angular.io/guide/component-styles.
Now that our component is ready, we need to properly add it to our Angular app.
Adding the component to the Angular app
Since we’ve generated the component using the Angular CLI, we don’t need to update the app.module.ts file: all the required changes have been automatically performed by the CLI.
However, if we want our new component to be reachable to our users within our Angular app, we need to make some minimal changes to the following files:
app-routing.module.tsnav-menu.component.tsnav-menu.component.html
Let’s get this done.
AppRoutingModule
Since we’ve created a dedicated AppRoutingModule to handle routing, we also need to update it by adding the new routing entry, so that our users will be able to navigate to that page.
Open the /src/app/app-routing.module.ts file and add the following highlighted lines:
import { NgModule } from '@angular/core';
import { Routes, RouterModule } from '@angular/router';
import { HomeComponent } from './home/home.component';
import { FetchDataComponent } from './fetch-data/fetch-data.component';
import { HealthCheckComponent } from './health-check/health-check.component';
const routes: Routes = [
  { path: '', component: HomeComponent, pathMatch: 'full' },
  { path: 'fetch-data', component: FetchDataComponent },
  { path: 'health-check', component: HealthCheckComponent }
];
@NgModule({
  imports: [RouterModule.forRoot(routes)],
  exports: [RouterModule]
})
export class AppRoutingModule { }
What we did here is not hard to understand: we’ve added a dedicated health-check route that will handle the navigation to our new component. Once done, we just need to add it to our NavMenuComponent so that our users will be able to see and use it within the app’s UI, which is what we’ll do now.
NavMenuComponent
Adding our new component navigation path to RoutingModule was a required step to make sure our users are able to reach it; however, we also need to add a link for our users to click on. Since NavMenuComponent is the component that handles the navigation user interface, we need to perform some stuff there as well.
Open the /src/app/nav-menu/nav-menu.component.html file and add the following highlighted lines:
<header>
  <nav>
    <a [routerLink]="['/']">Home</a>
    |
    <a [routerLink]="['/fetch-data']">Fetch Data</a>
    |
    <a [routerLink]="['/health-check']">Health Check</a>
  </nav>
</header>
Now that our new component has been added to our Angular app, we just need to test it out.
Testing it out
To see our new HealthCheckComponent in all of its glory, we just need to do the following:
- Hit F5 to launch the project in debug mode
- When the home view is done loading, click on the new Health Check link in the top-left navigation menu
If we did everything correctly, the browser should load the new Health Check view, which should look just like the following screenshot:
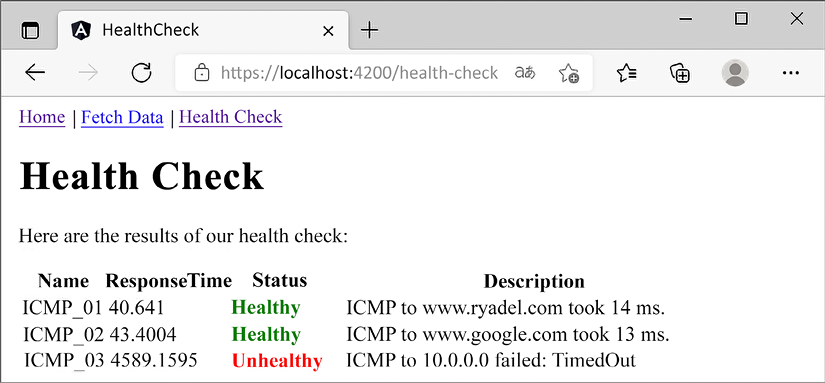
Figure 4.6: Our new HealthCheckComponent
It definitely seems like we did it!
Our health check is up and running, proudly showing us the results of the three ICMP requests we set up within our ASP.NET Core’s HealthChecksMiddleware.
That said, we must admit that the look and feel of such a table are not that great. And the rest of the app doesn’t look any better. The fact that we’re barely using any styling is starting to take its toll in terms of visual experience.
For this reason, before moving forward, it might be useful to spend some valuable time addressing such issues for good. Let’s be clear, we’re not going to turn our “minimalist” HTML templates into a jaw-dropping layout: we’ll just add some minor UI tweaks with the help of a free, open source, and well-known front-end framework.
Restyling the UI
You might think that the framework we’re referring to is Bootstrap, since it’s one of the most used choices when building responsive, mobile-first front-end applications. However, we’re not going to use it: we’ll opt for Angular Material instead, since it natively integrates with most Angular apps, provides a wide set of UI components, and gives a great look and feel, possibly even better than Bootstrap.
Introducing Angular Material
Angular Material is a UI component library that implements Material Design in Angular. As you most likely already know, Material Design is a UI design language that Google developed in 2014 that focuses on using grid-based layouts, responsive animations, transitions, padding, and depth effects such as lighting and shadows.
Material Design was introduced by the Google designer Matías Duarte on June 25, 2014, at the 2014 Google I/O conference. To make UI designers familiarize themselves with its core concepts, he explained that “unlike real paper, our digital material can expand and reform intelligently. Material has physical surfaces and edges. Seams and shadows provide meaning about what you can touch.”
The main purpose of Material Design is to create a new UI language combining principles of good design with technical and scientific innovation in order to provide a consistent user experience across not only all Google platforms and applications but also any other web applications seeking to adopt such concepts. The language was revamped in 2018, providing more flexibility and advanced customization features based on themes.
As of 2020, Material Design is used on almost all Google web applications and tools—including Gmail, YouTube, Google Drive, Google Docs, Sheets, Slides, Google Maps, and all of the Google Play-branded applications, as well as most Android and Google OS UI elements. Such wide adoption also includes Angular, which has been provided with a dedicated NPM package that can be added to any Angular-based project to implement Material Design into any Angular app; this package is called @angular/material and includes the native UI elements, the Component Dev Kit (CDK), a set of animations, and other useful stuff.
Installing Angular Material
Installing Angular Material is a rather easy process: the best thing is to follow the official instructions from the following URL:
https://material.angular.io/guide/getting-started
Which is what we’ll do right now.
Let’s start with opening a Command Prompt window: once done, navigate to the Angular project’s root folder—just like we do when we add a new component—and type the following command:
ng add @angular/[email protected]
The Angular Material installation wizard will start, as shown in the following screenshot:
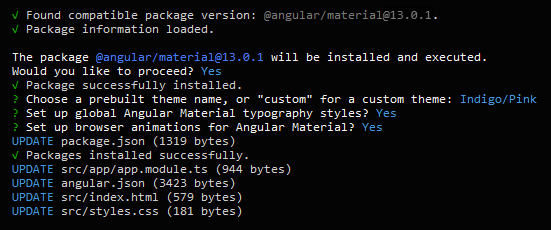
Figure 4.7: Installing Angular Material using the CLI
The Angular CLI will automatically find the most suitable/compatible version, depending on the version of the CLI itself. That said, it’s strongly advisable to use the version used within this book (see above).
The wizard will ask the following questions:
- Choose a prebuilt theme name: Indigo/Pink
- Set up global Angular Material typography styles? Yes
- Set up browser animations for Angular Material? Yes
As a matter of fact, we’re free to choose any default theme and opt-out of the browser animations if we don’t want them: however, adding the global typography styles is highly recommended, since we don’t have any additional CSS frameworks—and the default browser typography is not great.
Here’s what the wizard will do to our Angular app:
- Add the required NPM packages and dependencies to the
package.jsonfile:@angular/materialand@angular/cdk - Add the
BrowserAnimationModuleto the/src/app/app.module.tsfile (if we’ve answeredYESto the “add browser animations” question) - Add the
Robotofont and the Material Design icon found to the/src/index.htmlfile - Add the
mat-typographyCSS class to the<body>element of the/src/index.htmlfile - Add some basic styling to the
/src/style.cssfiles
Once Angular Material has been installed, we can start restyling our components.
For additional info about Angular Material, its setup process, and a list of supported features, check out the following links:
Adding a MatToolbar
The first component we’ll revamp is the NavMenuComponent, which doesn’t look that great. More precisely, we’ll replace its basic HTML template with an Angular Material native component specifically designed to host navigation menus: the MatToolbar.
- To install it, we need to perform the following tasks:
- Add the required references to the
AppModuleclass
Update the NavMenuComponent's HTML template accordingly
Let’s do this.
Updating the AppModule
Open the /src/app/app.module.ts file and add the following highlighted lines just below the already existing AppRoutingModule import statement:
import { AppRoutingModule } from './app-routing.module';
import { MatButtonModule } from '@angular/material/button';
import { MatIconModule } from '@angular/material/icon';
import { MatToolbarModule } from '@angular/material/toolbar';
Then add the following highlighted lines at the end of the @NgModule's imports array:
  imports: [
    BrowserModule,
    HttpClientModule,
    AppRoutingModule,
    BrowserAnimationsModule,
    MatButtonModule,
    MatIconModule,
    MatToolbarModule
  ]
As we can see, we’ve added three Angular Material modules:
MatButtonModule, which adds supports for button componentsMatIconModule, which allows the use of material iconsMatToolbarModule, the main component we want to add
We’re going to use all three of them to revamp our NavMenuComponent template file.
Updating the NavMenuComponent HTML template
Open the /src/app/nav-menu/nav-menu.component.html file and replace all the existing content with the following code:
<header>
  <mat-toolbar color="primary">
    <button mat-icon-button [routerLink]="['/']">
      <mat-icon>
        home
      </mat-icon>
    </button>
    <a mat-flat-button color="primary" [routerLink]="['/fetch-data']">
      Fetch Data
    </a>
    <a mat-flat-button color="primary" [routerLink]="['/health-check']">
      Health Check
    </a>
  </mat-toolbar>
</header>
As we can see, we’ve replaced our previous hand-made implementation—which was based on a plain <nav> HTML element—with a new one relying upon the three modules we’ve just added:
- The Angular Material module syntax is quite simple to understand: each component has its own tag; for example, the whole toolbar is defined by the
<mat-toolbar>tag. - These components can be styled using standard CSS classes or custom Attribute Directives, a specific kind of directive specifically designed to change the appearance or behavior of DOM elements and Angular components: for example, the menu links are styled with the
mat-flat-buttondirective, which applies some CSS classes to the<a>element itself to make it look like a button.
The official documentation of the Angular Material modules that we’ve used here are available at the following URLs:
https://material.angular.io/components/button/overview
https://material.angular.io/components/icon/overview
https://material.angular.io/components/toolbar/overview
To read more about Angular’s Attribute Directives, check out the following URL: https://angular.io/guide/attribute-directives.
First test run
Let’s take a small break from coding and styling to see what we just did. Press F5 to launch our project(s) in debug mode and see if our new top-level navigation menu looks better than before.
If you can’t see the updated Angular app after hitting F5, you can try to manually close all the console windows (including the one where ngcc is running) and then launch the projects again.
If we did everything correctly, we should see something like in the following screenshot:
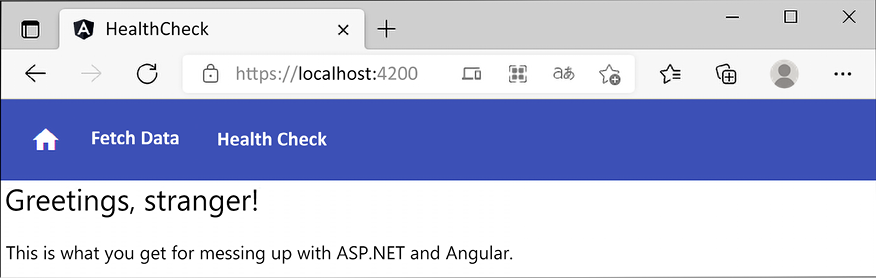
Figure 4.8: Our new top-level navigation menu using Angular Material’s MatToolbar component
Not bad at all! Maybe a bit of padding applied to the content below the menu would make it look even better: let’s quickly add it before moving on.
Open the /src/app/app.component.css file and add the following CSS rule:
.container {
  padding: 5px 10px;
}
This will create a small spacing between the content and the menu, as well as between the content and the external borders of the page.
Now we can continue styling our other components.
Playing with (S)CSS
The next thing we are about to do is to improve the look and feel of our HTML tables: we currently have two of them, one in the DataFetchComponent—which we’ve moved there from AppComponent a while ago—and another one in the HealthCheckComponent.
However, before doing that, we’re going to take the chance to replace our existing CSS files with SCSS files, so that we can use the extended CSS syntax provided by the powerful Sass preprocessor.
Wait a minute? What is Sass?
If you feel the urge to ask this question, read the following section: if you already know what we’re talking about, you might as well skip it, since you probably already know that story.
Introducing Sass
If you’ve worked with style sheets within the last few years, there’s no chance you haven’t heard of Sass; however, for the sake of those who haven’t, let’s take a few words to talk about it.
Before getting to that though, we must briefly introduce the concept of style sheets.
This section is mostly aimed at those who have never used Sass before. If you have some experience with Sass already or feel like you don’t need to know anything else about why we’ll use it, you might as well skip it entirely and jump to the next section: Replacing CSS with Sass.
A brief history of CSS
Style sheet language, also known as style language, is a programming language used to define the presentation layer’s UI design rules of a structured document. We can think of it as a skin or a theme that we can apply to a logical item (the structured document) to change its appearance. For example, we can make it look blue, red, or yellow; we can make the characters bigger or smaller and thinner or wider; we can change the text spacing, alignment, and flow; and so on.
Using dedicated style sheet languages gives developers the chance to separate the presentation layer’s code and structure (respectively, JavaScript and HTML) from the UI design rules, thus enforcing the Separation of Concerns (SoC) principle within the presentation layer itself.
When it comes to web pages, web applications, and anything else that mostly uses HTML, XHTML, XML, and other markup language-based documents, the most important style sheet language undoubtedly is CSS.
It was December 17, 1996, when the World Wide Web Consortium (W3C) released the official W3C CSS recommendation for the style sheet language that would be known as CSS1. CSS2 came less than two years later (May 1998), while its revised version, CSS2.1, took considerably more time (June 2011).
Starting from CSS3, things started to become more complex, since the W3C ditched the single, monolithic specification approach by splitting it into separate documents called modules, each one of them following its very own publishing, acceptance, and recommendation history. Starting in 2012, with four of these (Media Queries, Namespaces, Selectors, and Color) being published as formal recommendations and full CSS2.1 backward compatibility, CSS3 quickly became the most adopted style sheet language standard for the development of new websites.
CSS code sample
Regardless of their version, each adding new features while maintaining backward compatibility with the previous one(s), CSS sticks to the following syntax:
<selector> [sub-selector] [sub-sub-selector] {
    <property>: <value>;
    <another-property>: <value>;
    <yet-another-property>: <value>;
    /* ... and so on... */
}
This translates as follows:
.container {
  padding: 5px 10px;
}
We saw this code a short while ago; it’s the container class we’ve just added in the /src/app/app.component.css file to add some padding to our app’s content.
That class basically says that any HTML element with the container class assigned will have a padding of 5 px (top and bottom) and 10 px (left and right).
To assign a CSS class to an HTML element, we can use the class attribute in the following way:
<div class="container">
     [...some content...]
</div>
If the class attribute is already present, additional CSS classes can be assigned by separating them with a single space:
<div class="container otherClass someOtherClass">
     [...some content...]
</div>
Simple enough, isn’t it?
What is Sass and why use it?
Sass is a cascading style sheets preprocessor; we can think of it as a “syntax enhancer” for CSS files, enabling us to do a number of things that CSS doesn’t support (yet), just like PHP and/or ASP can do for an HTML page.
The following diagram should help us better understand the concept:
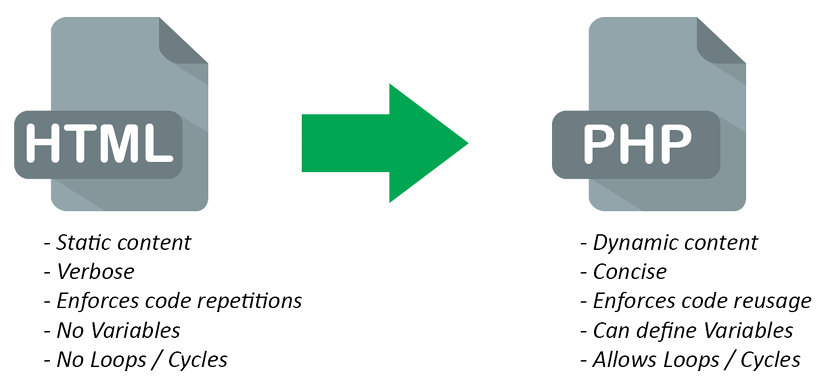
Figure 4.9: PHP advantages over static HTML pages
These are the main advantages of using a hypertext preprocessor instead of writing raw HTML pages; we’re talking about PHP, but the same goes for ASP.NET Web Forms, Razor, and basically everything else.
The following are the advantages of using Sass instead of writing raw CSS files:

Figure 4.10: Sass advantages over standard CSS syntax
As we can see, they serve the exact same purpose in terms of assisting, improving, and enhancing the development effort.
Making the switch from static style sheets to dynamic style sheets is just as easy as switching from static HTML pages to PHP or ASP dynamic pages; they both feature a nested metalanguage that can extend the base static language in a pure backward-compatible fashion. This means that a valid CSS file is also a valid Sass file, just as a valid HTML file is also a valid PHP or ASP file.
There are also some key differences between hypertext preprocessors and style sheet preprocessors, the most important being how web servers deal with them.
Hypertext preprocessors such as PHP and ASP are compiled by the web server upon each request; the web server compiles them on the fly and then serves the resulting HTML for each request/response flow. Conversely, style sheet preprocessor files are usually compiled into standard CSS files before being published; in other words, the web service doesn’t know about the existence of these files, as it just serves the resulting CSS-compiled result.
This also means that using a style sheet preprocessor will have no performance impact on the server, unless we choose to install some experimental and still highly inefficient handlers, extensions, modules, or client-side scripts that will compile the source files on the fly.
IMPORTANT NOTE: From now on, we’ll take for granted that the reader has a decent knowledge of CSS files, syntax, selectors, and their common use within HTML pages. If this is not the case, we strongly suggest that you learn the core CSS and Sass concepts before going further. The following URLs can greatly help newcomers understand the distinctive features of both languages:
Replacing CSS with Sass
As we know from Chapter 3, Looking Around, the Angular CLI’s default behavior is to generate standard CSS files: to perform the switch from CSS to SCSS, the first thing we need to do is to change such behavior.
To do that, open the angular.json file and add the following highlighted lines within the existing "schematics" section:
"schematics": {
  "@schematics/angular:application": {
    "strict": true
  },
  "@schematics/angular:component": {
    "style": "scss"
  }
}
That’s pretty much it: from now on, whenever we use the Angular CLI to generate our components, Sass files (SCSS) will be created instead of the standard CSS files.
The only thing we need to do now is to rename all the extensions of the style sheet files of our existing components, as well as updating the styleUrls references in the component’s TypeScript files: in both cases, we need to switch from .css to .scss.
Performing the renaming of our components’ style sheet files is a rather easy task that can be easily done within the Visual Studio GUI via the Solution Explorer: we just need to prepend an "s" letter to all the files with the .css extensions present within the /src/app folder (and subfolders), and then update that file’s reference in the corresponding .ts file.
Those who need further guidance can check out the GitHub project for this chapter, where all the files have been updated with the proper extension.
After we do that, the only file with the .css extension left in the whole project should be the /src/styles.css file—the one containing the CSS rules valid for the whole application. We can rename it to .scss as well; however—since it’s not a component style sheet file—we also need to update its corresponding references within the angular.json file in the following way:
"styles": [
    "./node_modules/@angular/material/prebuilt-themes/indigo-pink.css",
    "src/styles.scss"
]
IMPORTANT: Be sure to update all the references (there are two of them). Also, be sure to manually close all the console windows and relaunch the projects again after updating the angular.json file.
Once done, we can finally use Sass syntax (together with CSS syntax) anywhere in our Angular project.
Restyling the tables
Let’s immediately take advantage of the Sass syntax by restyling our existing HTML tables. Since we have two of them, we can define a global class within our new (renamed) /src/styles.scss files, which hosts our application-wide style sheet rules:
Open that file and append the following highlighted lines to the existing code:
html, body { height: 100%; }
body { margin: 0; font-family: Roboto, "Helvetica Neue", sans-serif; }
table {
  border: 0px;
  border-spacing: 0px;
  border-collapse: collapse;
  tr {
    border-bottom: 1px solid #dddddd;

    &:nth-child(even) {
    background-color: #f4f4f4;
    }

    th, td {
      text-align: left;
      padding: 5px 10px;
    }
  }
}
Once done, save the file and hit F5 to test the new table styling. To see that, we need to navigate to our FetchDataComponent and to our HealthCheckComponent, which can be done using our new Angular Material menu.
If we did everything correctly, we should be able to see the new CSS rules affecting the tables of both components, just like in the following screenshots:

Figure 4.11: HTML tables styled with Sass
That’s it: our UI is still not perfect, but we can be satisfied with these improvements, at least for now.
It’s worth noting that, instead of restyling our existing HTML tables, we could have used the Angular Material’s MatTable component to entirely replace them: by doing that, we would have gained a lot of powerful features, such as filtering, sorting, paging, and so on.
However, for the sake of simplicity, we have opted for a “faster” approach, which also allowed us to integrate Sass in our Angular project. We will make extensive use of the MatTable component in the next chapters, when we’ll have to deal with more complex (and overly populated) tables.
Now that we’ve learned the basics, we’ll move on to a completely different topic. However, the reader should already be able (and is strongly encouraged) to further expand this sample project with more sophisticated use case scenarios, such as:
- Create additional checks using the same approach that we’ve adopted for the
ICMPHealthCheckclass: a DBMS connection check, read/write permissions on a UNC folder or resources, the presence/absence of watchdog files, internet connectivity, CPU/memory/bandwidth usage, and so on. - Proactively handle the different states in our application depending on the various health check results: show a message to our users if the application is not working properly, disable the components of the application that are not working, switch to a fallback alternative, send alert email notifications to the administrators, and so on.
- Extend the
HealthChecksMiddlewarecapabilities with LiteXHealthChecks, a lightweight, yet powerful, NuGet package with a number of modular add-ons that allow us to check the status of a component in the application, such as a back-end service, database, or some internal state.
Further improve the look and feel of our Angular app by applying additional styling rules using the CSS and/or Sass syntax.
That said, we’ve just gained some important knowledge regarding Angular Material and Sass, two very useful tools that we’ll definitely use in the upcoming chapters.
Summary
Let’s spend a minute briefly recapping what we learned in this chapter. First of all, we acknowledged that .NET controllers are not the only tool in the shed: as a matter of fact, any middleware is virtually able to deal with the HTTP request and response cycle—as long as it is in our application’s pipeline.
To demonstrate such a concept, we introduced HealthChecksMiddleware, a neat ASP.NET Core built-in feature that can be used to implement status monitoring services, and then we implemented it. We started with the ASP.NET Core back-end, refining our work until we were able to create a JSON-structured output; then, we switched to Angular, where we learned how to properly fetch it with a component and show it on screen through the browser’s HTML-based UI.
Last but not least, we’ve spent some valuable time improving the UI and UX of our Angular app by adding a couple of powerful layout-based features: Angular Material and Sass. Eventually, the final outcome was good enough to reward us for our hard work.
That’s enough for the HealthCheck app, at least for the time being. Starting from the next chapter, we’ll bring back the standard .NET controllers pattern and see how we can leverage it to learn something new.
Suggested topics
For further information, we recommend the following topics: Health Monitoring, Health Checks, HealthChecksMiddleware, HealthCheckOptions, HTTP Requests, HTTP Responses, ICMP, PING, ResponseWriter, JSON, JsonSerializerOptions, Components, Routing, Modules, AppModule, HttpClient, ngIf, ngFor, Directives, Structural Directives, Interpolations, NgModule, Angular module system, JavaScript module system (import/export), Angular Material, Cascading Style Sheets (CSS), Sass.
References
- Health checks in ASP.NET Core: https://docs.microsoft.com/en-US/aspnet/core/host-and-deploy/health-checks
- Request and response operations in ASP.NET Core: https://docs.microsoft.com/en-us/aspnet/core/fundamentals/middleware/request-response
- ASP.NET Core health monitoring: https://docs.microsoft.com/en-us/dotnet/architecture/microservices/implement-resilient-applications/monitor-app-health
- “pattern-based using” and “using declarations”: https://docs.microsoft.com/en-us/dotnet/csharp/language-reference/proposals/csharp-8.0/using
- C# 8.0: Understanding Using Declarations: https://www.stevejgordon.co.uk/csharp-8-understanding-using-declarations
- String Interpolation in C#: https://docs.microsoft.com/en-us/dotnet/csharp/tutorials/string-interpolation
- TypeScript modules: https://www.typescriptlang.org/docs/handbook/modules.html
- Module Resolution: https://www.typescriptlang.org/docs/handbook/module-resolution.html
- Dependency Injection in ASP.NET Core: https://docs.microsoft.com/en-us/aspnet/core/fundamentals/dependency-injection
- Angular.io—Dependency Injection: https://angular.io/guide/dependency-injection
- Angular—Lifecycle Hooks: https://angular.io/guide/lifecycle-hooks
- ReactiveX Library—Observables: http://reactivex.io/rxjs/class/es6/Observable.js~Observable.html
- Angular.io—Observables guide: https://angular.io/guide/observables
- JavaScript—Import statement: https://developer.mozilla.org/en-US/docs/Web/JavaScript/Reference/Statements/import
- JavaScript—Export statement: https://developer.mozilla.org/en-US/docs/Web/JavaScript/Reference/Statements/export
- Angular—HttpClient: https://angular.io/guide/http#httpclient
- Angular—NgModules: https://angular.io/guide/ngmodules
- Angular—NgModules and JavaScript modules: https://angular.io/guide/architecture-modules#ngmodules-and-javascript-modules
- Angular—Displaying Data: https://angular.io/guide/displaying-data
- Angular—Template Syntax: https://angular.io/guide/template-syntax
- Angular—Structural Directives: https://angular.io/guide/structural-directives
- Angular Material: https://material.angular.io/
- CSS—Cascading Style Sheets: https://developer.mozilla.org/en-US/docs/Web/CSS
- Sass basics: https://sass-lang.com/guide