
3
Looking Around
Now that our project has been created, it’s time to take a quick look around and try to understand some of the hard work that the .NET and Angular SPA template has done to make it work.
Hey, wait a minute! Shouldn’t we skip all these setup technicalities and just jump into coding?
As a matter of fact, yes, we’ll definitely be jumping into the coding in a little while. However, before doing so, it’s wise to highlight a couple of aspects of the code that have been put in place already so that we’ll know how to move effectively within our project in advance: where to find the server-side and client-side code, where to put new content, how to change our initialization parameters, and so on. It will also be a good chance to review our basic knowledge of the Visual Studio environment and the packages we will need.
That’s precisely what we’re going to do in this chapter. More specifically, the following are the main topics we’re going to cover:
- Solution overview: A high-level summary of what we’ll be dealing with
- The ASP.NET back-end: An overview of the ASP.NET Core Web API project (HealthCheckAPI): controllers, configuration files, and so on
- The Angular front-end: An overview of the Angular project (HealthCheck): the workspace, the
/src/folder, the Angular initialization cycle, and so on - Creating a new front-end app with the Angular CLI: Installation, creation, and testing
- Getting to work: Changing the Web API endpoints, adding new Angular components, implementing a basic navigation and routing system, and so on
IMPORTANT! The sample code we’re reviewing here is the code that comes with the default Visual Studio templates shipped by .NET 6 SDK at the time of writing: in the (likely) event that this sample code is updated in future releases, ensure you get the former source code from the web using this book’s official GitHub repository and use it to replace the contents of your project folder.
Caution: failing to do this could result in you working with different sample code from the code featured in this book.
Technical requirements
In this chapter, all of the previous technical requirements listed in Chapter 2, Getting Ready, will apply, with no additional resources, libraries, or packages.
The code files for this chapter can be found here: https://github.com/PacktPublishing/ASP.NET-Core-6-and-Angular/tree/master/Chapter_03/.
Solution overview
The first thing that catches the eye is that, as we’ve already mentioned, the layout of a standard ASP.NET Core solution is quite different from what it used to be in ASP.NET 5 and earlier versions. The most notable thing is that we have two different projects – one for Angular (HealthCheck) and one for the ASP.NET Core Web API (HealthCheckAPI) – that start together and need to interact with each other. If we have previous “classic” ASP.NET single-project experience, we could find such an approach quite different from what we were used to working with.
The best thing about the new approach is that we’re instantly able to distinguish the ASP.NET back-end part from the Angular front-end part, which could be troublesome with the previous, single-project experience, when the two stacks were often intertwined.
Let’s quickly review their overall structure to better understand how each one of them works.
The ASP.NET back-end
The ASP.NET back-end stack is contained in the following folders:
- The
Dependenciesvirtual folder, which basically replaces the oldReferencesfolder and contains all the internal, external, and third-party references required to build and run our project. All the references to the NuGet packages that we’ll add to our project will also be put there. - The
/Controllers/folder, which has been shipped with any MVC-based ASP.NET application since the preceding release of the MVC framework: such a folder contains a single controller –WeatherForecastController.cs– which is responsible for serving the sample weather forecast data that we briefly saw in Chapter 2, Getting Ready, during our final test run. - The root-level files–
Program.csandappsettings.json–that will determine our web application’s configuration, including the modules and middlewares, compilation settings, and publishing rules; we’ll address them all in a while.
If you hail from the ASP.NET MVC framework(s), you might want to know why this template doesn’t contain a /Pages/ or /Views/ folder: where did our Razor Pages and views go?
As a matter of fact, this template doesn’t make use of pages or views. If we think about it, the reason is quite obvious: a Web API project doesn’t need any of them, since its main purpose is to return JSON data.
Configuration files
Let’s start by taking a look at the root-level configuration files and their purpose: Program.cs and appsettings.json. These files contain our web application’s configuration, including the modules and middlewares, as well as environment-specific settings and rules.
Those who are already familiar with ASP.NET Core will notice that we’re not mentioning the Startup.cs file, which was a pivotal configuration element along with the Program.cs file. The reason for that is fairly simple: it’s not required anymore. The new .NET 6 framework introduces a new hosting model for ASP.NET Core applications that unifies Startup.cs and Program.cs in a single file experience that takes advantage of the new C# top-level statements feature (which we briefly mentioned in Chapter 1, Introducing ASP.NET and Angular) to reduce the amount of boilerplate code required to get the app up and running.
For additional info regarding this change, check out the Migration to ASP.NET Core in .NET 6 development notes by David Fowler (ASP.NET Team Software Architect) at the following URL:
https://gist.github.com/davidfowl/0e0372c3c1d895c3ce195ba983b1e03d
The WeatherForecast.cs file contains a strongly typed class designed to be returned from the Get method of WeatherForecastController: this model can be seen as a View Model, as it will be serialized into JSON by the ASP.NET Core Framework. In our humble opinion, the template authors should have put it within the /ViewModel/ folder (or something like that) instead of leaving it at the root level. Anyway, let’s just ignore it for now, since it’s not a configuration file, and focus on the rest.
Program.cs
The Program.cs file will most likely intrigue most seasoned ASP.NET programmers, as it’s not something we usually see in a web application project. First introduced in ASP.NET Core 1.0, the Program.cs file’s main purpose is to create a builder: a factory object used by the .NET Core runtime to set up and build the interface that will host our web application.
In the first ASP.NET Core versions (up to 2.2), the builder was called WebHostBuilder and the hosting interface was known as IWebHost; in .NET 3.0, they became HostBuilder and IHost, respectively, due to the introduction of the generic host, a more versatile host that can support other workloads like worker services, gRPC services, and Windows services.
That’s great to know, but what is a host? In just a few words, it is the execution context of any ASP.NET Core app. In a web-based application, the host must implement the IHost interface, which exposes a collection of web-related features and services that will be used to handle the HTTP requests.
The preceding statement can lead to the assumption that the web host and the web server are the same thing. However, it’s very important to understand that they’re not, as they serve very different purposes. Simply put, the host is responsible for application startup and lifetime management, while the server is responsible for accepting HTTP requests. Part of the host’s responsibility includes ensuring that the application’s services and the server are available and properly configured.
We can think of the host as being a wrapper around the server: the host is configured to use a particular server, while the server is unaware of its host.
For further info regarding the IHost interface, as well as the whole ASP.NET Core initialization stack, check out the following guide: https://docs.microsoft.com/en-us/aspnet/core/fundamentals/.
In .NET 6, the generic host approach can still be used, but the recommended way to set up a web application is the new hosting model introduced with this version that we briefly mentioned a moment ago. The new approach relies upon a new WebApplicationBuilder class with a built-in implementation of IHostBuilder and IHost: this small, yet effective, improvement makes the Program.cs overall logic much simpler for new developers to understand without changing the underlying host-based approach.
If we open the Program.cs file and take a look at the code, we can see what the new minimal template looks like:
var builder = WebApplication.CreateBuilder(args);
// Add services to the container.
builder.Services.AddControllers();
// Learn more about configuring Swagger/OpenAPI at https://aka.ms/aspnetcore/swashbuckle
builder.Services.AddEndpointsApiExplorer();
builder.Services.AddSwaggerGen();
var app = builder.Build();
// Configure the HTTP request pipeline.
if (app.Environment.IsDevelopment())
{
    app.UseSwagger();
    app.UseSwaggerUI();
}
app.UseHttpsRedirection();
app.UseAuthorization();
app.MapControllers();
app.Run();
As we can easily see, the new code is mostly about executing the following tasks:
- Instantiate a
WebApplicationBuilder(line 1) - Add some services (lines 5-8)
- Use the builder to create a
WebApplicationobject (line 10) - Configure the app with the required middleware (lines 13-23)
- Run the app (line 25)
The IHost interface that we’ve just talked about is implemented by the WebApplication object and can be accessed by the Host public property (app.Host).
If we compare the new Program.cs code with the old Program.cs plus Startup.cs approach, which was the default until .NET 5, we can immediately see a huge difference in terms of overall complexity.
Here’s what a typical ASP.NET 5 Program.cs file looked like:
public class Program
{
    public static void Main(string[] args)
    {
        CreateHostBuilder(args).Build().Run();
    }
    public static IHostBuilder CreateHostBuilder(string[] args) =>
        Host.CreateDefaultBuilder(args)
            .ConfigureWebHostDefaults(webBuilder =>
            {
                webBuilder.UseStartup<Startup>();
            });
}
And here’s the source code of the corresponding Startup.cs file:
public class Startup
{
    public Startup(IConfiguration configuration)
    {
        Configuration = configuration;
    }
    public IConfiguration Configuration { get; }
    // This method gets called by the runtime. Use this method to add services to the container.
    public void ConfigureServices(IServiceCollection services)
    {
        services.AddControllersWithViews();
        // In production, the Angular files will be served from this directory
        services.AddSpaStaticFiles(configuration =>
        {
            configuration.RootPath = "ClientApp/dist";
        });
    }
    // This method gets called by the runtime. Use this method to configure the HTTP request pipeline.
    public void Configure(IApplicationBuilder app, IWebHostEnvironment env)
    {
        if (env.IsDevelopment())
        {
            app.UseDeveloperExceptionPage();
        }
        else
        {
            app.UseExceptionHandler("/Error");
            // The default HSTS value is 30 days. You may want to change this for production scenarios, see https://aka.ms/aspnetcore-hsts.
            app.UseHsts();
        }
        app.UseHttpsRedirection();
        app.UseStaticFiles();
        if (!env.IsDevelopment())
        {
            app.UseSpaStaticFiles();
        }
        app.UseRouting();
        app.UseEndpoints(endpoints =>
        {
            endpoints.MapControllerRoute(
                name: "default",
                pattern: "{controller}/{action=Index}/{id?}");
        });
        app.UseSpa(spa =>
        {
            // To learn more about options for serving an Angular SPA from ASP.NET Core,
            // see https://go.microsoft.com/fwlink/?linkid=864501
            spa.Options.SourcePath = "ClientApp";
            if (env.IsDevelopment())
            {
                spa.UseAngularCliServer(npmScript: "start");
            }
        });
    }
}
As we can see, the old approach looks a lot more complicated than the new version: we had to deal with a whole bunch of nested lambdas, pay attention to many configuration-aware overloads, and, most importantly, there was a huge amount of source code; maybe too much for a bootstrapping class, especially for a newcomer. No wonder the ASP.NET Core team did its best to try and simplify the whole thing.
Let’s get back to that new approach and take a closer look at what the improved Program.cs file does after instantiating WebApplication in the app local variable:
// Configure the HTTP request pipeline.
if (app.Environment.IsDevelopment())
{
    app.UseSwagger();
    app.UseSwaggerUI();
}
app.UseHttpsRedirection();
app.UseAuthorization();
app.MapControllers();
app.Run();
The code is very readable, so we can easily understand what happens here: the first comment line clearly explains it: we’re configuring the HTTP request pipeline by loading the required middlewares and services that will be used by our web application.
In detail, here’s what we have:
- An
ifstatement that registers a couple of middlewares only if the app is being run in a development environment: these “development” middlewares are both related to Swagger, which is something that we’ll talk about in a short while. - Another block of middlewares that will be used with any environment:
HttpsRedirection, which will handle HTTP-to-HTTPS redirects;Authorization, which allows access to some API requests to be restricted to authorized users only. Note how these methods are called with no parameters: this just means that their default settings are more than enough for us, so there’s nothing to configure or override here. - After the environment-specific and always-on middlewares, there’s a call to the
MapControllersmethod, which adds the endpoints required by the controller’s action methods to handle the incoming HTTP requests. We’ll extensively talk about that in upcoming chapters, when we deal with server-side routing aspects. For now, let’s just note that the method is called without any parameters, meaning that we’re not specifying any custom route here: this means that we’re just using the default routing rules enforced by the framework’s naming conventions, at least for now. - Last but not least comes the call to the
Runmethod, which executes the application and blocks the calling thread until theIHostshutdown.
It’s worth noting that middlewares and services added to the HTTP pipeline will process incoming requests in registration order, from top to bottom. This means that HttpsRedirection will take priority over Authorization, which will take place before the MapControllers method, and so on. Such behavior is very important and could cause unexpected results if taken lightly, as shown in the following Stack Overflow thread: https://stackoverflow.com/questions/52768852/.
It’s worth noting that the Program.cs file doesn’t contain any reference to the StaticFiles middleware, meaning that our Web API won’t be able to serve any static files such as TXT, CSS, JS, images, and videos. This is no surprise since we plan to serve all these files from the Angular app (or through a third party, such as a Content Delivery Network). This is another big difference with the single-project approach, where we would have been forced to add static files support to serve all the Angular files, bundles, and resources – at least during the development phase.
appsettings.json
The appsettings.json file is just a replacement for the good old Web.config file; the XML syntax has been replaced by the more readable and considerably less verbose JSON format. Moreover, the new configuration model is based upon key/value settings that can be retrieved from a wide variety of sources, including, but not limited to, JSON files, using a centralized interface.
Once retrieved, they can be easily accessed within our code using dependency injection via literal strings (using the IConfiguration interface).
This can be demonstrated by opening the WeatherForecastController.cs file and modifying the constructor in the following way (new/updated lines are highlighted):
public WeatherForecastController(
    ILogger<WeatherForecastController> logger,
    IConfiguration configuration
    )
{
    _logger = logger;
    var defaultLogLevel = configuration["Logging:LogLevel:Default"];
}
If we place a breakpoint by the end of the constructor and run our project in Debug mode, we can check that the defaultLogLevel variable will contain the "Information" string, which is precisely the value specified in the appsettings.json file.
Those who don’t like to deal with string literals to access configuration files could take the chance to define a custom POCO class that will internally read the IConfiguration values and return them as named properties: however, since we won’t need to access those values frequently, for the sake of simplicity, we’re going to avoid implementing such strongly typed logic and just use the literal approach shown above.
appsettings.Development.json
It’s worth noting that there’s also an appsettings.Development.json file nested below the main one. Such a file serves the same purpose as the old Web.Debug.config file, which was widely used during the ASP.NET 4.x period. In a nutshell, these additional files can be used to specify additional configuration key/value pairs (and/or override existing ones) for specific environments.
To better understand the concept, let’s take the chance to slightly modify the default logging behavior of the Development environment.
Open the appsettings.Development.json file and update the following lines:
{
  "Logging": {
    "LogLevel": {
      "Default": "Debug",
      "Microsoft.AspNetCore": "Warning"
    }
  }
}
After performing this change, every time our Web API project is launched in a Development environment the default log level will be set to Debug instead of Information, which will still be the default log level for the other environments – until we create other appsettings.<EnvironmentName>.json files to override it.
Assuming we understood everything here, let’s move on to the main players of any ASP.NET Core project: the Controllers.
Controllers
Controllers are the backbone of most ASP.NET Core applications since they are entitled to handle the incoming HTTP requests. More specifically, a controller is used to define a set of actions (or action methods), which are basically the methods that get called by the routing middleware to handle the requests mapped to them through routing rules.
Controllers logically group similar actions together: such aggregation mechanisms allow developers to conveniently define common sets of rules, not only for routing, but also for caching, authorization, and other settings that can benefit from being applied collectively.
As per ASP.NET Core convention, each controller class resides in the project’s root-level /Controllers/ folder and is suffixed with the Controller keyword.
In a typical ASP.NET MVC project, controllers are mostly used to serve the views to the client, which contains static or dynamic HTML content. That’s not the case in Web API projects, where their main purpose is to serve JSON output (REST APIs), XML-based responses (SOAP web services), a static or dynamically created resource (JPG, JS, and CSS files), or even a simple HTTP response (such as an HTTP 301 redirect) without the content body.
In a typical ASP.NET MVC project, all the controllers derive from the Controller class, which adds support from views; in Web API projects, since they don’t need to serve views, it’s better to have them extend the ControllerBase class instead, which is more lightweight.
This approach is also followed by the ASP.NET Core Web API project template we’re using: if we look at the WeatherForecastController source code, we can see that it derives from the ControllerBase class.
The only exception to this good practice comes if we plan to use the same controller to serve both views and Web APIs: when that’s the case, deriving it from Controller is the most logical and convenient choice.
WeatherForecastController
By acknowledging all this, we can already infer that the single sample WeatherForecastController contained in the /Controllers/ folder is there to expose a set of Web APIs that will be used by the Angular front-end. To quickly check it out, hit F5 to launch our project(s) in Debug mode and execute the default route by typing the following URL: https://localhost:40443/weatherforecast.
If we remember what we did in the previous chapters, we already know that this is the URL endpoint for the local Kestrel (or IISExpress) web server hosting the Web API projects.
The actual port number may vary, depending on the SPA Proxy Server URL assigned by Visual Studio and stored within the project configuration files. If you want to use different HTTP and/or HTTPS ports, follow the instructions that we supplied in Chapter 2, Getting Ready.
This will execute the Get() method defined in the WeatherForecastController.cs file. As we can see by looking at the source code, such a method has an IEnumerable<WeatherForecast> return value, meaning that it will return multiple objects of the WeatherForecast type.
If we copy the preceding URL into the browser and execute it, we should see a JSON array of randomly generated data, as shown in the following screenshot:

Figure 3.1: JSON array of weather data
It’s easy to imagine who’ll be asking for these values: the answer is… our Angular app.
Introducing OpenAPI (Swagger)
Before moving on to the Angular front-end project, there’s another back-end feature we should familiarize ourselves with: OpenAPI, formerly known as Swagger.
Those who have some experience with web services should have already heard such a name: in very short terms, the OpenAPI Specification (OAS) is a language-agnostic specification to document and describe REST APIs. Its main role is to allow computers, as well as humans, to univocally understand the capabilities of a REST API without having direct access to the source code.
The OpenAPI Specification was initially known as Swagger since its development (2010): the name was officially changed on January 1, 2016, when the Swagger specification was renamed the OpenAPI Specification (OAS) and was moved to a new GitHub repository, which is still there today.
The OpenAPI Specification GitHub repository is available at the following URL:
Adding OpenAPI support to a RESTful Web Service project will grant some relevant benefits, such as:
- Minimizing the amount of work needed to connect decoupled services
- Reducing the amount of time needed to accurately document the service
If we consider how important these aspects have become in the last few years, we can easily understand why OpenAPI can be included by default in most Visual Studio API templates: the one we’ve used to create our HealthCheckAPI project makes no exception, as we’ve seen in Chapter 2, Getting Ready, and early on in this chapter, when we were looking at the middlewares included in the Program.cs file.
More precisely, the default OpenAPI implementation added by our template is called Swashbuckle and is made available with the Swashbuckle.AspNetCore NuGet package. However, since we checked Enable OpenAPI Support when we created our project back in Chapter 2, Getting Ready, we don’t need to explicitly add it: it’s already included in our project.
To check whether the Swashbuckle.AspNetCore NuGet package is already installed, right-click on the HealthCheckAPI project node from Solution Explorer and select Manage NuGet Packages. The package should be clearly visible in the Installed tab, as shown in the following screenshot:
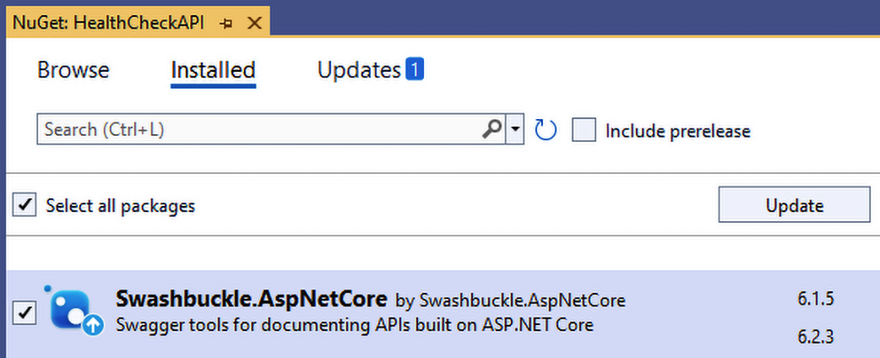
Figure 3.2: Swashbuckle.AspNetCore NuGet package
However, we could take the chance to upgrade the package to the most recent version.
In this book, we’ll use version 6.2.3, which is currently the most recent release: as always, we strongly suggest that you use it as well.
Adding Swashbuckle to our project allows us to use three different components:
- Swashbuckle.AspNetCore.Swagger: a middleware that can be used to expose SwaggerDocument objects as JSON endpoints
- Swashbuckle.AspNetCore.SwaggerGen: a generator that builds SwaggerDocument objects directly from the app’s routes, controllers, and models
- Swashbuckle.AspNetCore.SwaggerUI: a user interface that uses the Swagger JSON to create a rich and customizable user experience to visually document the Web API
If we look again at our existing Program.cs source code, we can see that these components are already present in our app’s initialization pipeline: however, the SwaggerUI is currently only available in our Development environment – which kind of makes sense, since we don’t know if we want to publish it (yet). Publicly documenting a Web API service might be a good thing if we want third-party services to consume it, but can be a major security, privacy, and/or performance flaw if we want to keep our endpoints (and data) for our eyes only.
As a matter of fact, keeping the SwaggerUI only available during development seems a good idea, at least for now: let’s use this opportunity to take a good look at it.
To do that, hit F5 to launch our project(s) in Debug mode and execute the Swagger UI default endpoint:
https://localhost:40443/swagger
As soon as we hit Enter, the default Swashbuckler Swagger UI should appear in all its glory, as shown in the following screenshot:

Figure 3.3: Swagger UI for HealthCheckAPI
As we can see, the SwaggerEndpoint that we configured in the Program.cs file is mentioned within a hyperlink right below the main title. If we click on that hyperlink, we’ll be able to see the autogenerated swagger.json file, which contains a comprehensive description of our single (for now) /WeatherForecast action method: accepted HTTP methods, input parameters, return types of the various JSON values, and so on.
We can easily understand how such an auto-documentation feature can be an invaluable resource for other back-end developers that don’t have much experience with the project’s code base – not to mention any third party who wants (or needs) to integrate with our Web API without having access to the source code.
That’s enough for now: we’ll come back to Swagger/OpenAPI in the upcoming chapters when we add more controllers and action methods to our Web API project.
Now that we’re done inspecting the ASP.NET Core back-end part, we can finally move on to the Angular front-end project.
The Angular front-end
The Angular front-end project comprises the following stuff:
- The
/src/folder, which contains the Angular app source code files, as well as some static assets (HTML, CSS, and the like). If we look at the source code files, we can see that they have a.tsextension, which means we’ll be using the TypeScript programming language (we’ll say more about this in a bit) - A bunch of root files, which contain the Angular configuration settings, the required npm packages to run the app, and the scripts to build the development and production bundles to host it
The front-end part of the template will probably be seen as more complex to understand, because Angular—just like most client-side frameworks—has evolved at a dramatic pace, thus experiencing many breaking changes in its core architecture, toolchain management, coding syntax, template, and setup.
For this very reason, it’s very important to take our time understanding the role of the various files shipped with the template. This brief overview will start with root-level configuration files, which will also be updated with the latest versions of the Angular packages (and their dependencies) that we’ll need to use.
The root files
The Angular workspace is the file system place containing the Angular files: a collection of application files, libraries, assets, and so on. In most ASP.NET Core and Angular project templates this type of workspace is located within the /ClientApp/ folder: however, since we opted for a Standalone Angular template, our workspace is located within the project’s root folder.
The workspace is created and initialized by the Angular CLI command used to create the app. Since we’ve used the Visual Studio GUI, we didn’t see that part with our own eyes because it was executed in the background. However, we’re going to fully experience it later on, when we manually create a new app with the Angular CLI.
Any CLI commands operating on the app and/or their libraries (such as adding or updating new packages) will be executed from within the workspace.
angular.json
The most important role within the workspace is played by the angular.json file, created by the CLI in the workspace root. This is the workspace configuration file and contains workspace-wide and project-specific configuration defaults for all build and development tools provided by the Angular CLI.
The first few properties at the top of the file define the workspace and project configuration options:
version: The configuration file versionnewProjectRoot: The path where new projects are created, relative to the workspace root folder. We can see that this value is set to theprojectsfolder, which doesn’t even exist (no need to worry about that: we won’t create any new Angular projects anyway)projects: A container item that hosts a sub-section for each project in the workspace, containing project-specific configuration optionsdefaultProject: The default project name—any CLI command that doesn’t specify a project name will be executed on this project
It’s worth noting that the angular.json file follows a standard generic-to-specific cascading rule. All configuration values set at the workspace level will be the default values for any project and can be overridden by those set at the project level. These, in turn, can be overridden by command-line values available when using the CLI.
It’s also worth mentioning that, before Angular 8, manually modifying the angular.json file was the only way to make changes to the workspace config.
That’s all we need to know, at least for the time being. All the configuration values are already good enough for our scenario, hence, we’ll just leave them as they are for now.
Up to Angular 7, manually modifying the angular.json file was the only way to make changes to the workspace config. This changed with Angular 8 with the introduction of the workspace API, which now allows us to read and modify these configurations much more conveniently. For additional info regarding this new feature, we suggest taking a look at the following page: https://github.com/angular/angular-cli/blob/master/packages/angular_devkit/core/README.md#workspaces.
package.json
The package.json file is the Node Package Manager (npm) configuration file. It basically contains a list of npm packages that the developer wants to be restored before the project starts. Those who already know what npm is and how it works can skip to the next section, while those who don’t should definitely keep reading.
npm started its life as the default package manager for the JavaScript runtime environment known as Node.js. During recent years, though, it has also been used to host a number of independent JavaScript projects, libraries, and frameworks of any kind, including Angular. Eventually, it became the de facto package manager for JavaScript frameworks and tooling. Those who have never used it can think of it as the NuGet for the JavaScript world.
Although npm is mostly a command-line tool, the easiest way to use it from Visual Studio is to properly configure a package.json file containing all the npm packages we want to get, restore, and keep up to date later on. These packages get downloaded in the /node_modules/ folder within our project directory, which is hidden by default within Visual Studio; however, all retrieved packages can be seen from the npm virtual folder. As soon as we add, delete, or update the package.json file, Visual Studio will automatically update that folder accordingly.
In the Angular SPA template we’ve been using, the shipped package.json file contains a huge number of packages—all Angular packages—plus a good bunch of dependencies, tools, and third-party utilities such as Karma (a great test runner for JavaScript/TypeScript).
Before moving ahead, let’s take a further look at our package.json file and try to get the most out of it. We can see how all packages are listed within a standard JSON object entirely made up of key-value pairs. The package name is the key, while the value is used to specify the version number. We can either input precise build numbers or use the standard npmJS syntax to specify auto-update rules bound to custom version ranges using supported prefixes, such as the following:
- The Tilde (
~): A value of"~1.1.4"will match all 1.1.x versions, excluding 1.2.0, 1.0.x, and so on - The Caret (
^): A value of"^1.1.4"will match everything above 1.1.4, excluding 2.0.0 and above
This is another scenario where IntelliSense comes in handy, as it will also visually explain the actual meaning of these prefixes.
For an extensive list of available npmJS commands and prefixes, it’s advisable to check out the official npmJS documentation at https://docs.npmjs.com/files/package.json.
Upgrading (or downgrading) Angular
As we can see, the Angular SPA template uses fixed version numbers for all Angular-related packages; this is definitely a wise choice since we have no guarantees that newer versions will seamlessly integrate with our existing code without raising some potentially breaking changes and/or compiler errors. Needless to say, the version number will naturally increase over time because template developers will definitely try to keep their good work up to date.
That said, here are the most important Angular packages and releases that will be used throughout this book (not including a small bunch of additional packages that will be added later on):
"@angular/animations": "13.0.1",
"@angular/common": "13.0.1",
"@angular/compiler": "13.0.1",
"@angular/core": "13.0.1",
"@angular/forms": "13.0.1",
"@angular/platform-browser": "13.0.1",
"@angular/platform-browser-dynamic": "13.0.1",
"@angular/router": "13.0.1",
"@angular-devkit/build-angular": "13.0.1",
"@angular/cli": "13.0.1",
"@angular/compiler-cli": "13.0.1"
The former group can be found in the dependencies section, while the latter is part of the devDependencies section. As we can see, the version number is mostly the same for all packages and corresponds to the latest Angular final release available at the time of writing.
The version of Angular that we use in this book was released a few weeks before this book hit the shelves. We did our best to use the latest available (non-beta, non-rc) version to give the reader the best possible experience with the most recent technology available. That said, that freshness will eventually decrease over time and this book’s code will start to become obsolete. When this happens, try not to blame us for that!
If we want to ensure the highest possible level of compatibility between our project and this book’s source code, we should definitely adopt that same release, which, at the time of writing, also corresponds to the latest stable one. We can easily perform the upgrade—or downgrade—by changing the version numbers; as soon as we save the file, Visual Studio should automatically fetch new versions through npm. In the unlikely scenario that it doesn’t, manually deleting the old packages and issuing a full rebuild should be enough to fix the issue.
As always, we’re free to overwrite such behavior and get newer (or older) versions of these packages, assuming that we properly understand the consequences according to the Disclaimer in Chapter 2, Getting Ready.
If you encounter problems while updating your package.json file, such as conflicting packages or broken code, ensure that you download the full source code from the official GitHub repository of this book, which includes the same package.json file that has been used to write, review, and test this book. It will definitely ensure a great level of compatibility with the source code you’ll find here.
Upgrading (or downgrading) the other packages
As we might expect, if we upgrade (or downgrade) Angular to the latest available version (at the time of writing), we also need to take care of a series of other npm packages that might need to be updated (or downgraded).
Here’s the full package list (including the Angular packages) we’ll be using in our package.json file throughout the book, split into dependencies and devDependencies sections. The relevant packages are summarized in the following snippet—be sure to triple-check them!
"dependencies": {
  "@angular/animations": "13.0.1",
  "@angular/common": "13.0.1",
  "@angular/compiler": "13.0.1",
  "@angular/core": "13.0.1",
  "@angular/forms": "13.0.1",
  "@angular/platform-browser": "13.0.1",
  "@angular/platform-browser-dynamic": "13.0.1",
  "@angular/router": "13.0.1",
  "rxjs": "7.4.0",
  "tslib": "2.3.1",
  "zone.js": "0.11.4",
  "jest-editor-support": "*"
},
"devDependencies": {
  "@angular-devkit/build-angular": "13.0.1",
  "@angular/cli": "13.0.1",
  "@angular/compiler-cli": "13.0.1",
  "@types/jasmine": "3.8.0",
  "@types/node": "^12.11.1",
  "jasmine-core": "3.8.0",
  "karma": "6.3.0",
  "karma-chrome-launcher": "3.1.0",
  "karma-coverage": "2.0.3",
  "karma-jasmine": "4.0.0",
  "karma-jasmine-html-reporter": "1.7.0",
  "typescript": "4.4.4"
}
It’s advisable to perform a manual command-line npm install followed by an npm update from the project’s root folder right after applying these changes to the package.json file in order to trigger a batch update of all the project’s npm packages. Sometimes, Visual Studio doesn’t update the packages automatically, and doing that using the GUI can be tricky.
Those who run into npm and/or ngcc compilation issues after the npm update command can also try to delete the /node_modules/ folder and then perform an npm install from scratch.
Upgrading the Angular code
It’s worth noting that our updated package.json file might not include some of the packages that were present in the Visual Studio default ASP.NET and Angular SPA project template. The reason for that is quite simple: those packages are either deprecated, obsolete, or not required by the code samples we’ll be working with from now on.
tsconfig.json
The tsconfig.json file is the TypeScript configuration file. Again, those who already know what TypeScript is won’t need to read all this, although those who don’t should.
In fewer than 100 words, TypeScript is a free, open source programming language developed and maintained by Microsoft that acts as a JavaScript superset; this means that any JavaScript program is also a valid TypeScript program. TypeScript also compiles to JavaScript, meaning it can seamlessly work on any JavaScript-compatible browser without external components.
The main reason for using it is to overcome JavaScript’s syntax limitations and overall shortcomings when developing large-scale applications or complex projects. Simply put, it makes the developer’s life easier when they are forced to deal with non-trivial code.
In this project, we will definitely use TypeScript for a number of good reasons. The most important ones are as follows:
- TypeScript has several advantageous features compared with JavaScript, such as static typing, classes, and interfaces. Using it in Visual Studio also gives us the chance to benefit from the built-in IntelliSense, which is a great benefit and often leads to a remarkable productivity boost.
- For a large client-side project, TypeScript will allow us to produce more robust code, which will also be fully deployable anywhere a plain JavaScript file would run.
Not to mention the fact that the Angular SPA template we chose already uses TypeScript. Hence, we can say that we already have one foot in the water!
Jokes aside, we’re not the only ones praising TypeScript; this has been acknowledged by the Angular team itself, considering the fact that the Angular source code has been written using TypeScript since Angular 2, as was proudly announced by Microsoft in the following MDSN blog post in March 2015: https://devblogs.microsoft.com/typescript/angular-2-built-on-typescript/.
This was further emphasized in this great post by Victor Savkin (cofounder of Narwhal Technologies and acknowledged Angular consultant) on his personal blog in October 2016: https://vsavkin.com/writing-angular-2-in-typescript-1fa77c78d8e8.
Getting back to the tsconfig.json file, there’s not much to say; the option values used by the Angular template are just what we need to configure both Visual Studio and the TypeScript compiler (TSC) to properly transpile the TypeScript code files included in the /src/ folder, hence there’s no need to change it.
For additional info about the tsconfig.json file and all the available options, visit the following URL: https://angular.io/config/tsconfig.
Other workspace-level files
There are also other notable files created by the CLI in the workspace root. Since we’ll not be changing them, we’ll just briefly mention them in the following list:
.browserlistrc: a file used by the build system to adjust CSS and JS output to support various browsers..editorconfig: a workspace-specific configuration for code editors..gitignore: a text file that tells Git—a version-control system you most likely know quite well—which files or folders to ignore in the workspace. These are intentionally untracked files that shouldn’t be added to the version control repository./node_modules/: a (hidden) folder containing all the npm packages for the entire workspace. This folder will be populated with packages defined in thepackage.jsonfile located on the workspace root; since it’s excluded from the project by default, we can only see it if we click on the Show All Files button at the top of Solution Explorer.aspnetcore-https.js: a script that sets up HTTPS for the application using the ASP.NET Core HTTPS certificate. Remember the HTTPS authorization popup that appeared in Chapter 2, Getting Ready, during our first test run? We’ve just found what triggered it.karma.conf.js: an application-specific Karma configuration. Karma is a tool used to run Jasmine-based tests. We can safely ignore the whole topic for now, as we’ll get to it later on.nuget.config: a NuGet configuration file: we can safely ignore it.package-lock.json: provides version information for all packages installed in the/node_modules/folder by the npm client. If you plan to replace npm with Yarn, you can safely delete this file (theyarn.lockfile will be created instead).Yarn is a package manager for the JavaScript programming language developed and released by Facebook in October 2016 to address some of the limitations that npm had at the time, and is meant to be a drop-in replacement for npm. For further info, read here: https://yarnpkg.com/.
README.md: introductory documentation for the workspace. The.mdextension stands for Markdown, a lightweight markup language created by John Gruber and Aaron Swartz in 2004.tsconfig.*.json: project-specific configuration options for various aspects of our app:.app.jsonfor application-level,.server.jsonfor server-level, and.spec.jsonfor tests. These options will override those set in the generictsconfig.jsonfile in the workspace root.
Now that we know the basics of various workspace-level files, we can move on to examining Angular’s source code files.
The /src/ folder
It’s time to pay a visit to the Angular app and see how it works by looking at its source code files. Rest assured, we won’t stay for long; we just want to get a glimpse of what’s under the hood.
By expanding the /src/ directory, we can see that there are the following sub-folders:
- The
/src/app/folder, along with all its sub-folders, contains all the TypeScript files related to our Angular app; in other words, the whole client-side application source code is meant to be put here. - The
/src/assets/folder is meant to store all the application’s images and other asset files. These files will be copied and/or updated as-is in the deployment folder whenever the application is built. - The
/src/environments/folder contains build configuration options that target specific environments; this template, just like any Angular new project default, includes anenvironment.tsfile (for development) and anenvironment.prod.tsfile (for production).
There is also a bunch of root-level files:
favicon.ico: a file containing one or more small icons that will be shown in the web browser’s address bar when we visit the Angular app, as well as near the page’s title in various browser components (tabs, bookmarks, history, and so on).index.html: the main HTML page that is served when we access the Angular app. The CLI automatically adds all JavaScript and CSS files when building our app, so we typically don’t need to add any<script>or<link>tags here manually.karma.conf.js: application-specific Karma configuration. Karma is a tool used to run Jasmine-based tests. We can safely ignore the whole topic for now, as we’ll get to it later on.main.ts: the main entry point for our application. Compiles the application with the JIT compiler and bootstraps the application’s root module (AppModule) to run in the browser. We can also use the AOT compiler without changing any code by appending the--aotflag to CLI build and serve commands.polyfills.ts: provides polyfill scripts for improving browser support.proxy.conf.ts: the Angular Live Development Server’s proxy configuration settings. We’ve already seen it in Chapter 2, Getting Ready, when we’ve changed the HTTPS port to the single rule currently present: the one that redirects all the HTTP requests to/weatherforecastto the API web server. In short, we’re going to update that rule to make it more generic so that it will redirect all the API HTTP requests to the Web API server.styles.css: a list of CSS files that supply styles for a project.test.ts: the main entry point for the project’s unit tests.
Let’s start our coding review with the /src/app/ folder’s content.
The /src/app/ folder
Our template’s /src/app/ folder follows Angular folder structure best practices and contains our project’s logic and data, thereby including all Angular modules, services, and components, as well as templates and styles. It’s also the only sub-folder worth investigating, at least for the time being.
AppModule
As we briefly anticipated in Chapter 1, Introducing ASP.NET and Angular, the basic building blocks of an Angular application are NgModules, which provide a compilation context for components. The role of NgModules is to collect related code into functional sets: therefore, the whole Angular app is defined by a set of one or more NgModules.
NgModules were introduced in Angular 2 RC5 and are a great, powerful way to organize and bootstrap any Angular application; they help developers consolidate their own set of components, directives, and pipes into reusable blocks. As we said previously, every Angular application since v2 RC5 must have at least one module, which is conventionally called a root module and is thus given the AppModule class name.
Any Angular app requires a root module—conventionally called AppModule—that tells Angular how to assemble the application, thus enabling bootstrapping and starting the initialization life cycle (see the diagram that follows). The remaining modules are known as feature modules and serve a different purpose. The root module also contains a reference list of all available components.
The following is a schema of the standard Angular Initialization Cycle, which will help us better visualize how it works:

Figure 3.4: The Angular initialization cycle
As we can see, the main.ts file bootstraps app.module.ts (AppModule), which then loads the app.component.ts file (AppComponent); the latter, as we’ll see in a short while, will then load all the other components whenever the application needs them.
The root module of the sample Angular app created by our template can be found in the /src/app/ folder and is defined within the app.module.ts file. If we look at the source code, we can see that our AppModule is split into two main code blocks:
- A list of import statements, pointing to all the references (in the form of TypeScript files) required by the application
- The root
NgModuleblock, which is basically a collection of named arrays, each one containing a set of Angular objects that serve a common purpose: directives, components, pipes, modules, providers, and so on. The last one contains the component we want to bootstrap, which, in most scenarios—including ours—is the main application component,AppComponent
AppComponent
If NgModules are Angular building blocks, components can be defined as the bricks used to put the app together, to the extent that we can say that an Angular app is basically a tree of components working together.
Components define views, which are sets of screen elements that Angular can choose between and modify according to your program logic and data, and use services, which provide specific functionality not directly related to views. Service providers can also be injected into components as dependencies, thus making the app code modular, reusable, and efficient.
The cornerstone of these components is conventionally called AppComponent, which is also the only component that—according to Angular folder structure conventions—should be placed in the /app/ root folder. All other components should be put in a sub-folder, which will act as a dedicated namespace.
As we can easily notice, AppComponent is also the only component present in our Standalone Angular template: this means that the app currently offers a single view only. On top of that, it also lacks a proper menu and navigation system. In other words, it’s literally a single-page application! Don’t worry, though: we’ll soon add other components, as well as perform some UI and UX tweaks to improve its look and feel.
As we can see, our AppComponent consists of four files:
app.component.ts: defines the component logic, that is, the component class source code.app.component.html: defines the HTML template associated with theAppComponent. Any Angular component can have an optional HTML file containing its UI layout structure instead of defining it within the component file itself. This is almost always a good practice unless the component comes with a very minimal UI.app.component.css: defines the base CSS StyleSheet for the component. Just like the.htmlfile, this file is optional, yet it should always be used unless the component doesn’t require UI styling.app.component.spec.ts: contains the unit tests for theapp.component.tssource file and can be run using the Jasmine JavaScript test framework through the Karma test runner.
Let’s take a brief look at each one of them.
The TypeScript class file
Let’s start with the app.component.ts file, which will help us to start familiarizing ourselves with the source code of a typical Angular component class:
import { HttpClient } from '@angular/common/http';
import { Component } from '@angular/core';
@Component({
  selector: 'app-root',
  templateUrl: './app.component.html',
  styleUrls: ['./app.component.css']
})
export class AppComponent {
  public forecasts?: WeatherForecast[];
  constructor(http: HttpClient) {
    http.get<WeatherForecast[]>('/weatherforecast').subscribe(result => {
      this.forecasts = result;
    }, error => console.error(error));
  }
  title = 'HealthCheck';
}
interface WeatherForecast {
  date: string;
  temperatureC: number;
  temperatureF: number;
  summary: string;
}
As we can see, the class contains the following coding blocks:
- A list of import statements, much like we’ve seen in the
AppModuleclass. - The
@Componentdecorator, which definesselector, as well as thetemplateUrlandstyleUrlsof the component.selectoris the most important thing defined there as it tells Angular to instantiate this component wherever it finds the corresponding tag in template HTML. In this case,AppComponentwill be instantiated wherever Angular finds the<app-root>tag. - The TypeScript class for the component, which includes the constructor, local properties, methods, and so on.
- An interface to store the weather forecast JSON data coming from the ASP.NET Core Web API in a typed fashion: ideally, these interfaces should require their own dedicated and separate file – however, for the sake of simplicity, the template we’re using puts it here.
Let’s now switch to the HTML template file.
The HTML template file
The /src/app/app.component.html file contains the HTML required to render the component on the browser’s screen. Within these templates, we can use HTML, CSS, and JS code, as well as some special Angular syntax that can be used to add powerful features, such as interpolation, template statements, binding syntax, property binding, directives, and reference variables.
We’ll talk more about these features in Chapter 4, Front-End and Back-End Interactions, when we create a custom component with a table-based template much similar to this one.
The StyleSheet file
As we can see, the /src/app/app.component.css style is currently empty: it just means that the component has no styles applied (yet). For now, we can just leave it as it is: we’ll come back to this file later on, when we start styling our Angular app.
The spec.ts file
Before going further ahead, let’s spend some time taking a better look at the app.component.spec.ts file. Those files, as per the Angular naming convention, are meant to contain unit tests for their corresponding source files and are run using the Jasmine JavaScript test framework through the Karma test runner.
For additional info regarding Jasmine and Karma, check out the following guides:
Jasmine: https://jasmine.github.io/
Karma: https://karma-runner.github.io/
Angular Unit Testing: https://angular.io/guide/testing
While we’re there, it could be useful to give them a run to see whether the Jasmine + Karma testing framework that has been set up by our template actually works.
Our first test run
Before running the test, it may be useful to understand a little bit more about Jasmine and Karma. If you don’t know anything about them, don’t worry—you will soon. For now, just know that Jasmine is an open source testing framework for JavaScript that can be used to define tests, while Karma is a test runner tool that automatically spawns a web server that will execute JavaScript source code against Jasmine-made tests and output their respective (and combined) results on a command line.
In this quick test, we’ll basically launch Karma to execute the source code of our sample Angular app against the Jasmine tests defined by the template in the app.component.spec.ts file; this is actually a much easier task than it might seem.
Open Command Prompt, navigate to the Angular project root folder, and then execute the following command:
> npm run ng test
This will call the Angular CLI using npm.
IMPORTANT: Chrome needs to be installed, otherwise the test won’t work.
In the unlikely event that the npm command returns a program not found error, check that the Node.js/npm binary folder is properly set within the PATH variable. If it’s not there, be sure to add it, and then close and re-open the command-line window and try again.
First testing attempt
Right after we hit Enter, a new browser window should open with the Karma console and a list of results for the Jasmine tests, as shown in the following figure:
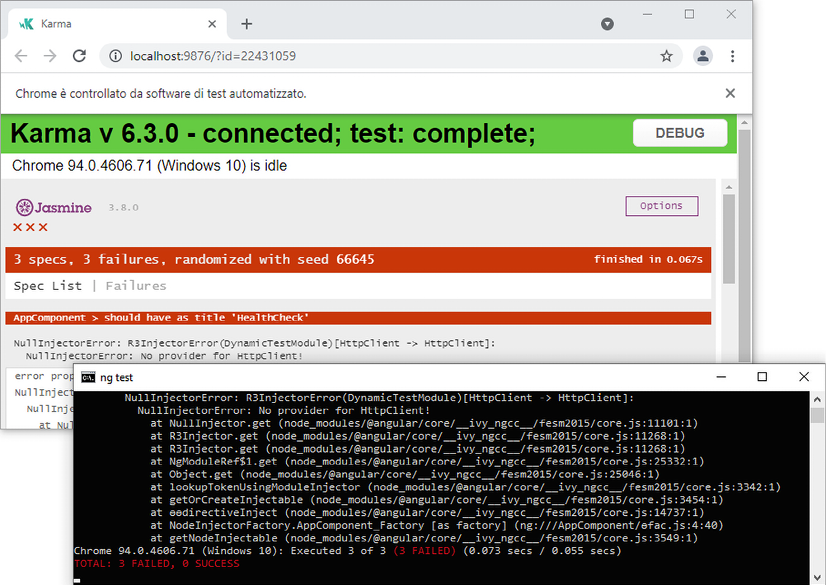
Figure 3.5: First run of the Jasmine test: epic fail
As we can see, we have three failed tests out of three: that’s quite unexpected, since we’re using template-generated code that should work right off the bat!
As a matter of fact, the app.component.spec.ts file shipped with the Standalone TypeScript Angular template has not been updated properly to reflect the component’s HTML template, at least at the time of writing: in other words, it’s broken.
To fix it, we need to perform the following changes to the source code (new and updated lines are highlighted):
import { TestBed } from '@angular/core/testing';
import { HttpClientTestingModule } from '@angular/common/http/testing';
import { AppComponent } from './app.component';
describe('AppComponent', () => {
  beforeEach(async () => {
    await TestBed.configureTestingModule({
      imports: [
        HttpClientTestingModule
      ],
      declarations: [
        AppComponent
      ],
    }).compileComponents();
  });
  it('should create the app', () => {
    const fixture = TestBed.createComponent(AppComponent);
    const app = fixture.componentInstance;
    expect(app).toBeTruthy();
  });
  it('should have as title 'HealthCheck'', () => {
    const fixture = TestBed.createComponent(AppComponent);
    const app = fixture.componentInstance;
    expect(app.title).toEqual('HealthCheck');
  });
  it('should render title', () => {
    const fixture = TestBed.createComponent(AppComponent);
    fixture.detectChanges();
    const compiled = fixture.nativeElement as HTMLElement;
    expect(compiled.querySelector('h1')?.textContent).toContain('Weather forecast');
  });
});
In a nutshell, here’s what we did:
- Added the
HttpClientTestingModuleto the testing module’simportlist, as the app requires it to run (and pass the three tests) - Changed the
'should render title'test (the last one) so that it will properly match the app title
Once done, we can try to launch the test again and see if we’ve managed to fix these errors.
Second testing attempt
Again, navigate to the Angular project root folder and execute the npm run ng test command. If we did everything properly, we should see something like the following screenshot:
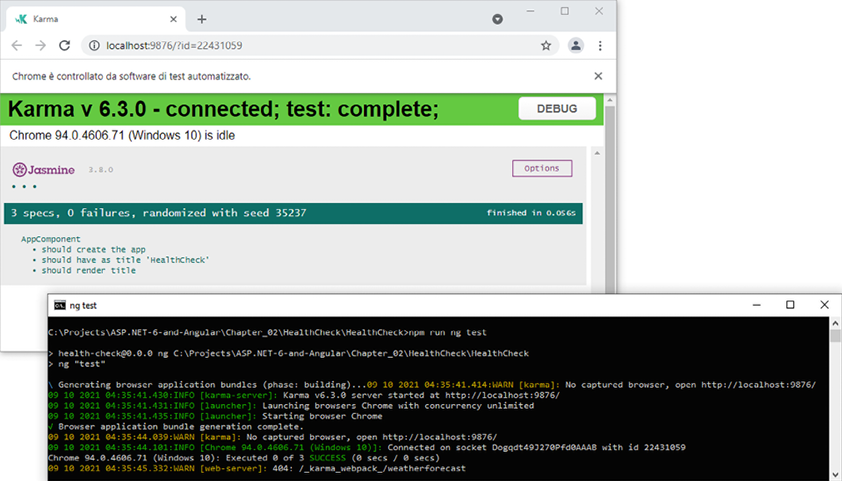
Figure 3.6: Second run of the Jasmine test: success!
All three tests have been completed successfully: well done!
For the sake of simplicity, we’re going to stop here with Angular app tests for the time being; we’ll discuss them in far greater depth in Chapter 9, Back-End and Front-End Debugging.
Getting to work
Now that we’ve got a general picture of our projects, it’s time to do something. Let’s start with two simple exercises that will also come in handy in the future. The first of these will involve the server-side endpoints of our Web API project, while the second will affect the client-side user experience of our Angular app. Both will help us to ensure we have really understood everything there is to know before proceeding to subsequent chapters.
Changing the API endpoints
If we take another look at Angular’s proxy.conf.js file, we can easily see that the only existing rule is explicitly mapping the single Web API’s action method of our Web API:
const PROXY_CONFIG = [
  {
    context: [
      "/weatherforecast",
    ],
    target: "https://localhost:40443",
    secure: false
  }
]
module.exports = PROXY_CONFIG;
This might be OK for our initial testing purposes, but it can become a very unpractical approach as soon as we start to add controllers and action methods: we surely don’t want to manually update these rules every time.
The best thing we can do to fix that is to define a single rule that will work for all our API endpoints: this can be done by defining a prefix (such as /api/ ) that will be used by all of our action methods’ endpoints. Such a change needs to be performed in three files:
- The Angular
app.component.tsfile (HealthCheck project), where the HTTP request is issued - The Angular proxy configuration file (HealthCheck project), where the HTTP request is diverted to the Web API web server
- The
WeatherForecastController.csfile (HealthCheckAPI project), which will respond to the HTTP request with the weather forecast JSON data
Let’s start with the Angular project.
Open the /src/app/app.component.ts file and update the existing '/weatherforecast' value in the following way:
constructor(http: HttpClient) {
  http.get<WeatherForecast[]>('/api/weatherforecast').subscribe(result => {
    this.forecasts = result;
  }, error => console.error(error));
}
Now we need to change the proxy, so the new URL will be properly addressed to the Web API application. Open the /src/proxy.conf.json file and update the existing endpoint in the following way:
const PROXY_CONFIG = [
  {
    context: [
      "/api",
    ],
    target: "https://localhost:40443",
    secure: false
  }
]
The Angular aspects of our job are done: now every HTTP request starting with /api – including the updated /api/weatherforecast – will be diverted to our back-end Web API application.
However, our Web API application doesn’t know it yet: if we now try to run our Angular app by hitting F5, we’d get no more weather forecast data, since the old /weatherforecast endpoint will return an HTTP 404 (Not Found) error. To fix the issue, we simply need to change it to /api/weatherforecast so that the updated rule will affect it.
Switch to the HealthCheckAPI project, open the /Controllers/WeatherForecastController.cs file, and add the api/ prefix to the existing [Route] attribute value (line 6 or so) in the following way:
[Route("api/[controller]")]
Now we can launch our project(s) in Debug mode and see if the Angular app is able to fetch the weather forecast data again.
The good thing about this change is that our Angular proxy now features a generic rule that will be valid for any API endpoint – as long as we include the api/ prefix in the controller’s route – without having to add a new rule every time.
For additional info about the Angular Live Development Server proxy settings, check out the following URL:
The changes we’ve just applied to our endpoint URLs are good enough when running our app(s) in Development mode since we can rely upon the Angular proxy and they will work great even when publishing our app(s) in a Production environment as long as we can serve the Web API through a proxy using similar techniques.
However, what if our hosting service (or strategy) doesn’t allow that? What if we want to publish our HealthCheck Angular app and the HealthCheckAPI back-end on two completely different domains without being able to proxy the latter through the /api/ folder of the former one? This is a typical scenario of most modern deployment techniques: for example, if we wanted to host our Angular app on a Content Delivery Network (CDN) instead of using an actual HTTP server.
If we want our app(s) to support such behaviors, the best thing we can do is to implement an additional baseUrl property and use it as a “prefix” for all our API calls: let’s take the chance to do that.
Implementing the baseUrl property
The best place to implement a baseUrl property would be the /src/environments/ folder, which we briefly mentioned earlier. This folder contains two files – environment.ts and environment.prod.ts – that can be used to define environment-specific settings, which is precisely what we need.
The environment.*.ts files are the Angular counterpart of the ASP.NET Core appsettings.*.json files, and they can be used to fulfill the same requirements: set up configuration values that will be automatically overridden depending on the app’s execution environment.
Open the /src/environments/environment.ts file and add the baseUrl property in the following way:
export const environment = {
  production: false,
  baseUrl: "/"
};
This is the value that we’re going to use in the Development environment since we can rely upon the Angular proxy.
Let’s now open the /src/environments/environment.prod.ts file and set up the baseUrl property with a slightly different value:
export const environment = {
  production: false,
  baseUrl: "https://localhost:40443/"
};
As we can see, this time we’ve set up a whole URL with a protocol and port. We’ve used localhost for the time being since we don’t have any clue about our Web API’s Production endpoint (yet); however, now that we have the baseUrl variable ready, we’ll easily be able to replace this value with an FQDN as soon as we have it available. As a matter of fact, we’re going to do that in Chapter 15, Windows, Linux, and Azure Deployment, when we’ll learn how to publish our apps in production.
Refactoring the Angular app
The next thing we’re going to do is to refactor our current Angular app to make it a bit more versatile and user-friendly. More specifically, here’s what we’re going to do:
- Add two new components, one for the app’s “welcome screen” and another for the existing data fetching example (where we’ll move the existing weather forecast implementation)
- Add a top-level navigation menu, so that the user will be able to navigate between the new components from the UI
- Implement a client-side routing system, so that each choice selected by the user through the navigation menu will be handled by showing the correct components
Let’s get to work.
Adding HomeComponent
Let’s start by adding HomeComponent, which will host our app’s home page contents. Given our development workspace, there are two main approaches for doing that:
- Use the Angular CLI
- Use the Visual Studio Add New Item feature
The Angular CLI method is considered the most convenient choice since it automatically generates all the required files and references: that’s the reason why we’re going to use it.
Open Command Prompt and navigate to the Angular project’s root folder. It should be /Projects/HealthCheck/HealthCheck/ if you followed our path naming conventions, and type the following command:
> ng generate component Home
The preceding command will perform the following tasks, as shown in the following screenshot:
- Create a new
/src/app/home/folder to host the new component files - Generate the component’s
ts,css,html, andspec.tsfiles and fill them with sample data - Update the
app.module.tsfile to add a reference to the new component

Figure 3.7: Output of the ng generate component’s Home command
Once done, we can move on to the next steps.
From now on, we’ll always create component files using the Angular CLI throughout the rest of the book. However, those who prefer to use the manual approach are free to do that: just be sure to add the required references to Angular’s AppModule, which will be shown in a short while.
The dry run switch
In case we want to see what the preceding ng command does without making any change, we can use the --dry-run switch in the following way:
> ng generate component Home --dry-run
That switch will prevent the CLI from making any changes to the file system, meaning that we will see what the ng command does without creating or modifying any file. This can be useful whenever we are unsure about what the command might do, since we’ll be able to see what it does without the risk of breaking something in our app.
It’s also worth noting that the --dry-run switch is not limited to the ng generate component: it can be used with any Angular CLI command.
Skipping the spec.ts file
In case we want to prevent the creation of the file for the unit tests, we can add the --skip-tests switch to the CLI command in the following way:
> ng generate component Home --skip-tests
This switch will prevent the Angular CLI from creating the spec.ts file for the component: we’ve briefly seen spec.ts files in Chapter 2, Getting Ready, when we performed our first unit test. Since we’re not going to use these files until Chapter 10, ASP.NET Core and Angular Unit Testing, when we talk about client-side and server-side testing, for the sake of simplicity, we’ll just skip them using the --skip-tests switch from now on. For that very reason, in case we have already generated the home.component.spec.ts file, we can delete it before going on.
Adding FetchDataComponent
The next thing we’re going to do is to create the FetchDataComponent, where we’ll put the autogenerated data fetch example that currently resides in AppComponent.
Again, use Command Prompt from within the HealthCheck project root path to issue the following console command:
ng generate component FetchData --skip-tests
Again, the command will add the required files and update AppModule accordingly.
Now we have two (mostly empty) components to play with: however, there’s currently no way for the user to reach them since our Angular app lacks a proper navigation menu, as well as a routing mechanism that allows such navigation to work.
Let’s solve this problem for good.
Adding the navigation menu
In a typical HTML-based user interface, a navigation menu is an element containing several hyperlinks (or buttons, or tabs) that allows the user to navigate between the various website sections, pages, or views.
If we think of it from an Angular perspective, we can easily see how it’s no different than a component, just like Home and FetchData. For that very reason, we’re going to create it with the same technique that we’ve used until now:
ng generate component NavMenu --skip-tests
With this, we can finally start to code!
First of all, open the /src/app/app.module.ts file to acknowledge the (highlighted) changes automatically performed by the Angular CLI:
import { HttpClientModule } from '@angular/common/http';
import { NgModule } from '@angular/core';
import { BrowserModule } from '@angular/platform-browser';
import { AppComponent } from './app.component';
import { HomeComponent } from './home/home.component';
import { FetchDataComponent } from './fetch-data/fetch-data.component';
import { NavMenuComponent } from './nav-menu/nav-menu.component';
@NgModule({
  declarations: [
    AppComponent,
    HomeComponent,
    FetchDataComponent,
    NavMenuComponent
  ],
  imports: [
    BrowserModule, HttpClientModule
  ],
  providers: [],
  bootstrap: [AppComponent]
})
export class AppModule { }
We don’t need to do anything here, but it can be useful to understand what we should have done if we didn’t use the Angular CLI and chose to create these components manually instead.
Let’s now create our navigation menu. From Visual Studio Solution Explorer, open the HealthCheck project, navigate to the /src/app/nav-menu/ folder, select the nav-menu.component.html file, and fill it with the following HTML code, overwriting the existing sample content:
<header>
  <nav>
    <a [routerLink]="['/']">Home</a>
    |
    <a [routerLink]="['/fetch-data']">Fetch Data</a>
  </nav>
</header>
As we can see, we didn’t do much: just the minimal amount of HTML code to implement a hyperlink-based navigation mechanism within a standard <header> element.
The only thing worth noting here is that each hyperlink element contains a reference to a RouterLink – an Angular directive that makes that element a link that initiates the navigation to a route. The navigation system that we’re going to build will open the routed components in a dedicated <router-outlet> container present on the page.
Updating the AppComponent
The best place to put that <router-outlet> location is AppComponent, which should also contain the NavMenuComponent: that way, AppComponent will truly become the backbone of our Angular app, containing both the navigation component and the container where the routed components will be opened.
However, before doing that, we need to “move” the current AppComponent behavior – showing the weather forecast data – to the dedicated FetchDataComponent that we added a moment ago: since the component’s behavior is handled by the source code contained in its TypeScript and HTML files, it means that we need to move the content of those files as well.
For the sake of simplicity, we can ignore the StyleSheet file for now since it’s currently empty.
Open the /src/app/fetch-data.component.ts file and update it in the following way (added/updated code is highlighted):
import { HttpClient } from '@angular/common/http';
import { Component, OnInit } from '@angular/core';
import { environment } from '../../environments/environment';
@Component({
  selector: 'app-fetch-data',
  templateUrl: './fetch-data.component.html',
  styleUrls: ['./fetch-data.component.css']
})
export class FetchDataComponent implements OnInit {
  public forecasts?: WeatherForecast[];
  constructor(http: HttpClient) {
    http.get<WeatherForecast[]>(environment.baseUrl + 'api/weatherforecast').subscribe(result => {
      this.forecasts = result;
    }, error => console.error(error));
  }
  ngOnInit(): void {
  }
}
interface WeatherForecast {
  date: string;
  temperatureC: number;
  temperatureF: number;
  summary: string;
}
As we can see, all the updated code lines are taken from the app.component.ts file: that was expected since we’re actually transferring the original behavior of AppComponent to this component.
We also took the chance to use the baseUrl property we added earlier on as a prefix for the 'api/weatherforecast' endpoint to make it ready for both Development and Production environments.
The same thing must be done with the /src/app/fetch-data.component.html file, which contains the HTML template for the component. This time, we can just perform a copy and paste from the app.component.html file since we do have no class names to preserve. Here’s the updated code:
<h1 id="tableLabel">Weather forecast</h1>
<p>This component demonstrates fetching data from the server.</p>
<p *ngIf="!forecasts"><em>Loading... Please refresh once the ASP.NET backend has started.</em></p>
<table *ngIf="forecasts">
  <thead>
    <tr>
      <th>Date</th>
      <th>Temp. (C)</th>
      <th>Temp. (F)</th>
      <th>Summary</th>
    </tr>
  </thead>
  <tbody>
    <tr *ngFor="let forecast of forecasts">
      <td>{{ forecast.date }}</td>
      <td>{{ forecast.temperatureC }}</td>
      <td>{{ forecast.temperatureF }}</td>
      <td>{{ forecast.summary }}</td>
    </tr>
  </tbody>
</table>
Now that we’ve “moved” the data-fetching behavior to FetchDataComponent, we can finally update the AppComponent source code so that it can perform its new “backbone” job.
Here’s the updated /src/app/app.component.ts file:
import { Component } from '@angular/core';
@Component({
  selector: 'app-root',
  templateUrl: './app.component.html',
  styleUrls: ['./app.component.css']
})
export class AppComponent {
  title = 'HealthCheck';
}
And here’s the corresponding /src/app/app.component.html modified file:
  <app-nav-menu></app-nav-menu>
  <div class="container">
    <router-outlet></router-outlet>
  </div>
As expected, the updated AppComponent is just a container for NavMenuComponent and the <router-outlet> Angular elements.
It’s worth noting that, in order to add a reference to NavMenuComponent, we had to use the <app-nav-menu> tag, which matches the value of the selector property specified in the nav-menu.component.ts file.
Updating the test files
Now that we’ve moved the behavior of AppComponent (and the source code) to FetchDataComponent, the test defined in the app.component.spec.ts file that looks for the app’s title will fail; this can be easily tested by running Karma with the ng test command and viewing the outcome.
To fix that, we have two options:
- Remove the
/src/app.component.spec.tsfile - Comment out the code for that test since we no longer need it
For the sake of simplicity, we’ll go with the latter option. Here’s how we can do that:
// Test removed in Chapter 3,
// since the AppComponent doesn't contain the app's title anymore.
//  it('should render title', () => {
//    const fixture = TestBed.createComponent(AppComponent);
//    fixture.detectChanges();
//    const compiled = fixture.nativeElement as HTMLElement;
//    expect(compiled.querySelector('h1')?.textContent).toContain('Weather forecast');
//  });
With this, all our components are ready: we just need to add the RouterModule to our Angular app to make everything work.
Adding the AppRoutingModule
The Angular RouterModule is an optional service that can be used to show a different component when the client URL changes: the component to display will be instantiated and shown within <router-outlet>, the tag we’ve just added to our HTML template file of AppComponent.
RouterModule can be implemented within the AppModule or in a separate module: however, since using a dedicated module is considered a best practice (more on that later), we’ll follow that approach.
From Solution Explorer, navigate to the /src/app/ folder and create a new TypeScript file, calling it app-routing.module.ts. Once done, fill it with the following content:
import { NgModule } from '@angular/core';
import { Routes, RouterModule } from '@angular/router';
import { HomeComponent } from './home/home.component';
import { FetchDataComponent } from './fetch-data/fetch-data.component';
const routes: Routes = [
  { path: '', component: HomeComponent, pathMatch: 'full' },
  { path: 'fetch-data', component: FetchDataComponent }
];
@NgModule({
  imports: [RouterModule.forRoot(routes)],
  exports: [RouterModule]
})
export class AppRoutingModule { }
Once done, open the app.module.ts file and update it in the following way (new/updated lines are highlighted):
import { HttpClientModule } from '@angular/common/http';
import { NgModule } from '@angular/core';
import { BrowserModule } from '@angular/platform-browser';
import { AppRoutingModule } from './app-routing.module';
import { AppComponent } from './app.component';
import { HomeComponent } from './home/home.component';
import { FetchDataComponent } from './fetch-data/fetch-data.component';
import { NavMenuComponent } from './nav-menu/nav-menu.component';
@NgModule({
  declarations: [
    AppComponent,
    HomeComponent,
    FetchDataComponent,
    NavMenuComponent
  ],
  imports: [
    BrowserModule,
    HttpClientModule,
    AppRoutingModule
  ],
  providers: [],
  bootstrap: [AppComponent]
})
export class AppModule { }
What we did should be quite straightforward: we’ve added a new import reference pointing to our new AppRoutingModule file path and added it to the imported modules (the imports array).
Reasons for using a dedicated routing module
We’ve just said that using a separate, dedicated routing module is considered an Angular best practice, but we still don’t know the reasons for this. What are the benefits that will compensate the additional work required to maintain its source code?
As a matter of fact, there are no real benefits for small and/or sample apps. When that’s the case, most developers will probably choose to skip the routing module and merge the routing configuration directly in AppModule itself, just like the sample VS app did in the first place.
However, such an approach is only convenient when the app’s configuration is minimal. When the app starts to grow, its routing logic will eventually become much more complex, thanks to some advanced features (such as specialized guard and resolver services) that, sooner or later, we’ll want (or have) to implement. When something like this happens, a dedicated routing module will help us to keep the source code clean, simplify and streamline the testing activities, and increase the overall consistency of our app.
The only downside that comes with using multiple modules is that the Angular CLI’s ng generate command won’t be able to determine which module we want to add the component’s references to. For example, if we now try to generate a new component using the following command:
ng generate component Test --skip-tests
The command will return the following error:
Error: More than one module matches.
Use skip-import option to skip importing the component into the closest module.
To avoid the above error, we have two choices:
- Use the
--skip-importswitch and add the references manually - Use the
--module=appswitch to target a specific module
In the upcoming chapters, we’ll often use the latter option whenever we need to add further components.
Finishing touches
We’re finally ready to test our new components, as well as our minimal navigation and routing system. However, before doing that, let’s spend a couple more minutes changing the ultra-minimalistic default HTML template of HomeComponent with a more satisfying welcome message.
Open the /src/app/home/home.component.html file and replace its entire contents with the following:
<h1>Greetings, stranger!</h1>
<p>This is what you get for messing up with ASP.NET and Angular.</p>
Save all the files, run the project in Debug mode, and get ready to see the following:
Figure 3.8: Looking at our new home view
It still looks pretty plain and uninspired, but hey… it’s just the start of the journey, right?
Test run
Now we can perform our final test run to see if our new components – as well as the routing and navigation system – actually work. If we got something similar to what we can see in the previous screenshot, we can already see that the new AppComponent works since it shows NavComponent and HomeComponent.
We just have to click on the Fetch Data link at the top to check whether the navigation and routing system is working as well: if everything has been done properly, we should be able to see our new DataFetchComponent together with the retrieved API data, just like in the following screenshot:
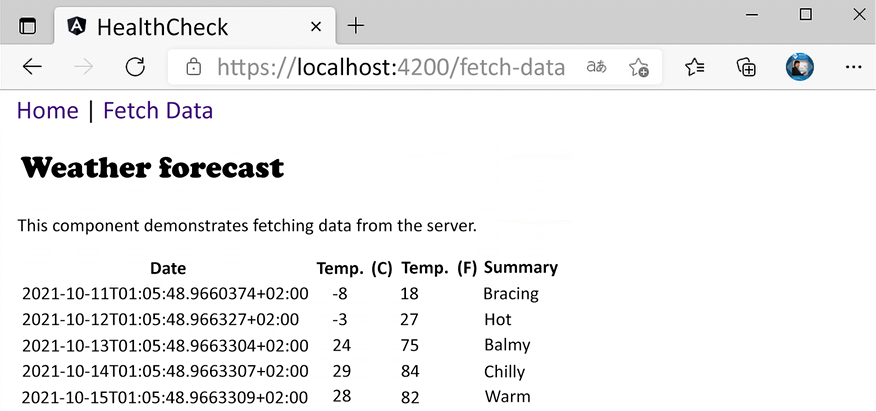
Figure 3.9: Our new FetchDataComponent
That’s about it for now. Rest assured, we can easily do better than that in terms of UI, UX, and overall features: we’ll greatly improve the look and feel of our sample apps in the following chapters, where we’ll start to use StyleSheets (which we didn’t even touch yet!), add new components, and so on. However, at least for the time being, we can be happy with what we did: understanding how easy it is to add components and update their content—and also how rapidly Visual Studio, ASP.NET, and Angular will react to our modifications—is good enough.
Summary
In this chapter, we spent some valuable time exploring and understanding our sample project’s core components, how they work together, and their distinctive roles. For the sake of simplicity, we split the analysis into two parts: the .NET back-end ecosystem, where we’ve inspected the ASP.NET Core Web API project (HealthCheckAPI), and the Angular front-end architecture, which was dedicated to the Standalone Angular project (HealthCheck). We’ve seen how each project comes with its own configuration files, folder structure, naming conventions, and overall scope.
At the end of the day, we’ve met the end goal of this chapter and learned a fair number of useful things: we know the location and purpose of both server-side and client-side source code files; we are aware of most ASP.NET Core and Angular configuration settings and parameters; we also learned how to change these settings to meet our needs, such as the Web API routing endpoints, and insert new stuff, as we did with the Angular components and routing module.
Part of the chapter was dedicated to the Angular CLI: we’ve spent a good amount of time learning how to create new components following the Angular best practices. Such time was very well spent since now we know how to set up a new ASP.NET Core and Angular project without having to rely on the Visual Studio default templates or use a manual approach.
Last but not least, we also took the time to perform a quick test run to see whether we’re ready to hold our ground against what’s coming in upcoming chapters: setting up an improved request-response cycle, building our own controllers, defining additional routing strategies, and more.
Suggested topics
For further information, we recommend the following topics: Razor Pages, the separation of concerns, the single responsibility principle, JSON, web hosts, Kestrel, ASP.NET middlewares, dependency injection, the Angular workspace, Jasmine, Karma, unit tests, server-side rendering (SSR), TypeScript, Angular architecture, the Angular initialization cycle, and the Angular Router Module.
References
- Introduction to ASP.NET Core: https://docs.microsoft.com/en-us/aspnet/core/
- Migration to ASP.NET Core in .NET 6: https://gist.github.com/davidfowl/0e0372c3c1d895c3ce195ba983b1e03d
- Angular: Setting Up the Local Environment and Workspace: https://angular.io/guide/setup-local
- Angular Architecture Overview: https://angular.io/guide/architecture
- Angular Upgrade Guide: https://update.angular.io/
- npmJS: https://docs.npmjs.com/files/package.json
- Yarn Package Manager: https://yarnpkg.com/
- TypeScript – Modules: https://www.typescriptlang.org/docs/handbook/modules.html
- TypeScript – Module Resolution: https://www.typescriptlang.org/docs/handbook/module-resolution.html
- TypeScript Configuration: https://angular.io/config/tsconfig
- TSLint: https://palantir.github.io/tslint/
- Angular AoT Compiler: https://angular.io/guide/aot-compiler
- Karma: https://karma-runner.github.io/
- Jasmine: https://jasmine.github.io/
- Angular – Testing: https://angular.io/guide/testing
- Strongly Typed Configuration Settings in ASP.NET Core: https://weblog.west-wind.com/posts/2016/may/23/strongly-typed-configuration-settings-in-aspnet-core
- Strongly Typed Configuration Settings in ASP.NET Core without IOptions<T>: https://www.strathweb.com/2016/09/strongly-typed-configuration-in-asp-net-core-without-ioptionst/
- Strongly Typed Configuration Settings in ASP.NET Core Part II: https://rimdev.io/strongly-typed-configuration-settings-in-asp-net-core-part-ii/
- Angular Development Server proxy settings: https://angular.io/guide/build#proxying-to-a-backend-server
- Strongly Typed Configuration Settings in ASP.NET Core Part II: https://rimdev.io/strongly-typed-configuration-settings-in-asp-net-core-part-ii/