
5
Data Model with Entity Framework Core
The HealthCheck sample app that we’ve been playing with since Chapter 2, Getting Ready, is working fine, yet it lacks some important features we would likely make use of in a typical web application; among the most important of them is the ability to read and write data from a Database Management System (DBMS) since this is an essential requirement for almost any web-related task: content management, knowledge sharing, instant communication, data storage and/or mining, tracking and statistics, user authentication, system logging, and so on.
Truth be told, even our HealthCheck app could definitely use some of these tasks: tracking the host statuses over time could be a nice feature; user authentication should be a must-have, especially if we plan to publicly release it to the web; system logging is always great to have; and so on. However, since we prefer to keep our projects as simple as possible, we’re going to create a new one and grant some DBMS capabilities to it.
Here’s what we’re going to do in this chapter:
- Create a brand-new .NET and Angular web application project called WorldCities: a database of cities from all over the world
- Choose a suitable data source to fetch a reasonable amount of real data to play with
- Define and implement a data model using Entity Framework Core
- Configure and deploy a DBMS engine that will be used by our project
- Create the database using Entity Framework Core’s Data Migrations feature
- Implement a data seeding strategy to load the data source to the database
- Read and write data with .NET using the Object-Relational Mapping (ORM) techniques provided by Entity Framework Core
Are you ready to get started?
Technical requirements
In this chapter, we’re going to need all of the technical requirements that were listed in the previous chapters, plus the following external libraries:
Microsoft.EntityFrameworkCoreNuGet packageMicrosoft.EntityFrameworkCore.ToolsNuGet packageMicrosoft.EntityFrameworkCore.SqlServerNuGet package- SQL Server 2019 (if we opt for the local SQL instance route)
- MS Azure subscription (if we opt for the cloud database hosting route)
As always, it’s advisable to avoid installing these straight away. We’re going to bring them in during this chapter so that we can contextualize their purpose within our project.
The code files for this chapter can be found at https://github.com/PacktPublishing/ASP.NET-Core-6-and-Angular/tree/master/Chapter_05/.
The WorldCities web app
The first thing we’re going to do is create two new projects using the two Visual Studio templates that we used in Chapter 2, Getting Ready:
- The Standalone TypeScript Angular template, for a new Angular project
- The ASP.NET Core Web API template, for a new Web API
In a nutshell, we just need to repeat what we did during the second part of Chapter 2, Getting Ready, where we created the HealthCheck and HealthCheckAPI projects: the only difference is that this time we’re going to give them a different name: WorldCities for the standalone TypeScript Angular project, and WorldCitiesAPI for the ASP.NET Core Web API.
Creating these two projects from scratch will be a great exercise, and a good chance to put into practice what you’ve learned until now. Let’s see if you’re able to do that without help!
If you have issues, you can check out the book’s GitHub repository for this chapter and compare its content with what you did.
Once we’ve created the two projects, the first thing we need to do is to ensure that Visual Studio will start them both by using the Multiple startup projects feature – just like we did in Chapter 2, Getting Ready. To do that, right-click to the solution node, select the Set Startup Projects option from the contextual menu, and act accordingly.
Right after that, we’ll need to apply the same upgrades and improvements to our new projects that we did on the HealthCheck and HealthCheckAPI projects in Chapter 2, Getting Ready.
Updating the ASP.NET Core app
Let’s start with the ASP.NET Core app, which only requires some minor changes. Here’s what we need to do:
- In the
launchSettings.jsonfile, change HTTP and HTTPS ports to40080and40443
That’s about it.
Updating the Angular app
Let’s move on to the Angular app. Here’s what we need to do:
- Upgrade (or downgrade) the Angular version in the
package.jsonfile - Edit the
/src/proxy.conf.jsonfile to update the Angular proxy context from/weatherforecastto/api, as well as changing the HTTPS port to40443to match the ASP.NET Core app - Add the
HomeComponentand theNavMenuComponentusing theng generateAngular CLI command - Remove the weather forecast data-fetching features from the
AppComponent, so that it will only contain theapp-nav-menuandrouter-outletelements - Add the
AppRoutingModuleto separate the routing strategies from theAppModule - Add the
baseUrlproperty to the/src/environments/environment.tsandenvironment.prod.tsfiles, using the"/"and"https://localhost:40443/"values respectively
As we can see, we didn’t mention the FetchDataComponent: we will not use it in our new WorldCities Angular app, therefore we can avoid creating it—as well as referencing it in the NavMenuComponent and AppRoutingModule.
While we’re there, we can keep the exercise going by applying the UI improvements that we implemented in the Restyling the UI section of Chapter 4, Front-End and Back-End Interactions:
- Install Angular Material
- Add the MatToolbar to the
NavMenuComponent - Replace CSS with Sass
Again, we can skip the HealthCheckComponent and all its references since we don’t need it.
Having to repeat all these steps might seem unpleasant at first, but it’s a good way to confirm that we’ve understood each relevant step. However, if you don’t want to practice you can also copy and paste the updated code from the HealthCheck Angular app… or directly pull the updated source code from this chapter’s GitHub repository.
After making all these changes, we can check that everything is working by pressing F5 and inspecting the outcome. If everything has been done properly, we should be able to see the following screen:
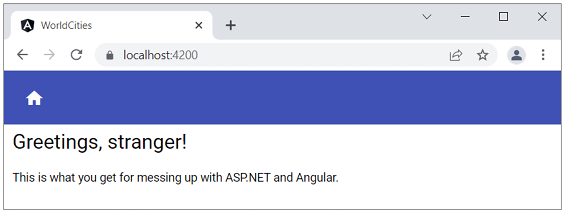
Figure 5.1: Inspecting our new WorldCities ASP.NET and Angular app
If you get a different outcome (or run into UI or compilation errors), you might want to compare your new WorldCities project against the one present in the GitHub repository for this chapter to ensure that all the updates and refactoring steps have been applied.
Since we don’t want to read that “Greeting, stranger!” phrase for the rest of this book, let’s take 2 minutes of our time to briefly revamp our new app’s home page.
Minimal UI restyling
Open the web browser and go to www.pexels.com, a neat website that offers free stock photos and videos shared by talented creators from all over the world. Type world map in the search bar and pick a suitable cover image, possibly with landscape proportions.
Here’s a good one, taken from https://www.pexels.com/photo/close-up-of-globe-335393/:

Figure 5.2: World map for our cover image
Many thanks to NastyaSensei for making the preceding image available under Pexel’s free-to-use license: https://www.pexels.com/license/.
You can check out more of her photos here: https://www.pexels.com/@nastyasensei-66707.
Download the photo using the lowest possible resolution available (640x426) and save it in our WorldCities app using the following path and name:
/src/assets/img/home.jpg
In order to do this, we’ll have to create the /img/ folder, because it isn’t there yet.
Now that we have our own home cover image, let’s update the home view to show it in a proper way; open the /src/app/home/home.component.html file and change its contents in the following way:
<h1>WorldCities</h1>
<p>
  A sample web application to demonstrate
  how to interact with ASP.NET, Angular,
  Entity Framework Core and a SQL Database.
</p>
<img src="/assets/img/home.jpg" alt="WorldCities"
     class="home-cover" />
As we can see from the preceding code, we plan to show our new image using an <img> element that also features a class attribute: this means that now we need to implement that home-cover CSS class using one of the styling component approaches supported by Angular.
As we know from what we’ve experienced in the previous chapters, we could do that by either adding a styles property to the component’s metadata by updating the /src/app/home/home.component.ts TypeScript file…
@Component({
  selector: 'app-home',
  templateUrl: './home.component.html',
  styles: ['.home-cover { display:block; margin:auto; max-width:100%; }']
})
… or we could use the separate SCSS file and implement the class there. We also know that this latter approach is almost always preferable, as it will allow us to separate the HTML structure from the CSS styling without messing up the component code, hence we’ll do it that way.
From Solution Explorer, open the /src/app/home/home.component.scss file—which should be empty by now—and fill its contents with the following code:
.home-cover {
  display:block;
  margin: auto;
  max-width:100%;
}
Be sure to check that the home.component.scss file is properly referenced in the styleUrls property within the component’s /src/app/home/home.component.ts file in the following way:
@Component({
  selector: 'app-home',
  templateUrl: './home.component.html',
  styleUrls: ['./home.component.scss']
})
Now that we’ve updated the SCSS file, let’s look at the style sheet rules that we’ve put in the home-cover class: as we can see, we’ve applied some minimal CSS styling to center the image and make it automatically resize so that its base width (640 px) won’t be a hindrance for mobile phones.
Let’s now press F5 and see what our new home view looks like:
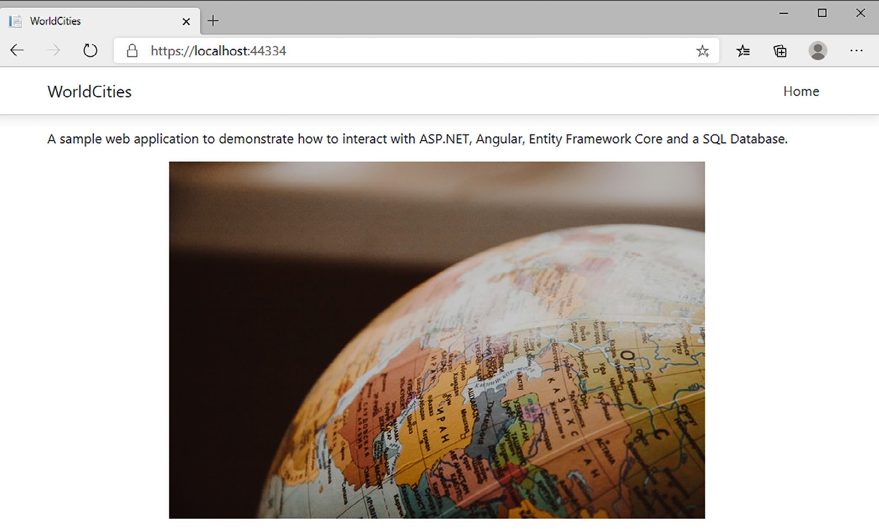
Figure 5.3: Inspecting our cover image
We will never win an award for this layout, but that’s OK for our purposes.
If we reduce our browser width to the minimum amount (or use MS Edge’s Mobile Emulation feature by opening the Developer Tools and then pressing Ctrl + Shift + M), we can also see how it would look on mobile devices:
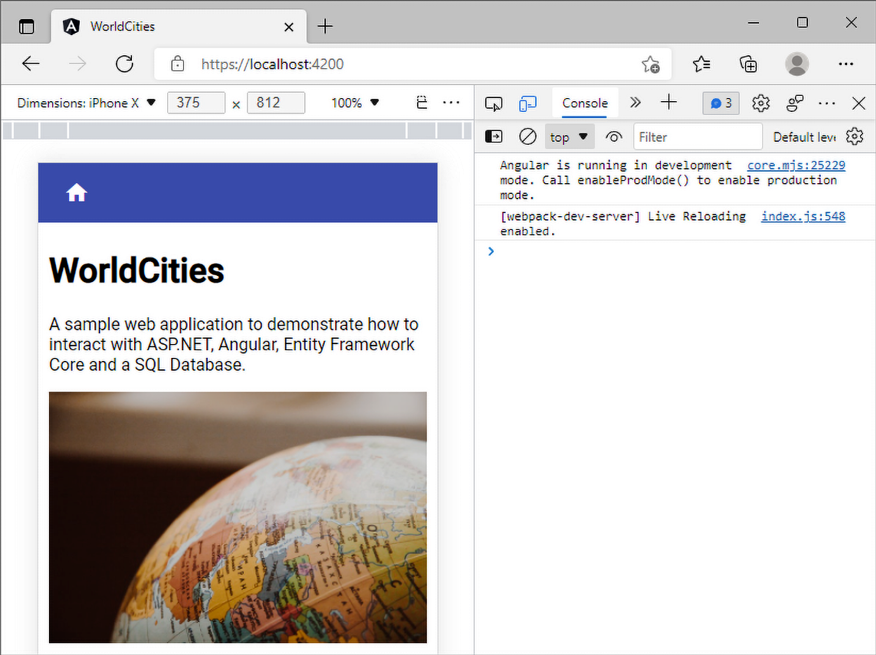
Figure 5.4: Mobile devices view of our cover page
Not that bad, is it?
That’s about it: now we have a brand-new .NET and Angular web application to play with. We just need a data source and a data model that can be accessed through a back-end Web API to retrieve some data from: in other words, a data server.
Reasons to use a data server
Before we move on, it would be wise to spend a couple of minutes answering the following question: do we really need a real data server? Can’t we just emulate one somehow? We’re only running code samples, after all.
As a matter of fact, we could definitely avoid doing that and skip this entire chapter: Angular provides a neat in-memory Web API package that replaces the HttpClient module’s HttpBackend and emulates CRUD operations over a RESTful API; the emulation is performed by intercepting the Angular HTTP requests and redirecting them to an in-memory data store under our control.
This package is great and works really well for most test case scenarios, such as the following:
- To simulate operations against data collections that haven’t been implemented on our dev/test server
- To write unit test apps that read and write data without having to intercept multiple HTTP calls and manufacture sequences of responses
- To perform end-to-end tests without messing with the real database, which is great for Continuous Integration (CI) builds
The in-memory Web API service works so well that the entire Angular documentation at https://angular.io/ relies upon it. However, we’re not going to use it for now, for a simple (and rather obvious) reason: this book’s focus is not on Angular, but the client/server interoperability between Angular and .NET; for that very reason, developing a real Web API and connecting it to a real data source through a real data model is part of the game.
We don’t want to simulate the behavior of a RESTful back-end because we need to understand what’s going on there and how to implement it properly: we want to implement it, along with the DBMS that will host and provide the data.
This is the reason why we created the WorldCitiesAPI project in the first place, and we definitely plan to use it: that’s precisely what we’re going to do, starting from the next section.
Those who want to get additional information about the Angular in-memory Web API service can visit the in-memory-web-api GitHub project page at https://github.com/angular/in-memory-web-api/.
The data source
What kind of data will our WorldCities web application need? We already know the answer: a database of cities from all over the world. Does such a repository even exist yet?
As a matter of fact, there are several alternatives we can use to populate our database and then make it available to our end users.
The following is the free world cities database by DSpace-CRIS:
- URL: https://dspace-cris.4science.it/handle/123456789/31
- Format: CSV
- License: Free to use
The following is GeoDataSource’s world cities database (free edition):
- URL: http://www.geodatasource.com/world-cities-database/free
- Format: CSV
- License: Free to use (registration required)
The following is the world cities database by simplemaps:
- URL: https://simplemaps.com/data/world-cities
- Format: CSV, XLSX
- License: Free to use (CC BY 4.0, https://creativecommons.org/licenses/by/4.0/)
All of these alternatives are good enough to suit our needs: we’ll go with simplemaps.com since it requires no registration and provides a human-readable spreadsheet format.
Open your favorite browser, type in or copy the above URL, and look for the Basic column of the World Cities Database section:

Figure 5.5: Downloading a world cities database from simplemaps.com
Click the Download button to retrieve the (huge) ZIP file containing both the .csv and .xlsx files and save it somewhere. That’s it for now; we’ll deal with these files later on.
Starting with the next section, we’ll start the building process of our data model: it’s going to be a long, but also very rewarding, journey.
The data model
Now that we have our raw data source, we need to find a way to make it available to our web application so that our users will be able to retrieve (and maybe alter) the actual data.
For the sake of simplicity, we won’t waste our precious time by introducing the whole data model concept, as well as the various meanings of these two words. Those of you who are experienced, as well as seasoned developers, will probably be aware of all of the relevant stuff. We’ll just say that when we are talking about a data model, we don’t mean anything more or anything less than a lightweight, definitely typed set of entity classes representing persistent, code-driven data structures that we can use as resources within our Web API code.
The word persistent has been used for a reason; we want our data structure to be stored in a database. That’s rather obvious for any application based on data. The brand-new web application we’re about to create won’t be an exception since we want it to act as a collection—or a repository—of records so that we can read, create, delete, and/or modify according to our needs.
As we can easily guess, all of these tasks will be performed by some back-end business logic (.NET controllers) that’s triggered by a front-end UI (Angular components).
Introducing Entity Framework Core
We will create our database with the help of Entity Framework Core (also known as EF Core), the well-known, open-source Object Relational Mapper (ORM) for ADO.NET that’s developed by Microsoft. The reasons for this choice are as follows:
- Seamless integration with the Visual Studio IDE
- A conceptual model based upon entity classes (Entity Data Model (EDM)), which will allow us to work with data using domain-specific objects without the need to write data-access code, which is precisely what we’re looking for
- Easy to deploy, use, and maintain in development and production phases
- Compatible with all of the major open-source and commercial SQL engines, including MSSQL, SQLite, Azure Cosmos DB, PostgreSQL, MySQL/MariaDB, MyCAT, Firebird, Db2/Informix, Oracle DB, and more, thanks to the official and/or third-party providers and/or connectors available via NuGet
It’s worth mentioning that Entity Framework Core was previously known as Entity Framework 7 until its latest RC release. The name change follows the ASP.NET 5/ASP.NET Core perspective switch we already talked about as it also emphasizes the Entity Framework Core major rewrite/redesign if we compare it to the previous installments.
You might be wondering why we’re choosing to adopt a SQL-based approach instead of going for a NoSQL alternative; there are many good NoSQL products, such as MongoDB, RavenDB, and CouchDB, that happen to have a C# connector library. What about using one of them instead?
The answer is rather simple: despite being available as third-party providers, they haven’t been included in the official Entity Framework Core Database Providers list (see the link in the following information box). For that very reason, we’re going to stick to the relational database, which may also be a more convenient approach for the simple database schemas we’re going to design within this book.
For those who want to know more about the upcoming release and/or feel bold enough to use it anyway—maybe with a NoSQL DB as well—we strongly suggest that you take a look at the following links and docs:
- Project roadmap: https://github.com/aspnet/EntityFramework/wiki/Roadmap
- Source code on GitHub: https://github.com/aspnet/EntityFramework
- Official documentation: https://docs.efproject.net/en/latest/
- Official Entity Framework Core Database Providers list: https://docs.microsoft.com/en-us/ef/core/providers/?tabs=dotnet-core-cli
Installing Entity Framework Core
To install Entity Framework Core, we need to add the relevant packages to the dependencies section of our project file. We can easily do this using the visual GUI in the following way:
- Right-click on the
WorldCitiesAPIproject - Select Manage NuGet Packages
- Ensure that the Package source drop-down list is set to All
- Go to the Browse tab and search for the packages containing the
Microsoft.EntityFrameworkCorekeyword:
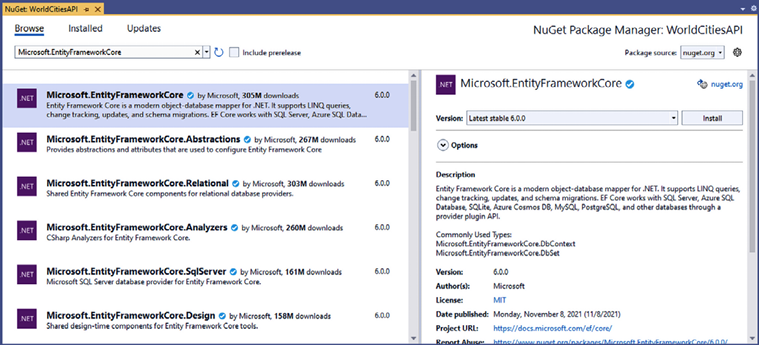
Figure 5.6: Installing Entity Framework Core
Once there, select and install the following packages (the latest at the time of writing):
Microsoft.EntityFrameworkCoreversion 6.0.0Microsoft.EntityFrameworkCore.Toolsversion 6.0.0Microsoft.EntityFrameworkCore.SqlServerversion 6.0.0
These packages will also bring some required dependencies, which we’ll need to install as well, and require the acceptance of their license terms:
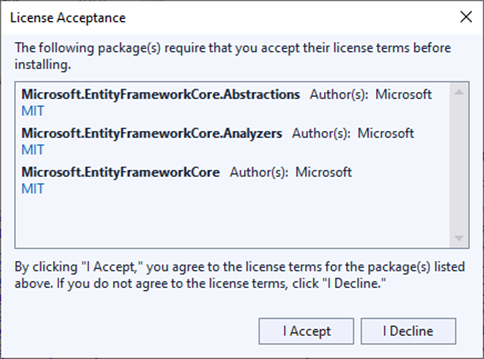
Figure 5.7: Accepting the license
If we prefer to do this using the NuGet Package Manager command line, we can input the following:
PM> Install-Package Microsoft.EntityFrameworkCore -Version 6.0.0
PM> Install-Package Microsoft.EntityFrameworkCore.Tools -Version 6.0.0
PM> Install-Package Microsoft.EntityFrameworkCore.SqlServer -Version 6.0.0
It’s worth noting that the version number, which is the one that’s the most recent at the time of writing, might be subject to change: be sure to triple-check it in this book’s GitHub repository as well!
The SQL Server Data Provider
Among the installed namespaces, it’s worth noting the presence of Microsoft.EntityFrameworkCore.SqlServer, which is the Microsoft SQL Database Provider for Entity Framework Core. This highly versatile connector provides an interface for the whole Microsoft SQL Server database family, including the latest SQL Server 2019.
DBMS licensing models
Despite having a rather expensive (to say the least) licensing model, there are at least three Microsoft SQL editions that can be used for free, as long as certain requirements are met:
- Evaluation edition is free, but comes with no production use rights, meaning that we can only use it on development servers. Additionally, it can only be used for 180 days. After that, we’ll have to either buy a license or uninstall it (and migrate to a different edition).
- Developer edition is also free and comes with no production use rights. However, it can be used without limitations, providing that we only use it for development and/or testing scenarios.
- Express edition is free and can be used in any environment, meaning that we can use it on development and production servers. However, it has some major performance and size limitations that could hinder the performance of a complex and/or high-traffic web application.
For additional information regarding the various SQL Server editions, including the commercial ones that do require a paid licensing model, check out the following links:
As we can easily see, both the Developer and Express editions can be a great deal for small web applications like those we’re playing with in this book.
What about Linux?
SQL Server 2019 is also available for Linux and officially supported for the following distributions:
- Red Hat Enterprise Linux (RHEL)
- SUSE Enterprise Server
- Ubuntu
Other than that, it can also be set to run on Docker and even provisioned as a virtual machine on Azure, which can often be a great alternative if we don’t want to install a local DMBS instance and save our precious hardware resources.
As for the licensing model, all SQL Server products are licensed the same way for all of these environments: this basically means that we can use our license (including the free ones) on the platform of our choice.
SQL Server alternatives
If you don’t feel like using Microsoft SQL Server, you’re 100% free to pick another DBMS engine, such as MySQL, PostgreSQL, or any other product, as long as it has some kind of Entity Framework Core official (or third-party) support.
Should we make this decision now? This entirely depends on the data modeling approach we want to adopt; for the time being, and for the sake of simplicity, we’re going to stick to the Microsoft SQL Server family, which allows us to install a decent DBMS for free on either our local machine (development and/or production) or Azure (thanks to its €200 cost and 12-month free trial): don’t worry about this for now—we’ll get there later on.
Data modeling approaches
Now that we have Entity Framework Core installed and we know—more or less—which DBMS we are going to use, we have to choose between one of the two available approaches to model the data structure: Code-First or Database-First. Each one comes with a fair number of advantages and disadvantages, as those of you with experience and those of you who are seasoned .NET developers will almost certainly know. Although we won’t dig too much into these, it would be useful to briefly summarize each before making a choice.
Code-First
This is Entity Framework’s flagship approach since version 4 and also the recommended one: an elegant, highly efficient data model development workflow. The appeal of this approach can be easily found in its premise; the Code-First approach allows developers to define model objects using only standard classes, without the need for any design tool, XML mapping files, or cumbersome piles of autogenerated code.
To summarize, we can say that going Code-First means writing the data model entity classes we’ll be using within our project and letting Entity Framework generate the database accordingly:

Figure 5.8: The Code-First approach
The pros and cons are explained in the following sections.
Pros
- There is no need for diagrams and visual tools whatsoever, which can be great for small-to-medium-sized projects as it will save a lot of time
- It has a fluent code API that allows the developer to follow a convention-over-configuration approach so that it can handle the most common scenarios, while also giving them the chance to switch to a custom, attribute-based implementation that overrides the need to customize the database mapping
Cons
- Good knowledge of C# and updated EF conventions is required.
- Maintaining the database can often be tricky, as well as handling updates without suffering data loss. Migration support, which was added in 4.3 to overcome this issue and has been continuously updated since then, greatly mitigates the problem, although it also affects the learning curve in a negative way.
Database-First
If we either have an existing database already or don’t mind building it beforehand, we could consider an alternative approach that goes the other way around: instead of letting EF Core automatically build the database using the SQL commands generated from the model objects, we generate these objects from an existing database using the dotnet ef command-line tool. This code-generation technique is known as model scaffolding and relies upon the following command:
> dotnet ef dbcontext scaffold
For additional info about EF model scaffolding and Database-First, visit the following URL:
https://docs.microsoft.com/en-us/ef/core/miscellaneous/cli/dotnet#dotnet-ef-dbcontext-scaffold
We can summarize this by saying that going Database-First will mean building the database and letting Entity Framework create/update the rest accordingly:

Figure 5.9: The Database-First approach
The pros and cons are explained in the following sections.
Pros
- If we have an already-existing database in place, this will probably be the way to go as it will spare us the need to recreate it
- The risk of data loss will be kept to a minimum because any structural change or database model update will always be performed on the database itself
Cons
- Manually updating the database can be tricky if we’re dealing with clusters, multiple instances, or several development/testing/production environments as we will have to manually keep them in sync instead of relying on code-driven updates/migrations or autogenerated SQL scripts
- We will have less control over the autogenerated model classes, therefore managing associations, foreign keys, and constraints will be more difficult
Making a choice
By taking the advantages and disadvantages of these two options into account, there is no such thing as an overall better or best approach; conversely, we can say that each project scenario will likely have a best-suited approach. That said, considering that Code-First is the recommended approach for Entity Framework Core, especially for new applications and/or whenever the database doesn’t exist yet, we have little to no doubt that adopting it will be our best choice.
Truth be told, the Database-First approach has become less and less popular in recent years, and the framework support for this technique dropped as well: as a matter of fact, such an approach is rarely used nowadays, unless there’s an already-existing database structure that can’t be easily updated or needs to be preserved the way it already is because other apps and/or services are already accessing it.
Now that we’ve made our choice, we’ll need to create some entities and find a suitable DBMS to store our data: this is precisely what we’re going to do in the following sections.
Creating the entities
Now that we have a data source, we can leverage one of the major advantages of the Code-First approach we talked about earlier and start writing our entity classes early on, without worrying too much about what database engine we’ll eventually use.
Truth be told, we already know something about what we’ll eventually use. We won’t be adopting a NoSQL solution as they aren’t officially supported by Entity Framework Core yet; we also don’t want to commit ourselves to purchasing expensive license plans, so the commercial editions of Oracle and SQL Server are probably out of the picture as well.
This leaves us with relatively few choices: SQL Server Developer (or Express) edition, MySQL/MariaDB, the community edition of Oracle (known as Oracle XE), or other less well-known solutions such as PostgreSQL. Furthermore, we are still not 100% sure about installing a local DBMS instance on our development machine (and/or on our production server) or relying on a cloud-hosted solution such as Azure.
That being said, adopting Code-First will give us the chance to postpone the call until our data model is ready.
However, to create the entity classes, we need to know what kind of data they are going to contain and how to structure it: that strongly depends on the data source and the database tables that we eventually want to create using Code-First.
In the following sections, we’re going to learn how we can deal with these tasks.
Defining the entities
In Entity Framework Core, as well as in most ORM frameworks, an entity is a class that maps to a given database table. The main purpose of entities is to make us able to work with data in an object-oriented fashion while using strongly typed properties to access table columns (and data relations) for each row. We’re going to use entities to fetch data from the database and serialize them to JSON for the front-end. We will also do the opposite, that is, deserializing them back whenever the front-end issues POST or PUT requests that will require the back-end to perform some permanent changes to the database, such as adding new rows or updating existing ones.
If we try to enlarge our focus and look at the general picture, we will be able to see how the entities play a central role among the whole bi-directional data flow between the DBMS, the back-end, and the front-end parts of our web application.
To understand such a concept, let’s take a look at the following diagram:

Figure 5.10: The DBMS data lifecycle
As we can clearly see, the main purpose of Entity Framework Core is to map the database tables to entity classes: that’s precisely what we need to do now.
Unzip the world cities compressed file we downloaded a while ago and open the worldcities.xlsx file: if you don’t have MS Excel, you can import it on Google Drive using Google Sheets, as shown at the following URL: http://bit.ly/worldcities-xlsx.
Right after importing it, I also took the chance to make some small readability improvements to that file: bolding column names, resizing the columns, changing the background color and freezing on the first row, and so on.
If we open the preceding URL, we will see what the imported spreadsheet looks like:

Figure 5.11: Inspecting the worldcities.xlsx file
By looking at the spreadsheet headers, we can infer at least two database tables we’re going to need:
- Cities: For columns A, B, C, and D (and arguably K, if we want to keep those unique IDs)
- Countries: For columns E, F, and G
This seems to be the most convenient choice in terms of common sense. Alternatively, we could put everything into a single Cities table, but we’re going to have a lot of redundant content, which is something we would arguably want to avoid.
If we’re going to deal with two database tables, this means that we need two entities to map them on and to create them in the first place, since we plan to adopt the Code-First approach.
The City entity
Let’s start with the City entity.
From the project’s Solution Explorer, do the following:
- Create a new
/Data/folder at the root level of theWorldCitiesAPIproject; this will be where all of our Entity Framework-related classes will reside. - Create a
/Data/Models/folder. - Add a new ASP.NET | Code | Class file, name it
City.cs, and replace the sample code with the following:using System.ComponentModel.DataAnnotations; using System.ComponentModel.DataAnnotations.Schema; namespace WorldCitiesAPI.Data.Models { public class City { #region Properties /// <summary> /// The unique id and primary key for this City /// </summary> [Key] [Required] public int Id { get; set; } /// <summary> /// City name (in UTF8 format) /// </summary> public string Name { get; set; } = null!; /// <summary> /// City latitude /// </summary> [Column(TypeName = "decimal(7,4)")] public decimal Lat { get; set; } /// <summary> /// City longitude /// </summary> [Column(TypeName = "decimal(7,4)")] public decimal Lon { get; set; } /// <summary> /// Country Id (foreign key) /// </summary> public int CountryId { get; set; } #endregion } }
As we can see, we added a dedicated property for each of the spreadsheet columns we identified early on; we also included a CountryId property, which we’re going to use to map the foreign key for the Country related to the city (more on that later on). We also tried to improve the overall readability of the entity class source code by providing each property with some useful comments that will definitely help us to remember what they are meant for.
Last but not least, it’s worth noting that we took the chance to decorate our entity class using some Data Annotations attributes as they are the most convenient way to override the default Code-First conventions. More specifically, we used the following annotations:
[Required]: This defines the property as a required (non-nullable) field.[Key]: This means that the property hosts the primary key of the database table.[Column(TypeName="decimal(7,4)"]: This means that the property will require a DB column of the specified type and precision. If we don’t provide this information, Entity Framework won’t know which precision to set for the database table columns it will create for those properties and will fall back to its default values. This fallback could result in a loss of precision if our actual data has a greater number of decimals.
Additional Data Annotations attributes will be added later on.
Those of you who have some experience with Entity Framework (and relational databases) will most likely understand what those Data Annotations are there for: they are a convenient way to instruct Entity Framework on how to properly build our database when using the Code-First approach. There’s nothing complex here; we’re just telling Entity Framework that the database columns that were created to host these properties should be set as required and that the primary key should be bound in a one-to-many relationship to other foreign columns in different tables.
In order to use the Data Annotations, we have to add a reference to one or both of the following namespaces, depending on the attributes we’re going to use:
System.ComponentModel.DataAnnotations
System.ComponentModel.DataAnnotations.Schema
If we take a look at the preceding code, we will see that both of these namespaces have been referenced with a using statement for convenience, even if the attributes we’ve used so far ([Key] and [Required]) only require the first one.
We’ll definitely talk more about Data Annotations in this chapter later on. If you want to find out more about Data Annotations in Entity Framework Core, we strongly suggest reading the official documentation, which can be found at the following URL: https://docs.microsoft.com/en-us/ef/core/modeling/.
The Country entity
The next entity will be the one for identifying the countries, which will have a one-to-many relationship with Cities.
This is hardly a surprise: we’re definitely going to expect a single Country for each City and multiple Cities for each given Country: this is what one-to-many relationships are for.
Right-click on the /Data/Models/ folder, add a Country.cs class file, and fill it with the following code:
using System.ComponentModel.DataAnnotations;
using System.ComponentModel.DataAnnotations.Schema;
namespace WorldCitiesAPI.Data.Models
{
    public class Country
    {
        #region Properties
        /// <summary>
        /// The unique id and primary key for this Country
        /// </summary>
        [Key]
        [Required]
        public int Id { get; set; }
        /// <summary>
        /// Country name (in UTF8 format)
        /// </summary>
        public string Name { get; set; } = null!;
        /// <summary>
        /// Country code (in ISO 3166-1 ALPHA-2 format)
        /// </summary>
        public string ISO2 { get; set; } = null!;
        /// <summary>
        /// Country code (in ISO 3166-1 ALPHA-3 format)
        /// </summary>
        public string ISO3 { get; set; } = null!;
        #endregion
    }
}
Again, there’s a property for each spreadsheet column with the relevant Data Annotations and comments.
ISO 3166 is a standard that was published by the International Organization for Standardization (ISO) that’s used to define unique codes for the names of countries, dependent territories, provinces, and states. For additional information, check out the following URLs:
The part that describes the country codes is the first one (ISO 3166-1), which defines three possible formats: ISO 3166-1 alpha-2 (two-letter country codes), ISO 3166-1 alpha-3 (three-letter country codes), and ISO 3166-1 numeric (three-digit country codes). For additional information about the ISO 3166-1 ALPHA-2 and ISO 3166-1 ALPHA-3 formats, which are the ones that are used in our data source and therefore in this book, check out the following URLs:
Should we (still) use #region blocks?
If we look at the code samples of the two entity classes we’ve just added, we can see that we’ve used some #region directives: let’s spend a minute talking about them.
As most C# developers already know, regions are preprocessor directives that let the developer specify a block of code that can be expanded or collapsed when using the outlining feature of the code editor.
For additional info about C# regions and common usage samples, read this guide:
Regions were introduced with the first versions of C# and were praised during the language’s early years because they were seen as a viable technique to improve code readability, especially in long and complex classes. However, they can also lure the developer into adopting a number of bad practices, such as shoving “unoptimized” or repeating code to hide it from view instead of refactoring it; dividing a complex method (or class) into multiple “tasks” instead of splitting it into multiple methods (or classes); embedding redundant code instead of making it less redundant; and so on.
Since the potential disadvantages of regions vastly exceed their supposed advantages, regions are now considered a bad practice by most C# developers and their usage has declined.
This opinion has been enforced by StyleCop, a great open-source static code analysis tool from Microsoft that checks C# code for conformance to the recommended coding styles and design guidelines, which summarizes its judgment regarding regions in its SA1124 rule:
TYPE: SA1124DoNotUseRegions
CAUSE: The C# code contains a region.
DESCRIPTION: A violation of this rule occurs whenever a region is placed anywhere within the code. In many editors, including Visual Studio, the region will appear collapsed by default, hiding the code within the region. It is generally a bad practice to hide code, as this can lead to bad decisions as the code is maintained over time.
HOW TO FIX: To fix a violation of this rule, remove the region from the code.
This kind of settles it: we should never use regions, period.
Those who want to know more about the #regions debate within the C# developer community and the reasons why they are discouraged nowadays might enjoy reading this Stack Overflow thread, which pretty much summarizes it:
Again, the verdict was (almost) unanimous: region blocks = code smell, and the best thing you can do to avoid such smell is open a window—and throw regions away.
Although I generally agree with such an “anti-region” approach, I still think that using #regions to group together fields, properties, and so on can be useful in some edge-case scenarios, such as code samples and tutorials (like the classes we’re creating and reviewing in this book), because it allows us to distinguish between different parts of code: for example, we’re going to use them to help the reader tell apart standard properties versus navigation properties within an entity type.
This is why in this book we’re still using them here and there, even if we’re fully aware that good, StyleCop-compliant code won’t need them—not even to group together fields, properties, private methods, constructors, and so on: at the same time, I also recommend not using them (or limiting their usage to a minimum amount) in your actual code.
Defining relationships
Now that we have built our main City and Country entity skeleton, we need to enforce the relationship we know exists between them. We want to be able to do stuff such as retrieving a Country and then browsing all of its related Cities, possibly in a strongly typed fashion.
To do this, we have to add a couple of new entity-related properties, one for each entity class. More specifically, we will be adding the following:
- A
Countryproperty in ourCityentity class, which will contain a single country related to that city (the parent) - A
Citiesproperty in ourCountryentity class, which will contain a collection of the cities related to that country (the children)
If we take a deeper look and try to visualize the relationship between those entities, we will be able to see how the former property identifies the parent (from each child’s perspective), while the latter will contain the children (from the parent’s perspective): such a pattern is precisely what we can expect for a one-to-many relationship like the one we’re dealing with.
In the following sections, we’ll learn how we can implement these two navigation properties.
Adding the Country property to the City entity class
Add the following code lines near the end of the file, near the end of the Properties region (new lines are highlighted):
using System.ComponentModel.DataAnnotations.Schema;
// ...existing code...
/// <summary>
/// Country Id (foreign key)
/// </summary>
[ForeignKey(nameof(Country))]
public int CountryId { get; set; }
#endregion
#region Navigation Properties
/// <summary>
/// The country related to this city.
/// </summary>
public Country? Country { get; set; } = null!;
#endregion
// …existing code...
As we can see, other than adding the new Country property, we also decorated the already-existing CountryId property with a new [ForeignKey(nameof(Country))] data annotation. Thanks to that annotation, Entity Framework will know that such a property will host a primary key of a foreign table and that the Country navigation property will be used to host the parent entity.
It’s worth noting that the binding that’s declared using that [ForeignKey] data annotation will also be formally enforced by creating a constraint, as long as the database engine supports such a feature.
It’s also worth noting that we used nameof(Country) instead of a mere "Country" literal string: we did that to increase the type safety of our code, thus making it less prone to typing errors.
As we can see by looking at the first line of the preceding source code, in order to use the [ForeignKey] data annotation we have to add a reference to the System.ComponentModel.DataAnnotations.Schema namespace at the beginning of the class in case we didn’t already.
Adding the Cities property to the Country entity class
Let’s now switch to the Country.cs class: once there, add the following right after the end of the Properties region:
// ...existing code...
#region Navigation Properties
/// <summary>
/// A collection of all the cities related to this country.
/// </summary>
public ICollection<City>? Cities { get; set; } = null!;
#endregion
// ...existing code...
That’s it. As we can see, no foreign key properties have been defined for this entity since one-to-many relationships don’t need them from the parent side: therefore, there’s no need to add a [ForeignKey] data annotation and/or its required namespace.
Entity Framework Core loading pattern
Now that we have a Cities property in the Country entity and a corresponding [ForeignKey] data annotation in the City entity, you may be wondering how we can use these navigation properties to load the related entities. To put this another way: how are we going to populate the Cities property within the Country entity whenever we need to?
Such a question gives us the chance to spend a couple of minutes enumerating the three ORM patterns supported by Entity Framework Core to load these kinds of related data:
- Eager loading: The related data is loaded from the database as part of the initial query.
- Explicit loading: The related data is explicitly loaded from the database at a later time.
- Lazy loading: The related data is transparently loaded from the database when the entity navigation property is accessed for the first time. This is the most complex pattern among the three and might suffer some serious performance impacts when not implemented properly.
It’s important to understand that, whenever we want to load an entity’s related data, we need to activate (or implement) one of these patterns. This means that, in our specific scenario, our Country entity’s Cities property will be set to NULL whenever we fetch one or more countries from the database, unless we explicitly tell Entity Framework Core to load the cities as well.
This is a very important aspect to consider when dealing with Web APIs because it will definitely impact how our .NET back-end will serve their JSON structured data responses to our front-end Angular client.
To understand what we mean, let’s take a look at a couple of examples.
The following is a standard Entity Framework Core query that’s used to retrieve Country from a given Id with the EF Core default behavior (no loading pattern defined or implemented):
var country = await _context.Countries
    .FindAsync(id);
return country; // country.Cities is still set to NULL
As we can see, the country variable is returned to the caller with the Cities property set to NULL, simply because we didn’t ask for it: for that very reason, if we convert that variable into a JSON object and return it to the client, the JSON object would contain no cities either.
The following is an Entity Framework Core query that retrieves country from a given id using eager loading:
var country = await _context.Countries
    .Include(c => c.Cities)
    .FindAsync(id);
return country; // country.Cities is (eagerly) loaded
Let’s try to understand what is happening here:
- The
Include()method that was specified at the start of the query tells Entity Framework Core to activate the eager loading data retrieval pattern - As for the new pattern, the EF query will fetch the
countryas well as all of the corresponding cities in a single query - For all of these reasons, the returned
countryvariable will have theCitiesproperty filled with all thecitiesrelated tocountry(that is, theCountryIdvalue will be equal to that country’sidvalue)
For the sake of simplicity, we’re only going to use eager loading through this book, using the Include() method whenever we need it; for additional information regarding lazy loading and explicit loading, we strongly suggest that you take a look at the following URL: https://docs.microsoft.com/en-US/ef/core/querying/related-data.
Defining the database table names
The SQL script generated by EF Core using the Code-First approach, as per its default settings, will create a database table for each entity using the entity’s class name: this basically means that we’re going to have a City table containing all the cities and a Country table for the countries. Although there’s nothing wrong with these names, we might as well change this default setting to create the tables in plural form for consistency reasons: Cities for the cities, Countries for the countries.
To “force” a database table name of our choice for each individual entity, we can add the [Table] data annotation attribute to the entity class in the following way.
For the City entity (the /Data/Models/City.cs file):
[Table("Cities")]
public class City
For the Country entity (the /Data/Models/Country.cs file):
[Table("Countries")]
public class Country
Before going further, let’s perform this simple update to our classes in order to demonstrate how easy it is to achieve additional control over the autogenerated database.
With this, we’re done with the entities, at least for the time being. Now, we just need to get ourselves a DBMS so that we can actually create our database.
Defining indexes
Since we’re going to deal with a dataset featuring tens of thousands of records, it could also be wise to add some indexes to our entities. Such a task can be easily done using the [Index] data annotation attribute in the following way.
For the City entity (the /Data/Models/City.cs file):
[Table("Cities")]
[Index(nameof(Name))]
[Index(nameof(Lat))]
[Index(nameof(Lon))]
public class City
For the Country entity (the /Data/Models/Country.cs file):
[Table("Countries")]
[Index(nameof(Name))]
[Index(nameof(ISO2))]
[Index(nameof(ISO3))]
public class Country
To use the [Index] attribute, we’ll also need to add the following reference in both files:
using Microsoft.EntityFrameworkCore;
When we generate the database using EF Core’s Code-First approach, these property attributes will be used to create SQL indexes for the corresponding table columns—which will greatly improve the performance of any lookup query.
Getting a SQL Server instance
Let’s close this gap once and for all and provide ourselves with a SQL Server instance. As we already mentioned, there are two major routes we can take:
- Install a local SQL Server instance (Express or Developer edition) on our development machine
- Set up a SQL database (and/or server) on Azure using one of the several options available on that platform
The former option embodies the classic, cloudless approach that software and web developers have been using since the dawn of time: a local instance is easy to pull off and will provide everything we’re going to need in development and production environments... as long as we don’t care about data redundancy, heavy infrastructure load and possible performance impacts (in the case of high-traffic websites), scaling, and other bottlenecks due to the fact that our server is a single physical entity.
In Azure, things work in a different way: putting our DBMS there gives us the chance to have our SQL Server workloads running as either a hosted infrastructure (Infrastructure as a Service, also known as IaaS) or a hosted service (Platform as a Service, also known as PaaS): the first option is great if we want to handle the database maintenance tasks by ourselves, such as applying patches and taking backups; the second option is preferable if we want to delegate these operations to Azure. However, regardless of the path we choose, we’re going to have a scalable database service with full redundancy and no single-point-of-failure guarantees, plus a lot of other performance and data security benefits. The downsides, as we can easily guess, are as follows: the additional cost and the fact that we’re going to have our data located elsewhere, which can be a major issue in terms of privacy and data protection in certain scenarios.
In the following section, we’ll quickly summarize how to pull off both of these approaches so that we can make the most convenient choice.
Installing SQL Server 2019
If we want to avoid the cloud and stick to an “old-school” approach, we can choose to install a SQL Server Express (or Developer) on-premises instance on our development (and later, on our production) machine.
To do that, perform the following steps:
- Download the SQL Server 2019 on-premises installation package (we’re going to use the Windows build here, but the Linux installer is also available) from the following URL: https://www.microsoft.com/en-us/sql-server/sql-server-downloads.
- Double-click on the executable file to start the installation process. When prompted for the installation type, select the BASIC option (unless we need to configure some advanced options to accommodate specific needs, provided that we know what we’re doing).
The installation package will then start downloading the required files. When it’s done, we’ll just have to click New SQL Server stand-alone installation (the first available option starting from the top, as shown in the following screenshot) to start the actual installation process:

Figure 5.12: Installing SQL Server 2019
Accept the license terms and go ahead, keeping all of the default options and performing the required operations (such as opening the Windows Firewall) when asked to.
If we want to keep our disk space consumption to a minimum amount, we can safely remove the SQL Replication and Machine Learning services from the Feature Selection section and save roughly 500 MB.
Set the Instance Name to SQLExpress and the Instance ID to SQLEXPRESS. Remember that choice: we’re going to need it when we have to write down our connection string.
When we’re asked to choose an Authentication Mode (as we can see in the following screenshot), choose one of the following options:
- Windows authentication mode, if we want to be able to have unrestricted access to the database engine only from the local machine (using our Windows credentials)
- Mixed Mode, to enable the SQL Server system administrator (the
sauser) and set a password for it
These two options can be seen in the following screenshot:

Figure 5.13: Server configuration
The former option is great for security, while the latter is much more versatile—especially if we’re going to administer the SQL server remotely using the SQL Server built-in administrative interface, which is the tool we’re going to use to create our database.
Those who need a more comprehensive guide to perform the SQL Server local instance installation can take a look at the following tutorials:
- Installing SQL Server on Windows: https://docs.microsoft.com/en-US/sql/database-engine/install-windows/installation-for-sql-server
- Installing SQL Server on Linux: https://docs.microsoft.com/en-US/sql/linux/sql-server-linux-setup
After the SQL Server installation is complete, we can immediately connect to the newly installed instance using one of the following free-to-use management tools:
Both are software applications that allow connecting to a SQL Server database and managing its contents (tables, users, agents, and so on), as well as performing queries and scripts. SSMS is only available for Windows and has a lot of features that can be performed using the GUI, while ADS embraces a portable, multiplatform, and lightweight design and provides a rather minimal interface that just allows performing SQL queries (at least for now).
For the purpose of this book we’re going to use SQL Server Management Studio, since it allows a more graceful learning curve for SQL novices; however, Azure Data Studio might be a great alternative for seasoned SQL developers who prefer to avoid the GUI-based approach and perform everything through SQL queries and scripts.
Installing the DB Management tool(s)
SQL Server Management Studio can be installed through the SQL Server installation wizard’s additional components (the SQL Server Management tools section) or downloaded as a standalone package from the following URL:
https://docs.microsoft.com/en-us/sql/ssms/download-sql-server-management-studio-ssms
Azure Data Studio can be downloaded from the following URL:
https://docs.microsoft.com/en-us/sql/azure-data-studio/download-azure-data-studio
Before using these tools to connect to our database, we’re going to spend some valuable time talking about the Azure path.
Creating a SQL Database on Azure
If you want to get over the DBMS local instances and embrace the cloudful Azure route, our to-do list entirely depends on which of the main approaches provided by the Azure platform we’re going to choose from. The three main options available to end users are, from the least to most expensive, a SQL database, a SQL Managed Instance, and a SQL virtual machine. We’ll go through each in turn.
SQL Database
This is a fully managed SQL Database engine based on SQL Server Enterprise edition. This option allows us to set up and manage one or more single relational databases hosted in the Azure cloud with a PaaS usage and billing model: more specifically, we can define it as a Database-as-a-Service (DBaaS) approach. This option provides built-in high availability, intelligence, and management, which means it’s great for those who want a versatile solution without the hassle of having to configure, manage, and pay for a whole server host.
SQL Managed Instance
This is a dedicated SQL Managed Instance on Azure. It is a scalable database service that provides near 100% compatibility with a standard SQL Server instance and features an IaaS usage and billing model. This option provides all of the same PaaS benefits as the previous one (SQL Database) but adds some additional features and capabilities, such as linked servers, service brokers, database mail, full Azure Virtual Network support, multiple databases with shared resources, and so on.
SQL virtual machine
This is a fully managed SQL Server consisting of a Windows or Linux virtual machine with a SQL Server instance installed on top of it. This approach, which also adopts an IaaS usage and billing model, offers full administrative control over the whole SQL Server instance and the underlying OS, hence being the most complex and customizable one. The most significant difference from the other two options (SQL Database and SQL Managed Instance) is that SQL Server virtual machines also allow full control over the database engine: we can choose when to start maintenance/patching, change the recovery model, pause/start the service, and so on.
Making a choice
All of these options are good and, although very different in terms of overall costs, can be activated free of charge: SQL Database is arguably the cheapest one because it’s free for 12 months, thanks to the trial subscription plan offered by Azure, as long as we keep its size under 250 GB; both SQL Managed Instance and SQL Virtual Machine are rather expensive, since they both provide a virtualized IaaS, but they can be activated for free (at least for a few weeks) with the €200 provided by that same Azure trial subscription plan.
For more information regarding the pros and cons of the Azure options described in the previous sections, we strongly suggest that you read the following guide: https://docs.microsoft.com/en-US/azure/sql-database/sql-database-paas-vs-sql-server-iaas.
In the following sections, we’re going to learn how to set up a SQL database since it is the less expensive approach in the long term: the only downside is that we’ll have to keep its size under 250 GB... which is definitely not an issue, considering that our world cities data source file is less than 1 GB in size.
If you want to opt for an Azure SQL Managed Instance (option #2), here’s a great guide explaining how to do that: https://docs.microsoft.com/en-us/azure/sql-database/sql-database-managed-instance-get-started.
If you wish to set up SQL Server installed on a virtual machine (option #3), here’s a tutorial covering that topic: https://docs.microsoft.com/en-US/azure/virtual-machines/windows/sql/quickstart-sql-vm-create-portal.
Setting up a SQL Database
Let’s start by visiting the following URL: https://azure.microsoft.com/en-us/free/services/sql-database/.
This will bring us to the following web page, which allows us to create an Azure SQL database instance:

Figure 5.14: Creating a new Azure free account
Click the Start free button and create a new account.
If you already have a valid MS account, you can definitely use it; however, you should only do that if you’re sure that you want to use the free Azure trial on it: if that’s not the case, consider creating a new one.
After a brief registration form (and/or login phase), we’ll be redirected to the Azure portal.
It goes without saying that if the account we’ve logged in with has already used up its free period or has an active paid subscription plan, we’ll be gracefully bounced back:

Figure 5.15: View for users who aren’t new
Eventually, after we’ve sorted everything out, we should be able to access the Azure portal (https://portal.azure.com) in all of its glory:

Figure 5.16: The Azure portal
Once there, do the following:
- Click the Create a resource button to access the Azure Marketplace.
- Search for an entry called Azure SQL.
- Click Create to access the selection page shown in the following screenshot:
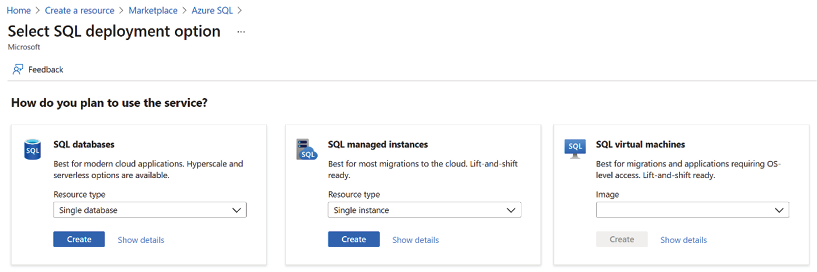
Figure 5.17: Selecting an SQL deployment option
From the preceding selection screen, do the following:
- Select the first option (SQL databases)
- Set the Resource type drop-down list to Single database
- Click the Create button to start the main setup wizard
During this process, we’ll also be asked to create our very first Azure tenant (unless we already have one). This is a virtual organization that owns and manages a specific set of Microsoft cloud services. Tenants are identified by unique URLs in the following format: <TenantName>.onmicrosoft.com. Just give it a suitable name and go ahead.
Configuring the instance
As soon as we click the Create button, we’ll be asked to configure our SQL Database with a wizard-like interface split into the following tabs:
- Basics: Subscription type, instance name, admin username and password, and so on
- Networking: Network connectivity method and firewall rules
- Security: Security settings
- Additional settings: Collation and time zone
- Tags: A set of name/value pairs that can be applied to logically organize Azure resources into functional categories or groups sharing a common scope (such as Production and Test)
- Review + create: Review and confirm all of the preceding settings
In the Basics tab, we have to insert the database details, such as the database name—which will also be the prefix of the database URL, in the <NAME>.database.windows.net format—and the server we would like to use. If this is our first time coming here, we’re not going to have any available servers. Due to this, we’ll have to create our first one by clicking on the Create new link and filling in the pop-over form that will slide to the rightmost side of the screen. Be sure to set a non-trivial Server admin login (we will use WorldCitiesAdmin in our screenshots) and a complex Password.
It’s important to understand that the Server admin login is not the account that will be used by our web application to access the WorldCities database: we’ll create a dedicated user (with fewer rights) for that. The Server admin login is the global administrator account of the whole Azure SQL Database service instance: we will mostly use it to perform high-level administrative tasks, such as creating the WorldCities database, adding the web application’s dedicated user, and so on.
The following screenshot shows an example of how to configure this part of the wizard:
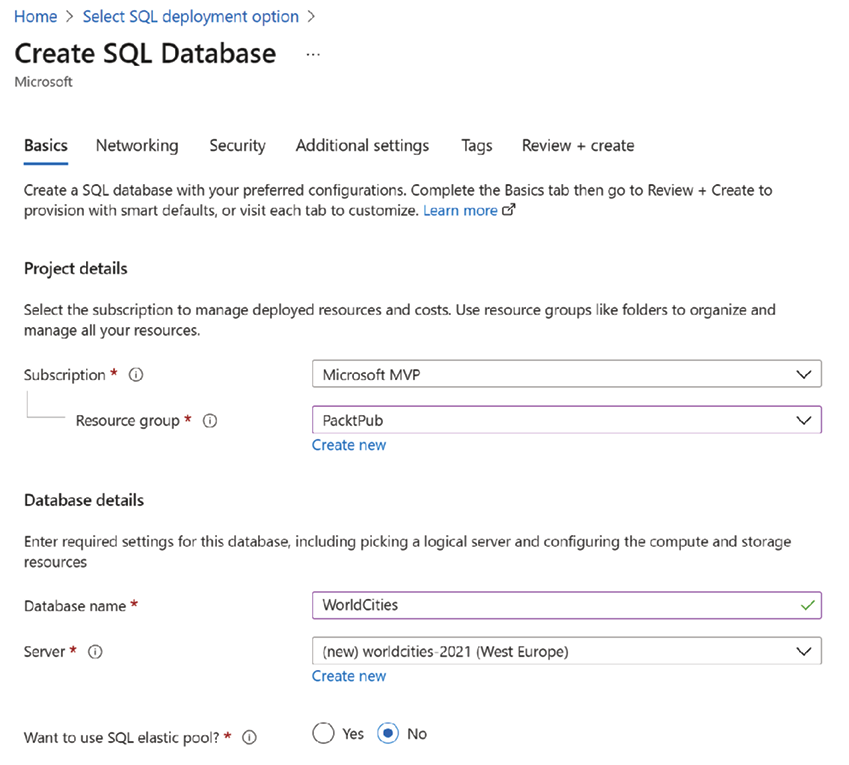
Figure 5.18: Configuring our SQL database
The last two options in the Basics tab will ask us for the Compute + storage type and Backup storage redundancy: for this specific project, we can definitely choose the minimum possible tier—a locally redundant Basic storage type with 2 GB maximum space (see the following screenshot):

Figure 5.19: Choosing the compute and storage type
However, if we’re feeling bold, we can go for a Standard type with 250 GB storage instead since it would still be free for 12 months.
In the Networking tab, be sure to choose a Public endpoint to enable external access from the internet so that we’ll be able to connect to our database from all of our environments. We should also set both the firewall rules to Yes to allow Azure services and resources to access the server and add our current IP address to the allowed IPs whitelist.
Wait a minute: isn’t that a major security issue? What if our databases contain personal or sensitive data?
As a matter of fact, it is: allowing public access from the internet is something we should always avoid unless we’re playing with open data for testing, demonstrative, or tutorial purposes... which is precisely what we’re doing right now.
The Additional settings and Tags tabs are OK with their default settings: we should only change them if we need to alter some options (such as the collation and the time zone that is most suitable for our language and country) or to activate specific stuff such as the advanced data security—which is completely unnecessary for our current needs.
In the Review + create tab, we’ll have our last chance to review and change our settings (as shown in the following screenshot):
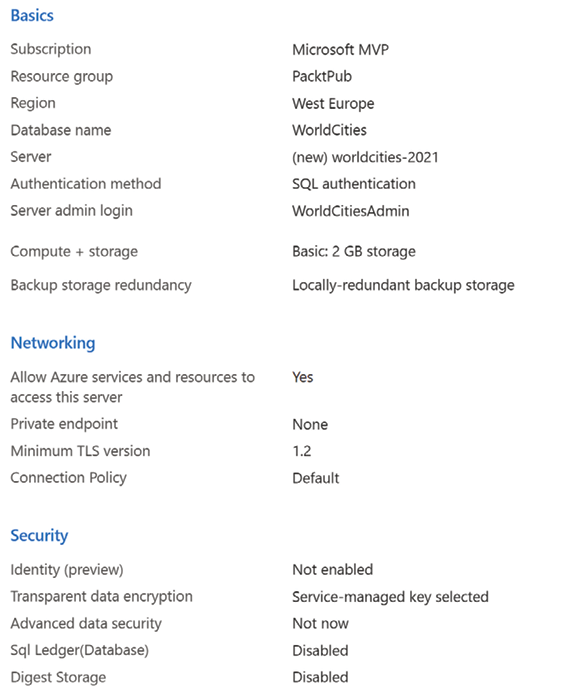
Figure 5.20: Reviewing our chosen settings
If we’re not sure about them, we have the chance to go back and change them. When we’re 100% sure, we can hit the Create button and have our SQL database deployed in a few seconds.
It’s worth noting that we can also download a template for automation in case we want to save these settings to create additional SQL databases in the future.
That’s it: now, we can focus on configuring our database.
Configuring the database
Regardless of the path we take—a local instance or Azure—we should be ready to manage our newly created Azure SQL database.
The most practical way to do that is to connect to it using one of the two free SQL Server Management GUIs provided by Microsoft that we talked about early on: SQL Server Management Studio and Azure Data Studio. If you haven’t installed it yet, now is the time to do that.
We’re going to use SQL Server Management Studio in the following examples and screenshots, as well as through the rest of the book.
Once the tool is installed, launch it: from the main dashboard, click on the New Connection link, then fill out the form with your SQL Database data as shown in the following screenshot:
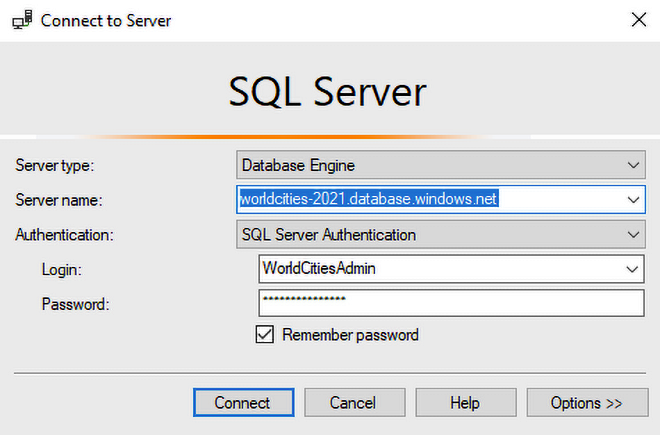
Figure 5.21: Connecting to the SQL Server
More specifically, we need to use the Server name, Login, and Password chosen when we installed our local SQL Server instance or created the SQL database on Azure.
As we can see by looking at the URL that we wrote in the Server field, in the preceding screenshot we’re connecting to a typical Azure SQL Database instance: in order to connect to a locally installed SQL Server, we would use localhostSQLEXPRESS, 127.0.0.1SQLEXPRESS, or something like that, depending on the instance name that we’ve chosen during the installation process.
By clicking the Connect button, we should be able to log in to our database server. As soon as SSMS connects to the SQL Database server, an Object Explorer window will appear, containing a tree view representing the structure of our SQL Server instance. This is the interface we’ll use to create our database, as well as the user/password that our application will use to access it.
Creating the WorldCities database
If we took the Azure SQL Database route, we should already be able to see the WorldCities database in the Databases folder of the Object Explorer tree to the left:
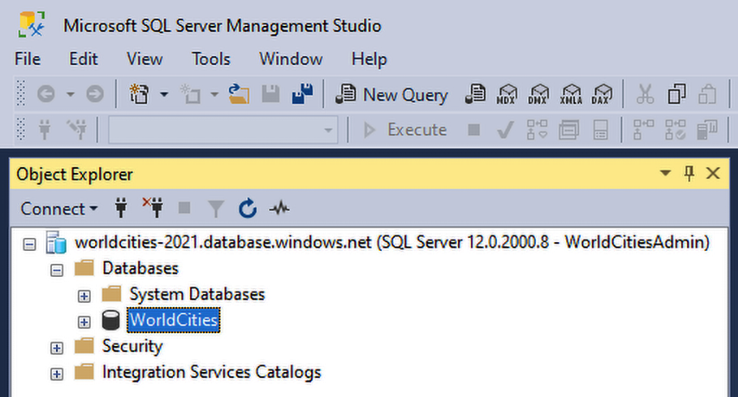
Figure 5.22: Inspecting the WorldCities folder in the Object Explorer
Alternatively, if we installed our local SQL Server Express or Developer instance, we’ll have to manually create it by doing the following:
- Right-click on the Databases folder
- Choose Add Database from the contextual menu
- Type in the WorldCities name, then click on OK to create it
Once the database has been created, we’ll get the chance to expand its tree node by clicking on the plus (+) sign to the left and visually interacting with all its child objects—tables, stored procedures, users, and so on—through the SSMS GUI. It goes without saying that if we do that now, we would find no tables because we haven’t created them yet: that’s something that Entity Framework Core will do for us later on. However, before doing that, we’re going to add a login account to make our web application able to connect.
Adding the WorldCities login
The database’s security settings can be configured using two different approaches:
- Using the SSMS GUI, which is only available when the database is hosted on a local (or remote) SQL Server instance, such as SQL Server Express or Developer
- Using raw SQL commands, which is always available—as well as the only available option if we created our SQL database on MS Azure (or if we’re using Azure Data Studio instead of SSMS)
Let’s start with the first option, which allows us to add and configure login accounts without writing a single line of SQL code.
Using the SSMS GUI
From the SSMS Object Explorer, go back to the top root folder and expand the Security folder, which should be just below it. Once there, do the following:
- Right-click on the
Loginssubfolder and choose New Login - In the modal window that appears, set the login name to
WorldCities - From the radio button list below the login name, select SQL Server Authentication and set a suitable password with decent strength (such as MyVeryOwn$721—we’re going to use this one for the code samples and screenshots from now on)
- Be sure to disable the User must change the password at next login option (which is checked by default); otherwise, Entity Framework Core will be unable to perform the login later on
- Set the user’s default database to
WorldCities - Review all of the options, then click on OK to create the
WorldCitiesaccount
If we want a simpler password, such as WorldCities or Password, we might have to disable the enforce password policy option. However, we strongly advise against doing that: choosing a weak password is never a wise choice, especially if we do that in a production-ready environment. We suggest that you always use a strong password, even in testing and development environments. Just be sure not to forget it, as we’re going to need it later on.
Using raw SQL commands
If we’re dealing with a SQL database hosted on MS Azure, we’re using Azure Data Studio, or we prefer to use raw SQL, here’s the script that will create the above user:
CREATE LOGIN WorldCities
   WITH PASSWORD = 'MyVeryOwn$721'
GO
If we want to relax the password policy, we can add the CHECK_POLICY = OFF option to the above query; however, we strongly advise against doing this for the security reasons explained early on.
Mapping the login to the database
The next thing we need to do is properly map this login to the WorldCities database we added earlier.
Here’s how to do that using the SSMS GUI:
- Double-click the
WorldCitieslogin name from theSecurityfolder to open the same model we used just a few seconds ago. - From the navigation menu to the left, switch to the User Mapping tab.
- Click on the checkbox to the left of the
WorldCitiesdatabase: the User cell should be automatically filled with theWorldCitiesvalue. If it doesn’t, we’ll need to manually typeWorldCitiesinto it. - In the Database role membership for box in the bottom-right panel, assign the
db_ownermembership role.
All of the preceding steps are depicted in the following screenshot:

Figure 5.23: Mapping the login to the WorldCities database
Again, if we need (or prefer) to use raw SQL commands, here’s the script to use (be sure to switch to the WorldCities database before launching it):
CREATE USER WorldCities
   FOR LOGIN WorldCities
   WITH DEFAULT_SCHEMA = dbo
GO
EXEC sp_addrolemember N'db_owner', N'WorldCities'
GO
That’s it! Now, we can go back to our web application project, add the connection string, and create our tables (and data) using the Entity Framework Code-First approach.
Creating the database using Code-First
Before going further, let’s do a quick checklist:
- Are we done with our entities? Yes
- Do we have a DBMS and a
WorldCitiesdatabase available? Yes - Have we gone through all of the required steps we need to complete to actually create and fill in the aforementioned database using Code-First? No
As a matter of fact, we need to take care of two more things:
- Set up an appropriate Database Context
- Enable Code-First Data Migrations support within our project
Within the following sections, we’re going to fill all of these gaps and eventually fill our WorldCities database.
Setting up the DbContext
To interact with data as objects/entity classes, Entity Framework Core uses the Microsoft.EntityFrameworkCore.DbContext class, also called DbContext or simply Context. This class is in charge of all of the entity objects during runtime, including populating them with data from the database, keeping track of changes, and persisting them to the database during CRUD operations.
We can easily create our very own DbContext class for our project—which we will call ApplicationDbContext—by doing the following:
- From Solution Explorer, right-click on the
/Data/folder we created a while ago and add a newApplicationDbContext.csclass file - Fill it with the following code:
using Microsoft.EntityFrameworkCore;
using WorldCitiesAPI.Data.Models;
namespace WorldCitiesAPI.Data
{
    public class ApplicationDbContext : DbContext
    {
        public ApplicationDbContext() : base()
        {
        }
        public ApplicationDbContext(DbContextOptions options)
         : base(options)
        {
        }
        public DbSet<City> Cities => Set<City>();
        public DbSet<Country> Countries => Set<Country>();
    }
}
As we can see, we took the chance to add a DbSet<T> property for each of our entities so that we can easily access them later on.
Entity type configuration methods
Since we chose to adopt the Code-First data modeling approach, we need to make sure that our entities are properly configured from within the code, so that the SQL scripts generated by Entity Framework Core will create the database using the names, database types, definitions, and rules that we want.
EF Core provides three available methods for configuring various aspects of your model:
- Data Annotations, through attributes applied directly on the entity types
- Fluent API (also known as ModelBuilder API), via custom rules applied by overriding the
OnModelCreatingmethod inDbContext - EntityTypeConfiguration classes, via custom rules applied to separate configuration classes referenced in the
DbContextOnModelCreatingoverride method (by all means an alternative take on the Fluent API approach)
All of them are viable enough for most scenarios: however, in a real project, it is highly advisable to avoid mixing them and just pick one for the sake of consistency.
Let’s briefly review all of them before choosing our pick.
Data Annotations
Data Annotations are dedicated attributes that can be applied to entity classes and properties to override the default Code-First conventions and/or to define new rules. The major advantage of Data Annotations is that they allow the developer to manage the data definition within the class code, which is great for code readability and maintainability.
As a matter of fact, we already used Data Annotations in our existing entity classes when we added the [Key], [Required], and [ForeignKey] attributes to their database-relevant properties. This means that, if we want to switch to another configuration method, we’ll need to perform some minor refactoring on our code.
Data Annotations are great for applying simple configuration changes, which often makes them ideal for small projects; however, they don’t support the whole set of configuration options made available by EF Core. Whenever we need to gain more control over our entity type settings, we might easily feel the urge to switch to a more powerful method.
Fluent API
In order to use the Fluent API, we need to override the OnModelCreating method in our derived context and use the ModelBuilder API to configure our model.
A great way to understand how we can use the Fluent API might be to see how we can convert our existing Data Annotations into ModelBuilder settings. Here’s how we can do that:
[...]
protected override void OnModelCreating(ModelBuilder modelBuilder)
{
    base.OnModelCreating(modelBuilder);
    modelBuilder.Entity<City>().ToTable("Cities");
    modelBuilder.Entity<City>()
        .HasKey(x => x.Id);
    modelBuilder.Entity<City>()
        .Property(x => x.Id).IsRequired();
    modelBuilder.Entity<City>()
        .Property(x => x.Lat).HasColumnType("decimal(7,4)");
    modelBuilder.Entity<City>()
        .Property(x => x.Lon).HasColumnType("decimal(7,4)");
    modelBuilder.Entity<Country>().ToTable("Countries");
    modelBuilder.Entity<Country>()
        .HasKey(x => x.Id);
    modelBuilder.Entity<Country>()
        .Property(x => x.Id).IsRequired();
    modelBuilder.Entity<City>()
        .HasOne(x => x.Country)
        .WithMany(y => y.Cities)
        .HasForeignKey(x => x.CountryId);
}
[...]
The preceding override method should be added to the ApplicationDbContext class right after the constructors: refer to the source code in the GitHub repository for details.
As we can see, for each data annotation that we’ve used so far there’s a corresponding Fluent API method: ToTable() for [Table], HasKey() for [Key], IsRequired() for [Required], and so on.
The major advantage of the Fluent API is that such a method allows us to specify the entity configuration without modifying our entity classes; furthermore, Fluent API configurations have the highest precedence, meaning that they will override any existing EF Core convention and/or data annotation applied to entity classes and properties.
Their only real downside is that, despite being “fluid,” they are quite verbose; in big projects and/or complex entity configuration scenarios, which is also when they really shine, the amount of code they require easily increases a lot as the required settings pile up, thus making the DbContext source code quite hard to read and maintain.
EntityTypeConfiguration classes
EntityTypeConfiguration classes are a pivotal aspect of an advanced coding pattern that aims to overcome the major issue of the Fluent API while retaining all their advantages.
In a nutshell, this technique leverages the ApplyConfigurationsFromAssembly Fluent API method, which allows the definition of external rules within separate configuration files, thus removing the need to stack up all of them within DbContext's OnModelCreating override method, and reduces the required amount of code to a single line.
Again, the best way to understand how this method works is to explain how we could convert our existing data annotation rules into configuration classes.
This time, we would need to create two additional files. The first one would be called /Data/Models/CityEntityTypeConfiguration.cs:
using Microsoft.EntityFrameworkCore;
using Microsoft.EntityFrameworkCore.Metadata.Builders;
namespace WorldCitiesAPI.Data.Models
{
    public class CityEntityTypeConfiguration
        : IEntityTypeConfiguration<City>
    {
        public void Configure(EntityTypeBuilder<City> builder)
        {
            builder.ToTable("Cities");
            builder.HasKey(x => x.Id);
            builder.Property(x => x.Id).IsRequired();
            builder
                .HasOne(x => x.Country)
                .WithMany(x => x.Cities)
                .HasForeignKey(x => x.CountryId);
            builder.Property(x => x.Lat).HasColumnType("decimal(7,4)");
            builder.Property(x => x.Lon).HasColumnType("decimal(7,4)");
        }
    }
}
And the second one would be called /Data/Models/CountryEntityTypeConfiguration.cs:
using Microsoft.EntityFrameworkCore;
using Microsoft.EntityFrameworkCore.Metadata.Builders;
namespace WorldCitiesAPI.Data.Models
{
    public class CountryEntityTypeConfiguration
        : IEntityTypeConfiguration<Country>
    {
        public void Configure(EntityTypeBuilder<Country> builder)
        {
            builder.ToTable("Countries");
            builder.HasKey(x => x.Id);
            builder.Property(x => x.Id).IsRequired();
        }
    }
}
Adding these configuration classes to our ApplicationDbContext would be as easy as adding this single line within the OnModelCreating method, which we added early on:
protected override void OnModelCreating(ModelBuilder modelBuilder)
{
    base.OnModelCreating(modelBuilder);
    // add the EntityTypeConfiguration classes
    modelBuilder.ApplyConfigurationsFromAssembly(
        typeof(ApplicationDbContext).Assembly
        );
}
Not bad, right?
Making a choice
Now that we’ve explored the three alternative ways to configure our entities offered by EF Core, we need to choose which one we use from now on.
It goes without saying that the EntityTypeConfiguration classes method is easily the most preferred approach for large projects because it gives us the chance to organize our settings in a consistent, structured, and readable way: however, since we’ll be dealing with very simple database models that will require a minimal number of configuration settings throughout this book, we’ll keep using the data annotation approach.
The basic implementation of the other two methods that we’ve discussed in this section early on is also available in this chapter’s source code in the GitHub repository, so that readers who want to adopt a different approach can still review them. Both the ApplicationDbContext's OnModelCreating method and the EntityTypeConfiguration classes have been documented with a <summary> explaining that this code is a redundant override of the data annotation rules and meant for educational purposes only: such redundant code will be removed in Chapter 6, Fetching and Displaying Data, and in the subsequent chapters, which will only feature the Data Annotations.
Database initialization strategies
Creating the database for the first time isn’t the only thing we need to worry about; for example, how can we keep track of the changes that will definitely occur for our data model?
In previous, non-core versions of EF (up to 6.x), we could choose one of the database management patterns (known as database initializers or DbInitializers) offered by the Code-First approach, that is, by picking the appropriate database initialization strategy for our specific needs, out of:
CreateDatabaseIfNotExistsDropCreateDatabaseIfModelChangesDropCreateDatabaseAlwaysMigrateDatabaseToLatestVersion
Additionally, should we need to address specific requirements, we can also set up our own custom initializer by extending one of the preceding ones and overriding their core methods.
The major flaw of DbInitializers was them not being immediate and streamlined enough for the average developer. They were viable yet difficult to handle without extensive knowledge of Entity Framework’s logic.
In Entity Framework Core, this pattern has been greatly simplified; there are no DbInitializers, and automatic data migrations have also been removed. The database initialization aspect is now entirely handled through PowerShell commands, with the sole exception of a small set of commands that can be placed directly on the DbContext implementation constructor to partially automatize the process; they are as follows:
Database.EnsureCreated()Database.EnsureDeleted()Database.Migrate()
There’s currently no way to create data migrations programmatically; they must be added via PowerShell, as we will see shortly.
Updating the appsettings.json file
From Solution Explorer, open the appsettings.json file and add a new "ConnectionStrings" JSON key section right below the "Logging" one with the following value (new lines are highlighted):
{
  "Logging": {
    "LogLevel": {
      "Default": "Warning"
    }
  },
  "AllowedHosts": "*",
  "ConnectionStrings": {
    "DefaultConnection": "Server=localhost\SQLEXPRESS;
    Database=WorldCities;
    User Id=WorldCities;Password=MyVeryOwn$721;
    Integrated Security=False;MultipleActiveResultSets=True;TrustServerCertificate=True"
  }
}
Unfortunately, JSON doesn’t support LF/CR, so we’ll need to put the DefaultConnection value on a single line. If you copy and paste the preceding text, ensure that Visual Studio doesn’t automatically add additional double quotes and/or escape characters to these lines; otherwise, your connection string won’t work.
This is the connection string we’ll be referencing in our project’s Program.cs file later on.
IMPORTANT: As we can see, now our appsettings.json file contains our database User Id and Password in clear text, thus posing a non-trivial security issue. While this file currently resides solely on our development machine, it is possible that sooner or later it will be “accidentally” shared or published elsewhere, for example in a GitHub repository. For that very reason, do not check-in your project until you’ve read the next paragraph.
Securing the connection string
Being able to securely store the database password and API keys in web applications while maintaining full efficiency in terms of debugging and testing has always been a challenge for all developers.
Back in the ASP.NET pre-Core days, most ASP.NET developers used to store them in the <connectionStrings> and/or <appSettings> sections of their project’s Web.config file in the following way:
<connectionStrings>
  <add name="DefaultConnection" connectionString="[MY CONNECTION STRING]"/>
</connectionStrings>
<appSettings>
  <add key="Google_ApiKey" value="[MY API KEY]"/>
  <add key="Facebook_Secret" value="[MY FB SECRET]"/>
</appSettings>
This practice is still in use nowadays, with the Web.config file being replaced by the appsettings.json file.
In terms of pure functionality, this behavior works very well, because when we launch our web applications, they will automatically fetch the required credentials whenever they need them even if we run them in Debug mode, just like they would do in a production environment.
This practice has always been very convenient because it also leverages the fact that ASP.NET allows us to define multiple files for different environments. More specifically:
- The Web.config approach can rely on multiple configuration files (
Web.Debug.config,Web.Release.config, and so on) that could be easily “merged” during the publishing phase using a highly configurable XSD transformation feature - The appsettings.json approach supports multiple configuration files as well (
appsettings.Development.json,appsettings.Production.json, and so on) that can be used to add or override the default settings for specific runtime environments using a cascade logic
Unfortunately, none of these places are safe or secure: if we get used to putting our valuable credentials in those plain text files, there’s a high risk that we’ll end up “accidentally” pushing them in a GitHub repository, with all the other developers being able to see and use them. For that very reason, such a habit is widely considered a bad practice and—if we’re still using it—we should definitely take the chance to get rid of it and start to handle our valuable secrets in a much better (and safer) way.
The question is: how we can do that without losing the effectiveness provided by the “good old” (and insecure) approach?
Introducing Secrets Storage
Starting with .NET Core 2.x and Visual Studio 2019, Microsoft provided their developers with a new feature that can be used to store any secret (database passwords, API keys, and so on) in a secure and effective way: this feature is called Secrets Storage and is well documented in Microsoft’s Safe storage of app secrets in development in ASP.NET Core official guide, available at the following URL: https://docs.microsoft.com/en-us/aspnet/core/security/app-secrets.
In a nutshell, the new feature creates a secrets.json file in the development machine’s user folder (in a typical Windows environment, the UsersUserNameAppDataRoamingMicrosoftUserSecrets directory), which can be used to add to or override elements of the standard appsettings.json files using the same syntax they already have.
This is good for a number of reasons, including:
- The
secrets.jsonfile cannot be accessed by remote users, such as those who could get the project from a GitHub repository, because it will be created in a local folder - The
secrets.jsonfile cannot be accessed by local users, because it will be created in the developer’s very own personal folder (which is inaccessible to other local users) - The
secrets.jsonfile will work right out of the box, basically extending theappsettings.jsonfile without forcing us to write any secrets there
This feature is a great alternative to the environment variables approach, which is another workaround suggested by Microsoft in the preceding guide that I personally don’t like as much (at least for development environments) because it is much less flexible and straightforward.
Now that we’ve chosen our path, let’s see how we can implement it.
Adding the secrets.json file
Among the greatest aspects of the Secrets Storage feature is the fact that it can be used from within the Visual Studio GUI, which is arguably the best way to do it.
All we need to do is to right-click the project’s root folder from Solution Explorer and select the Manage User Secrets options, as shown in the following screenshot:

Figure 5.24: Adding the secrets.json file
As soon as we select that option, Visual Studio will add a UserSecretsId element within a PropertyGroup of the project’s .csproj file, assigning a random GUID value to it:
  <PropertyGroup>
    [...]
    <UserSecretsId>9430de8f-8575-4a47-9d22-a98e491af64c</UserSecretsId>
  </PropertyGroup>
Such a random UserSecretsId value is then used by Visual Studio to generate an empty secrets.json file in the following folder:
UsersUserNameAppDataRoamingMicrosoftUserSecrets
Right after that, Visual Studio will open that secrets.json file within the GUI in edit mode, so that we can use it to store our secrets.
Sharing the secrets.json file between multiple projects
By default, the inner text of UserSecretsId is a randomly generated GUID; however, this value is arbitrary and can be changed: using a (random) unique identifier will prevent different projects from having the same secrets.json file; at the same time, choosing the same identifier can be useful if we want to “share” the same secrets between multiple projects.
In this book’s GitHub repository, we’ve taken advantage of this behavior by defining an arbitrary UserSecretsId for each different project—one for HealthCheckAPI, another one for WorldCitiesAPI, and so on—and “recycling” it through all the instances of these projects within the various chapters’ folders. For example, here’s the UserSecretsId value that we’ve used for all the instances of the current project:
<UserSecretsId>WorldCitiesAPI</UserSecretsId>
In order to manually set that value, we can use the Edit Project File option available from the Visual Studio GUI, which is accessible by right-clicking on Solutions Explorer’s project root folder:
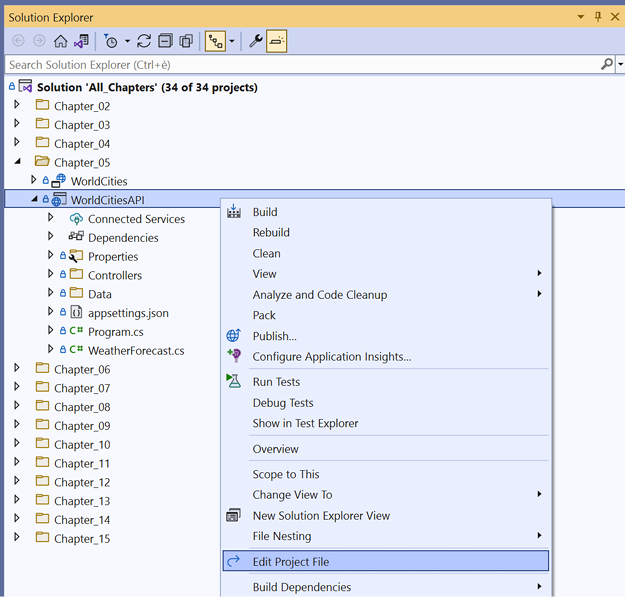
Figure 5.25: Manually setting the UserSecretsId value
Alternatively, we can also edit the WorldCities.csproj file in the project’s root folder using a text editor of our choice (including the Windows Notepad) and find the relevant line/value to change.
Working with the secrets.json file
Now that we’ve created our secrets.json file, let’s use it: open the appsettings.json file and cut out the whole ConnectionStrings block:
{
  "Logging": {
    "LogLevel": {
      "Default": "Warning"
    }
  },
  "AllowedHosts": "*"
}
And paste it within the secrets.json file in the following way:
{
  "ConnectionStrings": {
    "DefaultConnection": "Server=localhost\SQLEXPRESS;
    Database=WorldCities;
    User Id=WorldCities;Password=MyVeryOwn$721;
    Integrated Security=False;MultipleActiveResultSets=True;TrustServerCertificate=True"
  }
}
NOTE: The "DefaultConnection" value must be specified over a single line, otherwise it won’t work.
That’s basically it: the JSON keys defined in the secrets.json file will be added to those already present in the appsettings.json file (replacing them if already present) in a seamless and transparent way, without us having to do anything else.
In the next section, we’ll get a good chance to make use of such a handy feature.
Creating the database
Now that we have set up our own DbContext and defined a valid connection string pointing to our WorldCities database, we can easily add the initial migration and create our database.
Updating Program.cs
The first thing we have to do is add the EntityFramework support and our ApplicationDbContext implementation to our application startup class. Open the Program.cs file and add the following new lines right below the last service (it should be SwaggerGen):
// ...existing code...
builder.Services.AddSwaggerGen();
// Add ApplicationDbContext and SQL Server support
builder.Services.AddDbContext<ApplicationDbContext>(options =>
    options.UseSqlServer(
        builder.Configuration.GetConnectionString("DefaultConnection")
        )
);
// ...existing code...
The new code will also require the following namespace references:
using Microsoft.EntityFrameworkCore;
using WorldCitiesAPI.Data;
As we can see, we’ve used the GetConnectionString("DefaultConnection") extension method—provided by the IConfiguration interface—which can be used to retrieve the ConnectionStrings:DefaultConnection JSON key from the appsettings.json file.
However, in our specific scenario, this value will be fetched from the secrets.json file, since we moved the whole ConnectionStrings block there a short while ago.
The GetConnectionString("DefaultConnection") method is basically a shortcut for the Configuration["ConnectionStrings:DefaultConnection"] command: both of them will return the same JSON key value, as long as those keys exist, from the appsettings.json and/or secrets.json files.
Adding the initial migration
To add the initial migration we can either use the dotnet CLI (from the command line) or the Package Manager Console (from within the Visual Studio GUI).
Based on reader feedback, if your development environment went through a number of .NET Core SDK subsequent updates, the Package Manager Console might pick the wrong tooling and fail. With that in mind, I suggest trying the CLI first, then switching to the Package Manager Console in case of issues: if both approaches fail, it might be advisable to uninstall some of the old .NET Core SDKs and try again.
Using the dotnet CLI
Open PowerShell Command Prompt and navigate through the project’s root folder, which is as follows in our example:
C:ThisBookChapter_05WorldCitiesWorldCitiesAPI
Once there, type the following command to globally install the dotnet-ef command-line tool:
dotnet tool install --global dotnet-ef
Wait until the installation is complete. When we receive the green message output, type in the following command to add the first migration:
dotnet ef migrations add "Initial" -o "Data/Migrations"
The optional -o parameter can be used to change the location where the migration code-generated files will be created; if we don’t specify it, a root-level /Migrations/ folder will be created and used by default. Since we put all of the EntityFrameworkCore classes into the /Data/ folder, it’s advisable to store migrations there as well.
The preceding command will produce the following output:

Figure 5.26: Command-line output after adding the first migration
If we see a “green” light, it means that everything went OK: the initial migration has been set up and we’re ready to apply it.
If we go back to Visual Studio and take a look at our project’s Solution Explorer, we will see that there’s a new /Data/Migrations/ folder containing a bunch of code-generated files. Those files contain the actual low-level SQL commands that will be used by Entity Framework Core to create and/or update the database schema.
Updating the Database
Applying a data migration basically means creating (or updating) the database in order to synchronize its contents (tables structure, constraints, and so on) with the rules that are defined by the overall patterns and definitions within the DbContext, and by the Data Annotations within the various Entity classes. More specifically, the first data migration creates the whole database from scratch, while the subsequent ones will update it (creating tables, adding/modifying/removing table fields, and so on).
In our specific scenario, we’re about to execute our first migration. Here’s the one-liner we need to type from the command line (within the project root folder, just like before) to do that:
dotnet ef database update
Once we hit Enter, a bunch of SQL statements will fill the output of our command-line terminal window. When done, if everything is looking good, we can go back to the SSMS tool, refresh the Server Object Explorer tree view, and verify that the WorldCities database has been created, along with all of the relevant tables:

Figure 5.27: Checking the Object Explorer
The “No executable found matching command dotnet-ef” error
At the time of writing, there’s a nasty issue affecting most .NET-based Visual Studio projects that can prevent the dotnet ef command from working properly. More specifically, we may be prompted by the following error message when trying to execute any dotnet ef-based command:
No executable found matching command "dotnet-ef"
If we happen to experience this issue, we can try to check out the following:
- Double-check that we added the
Microsoft.EntityFrameworkCore.Toolspackage library (as explained earlier) properly, as it’s required for the command to work. - Ensure that we’re issuing the
dotnet efcommand in the project’s root folder—the same one that also contains the<ProjectName>.csprojfile; it won’t work anywhere else.
A lot more can be said regarding this issue but doing so is outside the scope of this book. Those of you who want to know more can take a look at this article I wrote about it while working on my ASP.NET Core 2 and Angular 5 book at https://goo.gl/Ki6mdb.
Using the Package Manager Console
If we get issues while using the dotnet CLI, we can often avoid nasty headaches by switching to the Package Manager Console provided by the Visual Studio GUI. To activate it, select View > Other Windows > Package Manager Console from Visual Studio’s main topmost menu.
Here’s the full set of PMC commands that can be used to replace the previously mentioned dotnet ef ones:
Add-Migration Initial -OutputDir "Data/Migrations"
Update-Database
To know more about the dotnet CLI commands and their corresponding Package Manager Console alternatives, check out the following official guides:
- EF Core .NET CLI reference: https://docs.microsoft.com/en-us/ef/core/miscellaneous/cli/dotnet
- EF Core PMC / PowerShell reference: https://docs.microsoft.com/en-us/ef/core/miscellaneous/cli/powershell
Checking the autogenerated DB tables
Regardless of the tool used (dotnet CLI or Package Manager Console), our WorldCities database should now have a couple of autogenerated tables ready to contain our Cities and Countries data: let’s quickly check them out before proceeding.
Open the SSMS tool and connect to SQL Server like we did a while ago, and open the WorldCities database that we created early on: the Cities and Countries tables generated by the dotnet-ef tool should indeed be there with their columns and keys, as shown in the following screenshot:

Figure 5.28: The autogenerated Cities table
Before we move on, it would be useful to say a few words explaining what Code-First migrations actually are, and the advantages we gain by using them.
Understanding migrations
Whenever we’re developing an application and defining a data model, we can be sure that it will change a number of times for many good reasons: new requirements from the product owner, optimization processes, consolidation phases, and so on. A bunch of properties will be added, deleted, or have their types changed. Chances are, sooner or later, we’ll be adding new entities as well and/or changing their relation pattern according to our ever-changing needs.
Each time we do something like that, we’ll also put our data model out of sync with its underlying, Code-First-generated database. This won’t be a problem when we’re debugging our app within a development environment because that scenario usually allows us to recreate the database from scratch whenever the project changes.
Upon deploying the application into production, we’ll be facing a whole different story: as long as we’re handling real data, dropping and recreating our database won’t be an option anymore. This is what the Code-First migrations feature is meant to address: giving the developer a chance to alter the database schema without having to drop/recreate the whole thing.
We won’t dig deeper into this topic; Entity Framework Core is a world of its own and addressing it in detail is out of the scope of this book. If you want to learn more, we suggest that you start with the official Entity Framework Core MS documentation at the following link:
Is data migration required?
Data migration can be very useful, but it’s not a required feature and we are definitely not forced to use it if we don’t want to. As a matter of fact, it can be quite a difficult concept to understand for a lot of developers, especially for those who aren’t much into DBMS design and/or scripting. It can also be very complex to manage in most scenarios, such as in companies where the DBA role is covered by someone who is below the IT development team (such as an external IT consultant or specialist).
Whenever we don’t want to use data migration from the beginning—or we get to a point where we don’t want to use it anymore—we can switch to a Database-First approach and start to manually design, create, and/or modify our tables: Entity Framework Core will work great, as long as the property types that are defined in the entities 100% match the corresponding database table fields. This can definitely be done, including when we put the project samples presented in this book into practice (this also applies to the WorldCities project), as long as we feel that data migration is not needed.
Alternatively, we can give it a try and see how it goes. The choice, as always, is yours.
Populating the database
Now that we have a SQL database available and a DbContext that we can use to read from and write to it, we are finally ready to populate those tables with our world cities data.
To do that, we need to implement a data seeding strategy. We can do this using one of the various Entity Framework Core-supported approaches:
- Model data seed
- Manual migration customization
- Custom initialization logic
These three methods are well explained in the following article, along with their very own sets of pros and cons: https://docs.microsoft.com/en-us/ef/core/modeling/data-seeding.
Since we have to handle a relatively big Excel file, we’re going to adopt the most customizable pattern we can make use of: some custom initialization logic relying upon a dedicated .NET controller that we can execute—manually or even automatically—whenever we need to seed our database.
Implement SeedController
Our custom initialization logic implementation will rely upon a brand-new dedicated controller, which will be called SeedController.
From our project’s Solution Explorer, do the following:
- Open the
/Controllers/folder - If the
WeatherForecastControlleris still there, remove it - Right-click on the
/Controllers/folder - Click on Add | Controller
- Choose the API Controller – Empty option
- Give the controller the SeedController name and click Add to create it
Once done, open the newly created /Controllers/SeedController.cs file and take a look at the source code: you’ll see that there’s just an empty class, just as expected for an empty controller! This is great since we need to understand some key concepts and—most importantly—learn how to properly translate them into source code.
Do you remember when we added our ApplicationDbContext class to the Program.cs file? As we should already know from Chapter 2, Getting Ready, this means that we’ve registered the Entity Framework Core-related services and our ApplicationDbContext in the DI container: this means that we can now leverage the dependency injection loading feature provided by the .NET architecture to inject an instance of that DbContext class within our controllers.
Here’s how we can translate such a concept into source code (the new lines are highlighted):
using Microsoft.AspNetCore.Http;
using Microsoft.AspNetCore.Mvc;
using WorldCitiesAPI.Data;
namespace WorldCitiesAPI.Controllers
{
    [Route("api/[controller]")]
    [ApiController]
    public class SeedController : ControllerBase
    {
        private readonly ApplicationDbContext _context;
        public SeedController(ApplicationDbContext context)
        {
            _context = context;
        }
    }
}
As we can see, we’ve added a _context private variable and used it to store an object instance of the ApplicationDbContext class within the constructor.
Such an instance will be provided by the framework—through its dependency injection feature—within the constructor method of SeedController.
Before making good use of that DbContext instance to insert a bunch of entities into our database, we need to find a way to read those world cities values from the Excel file. How can we do that?
Import the Excel file
Luckily enough, there’s a great third-party library that does precisely what we need: reading (and even writing!) Excel files using the Office Open XML format (xlsx), hence making their content available within any .NET-based application.
The name of this great tool is EPPlus. Its author, Jan Källman, made it freely available on GitHub and NuGet at the following URLs:
- GitHub (source code): https://github.com/JanKallman/EPPlus
- NuGet (.NET package): https://www.nuget.org/packages/EPPlus
As we can see, the project recently changed its licensing model:
- Until version 4.x, it was licensed under the GNU Library General Public License (LGPL) v3.0, meaning that we were allowed to integrate it into our software without limitations, as long as we didn’t modify it.
- From version 5.x and below, it uses a PolyForm Noncommercial and Commercial dual license, which basically means that we can use it only for non-commercial purposes.
For that very reason, in order to avoid any possible license infringement, we’re going to use the (now-deprecated) 4.5.3.3, it being the latest GNU-LGPL version available.
That said, those who want to use the latest EPPlus version with the Noncommercial license can do that by adding the following line in the Program.cs file:
ExcelPackage.LicenseContext = LicenseContext.NonCommercial;
However, v4.x is still viable enough for the purposes of our sample.
For additional info about the new EPPlus PolyForm Noncommercial license, check out the following URL:
https://polyformproject.org/licenses/noncommercial/1.0.0/
To find out more about the EPPlus licensing change, read this: https://www.epplussoftware.com/Home/LgplToPolyform.
The best way to install EPPlus in our WorldCitiesAPI project is to add the NuGet package using the NuGet Package Manager GUI:
- From the project’s Solution Explorer, right-click on the
WorldCitiesAPIproject - Select Manage NuGet Packages...
- Use the Browse tab to search for the
EPPluspackage, choose the version you want to install (4.5.3.3 in our case), and then initiate the task by clicking the Install button at the top right:
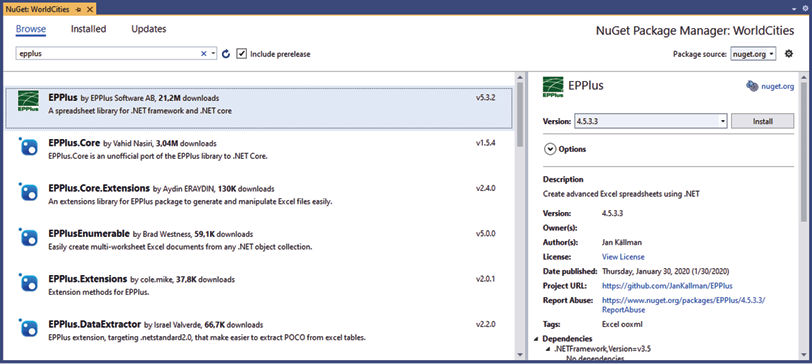
Figure 5.29: Adding the NuGet package using the NuGet Package Manager
Alternatively, type the following command from Visual Studio’s Package Manager Console:
> Install-Package EPPlus -Version 4.5.3.3
Once done, we can go back to the SeedController.cs file and use the awesome features of EPPlus to read the worldcities.xlsx Excel file.
However, before doing that, it could be wise to move that file so that it’s within our sample project’s /Data/ folder so that we’ll be able to read it using the .NET filesystem capabilities provided by the System.IO namespace. While we’re there, let’s create a /Data/Source/ subfolder and put it there to separate it from the other Entity Framework Core files:

Figure 5.30: Creating a separate Source subfolder for the worldcities.xlsx file
Here’s the source code that we need to add to our SeedController.cs file to read the worldcities.xlsx file and store all of the rows in a list of City entities:
using System.Security;
using Microsoft.AspNetCore.Mvc;
using Microsoft.EntityFrameworkCore;
using OfficeOpenXml;
using WorldCitiesAPI.Data;
using WorldCitiesAPI.Data.Models;
namespace WorldCitiesAPI.Controllers
{
    [Route("api/[controller]/[action]")]
    [ApiController]
    public class SeedController : ControllerBase
    {
        private readonly ApplicationDbContext _context;
        private readonly IWebHostEnvironment _env;
        public SeedController(
            ApplicationDbContext context,
            IWebHostEnvironment env)
        {
            _context = context;
            _env = env;
        }
        [HttpGet]
        public async Task<ActionResult> Import()
        {
            // prevents non-development environments from running this method
            if (!_env.IsDevelopment())
                    throw new SecurityException("Not allowed");
            var path = Path.Combine(
                _env.ContentRootPath,
                "Data/Source/worldcities.xlsx");
            using var stream = System.IO.File.OpenRead(path);
            using var excelPackage = new ExcelPackage(stream);
            // get the first worksheet
            var worksheet = excelPackage.Workbook.Worksheets[0];
            // define how many rows we want to process
            var nEndRow = worksheet.Dimension.End.Row;
            // initialize the record counters
            var numberOfCountriesAdded = 0;
            var numberOfCitiesAdded = 0;
            // create a lookup dictionary
            // containing all the countries already existing
            // into the Database (it will be empty on first run).
            var countriesByName = _context.Countries
                .AsNoTracking()
                .ToDictionary(x => x.Name, StringComparer.OrdinalIgnoreCase);
            // iterates through all rows, skipping the first one
            for (int nRow = 2; nRow <= nEndRow; nRow++)
            {
                var row = worksheet.Cells[
                    nRow, 1, nRow, worksheet.Dimension.End.Column];
                var countryName = row[nRow, 5].GetValue<string>();
                var iso2 = row[nRow, 6].GetValue<string>();
                var iso3 = row[nRow, 7].GetValue<string>();
                // skip this country if it already exists in the database
                if (countriesByName.ContainsKey(countryName))
                    continue;
                // create the Country entity and fill it with xlsx data
                var country = new Country
                {
                    Name = countryName,
                    ISO2 = iso2,
                    ISO3 = iso3
                };
                // add the new country to the DB context
                await _context.Countries.AddAsync(country);
                // store the country in our lookup to retrieve its Id later on
                countriesByName.Add(countryName, country);
                // increment the counter
                numberOfCountriesAdded++;
            }
            // save all the countries into the Database
            if (numberOfCountriesAdded > 0)
                await _context.SaveChangesAsync();
            // create a lookup dictionary
            // containing all the cities already existing
            // into the Database (it will be empty on first run).
            var cities = _context.Cities
                .AsNoTracking()
                .ToDictionary(x => (
                    Name: x.Name,
                    Lat: x.Lat,
                    Lon: x.Lon,
                    CountryId: x.CountryId));
            // iterates through all rows, skipping the first one
            for (int nRow = 2; nRow <= nEndRow; nRow++)
            {
                var row = worksheet.Cells[
                    nRow, 1, nRow, worksheet.Dimension.End.Column];
                var name = row[nRow, 1].GetValue<string>();
                var nameAscii = row[nRow, 2].GetValue<string>();
                var lat = row[nRow, 3].GetValue<decimal>();
                var lon = row[nRow, 4].GetValue<decimal>();
                var countryName = row[nRow, 5].GetValue<string>();
                // retrieve country Id by countryName
                var countryId = countriesByName[countryName].Id;
                // skip this city if it already exists in the database
                if (cities.ContainsKey((
                    Name: name,
                    Lat: lat,
                    Lon: lon,
                    CountryId: countryId)))
                    continue;
                // create the City entity and fill it with xlsx data
                var city = new City
                {
                    Name = name,
                    Lat = lat,
                    Lon = lon,
                    CountryId = countryId
                };
                // add the new city to the DB context
                _context.Cities.Add(city);
                // increment the counter
                numberOfCitiesAdded++;
            }
            // save all the cities into the Database
            if (numberOfCitiesAdded > 0)
                await _context.SaveChangesAsync();
            return new JsonResult(new
            {
                Cities = numberOfCitiesAdded,
                Countries = numberOfCountriesAdded
            });
        }
    }
}
As we can see, we’re doing a lot of interesting things here. The preceding code features a lot of comments and should be very readable; however, it could be useful to briefly enumerate the most relevant parts:
- We injected an
IWebHostEnvironmentinstance through dependency injection, just like we did forApplicationDbContext, so that we can retrieve the web application path and be able to read the Excel file. - We added an
Importaction method that will useApplicationDbContextand theEPPluspackage to read the Excel file and addCountriesandCities. - At the start of the
Importmethod’s implementation, we used theIWebHostEnvironmentinstance to determine if we’re running in a development environment or not: if we aren’t, the code will throw aSecurityException. By acting that way we’ll prevent anyone—including our users—from calling this method in production, thus restricting the whole importing task to developers only. Countriesare imported first because theCityentities require theCountryIdforeign key value, which will be returned when the correspondingCountryis created in the database as a new record.- We defined a
Dictionarycontainer object to store all existing countries (plus each newCountryright after we create it) so that we can query that list using LINQ to retrieve theCountryIdinstead of performing a lot ofSELECTqueries: this logic will also prevent the method from inserting the same country multiple times, should we happen to execute it more than once. - We defined another
Dictionarycontainer object to prevent the insertion of duplicate cities as well. - Last but not least, we created a JSON object to show the overall results on the screen.
It’s worth noting that we’ve issued our queries using EF Core’s AsNoTracking extension method, which returns a new query where the entities returned will not be cached in the DbContext or ObjectContext if they are modified within the code: this basically means that less data will be cached and tracked, with obvious benefits in terms of memory usage.
For additional info on the AsNoTracking extension method, check out the following URL:
https://docs.microsoft.com/en-us/dotnet/api/system.data.entity.dbextensions.asnotracking
If we want to get a closer look at how the whole importing procedure works, we can put some breakpoints inside the if loops to check it out while it’s running.
To execute the action method, hit F5 to launch the web application in debug mode and then type the following URL into the browser’s address bar: https://localhost:40443/api/Seed/Import.
Be aware that the Import method is designed to import 230+ countries and 12,000+ cities, so this task will likely require some time—between about 10 and 30 seconds on an average development machine, depending on the amount of available RAM, CPU performance, and database connection speed. It’s definitely a major data seed! We’re kind of stressing out the framework here.
If we don’t want to wait, we can always give the nEndRow internal variable a fixed value, such as 1,000, to limit the total number of cities (and countries) that will be read and therefore loaded into the database.
Eventually, we should be able to see the following response in our browser window:

Figure 5.31: Inspecting the data import
The preceding output means that the import has been performed successfully: we did it! Our database is now filled with 41001 cities and 237 countries for us to play with.
Those numbers might slightly change depending on the WorldCities database version: at the time of writing we’re using v1.74, which was updated on July 2021, but any subsequent version should work as well—as long as the MS Excel file structure doesn’t change. If you want to use the same exact MS Excel file that was used to write this book, you can find it in the GitHub project’s /Data/Source/ folder.
In the next section, we’re going to learn how we can read this data as well so that we’ll be able to bring Angular into the loop.
Entity controllers
Now that we have thousands of cities and hundreds of countries in our database, we need to find a way to bring this data to Angular and vice versa. As we already know from Chapter 2, Getting Ready, this role is played by the .NET controllers, so we’re going to create two of them:
CitiesController, to serve (and receive) the cities’ dataCountriesController, to do the same with the countries
Let’s get started.
CitiesController
Let’s start with the cities. Remember what we did when we created SeedController? What we’re going to do now is rather similar, but this time we’ll make good use of Visual Studio’s code-generation features.
From our project’s Solution Explorer, follow these steps:
- Right-click on the
/Controllers/folder. - Click on Add | Controller.
- Choose the Add API Controller with actions, using Entity Framework option (the last one from the top, at the time of writing).
- In the model window that appears, choose the
Citymodel class and theApplicationDbContextdata context class, as shown in the following screenshot. Name the controllerCitiesControllerand click Add to create it:
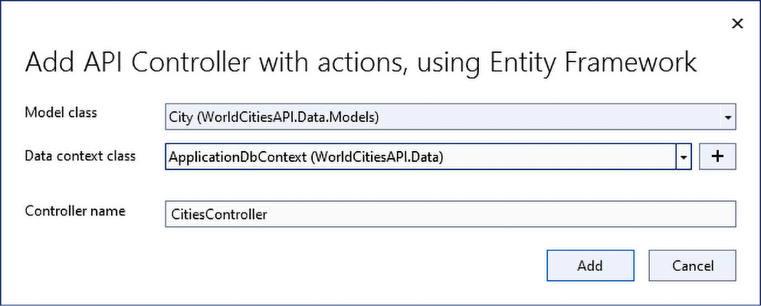
Figure 5.32: Creating CitiesController
The settings we specified during this phase will be used by Visual Studio to analyze our entities (and our DbContext) and autogenerate a whole API controller stuffed with useful methods.
After the CitiesController.cs file has been generated we can open it and see how the code generator did a lot of useful work, while sticking to a pattern that’s similar to the one we followed for our SeedController class.
You can see the generated code in the book’s GitHub repository for this chapter.
Here’s a breakdown of the relevant methods, in order of appearance:
GetCities()returns a JSON array containing all of the cities in the databaseGetCity(id)returns a JSON object containing a singleCityPutCity(id, city)allows us to modify an existingCityPostCity(city)allows us to add a newCityDeleteCity(id)allows us to delete an existingCity
It definitely seems that we do have everything we need for our front-end. Before moving on to Angular, let’s do the same for our Countries.
CountriesController
From Solution Explorer, right-click the /Controllers/ folder and perform the same set of tasks we performed to add CitiesController—except for the name, which will obviously be CountriesController.
At the end of the code-generation process, we’ll end up with a CountriesController.cs file stuffed with the Get, Put, Post, and Delete action methods that we need to handle the Countries.
Again, the generated code is available in the book’s GitHub repository for this chapter.
Before going further, let’s spend a couple of minutes examining some methodological considerations regarding using entities in controllers the way we just did.
Should we really use Entities?
When we created our CitiesController and CountriesController a short while ago, we selected our existing City and Country as our model classes. From a point of view, this seems like the most logical thing to do: those classes already contain everything we need to receive from the client, thus they are ideal for use as input parameters for the Put() and Post() action methods that we need.
However, using a model class to return results or accept parameters from the client is hardly a good practice: these model classes are meant to be a full representation of our database tables, not the interface to use to exchange data with the client. A much better approach is to keep the model entities that communicate with the database separated from the Data Transfer Objects (DTOs) that we use for GET, POST, and PUT methods. We’ll talk more about that in Chapter 8, Code Tweaks and Data Services, when we’ll refactor those action methods, replacing those model entities with DTOs, thus enforcing the single responsibility principle between them; however, for the next few chapters, we can benefit from the simplicity resulting from such a “non-recommended approach” and go ahead.
That concludes our journey through Entity Framework. Now, we need to connect the dots and reap what we’ve sown using our favorite front-end framework.
Testing it out
Now that our controllers are ready, we can perform a quick test to see if they’re working as expected.
Hit F5 to launch our web application in debug mode, then copy the following URL into the browser’s address bar: https://localhost:40443/api/Cities/.
If we made everything properly, we should see something like this:

Figure 5.33: Testing CitiesController
Here come our cities!
While we’re here, let’s check the countries as well with the following URL: https://localhost:40443/api/Countries/.
This is what we should receive from our browser:

Figure 5.34: Testing CountriesController
Here they are.
Our job here is done: let’s move on to the next chapter, where we’ll see how to present this data to the front-end.
Summary
We started this chapter by enumerating a number of things that simply cannot be done without a proper data provider. To overcome these limitations, we decided to provide ourselves with a DBMS engine and a persistent database for reading and/or writing data. To avoid messing with what we did in the previous chapters, we created a brand-new web application project to deal with that, which we called WorldCities.
Then, we chose a suitable data source for our new project: a list of world cities and countries that we could download for free in a handy MS Excel file.
Right after that, we moved on to the data model: Entity Framework Core seemed an obvious choice to get what we wanted, so we added its relevant packages to our project. We briefly enumerated the available data modeling approaches and resorted to using Code-First due to its flexibility.
Once done, we created our two entities, City and Country, both of which are based on the data source values we had to store within our database, along with a set of Data Annotations and relationships taking advantage of the renowned Entity Framework Core’s convention-over-configuration approach. Then, we built our ApplicationDbContext class accordingly.
After we created our data model, we evaluated the various options for configuring and deploying our DBMS engine: we reviewed the DMBS local instances and cloud-based solutions such as MS Azure, and we explained how to implement both of them.
Last but not least, we created our .NET controller classes to deal with the data: SeedController to read the Excel file and seed our database, CitiesController to deal with cities, and CountriesController to handle countries.
After completing all of these tasks, we ran our application in debug mode to verify that everything was still working as intended. Now, we’re ready to mess with the front-end part of our app. In the next chapter, we’ll learn how to properly fetch this data from the server and bring it to the user in a fashionable way.
Angular, here we come!
Suggested topics
For further information, we recommend the following topics: Web API, in-memory Web API, data source, data server, data model, data provider, ADO.NET, ORM, Entity Framework Core, Code-First, Database-First, Model-First, Entity class, Data Annotations, DbContext, CRUD operations, data migration, dependency injection, ORM mapping, JSON, ApiController.
References
- Angular In-Memory Web API: https://github.com/angular/in-memory-web-api/
- Wikipedia: ISO 3166: https://en.wikipedia.org/wiki/ISO_3166
- Wikipedia: ISO 3166 alpha-2: https://en.wikipedia.org/wiki/ISO_3166-1_alpha-2
- Wikipedia: ISO 3166 alpha-3: https://en.wikipedia.org/wiki/ISO_3166-1_alpha-3
- ISO 3166 country codes: https://www.iso.org/iso-3166-country-codes.html
- SQL Server 2019 official page: https://www.microsoft.com/en-us/sql-server/sql-server-2019
- SQL Server 2019 – compare SQL Server versions: https://www.microsoft.com/en-us/sql-server/sql-server-2019-comparison
- SQL Server 2019 on Linux: https://docs.microsoft.com/en-US/sql/linux/sql-server-linux-overview
- Installing SQL Server on Windows: https://docs.microsoft.com/en-US/sql/database-engine/install-windows/installation-for-sql-server
- Installing SQL Server on Linux: https://docs.microsoft.com/en-US/sql/linux/sql-server-linux-setup
- Download SQL Server Management Studio (SSMS): https://docs.microsoft.com/en-us/sql/ssms/download-sql-server-management-studio-ssms
- Create a SQL Server Database on Azure: https://azure.microsoft.com/en-us/resources/videos/create-sql-database-on-azure/
- Azure free account FAQ: https://azure.microsoft.com/en-in/free/free-account-faq/
- Azure SQL Server Managed Instance: https://azure.microsoft.com/en-us/services/sql-database/
- Use tags to organize your Azure resources: https://docs.microsoft.com/en-us/azure/azure-resource-manager/management/tag-resources
- Choose the right deployment option in Azure SQL: https://docs.microsoft.com/en-US/azure/sql-database/sql-database-paas-vs-sql-server-iaas
- Create an Azure SQL Database Managed Instance: https://docs.microsoft.com/en-us/azure/sql-database/sql-database-managed-instance-get-started
- Entity Framework Core: Loading Related Data: https://docs.microsoft.com/en-US/ef/core/querying/related-data
- Entity Framework Core: Modeling: https://docs.microsoft.com/en-us/ef/core/modeling/
- Entity Framework Core: Data Seeding: https://docs.microsoft.com/en-us/ef/core/modeling/data-seeding
- Entity Framework Core: DbContext: https://www.entityframeworktutorial.net/efcore/entity-framework-core-dbcontext.aspx
- EF Core .NET CLI reference: https://docs.microsoft.com/en-us/ef/core/miscellaneous/cli/dotnet
- EF Core PMC/PowerShell reference: https://docs.microsoft.com/en-us/ef/core/miscellaneous/cli/powershell
- #region (C# reference): https://docs.microsoft.com/en-us/dotnet/csharp/language-reference/preprocessor-directives/preprocessor-region
- Are #regions an antipattern or code smell?: https://softwareengineering.stackexchange.com/questions/53086/are-regions-an-antipattern-or-code-smell
- PolyForm Noncommercial license: https://polyformproject.org/licenses/noncommercial/1.0.0/
- EPPlus library licensing change: https://www.epplussoftware.com/Home/LgplToPolyform
- DbExtensions.AsNoTracking Method: https://docs.microsoft.com/en-us/dotnet/api/system.data.entity.dbextensions.asnotracking