
Editing Data on the Grid
It's useful to be able to navigate to a new page to edit a full row, but what if you would rather edit data right in the grid? The DataGrid control makes this possible, and, if you're happy with the default layout, extremely easy. By setting a few properties, you can allow users to edit data right in the grid. By writing a little code, you can save the data back out to the original data source.
To add the Edit button to each row (and the associated Cancel and Update buttons, which only display while you're editing a row), you follow the same sorts of steps you used in order to add the Hyperlink column—the Property Builder makes it simple. To add the Edit button, follow these steps:
1. |
Open ProductsEdit.aspx in the page designer. |
2. |
Right-click the DataGrid control and select Property Builder from the context menu. |
3. |
Select the Columns tab to display information about the columns displayed in the DataGrid control. |
4. |
From the Available Columns list, expand the Button Column node. Select Edit/Update/Cancel and then click the > button to add a new column to the Selected Columns list. |
5. |
Click the up-arrow button repeatedly until the new column is first in the list of available columns. |
6. |
Even though you won't use the Delete link until later in the chapter, select the Delete item in the Available Columns list, add it to the Selected Columns list, and move it up until it's the second item in the list. |
7. |
When you're done, click OK to dismiss the dialog box. |
TIP
If you'd rather display a standard button instead of a link, you can change the ButtonType property to PushButton, rather than LinkButton, before you dismiss the Properties dialog box.
Once you're done, you should immediately see a new column on the left side of the DataGrid control—the Edit column. Unfortunately, editing comes at a price—you must add some code to your page in order to activate editing as well as more code to handle the Cancel and Update buttons that appear while you're editing.
Beginning the Editing
When you click the Edit link on the DataGrid control, the control posts the page back and raises the EditCommand event on the server. In order to render the DataGrid control so that you can edit the selected row, you must set the control's EditItemIndex property, indicating which row it should be editing. (If no row is being edited, the EditItemIndex property is -1.) How can you determine which row you clicked? The EditCommand event handler receives, as its second parameter, a DataGridCommandEventArgs object. This object provides an Item property corresponding to the item (or row of data) that you selected. The Item property, an object itself, provides an ItemIndex property that contains the row number you need. Therefore, your EditCommand property will include at least this line of code (assuming that grdProducts is the name of your DataGrid control):
grdProducts.EditItemIndex = e.Item.ItemIndex
If you try out the sample page, you'll see that clicking the Edit link on a row places you in editing mode and replaces the Edit link with Save and Cancel links. Any modifiable cell in the grid displays as an editable control, and you can modify the data.
Listing 17.4 shows the sample page's EditCommand code.
Listing 17.4. The EditCommand Event Code Runs When You Click the Edit Link on the DataGrid Control
Private Sub grdProducts_EditCommand( _
 ByVal source As Object, _
 ByVal e As System.Web.UI.WebControls. _
 DataGridCommandEventArgs) _
 Handles grdProducts.EditCommand

  Dim ds As DataSet
  Dim dv As DataView
  ' Rehydrate the DataSet into a DataView
  ' You must use a DataView in order to
  ' use the RowFilter property.
  ds = CType(Session("DS"), DataSet)
  dv = ds.Tables(0).DefaultView

  If IsIE5() Then
    ' If this is IE5 or higher,
    ' smart navigation will display the
    ' edited row in the same place
    ' as on the original page.
    grdProducts.EditItemIndex = e.Item.ItemIndex
  Else
    ' If this isn't IE5 or higher, you need
    ' to only show the one row being
    ' edited. Otherwise, users would have
    ' to scroll down to the row.
    grdProducts.EditItemIndex = 0
							dv.RowFilter = "ProductID = " & e.Item.Cells(2).Text
  End If

  grdProducts.DataSource = dv
  grdProducts.DataBind()

  Session("AddMode") = False
  lnkAdd.Visible = False
End Sub
|
Rather than looking at the procedure sequentially, the following sections break the code up by functionality, describing each chunk of code in detail. There are quite a few new issues covered here, and it's worth discussing each in some depth.
Handling the Data
The EditCommand event handler runs after you've clicked the Edit link for a row in the DataGrid control. You must tell the grid which row it should be editing, and you must rebind the DataGrid control to its data source. (Remember, you're rendering the page and its contents because clicking the Edit link forced a roundtrip to the server. If you don't bind the control to its data source, it simply won't display any data!) The procedure uses this code to “rehydrate” the DataSet object that the page previously stored in a Session variable, and it uses the DefaultView property to retrieve a DataView object based on the only table in the DataSet:
Dim ds As DataSet
Dim dv As DataView
...
ds = CType(Session("DS"), DataSet)
dv = ds.Tables(0).DefaultView
Why do you need a DataView object here? Normally, you could simply bind the DataGrid control to a DataSet and be done with it. In this case, however, depending on the browser that requested the page, you may need a DataView object to find the row you need. (The next section solves this mystery—for now, just believe us.)
Given the DataView object, the code sets up the data source and rebinds the DataGrid control:
grdProducts.DataSource = dv
grdProducts.DataBind()
Managing the Grid
If you're testing the sample page using Internet Explorer 5.01 or later (and chances are good that this is a safe assumption), you probably noticed how nicely the browser maintains your position on the page when it rerenders after you click the Edit button. Perhaps you didn't even think about it, forgetting that you've posted back to the same page, making a roundtrip to the Web server. This isn't behavior you would normally expect when rendering a page, yet IE 5.01 (or later) and the ASP.NET page framework make it happen.
The magic in use here is a feature named SmartNavigation. This is a server-side feature provided by the ASP.NET page framework, and it makes postbacks to a page look better, if the request comes from IE5 or later. Specifically, SmartNavigation makes postbacks look better by performing these tasks:
-
Eliminating the flash/flickering caused by page navigation
-
Saving your position on the page so that when the browser displays the same page, you're at the same location on the page
-
Persisting the focus across postbacks so that you're in the same control before and after a postback
NOTE
SmartNavigation only saves information for a single page. As soon as you navigate elsewhere, all “smart” information is lost for the page.
This technology works great if the page request comes from a sufficiently enabled browser—all you need to do is set the SmartNavigation property for your page to True, and you're all set. As a matter of fact, the Page_Load procedure in the sample page sets this property for you:
Private Sub Page_Load( _
 ByVal Sender As System.Object, _
 ByVal e As System.EventArgs) Handles MyBase.Load

  If Not Page.IsPostBack Then
    Session("AddMode") = False
    GridLoad()
  End If
  Page.SmartNavigation = True
End Sub
If SmartNavigation is enabled, you can simply send the user back to the originally selected row. To do that, your code must set the EditItemIndex property to be the selected row, like this:
grdProducts.EditItemIndex = e.Item.ItemIndex
What about users who can't use the SmartNavigation feature? You can't really start editing the same row, because that row might be far down the page. Imagine what the user sees: After scrolling down the final row, for example, and clicking the Edit link, the page refreshes back at the top—the user has to scroll down to the bottom again to edit the row that was just clicked! Not good. We suggest you avoid this situation by displaying only the single row the user has selected for editing. To do that, the sample page's EditCommand procedure uses this code:
dv.RowFilter = "ProductID = " & e.Item.Cells(2).Text
grdProducts.EditItemIndex = 0
This code first retrieves the Text property from the cell within the selected row that contains the product ID (e.Item.Cells(2).Text) and builds up a filter expression. The code assigns the filter to the RowFilter property of the DataView object that contains the grid's data. This code effectively filters the DataView object so that it contains only a single row. The next line of code sets the EditItemIndex property of the grid to 0. Because the grid will only be showing a single filtered row, this is the index you need.
In order to determine which path through the code to take, the sample page includes a function, IsIE5, that determines the capabilities of the browser that made the request to the page:
Private Function IsIE5() As Boolean
  ' Check to see if the browser causing the
  ' request was IE5 or higher.
  With Request.Browser
    IsIE5 = ((.Browser = "IE" And .MajorVersion >= 5) _
     And Not FORCEDOWNLEVEL)
  End With
End Function
This function uses the Browser property of the Request object, checking the Browser and MajorVersion properties. In addition, the page includes the constant FORCEDOWNLEVEL, which is by default set to False. If you set this to True, you'll force the IsIE5 function to return False, allowing you to test the behavior on down-level browsers.
If you want to test out this behavior, and you only have a browser that supports SmartNavigation, set the FORCEDOWNLEVEL constant to True in the code:
Private Const FORCEDOWNLEVEL As Boolean = True
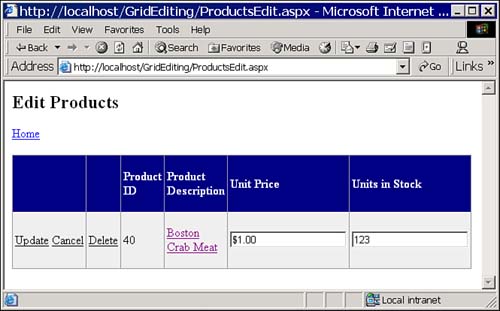
Then, display ProductsEdit.aspx in your browser, click the Edit link for a row, and you should see only that one row displayed in the posted page. Figure 17.5 shows how the page might look after clicking the Edit link, once you've set the FORCEDOWNLEVEL constant to True (or if you've browsed to the page from a down-level browser).
Figure 17.5. With a down-level browser, you'll most likely only want to display a single row for editing—it's less confusing to the user.
The whole chunk of code that handles the grid looks like this:
If IsIE5() Then
  ' If this is IE5 or higher,
  ' smart navigation will display the
  ' edited row in the same place
  ' as on the original page.
  grdProducts.EditItemIndex = e.Item.ItemIndex
Else
  ' If this isn't IE5 or higher, you need
  ' to only show the one row being
  ' edited. Otherwise, users would have
  ' to scroll down to the row.
  grdProducts.EditItemIndex = 0
								dv.RowFilter = "ProductID = " & e.Item.Cells(2).Text
End If
TIP
Obviously, we didn't dwell on either of the topics introduced here: the Cells property of the current row or the RowFilter method of a DataView object. You can certainly research both of these topics in the online help. For now, it's important to understand that the DataGrid control provides the selected row to your event procedure as the Item property (e.Item) and that row provides a collection of cells (e.Item.Cells(2), for example). If the cell contains controls (while you're editing, some cells contain TextBox controls, for example), each Cell object provides a Controls collection that allows you to access the controls inside each cell.
Adding Versus Editing
The ProductsEdit.aspx page treats adding a new row and editing an existing row in almost the same way, and even sharing some of the same code. (When you think about it, aren't these really similar operations? Once you add a blank row to contain the new data, editing and adding are the same, from then on, for the most part.) The real differences come when it's time to update the data—when adding, the code must create an INSERT SQL statement; when updating, the code uses an UPDATE SQL statement instead. The sample code keeps track of two different items, based on whether you're adding or editing:
The Add a New Product link at the top of the page disappears if you're currently editing a row, and it reappears when you're done.
The Session variable AddMode keeps track of whether you're in Add mode.
The grdProducts_EditCommand procedure handles both of these before it finishes, using this code:
Session("AddMode") = False
lnkAdd.Visible = False
Because this code only executes when you're entering edit mode, it must set the Session variable so that the code that saves the data knows you weren't in Add mode, and it also must hide the link that allows you to add a new row.
Saving the Data
When you click the Update link on the current row, you trigger a postback to the server, and the page runs the DataGrid control's UpdateCommand event handler. This procedure must perform the following tasks:
-
Retrieve the modified items from the grid
-
Update the data in the data store
-
Reset the DataGrid control's EditItemIndex property so that it doesn't attempt to display any row in edit mode
-
Rebind the DataGrid control to its data source
In addition, the sample page must handle saving the data differently if you are editing a row, as opposed to adding a new row. You'll learn more about adding a new row in a later section, but for now, as you peruse the code, just remember that AddMode will be True if you select the link to add a new row, and it will be False otherwise.
The procedure shown in Listing 17.5 runs after you select the Update link for a row in edit mode.
Listing 17.5. Updating Data Requires a Bit of Code
Private Sub grdProducts_UpdateCommand( _
 ByVal source As Object, _
 ByVal e As System.Web.UI.WebControls. _
 DataGridCommandEventArgs) _
 Handles grdProducts.UpdateCommand

  Dim strProductID As String
  Dim strName As String
  Dim strUnitPrice As String
  Dim strUnitsInStock As String
  Dim strSQL As String
  Dim strConn As String

  Try
    ' Retrieve edited items from grid
    With e.Item
      strProductID = .Cells(2).Text
      strName = _
       CType(.Cells(3).Controls(0), HyperLink).Text
      strUnitPrice = _
       CType(.Cells(4).Controls(0), TextBox).Text
      strUnitsInStock = _
       CType(.Cells(5).Controls(0), TextBox).Text
    End With

    ' Check to see if we are editing or adding
    If CBool(Session("AddMode")) Then
      strSQL = String.Format( _
       "INSERT INTO Products(ProductName, " & _
       "UnitPrice, UnitsInStock) " & _
       "VALUES( {0}, {1}, {2}) ", _
       DataHandler.QuoteString(strName), _
       strUnitPrice, strUnitsInStock)
    Else
      strSQL = String.Format( _
       "UPDATE Products " & _
       "SET ProductName = {0}, " & _
       "UnitPrice = {1}, " & _
       "UnitsInStock = {2} " & _
       "WHERE ProductID = {3}", _
       DataHandler.QuoteString(strName), _
       strUnitPrice, _
       strUnitsInStock, strProductID)
    End If

    ' Submit SQL
    strConn = Session("ConnectString").ToString
    DataHandler.ExecuteSQL(strSQL, strConn)

  Catch oException As Exception
    lblError.Text = oException.Message
    lblError.Visible = True

  End Try

  ' Reset Add flag, and reset the label.
  Session("AddMode") = False
  lnkAdd.Visible = True

  ' Turn off editing, and re-bind the grid.
  grdProducts.EditItemIndex = -1
  Call GridLoad()
End Sub
|
The grdProducts_UpdateCommand requires some detailed explanation.
The procedure starts by retrieving values from the grid. This issue is somewhat complicated, because you must use both the Cells property of the item provided by the event procedure's parameter, and you must use the Controls collection provided by the individual cell. In order to understand the Cells collection, take a look at Figure 17.5. The Item property represents the entire row in the table, and the Cells collection starts numbering with 0. In this example, Cells(0) contains two controls (the Update and Cancel links), Cells(1) contains one control (the Delete link), and Cells(2) contains the ProductID value. The procedure retrieves the value of the ProductID using this statement:
strProductID = .Cells(2).Text
Cells(3) contains a HyperLink control, and the procedure retrieves its value using this code:
strName = _
 CType(.Cells(3).Controls(0), HyperLink).Text
Because the Cells collection contains objects, and you need to retrieve the Text property of the hyperlink contained within the collection, you must use the CType function to convert the object into a HyperLink control so that you can retrieve the control's Text property.
The procedure continues, retrieving the value of the rest of the necessary controls, using this code:
strUnitPrice = _
 CType(.Cells(4).Controls(0), TextBox).Text
strUnitsInStock = _
 CType(.Cells(5).Controls(0), TextBox).Text
If a cell contains more than a single control (you'll see an example of this later in the chapter), your code would need to take that into account, using Controls(1), for example, to retrieve the second control within a cell.
Once the procedure has retrieved the values from the grid, it takes one of two paths, depending on whether you're adding a new row or editing an existing one. (You'll see more on adding a new row later in this chapter.) If you're adding, the procedure builds a SQL INSERT statement; otherwise, it builds a SQL UPDATE statement:
If CBool(Session("AddMode")) Then
  strSQL = String.Format( _
   "INSERT INTO Products(ProductName, " & _
   "UnitPrice, UnitsInStock) " & _
   "VALUES( {0}, {1}, {2}) ", _
   DataHandler.QuoteString(strName), _
   strUnitPrice, strUnitsInStock)
Else
  strSQL = String.Format( _
   "UPDATE Products " & _
   "SET ProductName = {0}, " & _
   "UnitPrice = {1}, " & _
   "UnitsInStock = {2} " & _
   "WHERE ProductID = {3}", _
   DataHandler.QuoteString(strName), _
   strUnitPrice, _
   strUnitsInStock, strProductID)
End If
Given the SQL statement appropriate to the action, the code retrieves the connection information and executes the SQL:
strConn = Session("ConnectString").ToString
DataHandler.ExecuteSQL(strSQL, strConn)
Before the procedure finishes up, it resets the Add a New Product label and the Session variable AddMode:
' Reset Add flag, and reset the label.
Session("AddMode") = False
lnkAdd.Visible = True
Finally, the procedure resets the DataGrid control's editing (indicating that no row is currently being edited) and rebinds the grid to its data:
' Turn off editing, and re-bind the grid.
grdProducts.EditItemIndex = -1
Call GridLoad()
Cancelling the Edit
If you're in the middle of editing a row and decide to cancel, you can select the Cancel link on the row (see Figure 17.5). When you do, you trigger a postback to the server, where the page runs the CancelCommand event handler for the control. All you need to do in this procedure is indicate to the control that you're no longer editing and then rebind the data to the grid.
To reset the edit mode, you simply set the EditItemIndex property of the DataGrid control to -1. The CancelCommand event handler in the sample page looks like this:
Private Sub grdProducts_CancelCommand( _
  ByVal source As Object, _
  ByVal e As System.Web.UI.WebControls. _
  DataGridCommandEventArgs) _
  Handles grdProducts.CancelCommand

  grdProducts.EditItemIndex = -1
							Call GridLoad()
  lnkAdd.Visible = True
End Sub