Adding the Control's Data Source
In order to display data within the control, you'll need to set up the data source and retrieve the columns you'll want displayed within the control. The following paragraphs walk you through this process. In this case, in order to display the fields as shown in Figure 19.1, you'll need a SQL string like this:
SELECT EmployeeID, FirstName, LastName,
(FirstName + ' ' + LastName) As Name,
('Images' + LastName + '.jpg') As PhotoURL, HomePhone
 FROM Employees ORDER BY LastName
This expression retrieves several fields and several expressions based on fields from the Employees table. You'll also need to retrieve the images we've supplied and copy them into the Images folder within your project. Once you've got everything set up, you'll need to set the DataSource property of the DataList control and call its DataBind method in order to display data. (Of course, you'll also need to place controls within the DataList in order to actually see data on the page—that's a job for a later section, however.)
Follow these steps to hook up the data binding:
1. |
Using Windows Explorer, browse to the JumpstartDataList folder. Select the subfolder named Images and press Ctrl+C to copy the folder to the Windows Clipboard. | |
2. |
Use Alt+Tab to switch back to Visual Studio .NET. In the Solution Explorer window, select your sample project (Northwind). Press Ctrl+V to paste the folder from the Clipboard, adding the images to your project. NOTE The names of the images match the last names of the employees in the sample database. If you change the names in the Employees table or change the names of the files, this example won't work correctly. | |
3. |
Make sure that EmployeeInfo.aspx is loaded in the page designer. Double-click the page to load the code designer and modify the Page_Load procedure so that it looks like this: Private Sub Page_Load( _ ByVal sender As System.Object, _ ByVal e As System.EventArgs) Handles MyBase.Load If Not IsPostBack Then DataListLoad() DataListBind() End If End Sub | |
4. |
Add the
DataListBind procedure, which will be called from several locations in this book. This procedure handles retrieving the saved DataSet object from a Session variable, setting the control's DataSource property, and calling the control's DataBind method: Private Sub DataListBind()
' Bind the DataList control to the
' Session variable containing the
' data.
datEmps.DataSource = Session("DS")
datEmps.DataBind()
End Sub
| |
5. |
Add the
DataListLoad procedure (see Listing 19.1), which handles retrieving the data and placing the DataSet object into a Session variable for later use. Listing 19.1. Load the DataList Control Using This Code
|
Now that you've added all the code, you might like to verify that the DataList control is working correctly. To do that, you'll need to add a simple ItemTemplate to the control. (The next section discusses the templates and the template editor in more detail.) Follow these steps to display the Name field for each row of data:
1. |
Use the View, Designer menu item to load the page designer. |
2. |
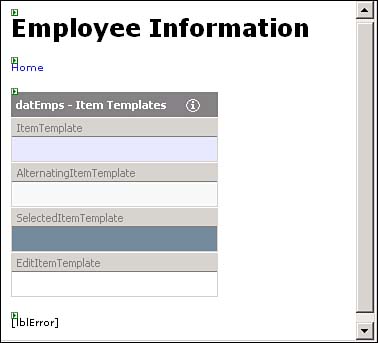
Right-click the DataList control and select Edit Templates, Item Templates from the context menu. You should see the designer shown in Figure 19.3. (Unlike the Repeater control, which has no user interface for working with templates, the DataList control provides a little bit of help, in the form of this designer.) Figure 19.3. Use this designer to edit the Item, AlternatingItem, and EditItem templates.
|
3. |
From the Toolbox window, drag a Label control into the section of the template editor named ItemTemplate. |
4. |
In the Properties window, set the ID property for your Label control to lblName. |
5. | |
6. |
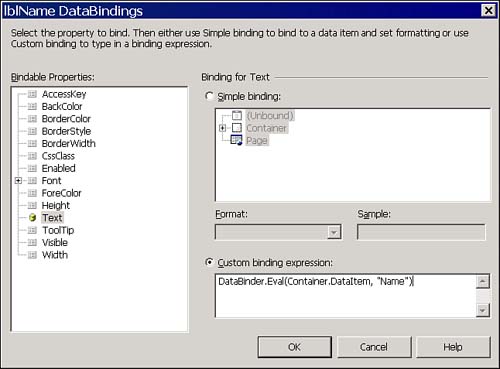
In the Bindable Properties list, select the Text property. |
7. |
Select the Custom Binding Expression text box and enter the following expression (when you're done, the dialog box should look like Figure 19.4): DataBinder.Eval(Container.DataItem, "Name") Figure 19.4. Set the data-binding properties here.
|
8. |
Click OK to dismiss the dialog box. |
9. |
Right-click the DataList control and select End Template Editing from the context menu. |
10. |