
Setting Up the Sample Stored Procedures
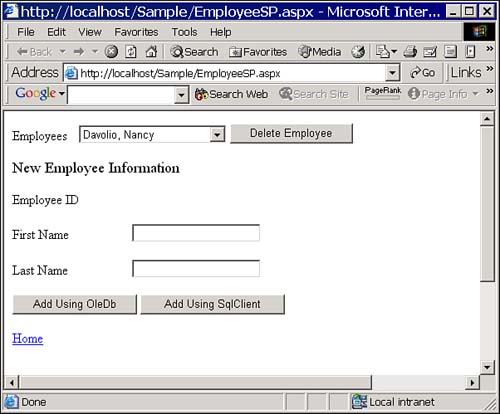
In this chapter, you'll import a new page, shown in Figure 15.1, that allows you to work with the Employees table in the Northwind sample database. (There's too much code here to ask you to create it yourself—this time, you'll just inspect it.) You'll list all employees, add a new employee, and delete an employee. In each case, you'll use a stored procedure to do your work. In addition, to demonstrate the similarities (and the differences), you'll look at the code that calls the “add” stored procedure twice—first using the OleDb namespace and then using the SqlClient namespace.
Figure 15.1. Use this Web page to input a new employee, list employees, and delete employees using stored procedures.
In order to work with EmployeeSP.aspx, you'll need to add it to your project. Follow these steps to add the page:
1. |
Open your Northwind.sln solution in Visual Studio .NET. |
2. |
Select Project, Add Existing Item. Be sure to select “All Files (*.*)” from the Files of Type combo box. |
3. |
Find the EmployeeSP.* files in the JumpstartStoredProcs folder and load them into the project. |
You should now be able to load the EmployeeSP.aspx page in the page designer and see a Web page that looks similar to the one shown in Figure 15.1.
You'll need to add another hyperlink to the Main page of your Northwind Web site so it can call this new EmployeeSP.aspx page. Follow these steps to add the link:
1. |
Open Main.aspx in the page designer. | ||||||||
2. |
Add a new Hyperlink control just below the Employees hyperlink. | ||||||||
3. |
Set the properties for the control as shown in Table 15.1.
|
Adding Stored Procedures to the Database
In order for EmployeeSP.aspx to do its work, you'll need to add three stored procedures to the Northwind sample database. To add the stored procedures to your database, follow these steps:
1. | |
2. |
In SQL Query Analyzer, use the File, Open menu to locate and select the JumpStartStoredProcsEmpSP.sql file, which contains the scripts you need to create the new stored procedures. |
3. |
Press F5 to run the script. (If you run the script more than once, you'll see errors on subsequent passes, but you can disregard those errors.) |
4. |
When you're done, shut down the SQL Query Analyzer application. |
WARNING
As in the rest of this book, all the steps listed in this section assume that you're running SQL Server on your own local machine and that you have complete rights to modify it. If that's not the case, you'll need to check with your system administrator to see about modifying the schema of the Northwind sample database. The steps listed here also assume that the SQL Server service is running.
The three stored procedures allow you to list, add, and delete employees. The first, EmployeeList (see Listing 15.1), retrieves full name and ID information for each employee and returns a set of rows containing the results:
Listing 15.1. Retrieve a Set of Rows Using a Stored Procedure
CREATE PROCEDURE EmployeeList AS SELECT LastName + ', ' + FirstName As Name, EmployeeID FROM Employees GO |
The second procedure, EmployeeDelete (see Listing 15.2), is simple. You pass in an employee ID value, and this procedure deletes that employee:
Listing 15.2. Delete a Row Using a Stored Procedure
CREATE PROCEDURE EmployeeDelete
       @EmpID int
AS
 DELETE FROM Employees WHERE EmployeeID = @EmpID
GO
|
WARNING
If you've done much work with relational databases, you know that our EmployeeDelete procedure is a bit naive—you can't go around deleting rows from databases willy-nilly. The sample database has created a relationship between the Employees table and the Orders table—if an employee has taken an order, you won't be able to delete that employee, at least not without some more effort than we've expended here. For now, only attempt to delete employees that you add yourself! All other attempts will fail.
The third procedure, EmployeeAdd (see Listing 15.3), is the complex one. This procedure expects you to supply first name and last name values as input parameters. The stored procedure uses an INSERT statement to insert the new employee, and it returns the new employee ID in the output parameter, @EmpID. The procedure returns the error value, if any, as the return value of the procedure.
Listing 15.3. Add a Row Using a Stored Procedure
CREATE PROCEDURE EmployeeAdd
        @EmpID int OUTPUT,
        @FirstName Char(10),
        @LastName Char(20)
AS
 INSERT INTO Employees( FirstName, LastName)
 VALUES(@FirstName, @LastName)
 SELECT @EmpID = @@IDENTITY
 RETURN @@ERROR
GO
|
Loading the DataHandlerSqlClient Class
Throughout this book, you've been building the DataHandler class, which provides generic procedures for working with data using the OleDb namespace. In this chapter, we've provided examples that also use the SqlClient namespace. This namespace includes objects that are specific to SQL Server, and using them can be more efficient if you know you'll only be working with SQL Server. In addition, working with the SqlClient namespace alters the way you call stored procedures a bit, and it's important to compare the OleDb and SqlClient namespaces in this regard. If you dig into the DataHandlerSqlClient class, you'll find the same procedures you've seen in the DataHandler class, except in this class the procedures interact with the SqlClient namespace's objects.
To load the DataHandlerSqlClient class into your project, follow these steps:
1. |
Select Project, Add Existing Item from the menu bar. |
2. |
Find the DataHandlerSqlClient.vb file in the JumpstartNorthwind folder and load this file into this solution. |
If you investigate the code, you'll find that these procedures are almost identical to their cousins in the DataHandler class. One difference is the Imports statement at the top. DataHandler imports System.Data.OleDb, and DataHandlerSqlClient imports System.Data.SqlClient. Take a few moments and compare the two classes—you'll see that they're almost identical.
TIP
If it bothers you that you have two classes that are nearly identical, you're not alone! Because this book doesn't focus on object-oriented techniques, following through on this tip is beyond the scope of the book. If you're interested, look into the IDbCommand, IDbConnection, and IDbDataAdapter interfaces. You can take advantage of these types to create a generic class that will work with any ADO.NET namespace.
Modifying Global.asax
Because you'll need a connection string that works with the SqlClient namespace, you'll need to modify Global.asax to call the ConnectStringBuild procedure in the class you've just added. Follow these steps to add the necessary call:
1. |
In the Solution Explorer window, select Global.asax. |
2. |
Right-click and select View Code from the context menu. |
3. |
Modify the Session_Start procedure so that it looks like this: Sub Session_Start( _
ByVal sender As Object, _
ByVal e As EventArgs)
Session("LoginID") = String.Empty
Session("Password") = String.Empty
Session("ConnectString") = _
DataHandler.ConnectStringBuild("sa", "")
Session("ConnectStringSql") = _
DataHandlerSqlClient.ConnectStringBuild("sa", "")
End Sub
|
TIP
If you need to use a different login or password to access your SQL Server, use those values rather than "sa" and "". If you're using integrated security, pass no parameters at all to the ConnectStringBuild procedure.