
Chapter 2
Amazon Elastic Compute Cloud and Amazon Elastic Block Store
THE AWS CERTIFIED SOLUTIONS ARCHITECT ASSOCIATE EXAM OBJECTIVES COVERED IN THIS CHAPTER MAY INCLUDE, BUT ARE NOT LIMITED TO, THE FOLLOWING:
- Domain 1: Design Resilient Architectures
- 1.1 Design a multi‐tier architecture solution
- 1.2 Design highly available and/or fault‐tolerant architectures
- 1.4 Choose appropriate resilient storage
- Domain 2: Design High‐Performing Architectures
- 2.1 Identify elastic and scalable compute solutions for a workload
- 2.2 Select high‐performing and scalable storage solutions for a workload
- Domain 3: Design Secure Applications and Architectures
- 3.1 Design secure access to AWS resources
- Domain 4: Design Cost‐Optimized Architectures
- 4.1 Identify cost‐effective storage solutions
- 4.2 Identify cost‐effective compute and database services
- 4.3 Design cost‐optimized network architectures
Introduction
The ultimate focus of a traditional data center/server room is its precious servers. But, to make those servers useful, you'll need to add racks, power supplies, cabling, switches, firewalls, and cooling.
AWS's Elastic Compute Cloud (EC2) is designed to replicate the data center/server room experience as closely as possible. At the center of it all is the EC2 virtual server, known as an instance. But, like the local server room I just described, EC2 provides a range of tools meant to support and enhance your instance's operations.
This chapter will explore the tools and practices used to fully leverage the power of the EC2 ecosystem, including the following:
- Provisioning an EC2 instance with the right hardware resources for your project
- Configuring the right base operating system for your application needs
- Building a secure and effective network environment for your instance
- Adding scripts to run as the instance boots to support (or start) your application
- Choosing the best EC2 pricing model for your needs
- Understanding how to manage and leverage the EC2 instance lifecycle
- Choosing the right storage drive type for your needs
- Securing your EC2 resources using key pairs, security groups, network access lists, and Identity and Access Management (IAM) roles
- Scaling the number of instances up and down to meet changing demand using Auto Scaling
- Accessing your instance as an administrator or end‐user client
EC2 Instances
An EC2 instance may only be a virtualized and abstracted subset of a physical server, but it behaves just like the real thing. It will have access to storage, memory, and a network interface, and its primary storage drive will come with a fresh and clean operating system running.
It's up to you to decide what kind of hardware resources you want your instance to have, what operating system and software stack you'd like it to run, and, ultimately, how much you'll pay for it. Let's see how all that works.
Provisioning Your Instance
You configure your instance's operating system and software stack, hardware specs (the CPU power, memory, primary storage, and network performance), and environment before launching it. The OS is defined by the Amazon Machine Image (AMI) you choose, and the hardware follows the instance type.
EC2 Amazon Machine Images
An AMI is really just a template document that contains information telling EC2 what OS and application software to include on the root data volume of the instance it's about to launch. There are four kinds of AMIs:
- Amazon Quick Start AMIs Amazon Quick Start images appear at the top of the list in the console when you start the process of launching a new instance. The Quick Start AMIs are popular choices and include various releases of Linux or Windows Server OSs and some specialty images for performing common operations (like deep learning and database). These AMIs are up‐to‐date and officially supported.
- AWS Marketplace AMIs AMIs from the AWS Marketplace are official, production‐ready images provided and supported by industry vendors like SAP and Cisco.
- Community AMIs More than 100,000 images are available as community AMIs. Many of these images are AMIs created and maintained by independent vendors and are usually built to meet a specific need. This is a good catalog to search if you're planning an application built on a custom combination of software resources.
- Private AMIs You can also store images created from your own instance deployments as private AMIs. Why would you want to do that? You might, for instance, want the ability to scale up the number of instances you've got running to meet growing demand. Having a reliable, tested, and patched instance image as an AMI makes incorporating autoscaling easy. You can also share images as AMIs or import VMs from your local infrastructure (by way of AWS S3) using the AWS VM Import/Export tool.
A particular AMI will be available in only a single region—although there will often be images with identical functionality in all regions. Keep this in mind as you plan your deployments: invoking the ID of an AMI in one region while working from within a different region will fail.
Instance Types
AWS allocates hardware resources to your instances according to the instance type—or hardware profile—you select. The particular workload you're planning for your instance will determine the type you choose. The idea is to balance cost against your need for compute power, memory, and storage space. Ideally, you'll find a type that offers exactly the amount of each to satisfy both your application and budget.
Should your needs change over time, you can easily move to a different instance type by stopping your instance, editing its instance type, and starting it back up again.
As listed in Table 2.1, there are currently more than 75 instance types organized into five instance families, although AWS frequently updates their selection. You can view the most recent collection at aws.amazon.com/ec2/instance-types.
TABLE 2.1 EC2 instance type family and their top‐level designations
| Instance type family | Types |
|---|---|
| General purpose | A1, T3, T3a, T2, M6g, M5, M5a, M5n, M4 |
| Compute optimized | C5, C5n, C4 |
| Memory optimized | R5, R5a, R5n, X1e, X1, High Memory, z1d |
| Accelerated computing | P3, P2, Inf1, G4, G3, F1 |
| Storage optimized | I3, I3en, D2, H1 |
- General Purpose The General Purpose family includes T3, T2, M5, and M4 types, which all aim to provide a balance of compute, memory, and network resources. T2 types, for instance, range from the t2.nano with one virtual CPU (vCPU0) and half a gigabyte of memory all the way up to the t2.2xlarge with its eight vCPUs and 32 GB of memory. Because it's eligible as part of the Free Tier, the t2.micro is often a good choice for experimenting. But there's nothing stopping you from using it for light‐use websites and various development‐related services.
M5 and M4 instances are recommended for many small and midsized data‐centric operations. Unlike T2, which requires EBS virtual volumes for storage, some M* instances come with their own instance storage drives that are actually physically attached to the host server. M5 types range from m5.large (2 vCPUs and 8 GB of memory) to the monstrous m5d.metal (96 vCPUs and 384 GB of memory).
- Compute Optimized For more demanding web servers and high‐end machine learning workloads, you'll choose from the Compute Optimized family that includes C5 and C4 types. C5 machines—currently available from the c5.large to the c5d.24xlarge—give you as much as 3.5 GHz of processor speed and strong network bandwidth.
- Memory Optimized Memory Optimized instances work well for intensive database, data analysis, and caching operations. The X1e, X1, and R4 types are available with as much as 3.9 terabytes of dynamic random‐access memory (DRAM)‐based memory and low‐latency solid‐state drive (SSD) storage volumes attached.
- Accelerated Computing You can achieve higher‐performing general‐purpose graphics processing unit (GPGPU) performance from the P3, P2, G3, and F1 types within the Accelerated Computing group. These instances make use of various generations of high‐end NVIDIA GPUs or, in the case of the F1 instances, an Xilinx Virtex UltraScale+ field‐programmable gate array (FPGA—if you don't know what that is, then you probably don't need it). Accelerated Computing instances are recommended for demanding workloads such as 3D visualizations and rendering, financial analysis, and computational fluid dynamics.
- Storage Optimized The H1, I3, and D2 types currently make up the Storage Optimized family that have large, low‐latency instance storage volumes (in the case of I3en, up to 60 TB of slower hard disk drive [HDD] storage). These instances work well with distributed filesystems and heavyweight data processing applications.
The specification details and instance type names will frequently change as AWS continues to leverage new technologies to support its customers' growing computing demands. But it's important to be at least familiar with the instance type families and the naming conventions AWS uses to identify them.
Configuring an Environment for Your Instance
Deciding where your EC2 instance will live is as important as choosing a performance configuration. Here, there are three primary details to get right: geographic region, virtual private cloud (VPC), and tenancy model.
AWS Regions
As you learned earlier, AWS servers are housed in data centers around the world and organized by geographical region. You'll generally want to launch an EC2 instance in the region that's physically closest to the majority of your customers or, if you're working with data that's subject to legal restrictions, within a jurisdiction that meets your compliance needs.
EC2 resources can be managed only when you're “located within” their region. You set the active region in the console through the drop‐down menu at the top of the page and through default configuration values in the AWS CLI or your SDK. You can update your CLI configuration by running aws configure.
Bear in mind that the costs and even functionality of services and features might vary between regions. It's always a good idea to consult the most up‐to‐date official documentation.
VPCs
Virtual private clouds (VPCs) are easy‐to‐use AWS network organizers and great tools for organizing your infrastructure. Because it's so easy to isolate the instances in one VPC from whatever else you have running, you might want to create a new VPC for each one of your projects or project stages. For example, you might have one VPC for early application development, another for beta testing, and a third for production (see Figure 2.1).
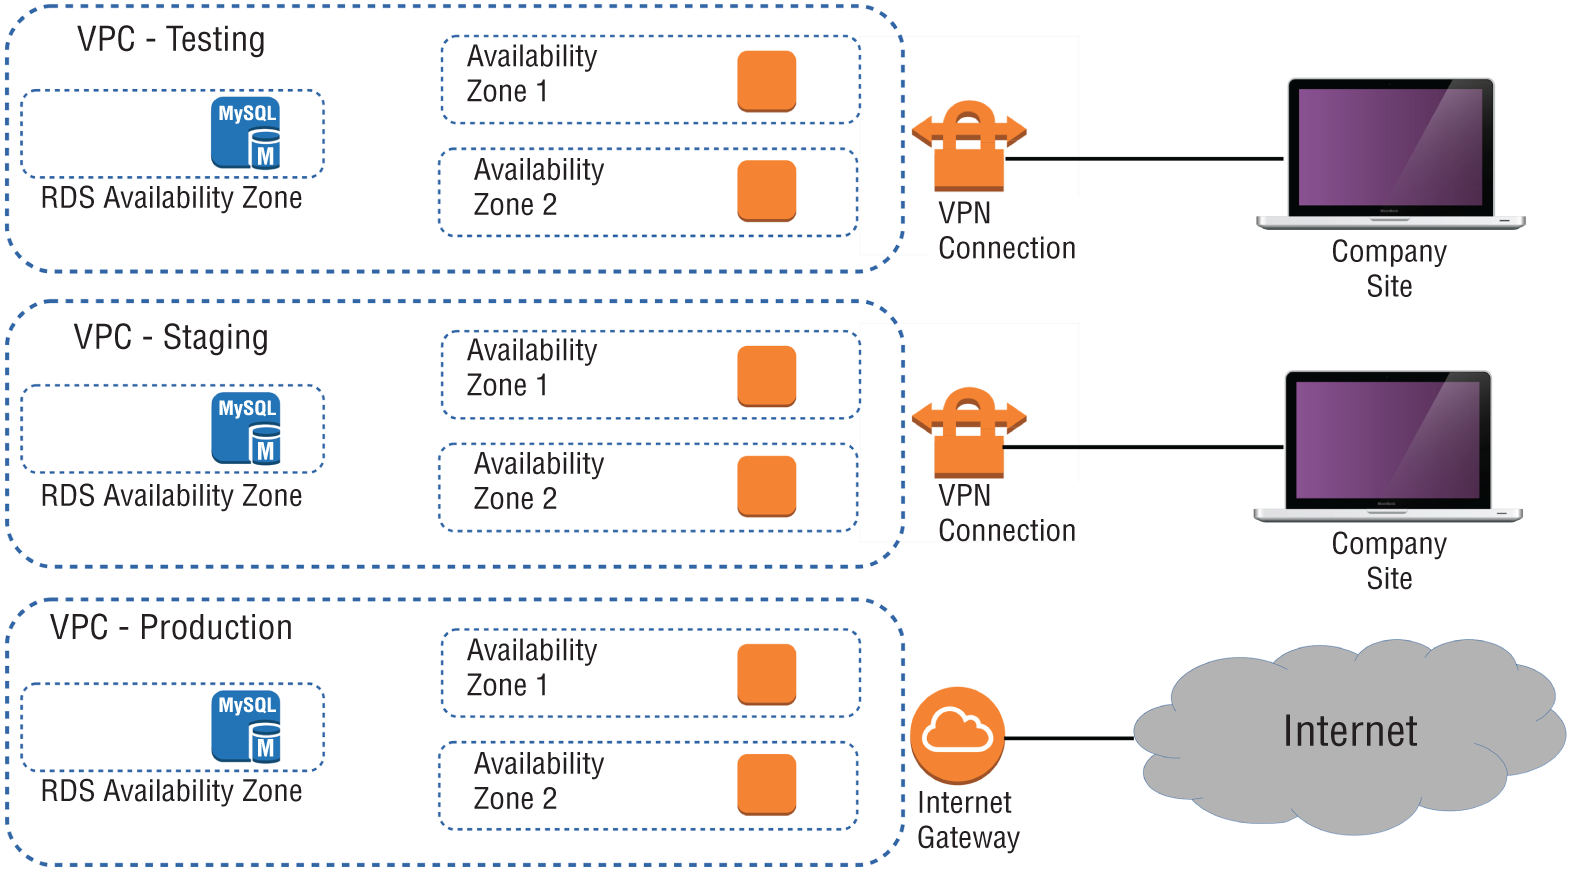
FIGURE 2.1 A multi‐VPC infrastructure for a development environment
Adding a simple VPC that doesn't incorporate a network address translation (NAT) gateway (docs.aws.amazon.com/AmazonVPC/latest/UserGuide/vpc-nat-gateway.html) or VPN access (docs.aws.amazon.com/vpn/latest/s2svpn/VPC_VPN.html) won't cost you anything. You'll learn much more about all this in Chapter 4, “Amazon Virtual Private Cloud.”
Tenancy
When launching an EC2 instance, you'll have the opportunity to choose a tenancy model. The default setting is shared tenancy, where your instance will run as a virtual machine on a physical server that's concurrently hosting other instances. Those other instances might well be owned and operated by other AWS customers, although the possibility of any kind of insecure interaction between instances is remote.
To meet special regulatory requirements, your organization's instances might need an extra level of isolation. The Dedicated Instance option ensures that your instance will run on a dedicated physical server. This means that it won't be sharing the server with resources owned by a different customer account. The Dedicated Host option allows you to actually identify and control the physical server you've been assigned to meet more restrictive licensing or regulatory requirements.
Naturally, dedicated instances and dedicated hosts will cost you more than instances using shared tenancy.
Exercise 2.1 will guide you through the launch of a simple EC2 Linux instance.
In Exercise 2.2, you'll see how changing an instance's type works.
Configuring Instance Behavior
You can optionally tell EC2 to execute commands on your instance as it boots by pointing to user data in your instance configuration (this is sometimes known as bootstrapping). Whether you specify the data during the console configuration process or by using the ‐‐user‐data value with the AWS CLI, you can have script files bring your instance to any desired state.
User data can consist of a few simple commands to install a web server and populate its web root, or it can be a sophisticated script setting up the instance as a working node within a Puppet Enterprise–driven platform.
Placement Groups
By default AWS will attempt to spread your instances across their infrastructure to create a profile that will be optimal for most use cases. But the specific demands of your operation might require a different setup. EC2 placement groups give you the power to define nonstandard profiles to better meet your needs. There are, at this time, three kinds of placement groups:
- Cluster groups launch each associated instance into a single availability zone within close physical proximity to each other. This provides low‐latency network interconnectivity and can be useful for high‐performance computing (HPC) applications, for instance.
- Spread groups separate instances physically across distinct hardware racks and even availability zones to reduce the risk of failure‐related data or service loss. Such a setup can be valuable when you're running hosts that can't tolerate multiple concurrent failures. If you're familiar with VMware's Distributed Resource Scheduler (DRS), this is similar to that.
- Partition groups let you associate some instances with each other, placing them in a single “partition.” But the instances within that single partition can be kept physically separated from instances within other partitions. This differs from spread groups where no two instances will ever share physical hardware.
Instance Pricing
You can purchase the use of EC2 instances through one of three models.
For always‐on deployments that you expect to run for less than 12 months, you'll normally pay for each hour your instance is running through the on‐demand model. On‐demand is the most flexible way to consume EC2 resources since you're able to closely control how much you pay by stopping and starting your instances according to your need. But, per hour, it's also the most expensive.
If you're planning to keep the lights burning 24/7 for more than a year, then you'll enjoy a significant discount by purchasing a reserve instance—generally over a term commitment of between one and three years. You can pay up front for the entire term of a reserve instance or, for incrementally higher rates, either partially up front and the rest in monthly charges or entirely through monthly charges. Table 2.2 gives you a sense of how costs can change between models. These estimates assume a Linux platform, all up‐front payments, and default tenancy. Actual costs may vary over time and between regions.
TABLE 2.2 Pricing estimates comparing on‐demand with reserve costs
| Instance type | Pricing model | Cost/hour | Cost/year |
|---|---|---|---|
| t2.micro | On‐demand | $0.0116 | $102.00 |
| t2.micro | Reserve (three‐year term) | $38.33 | |
| g3.4xlarge | On‐demand | $1.14 | $9986.40 |
| g3.4xlarge | Reserve (three‐year term) | $4429.66 |
For workloads that can withstand unexpected disruption (like computation‐intensive genome research applications), purchasing instances on Amazon's spot market can save you a lot of money. The idea is that you enter a maximum dollar‐value bid for an instance type running in a particular region. The next time an instance in that region becomes available at a per‐hour rate that's equal to or below your bid, it'll be launched using the AMI and launch template you specified. Once up, the instance will keep running either until you stop it—when your workload completes, for example—or until the instance's per‐hour rate rises above your maximum bid. You'll learn more about the spot market and reserve instances in Chapter 13, “The Cost Optimization Pillar.”
It will often make sense to combine multiple models within a single application infrastructure. An online store might, for instance, purchase one or two reserve instances to cover its normal customer demand but also allow autoscaling to automatically launch on‐demand instances during periods of unusually high demand.
Use Exercise 2.3 to dive deeper into EC2 pricing.
Instance Lifecycle
The state of a running EC2 instance can be managed in a number of ways. Terminating the instance will shut it down and cause its resources to be reallocated to the general AWS pool.
If your instance won't be needed for some time but you don't want to terminate it, you can save money by simply stopping it and then restarting it when it's needed again. The data on an EBS volume will in this case not be lost, although that would not be true for an instance volume.
Later in this chapter, you'll learn about both EBS and instance store volumes and the ways they work with EC2 instances.
You should be aware that a stopped instance that had been using a nonpersistent public IP address will most likely be assigned a different address when it's restarted. If you need a predictable IP address that can survive restarts, allocate an elastic IP address and associate it with your instance.
You can edit or change an instance's security group (which we'll discuss a bit later in this chapter) to update access policies at any time—even while an instance is running. You can also change its instance type to increase or decrease its compute, memory, and storage capacity (just try doing that on a physical server). You will need to stop the instance, change the type, and then restart it.
Resource Tags
The more resources you deploy on your AWS account, the harder it can be to properly keep track of things. Having constantly changing numbers of EC2 instances—along with accompanying storage volumes, security groups, and elastic IP addresses—all spread across two or three VPCs can get complicated.
The best way to keep a lid on the chaos is to find a way to quickly identify each resource you've got running by its purpose and its relationships to other resources. The best way to do that is by establishing a consistent naming convention and applying it to tags.
AWS resource tags can be used to label everything you'll ever touch across your AWS account—they're certainly not restricted to just EC2. Tags have a key and, optionally, an associated value. So, for example, you could assign a tag with the key production‐server to each element of a production deployment. Server instances could, in addition, have a value of server1, server2, and so on. A related security group could have the same production‐server key but security‐group1 for its value. Table 2.3 illustrates how that convention might play out over a larger deployment group.
TABLE 2.3 A sample key/value tagging convention
| Key | Value |
|---|---|
production‐server |
server1 |
production‐server |
server2 |
production‐server |
security‐group1 |
staging‐server |
server1 |
staging‐server |
server2 |
staging‐server |
security‐group1 |
test‐server |
server1 |
test‐server |
security‐group1 |
Applied properly, tags can improve the visibility of your resources, making it much easier to manage them effectively, audit and control costs and billing trends, and avoid costly errors.
Service Limits
By default, each AWS account has limits to the number of instances of a particular service you're able to launch. Sometimes those limits apply to a single region within an account, and others are global. As examples, you're allowed only five VPCs per region and 5,000 Secure Shell (SSH) key pairs across your account. If necessary, you can ask AWS to raise your ceiling for a particular service.
You can find up‐to‐date details regarding the limits of all AWS services at docs.aws.amazon.com/general/latest/gr/aws_service:limits.html.
EC2 Storage Volumes
Storage drives (or volumes as they're described in AWS documentation) are for the most part virtualized spaces carved out of larger physical drives. To the OS running on your instance, though, all AWS volumes will present themselves exactly as though they were normal physical drives. But there's actually more than one kind of AWS volume, and it's important to understand how each type works.
Elastic Block Store Volumes
You can attach as many Elastic Block Store (EBS) volumes to your instance as you like (although one volume can be attached to no more than a single instance at a time) and use them just as you would hard drives, flash drives, or USB drives with your physical server. And as with physical drives, the type of EBS volume you choose will have an impact on both performance and cost.
The AWS SLA guarantees the reliability of the data you store on its EBS volumes (promising at least 99.99 percent availability), so you don't have to worry about failure. When an EBS drive does fail, its data has already been duplicated and will probably be brought back online before anyone notices a problem. So, practically, the only thing that should concern you is how quickly and efficiently you can access your data.
There are currently four EBS volume types, two using SSD technologies and two using the older spinning hard drives. The performance of each volume type is measured in maximum IOPS/volume (where IOPS means input/output operations per second).
EBS‐Provisioned IOPS SSD
If your applications will require intense rates of I/O operations, then you should consider provisioned IOPS, which provides a maximum IOPS/volume of 64,000 and a maximum throughput/volume of 1,000 MB/s. Provisioned IOPS—which in some contexts is referred to as EBS Optimized—can cost $0.125/GB/month in addition to $0.065/provisioned IOPS.
EBS General‐Purpose SSD
For most regular server workloads that, ideally, deliver low‐latency performance, general‐purpose SSDs will work well. You'll get a maximum of 16,000 IOPS/volume, and it will cost you $0.10/GB/month. For reference, a general‐purpose SSD used as a typical 8 GB boot drive for a Linux instance would, at current rates, cost you $9.60/year.
Throughput‐Optimized HDD
Throughput‐optimized HDD volumes can provide reduced costs with acceptable performance where you're looking for throughput‐intensive workloads, including log processing and big data operations. These volumes can deliver only 500 IOPS/volume but with a 500 MB/s maximum throughput/volume, and they'll cost you only $0.045/GB/month.
Cold HDD
When you're working with larger volumes of data that require only infrequent access, a 250 IOPS/volume type might meet your needs for only $0.025/GB/month.
Table 2.4 lets you compare the basic specifications and estimated costs of those types.
TABLE 2.4 Sample costs for each of the four EBS storage volume types
| EBS‐provisioned IOPS SSD | EBS general‐purpose SSD | Throughput‐optimized HDD | Cold HDD | |
|---|---|---|---|---|
| Volume size | 4 GB–16 TB | 1 GB–16 TB | 500 GB–16 TB | 500 GB–16 TB |
| Max IOPS/volume | 64,000 | 16,000 | 500 | 250 |
| Max throughput/volume (MB/s) | 1,000 | 250 | 500 | 250 |
| Price (/month) | $0.125/GB + $0.065/prov IOPS | $0.10/GB | $0.045/GB | $0.025/GB |
EBS Volume Features
All EBS volumes can be copied by creating a snapshot. Existing snapshots can be used to generate other volumes that can be shared and/or attached to other instances or converted to images from which AMIs can be made. You can also generate an AMI image directly from a running instance‐attached EBS volume—although, to be sure no data is lost, you should shut down the instance first.
EBS volumes can be encrypted to protect their data while at rest or as it's sent back and forth to the EC2 host instance. EBS can manage the encryption keys automatically behind the scenes or use keys that you provide through the AWS Key Management Service (KMS).
Exercise 2.4 will walk you through launching a new instance based on an existing snapshot image.
Instance Store Volumes
Unlike EBS volumes, instance store volumes are ephemeral. This means that when the instances they're attached to are shut down, their data is permanently lost. So, why would you want to keep your data on an instance store volume more than on EBS?
- Instance store volumes are SSDs that are physically attached to the server hosting your instance and are connected via a fast NVMe (Non‐Volatile Memory Express) interface.
- The use of instance store volumes is included in the price of the instance itself.
- Instance store volumes work especially well for deployment models where instances are launched to fill short‐term roles (as part of autoscaling groups, for instance), import data from external sources, and are, effectively, disposable.
Whether one or more instance store volumes are available for your instance will depend on the instance type you choose. This is an important consideration to take into account when planning your deployment.
Even with all the benefits of EBS and instance storage, it's worth noting that there will be cases where you're much better off keeping large data sets outside of EC2 altogether. For many use cases, Amazon's S3 service can be a dramatically less expensive way to store files or even databases that are nevertheless instantly available for compute operations.
You'll learn more about this in Chapter 3, “AWS Storage.”
The bottom line is that EBS volumes are likely to be the right choice for instances whose data needs to persist beyond a reboot and for working with custom or off‐the‐shelf AMIs. Instance store volumes are, where available, useful for operations requiring low‐latency access to large amounts of data that needn't survive a system failure or reboot. And non‐EC2 storage can work well when you don't need fantastic read/write speeds, but you wish to enjoy the flexibility and cost savings of S3.
Accessing Your EC2 Instance
Like all networked devices, EC2 instances are identified by unique IP addresses. All instances are assigned at least one private IPv4 address that, by default, will fall within one of the blocks shown in Table 2.5.
TABLE 2.5 The three IP address ranges used by private networks
| From | To |
|---|---|
| 10.0.0.0 | 10.255.255.255 |
| 172.16.0.0 | 172.31.255.255 |
| 192.168.0.0 | 192.168.255.255 |
Out of the box, you'll only be able to connect to your instance from within its subnet, and the instance will have no direct connection to the Internet.
If your instance configuration calls for multiple network interfaces (to connect to otherwise unreachable resources), you can create and then attach one or more virtual elastic network interfaces to your instance. Each of these interfaces must be connected to an existing subnet and security group. You can optionally assign a static IP address within the subnet range.
Of course, an instance can also be assigned a public IP through which full Internet access is possible. As noted in the instance lifecycle discussion, the default public IP assigned to your instance is ephemeral and probably won't survive a reboot. Therefore, you'll usually want to allocate a permanent elastic IP for long‐term deployments. As long as it's attached to a running instance, there's no charge for elastic IPs.
I'll talk about accessing an instance as an administrator a bit later within the context of security. But there's a lot you can learn about a running EC2 instance—including the IP addresses you'll need to connect—through the instance metadata system. Running the following curl command from the command line while logged into the instance will return a list of the kinds of data that are available:
$ curl http://169.254.169.254/latest/meta‐data/ami-idami-launch-indexami-manifest-pathblock-device-mapping/hostnameinstance-actioninstance-idinstance-typelocal-hostnamelocal-ipv4macmetrics/network/placement/profilepublic-hostnamepublic-ipv4public-keys/reservation-idsecurity-groups
Entries ending with a trailing slash (/) contain further sublevels of information that can also be displayed by curl. Adding a data type to that curl command will then return the information you're after. This example displays the name of the security groups used by the instance:
$ curl http://169.254.169.254/latest/meta-data/security-groups launch-wizard-1Securing Your EC2 Instance
You are responsible for configuring appropriate and effective access controls to protect your EC2 instances from unauthorized use. Broadly speaking, AWS provides four tools to help you with this task: security groups, Identity and Access Management (IAM) roles, network address translation (NAT) instances, and key pairs.
Security Groups
An EC2 security group plays the role of a firewall. By default, a security group will deny all incoming traffic while permitting all outgoing traffic. You define group behavior by setting policy rules that will either block or allow specified traffic types. From that point on, any data packet coming into or leaving the perimeter will be measured against those rules and processed accordingly.
Traffic is assessed by examining its source and destination, the network port it's targeting, and the protocol it's set to use. A TCP packet sent to the SSH port 22 could, for example, only be allowed access to a particular instance if its source IP address matches the local public IP used by computers in your office. This lets you open up SSH access on your instance without having to worry about anyone from outside your company getting in.
Using security groups, you can easily create sophisticated rule sets to finely manage access to your services. You could, say, open up a website to the whole world while blocking access to your backend servers for everyone besides members of your team.
If necessary, you can update your security group rules and/or apply them to multiple instances.
IAM Roles
You can also control access to AWS resources—including EC2 instances—through the use of IAM roles. You define an IAM role by giving it permissions to perform actions on specified services or resources within your AWS account. When a particular role is assigned to a user or resource, they'll gain access to whichever resources were included in the role policies.
Using roles, you can give a limited number of entities (other resources or users) exclusive access to resources like your EC2 instances. But you can also assign an IAM role to an EC2 instance so that processes running within it can access the external tools—like an RDS database instance—it needs to do its work.
You'll learn more about IAM in Chapter 6, “Authentication and Authorization—AWS Identity and Access Management.”
NAT Devices
Sometimes you'll need to configure an EC2 instance without a public IP address to limit its exposure to the network. Naturally, that means it won't have any Internet connectivity. But that can present a problem because you'll probably still need to give it Internet access so that it can receive security patches and software updates.
One solution is to use network address translation (NAT) to give your private instance access to the Internet without allowing access to it from the Internet. AWS gives you two ways to do that: a NAT instance and a NAT gateway (see Figure 2.2). They'll both do the job, but since a NAT gateway is a managed service, it doesn't require that you manually launch and maintain an instance. Both approaches will incur monthly charges.
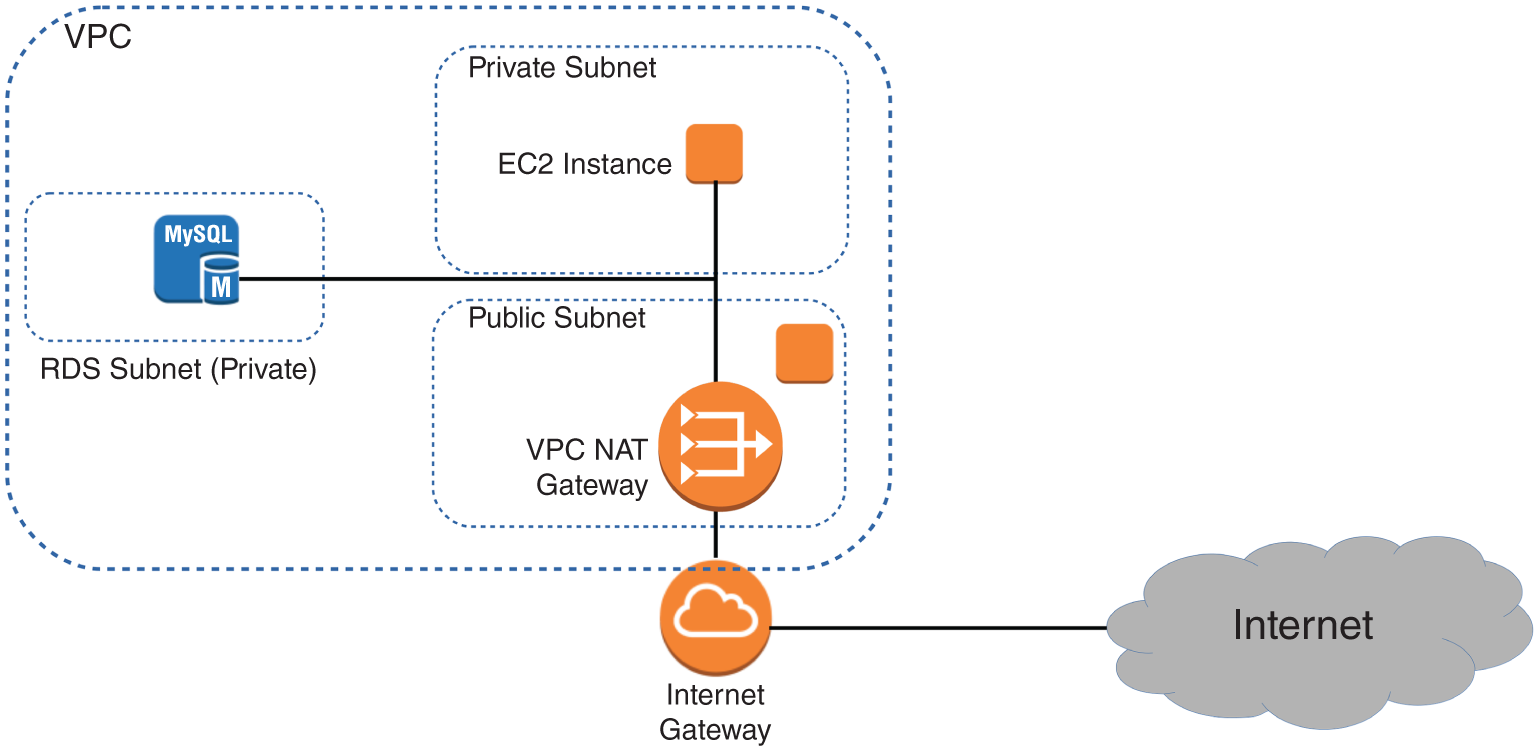
FIGURE 2.2 A NAT gateway providing network access to resources in private subnets
NAT will be discussed at greater length in Chapter 4.
Key Pairs
As any professional administrator will know, remote login sessions on your running instances should never be initiated over unencrypted plain‐text connections. To ensure properly secured sessions, you'll need to generate a key pair, save the public key to your EC2 server, and save its private half to your local machine. If you're working with a Windows AMI, you'll use the private key file to retrieve the password you'll need to authenticate into your instance. For a Linux AMI, the private key will allow you to open an SSH session.
Each key pair that AWS generates for you will remain installed within its original region and available for use with newly launched instances until you delete it. You should delete the AWS copy in the event your public key is lost or exposed. Just be careful before you mess with your keys—your access to an instance might depend on it.
EC2 Auto Scaling
The EC2 Auto Scaling service offers a way to both avoid application failure and recover from it when it happens. Auto Scaling works by provisioning and starting on your behalf a specified number of EC2 instances. It can dynamically add more instances to keep up with increased demand. And when an instance fails or gets terminated, Auto Scaling will automatically replace it.
EC2 Auto Scaling uses either a launch configuration or a launch template to automatically configure the instances that it launches. Both perform the same basic function of defining the basic configuration parameters of the instance as well as what scripts (if any) run on it at launch time. Launch configurations have been around longer and are more familiar to you if you've been using AWS for a while. You're also more likely to encounter them if you're going into an existing AWS environment. Launch templates are newer and are what AWS now recommends. You'll learn about both, but which you use is up to you.
Launch Configurations
When you create an instance manually, you have to specify many configuration parameters, including an AMI, instance type, SSH key pair, security group, instance profile, block device mapping, whether it's EBS optimized, placement tenancy, and user data, such as custom scripts to install and configure your application. A launch configuration is essentially a named document that contains the same information you'd provide when manually provisioning an instance.
You can create a launch configuration from an existing EC2 instance. Auto Scaling will copy the settings from the instance for you, but you can customize them as needed. You can also create a launch configuration from scratch.
Launch configurations are for use only with EC2 Auto Scaling, meaning you can't manually launch an instance using a launch configuration. Also, once you create a launch configuration, you can't modify it. If you want to change any of the settings, you have to create an entirely new launch configuration.
Launch Templates
Launch templates are similar to launch configurations in that you can specify the same settings. But the uses for launch templates are more versatile. You can use a launch template with Auto Scaling, of course, but you can also use it for spinning up one‐off EC2 instances or even creating a spot fleet.
Launch templates are also versioned, allowing you to change them after creation. Any time you need to make changes to a launch template, you create a new version of it. AWS keeps all versions, and you can then flip back and forth between versions as needed. This makes it easier to track your launch template changes over time. Complete Exercise 2.5 to create your own launch template.
Auto Scaling Groups
An Auto Scaling group is a group of EC2 instances that Auto Scaling manages. When creating an Auto Scaling group, you must first specify either the launch configuration or launch template you created. When you create an Auto Scaling group, you must specify how many running instances you want Auto Scaling to provision and maintain using the launch configuration or template you created. You must specify the minimum and maximum size of the Auto Scaling group. You may also optionally set the desired number of instances you want Auto Scaling to provision and maintain.
- Minimum Auto Scaling will ensure the number of healthy instances never goes below the minimum. If you set this to 0, Auto Scaling will not spawn any instances and will terminate any running instances in the group.
- Maximum Auto Scaling will make sure the number of healthy instances never exceeds this amount. This might seem strange but remember that you might have budget limitations and need to be protected from unexpected (and unaffordable) usage demands.
- Desired Capacity The desired capacity is an optional setting that must lie within the minimum and maximum values. If you don't specify a desired capacity, Auto Scaling will launch the number of instances as the minimum value. If you specify a desired capacity, Auto Scaling will add or terminate instances to stay at the desired capacity. For example, if you set the minimum to 1, the maximum to 10, and the desired capacity to 4, then Auto Scaling will create four instances. If one of those instances gets terminated—for example, because of human action or a host crash—Auto Scaling will replace it to maintain the desired capacity setting of 4. In the web console, desired capacity is also called the group size.
Specifying an Application Load Balancer Target Group
If you want to use an application load balancer (ALB) to distribute traffic to instances in your Auto Scaling group, just plug in the name of the ALB target group when creating the Auto Scaling group. Whenever Auto Scaling creates a new instance, it will automatically add it to the ALB target group.
Health Checks Against Application Instances
When you create an Auto Scaling group, Auto Scaling will strive to maintain the minimum number of instances, or the desired number if you've specified it. If an instance becomes unhealthy, Auto Scaling will terminate and replace it.
By default, Auto Scaling determines an instance's health based on EC2 health checks. Chapter 7, “CloudTrail, CloudWatch, and AWS Config,” covers how EC2 automatically performs system and instance status checks. These checks monitor for instance problems such as memory exhaustion, filesystem corruption, or an incorrect network or startup configuration, as well as for system problems that require AWS involvement to repair. Although these checks can catch a variety of instance and host‐related problems, they won't necessarily catch application‐specific problems.
If you're using an application load balancer to route traffic to your instances, you can configure health checks for the load balancer's target group. Target group health checks can check for HTTP response codes from 200 to 499. You can then configure your Auto Scaling group to use the results of these health checks to determine whether an instance is healthy.
If an instance fails the ALB health check, it will route traffic away from the failed instance, ensuring that users don't reach it. At the same time, Auto Scaling will remove the instance, create a replacement, and add the new instance to the load balancer's target group. The load balancer will then route traffic to the new instance.
Auto Scaling Options
Once you create an Auto Scaling group, you can leave it be and it will continue to maintain the minimum or desired number of instances indefinitely. However, maintaining the current number of instances is just one option. Auto Scaling provides several other options to scale out the number of instances to meet demand.
Manual Scaling
If you change the minimum, desired, or maximum values at any time after creating the group, Auto Scaling will immediately adjust. For example, if you have the desired capacity value set to 2 and change it to 4, Auto Scaling will launch two more instances. If you have four instances and set the desired capacity value to 2, Auto Scaling will terminate two instances. Think of the desired capacity as a thermostat.
Dynamic Scaling Policies
Most AWS‐managed resources are elastic—that is, they automatically scale to accommodate increased load. Some examples include S3, load balancers, Internet gateways, and NAT gateways. Regardless of how much traffic you throw at them, AWS is responsible for ensuring that they remain available while continuing to perform well. But when it comes to your EC2 instances, you're responsible for ensuring that they're powerful and plentiful enough to meet demand.
Running out of instance resources—be it CPU utilization, memory, or disk space—will almost always result in the failure of whatever you're running on it. To ensure that your instances never become overburdened, dynamic scaling policies automatically provision more instances before they hit that point. Auto Scaling generates the following aggregate metrics for all instances within the group:
- Aggregate CPU utilization
- Average request count per target
- Average network bytes in
- Average network bytes out
You're not limited to using just these native metrics. You can also use metric filters to extract metrics from CloudWatch logs and use those. As an example, your application may generate logs that indicate how long it takes to complete a process. If the process takes too long, you could have Auto Scaling spin up new instances.
Dynamic scaling policies work by monitoring a CloudWatch alarm and scaling out—by increasing the desired capacity—when the alarm is breaching. You can choose from three dynamic scaling policies: simple, step, and target tracking.
Simple Scaling Policies
With a simple scaling policy, whenever the metric rises above the threshold, Auto Scaling simply increases the desired capacity. How much it increases the desired capacity, however, depends on which of the following adjustment types you choose:
- ChangeInCapacity Increases the capacity by a specified amount. For instance, you could start with a desired capacity value of 4 and then have Auto Scaling increase the value by 2 when the load increases.
- ExactCapacity Sets the capacity to a specific value, regardless of the current value. For example, suppose the desired capacity value is 4. You create a policy to change the value to 6 when the load increases.
- PercentChangeInCapacity Increases the capacity by a percentage of the current amount. If the current desired capacity value is 4 and you specify the percent change in capacity as 50 percent, then Auto Scaling will bump the desired capacity value to 6.
For example, suppose you have four instances and create a simple scaling policy that specifies a PercentChangeInCapacity adjustment of 50 percent. When the monitored alarm triggers, Auto Scaling will increment the desired capacity by 2, which will in turn add two instances to the Auto Scaling group, for a total of six.
After Auto Scaling completes the adjustment, it waits a cooldown period before executing the policy again, even if the alarm is still breaching. The default cooldown period is 300 seconds, but you can set it as high as you want or as low as 0—effectively disabling it. Note that if an instance is unhealthy, Auto Scaling will not wait for the cooldown period before replacing the unhealthy instance.
Referring to the preceding example, suppose that after the scaling adjustment completes and the cooldown period expires, the monitored alarm drops below the threshold. At this point, the desired capacity value is 6. If the alarm triggers again, the simple scaling action will execute again and add three more instances. Keep in mind that Auto Scaling will never increase the desired capacity beyond the group's maximum setting.
Step Scaling Policies
If the demand on your application is rapidly increasing, a simple scaling policy may not add enough instances quickly enough. Using a step scaling policy, you can instead add instances based on how much the aggregate metric exceeds the threshold.
To illustrate, suppose your group starts out with four instances. You want to add more instances to the group as the average CPU utilization of the group increases. When the utilization hits 50 percent, you want to add two more instances. When it goes above 60 percent, you want to add four more instances.
You'd first create a CloudWatch Alarm to monitor the average CPU utilization and set the alarm threshold to 50 percent, since this is the utilization level at which you want to start increasing the desired capacity.
You must then specify at least one step adjustment. Each step adjustment consists of the following:
- A lower bound
- An upper bound
- The adjustment type
- The amount by which to increase the desired capacity
The upper and lower bounds define a range that the metric has to fall within for the step adjustment to execute. Suppose that for the first step you set a lower bound of 50 and an upper bound of 60, with a ChangeInCapacity adjustment of 2. When the alarm triggers, Auto Scaling will consider the metric value of the group's average CPU utilization. Suppose it's 55 percent. Because 55 is between 50 and 60, Auto Scaling will execute the action specified in this step, which is to add two instances to the desired capacity.
Suppose now that you create another step with a lower bound of 60 and an upper bound of infinity. You also set a ChangeInCapacity adjustment of 4. If the average CPU utilization increases to 62 percent, Auto Scaling will note that 60 <= 62 < infinity and will execute the action for this step, adding four instances to the desired capacity.
You might be wondering what would happen if the utilization were 60 percent. Step ranges can't overlap. A metric of 60 percent would fall within the lower bound of the second step.
With a step scaling policy, you can optionally specify a warm‐up time, which is how long Auto Scaling will wait until considering the metrics of newly added instances. The default warm‐up time is 300 seconds. Note that there are no cooldown periods in step scaling policies.
Target Tracking Policies
If step scaling policies are too involved for your taste, you can instead use target tracking policies. All you do is select a metric and target value, and Auto Scaling will create a CloudWatch Alarm and a scaling policy to adjust the number of instances to keep the metric near that target.
The metric you choose must change proportionally to the instance load. Metrics like this include average CPU utilization for the group and request count per target. Aggregate metrics like the total request count for the ALB don't change proportionally to the load on an individual instance and aren't appropriate for use in a target tracking policy.
In addition to scaling out, target tracking will scale in by deleting instances to maintain the target metric value. If you don't want this behavior, you can disable scaling in. Also, just as with a step scaling policy, you can optionally specify a warm‐up time.
Scheduled Actions
Scheduled actions are useful if you have a predictable load pattern and want to adjust your capacity proactively, ensuring you have enough instances before demand hits.
When you create a scheduled action, you must specify the following:
- A minimum, maximum, or desired capacity value
- A start date and time
You may optionally set the policy to recur at regular intervals, which is useful if you have a repeating load pattern. You can also set an end time, after which the scheduled policy gets deleted.
To illustrate how you might use a scheduled action, suppose you normally run only two instances in your Auto Scaling group during the week. But on Friday, things get busy, and you know you'll need four instances to keep up. You'd start by creating a scheduled action that sets the desired capacity to 2 and recurs every Saturday, as shown in Figure 2.3.
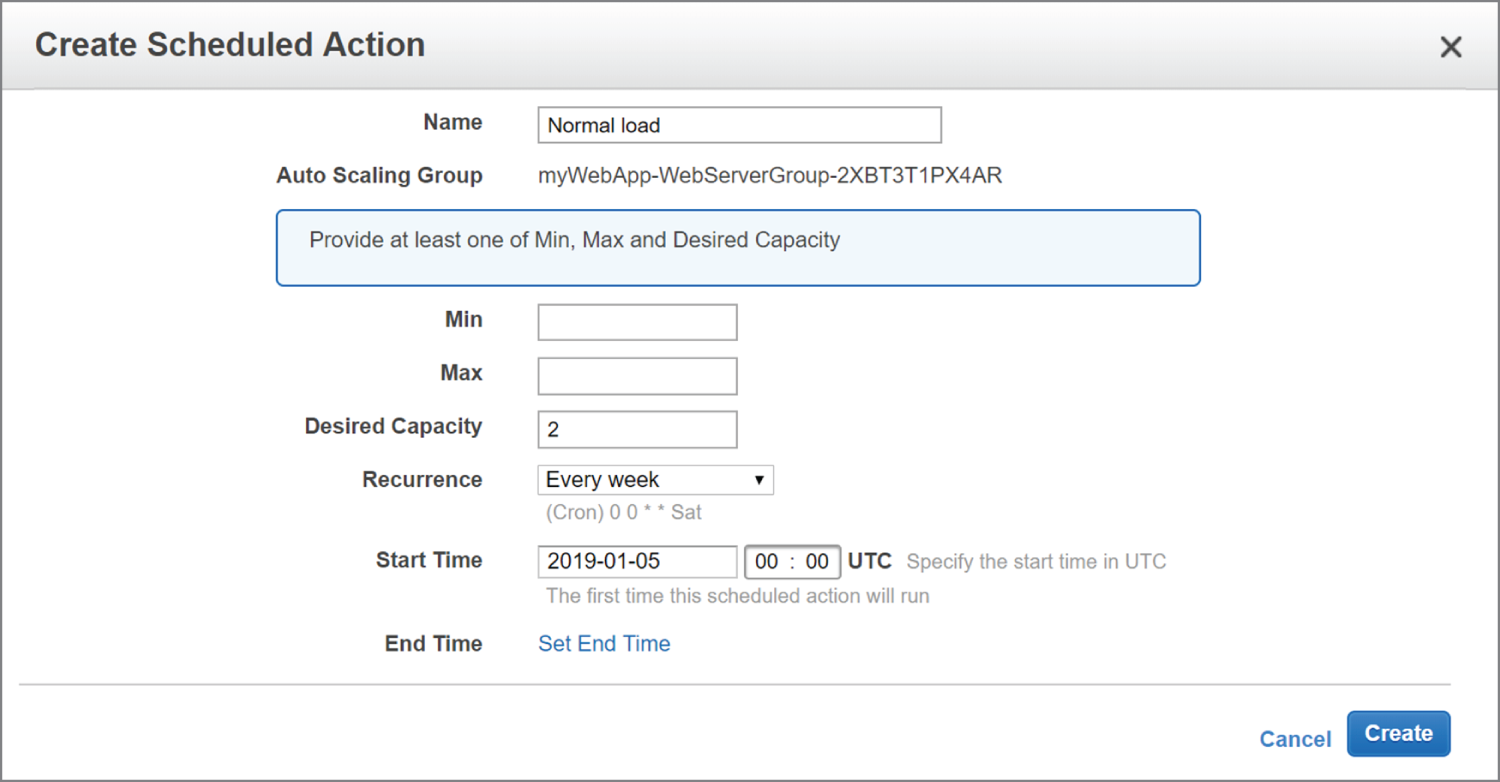
FIGURE 2.3 Scheduled action setting the desired capacity to 2 every Saturday
The start date is January 5, 2019, which is a Saturday. To handle the expected Friday spike, you'd create another weekly recurring policy to set the desired capacity to 4, as shown in Figure 2.4.
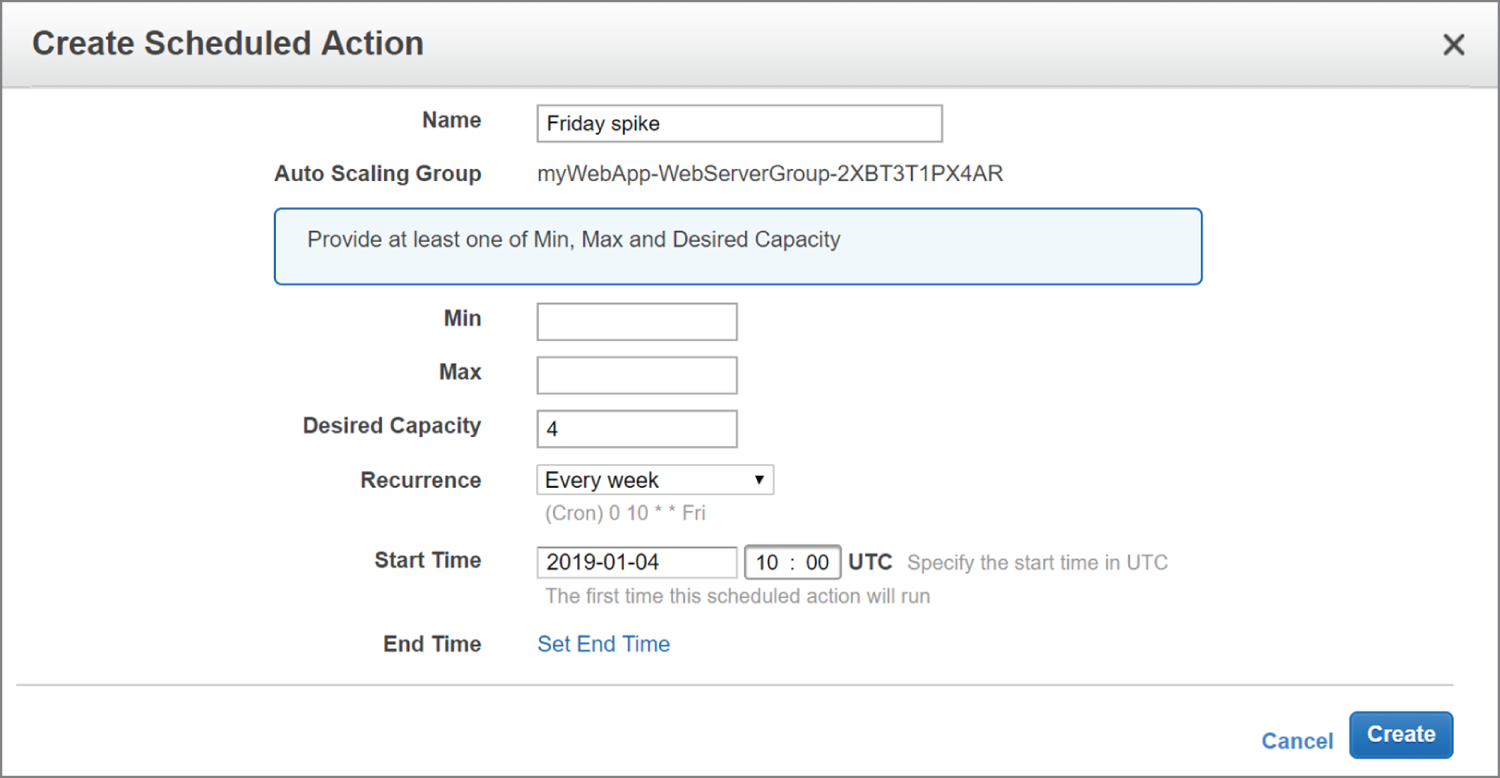
FIGURE 2.4 Scheduled action setting the desired capacity to 4 every Friday
This action will run every Friday, setting the desired capacity to 4, prior to the anticipated increased load.
Note that you can combine scheduled actions with dynamic scaling policies. For example, if you're running an e‐commerce site, you may use a scheduled action to increase the maximum group size during busy shopping seasons and then rely on dynamic scaling policies to increase the desired capacity as needed.
AWS Systems Manager
AWS Systems Manager, formerly known as EC2 Systems Manager and Simple Systems Manager (SSM), lets you automatically or manually perform actions against your AWS resources and on‐premises servers.
From an operational perspective, Systems Manager can handle many of the maintenance tasks that often require manual intervention or writing scripts. For on‐premises and EC2 instances, these tasks include upgrading installed packages, taking an inventory of installed software, and installing a new application. For your other AWS resources, such tasks may include creating an AMI golden image from an EBS snapshot, attaching IAM instance profiles, or disabling public read access to S3 buckets.
Systems Manager provides the following two capabilities:
- Actions
- Insights
Actions
Actions let you automatically or manually perform actions against your AWS resources, either individually or in bulk. These actions must be defined in documents, which are divided into three types:
- Automation—actions you can run against your AWS resources
- Command—actions you run against your Linux or Windows instances
- Policy—defined processes for collecting inventory data from managed instances
Automation
Automation enables you to perform actions against your AWS resources in bulk. For example, you can restart multiple EC2 instances, update CloudFormation stacks, and patch AMIs.
Automation provides granular control over how it carries out its individual actions. It can perform the entire automation task in one fell swoop, or it can perform one step at a time, enabling you to control precisely what happens and when. Automation also offers rate control so that you can specify as a number or a percentage how many resources to target at once.
Run Command
While automation lets you automate tasks against your AWS resources, Run commands let you execute tasks on your managed instances that would otherwise require logging in or using a third‐party tool to execute a custom script.
Systems Manager accomplishes this via an agent installed on your EC2 and on‐premises managed instances. The Systems Manager agent is installed by default on more recent Windows Server, Amazon Linux, and Ubuntu Server AMIs. You can manually install the agent on other AMIs and on‐premises servers.
By default, Systems Manager doesn't have permissions to do anything on your instances. You first need to apply an instance profile role that contains the permissions in the AmazonEC2RoleforSSM policy.
AWS offers a variety of preconfigured command documents for Linux and Windows instances; for example, the AWS‐InstallApplication document installs software on Windows, and the AWS‐RunShellScript document allows you to execute arbitrary shell scripts against Linux instances. Other documents include tasks such as restarting a Windows service or installing the CodeDeploy agent.
You can target instances by tag or select them individually. As with automation, you may use rate limiting to control how many instances you target at once.
Session Manager
Session Manager lets you achieve interactive Bash and PowerShell access to your Linux and Windows instances, respectively, without having to open up inbound ports on a security group or network ACL or even having your instances in a public subnet. You don't need to set up a protective bastion host or worry about SSH keys. All Linux versions and Windows Server 2008 R2 through 2016 are supported.
You open a session using the web console or AWS CLI. You must first install the Session Manager plug‐in on your local machine to use the AWS CLI to start a session. The Session Manager SDK has libraries for developers to create custom applications that connect to instances. This is useful if you want to integrate an existing configuration management system with your instances without opening ports in a security group or NACL.
Connections made via Session Manager are secured using TLS 1.2. Session Manager can keep a log of all logins in CloudTrail and store a record of commands run within a session in an S3 bucket.
Patch Manager
Patch Manager helps you automate the patching of your Linux and Windows instances. It will work for supporting versions of the following operating systems:
- Windows Server
- Ubuntu Server
- Red Hat Enterprise Linux (RHEL)
- SUSE Linux Enterprise Server (SLES)
- CentOS
- Amazon Linux
- Amazon Linux 2
You can individually choose instances to patch, patch according to tags, or create a patch group. A patch group is a collection of instances with the tag key Patch Group. For example, if you wanted to include some instances in the Webservers patch group, you'd assign tags to each instance with the tag key of Patch Group and the tag value of Webservers. Keep in mind that the tag key is case‐sensitive.
Patch Manager uses patch baselines to define which available patches to install, as well as whether the patches will be installed automatically or require approval.
AWS offers default baselines that differ according to operating system but include patches that are classified as security related, critical, important, or required. The patch baselines for all operating systems except Ubuntu automatically approve these patches after seven days. This is called an auto‐approval delay.
For more control over which patches get installed, you can create your own custom baselines. Each custom baseline contains one or more approval rules that define the operating system, the classification and severity level of patches to install, and an auto‐approval delay.
You can also specify approved patches in a custom baseline configuration. For Windows baselines, you can specify knowledgebase and security bulletin IDs. For Linux baselines, you can specify Common Vulnerabilities and Exposures (CVE) IDs or full package names. If a patch is approved, it will be installed during a maintenance window that you specify. Alternatively, you can forego a maintenance window and patch your instances immediately. Patch Manager executes the AWS‐RunPatchBaseline document to perform patching.
State Manager
While Patch Manager can help ensure your instances are all at the same patch level, State Manager is a configuration management tool that ensures your instances have the software you want them to have and are configured in the way you define. More generally, State Manager can automatically run command and policy documents against your instances, either one time only or on a schedule. For example, you may want to install antivirus software on your instances and then take a software inventory.
To use State Manager, you must create an association that defines the command document to run, any parameters you want to pass to it, the target instances, and the schedule. Once you create an association, State Manager will immediately execute it against the target instances that are online. Thereafter, it will follow the schedule.
There is currently only one policy document you can use with State Manager: AWS‐GatherSoftwareInventory. This document defines what specific metadata to collect from your instances. Despite the name, in addition to collecting software inventory, you can have it collect network configurations, file information, CPU information, and for Windows, registry values.
Insights
Insights aggregate health, compliance, and operational details about your AWS resources into a single area of AWS Systems Manager. Some insights are categorized according to AWS resource groups, which are collections of resources in an AWS region. You define a resource group based on one or more tag keys and optionally tag values. For example, you can apply the same tag key to all resources related to a particular application—EC2 instances, S3 buckets, EBS volumes, security groups, and so on. Insight categories are covered next.
Built‐in Insights
Built‐in insights are monitoring views that Systems Manager makes available to you by default. Built‐in insights include the following:
- AWS Config Compliance This insight shows the total number of resources in a resource group that are compliant or noncompliant with AWS Config rules, as well as compliance by resource. It also shows a brief history of configuration changes tracked by AWS Config.
- CloudTrail Events This insight displays each resource in the group, the resource type, and the last event that CloudTrail recorded against the resource.
- Personal Health Dashboard The Personal Health Dashboard contains alerts when AWS experiences an issue that may impact your resources. For example, some service APIs occasionally experience increased latency. It also shows you the number of events that AWS resolved within the last 24 hours.
- Trusted Advisor Recommendations The AWS Trusted Advisor tool can check your AWS environment for optimizations and recommendations related to cost optimization, performance, security, and fault tolerance. It will also show you when you've exceeded 80 percent of your limit for a service.
Business and Enterprise support customers get access to all Trusted Advisor checks. All AWS customers get the following security checks for free:
- Public access to an S3 bucket, particularly upload and delete access
- Security groups with unrestricted access to ports that normally should be restricted, such as TCP port 1433 (MySQL) and 3389 (Remote Desktop Protocol)
- Whether you've created an IAM user
- Whether multifactor authentication is enabled for the root user
- Public access to an EBS or RDS snapshot
Inventory Manager
The Inventory Manager collects data from your instances, including operating system and application versions. Inventory Manager can collect data for the following:
- Operating system name and version
- Applications and filenames, versions, and sizes
- Network configuration, including IP and media access control (MAC) addresses
- Windows updates, roles, services, and registry values
- CPU model, cores, and speed
You choose which instances to collect data from by creating a regionwide inventory association by executing the AWS‐GatherSoftwareInventory policy document. You can choose all instances in your account or select instances manually or by tag. When you choose all instances in your account, it's called a global inventory association, and new instances you create in the region are automatically added to it. Inventory collection occurs at least every 30 minutes.
When you configure the Systems Manager agent on an on‐premises server, you specify a region for inventory purposes. To aggregate metadata for instances from different regions and accounts, you may configure Resource Data Sync in each region to store all inventory data in a single S3 bucket.
Compliance
Compliance insights show how the patch and association status of your instances stacks up against the rules you've configured. Patch compliance shows the number of instances that have the patches in their configured baseline, as well as details of the specific patches installed. Association compliance shows the number of instances that have had an association successfully executed against them.
AWS CLI Example
The following example code shows how you can use an AWS CLI command to deploy an EC2 instance that includes many of the features you learned about in this chapter. Naturally, the image‐id, security‐group‐ids, and subnet‐id values are not real. Those you would replace with actual IDs that fit your account and region.
aws ec2 run-instances --image-id ami-xxxxxxxx --count 1--instance-type t2.micro --key-name MyKeyPair--security-group-ids sg-xxxxxxxx --subnet-id subnet-xxxxxxxx--user-data file://my_script.sh--tag-specifications'ResourceType=instance,Tags=[{Key=webserver,Value=production}]''ResourceType=volume,Tags=[{Key=cost-center,Value=cc123}]'
This example launches a single (‐‐count 1) instance that's based on the specified AMI. The desired instance type, key name, security group, and subnet are all identified. A script file (that must exist locally so it can be read) is added using the user‐data argument, and two tags are associated with the instance (webserver:production and cost‐center:cc123).
If you need to install the AWS CLI, perform Exercise 2.6.
Never leave any resources running after you've finished using them. Exercise 2.7 can help.
Summary
The base software stack that runs on an EC2 instance is defined by your choice of Amazon Machine Image and any scripts or user data you add at launch time, and the hardware profile is the product of an instance type. A tenancy setting determines whether your instance will share a physical host with other instances.
As with all your AWS resources, it's important to give your EC2 instances easily identifiable tags that conform to a systemwide naming convention. There are limits to the number of resources you'll be allowed to launch within a single region and account wide. Should you hit your limit, you can always request access to additional resources.
If you plan to run an instance for a year or longer, you can save a significant amount of money compared to paying for on‐demand by purchasing a reserve instance. If your workload can withstand unexpected shutdowns, then a spot instance could also make sense.
There are four kinds of Elastic Block Store volumes: two high IOPS and low‐latency SSD types and two traditional hard drives. Your workload and budget will inform your choice. In addition, some EC2 instance types come with ephemeral instance store volumes that offer fast data access but whose data is lost when the instance is shut down.
All EC2 instances are given at least one private IP address, and should they require Internet access, they can also be given a nonpermanent public IP. If you require a permanent public IP, you can assign an elastic IP to the instance.
You secure access to your EC2 instances using software firewalls known as security groups and can open up secure and limited access through IAM roles, NAT instances or NAT gateways, and key pairs.
EC2 Auto Scaling can help you avoid application failures caused by overloaded instances. By implementing dynamic scaling policies, you can ensure that you always have enough instances to handle increased demand. In the event of some failure, a well‐designed Auto Scaling group will ensure that you always have a minimum number of healthy instances. When an instance becomes unhealthy, Auto Scaling will terminate and replace it.
Exam Essentials
- Understand how to provision and launch an EC2 instance. You'll need to select the right AMI and instance type, configure a security group, add any extra storage volumes that might be needed, point to any necessary user data and scripts, and, ideally, tag all the elements using descriptive key values.
- Understand how to choose the right hardware/software profile for your workload. Consider the benefits of building your own image against the ease and simplicity of using a marketplace, community, or official AMI. Calculate the user demand you expect your application to generate so that you can select an appropriate instance type. Remember that you can always change your instance type later if necessary.
- Understand EC2 pricing models and how to choose one to fit your needs. Know how to calculate whether you'll be best off on the spot market, with on‐demand, or with reserve—or some combination of the three.
- Understand how to configure a security group to balance access with security to match your deployment profile. Security groups act as firewalls, applying policy rules to determine which network traffic is allowed through. You can control traffic based on a packet's protocol and network port and its source and intended destination.
- Know how to access a running instance. Instance data, including private and public IP addresses, can be retrieved from the AWS Console, through the AWS CLI, and from metadata queries on the instance itself. You'll need this information so that you can log in to administer the instance or access its web‐facing applications.
- Understand the features and behavior of storage volume types. SSD volumes can achieve higher IOPS and, therefore, lower latency, but they come at a cost that's higher than traditional hard drives.
- Know how to create a snapshot from a storage volume and how to attach the snapshot to a different instance. Any EBS drive can be copied and either attached to a different instance or used to generate an image that, in turn, can be made into an AMI and shared or used to launch any number of new instances.
- Be able to configure EC2 Auto Scaling. Auto Scaling can help you avoid application failures by automatically provisioning new instances when you need them, avoiding instance failures caused by resource exhaustion. When an instance failure does occur, Auto Scaling steps in and creates a replacement.
Review Questions
- You need to deploy multiple EC2 Linux instances that will provide your company with virtual private networks (VPNs) using software called OpenVPN. Which of the following will be the most efficient solutions? (Choose two.)
- Select a regular Linux AMI and bootstrap it using user data that will install and configure the OpenVPN package on the instance and use it for your VPN instances.
- Search the community AMIs for an official AMI provided and supported by the OpenVPN company.
- Search the AWS Marketplace to see whether there's an official AMI provided and supported by the OpenVPN company.
- Select a regular Linux AMI and SSH to manually install and configure the OpenVPN package.
- Create a Site‐to‐Site VPN Connection from the wizard in the AWS VPC dashboard.
- As part of your company's long‐term cloud migration strategy, you have a VMware virtual machine in your local infrastructure that you'd like to copy to your AWS account and run as an EC2 instance. Which of the following will be necessary steps? (Choose two.)
- Import the virtual machine to your AWS region using a secure SSH tunnel.
- Import the virtual machine using VM Import/Export.
- Select the imported VM from among your private AMIs and launch an instance.
- Select the imported VM from the AWS Marketplace AMIs and launch an instance.
- Use the AWS CLI to securely copy your virtual machine image to an S3 bucket within the AWS region you'll be using.
- Your AWS CLI command to launch an AMI as an EC2 instance has failed, giving you an error message that includes
InvalidAMIID.NotFound. What of the following is the most likely cause?- You haven't properly configured the
~/.aws/configfile. - The AMI is being updated and is temporarily unavailable.
- Your key pair file has been given the wrong (overly permissive) permissions.
- The AMI you specified exists in a different region than the one you've currently specified.
- You haven't properly configured the
- The sensitivity of the data your company works with means that the instances you run must be secured through complete physical isolation. What should you specify as you configure a new instance?
- Dedicated Host tenancy
- Shared tenancy
- Dedicated Instance tenancy
- Isolated tenancy
- Normally, two instances running m5.large instance types can handle the traffic accessing your online e‐commerce site, but you know that you will face short, unpredictable periods of high demand. Which of the following choices should you implement? (Choose two.)
- Configure autoscaling.
- Configure load balancing.
- Purchase two m5.large instances on the spot market and as many on‐demand instances as necessary.
- Shut down your m5.large instances and purchase instances using a more robust instance type to replace them.
- Purchase two m5.large reserve instances and as many on‐demand instances as necessary.
- Which of the following use cases would be most cost effective if run using spot market instances?
- Your e‐commerce website is built using a publicly available AMI.
- You provide high‐end video rendering services using a fault‐tolerant process that can easily manage a job that was unexpectedly interrupted.
- You're running a backend database that must be reliably updated to keep track of critical transactions.
- Your deployment runs as a static website on S3.
- In the course of a routine infrastructure audit, your organization discovers that some of your running EC2 instances are not configured properly and must be updated. Which of the following configuration details cannot be changed on an existing EC2 instance?
- AMI
- Instance type
- Security group
- Public IP address
- For an account with multiple resources running as part of multiple projects, which of the following key/value combination examples would make for the most effective identification convention for resource tags?
servers:server1project1:server1EC2:project1:server1server1:project1
- Which of the following EBS options will you need to keep your data‐hungry application that requires up to 20,000 IOPS happy?
- Cold HDD
- General‐purpose SSD
- Throughput‐optimized HDD
- Provisioned‐IOPS SSD
- Your organization needs to introduce Auto Scaling to its infrastructure and needs to generate a “golden image” AMI from an existing EBS volume. This image will need to be shared among multiple AWS accounts belonging to your organization. Which of the following steps will get you there? (Choose three.)
- Create an image from a detached EBS volume, use it to create a snapshot, select your new AMI from your private collection, and use it for your launch configuration.
- Create a snapshot of the EBS root volume you need, use it to create an image, select your new AMI from your private collection, and use it for your launch configuration.
- Create an image from the EBS volume attached to the instance, select your new AMI from your private collection, and use it for your launch configuration.
- Search the AWS Marketplace for the appropriate image and use it for your launch configuration.
- Import the snapshot of an EBS root volume from a different AWS account, use it to create an image, select your new AMI from your private collection, and use it for your launch configuration.
- Which of the following are benefits of instance store volumes? (Choose two.)
- Instance volumes are physically attached to the server that's hosting your instance, allowing faster data access.
- Instance volumes can be used to store data even after the instance is shut down.
- The use of instance volumes does not incur costs (beyond those for the instance itself).
- You can set termination protection so that an instance volume can't be accidentally shut down.
- Instance volumes are commonly used as a base for the creation of AMIs.
- According to default behavior (and AWS recommendations), which of the following IP addresses could be assigned as the private IP for an EC2 instance? (Choose two.)
- 54.61.211.98
- 23.176.92.3
- 172.17.23.43
- 10.0.32.176
- 192.140.2.118
- You need to restrict access to your EC2 instance‐based application to only certain clients and only certain targets. Which three attributes of an incoming data packet are used by a security group to determine whether it should be allowed through? (Choose three.)
- Network port
- Source address
- Datagram header size
- Network protocol
- Destination address
- How are IAM roles commonly used to ensure secure resource access in relation to EC2 instances? (Choose two.)
- A role can assign processes running on the EC2 instance itself permission to access other AWS resources.
- A user can be given permission to authenticate as a role and access all associated resources.
- A role can be associated with individual instance‐based processes (Linux instances only), giving them permission to access other AWS resources.
- A role can give users and resources permission to access the EC2 instance.
- You have an instance running within a private subnet that needs external network access to receive software updates and patches. Which of the following can securely provide that access from a public subnet within the same VPC? (Choose two.)
- Internet gateway
- NAT instance
- Virtual private gateway
- NAT gateway
- VPN
- What do you have to do to securely authenticate to the GUI console of a Windows EC2 session?
- Use the private key of your key pair to initiate an SSH tunnel session.
- Use the public key of your key pair to initiate an SSH tunnel session.
- Use the public key of your key pair to retrieve the password you'll use to log in.
- Use the private key of your key pair to retrieve the password you'll use to log in.
- Your application deployment includes multiple EC2 instances that need low‐latency connections to each other. Which of the following AWS tools will allow you to locate EC2 instances closer to each other to reduce network latency?
- Load balancing
- Placement groups
- AWS Systems Manager
- AWS Fargate
- To save configuration time and money, you want your application to run only when network events trigger it but shut down immediately after. Which of the following will do that for you?
- AWS Lambda
- AWS Elastic Beanstalk
- Amazon Elastic Container Service (ECS)
- Auto Scaling
- Which of the following will allow you to quickly copy a virtual machine image from your local infrastructure to your AWS VPC?
- AWS Simple Storage Service (S3)
- AWS Snowball
- VM Import/Export
- AWS Direct Connect
- You've configured an EC2 Auto Scaling group to use a launch configuration to provision and install an application on several instances. You now need to reconfigure Auto Scaling to install an additional application on new instances. Which of the following should you do?
- Modify the launch configuration.
- Create a launch template and configure the Auto Scaling group to use it.
- Modify the launch template.
- Modify the CloudFormation template.
- You create an Auto Scaling group with a minimum group size of 3, a maximum group size of 10, and a desired capacity of 5. You then manually terminate two instances in the group. Which of the following will Auto Scaling do?
- Create two new instances
- Reduce the desired capacity to 3
- Nothing
- Increment the minimum group size to 5
- You're running an application that receives a spike in traffic on the first day of every month. You want to configure Auto Scaling to add more instances before the spike begins and then add additional instances in proportion to the CPU utilization of each instance. Which of the following should you implement? (Choose all that apply.)
- Target tracking policies
- Scheduled actions
- Step scaling policies
- Simple scaling policies
- Load balancing
- As part of your new data backup protocols, you need to manually take EBS snapshots of several hundred volumes. Which type of Systems Manager document enables you to do this?
- Command
- Automation
- Policy
- Manual