© Kinnary Jangla 2018
Kinnary JanglaAccelerating Development Velocity Using Dockerhttps://doi.org/10.1007/978-1-4842-3936-0_5

5. Docker Images

Kinnary Jangla1 
(1)
San Francisco, CA, USA
 

A Docker image is an immutable read-only file system that is a snapshot of the entire package of an application, including the dependencies, configuration, and settings.

In this chapter, you’ll learn about Dockerfile and its basics. We’ll build images using Dockerfiles and then view the running images. We’ll then run these images inside a Docker container, and you’ll discover how to attach the container to our local terminal input/output.

Docker Images

As mentioned previously, Docker images are read-only and immutable and created with the docker image build command . They are stored inside a Docker registry and run inside a container. Images can become quite large very quickly. Therefore, they are designed to be composed of layers of other images, allowing a minimal amount of data to be sent when transferring images over a network. So, you can build your own customized image on top of an existing image. When you modify that image, new layers are added that contain your changes.

As for Docker containers, you’ll learn about them in more detail later in this chapter, but to summarize with a programming metaphor, if an image is a class, then a container is an instance of a class, that is, a runtime object. While images are lightweight and portable encapsulations of an environment, containers are the running instances of images.

Furthermore, a Docker image is created using a Dockerfile. Let’s see what a Dockerfile is. Later on, you’ll learn how to build a Docker image from a Dockerfile.

Dockerfile

Everything Docker begins with a Dockerfile. The Dockerfile is the instruction set on how to build an image. It the basis on which your entire Docker container is built. It specifies all the configuration settings environment variables, volumes to be mounted, the base image to build on top of, the list of dependencies, etc. All this is then bundled into an image that then runs inside the container.

A Dockerfile must be built to create the Docker image of an application. The image is just the “compiled version” of the source code that lives inside the Dockerfile. The Dockerfile is a text file that contains a set of instructions or commands that are then assembled into an image.

Creating a Sample Dockerfile

Let’s create a sample Dockerfile next. To begin, create a file called Dockerfile inside a directory called docker.
kinnaryjangla@dev-abc:~/code/docker$ vim Dockerfile
Build your Dockerfile using the following commands. Replace the LABEL maintainer email with your e-mail address.
#This is a sample image
FROM ubuntu
LABEL maintainer="[email protected]"
RUN apt-get update
RUN apt-get install –y nginx
CMD ["echo", "Hello World!"]
Let’s look at the instructions in the preceding Dockerfile.
  1. 1.

    The first line, #This is a sample image, is a comment. You can add other comments to the Dockerfile for readability using the # command.

     
  2. 2.

    The FROM keyword is used to tell Docker which base image you want to build your customized image on top of. This instruction is mandatory.

     
  3. 3.

    LABEL is a non-executable instruction used to indicate the author of the Dockerfile.

     
  4. 4.
    The RUN instruction is used to execute a command on top of an existing image. That in turn creates another layer with the results of the execution of the command on top of the image. For example, if there is a precondition to install PHP before running an application, you can run appropriate commands to install PHP on top of the base image (say, Ubuntu), as shown following.
    FROM ubuntu
    RUN apt-get update && update apt-get install –y php
     
  5. 5.

    The CMD command doesn’t execute anything during the build time. It just specifies the intended command for the image. The difference between the CMD and the RUN command is that RUN actually executes the command during build time. If you have multiple CMD instructions in the Dockerfile, only the last one will take effect.

     
Following are some other commands that can come in handy when creating the Dockerfile:
  • ENV: This instruction can be used to set the environment variables in the container as shown following.

    #Default environment variables requires to run service, can be overridden by docker run
    ENV CONFIG_FILE=config/config.service.test.properties
             HEAP_SIZE=6G
             LOG4J_CONFIG_FILE=config/log4j_local.xml
             NEW_SIZE=4G
  • COPY: This instruction is used to copy the files and directories from a specified source to a specified destination (in the file system of the container), as follows.

    COPY conditions.txt /usr/tmp
  • ADD: The ADD instruction is like the COPY instruction. It has some additional features, such as support for remote URLs. The COPY instruction is more readable, so if you don’t need the extra supported features that ADD provides, it’s recommended that you use the COPY instruction instead. See the following usage. Tar or zip files will be auto-expanded when you add one to a source destination.

    ADD http://www.xyz.com/sample.tar.xz /usr/src
  • WORKDIR: This is used to set the currently active directory for other instructions, such as RUN, CMD, ENTRYPOINT, COPY, and ADD. See the following paragraph for a usage example.

    If you provide a relative path as the WORKDIR, it will be taken as relative to the path of the previous WORKDIR instruction.
    WORKDIR   /user
    WORKDIR   home
  • USER: This is used to set the UID (or username) to use when running the image or any subsequent commands. See the following usage.

    USER daemon
  • VOLUME: This instruction specifies a path in which data should be persisted longer than the life of the container. See the following usage.

    VOLUME     /data
  • ENTRYPOINT: This command is the primary command of your Docker image.

This command is set in such a way that whenever you run the image, the ENTRYPOINT command will be executed every time.

You can also pass arguments here, but they are optional. You can pass them when you run the image with something such as docker run <image-name>.

Also, all the elements specified using CMD will be overridden, except the arguments. They will be passed to the command specified in ENTRYPOINT. Following is a sample usage.
CMD  "Hello World!"
ENTRYPOINT  echo

Save this file, and in the next section, you’ll see how to build an image from this Dockerfile.

Building Images with Dockerfile

As you’ve learned so far, Docker images are immutable, read-only file systems. Images can be based on other existing images that can be pulled from Dockerfile. This makes modifying them a lot easier, because the only thing that changes is the layer that gets modified. This also prevents images from becoming extremely large in size.

In the previous section, we created a Dockerfile called Dockerfile with some basic instructions and saved it in a directory called docker.

Let’s continue to build an image from the Dockerfile created in the previous section. From the docker directory, run the command docker image build. The . builds the Dockerfile within the directory.

When you run this command for the first time, you’ll see a long list of packages being pulled, because we’re building our image on top of the Ubuntu image.

I am going to divide the output in multiple sections, to make it easier to read. You should be able to see this entire output, if your image is built successfully.

As per the Dockerfile, each instruction is built sequentially. In the following sequence, you see first (Step 1/5) some images get pulled successfully from the base Ubuntu image. Step 2/5 assigns the author of the image to the image. In Step 3/5, the apt-get update command runs on top of the base Ubuntu image.
kinnaryjangla@dev-abc:~/code/docker$ docker image build .
Sending build context to Docker daemon  2.048kB
Step 1/5 : FROM ubuntu
latest: Pulling from library/ubuntu
124c757242f8: Pull complete
9d866f8bde2a: Pull complete
fa3f2f277e67: Pull complete
398d32b153e8: Pull complete
afde35469481: Pull complete
Digest: sha256:de774a3145f7ca4f0bd144c7d4ffb2931e06634f11529653b23eba85aef8e378
Status: Downloaded newer image for ubuntu:latest
---> cd6d8154f1e1
Step 2/5 : LABEL maintainer "[email protected]"
---> Running in 2d6e3abeff60
---> b7df3b688aca
Removing intermediate container 2d6e3abeff60
Step 3/5 : RUN apt-get update
---> Running in 8bd46979c5fa
Moving forward as part of Step 3/5, a bunch of other packages are installed as apt-get update is executed.
Step 3/5 : RUN apt-get update
---> Running in 8bd46979c5fa
Get:1 http://security.ubuntu.com/ubuntu bionic-security InRelease [83.2 kB]
Get:2 http://archive.ubuntu.com/ubuntu bionic InRelease [242 kB]
Get:3 http://security.ubuntu.com/ubuntu bionic-security/universe Sources [17.4 kB]
Get:4 http://archive.ubuntu.com/ubuntu bionic-updates InRelease [88.7 kB]
Get:5 http://security.ubuntu.com/ubuntu bionic-security/multiverse amd64 Packages [1363 B]
Get:6 http://security.ubuntu.com/ubuntu bionic-security/main amd64 Packages [203 kB]
Get:7 http://archive.ubuntu.com/ubuntu bionic-backports InRelease [74.6 kB]
Get:8 http://archive.ubuntu.com/ubuntu bionic/universe Sources [11.5 MB]
Get:9 http://security.ubuntu.com/ubuntu bionic-security/universe amd64 Packages [69.0 kB]
Get:10 http://archive.ubuntu.com/ubuntu bionic/main amd64 Packages [1344 kB]
Get:11 http://archive.ubuntu.com/ubuntu bionic/universe amd64 Packages [11.3 MB]
Get:12 http://archive.ubuntu.com/ubuntu bionic/multiverse amd64 Packages [186 kB]
Get:13 http://archive.ubuntu.com/ubuntu bionic/restricted amd64 Packages [13.5 kB]
Get:14 http://archive.ubuntu.com/ubuntu bionic-updates/universe Sources [70.4 kB]
Get:15 http://archive.ubuntu.com/ubuntu bionic-updates/universe amd64 Packages [226 kB]
Get:16 http://archive.ubuntu.com/ubuntu bionic-updates/main amd64 Packages [401 kB]
Get:17 http://archive.ubuntu.com/ubuntu bionic-updates/multiverse amd64 Packages [3925 B]
Get:18 http://archive.ubuntu.com/ubuntu bionic-backports/universe amd64 Packages [2807 B]
Fetched 25.9 MB in 3s (8072 kB/s)
Reading package lists...
---> e8081b840106
Removing intermediate container 8bd46979c5fa
Furthermore, Step 4/5 gets executed where the apt-get install -y nginx command runs. As a part of this run command, it builds a dependency tree and installs more packages.
Step 4/5 : RUN apt-get install –y nginx
---> Running in 4e8613ee2337
Reading package lists...
Building dependency tree...
Reading state information...
The following additional packages will be installed:
       fontconfig-config fonts-dejavu-core geoip-database libbsd0 libexpat1
       libfontconfig1 libfreetype6 libgd3 libgeoip1 libicu60 libjbig0
       libjpeg-turbo8 libjpeg8 libnginx-mod-http-geoip
       libnginx-mod-http-image-filter libnginx-mod-http-xslt-filter
       libnginx-mod-mail libnginx-data libxau6 libxdmcp6 libxml libxpm4
       libxslt1.1 multiarch-support nginx-common nginx-code ucf
Suggested packages:
       Libgd-tools geoip-bin fcgiwrap nginx-doc ssl-cert
The following NEW packages will be installed:
       fontconfig-config fonts-dejavu-core geoip-database libbsd0 libexpat1
       libfontconfig1 libfreetype6 libgd3 libgeoip1 libicu60 libjbig0
       libjpeg-turbo8 libjpeg8 libnginx-mod-http-geoip
       libnginx-mod-http-image-filter libnginx-mod-http-xslt-filter
       libnginx-mod-mail libnginx-data libxau6 libxdmcp6 libxml libxpm4
       libxslt1.1 multiarch-support nginx-common nginx-code ucf 0 upgraded, 35 newly installed, 0 to remove and 8 no upgraded.
Need to get 16.1 MB of archives.
Soon after, it will install some additional archives.
Need to get 16.1 MB of archives
Get:1 http://security.ubuntu.com/ubuntu bionic-security InRelease [83.2 kB]
Get:2 http://archive.ubuntu.com/ubuntu bionic InRelease [242 kB]
Get:3 http://security.ubuntu.com/ubuntu bionic-security/universe Sources [17.4 kB]
Get:4 http://archive.ubuntu.com/ubuntu bionic-updates InRelease [88.7 kB]
Get:5 http://security.ubuntu.com/ubuntu bionic-security/multiverse amd64 Packages [1363 B]
Get:6 http://security.ubuntu.com/ubuntu bionic-security/main amd64 Packages [203 kB]
Get:7 http://archive.ubuntu.com/ubuntu bionic-backports InRelease [74.6 kB]
Get:8 http://archive.ubuntu.com/ubuntu bionic/universe Sources [11.5 MB]
Get:9 http://security.ubuntu.com/ubuntu bionic-security/universe amd64 Packages [69.0 kB]
Get:10 http://archive.ubuntu.com/ubuntu bionic/main amd64 Packages [1344 kB]
Get:11 http://archive.ubuntu.com/ubuntu bionic/universe amd64 Packages [11.3 MB]
Get:12 http://archive.ubuntu.com/ubuntu bionic/multiverse amd64 Packages [186 kB]
Get:13 http://archive.ubuntu.com/ubuntu bionic/restricted amd64 Packages [13.5 kB]
Get:14 http://archive.ubuntu.com/ubuntu bionic-updates/universe Sources [70.4 kB]
Get:15 http://archive.ubuntu.com/ubuntu bionic-updates/universe amd64 Packages [226 kB]
Get:16 http://archive.ubuntu.com/ubuntu bionic-updates/main amd64 Packages [401 kB]
Get:17 http://archive.ubuntu.com/ubuntu bionic-updates/multiverse amd64 Packages [3925 B]
Get:18 http://archive.ubuntu.com/ubuntu bionic-backports/universe amd64 Packages [2807 B]
Get:19 http://security.ubuntu.com/ubuntu bionic-security InRelease [83.2 kB]
Get:20 http://archive.ubuntu.com/ubuntu bionic InRelease [242 kB]
Get:21 http://security.ubuntu.com/ubuntu bionic-security/universe Sources [17.4 kB]
Get:22 http://archive.ubuntu.com/ubuntu bionic-updates InRelease [88.7 kB]
Get:23 http://security.ubuntu.com/ubuntu bionic-security/multiverse amd64 Packages [1363 B]
Get:24 http://security.ubuntu.com/ubuntu bionic-security/main amd64 Packages [203 kB]
Get:25 http://archive.ubuntu.com/ubuntu bionic-backports InRelease [74.6 kB]
Get:26 http://archive.ubuntu.com/ubuntu bionic/universe Sources [11.5 MB]
Get:27 http://security.ubuntu.com/ubuntu bionic-security/universe amd64 Packages [69.0 kB]
Get:28 http://archive.ubuntu.com/ubuntu bionic/main amd64 Packages [1344 kB]
Get:29 http://archive.ubuntu.com/ubuntu bionic/universe amd64 Packages [11.3 MB]
Get:30 http://archive.ubuntu.com/ubuntu bionic/multiverse amd64 Packages [186 kB]
Get:31 http://archive.ubuntu.com/ubuntu bionic/restricted amd64 Packages [13.5 kB]
Get:32 http://archive.ubuntu.com/ubuntu bionic-updates/universe Sources [70.4 kB]
Get:33 http://archive.ubuntu.com/ubuntu bionic-updates/universe amd64 Packages [226 kB]
Get:34 http://archive.ubuntu.com/ubuntu bionic-updates/main amd64 Packages [401 kB]
Get:35 http://archive.ubuntu.com/ubuntu bionic/main amd64 nginx all 1.14.0-ubuntu[3596 B]
It’ll continue to unpack some of the installed dependencies.
Hit http://ppa.launchpad.net trusty InRelease
Get:1 https://ubuntu-archive.pinadmin.com trusty InRelease
Ign https://ubuntu-archive.pinadmin.com trusty InRelease
Get:2 https://artifacts.pinadmin.com trusty InRelease
Ign https://artifacts.pinadmin.com trusty InRelease
Get:3 https://puppetlabs.pinadmin.com trusty InRelease
Ign https://puppetlabs.pinadmin.com trusty InRelease
Hit https://ubuntu-archive.pinadmin.com trusty-security InRelease
Get:4 https://debrepo-trusty.pinadmin.com trusty InRelease
Hit https://download.docker.com trusty InRelease
Ign https://debrepo-trusty.pinadmin.com trusty InRelease
Hit https://saltrepo.pinadmin.com trusty InRelease
Hit https://artifacts.pinadmin.com trusty-security InRelease
Hit https://puppetlabs.pinadmin.com trusty Release.gpg
Hit https://debrepo-trusty.pinadmin.com trusty Release.gpg
Hit https://deb.nodesource.com precise InRelease
Hit https://puppetlabs.pinadmin.com trusty Release
Hit https://download.docker.com trusty/stable amd64 Packages
Hit https://debrepo-trusty.pinadmin.com trusty Release
Hit https://saltrepo.pinadmin.com trusty/main amd64 Packages
Hit https://deb.nodesource.com precise/main Sources
Hit https://deb.nodesource.com precise/main amd64 Packages
Hit https://puppetlabs.pinadmin.com trusty/puppet amd64 Packages
Hit https://debrepo-trusty.pinadmin.com trusty/main all Packages
Hit https://debrepo-trusty.pinadmin.com trusty/main amd64 Packages
Hit https://ubuntu-archive.pinadmin.com trusty-updates InRelease
Hit http://ppa.launchpad.net trusty/main amd64 Packages
Hit https://artifacts.pinadmin.com trusty-updates InRelease
Hit https://ubuntu-archive.pinadmin.com trusty Release.gpg
Hit https://artifacts.pinadmin.com trusty Release.gpg
Ign http://binaries.erlang-solutions.com trusty InRelease
Hit https://ubuntu-archive.pinadmin.com trusty-security/main amd64 Packages
Hit https://artifacts.pinadmin.com trusty-security/main amd64 Packages
Hit https://ubuntu-archive.pinadmin.com trusty-security/universe amd64 Packages
Hit http://binaries.erlang-solutions.com trusty Release.gpg
Hit https://artifacts.pinadmin.com trusty-security/restricted amd64 Packages
Hit https://ubuntu-archive.pinadmin.com trusty-updates/main amd64 Packages
Hit https://artifacts.pinadmin.com trusty-security/universe amd64 Packages
Hit https://ubuntu-archive.pinadmin.com trusty-updates/universe amd64 Packages
Hit http://binaries.erlang-solutions.com trusty Release
Hit https://artifacts.pinadmin.com trusty-updates/main amd64 Packages
Hit https://ubuntu-archive.pinadmin.com trusty Release
Hit https://artifacts.pinadmin.com trusty-updates/universe amd64 Packages
Hit http://binaries.erlang-solutions.com trusty/contrib amd64 Packages
Hit https://ubuntu-archive.pinadmin.com trusty/main amd64 Packages
Hit https://artifacts.pinadmin.com trusty Release
Hit https://ubuntu-archive.pinadmin.com trusty/restricted amd64 Packages
Hit https://artifacts.pinadmin.com trusty/main amd64 Packages
Hit https://ubuntu-archive.pinadmin.com trusty/universe amd64 Packages
Hit https://artifacts.pinadmin.com trusty/restricted amd64 Packages
Hit https://artifacts.pinadmin.com trusty/universe amd64 Packages
It also unpacks the nginx package.
Reading package lists... Done
Building dependency tree
Reading state information... Done
The following packages were automatically installed and are no longer required:
  fonts-cabin fonts-comfortaa fonts-dejavu-extra fonts-droid
  fonts-font-awesome fonts-freefont-otf fonts-gfs-artemisia
  fonts-gfs-complutum fonts-gfs-didot fonts-gfs-neohellenic fonts-gfs-olga
  fonts-gfs-solomos fonts-inconsolata fonts-junicode fonts-lato
  fonts-linuxlibertine fonts-lmodern fonts-lobster fonts-lobstertwo
  fonts-oflb-asana-math fonts-sil-gentium fonts-sil-gentium-basic fonts-stix
  libcupsfilters1 libcupsimage2 libfile-basedir-perl libfile-desktopentry-perl
  libfile-mimeinfo-perl libijs-0.35 libjbig2dec0 libkpathsea6 libpaper-utils
  libpaper1 libpoppler44 libptexenc1 lmodern luatex pinterest-nginx-common
  poppler-data tcl tex-common tk ttf-adf-accanthis ttf-adf-gillius
  x11-xserver-utils xdg-utils
Use 'apt-get autoremove' to remove them.
The following extra packages will be installed:
  nginx-common nginx-core
Suggested packages:
  fcgiwrap nginx-doc
The following packages will be REMOVED:
  pinterest-nginx
The following NEW packages will be installed:
  nginx nginx-common nginx-core
0 upgraded, 3 newly installed, 1 to remove and 148 not upgraded.
Need to get 349 kB of archives.
After this operation, 6,641 kB disk space will be freed.
Get:1 https://artifacts.pinadmin.com/artifactory/ubuntu-archive-remote/ trusty-security/main nginx-common all 1.4.6-1ubuntu3.8 [19.1 kB]
Get:2 https://artifacts.pinadmin.com/artifactory/ubuntu-archive-remote/ trusty-security/main nginx-core amd64 1.4.6-1ubuntu3.8 [325 kB]
Get:3 https://artifacts.pinadmin.com/artifactory/ubuntu-archive-remote/ trusty-security/main nginx all 1.4.6-1ubuntu3.8 [5,394 B]
Fetched 349 kB in 0s (1,887 kB/s)
Preconfiguring packages ...
(Reading database ... 168260 files and directories currently installed.)
Removing pinterest-nginx (1.9.2) ...
Selecting previously unselected package nginx-common.
(Reading database ... 168258 files and directories currently installed.)
Preparing to unpack .../nginx-common_1.4.6-1ubuntu3.8_all.deb ...
Unpacking nginx-common (1.4.6-1ubuntu3.8) ...
dpkg: error processing archive /var/cache/apt/archives/nginx-common_1.4.6-1ubuntu3.8_all.deb (--unpack):
trying to overwrite '/lib/systemd/system/nginx.service', which is also in package pinterest-nginx-common 1.9.2
Selecting previously unselected package nginx-core.
Preparing to unpack .../nginx-core_1.4.6-1ubuntu3.8_amd64.deb ...
Unpacking nginx-core (1.4.6-1ubuntu3.8) ...
Selecting previously unselected package nginx.
Preparing to unpack .../nginx_1.4.6-1ubuntu3.8_all.deb ...
Unpacking nginx (1.4.6-1ubuntu3.8) ...
It then sets up the nginx package and removes the intermediate container.
Debconf: falling back to frontend: Teletype
Setting up libnginx-mod-mail (1.14.0-0ubuntu1) . . .
Setting up libxdmcp6:amd64 (1:1.1.2-3) . . .
Setting up libnginx-mod-http-geoip (1.14.0-0ubuntu1) . . .
Setting up libx11-data (2:1.6.4-3) . . .
Setting up libxau6:amd64 (1:1.0.8-1) . . .
Setting up libwebp6:amd64 (0.6.1-2) . . .
Setting up libjpeg8:amd64 (8c-2ubuntu8) . . .
Setting up libnginx-mod-mail (1.14.0-0ubuntu1) . . .
Setting up libnginx-mod-http-geoip (1.14.0-0ubuntu1) . . .
Setting up libx11-data (2:1.6.4-3) . . .
Setting up libxau6:amd64 (1:1.0.8-1) . . .
Setting up libwebp6:amd64 (0.6.1-2) . . .
Setting up nginx (1.14.0-0ubuntu1) . . .
Processing triggers for libc-bin (2.27-3ubuntu1) . . .
---> 3e5c6069eaf3
Removing intermediate container 5bae8841a2ac
Finally, it executes the CMD command and builds the image successfully.
Step 5/5: CMD echo Hello World!
---> Running in 171dfcbaks42ka
---> 35c2e82eajd416
Removing intermediate container 171hsbva624bs9
Successful built 35c2e82eajd416
To view the image that you just built, run the command docker image ls, and you should be able to see the preceding successfully built image in the list.
kinnaryjangla@dev-abc:~/code/demo/docker$ docker image ls
REPOSITORY    TAG      IMAGE ID       CREATED          SIZE
Ubuntu        latest   113a43faa138   4 weeks ago      81.1MB

In the next section, let’s run this image inside a container.

Docker Containers

Now that we have built a Docker image successfully, let’s look into what a Docker container is and run this image inside a container.

As we’ve seen before, Docker containers provide a different form of isolation than virtual machines (VMs). They are lightweight platforms to package your entire microservices application and have it running inside the container.

Let’s run inside a container the image we built successfully. There are multiple ways to run a Docker image inside a container.

In the code below, we see the image ID and the tag name of the Docker image.
kinnaryjangla@dev-abc:~/code/demo/docker$ docker image ls
REPOSITORY    TAG      IMAGE ID        CREATED          SIZE
Ubuntu        latest   113a43faa138    4 weeks ago      81.1MB

You could use either or both to run the image inside a container.

Using the name and the tag ID together, you could run the image as follows:
kinnaryjangla@dev-abc:~/code/demo/docker$ docker container run -I –t ubuntu:latest /bin/bash root@cffbfc9312: /#
Alternatively, you could run the image as in the following, without the tag name and using only the image ID:
kinnaryjangla@dev-abc:~/code/demo/docker$  docker container run -i –t 113a43faa138   /bin/bash root@cffbfc9312
Now, before we can see how to explore the container, let’s first confirm that the container is up and running. In another window, run the docker container ls command, and you should be able to view the container, in the list of containers.
kinnaryjangla@dev-abc:~/code/demo/docker$  docker container ls
CONTAINER ID   IMAGE         COMMAND      CREATED           STATUS
PORTS                             NAMES
d121c440051b   113a43faa138  "/bin/bash"  8 seconds ago  Up 7 seconds
0.0.0.0-5001->8821/tcp            dreamy_clean

Now let’s look inside the container. Your container has the ID 1c3e3baace92.

There are multiple ways to get inside your running container using docker exec, docker attach, etc.
kinnaryjangla@dev-abc:~/code/demo/docker$ docker container attach dreamly_clean
   root@517s27n525fs: /#
kinnaryjangla@dev-abc:~/code/demo/docker$ docker container exec -t -i dreamy_clean  /bin/bash
root@517s27n525fs: /# ls
bin   host   dev   src   home   lib   lib64   media   mnt   opt   proc   root   run   sbin   srv   sys   tmp   usr   var
root@517s27n525fs: /#

When inside the container, you can view logs, volumes that have been mounted, etc. Getting inside the Docker container very much comes in handy when debugging errors.

Because we started a shell, to get out of the container, just close the shell, by using the exit command, and you should be back on the command prompt of your local terminal.
root@517s27n525fs: /# exit
exit
kinnaryjangla@dev-abc:~/code/demo/docker$

Attaching and Detaching from a Docker Container

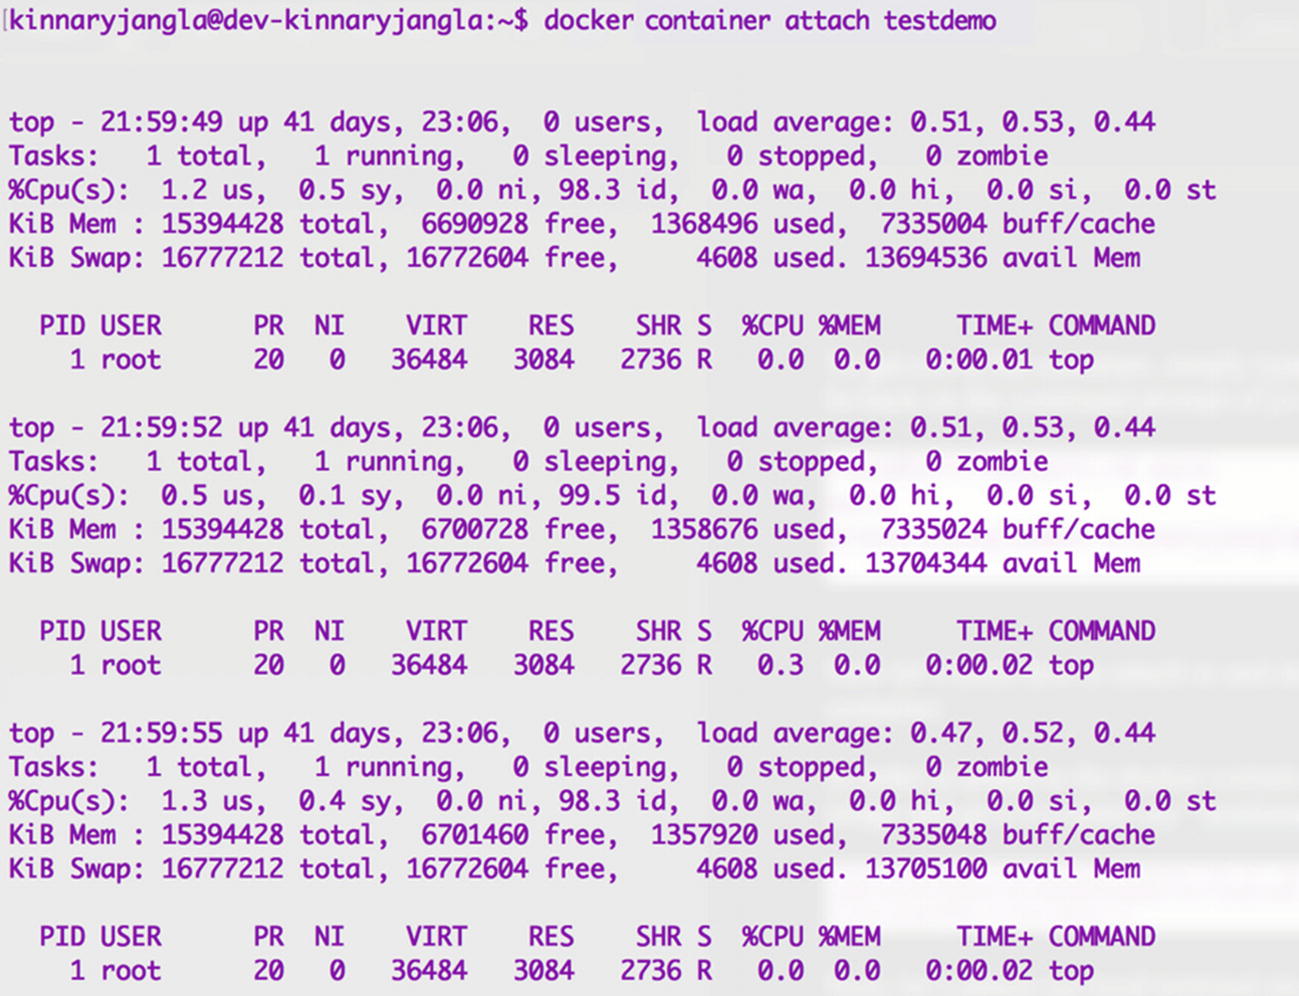
Attaching to the Docker container means attaching the local standard input/output to the Docker container. Detaching means detaching your local input/output from the Docker container. Now you’ll learn how to attach to and detach from a Docker container.

In order to attach to the Docker container, first run the Docker image, and give it a name, say, “testdemo.”
kinnaryjangla@dev-abc:~/code/demo/docker$ docker container run -d –-name testdemo ubuntu /usr/bin/tap -b easjhf7ejbadgsvkaid888sagdhabgfks555

kinnaryjangla@dev-abv:~/code/demo/docker$

Next, let’s attach our local terminal standard input/output to the container using docker container attach, as shown in Figure 5-1.
../images/465114_1_En_5_Chapter/465114_1_En_5_Fig1_HTML.jpg
Figure 5-1

Attaching to the Docker container

You should see that your terminal is now attached to the container’s input/output.

Let’s do another quick example, in which you can see the exit code of your container in your local terminal output.
kinnaryjangla@dev-abc:~/code/demo/docker$ docker container run –name test -d -it ubuntu
easjhf7ejbadgsvkaid888sagdhabgfks555
kinnaryjangla@dev-abc:~/code/demo/docker$ docker container attach test
root@ksjhdf6t3uqe: /# exit 13
exit
kinnaryjangla@dev-abc:~/code/demo/docker$ echo $?
13
kinnaryjangla@dev-abc:~/code/demo/docker$ docker container ls -a | grep test
ksjhdf6t3uqe   ubuntu    "/bin/bash"    28 seconds ago    Exited(13) 15 seconds ago

In this example, we run the image inside a container and call it test. We then attach the container to the local standard input/output. From inside the container, we set an exit code of 13, which exits the container. On your local terminal, when you echo, you see 13 as the output. In your list of containers, you see that the container exited, owing due to the exit code 13.

You can also create a new container over a certain image. This is useful when you want to set up a container configuration beforehand.

To create a container over our Ubuntu image, let’s use docker container create -t -I ubuntu bash.
kinnaryjangla@dev-abc:~/code/demo/docker$ docker container create -t -I ubuntu bash cee13y299o1hkjasd462e4jhdasi7673242hbd76gdewu
Then start this container, using the first few letters of the container ID that was created previously.
kinnaryjangla@dev-abc:~/code/demo/docker$ docker container start -a -i cee13y299
root@ cee13y299: /#

This lands you inside the newly created container.

You can do various things when you create a container, such as initializing volumes and even removing them using the -v option.

Now that we’ve looked at how to create Dockerfiles, how to build images with Dockerfiles, and how to run these images inside a container, in the next chapter, let’s look at how to link multiple containers,in order to get an entire microservices application up and running on Docker.

Summary

In this chapter, we looked at what a Dockerfile is and created a basic Dockerfile step by step. You learned that a Dockerfile is the first step to anything Docker.

Later, we built an image using this Dockerfile. We looked at how to list all the images on your host machine.

Later, we ran this image inside a container and looked at how to attach the container to our local terminal input/output. We executed a few examples and attached and detached the container to our local terminal. You also learned how to list all the containers that are up and running on your machine.

In the next chapter, we’ll look at how to link multiple containers, hence multiple services to each other, and create a real-world microservices application, using Docker.

..................Content has been hidden....................

You can't read the all page of ebook, please click here login for view all page.
Reset
18.191.212.113