
Debugging is the art of identifying and removing errors from computer software.
In the previous chapter, you learned how to use and install Docker Compose and saw some examples of how to use it in real-world scenarios. You also saw what happens behind the scenes of Docker Compose when containers talk to each other.
In this chapter, you’ll learn how to debug these microservices that run together with the help of Docker Compose. We’ll look at the challenges of a distributed system and how we can use Docker to overcome some of the challenges related to debugging, which, in turn, can help accelerate the pace at which an engineer can develop.
In Chapter 3, we explored the differences between monolith and microservices architecture. We also looked at the challenges of a microservices architecture. A microservices architecture inherits challenges of a distributed environment. Let’s look at that more closely.
Distributed Environments
What exactly is a distributed system? In the simplest terms, it is a group of individual computers working together and appearing to the external user as one system. These computers have shared state, concurrency behaviors, and failure handing properties, if implemented correctly.
Some of the obvious advantages of a distributed system are sharing, collaboration, scalability, reliability, and availability. The World Wide Web is a fantastic example of a distributed system.
Advantages of Distributed Systems
Scalability
Every project starts small. As it progresses successfully, it must be expanded in several dimensions, including space, network bandwidth, CPU resources, database size, etc. The simplest solution is to replace your computers with bigger and more powerful CPUs. This is however, very inefficient, because you are throwing away previous resources, and future scalability is not taken into account.
The ideal solution is to add resources as a product grows. This is where a distributed system enables scaling very easily and more efficiently.
There are two types of scaling methods, namely, horizontal and vertical scaling. In horizontal scaling, you add more machines, and in vertical scaling, you add more resources, such as memory, CPUs, etc.
Reliability and Availability
A single point of failure can bring an entire web site down. If the application is architected correctly, however, when multiple services are running independently on different servers in a distributed system, other web sites continue running, and a single failure in the site doesn’t necessarily cause system shutdown.
Autonomy
Data sharing in a distributed system allows sites to access data residing at other sites, and, at the same time, sharing data lets each site maintain a certain degree of control over the data that is stored locally. Local database administrators can then have complete autonomy to decide how to operate the databases.
For these reasons, distributed systems really shine in today’s business settings. But designing a distributed system comes with its own set of challenges and is not as straightforward and simple.
Challenges of Distributed Systems
Let’s look at some of the major challenges you’ll face with distributed systems.
Heterogeneity
One of the advantages of distributed systems is that different components and services can be written using different tech stacks. This gives the developers the independence to use the platforms they are most comfortable with.
But when services are written in different languages, on different operating systems (OSs), use different network protocols and hardware devices, programs cannot communicate with each other, unless some common standards are established. For example, different languages use different ways of representing characters and data structures. In order for services written in different languages to communicate, this difference must somehow be bridged.
For this reason, some kind of a middleware layer must be present, to bridge the gaps of different platforms, at the same time masking the heterogeneity of everything that is underlying. Some ways of doing this are standardizing around REST or gRPC (a remote procedure call initially developed by Google).
Concealing the Complexity
As discussed, a distributed system has lot of underlying complexity, such as differences in data representation, accessibility and location of resources, resource sharing by several components, failure and recovery of resources, etc. These complexities are best masked from the user, so that the system is perceived as a single system, rather than as a set of independent components.
Concurrency
One of the advantages of a distributed system is that services and applications can access common resources. With this sharing of data comes the possibility of multiple services that can attempt to access the same resources at the same time. So, in such a scenario, objects must be able to operate efficiently in a synchronous fashion, while maintaining data consistency. This is usually achieved by using standard concurrency techniques, such as semaphores. For example, in the digital stock market, multiple people buy and sell at a single point in time.
Scalability
For a growing product, a distributed system has to scale efficiently, in order to address issues such as increasing network bandwidth; an increase in latency, which could potentially be a result of an increase in user traffic; increase in data read and writes; the number of resources to be processed; overloading of servers; etc. For all these reasons, scaling distributed systems efficiently is a very important issue that companies such as Amazon and Google continuously work to address.
Failure Handling
Single points of failure can bring a whole system down, as previously mentioned. Having an entire service fail is extremely harmful for service availability. But we can worry about this a little less with a distributed system, because individual components can continue to operate. However, partial failures are very common in distributed systems. For example, a switch failure can interfere with some nodes of communication but not others; some network messages may be lost; some nodes crash, while some continue running. Handling of these failures is particularly difficult in a distributed system. Conversely, in a single monolith system, it is simpler to tell which process has died or exited. In a distributed system, the only way to know this is to notice a halt in receiving signals from a previously operating node. This could be difficult to debug as well, because it could either be a fatal signal or a delayed response over the network. Furthermore, it could even produce incorrect results or incomplete results. Diagnosing such issues incorrectly could cause us to come to the wrong conclusion and, thereby, lead us to solving the wrong problem.
Debugging
Given that a distributed system has multiple services linked to one another, handling of failures as those mentioned previously can get tricky. Debugging these failures can get even trickier. In order to debug, you would have to get all the services up and running first. Consider multiple services dependent of different versions of a library. Getting these services running on a single machine would be pretty difficult, maybe even impossible, without the use of some kind of virtualization.
Sample Real-World End-to-End Use Case
Some of the challenges of a distributed environment can be addressed with Docker. Let’s look at how to specifically debug an end-to-end application whose service runs using Docker Compose.
Consider a web site that takes a list of interests as user input and renders images in the user’s feed, based on these interests. This can get extremely complex, if you take user signals into account. That would include learning from user signals and rendering images from the categories or interests that the user is known to click most and rendering fewer images from categories or interests that the user has not clicked very often. This can become complicated very quickly. For the purpose of maintaining simplicity, I will not take user signals into account in this example.
So, let’s look at what our application does. Our application basically contains a table from which user ID is mapped to a list of interests and an inverted index of interests to images in a MySQL database. When the user logs into his or her account, an HTTP request is made to a service, in order to retrieve the user’s list of interests. This list is then sent to another service, which in turn looks at the database and gets five images per interest from the interest list. Once this data is returned, this service then sorts this image list according to those most recently created and sends it back to the client in the HTTP response.
- 1.
A service that makes the HTTP request with the user ID. We will call this service Client.
- 2.
A service that calls the MySQL database to get a list of interests for the user ID. Let’s call this service DB.
- 3.
A service that takes a list of interests as input and makes a call to the MySQL database to get a list of five images for each of those interests. When it receives the results, this service sorts these images, based on the ones most recently created, and returns them back to the Client service. Let’s call this service Api.
I will not go into detail about how each service does its job or the schema of the database. For the purposes of this example, we’ll look at the Dockerfiles of each service, the Docker Compose file that will get all these services up and running at the same time, and, finally, we’ll make an HTTP request to our service and look at the response received and the images rendered.
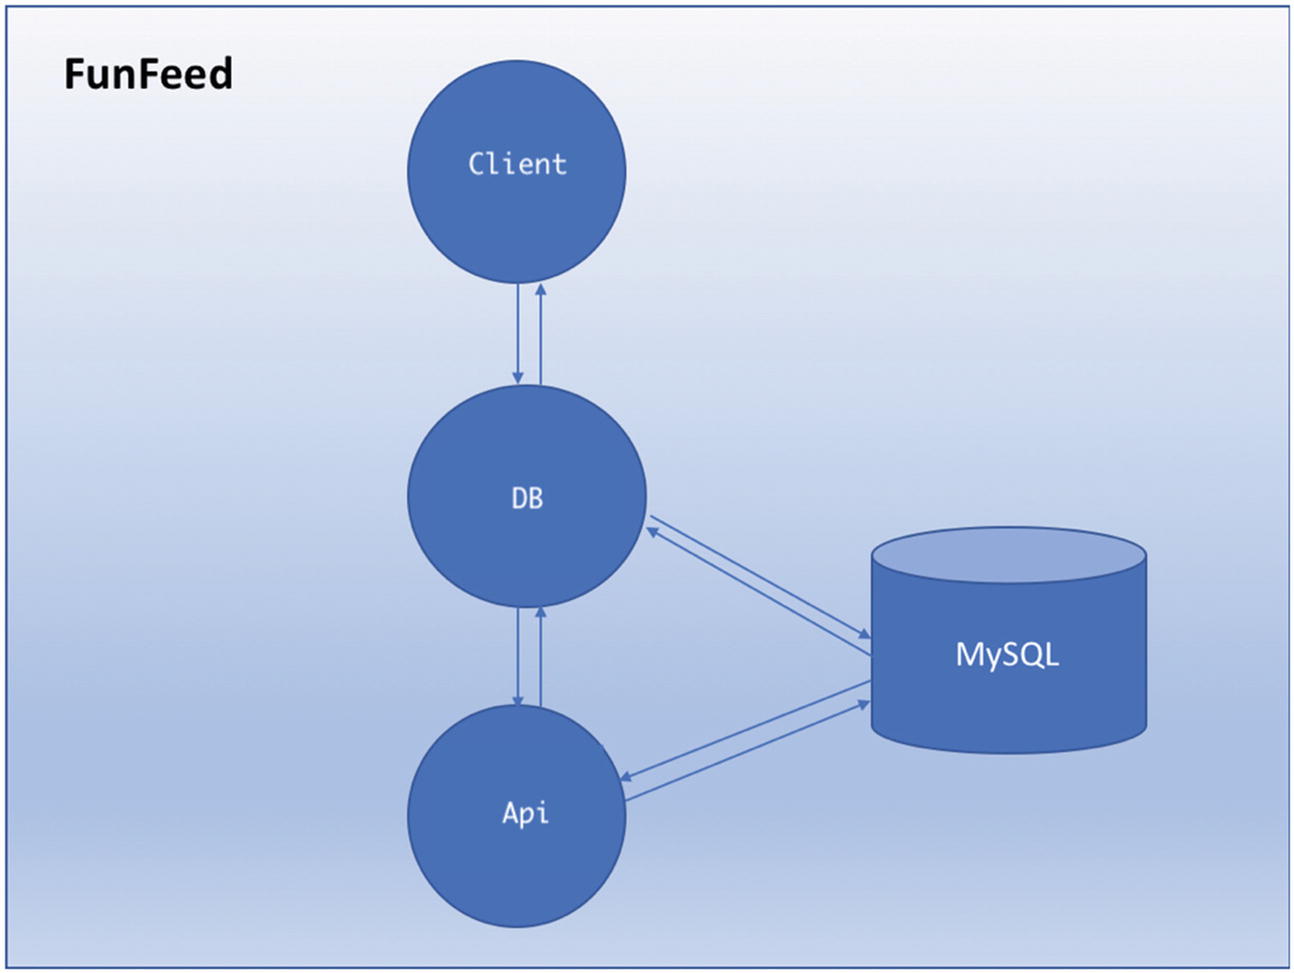
FunFeed application, with its microservices, namely, Client, DB, and Api, and the MySQL database
- 1.Client: When the user logs in to the FunFeed application, this service makes an HTTP request to the DB service with the user ID in the request and awaits a response from the DB service.
- a.
HTTP request input: User ID
- b.
HTTP response received: List of images to be rendered on the browser
- a.
- 2.DB: This service accepts the HTTP request from the Client service, takes the user ID as input, and makes a database request to get a list of interests for that user ID. It then sends this list of interests to the Api service and awaits a response.
- a.
Input to the database: User ID
- b.
Response received from the database: List of interests
- c.
HTTP request to the interest service input: List of user interests
- d.
HTTP response received: List of images
- a.
- 3.Api: This service takes the list of interests from the DB service as input, sends this list to the database, and gets a list of images in response from the database. It then sorts this list and sends it back to the DB service, which in turn sends this response back to the Client service.
- a.
HTTP request input received: List of interests
- b.
Request to database: List of interests
- c.
Response from database: List of images
- d.
Response to DB service: List of images
- a.
Now let’s take a closer look at the Client service.
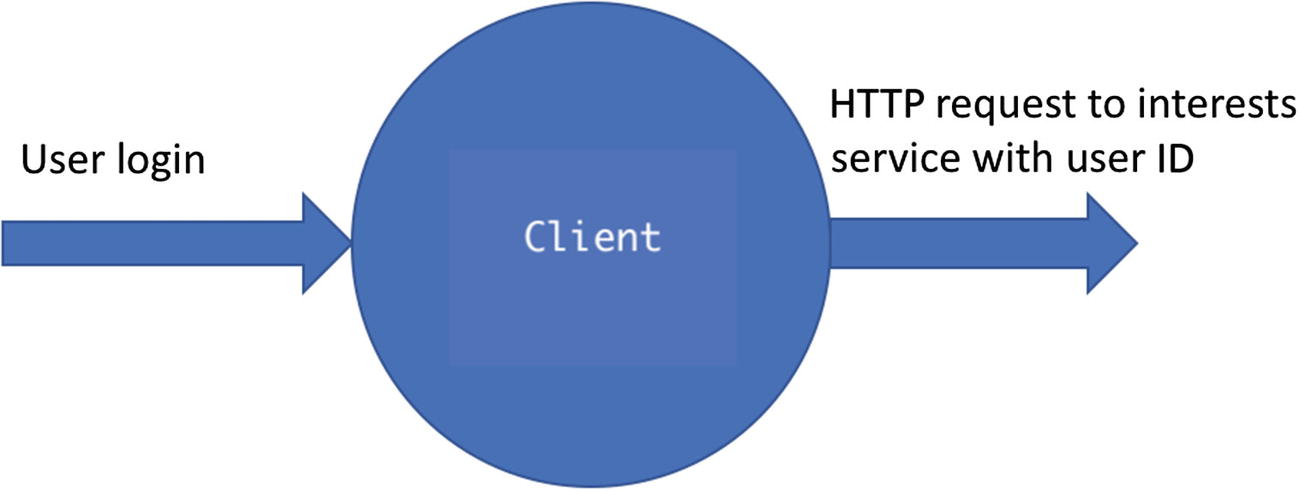
Client service input/output
- 1.
The FROM command sets the base image for the rest of the instructions. In this case, we set the base image to openjdk:7.
- 2.
The ENV instruction sets the environment variables for the container. In this case, we set our config file to config/client.dev.properties, our heap size to 4G, our logs config file to config/log4j.dev.properties, and our Java command to java.
- 3.
Next, we set our working directory inside the container to /opt/client, using the WORKDIR instruction. This means when you log in to your container, you will be inside the opt/client folder.
- 4.
With the ADD instruction, we copy the folders to the container. First, we set the argument ARTIFACT_PATH to target/client-server-0.1-SNAPSHOT-bin.tar.gz, using the ARG instruction, and next we copy this client-server-0.1-SNAPSHOT-bin.tar.gz file to the /opt/client folder inside the container.
- 5.
And, finally, we use the CMD instruction, which specifies the command for the image and does not execute it during build time. In this case, the command for the image is scripts/run_in_container.sh. This means, that this script run_in_container.sh, is used to get the Client service up and running.
Put succinctly, the Client service Dockerfile sets the base image that the rest of the instructions can sit on, sets some environment variables for the client container, sets a working directory and copies some files, and, finally, sets up the command for the image run.
- 1.
The FROM command sets the base image for the rest of the instructions. In this case, we set the base image to openjdk:7.
- 2.
The ENV instruction sets the environment variables for the container. In this case, we set our config file to config/db.yaml, our heap size to 4G, our logs config file to config/log4j.dev.properties.
- 3.
Next, we set our working directory inside the container to /opt/db, using the WORKDIR instruction. This means when you log in to your container, you will be inside the opt/db folder.
- 4.
With the ADD instruction, we copy the folders to the container. First, we set the argument ARTIFACT_PATH to target/db-0.1-SNAPSHOT-bin.tar.gz, using the ARG instruction, and next we copy this db-0.1-SNAPSHOT-bin.tar.gz file to the /opt/db folder inside the container. We also copy the target, scripts, and config folders on the host machine to the target, scripts, and config folders inside the container.
- 5.
And, finally, we use the CMD instruction, which specifies the command for the image and does not execute it during build time. In this case, the command for the image is scripts/run_in_container.sh. This means, that this script, run_in_container.sh, is used to get the DB service up and running.
- 1.
The FROM command sets the base image for the rest of the instructions. In this case, we set the base image to openjdk:7.
- 2.
The ENV instruction sets the environment variables for the container. In this case, we set our config file to config/api.test.properties, our heap size to 4G, our logs config file to config/log4j_local.xml.
- 3.
Next, we set our working directory inside the container to /opt/api, using the WORKDIR instruction. This means that when you log in to your container, you will be inside the opt/api folder.
- 4.
With the ADD instruction, we copy the folders to the container. First, we set the argument ARTIFACT_PATH to target/api-0.1-SNAPSHOT-bin.tar.gz, using the ARG instruction, and next we copy this api-0.1-SNAPSHOT-bin.tar.gz file to the /opt/api folder inside the container. We also copy the target, scripts, and config folders on the host machine to the target, scripts, and config folders inside the container.
- 5.
And, finally, we use the CMD instruction, which specifies the command for the image and does not execute it during build time. In this case, the command for the image is scripts/run_in_container.sh. This means that this script, run_in_container.sh, is used to get the Api service up and running.
Now that we have looked at the individual Dockerfiles of all three services, let’s take a look at some of the dependencies of those services.
As you can see in the preceding code snippet, the Client service depends upon the Puppycrawl tool version 7.5.1, in addition to the JUnit and Twitter dependencies.
We already have versioning conflicts for JUnit and com.twitter.common libraries, because both of these are used by both Client and DB services, except that these services use different versions of these libraries. If you were to run these services on a single machine on the same application server, you would have to make these compatible with the same version of JUnit and Twitter. Imagine doing this for 50 dependencies, which could very well be the case for huge services. Then imagine adding a new service that depends on the latest version of JUnit, in which case, you would have to make all the previous services use the latest version of JUnit. In addition, JUnit is a test-scoped dependency, so it isn’t even included in the final artifact. If a previous service was using a feature that is potentially not supported in the latest version of JUnit, that would break your service, and you would have to rewrite some of it to use the latest version of JUnit. Nightmare! Isn’t it?
Even though the Api service does not need JUnit or Twitter to execute, it is dependent on the Apache Maven plug-ins and the Puppycrawl tool plug-in, both of which are different versions than those of the Client service, as you can see in the code snippet.
Even though there are conflicts in the dependencies of all these three services, Docker can handle this gracefully, using one of its properties of application isolation. That means that running these services individually inside Docker containers will not cause these services to conflict with one another. Instead, they can operate in their own isolated environment and run simultaneously.
Alright, now that we have established why we are going to run these services in Docker containers (to enable them running in their isolated environments, to avoid conflict dependencies), let’s look at how can we get them all running together, so we can run the application end to end all at once.
As you can see in preceding code snippet, the docker-compose file of the FunFeed application contains the configuration of all three services Client, DB, and Api.
- 1.
services: The services key tells the docker engine all the services that constitute the application. In this case, the docker-compose.yaml file lives inside the FunFeed folder and contains three services, namely, Client, DB, and Api, as you can see in the preceding code snippet.
- 2.
build: The build key specifies the context path and the path to the Dockerfile for each service.
- 3.
ports: The ports key specifies which port on the container maps to which port on the host machine. In the preceding code snippet, under the Client service, you can see that port 8887 on the Docker container maps to port 5001 on the host machine.
- 4.
command: This key specifies the command on image run. Under the Api service, you can see that the command for the Api service image run is bash scripts/run_dev_server.sh.
- 5.
container_name: This key is the container name for the container in which that service runs in. For example, the container name for Client is client, that for DB is db, and that for Api is api.
- 6.
volumes: This key specifies the volumes you want mapped from the host machine to the Docker container for each service.
- 7.
environment: This specifies the environment variables for your Docker container.
Now that we’ve looked at our docker-compose file, let’s go ahead and run this and see what it looks like.
As you can see, so far, we have Api and Client services running successfully. Next, let’s verify whether Api, DB, and Client Docker containers are running.
Now that we have all the Docker containers for all the services of our application up and running, as you can see in the preceding code snippet, let’s see how we can look at the logs and how to look inside these Docker containers.
Note, as you can see, the Dockerfile of the Api service sets the working directory to be /opt/api, which is why the container starts in that directory.
Now that we’ve looked at how to get inside the Docker containers, let’s go ahead and query the entire FunFeed application.
The FunFeed application services talk to one another over a common network that could be defined in the docker-compose file. The Client service talks to the DB service, and the DB service talks to the Api service. This means that any incoming request from the Client service to the DB service will not go to the DB production service anymore. Instead, the request will be processed by the DB service running inside the Docker container named db. Similarly, any incoming request from the DB service to the Api service will go to the Api service running inside the Docker container named api.
Now that we’re clear on how the request is going to get processed, it’s time for the finale! Let’s query our FunFeed application and see what we get back.
In order to query our application, make sure that you are inside the FunFeed ➤ client directory. Remember: client is our Client service, which will accept this request, authenticate the user, and send the user ID to the DB service, to get a list of interests for that user and then send it to the Api service, to get the list of images in the response.
Let’s look at what the preceding request means.
The server/local_test_serversh is the script that starts the server for the Client service, such that it gets ready to accept the incoming requests. The user_id is the parameter that is being passed to this script as an input. "--" before user_id is just how the script recognizes what the input parameters are. num_results is a parameter that accepts the number of results.
Now let’s look back at the preceding snippets. Observe that all three services are ready to accept incoming requests.
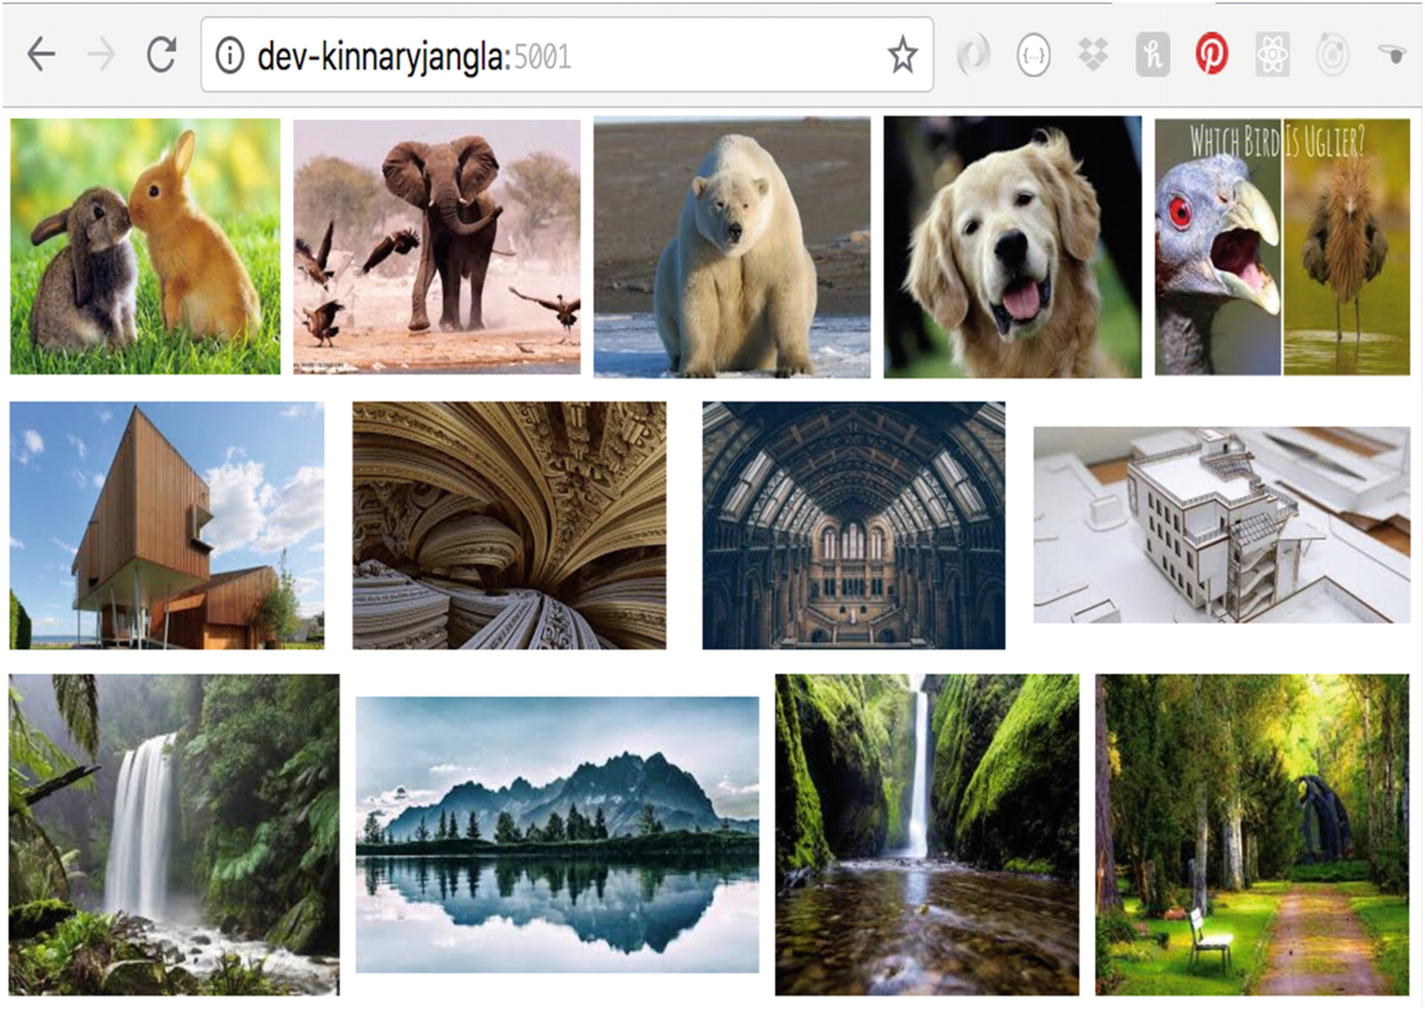
FunFeed application results on the browser
- 1.
The Client service took the request, parsed the user input (user_id and num_results) and sent this request to the DB service.
- 2.
The DB service then authenticated the user ID.
- 3.
The DB service then queried the MySQL database and looked up the user ID in the userIdToInterests SQL table, which had a mapping of the user ID to the Interests table.
- 4.
The query resulted in a list of interests in the form of strings, such as animals, architecture, nature.
- 5.
Once the DB service received this list, it then made a new request to the Api service, with this interest list as an input parameter.
- 6.
The Api service queried the DbToImages table in the MySQL database and returned a list of images.
- 7.
The Api service sorted the list of images it got back from the query.
- 8.
The Api service then sent this list of images back to the DB service.
- 9.
The DB service sent these images back to the Client service.
- 10.
The Client service then rendered these images on the browser.
Note
There are many more optimizations that can be done in this application architecture, for example, storing images in a cloud-based storage or a CDN, improving latency by using HTTP accelerators or simple caching, breaking the DB service down into an authentication service and a service that is responsible for getting the interests list, etc. But all these optimizations are out of our scope. This application is simply to demonstrate how Docker can efficiently be used to render applications that have dependency conflicts with one another.
Furthermore, if you see in your terminal where the client Docker container is running, running the docker container logs command should show you everything that’s happening inside each container. You should be able to see all the post and get requests being made and all data received. Remember: What you see in the logs is because of what your service and script logs on the output terminal. So, if you want more verbosity, make sure your script of your service logs the requests or the data that you would like to see in the logs. That also makes it easier to debug, if something is failing in any of these services.
Debugging
Now that we’ve looked at how an end-to-end application runs successfully on Docker, let’s take a look at how you would debug if something failed here and what could be potential hurdles as you develop.
- Dockerfile for an individual service has build errors.
Apt-get is something that mostly all Dockerfiles might have. So, make sure you have that installed. It could potentially be out of date, and you might need an upgrade, so run apt-get upgrade to upgrade its version.
Another reason could be that you’re using ADD instead of COPY. In this case, first try to understand the difference between the two. COPY is a much easier command, because it simply copies the files from the host machine to the container. ADD adds more complexity, because it includes more features, such as being able to add from a remote URL and auto-unpacking of compressed artifacts such as zip, tar, etc. If you don’t need that simplicity, use COPY.
If you’re using :latest in your FROM command, the latest image might have been updated. To prevent this, you could use a certain version tag to be more specific about which exact build you are taking the base image from.
You might have multiple FROM statements. Docker will always use the last one.
- The docker-compose.yaml file has build errors.
Make sure your Docker Engine is updated and that you have the right permissions to run the scripts and access the files.
Make sure the docker-compose.yaml file is at the root of your project directory.
Make sure your resources are not named with dots and dashes or any other illegal characters.
Make sure you have access to the resources from the root directory.
You might see an error from the Docker daemon, such as that following. Your solution here will be to run chmod +x scripts/run_in_container.sh, where you are making the script an executable file. Then rebuild the modules.
- One of the services might exit with a certain error code
When you run docker-compose up, one or more of the services might not start successfully.
It might error with an exit code, as shown following.
The error code 0 could really be anything. You could start first with running your script individually, using the bash command directly from your service directory, making sure the script runs and the service starts up successfully. If you’re not able to get the script running successfully by itself, then there is either an issue with the way your service starts up or an error in the script itself. Narrowing down whether the script is an issue could be helpful.
- service could be crashing inside the Docker container.
If everything else looks fine, but your service still exits with an error code, there is a possibility that your service could be crashing inside the Docker container it’s running in.
You can either look at the logs of the container using the docker logs <container-name> command, or you can log in inside the Docker container, then view whether the volumes are correctly mounted and the configurations are as per specifications, etc.
Once inside the Docker container, you could also run the script to get the service up and running and make sure it has no permission issues.
- Unused Docker containers
Because you can spin up Docker containers so quickly, one thing to be aware of is that many unused Docker containers will simply keep consuming heaps of space on your machine.
If you don’t need these containers and images, feel free to remove them, so that they don’t consume all that space.
docker system prune, with or without options, can help with removing unused Docker containers, networks, or images that could be dangling, and even volumes, optionally. Some options that could be used are –all, which would remove all containers, and --volumes, which would prune volumes.

Doing the preceding will ask you for a prompt, as shown following.
- Service discovery added overhead
With the multi-tenancy territory comes an added overhead of discovering all these services. In our FunFeed example, I’ve left that out, as it is beyond our scope.
In order to successfully launch an application running on a microservices architecture, you have to implement some kind of service discovery.
In this day and age, with the rapid adoption of Docker, there are multiple solutions for this, such as ZooKeeper, Consul, etc.
This overhead could potentially also cause issues while running docker-compose.
Last, docker-compose in theory is a very powerful and extremely straightforward tool to run multi-container applications. It’s super convenient to get an application that is composed of multiple microservices up and running for development purposes and also in production environments.
Today, many companies, such as Pinterest, Lyft, Yelp, etc., run their services on Docker containers. In order for Docker containers to run at scale (to compute the resources needed to run containers), options such as Amazon Web Services (AWS) or any other public clouds come in very handy. AWS lets you deploy containers pretty quickly.
In addition, in order to get services running at scale in such large companies, automation of deployment of these services, also known as orchestration, requires different solutions. We’ll look at that a little more in detail in the next and final chapter.
Summary
Phew, that was a lot! In this chapter, we looked at distributed environments and their advantages and challenges. You saw in depth that heterogeneity, concurrency, scalability, transparency, and failure handling are just a few of the issues related to distributed environments.
Later, we saw how an end-to-end application composed of microservices runs, using the Docker Compose tool. We walked through each service, its responsibility, individual Dockerfiles, the docker-compose file that runs the entire application, and, finally, we made a request to the entire end-to-end application, once all Docker containers were up and running. We saw the output of that request in a web browser. Last, we looked at some of the hurdles that you can encounter while running a full application on Docker.
In the next chapter, we’ll look at how Docker works in production environments, how to scale Docker containers, and how all this ultimately helps us accelerate the development for software engineers.