
Chapter 5. Queries and SQL
Hacks 40–54
You can accomplish a lot with the Access query grid. You can achieve even more by working directly in the SQL pane. Queries are categorized into two types:
Select (passive) queries and
Action queries. You use
Select queries to pull data records out of tables. You use
Action queries to do something with or to the data. You can run both types of queries in the query grid, but only up to a point. For example, to use a Union query you must use straight SQL statements. You also must use the SQL language for certain sophisticated Action queries.
In this chapter, you’ll find all sorts of SQL activities going on, both in and out of the grid. For instance, “Return a Sample of Records” [Hack #40] shows how to return a small set of records using settings in the grid. Meanwhile, “Place a Grand Total in a Query” [Hack #43] is achieved with SQL.
All in all, these hacks show how to accomplish some cool and/or necessary tasks you might be hard-pressed to figure out how to do on your own. Decent knowledge of the SQL language pays off in spades as you work on your projects. The query grid shields you from learning SQL, but after a while, you probably will need to do things you can’t do using the grid. Hopefully, the hacks in this chapter will get the brain gears turning and serve as a springboard to even more sophisticated database work.
Return a Sample of Records
Use the Top predicate to return a portion of your records without bias.
Most often, you use a Select query to return all the records that match certain criteria. Usually, this query returns a data set that is smaller than the table or tables upon which the query is built. That is, not all records match the criteria, and the number of records that do match is smaller than the underlying set of table data.
Sometimes, you might need only a sample of records that aren’t based on the criteria or in which the criteria are irrelevant. This isn’t the same as fine-tuning the criteria to limit the number of returned records. For example, statistical work might require a sample from which to infer facts about the whole data set. Regardless of whether the population data is a table or a filtered data set already based on some criteria, the point is that the next step of getting a sample is completed without any preconceived notion. This is where the SQL Top predicate comes in handy.
The Top predicate works in two ways:
Returns a number of records
Returns a percentage of records
Using the Top Predicate
The Top predicate allows you to isolate records from the top of a data set. If you want to get records from the bottom, first apply a reverse sort (i.e., descending instead of ascending). Either way, you will continuously get the same set of records each time you run the query. Later in this hack, we’ll discuss a method for getting a true random sample.
Figure 5-1 shows a query in Design mode in which the query property sheet is used to indicate the number of records to return. The Top Values property has a few values from which to select. You can use one of these, or you can enter your own.

With 25 as the selected count to return, the query returns, no surprise, 25 records from the top of the data set, as shown in Figure 5-2.

It’s interesting to see the SQL the Access query grid generates. Switching to SQL view, here is what you see:
	SELECT TOP 25 Occurrences.Reading
	FROM Occurrences;
The Top predicate sits just after the Select statement and specifies the number of records to return.
To return a percentage of records, simply add the word Percent to the SQL statement, after the number:
	SELECT TOP 25 PERCENT Occurrences.Reading
	FROM Occurrences;
To indicate percent when using the query designer, add the percent sign (%) to the Top Values property, as shown in Figure 5-3.

Hacking the Hack
The Top predicate is great for grabbing a handful of records, but it will always grab the same records. Even when no sort is placed on the source data, the records still sit in the order in which they were placed in the table.
Returning a random set of records requires using the
Rnd function. You apply this as a sort. Normally, a sort isn’t what you want to use to return an unbiased data set, but sorting on a random value makes this a moot point. To make this work, alter the SQL statement to look like this:
	SELECT TOP 25 Occurrences.Reading
	FROM Occurrences
	ORDER BY RND([Reading]);
Enter the name of the field as the argument for the Rnd function. Each time the query runs, a random selection of records is returned.
Create Bulletproof Insert Operations
Prevent failed append operations so that all the records make it into the table.
You use the SQL Insert statement to append records to a table. Although this usually works great, it is prone to issues that can make it bomb. This hack shows two things you can do to validate data before handing it off to an Insert operation. Before we discuss these validation methods, let’s create a simple table, as shown in Figure 5-4.
The table has two fields:
Handling Excessive Text Length
One thing that can trip up an Insert is trying to stick data into a field when the data is longer than the field length. This is an issue only for text fields. Here is an
Insert statement that works fine:
"Insert Into Patients (Patient, Age) Values ('Gary', 22)"The name Gary fits in the Patient text field. Now, look at this statement:
"Insert Into Patients (Patient, Age) Values ('Bartholemew', 22)"Uh-oh. The name Bartholemew is 11 characters long, but the Patient field can accept a maximum of only 10 characters. The easiest way to fix statements such as these is to truncate the text to 10 characters by using the Left function.
Here is a sample code routine that appends records from the NewPatients table to the Patients table. The Left function sits in the middle of the Insert statement and ensures that no name is longer than 10 characters:
	Dim myDB As ADODB.Connection
	Set myDB = CurrentProject.Connection
	Dim rsNewPatients As ADODB.Recordset
	Set rsNewPatients = New ADODB.Recordset
	rsNewPatients.Open ("Select * from NewPatients"), myDB
	Do Until rsNewPatients.EOF
	myDB.Execute ("Insert Into Patients Values ('" & _
		 Left(rsNewPatients.Fields("Patient"), 10) & _
		 "', " & rsNewPatients.Fields("Age") & ")")
	rsNewPatients.MoveNext
	Loop
rsNewPatients.Close
myDB.Close
Set myDB = Nothing
The Left function cuts the size of the name to 10 characters. Another option, of course, is to increase the size of the table field.
Watching Out for Apostrophes
Nothing disrupts an Insert faster than the odd apostrophe or single quotation mark. It’s reasonable to have these in your data; after all, the name O’Reilly has one. But in a SQL Insert, the single quote qualifies text. Therefore, without a little help, this Insert operation will fail:
"Insert Into Patients (Patient, Age) Values (Left('O'Reilly',10), 22)"The problem is that as the statement is executed, the single quote before the letter O starts the text and the single quote after the letter O ends the text. This leaves the Reilly part of the name as unidentifiable.
Doubling up single quotes removes the problem, and the way to do this is to use the Replace function. Replace replaces each instance of a single quote with two single quotes. Here is the previous code routine modified to handle single quotes:
	Dim myDB As ADODB.Connection
	Set myDB = CurrentProject.Connection
	Dim rsNewPatients As ADODB.Recordset
	Set rsNewPatients = New ADODB.Recordset
	rsNewPatients.Open ("Select * from NewPatients"), myDB
	Do Until rsNewPatients.EOF
	  myDB.Execute ("Insert Into Patients Values ('" & _
         Replace(rsNewPatients.Fields("Patient"), "'", "''") & _
         "', " & rsNewPatients.Fields("Age") & ")")
	rsNewPatients.MoveNext
	Loop
	rsNewPatients.Close
	myDB.Close
	Set myDB = Nothing
Here is how to use the Replace function:
Replace(rsNewPatients.Fields("Patient"), "'", "''")
Replace works by testing a string of text for one or more characters. If the string is found, it is replaced with another string of one or more characters. The three function arguments are:
The string being searched
The characters being searched for
The replacement string
All data coming from the NewPatients Patient field is tested for the single quote, and if it’s found, the quote is replaced with two single quotes. This creates an acceptable SQL statement, and the insert can proceed.
Combining the Two Validations
I left the best for last. You need to test for both excessive length and apostrophes. Can you test for both simultaneously? You bet! Just nest one function inside the other with the following code:
	myDB.Execute ("Insert Into Patients Values ('" & _
       Left(Replace(rsNewPatients.Fields("Patient"), "'", "''"), 10) & _
       "', " & rsNewPatients.Fields("Age") & ")")
Find Unmatched Records on Multiple Field Keys
The Find Unmatched Query Wizard looks for unmatched records based on a single related field. You can adapt this query to work on more than one related field.
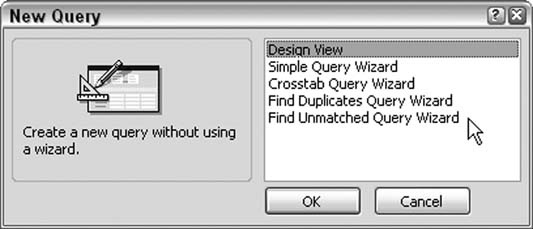
The easiest way to find records in one table that has no related records in another table is to use Access’s built-in Find Unmatched Query Wizard. Figure 5-5 shows the New Query dialog box, which accesses the wizard.
A handful of wizard screens walk you through setting up the query. You select the two tables and even which way the query should work. For example, do you need to know which records in Table A have no related records in Table B? Or do you need to know which records in Table B have no related records in Table A? Either way, the key to making this possible is that the tables are related in the first place.
Tip
Strictly speaking, the tables selected to be in an unmatched query don’t have to be formally related, at least in regard to setting up a relationship in the Relationships window. It’s just that the fields being matched should be housing the same data; otherwise, all records are returned as unmatched.
Tables can be related on single field keys or on multiple field keys. Unfortunately, the wizard lets you specify only a single field to relate the tables, as shown in Figure 5-6.

Select a single field from each table, on the left and right, and then click the button between the two tables to set the match the query will use. The wizard generates a query that is saved in the database. This is convenient because it allows you to reuse the query without having to recreate it. You also can change the query, which I’ll describe next.
Reviewing the Query
The example used here finds which customers have no matching records in a sales table. Using the Find Unmatched Query Wizard, I can look for customers based on their last name alone. Figure 5-7 shows the query design the wizard generated.
The query uses a LEFT JOIN to return all records of customers whose last name field is Null in the sales table. The SQL looks like this:
	SELECT tblCustomers3.FirstName, tblCustomers3.LastName
	FROM tblCustomers3 LEFT JOIN tblSales3 ON
	tblCustomers3.LastName = tblSales3.LastName
	WHERE (((tblSales3.LastName) Is Null));

There is a problem here, though. Two customers might have the same last name. In that case, as long as one of the customers has a record in the sales table, any other customers with the same last name don’t appear in the query’s results, even if they should.
Figure 5-8 illustrates this point. Left to right across the screen are the customer table, the sales table, and the query that looks for customers that have no sales. Starting on the left, there are two customers with the same last name: Kam Winter and Muriel Winter. In the sales table, in the middle, Muriel Winter has a sales record. In the query result on the right, Kam Winter is not listed as a customer with no sales, even though Kam should be there.
Because the last name is all that is tested, all customers with the same name are skipped in the query results, as long as one of them has a sales record. This isn’t acceptable.
Changing the Query
All you need to do is alter the query so that both the last name and the first name are tested. We do this in the query design, in either the grid or the SQL pane. Figure 5-9 shows how the query is designed now.
It’s important to make sure a few things are changed correctly:
You need to add a criterion that looks for
NullinFirst Name.You need to add a second relationship between the tables, on the new included field. Look closely at the differences in how the tables in the query are related, comparing the design in Figure 5-7 with the design in Figure 5-9.
You should uncheck the fields that come from the secondary table (the sales table in this example); that is, they should not appear in the output.
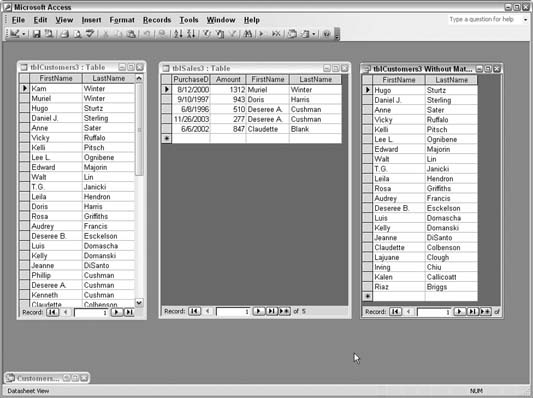

Figure 5-10 shows how the query returns Kam Winter as being a customer with no sales records. Some other customers appear in the result as well.

Place a Grand Total in a Query
Use a Union query to combine raw data records with the data total.
Here’s a neat way to list the records in a table and have the total appear at the bottom. First, create a Select query to return the table records; then use the Union statement to combine them with the data total. The Sum aggregate function handles returning the total. The assumption, of course, is that the data is numeric.
You need to enter this type of query in the SQL pane because the query grid doesn’t support creating or displaying
Union queries. Here is a sample SQL statement that combines sales records with the sum of the sales:
	SELECT tblSales.Amount
	FROM tblSales
	UNION ALL SELECT Sum(tblSales.Amount) AS SumOfAmount
	FROM tblSales;
Figure 5-11 shows the bottom of the returned query records. Sure enough, a grand total is in the last record.

Sort Any Arbitrary String of Characters
The Access query grid is great for sorting your data, but you need to help it sort on characters in the middle of a field.
I love the query grid. It’s very helpful for doing all sorts of sorts (pun intended). But did you ever notice that sorting on text data always occurs on the whole field, going left to right? This makes sense because this is the most common sorting requirement. Imagine, though, the problem of having to sort on, say, just the fifth character, or the last three characters, or in any other way that isn’t the norm.
This is an issue especially when Access is used with data that comes from other systems. Accounting systems are notorious for this. They often lump together a bunch of disparate data into a fixed-width field. Here’s another classic problem: you are given a list of people’s names in one field, structured as first name/last name, but you need to sort on just the last name.
Sorting in the Middle
Figure 5-12 shows a table filled with sales records. The records follow a strict format comprising a two-character vendor code and a six-character date; the remaining digits are the sales amount, and the last two of those digits are the decimal part of the amount. Therefore, the first SalesData record (CT1023044595) breaks down like this:
Vendor code is CT.
The date is October 23, 2004.
The amount is $45.95.
Let’s say you need to sort the records by date. As shown in Figure 5-12, in each record, the date starts in position 3 and takes up six places.
Have you ever worked with data such as this? You need a record layout to go with the data; otherwise, you can’t tell what kind of data it is. What if you had to guess which characters make up the date? Garbage in, garbage out, as the saying goes.
The best way to tackle a problem such as this is to use the
Mid function. Mid is one of the functions that let you manipulate textual data. It works by isolating a part of a larger text string. You have to tell Mid three things: the string of data, the position you want to start from, and how many characters to include. The syntax looks like this:
Mid(string, starting position, length)
Tip
Even though we are conceptually working with dates in this example, the stored information is in text format. Therefore, it’s easy to manipulate the date with standard string functions.
Figure 5-13 shows a query design in which the Mid function is used. The first column is the SalesData field itself, and the second column is a calculated field using the Mid function. Within the function, SalesData is enclosed in brackets. This is the standard way to put a field name in a function. Mid's parameters are set to isolate six characters starting at position 3 (the date, in other words).

When the query runs, the second column has just the date in it because Mid does the job of grabbing the characters from positions 3 through 8. The second column receives the sort because, after all, the date is what we need to sort on. So, where the Sort row and the second column meet, set the choice to sort in ascending order by selecting Ascending from the drop-down menu.
Note in Figure 5-13 that the Show checkbox for the calculated field is unchecked. You don’t have to actually display the column when the query is run. It is used just to make the sort happen, but it doesn’t necessarily have to appear in the results.
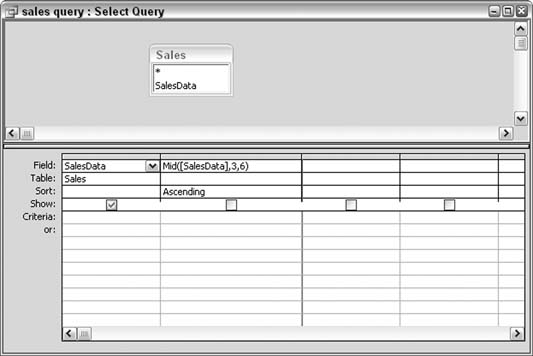
Figure 5-14 shows the result of running the query. Now the sales records are sorted by date. The first returned record (MR0104047011) contains 010404, the equivalent of January 4, 2004.

Sorting on Mixed Fixed Positions
What if you have to sort on both the date and the amount? What if the sort has to show the date in ascending order and the amount in descending order? This is a common requirement: to see money amounts sorted from high to low. Can you do this?
But of course! In this case, the technique is to have two columns with expressions, one each for the date and the amount. Figure 5-15 shows how you do this, with the amount starting in the ninth position. The length parameter for the Mid function that processes the amount is set to 5. Usually, a length is known, but not always. In this example, the amounts among the records might be four or five digits long, so setting the length to 5 works for all records.

In this example, as before, only the actual SalesData field is shown when the query runs. Therefore, the second and third columns both have unchecked Show boxes. The second and third columns both use Mid to work on different substrings within the same full SalesData string.
Now the result is slightly different. Figure 5-16 displays the returned data. Comparing this result to the result shown in Figure 5-14, you can see that records 6 through 8 have been reordered. These records share the same date of January 16, 2004 (011604), but now the amounts are reordered based on the query specification.

Sorting on Characters When Their Position Is Unknown
Often, you need to manipulate data imported from external systems before you can use it in your application. This is a common issue with names. Your database table might have separate fields for first and last names. This of course makes it a no-brainer to sort on last name. But imagine the difficulty when you are given full names in one field. What if the names are in the order of first and then last name, with a space in the middle, and you need to sort on the last name? The difference here, compared to the previous sales information example, is that you can’t know, record by record, in which position the last name starts.
The trick to sorting by last name is to first determine the position of the space. In this case, you use the InStr function with the Mid function. Instead of hard-coding the position of the space, InStr returns the position of the space.
The InStr function tells you the starting position of the first occurrence of a substring inside a larger string. In this example, the string being searched is the Client field, and the substring is a space. By itself, InStr looks like this:
InStr([Client]," ")
Here we use the InStr function to tell the Mid function the position from which it should start counting. InStr is embedded inside the Mid function. Together, they look like this:
Mid([Client],InStr([Client]," ")+1,10)
Note that although the InStr function returns the position of the space, we are interested in the starting position of the last name. This is one position to the right of the space, and for this reason, 1 is added after the InStr function. The returned value of InStr plus the value 1 is used as the starting position parameter in the Mid function.
Figure 5-17 shows how to set up a query using these nested functions. The value of 10 is arbitrarily used here as the length of the last name. Last names vary in length, but using 10 characters to sort on all but guarantees the sort will be in the right order.
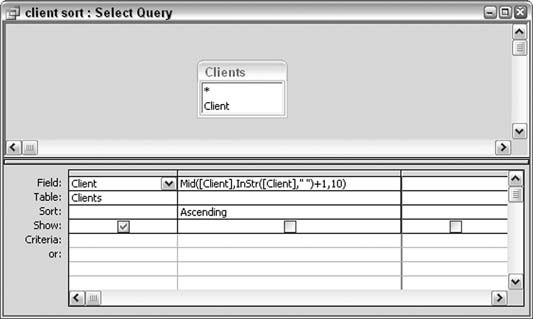
Figure 5-18 shows the result of the query. Clients are sorted by last name, within a single field that contains full first and last names. Neat!
Hacking the Hack
Sorting on names isn’t difficult when first and last names are all you have to work with. But what about middle names, titles, and suffixes? How can you handle these? Let’s up the ante on this hack and include a custom function in the query.

The function we need will examine the names in the Client field to determine the position of the space. Here’s the catch: now there could be more than one space. My name is Ken S. Bluttman; that’s two spaces—one on each side of the middle initial. Some names have three, four, or even five spaces. The function is meant to simply figure out the best space to use; it figures out the position of that space and tells the Mid function where it is.
First, you write the function in a VBA code module. To do this, from the database window, go to the Modules tab, and select to create a new module. Enter this code:
  Function find_space(client_name As String)
  Dim name_length As Integer
  Dim space_loop As Integer
  Dim space_count As Integer
  Dim partial_name As String
  Dim first_space_position As Integer
  'count spaces in full name
  space_count = 0
  name_length = Len(client_name)
  For space_loop = 1 To name_length
    If Mid(client_name, space_loop, 1) = " " Then
      space_count = space_count + 1
    End If
  Next space_loop
  'parse the full name using assumptions in each Case
  Select Case space_count
   Case 0
     'no spaces found!
     'return 1 as the position
     find_space = 1
   Case 1
     'a first name and last name
     'split after first space
     find_space = InStr(client_name, " ")
   Case 2, 3
     'assume a first name, Middle name, and last name (2 spaces)
     'or a first name, Middle name, last name, and suffix (3 spaces)
     'split after second space
     find_space = InStr(client_name, " ")
     first_space_position = find_space
     partial_name = _
        Mid(client_name, find_space, name_length - find_space)
     find_space = InStr(partial_name, " ") + first_space_position - 1
   Case Else
     'difficult to make assumption on name structure
     'split after first space
     find_space = InStr(client_name, " ")
End Select
End Function
In a nutshell, the function takes a client name, counts how many spaces are in it, and then determines which space is best. The position of that space is used in the Mid function as before.
In the query grid, the call to the function, named find_space, is embedded in the Mid function, like this:
Mid([Client],find_space([Client])+1,10)
Figure 5-19 shows how to set up the query.

When the query runs, each client name is examined in the find_space function. The function returns the best space position, and the names are sorted. Figure 5-20 shows the results of running the query.

Looking closely, you will see that the sort isn’t without problems. The way the function is written, it assumes that when there are two spaces, the format of the name is first name, last name, suffix. This works for a name such as Alex Avakian III. The function assumes the last name starts after the first space.
Unfortunately, a name such as Tammy Jill Adams doesn’t end up with the other last names beginning with A. The function assumes the best space is the first, and the name is sorted as though the last name starts with J. Tammy’s last name starts after the second space. Sorry, Tammy!
Splitting names apart is traditionally a thorny problem. Some names always confound the best intentions of a name-parsing routine. That must be why I keep getting catalogs addressed to Mr. Ken.
See Also
“Use a Custom Function in a Query” [Hack #48]
Summarize Complex Data
Take advantage of Crosstab queries to get a view on multifaceted data.
When you need to aggregate data that has more than a simple grouping structure,
Crosstabs are the way to go. “Create Conditional Subtotals”
[Hack #29]
shows you how to use groups and conditional summing on a report. That works as long as the conditions don’t lead to an overwhelming number of possibilities.
The example in that hack uses five states and two years on which to create subtotals. The data model, though, has another table in play: a table of pets (the model is a simulation of a veterinary practice). This creates a large number of possibilities, such as all cat visits in New York in 2003, or all dog visits in Pennsylvania in 2004, and so on. Figure 5-21 shows the updated data model for this hack.

The data model includes seven types of pets (bird, cat, dog, ferret, horse, monkey, and snake), five states (CT, MA, NJ, NY, and PA), and two years of data (2003 and 2004). This makes 70 possible combinations. The best way to sum up the number of visits in which all these combinations of criteria are mixed and matched is to use a Crosstab query.
To get started, we must put together a Select query to join the different tables and return the fields needed in the Crosstab. Note that the Select query has a calculated field that isolates the year out of the DateOfService field. Figure 5-22 shows the design of the Select query.

Introducing the Crosstab
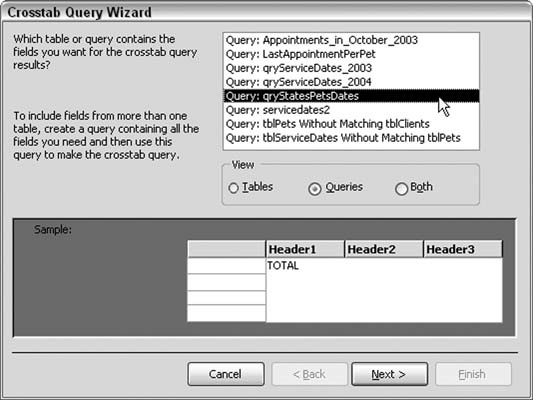
Access has a Crosstab Query Wizard, which walks you through creating a Crosstab query. Figure 5-23 shows the New Query dialog box in which a Crosstab query is initiated.

In this example, select the qryStatesPetsDates query in the first screen of the wizard, as shown in Figure 5-24.
In the next screen, select two fields as the rows. In a Crosstab query, the rows act as groups. Note that at least two fields must remain after you select fields for the rows. Select the state and pet type fields to be the row headings.
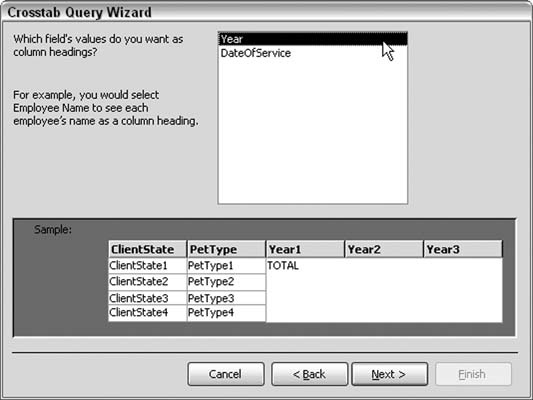
In the next screen, select a field to be the column field. Crosstabs require at least one column field. Choose Year here, as shown in Figure 5-25 (note that this figure shows the third screen, not the second).
In the last field selection screen, one field remains. Select the type of aggregation—in this case, Count, as shown in Figure 5-26, because the purpose is to count visits. Also be sure to uncheck the “Yes, include row sums” checkbox on the left. Keeping this checked returns a field of sums based on just combinations of state and pet type (the row headings) and that isn’t our focus here; we’re looking for the combination of state, pet type, and year.

When the query completes, all the counts are available. Figure 5-27 shows how the query presents sums in all combinations of state, pet type, and year.
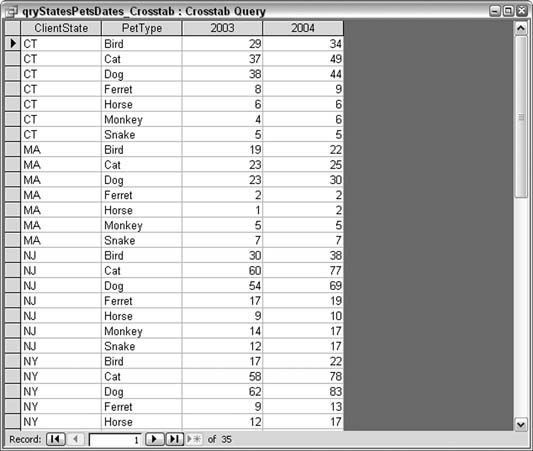
There are 35 records by virtue of the fact that state and pet type are row headings, and year is a column heading. This still provides the 70 unique combinations because the two years, 2003 and 2004, each have their own column.
See Also
“Create Conditional Subtotals” [Hack #29]
Get All Combinations of Data
Remove the Join clause in a SQL statement to return a Cartesian product (which returns all possible combinations).
Leaving the Join clause out of a SQL statement returns a number of records equal to the product of the number of records in the tables. Taking two tables, for example, as long as one field from either table is designated for output, the number of returned records in a Select query of this design is the product of the counts of the two tables.
Behind the scenes, the query is matching all combinations of the data. If each table has hundreds or thousands of records, the returned number of records can be in the millions. This can be disastrous—that is, unless returning records in this way is by design. Why would you do this? It makes sense to do it to explicitly return all the combinations. If you need such all-inclusive matching, you don’t have to bother with any VBA code; just create a query that does it for you. Figure 5-28 shows a table with 12 people and another table with eight possible activities.
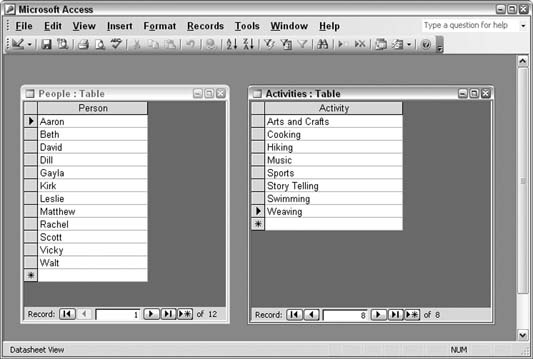
Create a Select query with the two tables, and designate the single field from each table for output. Figure 5-29 shows the query design. Note that the lack of a relation line between the tables is intentional.

A little tip-tap on a calculator shows 96 combinations of person and activity. Running the query returns the 96 records, as shown in Figure 5-30.

The query results can be copied, exported, and so on. This is a fast and easy way to get all combinations of data. Going one step further, a third table is added to the query. This new table contains parts of the day, in two records: morning and afternoon. Running the query returns the expected 192 records, which is the product of 12 x 8 x 2. Figure 5-31 shows the result.

Although it isn’t efficient to handle data in this unrelated way, at least with regard to database work, a set of combinations such as this makes for useful reports, checklists, and so on.
Don’t Let Nulls Ruin Data Summaries
When nulls are mixed in with valid data, incorrect results can occur. Here are some guidelines to tame the beast.
When you are dealing with values in Access, you might be tempted to think that a blank field is simply a blank field. However, there is a difference between a blank field that is filled in with an empty string and a blank field that is null. For example, when you are looking at number fields, there is a difference between a field with a 0 value and a field with a null value. This hack helps you work with these nonvalue values.
The first frustrating thing about nulls is that if you write a line such as this, every line will show up as Not Blank, even if you have null values:
IIF([Amount]=Null,"Blank","Not Blank")
This occurs because in a Boolean expression, any item compared to Null returns False.
There is an easy way to deal with this, using a function available in Access called
ISNULL. This function returns a Boolean and allows you to perform your test. Here is how to rewrite the previous example:
IIF(ISNULL([Amount],"Blank","Not Blank")
That clinches it. Now, any encountered null is converted to Blank.
Nulls in Number Fields
Let’s assume you have a table with a field called Amount. You are trying to determine the average of that field (assume also that the average doesn’t need to be weighted). If you write a query that attempts to determine the average value, the SQL might look like this:
	SELECT Avg(tbl_Amount.Amount) AS AvgOfAmount
	FROM tbl_Amount;
This gives you the average amount of the values in that field. However, if you have nulls for any of the values, the query will ignore them. So, if your values are 8, null, 8, null, 8, null, the average is 8. If your values are 8, 0, 8, 0, 8, 0, the average is 4. Depending on the purpose of the query, you might want to see 4 instead of 8.
If you want to substitute 0 for null, you can try to do it with the ISNULL function by writing a line such as this:
IIF(ISNULL([Amount]),0,[Amount])
There is a much easier way, though. The NZ function available in Access requires two parameters: one for the value and the other for the value if it is null. You can use this for both number and string functions. Here is what the SQL of the query looks like using the NZ function:
	SELECT Avg(NZ([Amount],0)) AS AverageofAmount
	FROM tbl_Amount;
As you can see, this is more compact than writing out IIF statements to perform the same function.
Next, let’s look at an example of a string function. Assume you live in an area where pine trees are popular, and you have a survey in which you input the type of tree only if it is something other than pine; otherwise, you just input the number of trees (bad design, but I’ve seen worse) and leave the tree type field null.
Now, assume that you have inherited this application, and you want to use it in other areas of the country. You want to update all the null Tree_Type fields with Pine Tree. You can do so with the NZ function. Here is what the SQL for this query looks like:
	UPDATE tbl_TreeTypes SET tbl_TreeTypes.Tree_Type =
	nz([Tree_Type],"Pine Tree");
This will work, but you have to update every record. So, if you can’t use Tree_Type = Null, you might ask if you can use null for criteria in a query. You can, using one of two methods. The easiest way is to use IS NULL for the criteria. The previous query looks like this using IS NULL:
	UPDATE tbl_TreeTypes SET tbl_TreeTypes.Tree_Type = "Pine Tree"
	WHERE (((tbl_TreeTypes.Tree_Type) Is Null));.
Preventing Nulls
It might be necessary for you to prevent nulls and zero-length strings in your database in the first place. A good example for this might be a name field or a ZIP code field. You can do this through either your table design or your data entry forms.
Table design to prevent nulls and zero-length strings.
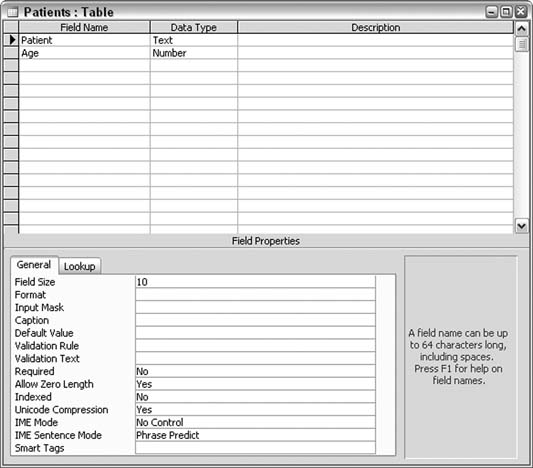
When you design your table, you can set several properties to help you handle blank fields, as shown in Figure 5-32.

The first is a property called Required. If you enter Yes for the Required property, you are telling Access a value must be entered in this field for it to be saved. This won’t prevent someone filling it with a zero-length string. Setting the Allow Zero Length property to No forces an entry other than a zero-length string. If you say Yes, and you just want to eliminate nulls (test for blank by writing [Field]="”), you can set the Default Value property to “”.
If you set these two properties correctly, you will have a value in each field, and you won’t have to deal with nulls in your application. The same thing applies to number fields: there is a Required property you can set to Yes, and there is also a Default Value property. Normally, the Default Value property is set to 0 in a number field. However, if you want to ensure that users enter a value in this field and don’t simply skip over it, you can remove the 0 in the default value field and set the Required property to Yes. This ensures that the record isn’t saved until the user puts a value in the field (0 can be entered unless you have a validation rule in place).
Form design to prevent nulls and zero-length strings.
If you don’t have control over the table design, but you want to ensure the data entered is accurate, you can do so through Access forms. When you create a form in Access, several textbox properties are available that can help you ensure meaningful data, as shown in Figure 5-33.

You can set the Default Value property to allow a zero-length string if all you want is avoid a null.
You can also write code in the Lost Focus event. It is important to do this in the Lost Focus event because the Before Update event won’t fire if the field is just tabbed through, and the After Update event fires after the field has actually been changed. Here is what that code might look like for a text box called TextBox1:
	Private Sub TextBox1_LostFocus( )
	If IsNull(Me.TextBox1.Value) Then
      MsgBox "You must enter a value in this field", vbOKOnly, "Important"
	  Me.TextBox2.SetFocus
	  Me.TextBox1.SetFocus
	End If
	End Sub
You might be wondering why the Set Focus event is called twice. You must set the focus off of the text box and then back onto it; otherwise, it won’t let you set the focus to the box. You might also be wondering why the code doesn’t use the Validation Rule property. The validation rule run onlys when the field is changed, so if you simply skip a field, it won’t run.
There is a limitation to using the Lost Focus event if a user uses th mouse and doesn’t click each field. You can get around this limitation by setting the Cycle property on the Other tab of the Form Properties dialog box to Current Record (as shown in Figure 5-34) and then setting the Navigation Buttons property to No on the Format tab of the same dialog box (as shown in Figure 5-35).


Once you have done this, you can create your own buttons to allow users to move to the next record, and you can put your validation text in there. In all cases, it is much easier to assign these settings during table design, but many times you don’t have that control.
—Michael Schmalz
Use a Custom Function in a Query
Write a custom function to manipulate multiple data formats.
When you need to perform complex manipulation of data in a query, it is often easier to write a function to perform the manipulation. You can avoid using complex functions inside a query and always write a user function. However, it is best to use your judgment. If you have a rather simple concatenation of a few fields, I suggest you write a user function within your query. But if you need to perform something complex and it is likely that you will need to do it in other places in the application, creating a new function will save you a lot of time.
Creating a New Function
To create a function, go to the Modules tab in Access, and create a new module. Once you are in the new module (you can also go into Design view in an existing module), select Insert → Procedure. Give it a name, select Function as the Type, and select Public as the Scope. Once you have your function, you can place variables between the parentheses. After the parentheses, give your function a type by typing As datatype; this ensures that your function is returned in the datatype that you expect.
Manipulating Dates
Dates come from different systems in many different formats, including YYYYMMDD, MM/DD/YYYY, and MMDDYYYY. The problem comes when you need to have the date in another format, as happens when you import data from a mainframe or a fixed-length text file in which the date is actually imported as text. This first example assumes the format being imported is YYYYMMDD or YYMMDD. In this function, the string is brought in as an argument and the Left, Right, and Mid
functions are used with the CDate function to create the date:
	Public Function GetDate(Dt As Variant) As Date
	Dim MM As String
	Dim DD As String
	Dim YYYY As String
	If VBA.InStr(1, Dt, "/") > 0 Then Dt = ""
	Select Case VBA.Len(Access.Nz(Dt, ""))
     Case 8
	   YYYY = VBA.Left(Dt, 4)
	   MM = VBA.Mid(Dt, 5, 2)
	   DD = VBA.Right(Dt, 2)
	   GetDate = VBA.CDate(MM & "/" & DD & "/" & YYYY)
     Case6
	   YYYY = VBA.Left(Dt, 2)
	   MM = VBA.Mid(Dt, 3, 2)
	   DD = Right(Dt, 2)
	   GetDate = VBA.CDate(MM & "/" & DD & "/" & YYYY)
	Case Else
	   GetDate = #1/1/1900#
   End Select
   End Function
Notice that this function passes the string as a variant; this allows it to test for a null value or trap an actual date. If the variable is declared as a string, a null value results in an error. In this case, if a real date, null value, or anything other than YYMMDD or YYYYMMDD is passed, it returns a date of 1/1/1900. You can set that date to be something else. The If InStr … Then line tests to see if a slash (/) is in the Dt variable. If it is, the procedure sets Dt to an empty string.
Now, let’s assume you need to take it the other way. Assume you have a date field, and you need to turn it into a fixed-length string. Here is how the required function looks:
       Public Function GetDateString(Dt As Date) As String
       Dim MM As String
       Dim DD As String
       Dim YYYY As String

       MM = VBA.Right(DatePart("m", Dt) + 100, 2)
       DD = VBA.Right(DatePart("d", Dt) + 100, 2)
       YYYY = VBA.DatePart("yyyy", Dt)

       GetDateString = YYYY & MM & DD

       End Function
This function passes the variable as a date. If a null or nondate is passed to the function, it returns #Error. This result simply shows how the function reacts when an inappropriate date is passed to it.
Also notice that the function uses the Right function along with DatePart and then adds 100 to it. This ensures that the month and date return two digits. If you didn’t do this, it might work on your computer if you have dates set with leading zeros, but it could bomb on another computer. You can also use this logic anytime you need to put leading zeros in for a number. If you need five leading zeros, type right(x+100000,5).
Your next question might be, “How do I use these functions?” You can call these functions from within a query, just like you would any other function. You can also use them in forms, reports, and so on. Let’s assume you have a table called tbl_PersonalInformation, and you have a field called HireDate that is a date type. If you need to have a field in a query that formats the date as YYYYMMDD, write it in the query’s Design view, like this:
TextHireDate: GetDateString([HireDate])
That is all you need to do. The date will be converted to a string in the format that you need. It is important to note that you could do the same thing the function does right in the query. However, by doing it that way, you have no way of easily reusing the logic elsewhere in the application.
—Michael Schmalz
Create Access Tables with SQL Server Scripts
SQL Server writes scripts that create tables. With a little editing, you can put them to work in Access.
So much attention is given to upsizing from Access to SQL Server. This makes sense because, after all, databases tend to grow, not shrink. However, this hack isn’t concerned with data; it has to do with design. Every so often you might need to duplicate a SQL Server schema in Access. This could be for the very purpose of preparing your Access database for SQL Server.
If you are familiar with SQL Server, you already know SQL Server Enterprise Manager can write SQL create table scripts based on existing tables. If this is all new to you, come along for the ride!
Walking Through Enterprise Manager
Enterprise Manager, shown in Figure 5-36, is the utility you use to manage SQL Server.
The Pets database is accessed in the left pane. The database contains various objects. The tables of the Pets database are listed in the right pane. Most of the tables are system tables. The last three tables—tblAppointments, tblClients, and tblPets—are user tables. That means I created them; this is the same paradigm we use in Access.
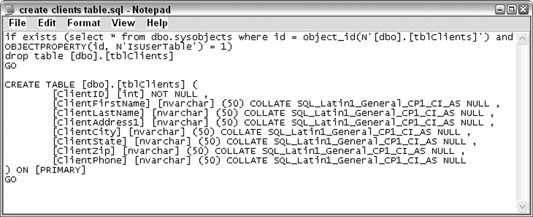
To generate a SQL script, right-click the tblClients table, and select All Tasks → Generate SQL Script…, as shown in Figure 5-37. After you select a destination for the script, a file is created.
A text file is written with SQL Server–specific SQL statements. Figure 5-38shows the generated script opened in Notepad.


As is, this script won’t work if it’s run inside an Access query. The pertinent part is in the middle, starting with the Create Table statement. Create Table is recognizable SQL in Access. Even so, the field types aren’t correct in Access, so we still have to clean this up. Knowing what to do requires a little SQL knowledge, but if you haven’t learned any yet, it’s not a bad thing to get to know.
Once you’ve cleaned up the SQL, and it’s ready for Access, you need to call up a
Data Definition query. Figure 5-39 shows where to access this special type of query in Access.

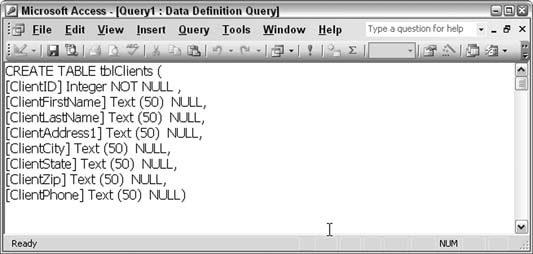
Once you select the query type, you are left in a pane in which SQL is entered. Figure 5-40 shows the pane with the edited SQL script. Now it is ready to run in Access.
Sure enough, when this query runs, it creates a new tblClients table. So, essentially, not only is it possible to recreate a SQL schema in Access, but you also can edit a SQL Server–generated script to get the job done.
See Also
SQL Pocket Guide (O’Reilly)
SQL in a Nutshell (O’Reilly)
Use Wildcards in Queries
The Like operator comes in handy when you don’t quite remember how to spell a data item.
When you can remember only a partial amount of information, a great way to search through your database records is to use the SQL
Like operator. Combining Like with wildcards makes for some powerful queries.
For example, imagine you have a database table filled with customer records. You need to look up someone whose last name starts with De, and that’s all you can recall about her name.
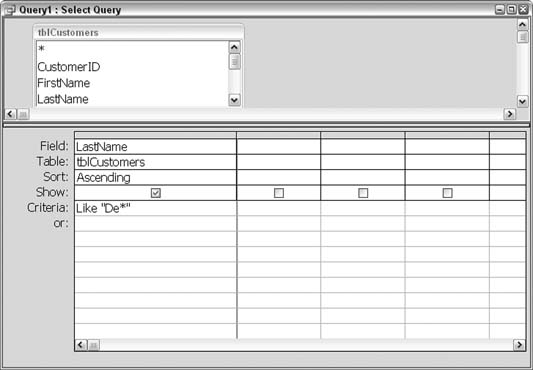
Figure 5-41 shows a query that uses the asterisk (*) wildcard to find all customers whose last name starts with De. The asterisk is a placeholder for any number of characters. Therefore, running this query returns all customers with De as the first two characters in their last name.
Let’s say instead that you remember the last name starts with D and is four characters long. In this case, the question mark (?) wildcard comes in handy. You use the question mark as a placeholder to represent a single character. Figure 5-42 shows three question marks being used to make up for three spaces after the letter D.
Figure 5-43 shows the result of running the query. All customers with four-character last names that start with D are returned.
Using wildcards lets you really get to your data in creative ways. You might recall the first and last letter of a name, or even just that a name is four characters long, but you don’t remember any of the actual characters! In such as case, using a criterion of Like "????" returns all customers with last names that are four characters long, as shown in Figure 5-44.


Get Cleaner Or-Based Criteria
Avoid using multiple rows in the query grid by using the In operator.
The Access query grid is designed for easy query assembly, and it does a great job. Without a doubt, the grid has been an essential learning tool that helps us understand and use queries.
You can use the grid to create
Or-based criteria in two ways. Figure 5-45 shows a typical way to set up a query. In this case, the query returns records in which the state is any of six possible values. As you can see, however, if a few more states were to be included, it would become necessary to start scrolling vertically to work on the list of states.
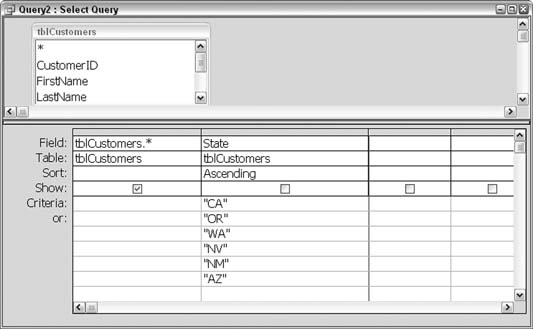
Figure 5-46 shows an alternate way to set up the Or criteria. The specified states are put on one row, with Or statements throughout. However, this design also suffers from becoming unwieldy if more states are added. Each additional state being added also requires another Or operator, so the expression can become quite long.

The In operator is the solution to this dilemma. The In operator is perfect for establishing Or-based criteria. Whereas in Figure 5-46 the inclusion of each state requires another Or operator, only one In operator is necessary, as shown in Figure 5-47.

Using the In operator makes it easy to add more states to the criteria. Just make sure you separate each state abbreviation with a comma.
Get Cleaner And-Based Criteria
Remove the need for multiple And statements by combining the In and Not operators.
Sometimes, criteria are set up to filter out certain records instead of including them. This reversal of logic makes sense in situations in which you want to return most of the records, but not all of them. “Get Cleaner Or-Based Criteria”
[Hack #51]
shows how to use the
In operator to better manage Or based criteria. When you set up criteria to be excluded, however, use the And operator. For example, you might ask, “Give me all states, except California and New Mexico.”
Figure 5-48 shows a query design that excludes six states from the query results. As new states are added to this list, an additional And operator is required. Eventually, this method of writing multiple Andoperators becomes tiresome and you end up having to scroll to read through it all.

The In operator might come to mind as a way to reduce the long criteria statement. However, the point is to not include the criteria. The solution is to use both the In
and the Not operators. Not is a logical operator: it reverses a condition. Including it with an In operator results in a list of items not to include, which works perfectly for this type of query.
Figure 5-49 shows the improved query, in which the multiple And statements are removed.
The query returns the same results, with a less-cluttered SQL statement.

Create an Outer Join
Access doesn’t support making an outer join; here’s a workaround.
The standard join between two tables returns records that match based on the field or fields being selected as keys. This is called an inner join. For example, a statement such as “give me all customers and their sales records” usually is interpreted to mean return all the sales records and the customers to whom those records belong.
Sometimes, though, a left or right join is requested. For example, “give me all our customers and any sales they might have had” is really a request for a left join. In other words, return all the records from the left table (the customers) and any sales records that go with them.
Figure 5-50 shows how records returned from a left join query look. In this example, there are more customers than purchase date records. Some of the customers have no purchases and therefore have no data in the column on the right.
A right join returns all records from the table on the right and only those records from the table on the left that match on the key. The three types of joins—inner, left, and right—are easy to set up. The inner one is the default when two tables are related.
You can set the join type in either the Relationships window or in a query design by double-clicking directly on the line between the two tables. Figure 5-51 shows the Join Properties dialog box that appears when the line is double-clicked. The dialog contains options for the three join types.


As you can see, there is no option to create an outer join, which would return all the records that match, plus the records that don’t match from both tables. The trick to doing this is to simply assemble the three types of available join queries into one query. This final query uses the Union operator to assemble the results from the other three queries.
A Union query works only with straight SQL statements. You can enter the SQL directly into a new query or, to make it easier, copy the generated SQL from the three join types and paste it into a new query. All you need to do is start the second and third mini-SQL Select statements with the Union operator in a new query, like this:
     SELECT tblCustomer2.LastName, tblSales2.PurchaseDate
     FROM tblCustomer2 INNER JOIN tblSales2 ON
     tblCustomer2.CustomerID = tblSales2.Customer_ID
     Union
     SELECT tblCustomer2.LastName, tblSales2.PurchaseDate
     FROM tblCustomer2 LEFT JOIN tblSales2 On
     tblCustomer2.CustomerID = tblSales2.Customer_ID
     Union
     SELECT tblCustomer2.LastName, tblSales2.PurchaseDate
     FROM tblCustomer2 RIGHT JOIN tblSales2 ON
     tblCustomer2.CustomerID = tblSales2.Customer_ID;
Figure 5-52 shows the result of running the SQL.
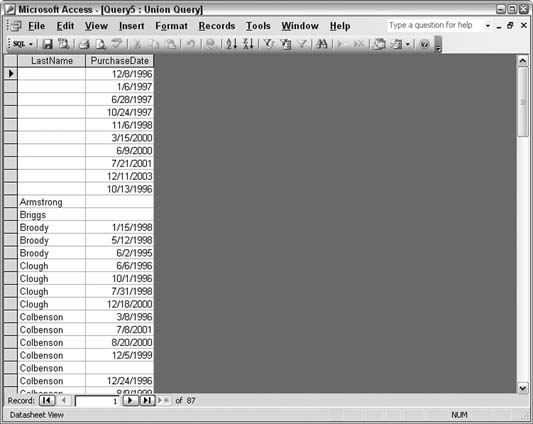
Both columns (each comes from a different table) have blanks—where there was no matching record in the other table—and the records that match are there as well.
Use Regular Expressions in Access Queries
Sometimes wildcards aren’t enough. With a little hacking, you can use regular expressions in your queries.
Although Access allows for some powerful string matching (see “Wildcard characters and the Like operator” in the Access Help system), sometimes you require an even more powerful solution. Microsoft added the ability to use regular expressions back in Version 5.0 of its Windows Scripting Engine, bringing it up to par with JavaScript. You can use this power inside an Access query as well.
Although the advanced details of regular expressions are beyond the scope of this hack, this example will get you started if you are new to the subject. If you need more information, I recommend the book Mastering Regular Expressions (O’Reilly).
In many cases it’s possible to work around the lack of built-in regular expressions using Access’s wildcard characters and multiple calls to different string functions, such as Left, Mid, Right, Len, and so on. However, once you see what you can do with a single custom function call, you can imagine the advanced possibilities and time savings.
Creating the Custom Function
The first thing we need to do is create a function that can be called from our Access query that ties into the Microsoft Scripting Runtime library.
Tip
This hack assumes the machine you are running has the latest version of Microsoft’s Scripting Engine installed. If you are unsure, visit http://www.microsoft.com/scripting.
The following code uses the
CreateObject function so that you don’t have to check the Referenceeach time the code is placed in a new database:
     Public Function RegExp(strString As String, _
         strRegExp As String, Optional bolIgnoreCase As Boolean = False) As
     Boolean
         Dim re As Object
         Set re = CreateObject("vbscript.RegExp")
         re.Pattern = strRegExp
         re.IgnoreCase = bolIgnoreCase
         If re.Test(strString) Then
             RegExp = True
         Else
             RegExp = False
         End If
     End Function
The function has two required parameters: the string being matched against and the string that contains the regular expression. The third, optional parameter tells the function whether to match the regular expression while ignoring the case; the default won’t ignore the case.
Creating an Example Query
As an example, let’s look at verifying part numbers by finding those that don’t match a given criterion. Many times, you might receive data from multiple people and platforms that needs to be cleaned before going into a master database. Let’s say that part numbers for a factory have the following criteria:
They must start with a capital PN or a capital P.
The next two positions must be numeric.
The next position must be a capital letter (A–Z).
The next three to four positions must be numeric.
The next five to six positions must be capital letters (A–Z).
Examples of part numbers that meet the criteria include PN12W123ABCDE and P12W123ABCDE. Examples that don’t meet the criteria include PN12W13ABCDE (only two digits after the W) and 12W123ABCDE (doesn’t start with PN or P).
Given the set of criteria for the part number, here’s the regular expression:
"^(PN|P)[0-9][0-9][A-Z][0-9]{3,4}[A-Z]{5,6}$"As mentioned earlier, these regular expressions can become quite overwhelming until you get used to them. If you aren’t familiar with them, I strongly recommend additional reading to learn the full power of these expressions. To better understand it, let’s break down this expression:
- ^
Tells the expression to start at the beginning of the string
-
(PN|P) Says to match the characters PN or P
-
[0-9][0-9] Tells the expression to match two digits, both in the range 0 through 9
-
[A-Z] Says to match a single character A through Z
-
[0-9]{3,4} Says to match a single digit 0 through 9 at least three times and a maximum of four times
-
[A-Z]{5,6} Says to match a single character A through Z at least five times and a maximum of six times
Figure 5-53 shows the layout for a query to find part numbers that don’t match our criteria.

Running the query in Figure 5-53 returns the part numbers that do not match our given criteria so that you can review them before placing them into a master database. Although you can do this without tapping into the power of regular expressions, it requires a much more involved solution.
Hacking the Hack
As you discover the power of regular expressions, you will find them to be very robust for all kinds of text processing. Another handy trick is to use them to verify text input on a form. To do so, call the custom RegExp function from the BeforeUpdate event of the text box. If it returns false, set the Cancel parameter variable to True, which clears the input on the text box.
You can even add an advanced feature to your application, which allows the user to do searches based on her own regular expressions!
—Steve Huff