Chapter 7. External Programs and Data
Hacks 59–71
Access isn’t an island of an application, not by a long shot. It integrates easily with many programs. Obviously, it shares characteristics with the other Office products, and it is relatively easy to include Word, Excel, Outlook, and PowerPoint files in your Access solutions. Several hacks in this chapter do just that. For example, “Import Noncontiguous Ranges of Data from Excel” [Hack #59] and “Use Excel Functions Inside Access” [Hack #61] involve integration with Excel. “Manage Word Documents from Access” [Hack #67] shows you how to use Word’s object model to create a programmatic solution, and “Use Word to Compare Data in Two Access Tables” [Hack #62] shows you a neat way to use Word independently to test your data.
This chapter also includes hacks on using XML data, integrating with MySQL, and using SQL Server stored procedures. All in all, the chapter offers quite a bit, and using the techniques presented here will certainly gain you an edge in your development efforts.
Import Noncontiguous Ranges of Data from Excel
A standard import lets you get only one data range at a time. Here are a couple of workarounds to get you more.
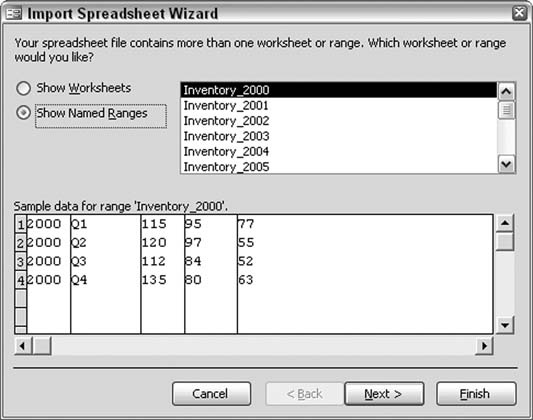
When importing data from an Excel workbook into Access, you can select to import a worksheet or a range. You can select a range only when the workbook includes established named ranges. Figure 7-1 shows the first screen of the Import Spreadsheet Wizard. This wizard appears after you select File → Get External Data and select to import from an Excel file.
Whether you’re importing a worksheet or a range, the problem is that you can select only one item in the list. Usually, single worksheets are imported because a wealth of data can sit on a single worksheet. Ranges are a different story. You might need to import more than one range. It’s tedious to run the Import Spreadsheet Wizard over and over again.
Using Macros for Multiple Imports
An easy way around the one-range-at-a-time import is to create a macro that uses multiple TransferSpreadsheet actions. Each occurrence of this action imports a single range, but you can create a sequence of them in a single macro. You should consider whether the ranges are to be imported as new tables, or whether the ranges are to be accumulated into a single table.
Import Excel data into separate tables
Figure 7-2 shows a macro that imports five ranges into five tables. Each import puts data into a separate Access table. Each table name is specified in the Table Name argument of each TransferSpreadsheet action. The first five actions of the macro delete the existing tables just before the imports. The imports place the Excel data into tables with the same name as the tables being deleted
Here is a potential problem: if you don’t delete the tables first, the data is appended to the tables because they already exist. Most likely you don’t want to do this. Deleting the Access tables first guarantees that the tables are recreated with just the newly imported data.
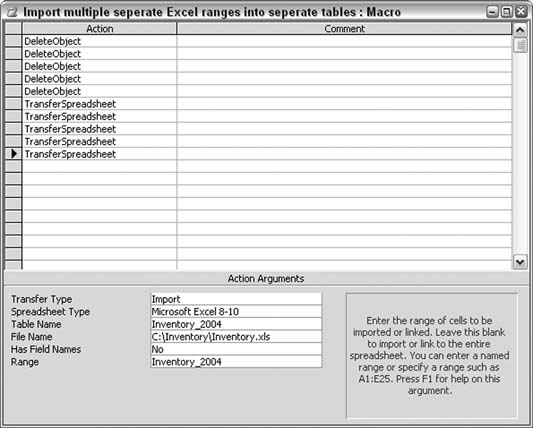
You set the actualTransferSpreadsheet actions such that each addresses a different range in the Excel data. You set this in the Range argument, shown in Figure 7-2; it’s an acceptable way to gather data from different Excel ranges.
Import Excel data into a single table
If you want to combine the data from different Excel ranges into one Access table, the Table Name argument of each TransferSpreadsheet action should be identical. You still must empty the destination table first. In this macro, you do so with the RunSQL action, which runs a simple Delete operation:
Delete * From Inventory_All
Prior to this, turn off warnings so that the process isn’t interrupted with a confirmation message.
After the Delete operation, the TransferSpreadsheet actions fill the nowempty Inventory_All table. All the data is appended to the table.
Figure 7-3 shows how this macro is structured.

Importing Noncontiguous Data from Excel Without Using Ranges
Macros are handy but are limited in power. As shown in the previous section, you can import ranges easily enough. You can even import areas of a workbook by address. In other words, you can enter A1:D15 to import part of an Excel worksheet. That’s about it, though. A macro can’t do anything much more sophisticated than that. This is where some VBA comes in handy.
Figure 7-4 shows an Excel worksheet. The data consists of product amounts broken out by years and quarters.
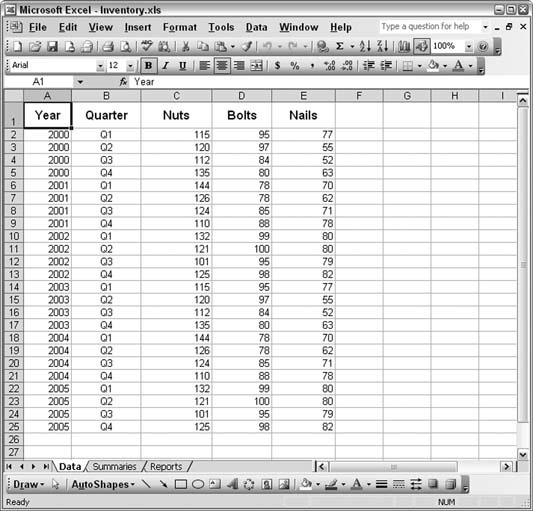
To import, say, just the second-quarter figures for each year requires a process that tests each row to see if the quarter is Q2. Here is a code routine that does just that:
	 Sub get_excel()
	 Dim test_quarter As Integer
	 Dim conn As ADODB.Connection
	 Set conn = CurrentProject.Connection
	 Dim xl As Object
	 Set xl = GetObject("C:InventoryInventory.xls")
	 'first delete existing records
	 conn.Execute "Delete * From Inventory_All"
	 With xl
	   With .Worksheets("Data")
	     For test_quarter = 2 To 25 'known row numbers on worksheet
	       If .Cells(test_quarter, 2) = "Q2" Then
			 ssql = "Insert Into Inventory_All Values("
			 ssql = ssql & .Cells(test_quarter, 1) & ", "
			 ssql = ssql & "'" & .Cells(test_quarter, 2) & "',"
   ssql = ssql & .Cells(test_quarter, 3) & ", "
			 ssql = ssql & .Cells(test_quarter, 4) & ", "
			 ssql = ssql & .Cells(test_quarter, 5) & ")"
			 conn.Execute ssql
		   End If
		  Next test_quarter
	   End With
     End With
	 xl.Close
	 Set xl = Nothing
	 MsgBox "done"
	 End Sub
This code uses automation to create an Excel object and sets the workbook to the object. It then cycles through the worksheet rows. A test sees if the value in column 2 is Q2. When this is true, all five columns of the row are inserted into the Inventory_All Access table.
Of course, you can alter the code to test on other conditions. Also, you don’t have to hardcode the Q2 test. Figure 7-5 shows the Access table populated with just the second-quarter records.

A little code can go a long way. Setting the reference to the Excel workbook is a simple process with the GetObject function. Once the routine is connected to a workbook, you can do many things with a little knowledge of
Excel’s programmatic model.
Use Excel to Reorient Access Data
Use Excel’s Paste Special Transpose feature to turn data on its ear.
Here’s an easy way to change columns to rows (or rows to columns; I guess it all depends on how you look at it). Figure 7-6 shows a table filled with some data. The table contains 8 fields and 100 rows of data.
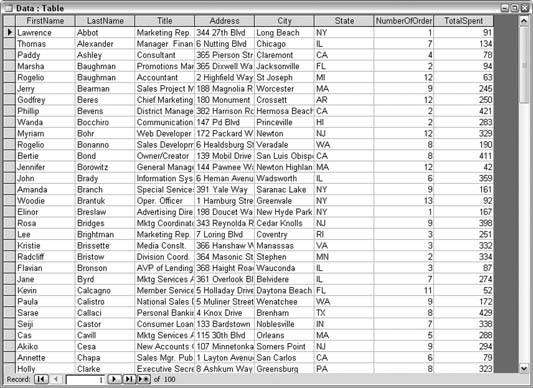
Perhaps your user wants to view the data so that each person’s record is displayed vertically, which isn’t an uncommon request with Excel users. This hack shows how to do just that: put this data in Excel, but turn it sideways.
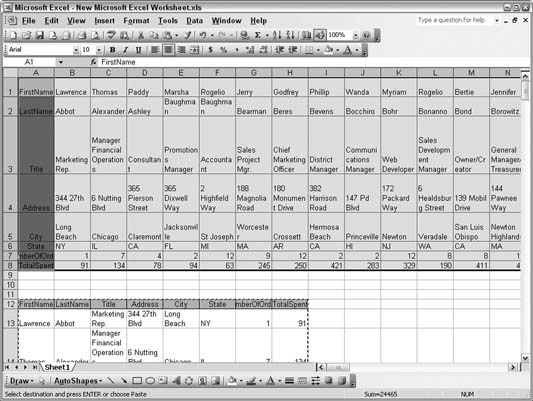
First, select all the data in the Access table; then, pop over to an open Excel workbook. Find an empty worksheet, and paste the data. Note that for this example, I have purposely pasted the data in row 12. You will see why in a moment. Figure 7-7 shows how the data landed in Excel.

Upon being pasted, the data is in a selected state. That’s great! Just leave it as is, but if you lose the selection, just select it again. The next step is to copy the data, by either selecting Edit → Copy or pressing Ctrl-C. Copying the data is a necessary step. It might seem that the data is already on the clipboard. It is, but not in the way we need; therefore, the extra copy from within Excel is necessary.
Now that the data is copied in an Excel format, click in cell A1. This removes the selected state from the data, but that’s okay at this point. In fact for the next step, the data must be deselected, and a single cell must be active.
Use the Edit → Paste Special menu to open the Paste Special dialog box, as shown in Figure 7-8.

There are few things to note in Figure 7-8. As already noted, the data is deselected. Cell A1 is the active cell. The Paste Special dialog will paste the copied data in the next operation, but the critical point is that the Transpose box is checked. This checkbox is near the bottom of the dialog box.
Clicking the OK button completes the process. Figure 7-9 shows how the data sits at the top of the worksheet. Earlier, I made the first paste in row 12 to give enough room for the second paste. We already knew there were eight fields of data, and now they occupy eight worksheet rows. Although not visible in Figure 7-9, the data goes 100 columns to the right.
The data in the first paste is no longer needed, so you can delete it. A few formatting changes will make the data presentable and ready for work. Figure 7-10 shows how the data looks after a facelift and how analysis is already being run on the data.

Use Excel Functions Inside Access
Expose powerful functions available in Excel to your Access application.
Excel has many powerful built-in functions for such things as financial and statistical analysis. If you want to do the same type of analysis in Access, you can do one of the following three things: purchase an off-the-shelf code solution, write your own code for analysis, or use automation to tap into Excel’s functions from inside Access. This hack shows you how to tap into Excel via automation and use spreadsheet functions, saving you time and money over the other options.
This hack involves Access working hand in hand with Excel, so you need to make sure Excel is installed on the machine on which your database will be running. This is a safe assumption in most corporate environments.
A Simple Excel Function
Excel’s FV (future value) function calculates the value of an investment at some time in the future based on periodic, constant payments and on a constant interest rate. The following VBA function takes the same parameters as Excel’s FV worksheet function and returns the same result as if you were using the future value function right in Excel:
  Public Function FV(dblRate As Double, intNper As Integer, _
    			  dblPmt As Double, dblPv As Double, _
				  intType As Integer) As Double
	 Dim xl As Object
     Set xl = CreateObject("Excel.Application")
     FV = xl.WorksheetFunction.FV(dblRate, intNper, dblPmt, dblPv, intType)
     Set xl = Nothing
 End Function
The WorksheetFunction property of Excel’s Application object is key to calling Excel functions from code, whether in Access or even directly in Excel’s VBA environment. With this property, nearly every Excel worksheet function is available to build into a solution.
Figure 7-11 shows a form that takes input from a user and calls the FV function from the Calculate Future Value button.

Clicking the Calculate Future Value button executes the following code:
    Private Sub cmdFV_Click( )
        Dim dblFV As Double
        dblFV = FV(txtRate / 12, txtNper, txtPmt, dblPv, frmType)
        MsgBox "FV = " & dblFV, vbInformation, "Future Value"
    End Sub
The cmdFV_Click event calls the FV
function and displays the message box shown in Figure 7-12. You can modify the code to write the solution back to a table or to display it elsewhere on the form object as needed.

An Excel Function with an Array Parameter
The example of calculating a future value required five parameters to be passed into Excel, and with the magic of automation, we got the result back. However, what would happen if one of those parameters were an array, as many are in Excel?
If an Excel function requires an array or table array, you can pass it an array or a multidimensional array created in Access and get back the needed result. Let’s look at the code you’d use to call Excel’s percentile worksheet function, which returns the kth percentile of values that you specify from a given array of values:
Public Function Percentile(strTbl As String, strFld As String, k As Double)
As Double
    Dim rst As ADODB.Recordset
    Dim dblData() As Double
    Dim xl As Object
    Dim x As Integer
    Set xl = CreateObject("Excel.Application")
    Set rst = New ADODB.Recordset
    rst.Open "Select * from " & strTbl, CurrentProject.Connection,
adOpenStatic
    ReDim dblData(rst.RecordCount - 1)
    For x = 0 To (rst.RecordCount - 1)
        dblData(x) = rst(strFld)
        rst.MoveNext
        Next x
        Percentile = xl.WorksheetFunction.Percentile(dblData, k)
        rst.Close
        Set rst = Nothing
        Set xl = Nothing
    End Function
With this function, we pass the table name and field name to be read into the Access array, which in return is passed into Excel’s percentile function along with the kth percentile value that we are looking for in the array of values. It’s worth noting that you can pass the function a query name instead of a table, depending on the application’s requirements.
Figure 7-13 shows a form that displays a subform that is bound to the tblData table and displaying the SampleData field in datasheet mode.

This sample calculates the 30th percentile from the list 1, 2, 3, 4, 5, 14, 13, 13, 16, 15, 16, 156 when the user clicks the Calculate Percentile button. Clicking the Calculate Percentile button executes the following code:
Private Sub cmdPercentile_Click()
    Dim dblPercentile As Double
    dblPercentile = Percentile("tblData", "SampleData", txtK)
    MsgBox "Percentile = " & dblPercentile, vbInformation, "Percentile"
End Sub
This code produces the message box in Figure 7-14.

As noted previously with the FV function, you can write this return value back to a table or display it on the form. You can also call the FV function or Percentile function from a query or use it on a report.
Other Excel Spreadsheet Functions
You can call more than 100 functions using the WorksheetFunction method of the Excel object via automation. Keep in mind that some are redundant with built-in Access functions, such as Excel’s ISNUMBER and Access’s ISNUMERICM, and others, such as ISERR and ISNA, aren’t of much use unless you are doing some other advanced spreadsheet automation.
You also have to consider whether the overhead of automation is acceptable in your application. It might not be as efficient as a well-written custom function. However, it can be a huge timesaver if you don’t have time to write your own custom functions such as the Percentile function.
—Steve Huff
Use Word to Compare Data in Two Access Tables
Look for discrepancies the easy way, using Word’s Document Compare utility.
Sometimes, you have to compare data in two Access tables. Usually you do this when you have one table that derives from two different copies of the database. The data might differ between the tables; for example, some data has been updated in one table, and now you need to uncover the discrepancies.
You can do this in a couple of ways. You can use some queries, but if there are many fields, query design could be difficult. Another option is to write code to read through both tables and identify the differences. This works but it also takes a bit of time to get the code working correctly.
Here’s a great alternative: Word has a built-in feature that compares two documents and highlights the differences.
The first thing you need to do is export the Access tables as text files. Word then uses these to run a comparison. Figure 7-15 shows the two tables already saved as text. As you can see, they appear identical.

In Word, open one of the text files. Then, use the Tools → Compare and Merge Documents menu item to browse to the second text file. As shown in Figure 7-16, you have options for how to compare and merge the documents. I always choose “Merge into new document.” That way, I know the original files aren’t altered.
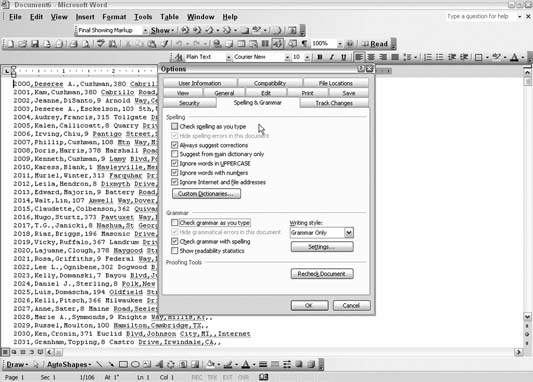
A new document is created, but you immediately run into a problem. Word’s spellchecker and grammar checker will flag nearly everything as incorrect because the export from Access creates records with no space breaks. This is correct for the data, but not as far as Word is concerned. So, the next thing to do is turn off the spellchecker and grammar checker in Word’s Options dialog, as shown in Figure 7-17. By the way, the first opened text file didn’t flag any errors because it was still a text file. The new merged document, on the other hand, is a proper Word document.

Once you can see the document for what it is, you can see places where the data doesn’t match because the data is formatted with strikethroughs, as shown in Figure 7-18.
Scrolling through this data is a breeze. You can quickly see where the data is different and decide what to do about it.
—Andrea Moss

Import Varied XML Data into Access
Access is pretty good at importing simple XML data, but sometimes you want to import data that isn’t precisely the way Access expects it to be.
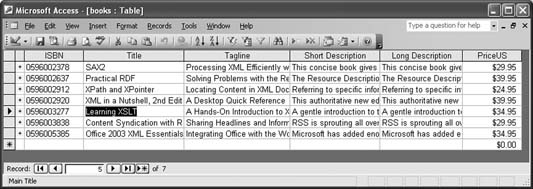
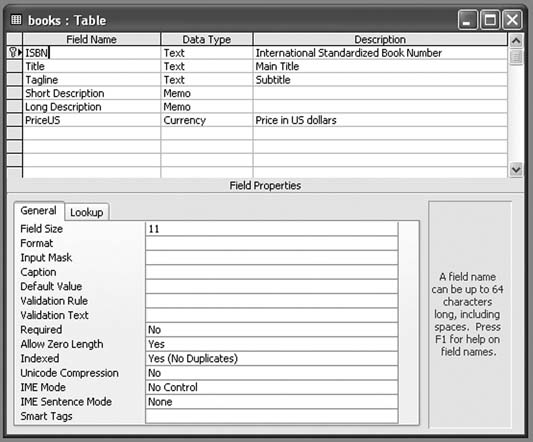
Access lets you import data from XML files into its tables. For example, let’s consider a database containing a table that defines a list of books. Figure 7-19 shows the Design view for this table. It includes six fields of three different types.
To begin, the table contains a few books, as shown in Figure 7-20.
The easiest way to see the XML format Access expects to receive when it imports data to this table is to export some of the data, which you can do by selecting a table in the database and then selecting Export... from the File menu. In this case, the XML format we’ll need to let Access import automatically looks like the data that was just exported as XML. In other words, exporting records into XML shows the XML node structure any XML data being imported back in should have. Example 7-1 shows the exported data.


Example 7-1. New data for import
<?xml version="1.0" encoding="UTF-8"?>
<dataroot>
<books>
<ISBN>0596002637</ISBN>
<Title>Practical RDF</Title>
<Tagline>Solving Problems with the Resource Description Framework</Tagline>
<Short_x0020_Description>The Resource Description Framework (RDF) is a structure
for describing and interchanging metadata on the Web.</Short_x0020_Description>
<Long_x0020_Description>The Resource Description Framework (RDF) is a structure
for describing and interchanging metadata on the Web - anything from library
catalogs and worldwide directories to bioinformatics, Mozilla internal data
structures, and knowledge bases for artificial intelligence projects.</Long_
x0020_Description>
<PriceUS>39.95</PriceUS>
</books>
<books>
<ISBN>0596003838</ISBN>
<Title>Content Syndication with RSS</Title>
<Tagline>Sharing Headlines and Information Using XML</Tagline>
<Short_x0020_Description>RSS is sprouting all over the Web, connecting weblogs
and providing news feeds.</Short_x0020_Description>
<Long_x0020_Description>RSS is sprouting all over the Web, connecting weblogs and
providing news feeds. Originally developed by Netscape in 1999, RSS (which can
stand for RDF Site Summary, Rich Site Summary, or Really Simple Syndication) is
an XML-based format that allows Web developers to create a data feed that
supplies headlines, links, and article summaries from a web site</Long_x0020_
Description>
<PriceUS>29.95</PriceUS>
</books>
<books>
<ISBN>0596002912</ISBN>
<Title>XPath and XPointer</Title>
<Tagline>Locating Content in XML Documents</Tagline>
<Short_x0020_Description>Referring to specific information inside an XML document
can be like looking for a needle in a haystack: how do you differentiate the
information you need from everything else?</Short_x0020_Description>
<Long_x0020_Description>Referring to specific information inside an XML document
can be like looking for a needle in a haystack: how do you differentiate the
information you need from everything else? XPath and XPointer are two closely
related tools that play a key role in XML processing by allowing developers to
find these needles and manipulate embedded information.</Long_x0020_Description>
<PriceUS>24.95</PriceUS>
</books>
</dataroot>
The structure begins with the dataroot element, though Access doesn’t actually care what that container element’s name is. The books element tells Access this information goes into the books table, and the ISBN, Title, Tagline, and other elements inside each books element go to fields in the books table. The only trick is in the Short Description and Long Description fields, which, because XML won’t accept spaces in tag names, Access prefers to see as Short_x0020_Description and Long_x0020_Description. Access doesn’t care what order the fields come in, but it will recognize them only if they’re child elements, not attributes.
To get started, select Get External Data from the File menu, and then select Import. The dialog box shown in Figure 7-21 will appear.
You might need to select XML from the “Files of type” drop-down menu at the bottom because the dialog initially defaults to Access formats. Select a file, and click Import. The Import XML dialog box shown in Figure 7-22 will appear.
You can click the plus sign to the left of the books if you want to inspect their structure. If you just click OK, Access creates a new table called books1 (or whatever number avoids a conflict) to import the XML into Access without conflicting with the prior XML table.


That might be perfectly fine because it gives you a chance to compare the new data with the old before merging the two. Access provides two more options, however: one that lets you just create a new table based on the structure of the XML file, and another that lets you append the data in the XML file to an existing table. In this case, we know the new books are different from the old books, so click Options, and select Append Data to Existing Table(s), as shown in Figure 7-23.
If you click OK now, the extra books will be added to the existing books table, as shown in Figure 7-24.
Access refuses to import XML data, which causes a conflict with existing key relationships. For example, if you import that same document again in the same way, you’ll be rewarded with the ImportErrors table shown in Figure 7-25.


Using the Transform… button shown in Figure 7-23, you can also perform conversions, which make it easier to import data that doesn’t arrive in a form that meets Access’s expectations. For example, suppose information about a new book arrived in the form shown in Example 7-2.
Example 7-2. ch0812.xml, an attribute-based XML document for import
<update>
<books ISBN="0596003277" Title="Learning XSLT" Tagline="A Hands-On
Introduction to XSLT and XPath" Short_x0020_Description="A gentle
introduction to the complex intricacies of XSLT" Long_x0020
_Description="A gentle introduction to the complex intricacies of
XSLT and XPath, walking through the spec from simple work to
complex." PriceUS="34.95" />
</update>
In Example 7-2, all data is stored in attributes, and Access won’t even look at attributes during an import. To get this information into Access, you need to use a transformation, such as the generic one shown in Example 7-3, which converts all attributes to child elements.
Example 7-3. ch0813.xsl, a stylesheet for transforming attributes into elements
<?xml version="1.0" encoding="UTF-8"?>
<xsl:stylesheet version="1.0" xmlns:xsl="http://www.w3.org/1999/XSL/Transform">
<!--Derived from recipe 6.1 of Sal Mangano's XSLT Cookbook-->

<xsl:output method="xml" version="1.0" encoding="UTF-8" indent="yes"/>

<xsl:template match="@*">
  <xsl:element name="{local-name(.)}" namespace="{namespace-uri(..)}">
    <xsl:value-of select="."/>
  </xsl:element>
</xsl:template>

<xsl:template match="node( )">
  <xsl:copy>
    <xsl:apply-templates select="@* | node( )"/>
  </xsl:copy>
</xsl:template>

</xsl:stylesheet>
When applied to Example 7-2, the stylesheet in Example 7-3 produces the result shown in Example 7-4, which Access can import easily.
Tip
Again, Access doesn’t care what the root element’s name is; update is an appropriate description for human consumption.
Example 7-4. An “elementized” version of the data in Example 7-2
<?xml version="1.0" encoding="UTF-8"?>
<update>
<books>
<ISBN>0596003277</ISBN>
<Title>Learning XSLT</Title>
<Tagline>A Hands-On Introduction to XSLT and XPath</Tagline>
<Short_x0020_Description>A gentle introduction to the complex intricacies of
XSLT</Short_x0020_Description>
<Long_x0020_Description>A gentle introduction to the complex intricacies of XSLT
and XPath, walking through the spec from simple work to complex.</Long_x0020_
Description>
<PriceUS>34.95</PriceUS>
</books>
</update>
If you tell Access to import ch0812.xml, the file shown in Example 7-2, you won’t have much to choose from in the Import XML dialog box, as shown in Figure 7-26.

If you choose Options → Transform…, you canadd the stylesheet, much as you did for the export transformation. Add the stylesheet to the list of transformations, and select ch0813, as shown in Figure 7-27.
When you click OK, Access applies the transformation to the document, modifying the display of components you see and producing the result in Figure 7-28.
In this case, the table already exists, so be sure to select Append Data to Existing Table(s). When you click OK, the data from Example 7-1 is added to the books table, as shown in Figure 7-29.
Transformations are a powerful tool in pretty much any area of XML development. Using a bit of XSLT—admittedly, a bit challenging to learn—you can convert the structures you have into the structures Access expects.


See Also
“Export XML Data Sanely” [Hack #64]
“Break Through VBA’s Transformation Barrier” [Hack #65]
—Simon St. Laurent
Export XML Data Sanely
Working around the thorny issue of exporting related data to XML.
Exporting a single table to XML produces some easily reusable data. Exporting multiple tables to XML, however, might not produce data that other applications can use; it all depends on how you structured your tables and relationships. You can solve this problem in two ways: restructure your data or use a query to export data that’s been unnormalized.
For our initial example, we’ll start with a database containing a table that defines a list of books. Figure 7-30 shows the Design view for that table. It includes six fields of three different types.
For the initial tests, this table contains just a little bit of information. Exporting mature tables with thousands of records can quickly produce large XML files—definitely useful in real life but difficult for initial analysis. Figure 7-31shows a partial view of the content in the test table.

Exporting this table to XML involves a few steps, most of which will be familiar to developers who have exported information from Access databases before. The process starts by selecting the books table in the database, then selecting Export… from the File menu. The dialog box shown in Figure 7-32 will appear, and you’ll need to select XML (*.xml) from the “Save as type” drop-down box.

When you perform the export, Access might actually create more files than just the XML file, but they’ll all appear in the same directory together with the XML. Once you click the Export button, a small dialog box with basic options, shown in Figure 7-33, appears.

For now, we’ll accept the defaults and just click OK. This results in two files: books.xml and books.xsd. The books.xml file contains the information from the table, and books.xsd contains an XML Schema description of that content, annotated with a bit of information specific to Access and its Jet database engine.
The books.xml file, shown in Example 7-5, reflects the structure and content of the original table closely.
Example 7-5. A simple table export
<?xml version="1.0" encoding="UTF-8"?>
<dataroot xmlns:od="urn:schemas-microsoft-com:officedata" xmlns:xsi="http://www.w3.org/2001/XMLSchema-instance" xsi:noNamespaceSchemaLocation="books.xsd"
generated="2003-03-26T13:49:17">
<books>
<ISBN>0596005385</ISBN>
<Title>Office 2003 XML Essentials</Title>
<Tagline>Integrating Office with the World</Tagline>
<Short_x0020_Description>Microsoft has added enormous XML functionality to Word,
Excel, and Access, as well as a new application, Microsoft InfoPath. This book
gets readers started in using those features.</Short_x0020_Description>
<Long_x0020_Description>Microsoft has added enormous XML functionality to Word,
Excel, and Access, as well as a new application, Microsoft InfoPath. This book
gets readers started in using those features.</Long_x0020_Description>
<PriceUS>34.95</PriceUS>
</books>
<books>
<ISBN>0596002920</ISBN>
<Title>XML in a Nutshell, 2nd Edition	</Title>
<Tagline>A Desktop Quick Reference</Tagline>
<Short_x0020_Description>This authoritative new edition of XML in a Nutshell
provides developers with a complete guide to the rapidly evolving XML space.</
Short_x0020_Description>
<Long_x0020_Description>This authoritative new edition of XML in a Nutshell
provides developers with a complete guide to the rapidly evolving XML space.
Serious users of XML will find topics on just about everything they need,
including fundamental syntax rules, details of DTD and XML Schema creation, XSLT
transformations, and APIs used for processing XML documents. Simply put, this is
the only references of its kind among XML books.</Long_x0020_Description>
<PriceUS>39.95</PriceUS>
</books>
<books>
<ISBN>0596002378</ISBN>
<Title>SAX2</Title>
<Tagline>Processing XML Efficiently with Java</Tagline>
<Short_x0020_Description>This concise book gives you the information you need to
effectively use the Simple API for XML, the dominant API for efficient XML
processing with Java.</Short_x0020_Description>
<Long_x0020_Description>This concise book gives you the information you need to
effectively use the Simple API for XML, the dominant API for efficient XML
processing with Java.</Long_x0020_Description>
<PriceUS>29.95</PriceUS>
</books>
</dataroot>
This document’s root element, dataroot, is the only piece of this document specific to Access:
<dataroot xmlns:od="urn:schemas-microsoft-com:officedata" xmlns:xsi="http://www.w3.org/2001/XMLSchema-instance" xsi:noNamespaceSchemaLocation="books.
xsd" generated="2003-03-26T13:49:17">
It makes a namespace declaration for the od prefix, which isn’t actually used in this document, and it includes a pointer to the XML Schema describing this document’s structure. Because the element names used here aren’t in any namespace, the document uses the xsi:noNamespaceSchemaLocation attribute to identify the schema that should be used for all the elements in this document that have no namespace. It also includes one small bit of metadata in the generated attribute, that identifies the time and date when this XML document was created.
The dataroot element contains three child books elements, each indicating a row in the books table. Their contents map fairly simply to the names and values of the table columns:
<books>
<ISBN>0596002920</ISBN>
<Title>XML in a Nutshell, 2nd Edition</Title>
<Tagline>A Desktop Quick Reference</Tagline>
<Short_x0020_Description>This authoritative new edition of XML in a Nutshell
provides developers with a complete guide to the rapidly evolving XML space.
</Short_x0020_Description>
<Long_x0020_Description>This authoritative new edition of XML in a Nutshell
provides developers with a complete guide to the rapidly evolving XML space.
Serious users of XML will find topics on just about everything they need,
including fundamental syntax rules, details of DTD and XML Schema creation,
XSLT transformations, and APIs used for processing XML documents. Simply
put, this is the only references of its kind among XML books.</Long_x0020_
Description>
<PriceUS>39.95</PriceUS>
</books>
The only significant variation here involves the column names, which include spaces. Instead of Short Description, now we have Short_x0020_Description, following a convention Microsoft developed for representing spaces in XML element names.
Tip
XML forbids spaces in element names because they make it difficult to separate the element name from the attributes, so Access uses _x0020_, the Unicode hex number, for the space.
Exporting individual tables is useful, but sometimes you might want to export multiple tables and preserve the relationships between them. Access allows you to export a set of tables, though it works most easily when only two tables are involved.
Exporting from Tables in a One-to-Many Relationship
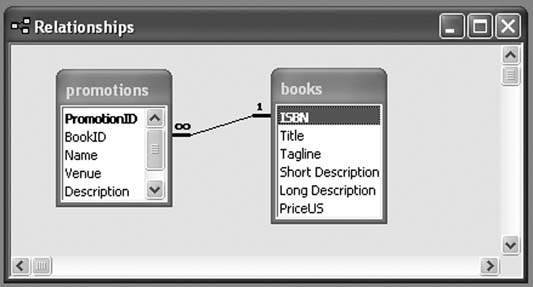
For our first example, we’ll add a table that contains information about (very fictional) promotions for various books. Figure 7-34 shows what this table looks like.

The promotions table links to the books table through its BookID field, as shown in Figure 7-35.
Exporting this pair of tables takes a few more steps because Access lets you choose how the export works. The choice of which table is the base table makes a big difference in the export results, so the following examples will export it both ways.
We’ll start by exporting the books table again, but this time, we’ll select More Options from the dialog box shown in Figure 7-36.

Clicking More Options brings up a larger dialog with a lot more choices, as shown in Figure 7-37.
In this case, all the information we need is on the first (Data) tab. Checking the Promotions box and clicking the OK button tells Access to export both the books table and the linked records of the promotions table—in this case, all of them. Example 7-6 shows an abbreviated version of the export, with the new content from the promotions table in bold.

Example 7-6. Exported linked tables
<?xml version="1.0" encoding="UTF-8"?> <dataroot xmlns:od="urn:schemas-microsoft-com:officedata" xmlns:xsi="http://www.w3.org/2001/XMLSchema-instance" xsi:noNamespaceSchemaLocation="ch0804.xsd" generated="2003-03-31T16:37:01"> <books> <ISBN>0596005385</ISBN> <Title>Office 2003 XML Essentials</Title> <Tagline>Integrating Office with the World</Tagline> <Short_x0020_Description>...</Short_x0020_Description> <Long_x0020_Description>...</Long_x0020_Description> <PriceUS>34.95</PriceUS><promotions> <PromotionID>1</PromotionID> <BookID>0596005385</BookID> <Name>Palm civet bonus</Name> <Venue>Anywhere interested</Venue> <Description>A stuffed-animal palm civet, lovingly screen-printed to match the cover, with every copy of the book.</Description> <Cost>10000</Cost> </promotions> <promotions> <PromotionID>3</PromotionID> <BookID>0596005385</BookID> <Name>Key chains</Name> <Venue>Conferences</Venue> <Description>keychains adorned with lovely palm civets and the title of the book.</Description> <Cost>1000</Cost> </promotions></books> <books> <ISBN>0596002920</ISBN> <Title>XML in a Nutshell, 2nd Edition</Title> <Tagline>A Desk top Quick Reference</Tagline> <Short_x0020_Description>...</Short_x0020_Description> <Long_x0020_Description>...</Long_x0020_Description> <PriceUS>39.95</PriceUS> </books> <books> <ISBN>0596002378</ISBN> <Title>SAX2</Title> <Tagline>Processing XML Efficiently with Java</Tagline> <Short_x0020_Description>...</Short_x0020_Description> <Long_x0020_Description>...</Long_x0020_Description> <PriceUS>29.95</PriceUS><promotions> <PromotionID>2</PromotionID> <BookID>0596002378</BookID> <Name>Free filters</Name> <Venue>Online/Safari</Venue> <Description>Bonus SAX filters, open source-licensed, for developers who visit the SAX2 book site.</Description> <Cost>0</Cost> </promotions></books> </dataroot>
The general pattern here is much like the original export of the books table, except that zero or more promotions elements—whose BookID holds the same value as the containing books element’s ISBN element—now appear inside each books element. This works the same way that zero or more books elements appeared inside the dataroot element. All the table columns are listed inside each promotions element, making it easy to reconstruct the information in the promotions table or to treat the information as a complete set of information about each book. There’s no need to reconstruct the original tables and calculate primary key/foreign key links.
As soon as you step beyond the one-to-many relationship, however, this kind of simple containment will fail you.
Exporting from Tables in a Many-to-Many Relationship
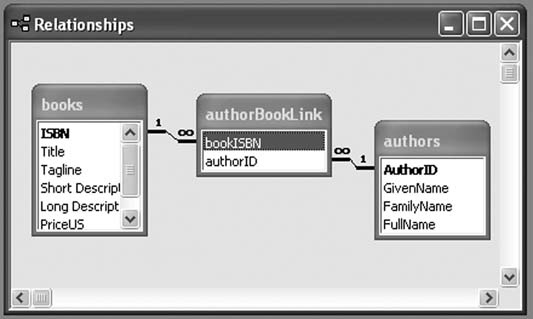
A many-to-many relationship, implemented with an intermediary table, as shown in Figure 7-38, produces XML that most likely will be useful only if someone reimports it into Access and works with it there.
Access lets you traverse this relationship in an XML export, as shown in Figure 7-39. This time, the export uses a [Lookup Data] element to indicate that simply nesting the data in the XML document structures isn’t going to work. One-to-many relationships are represented using containment, and many-to-one relationships are represented as separate pieces. In this case, the many-to-many relationship includes both of those choices.

[Lookup Data] provides a warning that reassembling some of these relationships is going to require extra lookup work on the part of the consuming application.
Example 7-7 shows the results of this export.
Example 7-7. A many-to-many export combining containment and lookup
<?xml version="1.0" encoding="UTF-8"?>
<dataroot xmlns:od="urn:schemas-microsoft-com:officedata" xmlns:xsi="http://www.w3.org/2001/XMLSchema-instance" xsi:noNamespaceSchemaLocation="ch0806.xsd"
generated="2003-04-01T21:01:50">
<books>
<ISBN>0596005385</ISBN>
<Title>Office 2003 XML Essentials</Title>
<Tagline>Integrating Office with the World</Tagline>
<Short_x0020_Description>...</Short_x0020_Description>
<Long_x0020_Description>...</Long_x0020_Description>
<PriceUS>34.95</PriceUS>
<authorBookLink>
<bookISBN>0596005385</bookISBN>
<authorID>1</authorID>
</authorBookLink>
</books>
<books>
<ISBN>0596002920</ISBN>
<Title>XML in a Nutshell, 2nd Edition</Title>
<Tagline>A Desktop Quick Reference</Tagline>
<Short_x0020_Description>...</Short_x0020_Description>
<Long_x0020_Description>...</Long_x0020_Description>
<PriceUS>39.95</PriceUS>
<authorBookLink>
<bookISBN>0596002920</bookISBN>
<authorID>3</authorID>
</authorBookLink>
<authorBookLink>
<bookISBN>0596002920</bookISBN>
<authorID>4</authorID>
</authorBookLink>
</books>
<books>
<ISBN>0596002378</ISBN>
<Title>SAX2</Title>
<Tagline>Processing XML Efficiently with Java</Tagline>
<Short_x0020_Description>...</Short_x0020_Description>
<Long_x0020_Description>...</Long_x0020_Description>
<PriceUS>29.95</PriceUS>
<authorBookLink>
<bookISBN>0596002378</bookISBN>
<authorID>2</authorID>
</authorBookLink>
</books>
<authors>
<AuthorID>1</AuthorID>
<GivenName>Simon</GivenName>
<FamilyName>St.Laurent</FamilyName>
<FullName>Simon St.Laurent</FullName>
</authors>
<authors>
<AuthorID>2</AuthorID>
<GivenName>David</GivenName>
<FamilyName>Brownell</FamilyName>
<FullName>David Brownell</FullName>
</authors>
<authors>
<AuthorID>3</AuthorID>
<GivenName>Elliotte</GivenName>
<FamilyName>Harold</FamilyName>
<FullName>Elliotte Rusty Harold</FullName>
</authors>
<authors>
<AuthorID>4</AuthorID>
<GivenName>Scott</GivenName>
<FamilyName>Means</FamilyName>
<FullName>W. Scott Means</FullName>
</authors>
</dataroot>
Now each books element contains one or more authorBookLink elements, each holding an authorID element. The value of that authorID element maps to an authorID element inside an authors element. If the data is going back into Access, this is fine, but if it’s going to another application—Excel, perhaps, or an XSLT transformation into HTML for a browser—this isn’t much fun.
This might feel like a case in which it would make sense to store repetitive (nonnormalized) data in the tables, but fortunately, there’s a better option: exporting a query instead of a table.
Using a Query to Tame the Export
By themselves, queries don’t provide nested views, but they certainly make it easier to present some kinds of information—notably, many-to-many relationships. The mechanics of exporting queries are much like those of exporting single tables, and the results are similar.
Tip
Access supports SQL queries, obviously, because that’s at the heart of its functionality. Access doesn’t, however, support other standards for querying, such as XQuery.
To demonstrate, let’s export a SQL query named booksByAuthor, which uses the books, authors, and authorBookLink tables to create a list of books sorted by author. The SQL for the query expresses the relationships an XML processor working with the linked table export would otherwise have to deal with:
SELECT authors.GivenName, authors.FamilyName, books.ISBN, books.Title
FROM books INNER JOIN (authors INNER JOIN authorBookLink ON authors.AuthorID
= authorBookLink.authorID) ON books.ISBN = authorBookLink.bookISBN
ORDER BY authors.FamilyName;
The interface for exporting a query is the same as the interface for a table, except there is no option for exporting linked information. When you export a query, all the information you want to export must be in that query. Exporting the query produces the result shown in Example 7-8.
Example 7-8. An exported query
<?xml version="1.0" encoding="UTF-8"?>
<dataroot xmlns:od="urn:schemas-microsoft-com:officedata" xmlns:xsi="http://www.w3.org/2001/XMLSchema-instance" xsi:noNamespaceSchemaLocation="booksByAuthor.
xsd" generated="2003-04-02T14:47:59">
<booksByAuthor>
<GivenName>David</GivenName>
<FamilyName>Brownell</FamilyName>
<ISBN>0596002378</ISBN>
<Title>SAX2</Title>
</booksByAuthor>
<booksByAuthor>
<GivenName>Elliotte</GivenName>
<FamilyName>Harold</FamilyName>
<ISBN>0596002920</ISBN>
<Title>XML in a Nutshell, 2nd Edition</Title>
</booksByAuthor>
<booksByAuthor>
<GivenName>Scott</GivenName>
<FamilyName>Means</FamilyName>
<ISBN>0596002920</ISBN>
<Title>XML in a Nutshell, 2nd Edition</Title>
</booksByAuthor>
<booksByAuthor>
<GivenName>Simon</GivenName>
<FamilyName>St.Laurent</FamilyName>
<ISBN>0596005385</ISBN>
<Title>Office 2003 XML Essentials</Title>
</booksByAuthor>
</dataroot>
Just as in a tabular representation of the query, information repeats—notably, the ISBN and title of XML in a Nutshell, which has two authors. If you’re sending data to an application that lacks Access’s appreciation for relations between tables, this approach will probably work much more easily.
See Also
“Import Varied XML Data into Access” [Hack #63]
“Break Through VBA’s Transformation Barrier” [Hack #65]
—Simon St. Laurent
Break Through VBA’s Transformation Barrier
Strange but true: Access supports XSLT transformation on input when you use the GUI, but not when you automate the process with VBA. The same goes for output. Fortunately, you can work around this by calling the MSXML parser directly.
The examples in “Import Varied XML Data into Access” [Hack #63] give some ideas for how to get information into your Access tables even if the data arrives in a format other than the simple element-only form Access expects. However, if such data arrives on a regular basis, you probably don’t want to be clicking through forms every time you need to import more data.
Unfortunately, converting these steps to an automated VBA process is a challenge because the ImportXML function doesn’t provide a place for any
transformations. As it turns out, neither does the ExportXML function.
The syntax of the ImportXML function looks like this:
Application.ImportXML (DataSource, ImportOptions)It takes only a data source, the name and path of the XML file to import, and an options constant—acAppendData,
acStructureAndData (the default), or acStructureOnly. There is no option for an XSLT transformation. Similarly, the ExportXML function looks like this:
Application.ExportXML (ObjectType, DataSource, DataTarget, SchemaTarget, PresentationTarget, ImageTarget, Encoding, OtherFlags)The PresentationTarget argument does have something to do with transformation, but it’s only for output. It identifies where Access will put a stylesheet for turning the XML into HTML based on its own expectations, not yours.
You can get around these problems in two ways. First, you can write some custom code. The import version will instantiate an XML parser (probably MSXML), read the content from the document however you deem appropriate, and then use ADO, DAO, or SQL Update queries to put the data in the database. The export version will read data from the database and write it to an MSXML DOM tree as necessary.
This might be appropriate if you have complicated cases, but it’s a lot of code for what’s most likely a simple problem, and you can’t test how it works (or reuse that work) outside of Access.
A more likely approach, if you can stand working with XSLT, is to add a step before the import or after the export that performs an extra transformation. Because Access doesn’t let you pass objects to the import or get objects from the export, you need to work with temporary files to produce the results you want. Conveniently, you can use the same function for both cases.
A simple version of this function looks like this:
Private Sub Transform(sourceFile, stylesheetFile, resultFile)

Dim source As New MSXML2.DOMDocument30
Dim stylesheet As New MSXML2.DOMDocument30
Dim result As New MSXML2.DOMDocument30

' Load data.
source.async = False
source.Load sourceFile

' Load style sheet.
stylesheet.async = False
stylesheet.Load stylesheetFile

If (source.parseError.errorCode <> 0) Then
   MsgBox ("Error loading source document: " & source.parseError.reason)
   Else
If (stylesheet.parseError.errorCode <> 0) Then
      MsgBox ("Error loading stylesheet document: " & _
         stylesheet.parseError.reason)
   Else
      ' Do the transform.
      source.transformNodeToObject stylesheet, result
      result.Save resultFile
End If
End If

End Sub
The Transform function takes three arguments: the path of a source file holding the original XML, the path of a stylesheet file holding the XSLT that will be used to transform it, and the path to which the resulting document should be saved. Typically, you’ll want to call Transform before using Access’s native ImportXML function or after you’ve used the ExportXML function.
For example, you might import XML files to a table directly with this call:
Application.ImportXML "http://simonstl.com/ora/updateBook.xml", acAppendData
But if that XML file stored the data as attributes, and you wanted to apply a transformation to that data before you imported it into Access, you might do this instead:
Transform "http://simonstl.com/ora/updateBook.xml", _
    "C:xsltattsToElem.xsl", _
    "C:	emp	empImport.xml"
Application.ImportXML "C:	emp	empImport.xml", acAppendData
Similarly, you can apply a transformation after you exported data, turning it into HTML:
Application.ExportXML acExportTable, "books", "C:	emp	empExport.xml"
Transform "C:	emp	empExport.xml", _
    "C:xsltooksToHTML.xsl", _
    "C:exportexportedBooks.html"
Writing XML documents out to files and then reparsing them isn’t efficient by any means, but it patches a gap left by the Access API for importing and exporting XML. Unless you’re dealing with huge volumes of data, or doing this processing constantly, users of your databases aren’t likely to notice a big difference. Import and export are usually pretty slow operations anyway.
See Also
“Import Varied XML Data into Access” [Hack #63]
“Export XML Data Sanely” [Hack #64]
—Simon St. Laurent
Leverage SQL Server Power by Calling Stored Procedures
Get a leg up on performance when using SQL Server data.
Developers creating Access applications that are front ends to SQL Server databases have two choices for their application type. The Microsoft-recommended choice is to use an Access data project (ADP), which is directly tied to the SQL Server database. This native-mode OLE DB connection results in a lighter-weight, better-performing front end that can directly use SQL views, stored procedures, and user-defined functions. It also lets developers design objects directly on the server (no need to use Enterprise Manager).
Despite these advantages, many situations force developers to use ODBC linked tables in a traditional Access MDB file. Not the least of these is the ability to create local tables in the MDB (in an ADP, even the Switchboard Items table must be on the server) and the ability to connect to other data sources (such as other Access databases, Excel spreadsheets, text files, and so on). Just because you choose to use an MDB as a front end doesn’t mean you have to give up the server-side processing power of SQL Server stored procedures.
Hooking Up with ODBC
When an Access MDB is using ODBC links to SQL Server, all data processing is done on the client side—that is, within Access on the workstation. If a listbox on a form gets filtered by a combo box selection, all the records are returned over the network to Access and Access applies the filter. Alternatively, the use of stored procedures can increase performance in your Access MDBs by shifting the filtering to the server. Stored procedures are powerful because they combine the data-joining capabilities of Access queries or SQL views with the ability of VBA procedures to accept parameters and to loop and process data.
T-SQL, Microsoft SQL Server’s version of the SQL language, is somewhat different from the Jet (Access’s) flavor of SQL. It is also much different from VBA. However, if you can create Access queries and write VBA functions, you can learn to write SQL stored procedures. It isn’t difficult to become good enough in T-SQL to increase the performance of your applications. Whether you install MSDE (the lite version of SQL Server that ships with Microsoft Office) or SQL Server itself, you can look at the stored procedures within the Northwind database to get started.
The ADO library is one way to execute stored procedures in Access. You do this in VBA by executing a Command object whose command text is the stored procedure name. First it is necessary to open a Connection object on the SQL Server database. The code in Example 7-9 executes the CustOrdersOrders stored procedure that ships with Northwind, sending in the much-abused customerid ALFKI to fill an ADO recordset with all the orders belonging to Alfreds Futterkiste.
Example 7-9. Running a stored procedure
Dim cn As ADODB.Connection
Dim sp As ADODB.Command
Dim rs As ADODB.Recordset
Set cn = New ADODB.Connection
cn.ConnectionString = CurrentDb.TableDefs("dbo_customers").Connect
cn.Open
Set sp = New ADODB.Command
sp.ActiveConnection = cnSQL
sp.CommandType = adCmdStoredProc
sp.CommandText = "CustOrdersOrders"
sp.Parameters.Refresh
sp.Parameters("@customerid") = "ALFKI"
Set rs = sp.Execute
Access, however, can’t use ADO recordsets in certain situations. Although Access uses ADO more and more with every new version release, Access 2003 still has deep ties to DAO, so much so that Microsoft put back a default reference to DAO in VBA, after not including it in Access 2002 (XP). A data-entry form bound to a linked table will have an underlying recordset that isn’t ADO, but rather, is DAO. Controls such as combo boxes or listboxes, on unbound or DAO-bound forms, require their recordsets to be DAO as well.
Creating a Pass-Through Query
Access can tap into stored procedure power and get a DAO recordset filled with data via a stored procedure using an underutilized feature known as a
Pass-Through query. Creating a Pass-Through query is relatively straightforward, and the results returned are in a DAO recordset, appropriate for use in any Access object or control that can use a query as its data source.
To create a Pass-Through query, select Queries in the Database window, and click New. Click Design View, and then click OK. Click Close on the Table list to go directly into Design view. On the Query menu, click SQL-Specific, and then click Pass-Through, as shown in Figure 7-40.

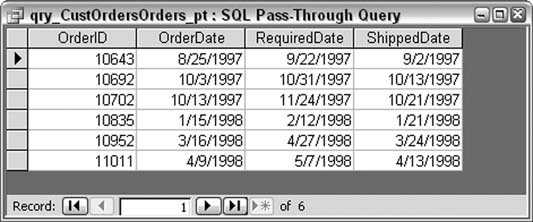
The query designer will switch to SQL view and allow only SQL statements to be entered. Enter CustOrdersOrders
'ALFKI' in the SQL view of the query designer. Click Save, and name the query qry_CustOrdersOrders_pt.
At this point, Access doesn’t know where to pass this query. On first execution, you are prompted for the data source connection to use: cChoose the same data source you used to link your SQL tables. After choosing the appropriate data source, Access sends the SQL string contained in the query to the server, and SQL runs the stored procedure and returns the results to Access, as shown in Figure 7-41.
—Steve Conklin
Manage Word Documents from Access
Tap into the Word object library to copy Access data directly into a Word document.
As is the case with all Microsoft Office products, Word has a significant number of exposed objects and methods to work with, and becoming familiar with a decent number of these is a challenge worth undertaking.
This hack creates a procedure that places data from Access into a table in a Word document. The concepts here also apply to other Word manipulations. Perhaps this will be your springboard into a new avenue of Office development.
Hooking into Word
In an Access code module, we’re going to place a routine to work with an existing Word document. To make this a little easier, we’ll set a reference to Word’s object library. We’ll do this inside the Access VB Editor, using the Tools → References menu and the References dialog box, as shown in Figure 7-42. Note that your version number of the Word library might differ, so use whatever you have.

The Code
The next thing to do is enter the code. This must go into an Access code module:
Sub Access_to_Word()
Dim conn As ADODB.Connection
Set conn = CurrentProject.Connection
Dim recset As ADODB.Recordset
Set recset = New ADODB.Recordset
Dim row_num As Integer
Dim col_num As Integer
Dim word_doc As Object
'Assumes Word doc is in same path - change name and path as needed
Set word_doc = GetObject(Application.CurrentProject.Path & "Customers.doc")

'get data from Access table
recset.Open "Select * From Customers Where State='OR'", _
   conn, adOpenKeyset, adLockOptimistic
'get the record count - used to create Word Table
recset.MoveLast
recset.MoveFirst

With word_doc
'navigate to Word bookmark and create table
'the number of table rows matches the recordset row count
'the number of table columns matches the number of recordset fields
.Bookmarks("Customers").Select
.Tables.Add Range:=Selection.Range, _
         NumRows:=recset.RecordCount, NumColumns:=recset.Fields.Count
    For row_num = 1 To recset.RecordCount
      For col_num = 1 To recset.Fields.Count
        .Tables(.Tables.Count).Cell(row_num, col_num).
        Select Selection.TypeText recset.Fields(col_num - 1)
      Next col_num
    'next database record
    recset.MoveNext
    Next row_num
  End With
  recset.Close
  Set recset = Nothing
  Set word_doc = Nothing
  MsgBox "done"
  End Sub
Here are some highlights of this code:
The Access data is gathered into a recordset.
The
GetObjectfunction is referenced to the existing Word document. Note that this example assumes the database and the document are in the same directory. Also, the name of the document is hardcoded, but you can change this as necessary.The document has a preestablished bookmark named Customers. This is used as a guide to where to create the table.
A Word table is created, and its row and column dimensions match those of the recordset. This ensures the new Word table is exactly the correct size to house the data.
The Word table is populated cell by cell by looping through the recordset. An outer loop cycles through the recordset rows, and in each row an inner loop cycles through each field.
The Data Has Landed Intact
After running this code, the document has a table with the data, as shown in Figure 7-43. Note that there is no connection back to Access; the data is just essentially part of the Word document.
Note that this simplistic example assumes a number of things: the bookmark exists, there is no existing table, and the Access table isn’t too large in terms of rows and fields to make the Word table too densely packed.
Nonetheless, this hack serves as a brief introduction to tapping into Word objects. Because the reference has been set to the library, you can now use the Object Browser in Access to review Word’s objects.

Use Access as a Front End to MySQL
MySQL is a widely used open source database program that often runs on Linux web servers, and Access makes a great front end for data entry and reporting.
MySQL is a wildly successful open source SQL database that runs on most Linux-based web servers. It’s the perfect database to store information for use in database-driven web sites because you can use the PHP programming language to read the data from MySQL and display it on web pages. In fact, the combination of Linux, Apache (an open source web server that runs on Linux), MySQL, and PHP is so popular that it’s known by its initials: LAMP.
However, MySQL doesn’t hold a candle to Access when it comes to forms and reports. MySQL has no built-in form editor or report writer. Instead, you type commands at a command line or write programs (usually as part of PHP-based web pages) to enter, edit, and display information.
But who wants to create programs that display data entry forms for each table? This is where Access comes in. Access can add a friendly face to your MySQL database. In the same way an Access database can link to tables in another Access database, you can link to tables in a MySQL database on your web server over a LAN or the Internet. Once the tables are linked, you (or your users) can use Access forms to enter or edit the MySQL data and Access reports to display it.
Installing the MySQL Tools
MySQL does have a Windows-based utility you can use for creating and editing the structure of the tables in your MySQL databases. The older version of the program is called MySQL Control Center, and it has been replaced by MySQL Query Browser. You can download either program from the MySQL web site (http://dev.mysql.com/downloads/) for free. The manual for MySQL Query Browser is available online at http://dev.mysql.com/doc/ query browser/en/, or you can download it as a PDF or Windows Help file.
When you start MySQL Query Browser, you specify the server on which MySQL runs, your MySQL username, and your password. Once connected, you see a list of the tables for which you have access permission, and you can view or edit the data or structure of the tables, as shown in Figure 7-44.
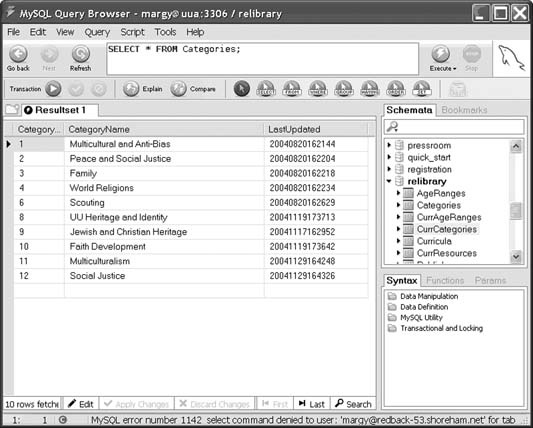
MySQL Query Browser is useful, but it’s not the tool to give to your database users. For example, you can’t create forms with data validation, combo boxes, or subforms, and you can’t create formatted reports. For this, you need Access.
For Access to connect to a MySQL database, you need to install the MySQL Connector/ODBC driver (also called the MySQL ODBC or MyODBC driver). This driver lets Access communicate with MySQL via Open DataBase Connectivity (ODBC). You can download the MySQL ODBC driver from (http://dev.mysql.com/downloads/) for free. After you install it, a new option appears when you link to external tables from an Access database.
You don’t need to install MySQL Query Browser on every computer on which your Access database will run; you need it only if you plan to use it to look at or change the structure of the tables in your MySQL database. But every computer on which your Access database runs needs the MySQL ODBC driver installed because Access uses the driver every time you open a linked MySQL table.
If you plan to connect to a MySQL database over the Internet, your requests will probably need to pass through one or more firewalls. The MySQL ODBC driver communicates over port 3306, so this port must be open on all the firewalls between your computer and the MySQL server. You can specify a different port when you create the link from Access to MySQL, in case your MySQL server is configured to use a nonstandard port number.
Linking to MySQL Tables
Once you’ve got the MySQL ODBC driver installed, linking Access to MySQL tables requires two steps: making sure the tables contain the right fields and making the link. For the Access/MySQL link to work right when editing data into the tables, each table to which you link needs to have the following two fields (the names of the fields don’t matter):
-
AutoNumber In MySQL, this is an
INT(integer) field of size11with theUNSIGNEDandAUTO INC(auto increment) options selected. This field must be the primary key for the table.-
Date This field is updated automatically any time the record is edited. In MySQL, this is a
TIMESTAMPfield.
Most tables have these two fields anyway; good database design suggests using an AutoNumber field as the primary key for most tables. However, if your MySQL tables don’t have these fields, you need to use MySQL Query Browser or some other tool to add them.
Creating the links in Access is a snap. Choose File → Get External Data → Link Tables to display the Link dialog box. Set the file type to ODBC Databases, and you see the Select Data Source dialog box, which lists ODBC databases you’ve used before, in the form of Data Source Name (DSN) files that contain the connection information for the database. If you are opening a table in a database you’ve used before, choose the DSN file for the database, click OK, and choose the tables to link.
If you are linking to a MySQL database for the first time, click the New button in the Select Data Source dialog box, choose MySQL ODBC Driver from the driver list (it’s near the end), click Next, specify a name for the DSN file you are creating to store the connection information, and click Finish. You’ll see the MySQL ODBC Driver DSN Configuration dialog box, shown in Figure 7-45.
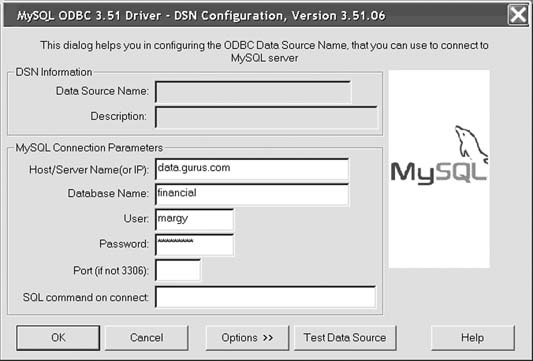
Fill in the hostname of the MySQL server, the name of the database that contains the tables to which you want to link, and your MySQL username and password. If your MySQL server doesn’t communicate over port 3306 (the default), enter the port number, too. If you want to make sure your connection information is correct, click Test Data Source, and Access will try to connect to the MySQL database and tell you whether it succeeded.
When you click OK, Access displays the Link Tables dialog box (the same dialog box you use when linking to tables in other Access databases). However, in addition to the list of tables, you can select the Save Password checkbox. This option is misnamed because Access stores the MySQL password no matter what; this checkbox actually controls whether it stores the MySQL username. If you don’t select this option, you have to enter the MySQL username each time your Access database makes its initial connection to the MySQL database.
Warning
If you have any security concerns about the information in the table, don’t check the Save Password checkbox when you create a link to a MySQL table. If you save both the MySQL username and password in the Access database, anyone who can open the Access database can make changes to the information in your MySQL database.
Linked tables from MySQL databases appear on the Tables list in the Access Database window with a blue-green globe icon rather than the usual box icon. You can’t change the structure of linked tables, and you can’t create relationships that enforce referential integrity between tables, but otherwise, you can use the data just as if it were in your Access database. If you change the structure of a table in the MySQL table, be sure to relink it by choosing Tools → Database Utilities → Linked Table Manager.
Hacking the Hack
When you specify the information about a MySQL database, Access creates a DSN file and stores it in the C:Program FilesCommon FilesODBCData Sources folder (assuming Windows is installed on your C: drive). Strangely, Access also stores the information in the database (MDB) file, so it doesn’t read this DSN file again after it creates it. If you set up an Access database with MySQL links and then take the database to another machine, all you need is the MySQL ODBC driver installed. You don’t need to bring along the DSN file, too.
Access stores the MySQL connection information as a connection string that looks like this (the line breaks after each semicolon are included for readability only):
    ODBC;
    DRIVER={MySQL ODBC 3.51 Driver};
    DESC=;
    DATABASE=financial;
    SERVER=data.gurus.com;
    UID=odbc-margy;
    PASSWORD=ziasti;
    PORT=;
    OPTION=;
    STMT=;
    TABLE=Categories
To see the connection string for a linked table, select the table in the Database window, click Design, click Yes when Access points out that the table structure will be read-only, right-click anywhere in the Design window, and choose Properties from the menu that appears. As you can see, both the username and the password (if you have chosen to save the password) appear in plain text—so much for security. You can’t edit the connection string because the table structure can’t be edited.
If you open a DSN file with Notepad or another text editor, you see the same connection string, but without the semicolons. You can edit the DSN file, but it won’t affect existing linked tables; it affects only tables that you link using the DSN file in the future.
See Also
MySQL documentation at http://dev.mysql.com/doc/
MySQL Connector/ODBC driver documentation at http://dev.mysql. com/doc/mysql/en/ODBC_Connector.html
PHP documentation at http://www.php.net/docs.php
—Margaret Levine Young
Send Access Data Through Outlook Automatically
Implement bulk emailing of your data by tapping into Outlook objects.
The purpose of most databases is to store and report information. Often, it is necessary to send the reports that are generated by a database to multiple users. This doesn’t have to be a manual process. By automating Microsoft Outlook from Access VBA, it is possible to automatically generate reports and send them via email.
The first item you need to determine is whether you are going to send emails only through your address book. If you decide to do that, you don’t need to adjust any of the default settings in Outlook. If, however, you want to send to any address through your application, you need to make a change in Outlook.
By default, Outlook automatically checks the email addresses when you send an email. When you are doing this in an automated fashion, you will have errors to deal with if an email address doesn’t exist in your address book. To shut off this feature in Outlook, go to the Tools → Options dialog.
On the Options dialog, shown in Figure 7-46, click the E-mail Options button in the Preferences tab, and then click the Advanced E-mail Options button shown in Figure 7-47.
This action brings up a dialog box with three sections: “Save messages,” “When new items arrive in my Inbox,” and “When sending a message,” as shown in Figure 7-48.
The “When sending a message” section contains a checkbox for “Automatic name checking,” as shown in Figure 7-48. Check the box if you want Outlook to check addresses, and uncheck it if you want to simply send the messages without checking.
Now that you have determined how you want Outlook to handle addresses, you are ready to build email functionality into your application. Although you will eventually want to have reports based on parameterized queries that go to different users, this example shows how to send individual reports to multiple recipients.

It should be noted that to deal with the increasing number of problems with viruses, Outlook prompts the user to allow access to the address book and to send the messages. Although this prevents you from sending email unattended, it is certainly much easier than doing everything manually every time. In older versions of Outlook, you can send multiple emails unattended.
To accomplish the email task, create a table called tbl_Email with two text fields: Email_Address (50 characters) and Report_Name (25 characters). You can make the fields larger if it is warranted. If you use automatic name checking, you just need to put in the display name of the people you want to send the messages to in the Email_Address field. If you aren’t using automatic name checking, you need to enter the full email address. Put in two or three records for your test.
In a normal application environment, you would want this to be driven from a form; however, this example simply sends all the emails through a procedure.

To create the procedure, go to the Modules tab in Access, and click New. Once you are in a blank module, go to Insert → Procedure, make sure the radio boxes for Sub and Public are selected, and fill in SendOutlookEmail in the Name text box. This creates the shell for your procedure.
Now you need to create a reference to Microsoft Outlook. Do this by going to Tools → References and checking the box for the version of Outlook that you have. Now you can reference the Outlook object model. If you use a version of Access other than Access 2003, you might need to check the box for Microsoft Data Access Objects (mine is Microsoft DAO 3.6 Object Library). Now you are ready to begin coding.
The Code
The code is shown in Example 7-10.

Example 7-10.Access VBA code to send email
  Public Sub SendOutlookEmail()
Dim db As DAO.Database
Dim ReportRs As DAO.Recordset
Dim EmailRS As DAO.Recordset

Dim olApp As Outlook.Application
Dim olMail As Outlook.MailItem

Dim EmailColl As Collection
Dim varEmail As Variant
Dim FileName As String

' Outlook only allows one instance to be open at a time,
' so you can call it with New and it will use the instance
' that you already have open. I suggest having Outlook open
' already so you are not prompted for user name or password.
Set olApp = New Outlook.Application
Set db = CurrentDb
Set ReportRs = db.OpenRecordset( _
     "Select Report_Name from tbl_Email Group by Report_Name")

ReportRs.MoveFirst

While Not ReportRs.EOF
  Set EmailColl = New Collection
  Set EmailRS = db.OpenRecordset( _
    "Select Email_Address from tbl_Email Where Report_Name = " & """" & _
      ReportRs.Fields(0).Value & """" & ";")
  EmailRS.MoveFirst
  While Not EmailRS.EOF
    EmailColl.Add EmailRS.Fields(0).Value
    EmailRS.MoveNext
  Wend

  EmailRS.Close
  Set EmailRS = Nothing

  Set olMail = olApp.CreateItem(olMailItem)
  olMail.subject = "Monthly Report"
  For Each varEmail In EmailColl
    olMail.Recipients.Add varEmail
  Next
  olMail.Body = "Your Monthly Report is attached"
  FileName = "C:Reports" & ReportRs.Fields(0).Value & ".rtf"
  DoCmd.OutputTo acReport, ReportRs.Fields(0).Value, _
     acFormatRTF, FileName
  ' If you had multiple attachments, you could add them one at a time
  olMail.Attachments.Add FileName, olByValue, 1, "Monthly Report"
  olMail.Send

  Set olMail = Nothing
  Set EmailColl = Nothing

  ReportRs.MoveNext
Wend

  ReportRs.Close
  Set ReportRs = Nothing

  Set olApp = Nothing
  ' You can close Outlook with olApp.Quit - but since I suggested
  ' that you keep it open I am not closing it here

  Set db = Nothing
End Sub
When you run the code, you will quickly become annoyed at the number of prompts you receive. As stated earlier, this is much better than doing it manually, but there has to be a better way.
Tip
The code requires several variables for the Outlook objects and data objects; see Example 7-10 for these items. This example also takes advantage of the Collection object; however, you can skip that step and just use the recordset. The main reason the code uses the Collection object is that, in my production-automated email applications, I pass Collections to the email procedure for the report names and the email addresses. This lets me use that same procedure in other Microsoft Office applications such as Excel or Word, where I might not be using recordsets. The procedure saves the reports in a directory called C:Reports; if this directory doesn’t exist on your system, you can create the directory, or you can place the reports in a different directory.
An Easier Way
Now that you are familiar with the items to send emails through Outlook, here is an easier way to handle it. Most likely this will be helpful only for large jobs because it requires two-steps.
The adjusted Access procedure in Example 7-11 changes the original code from Example 7-10 to save the email instructions in an ADO.Recordset XML file. Outlook then processes this file. You will need to create a reference to ADO in both the Outlook and Access VBA environments.
Example 7-11. Creating an XML file from an ADO recordset
Public Sub CreateOutlookXML()
Dim db As DAO.Database
Dim ReportRs As DAO.Recordset
Dim EmailRS As DAO.Recordset

Dim saveRS As ADODB.Recordset
Set saveRS = New ADODB.Recordset

saveRS.Fields.Append "Email_Address", adVarChar, 50, adFldFixed
saveRS.Fields.Append "File_Name", adVarChar, 50, adFldFixed
saveRS.Open
Dim FileName As String

Set db = CurrentDb
Set ReportRs = db.OpenRecordset( _
     "Select Report_Name from tbl_Email Group by Report_Name")

ReportRs.MoveFirst
While Not ReportRs.EOF
  FileName = "C:Reports" & ReportRs.Fields(0).Value & ".rtf"

Set EmailRS = db.OpenRecordset( _
  "Select Email_Address from tbl_Email Where Report_Name = " & """" & _
    ReportRs.Fields(0).Value & """" & ";")
EmailRS.MoveFirst
While Not EmailRS.EOF
  saveRS.AddNew
    saveRS.Fields(0).Value = EmailRS.Fields(0).Value
    saveRS.Fields(1).Value = FileName
  saveRS.Update
  EmailRS.MoveNext
Wend

EmailRS.Close
Set EmailRS = Nothing

DoCmd.OutputTo acReport, ReportRs.Fields(0).Value, _
   acFormatRTF, FileName

  ReportRs.MoveNext
Wend

  saveRS.Save "C:ReportsEmailFile.xml", adPersistXML
  saveRS.Close
  Set saveRS = Nothing
  ReportRs.Close
  Set ReportRs = Nothing

  Set db = Nothing
End Sub
This procedure takes advantage of a disconnected ADO recordset. With ADO, you can create a recordset on-the-fly without connecting to a database. In addition, you might also notice that this procedure creates all the files Outlook will send later. If you want to, you can have a step that runs at the beginning of the process to create the XML file with no records and then have multiple procedures run that continue to add to the XML file to be processed by Outlook at a particular time.
Macros in Outlook
Next, you need to create the Outlook procedure. To make this work, you need to add a macro to your Outlook environment. In Outlook, select Tools → Macros → Visual Basic Editor, and click the ThisOutlookSession object in the Project Explorer. Once there, enter the code in Example 7-12.
Example 7-12. Processing the ADO recordset in Outlook
Public Sub EmailTest()
Dim mi As MailItem
Dim varitm As Variant
Dim adors As ADODB.Recordset
Set adors = New ADODB.Recordset
adors.Open "C:ReportsEmailFile.xml"
adors.MoveFirst
While Not adors.EOF
Set mi = Application.CreateItem(olMailItem)
mi.Recipients.Add adors.Fields(0).Value
mi.Subject = "Monthly Report"
mi.Body = "Your monthly report is attached."
mi.Attachments.Add adors.Fields(1).Value, olByValue, 1, "Monthly Report"
mi.Send
Set mi = Nothing
adors.MoveNext
Wend
adors.Close
Set adors = Nothing
End Sub
This sends all your emails without prompting you each time. Although it creates a two step process, you will appreciate not having to click through each message. This is particularly useful if you have a significant number of emails to send. If necessary, you can store additional fields for Subject and Body in the recordset and have those also become dynamic.
The one downside of this procedure is that it sends an individual email for each record. You can update it to go through the recordset and determine if emails can be grouped; however, this is unlikely to be necessary. In addition, you can also create multiple XML files for each email to be sent and have the procedure cycle through all the XML files and then move them when it is completed (I implemented such a procedure for a client once).
You will need to save this procedure using the Save icon from the Visual Basic Environment if you want to use it again. Also, depending on your security settings, you might be prompted to enable this macro each time you open Outlook and attempt to use it.
Using either approach will certainly help you tackle your Access projects and help automate sending emails. If you need to send just a message to users, you can use the first procedure and eliminate the lines related to attachments. In either case, the power of using VBA in Microsoft Office applications should be evident.
—Michael Schmalz
Create Access Tables from Outside Access
You don’t have to be in Access to use Access.
Here’s the scenario: you have an Excel solution that needs to populate an Access table. The table will be a new table in the database. You might think the table needs to exist before you can populate it via ADO or some other means, so you manually create the table and then go back to Excel and run the routine that populates the table.
Actually, you don’t have to go to Access and create the table. Just create it directly from code while in Excel. It’s a simple matter, really; you just need to work with the ADOX library.
In Excel, set a reference to ADOX by using the Tools → References menu and setting the references in the References dialog box, as shown in Figure 7-49.

The Code
It’s now just a matter of whipping up a little code that uses the ADOX programmatic model. In an Excel code module, enter this code:
Dim cat As New ADOX.Catalog
Dim tbl As New ADOX.Table
Dim db_file_path As String
'change path and database!
db_file_path = ActiveWorkbook.Path & "abc.mdb"
'connect to the Access database
cat.ActiveConnection = "Provider=Microsoft.Jet.OLEDB.4.0;" & _
   "Data Source=" & db_file_path

'Create a table
With tbl
.Name = "Prospects"
' First, fields are appended to the table object
' Then the table object is appended to the Tables collection
.Columns.Append "Name", adVarWChar
.Columns.Append "Company", adVarWChar
.Columns.Append "Phone", adVarWChar
.Columns.Append "Address", adVarWChar
End With

cat.Tables.Append tbl

Set cat = Nothing
MsgBox "Table created!"
Just be sure to change the hardcoded database name and path. This code creates the Prospects table in the Access database. The table will have four fields. The Append method of the Columns property takes the name of the field and the field type as a constant. The constants for the field types differ from what you see in Access, although they serve the same purpose. To see all the constants, use the Object Browser and filter it to just show the ADOX library, as shown in Figure 7-50.

Hacking the Hack
This hack uses ADOX, which is an available external library. You just as easily can run the code in this hack from Word, PowerPoint, Outlook, and other programs. The point is that you can create and manipulate Access database tables even when Access isn’t running.
Write VBA with the Macro Recorder in Word and Excel
Take advantage of autogenerated code to speed up your coding efforts.
Let’s say you need to work with Word or Excel from within Access. And let’s say the project involves writing VBA for Word or Excel that will be used from Access via automation. Well, you don’t have to climb as steep a learning curve as you might think. That’s because both Word and Excel can generate VBA code automatically.
To make this work, you first turn on the Macro Recorder, perform certain actions in the application, and then stop the recorder. Just select Tools → Macro → Record New Macro to start the recorder, as shown in Figure 7-51.
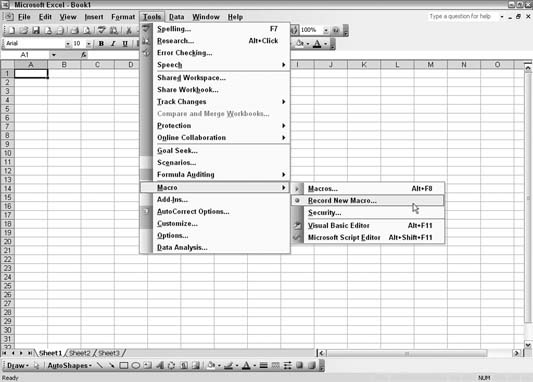
With the recorder running, you can perform a few actions of entering data and creating a chart. After stopping the recorder (while it is recording, a toolbar with a Stop button is visible), the code is in an Excel code module. Figure 7-52 shows an example of the code Excel generates.
Usually, you’ll need to work with the generated code. It will have hardcoded cell references that might not make sense for your application.

However, using the Macro Recorder, you can generate most of what you need and then just edit it to make it work right. Code such as this that works in Excel will run fairly well from Access when a reference is set to the Excel library (everything said here also applies to Word). You will need to make some changes, but this is still a big timesaver.
—Kirk Lamb