
Few things can enliven your movie like sound. Whether it is a short sound effect clip or background music, voice narrations, or musical scores, a judicious use of sound can often make the difference in a project.
Although not visible to the naked eye, sounds are made of waves that vary in frequency and amplitude. Digital sounds are visually represented as waveforms. Waveforms appear as vertically stacked lines of varying heights, resembling the output from a seismic chart of an earthquake. The more intense the sound, the taller and denser the waveform line measurement.
For computer usage, sounds are transformed into mathematical equations, called digital sampling. Digital quality is measured by how many samples exist in a single second of the sound, called the sampling rate. Sampling rates are expressed in kilohertz (kHz). Higher sampling rates result in larger files and clearer sounds. Typically, sampling size is measured in 8, 16, or 24 bits. The bit rate is the amount of data that is streamed or encoded for each second that plays in a sound file. Higher bit rates result in higher-quality sound waves.
Like graphics, sounds can consume large amounts of disk space and RAM, and stereo sounds use twice as much data as mono sounds. You can set compression options for reducing event sounds and streaming sounds when publishing and exporting your Flash files. Compression simply reduces the overall file size of an audio clip. Keep in mind that the more you compress a sound and lower the sampling rate, the smaller the sound file and the lower the sound quality. It may take some experimentation to find the right balance between file size and sound quality in your own Flash movies.
All sounds that you add in Flash, whether music, narration, or sound effects, fall into two categories: event driven and streamed. An action in your movie triggers event-driven sounds, and these types of sounds must be downloaded completely before playing in your movie. Using the Timeline, you can assign an event sound to start playing on a specific keyframe, and it will continue to play independently of the Timeline for your movie. If the event sound is longer than your movie, it continues to play even when your movie stops. You can use event sounds when you do not want to synchronize a sound clip with frames in your movie.
Streamed sounds are downloaded as they are needed and start playing even if the entire clip has not yet finished downloading. Flash synchronizes streamed sounds with the frames of your movie and attempts to keep any animation in sync with the streamed sounds.
When assigning event or streamed sounds, you can use the options in the Property Inspector to specify the sound type. Flash offers four sync options — event, stream, start, and stop — based on what you want the sound to do.
Flash recognizes a large variety of sound file formats. You can import WAV, AIFF, MP3, System 7 Sounds (Mac), Sun AU, Sound Designer II (Mac), and QuickTime file formats into your movies. You need to install QuickTime 4 or later to support some of the sound file formats. When importing sounds, Flash works best with 16-bit sounds.
You can export the audio you use in your Flash movies in MP3 format, or you can compress it as ADPCM, MP3, or RAW. You can find compression options in the Publish Settings dialog box. You can check the file format for any sound clip using the Sound Properties dialog box. The dialog box offers detailed information about the sound clip, including file size and compression assigned to the clip.
If you create Flash content for mobile devices, you can publish your Flash movie with device sounds, which are encoded in the device's native file format. Device sound formats include MIDI, MFi, and SMAF.
You can import sounds from other sources to use in your Flash movies. Flash stores imported sounds in the library. You add sound clips in the same way that you add other frame content. Although you can add only one sound per frame in Flash, you can use multiple layers for different sounds. For example, you can add new sounds to the same frame but assign them to different layers. To help keep your movie organized, it is a good practice to add sounds to their own layers in a movie.
You can use the Property Inspector to control sounds in a movie, such as changing the sound type and creating sounds that repeat, or loop. You can also apply sound effects to fade sound in or out or appear to emanate from the left speaker channel or right speaker channel. You can also find a few rudimentary features for editing sounds in Flash using the Edit Envelope dialog box. This dialog box enables you to set beginning and end points for a sound and control the volume of a sound while it plays in a movie.
However, you should keep in mind that Flash is not designed to be an audio editing tool. If your movie sounds require more detailed editing, use a sound editing program, such as Adobe Soundbooth CS4 or Apple Logic Pro 7, to modify the sound clip before importing it for use in Flash.
You can also use ActionScript to control how a sound plays in a movie. ActionScript can be used to set up buttons that can start or stop sounds or control the volume, as well as for importing the sound and setting what kinds of events can be used as triggers for the sound.
Although sound can add a degree of professionalism to a project if done right, it can as easily detract from the project if done incorrectly. There are several factors to consider when adding sound files. First, you must think about whether the sound is actually enhancing your project or if you are adding it simply because you can. Second, consider that many users may be unable to hear the sound, either due to a physical disability or, more often, due simply to the fact that they either do not have speakers or they are turned off. You must think about how these users will be able to obtain information from your site if that information is presented only through sound. Third, keep in mind that sound files will increase the file size of your movie, possibly dramatically.
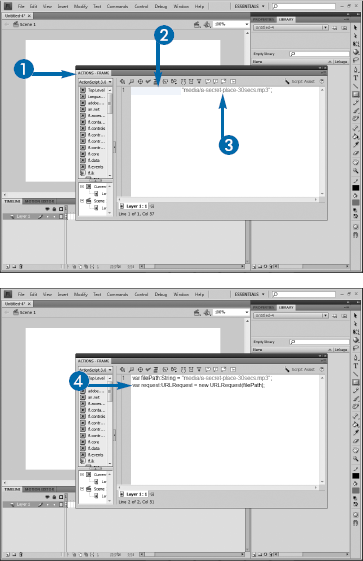
Two options exist for playing sounds in a Flash movie. First, you can import a sound directly into the project's library, export it for ActionScript, and then create an instance of it to play. Second, you can load an external sound file.
Both methods have their pros and cons. The biggest advantage of playing sounds from the library is that you do not need to deal with remembering to upload additional files to the server. Loading an external sound is covered in the next section, "Load and Play an External Sound."
Playing a sound from the library involves a process almost identical to that used when creating instances of MovieClips in code. You begin by adding the sound to the library. See the preceding section, "Understanding Sound in Flash," for information on what formats are supported by Flash. Once imported, you can right-click the sound file in the library to access its properties. Just as you would do for a MovieClip, when you export the file for ActionScript, you provide a unique class name for the sound.
After you have the sound marked for export, you can add it to your code and create an instance. For example, if you exported a sound as SoundTrack, you might type something like this: var mySound:Sound = new SoundTrack();.
Finally, you can call the play() method of the Sound class to have your sound file play. You can call this method directly in your code, in which case the sound will begin playing as soon as your movie loads and will play in its entirety, or you can call it within an event handler.

The Import to Library dialog box opens.


The sound is imported to the library.


The Sound Properties dialog box appears.


A dialog box appears stating that the classpath will be automatically generated.

The sound is exported for script.


Flash Player runs. In this example, the movie is blank visually, but the sound plays.
When you export the sound for ActionScript, Flash will provide a default class name for your sound file, which will simply be the same as the file itself. Unfortunately, this default class name will not work, as it will contain the file extension. Although the extension by itself is not a problem, the dot separating the filename from the extension will cause your ActionScript code to fail because class names cannot contain dots. For example, if you import a sound file weddingmusic.mp3 and accept the default class name of weddingmusic.wav, when you try to create an instance of that class, you would need to type
var theMusic:Sound = wedddingmusic.mp3();
You can see that this appears to be an attempt to call an mp3 method of class weddingmusic. Therefore, you should change the class name. At the very least, you should remove the dot and file extension, but to maintain coding standards, you should also convert the filename to the standard casing scheme used for classes. Therefore, the preceding example should be given a class name of WeddingMusic.
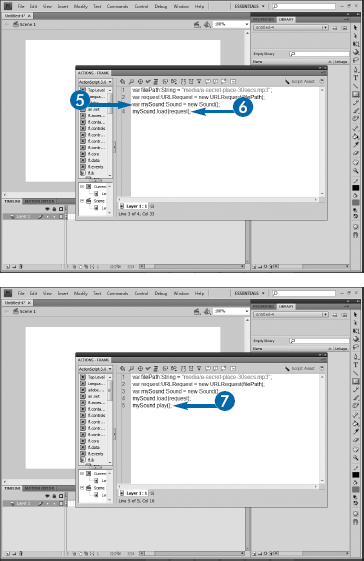
Rather than play a sound from the library, you can load an external sound file at runtime. This offers advantages over playing sounds from the library. First, by loading sounds into the library, you are increasing the file size of your movie. If you load external sounds, your movie's file size will remain smaller, so it can load and play faster. This is particularly beneficial if you do not believe that all your users will encounter the section of the movie that contains the sound. Second, by keeping the sounds apart from your Flash movie, you can change them at will by simply placing new sounds on the Web server. If you have sounds playing from the library, you would need to open Flash CS4 Professional, import the sound, export for ActionScript, and then republish your movie every time you wanted to change the sound.
In order to load external sounds, you must first create an instance of the Sound class. Then you can call its load() method. This method takes as an argument an instance of the URLRequest class, which is used any time that you want to call files from a Web server. The URLRequest class simplifies the process by which Flash can call external resources and is discussed in more detail in Chapter 17.
Once loaded, the sound can be started by calling its play() method. Other methods of the Sound class also exist to further control the sound; they are discussed in detail later in this chapter.
Note
If necessary, you may need to include the directory in which the sound resides.
Flash Player runs. In this example, the movie is blank visually, but the sound plays.
Note
You may need to save the file before you can test it.
It is worth noting that although loading an external sound file will reduce the size of the SWF when compared to those with sounds imported in the library, the actual download time for the user will, in the end, be the same. For example, there is no real logical difference between downloading a 1MB SWF that includes embedded sounds and downloading a 200KB SWF and then downloading an 800KB MP3: You end up downloading 1MB either way. The file size advantage to loading sounds at runtime is that the SWF will download initially much faster, so the user can begin interacting with it immediately.
In the example shown here, only the filename is given for the sound, which means that the sound file must be in the same directory on the Web server as the SWF. If you want to store your sounds in another directory, you can provide a relative path to the file instead. For example, instead of setting a filePath variable above to "music.mp3", you could use "sounds/music.mp3", or even a more complex path such as "../sounds/soundtrack/music.mp3".
When your users access your movie over the Internet, there will likely be a delay before an externally loaded sound file can play due to download time. Any attempt to play the sound before loading will cause an error.
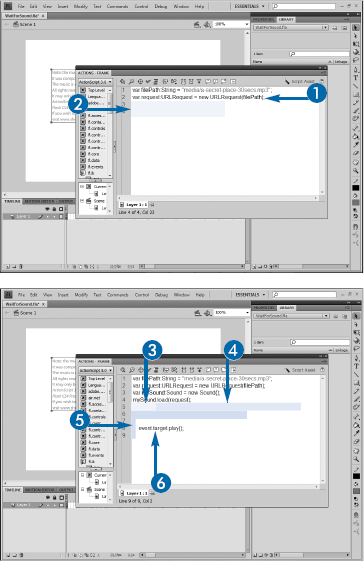
You can avoid this error by adding an event listener to your sound instance and listening for the Complete event. This event is broadcast any time you load an external file, and not surprisingly, it is broadcast when the file has completed downloading. By placing your sound's play command within the event handler, you can ensure that Flash Player will not attempt to play the sound until it is downloaded and ready.
Any time you begin relying on external sources for your content, you increase the possibility of errors. The soundfile may not actually be on the server, or its path may have been specified incorrectly. The server may be down, or the user may have lost his or her Internet connection.
You can prevent potential runtime errors from occurring by testing to be sure that the sound loads successfully. The easiest method for doing this is to add an event listener to the sound that listens for the I/O error event. I/O stands for input/output, and the event will occur only if something — anything — happens to prevent the sound from loading successfully. Therefore, if you have a sound instance called theTheme, you could write theTheme.addEventListener(IOErrorEvent.IO_ERROR, loadError). The loadError method could then simply contain some sort of friendly output to your users explaining that an error occurred in loading the sound and that they should try again later.
Note
See the preceding section, "Load and Play an External Sound," for details on these steps.
You can create a progress indication to let the user know that a large file is downloading. You can use the Progress event to test the number of bytes that have loaded, and by dividing this by the total number of bytes in the file, you can determine how much of the file has loaded. You can then either use this number to manipulate a drawn object, as shown in the following, or display the number in a text field.
var request:URLRequest = new URLRequest("music.mp3");
var mySound:Sound = new Sound();
mySound.load(request);
mySound.addEventListener(ProgressEvent.PROGRESS, showProgress);
function showProgress(event:ProgressEvent):void
{
                   progressBar.width = 100 * (event.bytesLoaded/event.bytesTotal);
}Although sounds can be played directly using the play() method of the Sound class, you can establish more control over your sound by isolating it in a channel. Audio professionals have long worked with multitrack recordings, which allow individual recordings so that they can be edited later. The ActionScript SoundChannel class mimics this functionality, although it has applications beyond mere recording of audio. You should note that the channels created by the class are not left and right channels but rather represent individual tracks of sound. Either stereo or mono sounds can be placed in a channel.
One particular advantage of using channels is that they allow you to further control the sound by stopping, pausing, and resuming it. You can stop a sound by calling the stop() method; note, however, that this is a method of the channel, not the sound, whereas play() is a method of the sound itself.
You also pause a sound by calling the channel's stop() method. Generally, the difference between pausing and stopping is that with a pause, you will want the sound to resume playing at the point at which it was paused. Fortunately, the channel contains a position property that stores the point at which the sound is currently playing. By storing this value in a variable before you pause, you can pass it back to the play method and resume where you left off.
All of these actions can of course be placed into event handlers for buttons or other user interface objects, allowing your user to start, stop, and pause the playback of the sound in your movie.


In the example shown here, two buttons are used. It is possible to do this with a single button instead. To do this, you would need to create a MovieClip with two keyframes. In one frame, draw the symbol to represent pause and in the other, the symbol representing resume or play. Label each frame.
Then you could write the pause event handler as the following:
function pauseSound(event:MouseEvent):void
{
                   myButton.removeEventListener(MouseEvent.CLICK, pauseSound);
                   myButton.gotoAndStop("resume");
                   var position:Number = channel.position;
                   channel.stop();
                   myButton.addEventListener(MouseEvent.CLICK, resumeSound);
}
Your resume function would look very similar:
function resumeSound(event:MouseEvent):void
{
                   myButton.removeEventListener(MouseEvent.CLICK, resumeSound);
                   myButton.gotoAndStop("pause");
                   channel.play(position);
                   myButton.addEventListener(MouseEvent.CLICK, pauseSound);
}ActionScript provides a SoundTransform class that enables you to manipulate the volume of sound during playback. You set the volume by manipulating the volume property of an instance of the transform object. The value is expressed as a number ranging from 0 to 1, with 0 representing no volume or mute and 1 representing full volume.
The SoundChannel class contains a soundTransform property that represents an instance of the transform class. By setting the volume in an instance of the transform class and then applying that instance to the channel, you can adjust the volume.
The user interface to manipulate volume can be handled in any way that you choose. At the simplest level, you could simply have a button that, when clicked, mutes the sound, and that when clicked again, restores the volume. Alternatively, you could have a series of buttons representing various volume levels or even a more complex MovieClip that allows the user to drag a slider up to increase the volume or down to decrease it. See Chapter 13 for details on using drag and drop in your movies. You could even, in theory, control volume simply through mouse movement by detecting the mouseX coordinates relative to the Stage and then increasing the volume as the user moves the mouse right and decreasing it on a left move. You could also use the mouseY coordinates to achieve the same effect with up and down movement, although you should keep in mind that in Flash, downward movement increases the y value, so you would actually need to calculate the opposite of the mouseY coordinate. To keep the code in the example here simple, only a mute/unmute button will be shown.


If you have more than one sound playing, you can stop all sounds by calling the stopAllSounds() method of the SoundMixer class. The class is static; you do not need to create an instance of it to use it. You can also apply effects created with a SoundTransform instance, such as volume control, by applying the SoundTransform instance to the SoundMixer's soundTransform property.
If you are using stereo sound, you can manipulate the SoundTransform's pan property to pan the sound between the two speakers. Values for the property range from −1 to 1. A value of −1 puts all the sound in the left speaker, whereas a value of 1 uses only the right speaker. A value of 0, the default, evenly divides the sound. Although it can be fun to play with panning, keep in mind that very few computer users have speakers properly positioned to hear true stereo sound, so the effect will be limited or potentially lost altogether for them.
When recording sound, most MP3 encoders have the ability to inject metadata into the file. Metadata is data about data — generally, text that describes the data. Metadata is generally used for search purposes, as it provides text on which to search otherwise unsearchable binary files. Modern MP3 encoders almost universally follow a standard developed in the late 1990s: Called ID3, it provides a standard set of "tags" to describe music files.
ActionScript contains an ID3Info class that can be used to read ID3 tags in your music. You can use this to display the title of the song, the artist, the album, the length of the music, or any other piece of information that was encoded into the file. A total of seven ID3 tags are represented by properties of the id3 property of the Sound class: comment, album, genre, songName, artist, track, and year. If, for example, you have a sound clip named mySound, you could read the track's title into a text field named txtSongTitle like so:
txtSongTitle.text = mySound.id3.songName;
The remaining ID3 tags are represented by four-letter constants. The composer, for example, would be read using mySound.id3.TCOM. You can view a complete list of the tags and their associated constants online at http://livedocs.adobe.com/flash/9.0/ActionScriptLangRefV3/flash/media/Sound.html#id3.
When reading a tag directly, ActionScript will always return undefined for tags that are not encoded within a particular sound.


ActionScript also supports an ID3 event, which is called whenever Flash Player encounters an ID3 tag. Using this event and a for loop, you could theoretically return a list of all of a particular song's ID3 data:
mySound.addEventListener(Event.ID3, displayAllTags);
function displayAllTags(event:Event):void
{
                   var id3Properties:ID3Info = event.target.id3;
                   for(var propertyName:String in id3Properties)
                   {
                      trace("ID3 Tag: " & propertyName & "=" & id3Properties[propertyName]);
                   }
}