
In object-oriented programming, a package is a container for a group of related classes. In real terms, a package is simply the folder on your computer that contains your class files. The packages you use for your Flash projects should be created in the same folder as the other files for your project; normally, the top-level package will be in the same directory as the FLA file. By convention, package names should begin with a lowercase letter and then contain mixed case after that.
Many classes exist in ActionScript, and the possibility exists that you could create a custom class with the same name as one of the built-in classes. In this situation, a name conflict will occur, resulting in an error when you attempt to publish the file. However, you do not need to memorize the names of all the classes in ActionScript, as name conflicts can be avoided through the use of packages. The technical name of a class includes its package name, so if you create a custom class called PhotoGallery and place it in a package called bradyStudios, then the name of the class is technically bradyStudios.PhotoGallery. As the name of the package is obviously not something that would be built into Flash, there would not be a name conflict even if ActionScript contained a built-in class called PhotoGallery.
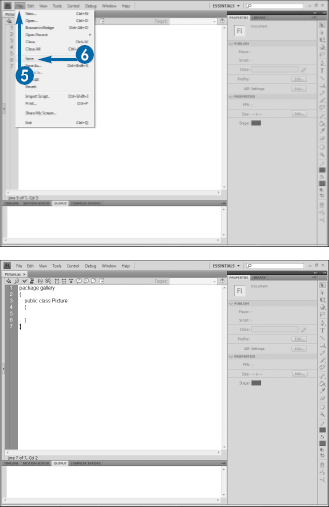
You do not need to do anything special in setting up a package. In fact, you do not even do it within Flash: Simply use your normal operating system tools for creating the folder or folders you need.


The package is created.

In order to guarantee the uniqueness of class names, developers have long used a process of reversing their domain name in packages. Therefore, a developer working on a site at www.bradystudios.com would create a package com.bradyStudios.www. Because your domain name is guaranteed to be unique, so too is your package, and thus you need not worry about name conflicts with your classes.
Understand, however, that folder names cannot contain dots. In this example, you would not have a folder called com.bradyStudios.www. Rather, you would have a top-level folder called com, which would contain a folder bradyStudios, which in turn would contain a www folder.
Note that you are in no way required to use this structure. It was simply developed as a way to free you from ever having to worry about name conflicts. Even if you get code from another developer, if she follows the same structure, then her classes would be in a different package, so if you and she both had classes with the same name, there would be no conflict.
Everything that happens in ActionScript happens through classes. When you build a Flash movie visually in Flash CS4 Professional and then publish the movie to an SWF, Flash actually builds a series of ActionScript classes and compiles those into the SWF file. Each of your symbols becomes a class. In fact, the Stage itself is a class. Although relying on the default classes in ActionScript, such as Stage and MovieClip, can be useful in many cases, in many more cases you will need to create your own classes.
Each class that you create will reside in its own ActionScript file. An ActionScript file is simply a text file that contains ActionScript code. Although ActionScript files can be created in any text editor, creating them in Flash provides for code hinting, code coloring, and context-sensitive help.
You can create a new ActionScript file in several ways. If you do not have any files open, you should see the Start screen, which will contain a link to create a new ActionScript file, as shown in Chapter 1. If you do have a file open, you can create a new blank document by following the steps in this section. Unlike normal FLA files, the ActionScript file will open in the Actions panel, but the panel will appear full-screen. ActionScript files do not have a Stage or Timeline, and you can only type code.
The file needs to be saved with an .as extension; although if you are creating it in Flash, the extension will be added automatically. Also, you should save your class files into a package to avoid naming conflicts.

The Save As dialog box opens.

Note
See the preceding section, "Create a Package," for more information.
Note
Your class name should always begin with a capital letter.
The file is saved.
You can enter any ActionScript into an external file. Although the examples in this chapter show using the external file for custom classes, you can in fact copy any of the code from an FLA and place it in an external ActionScript file. That file can then be imported back into the document using an import statement that references the file:
import "actionscript/myfunctions.as";
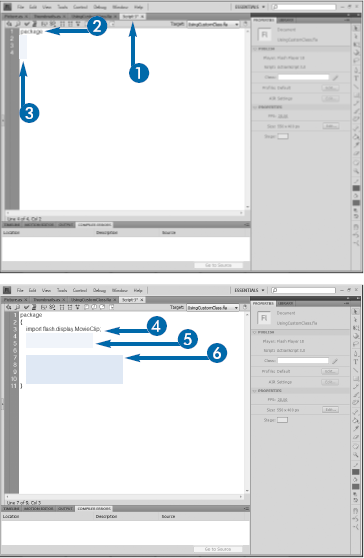
Before you begin coding your custom class, it can help to begin by creating the skeleton of the file that you plan to use. All custom classes follow the same basic structure, so you will quickly get used to the code that you need to add.
The first line of the code declares the package that will contain the class. Remember, a package is nothing more than a folder on your hard drive, and you should group similar classes together in a folder. See the earlier section "Create a Package" for more information. If the file is saved in the same folder as the FLA that will use it, you can simply type package; to declare that this class does not belong to any particular package. Otherwise, you will type the package keyword followed by the package name. Either way, the package declaration will be followed by a pair of curly braces.
Within these braces, you will declare the class name itself by providing an access modifier, followed by the class keyword, and then the name of the class. The modifier defines what other code can create instances of the class. The most common modifier is public, which means that code from just about anywhere can instantiate the class. Other modifiers are discussed later in this chapter.
After the modifier and name, you will enter another pair of curly braces. Inside these braces will be all the code for the class. When you save the file, you need to be sure that the filename matches the name of the class declared in the code.

Normally, filenames in Windows are not case sensitive, so the operating system sees the files Photo.as and photo.as as the same. However, in ActionScript, the filename for the class definition file must exactly match the name provided in the signature line of the class, including case. Therefore, if the file is saved as Photo.as, with a capital P, then the signature line of the class must be
public class Photo
It does not matter if you type the class signature line before saving the file or if you save the blank file first and then type the line — just be sure that they match. Keep in mind that all built-in classes in ActionScript begin with capital letters, and it is strongly recommended that you maintain the same convention in your custom classes.
Classes can contain properties and methods. Properties are the "nouns" of the class — the things that are used to define it. Methods are explored in detail later in this chapter.
A property of a class is in fact nothing more than a variable that is defined within the class. Properties are defined almost exactly as variables in other parts of the script by using the var keyword and a name. The only difference is that properties should also include an access modifier in their declaration. Most properties have their access modifier set to public or private. Public properties are those that can be read and set from outside of the class, whereas private properties can be accessed only by methods and other properties within the class. For example, if you have a property firstName in a custom class and you want to be able to set the name from your main movie's script, then the property would need to be public.
As variables, property names must follow all the same rules as variable names: They must begin with a letter or underscore and can contain only letters, numbers, and underscores. As with normal variables, you should also declare a data type for each property. See Chapter 2 for a discussion on ActionScript data types and their use. You can set a value for a property when you create it or have the value set later in the code for the class. Public properties may also have values set by the code that instantiates the class.
Note
See "Create a New ActionScript File" and "Create a Custom Class Skeleton" earlier in this chapter for information on creating new class files.
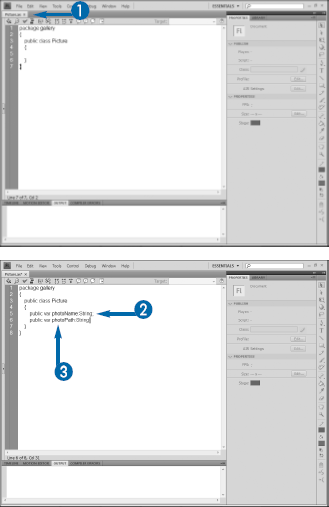

The file is saved, and the new properties are added to the class.
Besides public and private, there are several other access modifiers. You can also set properties as internal, in which case they are available only to other code within this class and to other classes within the same package. Internal is actually the default modifier in ActionScript, which is part of the reason why it is important to always set it: Properties defined without a modifier will not be settable to your movie unless you expressly set the modifier to public.
Programmers familiar with other languages, particularly Java, may prefer to set all properties to private and then use a series of functions to access them. This technique, called getters and setters, works in ActionScript as well and is covered later in this chapter in the section "Get and Set Class Properties."
Whenever you instantiate a class in your Flash movie, ActionScript automatically calls a special method within the class called a constructor. A constructor is in fact nothing more than a function defined in the class that has the same name as the class.
Constructors are used to initialize the class. You may need to perform calculations on the properties of the class, call other functions within the class, or maybe even instantiate another class. Any and all of these can be done with the constructor.
The constructor is written almost exactly like a normal function. You begin with an access modifier, although constructors must always have their modifier set to public, which makes logical sense as by definition, the constructor is a function that will be called from somewhere else — the code that is instantiating the class.
Following the access modifier, you write the keyword function, followed by the name of the class and a set of parentheses. You can have the constructor take arguments or not depending on what is needed by the class.
You are not required to write a constructor. If there is nothing specific that needs to be done when the class is instantiated, you can simply ignore the constructor. ActionScript will automatically create an empty constructor when a class without one is instantiated.
Constructors cannot include a return statement. The function actually returns an instance of the class, but you do not need to specify this. Also, the constructor signature line will not have a return data type.
Note
See "Create a New ActionScript File" and "Create a Custom Class Skeleton" earlier in this chapter for information on creating new class files.
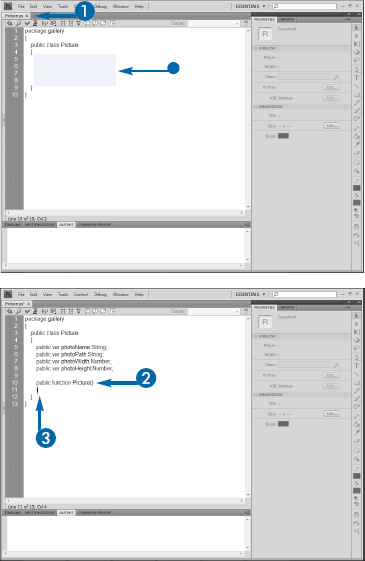
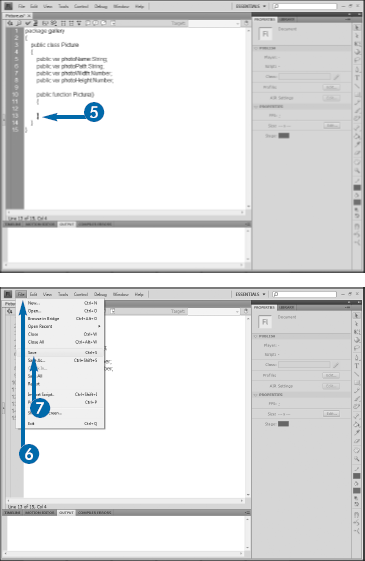
The class is saved with the constructor.
There is no way to prevent the constructor from being called when the class is instantiated. If there is code that you want to execute from within the class only in certain situations, then you should write that as a specific method within the class. This gives you the ability to control when the code is executed, as you would need to expressly call the method. Class methods are discussed in the next section, "Define a Method."
Even though ActionScript will automatically create an empty constructor, many developers consider it a best practice to create an empty constructor in your code rather than rely on ActionScript to do it for you. An empty constructor is simply one that contains no code within its curly braces.
Methods can be seen as the "verbs" of a class — the things that the class can actually do. As an example, the built-in Math class contains the random() method, which generates and returns a random number.
Your custom classes can contain methods as well. Just as a property is actually nothing more than a variable in the class, a method is in fact nothing more than a function in a class. As with normal functions, your methods should have a name in the form of verbNoun. Methods can take arguments and can return values.
You use an access modifier to define what code can call a method. A public method can be called either by other code within the class or by code outside of the class — for example, by the movie that instantiates the class. A private method can be called only by other methods within the class. A method set to internal can be called by other code in the class or by other classes in the same package. Most if not all of your methods will be set to either public or private.
You create a method in the same way that you create a normal function. Begin with an access modifier, followed by the function keyword, the name of the method, and a set of parentheses. If the method will take arguments, declare those, along with appropriate data types, within the parentheses. After the closing parenthesis, type a colon and an appropriate return type for the method. Then type a pair of curly braces and within the braces any code that will be executed by the method.
Note
See "Create a New ActionScript File" and "Create a Custom Class Skeleton" earlier in this chapter for information on creating new class files.

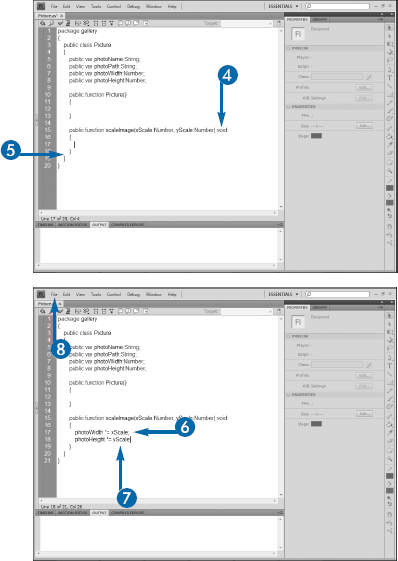

The class is saved, and the method is added to it.
The example in the steps in this section multiplies the values of the width of the photo by the xScale being passed into the method. Note that the class properties are directly available to the method of the class. As class properties, their access modifiers do not matter: You can call either public or private properties from anywhere within the class.
The code also uses a shortcut to perform the math. The *= operator tells ActionScript to take the current value of the variable on the left side of the operator and multiply it by the variable on the right. In other words, photoWidth *= xScale is the same as photoWidth = photoWidth * xScale. You can use this shortcut operator with any of the basic mathematical operators, as in +=, –=, and /=.
Sometimes, you will need to create a custom class that will derive some or all of its properties and methods from another class. The example in this section creates a thumbnail class to display photos. The basic properties of the thumbnail are the same as those of the photo: the name, file location, and so on. In fact, the only difference between the thumbnail and the photo is its size. Therefore, rather than re-create all the details contained in the Picture class, you can instead create a subclass. This way, Thumbnails can inherit the properties of Picture but also have its own properties, such as its smaller size.
Chapter 8 presents another example of this process. In that case, you will learn how to create visual elements on the Stage through code by creating a subclass of MovieClip.
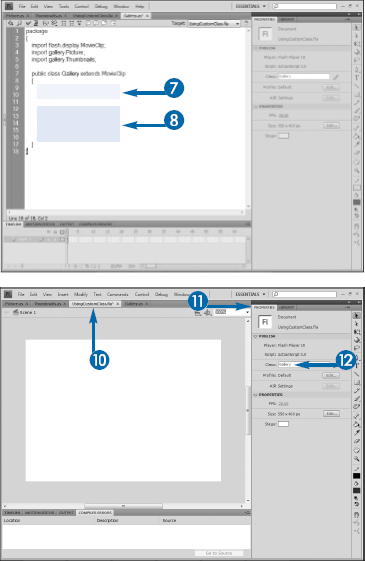
Creating a subclass is known as extending a class; you are taking a current class and extending it into a new class. The class being extended is known as a superclass.
When you create a subclass, you need to import the superclass by providing its fully qualified name — that is, its name and package. You then add the keyword extends and the superclass name to the signature line of the subclass. Properties and methods of the superclass are available to the subclass via the super() method. If you are extending one of the built-in ActionScript classes, you can look up its fully qualified name either in the Flash help file or in the official ActionScript documentation online.
Note
See the section "Create a New ActionScript File" for details.


Note
See the section "Define Properties of the Class" for details.
Note
See the section "Define a Method" for details.

The Save As dialog box opens.


In this example, the
Pictureclass is extended by the newThumbnailsclass.
Although it will make sense most of the time to place a subclass in the same package as its superclass, this is not required. Because the superclass is explicitly imported into the subclass and you must provide a fully qualified name for the superclass, the two can be in completely different packages if you prefer.
Any class, including those built into ActionScript, can be extended. In fact, when you create a symbol on the Stage, you are actually extending the MovieClip or SimpleButton class. While for convenience, we refer to symbols as "MovieClips" or "Buttons," they are actually their own classes, subclasses of the MovieClip or SimpleButton class.
After you have finished writing the code for your custom class, you can use it in your movie. There are several approaches to implementing custom classes. You can redefine the movie itself to be an instance of your class, which is covered in the next section, "Define a Document Class." You can also create an instance of the class in your ActionScript code by importing it and then calling its constructor with the new keyword:
import pictures.Picture;
var myPicture:Picture = new Picture();
This code creates an instance of Picture called myPicture. It assumes that the constructor of the class does not take arguments; if it did, you would need to provide those arguments inside the parentheses.
After the class has been instantiated, you can read or set values of its properties or call its methods using dot notation, such as myPicture.photoWidth = 300 or myPicture.scalePhoto(2,2). Keep in mind that only public properties and methods can be called this way. If you attempt to read or write a private property or to call a private method, you will get an error.
You must import your custom class, using its fully qualified name, including its package, in order to instantiate it in your code.
Note
See Chapter 1 for details on opening and creating movies.
You can also press F9.


The movie opens in Flash Player. In this example, the movie is blank; you are testing it to be sure that no errors occur when you run it. If any errors occur, return to your code to fix them.
You can create as many instances of a class as you need by simply using the new keyword to call its constructor repeatedly. You need to import the class only once, regardless of how many instances you create:
import photos.Photo;
var myPhoto1:Photo = new Photo();
var myPhoto2:Photo = new Photo();
var myPhoto3:Photo = new Photo();
Each instance could then be dealt with independently:
myPhoto1.photoName = "My first photo";
myPhoto2.photoName = "My second photo";
myPhoto3.photoName = "My third photo";
By default, Flash movies are instances of the Timeline class, which is in turn a subclass of MovieClip. This is why you can do most of the things to the Timeline that you can do to a MovieClip; however, as with all subclasses, Timeline does have a few differences.
There may be times when it will be more efficient to base your movie off of another class instead. This new custom class for the movie is called a document class. For example, you may create a custom class that automatically instantiates a certain number of child classes. In the case of a photo gallery application, you could have a document class that imported the Picture and Thumbnails classes and generated a certain number of instances of each, which would save you from having to do that yourself in the movie.
If you want the movie to continue to act as a regular movie — if you are creating a document class to add functionality, rather than remove it — then you need to be sure that the document class extends the MovieClip class. See the section "Extend a Class" earlier in this chapter for details. If you base your document on a class that does not extend MovieClip, you will lose the Timeline and the ability to animate within your project, and you may encounter other errors as you move through your project, so you should do this only after carefully testing the implications.
Note
See the section "Create a New ActionScript File" for details.
Note
In this example, the class will be placed in the main document folder, so there is no package name.
Note
See the section "Define Properties of the Class" for details.
Note
See the section "Define a Method" for details.
The Properties panel opens.
The document class is applied to the movie.
In the example in the steps in this section, the document class will require three imported classes: the MovieClip that it is extending and the custom Picture and Thumbnails classes, instances of which will be created by the constructor. Note that each of these classes must be imported to be used: Picture and Thumbnails from the gallery package and MovieClip from its package in flash.display.
Although you will know the locations of your custom classes, finding the package that contains any of the built-in classes can be more challenging. The easiest way to find these packages is to simply use a search engine such as Google. If you search for "ActionScript 3 MovieClip" using Google, the first or second link of the results will likely be to the official Adobe documentation for the class, which will list the package. In fact, the package will likely be visible in the description on the search engine's page, so you may not even have to click the link to get the information that you need.
Experienced programmers with backgrounds in object-oriented languages such as Java have long practiced a technique whereby they declare all properties of a class as private and then use a special set of functions to either get the value of the property or set it. These getters and setters allow the developers to change the name of the property without having to worry about changing all references to it throughout their code: The property's name will be referenced only by the appropriate getter and setter within the class. Therefore, code that uses this technique tends to be easier to maintain.
To use this technique, you simply need to change the access modifier on each property from public to private. Then, to allow the value of the property to be set, you can write a method for the property, called setProperty, where Property is the name of the property to be set. The method will take as an argument the value to be set to the property and will return an instance of the property with the correct data type. A getter works the same way: Create a method called getProperty, which returns an instance of the property.
For example, a method to set a fileName property might look like this:
public function setFileName(fileName:String):
String
{     this.fileName = fileName;}
Note here that although the properties are set to private, the methods must be set to public, as they will be called from outside of the class.
Note
See the sections "Create a Custom Class Skeleton" and "Define Properties of the Class" for details.

The file is saved and now uses getters and setters.

To use getters and setters, you will simply call the appropriate method instead of the property. In the example of the Picture class used in the example shown here, the photoName property was before set using
myPhoto1.photoName = "My first photo"
Now, you would call the setter:
myPhoto1.setPhotoName("My first photo");.The photoName property would be retrieved using the same logic, so to create a local variable in the movie equal to the name, instead of this:
private var firstPhotoName = myPhoto1.photoName;
You would now type
var firstPhotoName = myPhoto1.getPhotoName():
Occasionally, you may need to create a property within your custom class that can be called without specifically creating an instance of the method. These are properties that will not change or be affected by individual instances, and they are known as static properties.
For example, in a photo gallery application, you may have a standard copyright notice that you want to append to every photo. If you assume for the sake of the example that each photo will have the exact same copyright message, it would make sense to set the text as a static property of the class. You set a static property by adding the static keyword in the property's definition:
public static var copyright:String = "Photo
 copyright Brady Studios.";
You can then use the property by directly calling the class, instead of an instance. Using this example, if this is defined in a class called Photo, you could display the copyright notice in a text field named txtCopyright by simply typing
txtCopyright.text = Photo.copyright;
Text fields are discussed in more detail in Chapter 9.
Note
See the section "Create a Custom Class Skeleton" for details.


The class file is saved, and the static property is added to the class.
By definition, static properties are those that do not change from one instance to the next. Taking the example shown here, if each photo needed a separate copyright notice, then you would need to add the notice as a regular property of the class and if needed, create a getter and setter for it.
You can also create static methods. As with static properties, you simply add the static keyword to the function definition:
public static function getCompanyName():String
Static functions and methods are designed to be directly called outside of the class itself, so they will always have their access modifier set to public.