
Although you can import a variety of formats of images and sound files into your Flash projects, only one format is supported for video: Flash Video. In order to work in video in Flash, you need to convert it from whichever format it was created in to the Flash Video format. Flash Video files provide a small file size while maintaining quality. Flash Video is commonly referred to as FLV, after the file extension used with converted movies.
When you install Flash CS4 Professional, the Adobe Media Encoder is automatically installed as well. You need to use the Adobe Media Encoder in order to convert video from its original source format to FLV. You can access it either from the first screen of the Import Video dialog box or directly from the operating system through the Start menu or the Dock.
The Media Encoder allows you to select a source video file. Almost every widely supported video format, including AVI, MOV, and MPEG, are supported by the encoder. You can either choose to encode it as FLV, to use in Flash movies; the new F4V format, which offers higher-quality conversion than FLV; or the H.264 format for use on the Apple iPhone. You can select from a list of presets for the size and quality of the movie and select a path to which the resulting file is saved. The Media Encoder also supports batch converting, so if you have multiple videos to convert, you can add them all to the encoder and then leave it to run by itself. Encoding can be a very slow process.


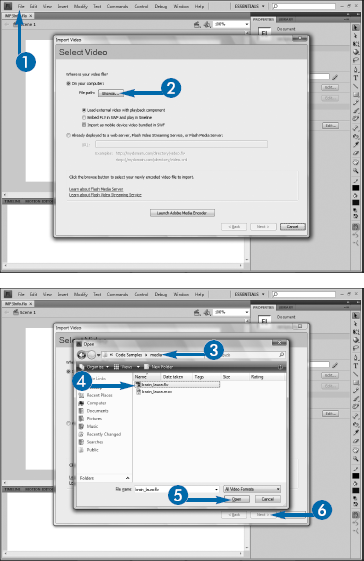
The Import Video dialog box appears.
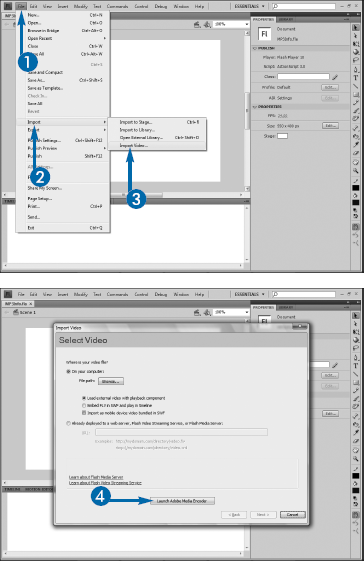

The Adobe Media Encoder launches.

The Open dialog box appears.


The video is converted to FLV format.
You can also convert videos to the Flash Video format directly from within Adobe's video suite of products. These include Adobe Premiere Pro CS4, a professional-level video editing application and Adobe After Effects CS4, a powerful animation tool used by most professional producers to create title sequences, work with blue- and green-screen effects, and much more. These two products, along with Adobe Encore CS4 for burning DVD and Blu-ray discs, Adobe Soundbooth CS4 for audio editing, and Adobe OnLocation CS4 for recording live video, can be purchased as part of the Adobe Creative Suite 4 Production Premium suite. The suite also includes Flash, Photoshop CS4, and Illustrator CS4.
The Flash Video format is a noneditable format, much like SWF. All the editing that you need to do with your video must be done in a video editing tool such as Adobe Premiere Pro or Final Cut Pro. The techniques involved in effectively shooting and editing video are beyond the scope of this book.
The simplest method of inserting Flash Video into a Flash movie is to use the FLVPlayback component. Components are special MovieClips that are included with Flash and contain prebuilt functionality. The FLV component greatly simplifies the process of inserting Flash Video into a movie. It relies on ActionScript, but all the coding and implementation are hidden from view.
You need to convert your video to the FLV format before you can use the component. See the previous section, "Convert Video to Flash Video," for details on how to convert to FLV.
Flash includes a wizard that steps you through the process of loading the FLV into the component. The wizard provides a simple, three-step process for conversion. You can select a video on your hard drive and configure the look and feel of the control buttons. After you complete the wizard, Flash places an instance of the playback component on the Stage. The FLVPlayback component includes all the visual elements and code necessary to control the video. You can then simply save the file, upload both it and the FLV file to your Web server, and enjoy the video.
You can select the instance of the component on the Stage and use the Component Inspector panel to alter its settings if you want to. A few of the available settings include the skin, or playback controls, and whether the video plays automatically. You can open the Component Inspector from the Window menu.

You can also add video to your movie without using the Import Video Wizard, as long as the video has already been converted to FLV. You can click Window
There is no particular advantage or disadvantage to inserting the video via the wizard or doing it yourself by dragging the component to the Stage and configuring it manually. The end result is the same either way.
Instead of creating the FLVPlayback component visually on the Stage and using the Import Video Wizard and Component Inspector panels to configure its settings, you can instantiate it through code. This provides additional flexibility not offered when using the component visually.
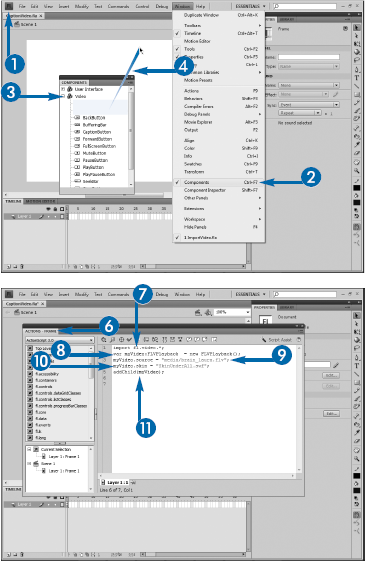
Before you can use the component in code, you still must place an instance of it in your library. You can do this by dragging the FLVPlayback component either to the Stage or directly to the library. If you drag it to the Stage, you will want to remove the instance before proceeding.
In your code, you will need to import the classes from the fl.video package, using the * wildcard. Then you can create an instance of the FLVPlayback class, set its source property to the path to the FLV file, and finally, use the addChild() method to add it to the Stage.
If you do not add a skin to your component, it will play but only once, not providing your users with any method by which they can rewind the video or play it again. You can add a skin to your video by setting the FLVPlayback instance's skin property to the name of one of the prebuilt skins that come with Flash. You can browse through the available skins using the Component Inspector. You can also modify the skinBackgroundColor and skinBackgroundAlpha properties to change the appearance of the skin to better match your Web site. The skinBackgroundColor property takes any valid hexadecimal color, and the skinBackgroundAlpha property takes a number between 0 for transparent and 1 for opaque.


You need to be aware that your FLV file remains independent of your SWF at all times. This allows you to have even long videos in your Flash movies without the corresponding dramatic file size increase. However, you also will need to be aware that as a separate file, you need to be sure that you place the FLV in a folder that can be referenced from the SWF; generally, it is a good idea to either place the FLV directly in the same folder as the SWF or in a subfolder under the SWF's. In addition, you need to be sure that you remember to upload the FLV to your Web server.
Your Web server may need to be configured in order to play back FLVs. If you use a third-party, commercial Web host, you will need to check to be sure that its servers support Flash Video.
Just as you could in Flash Player 9, in Flash Player 10, you can add controls to your video to allow your user to expand and play the video full screen. Flash Player 9 and later supports true full screen; that is, the video will expand to completely fill the screen and not be limited by the browser window or other elements onscreen.
You should keep in mind that all video are rasters; that is, they are pixel-based and resolution dependent. Although you can in theory expand any video to full screen, smaller videos will be pixilated, possibly to the point of being unwatchable. You also want to make sure that when you encode the video in the Adobe Media Encoder that you select the option to deinterlace. This allows the two fields used to create digital video to be properly converted into the Flash Video frames. Turning this option on will greatly reduce the jagged lines that can appear around the edges of objects in your video.
In order to provide for full-screen viewing, you need to use one of the skins that contains either "Full Screen" or "All" as part of its name. These skins provide the user with a button to expand Flash Player to full-screen mode. Finally, you need to add the allowFullScreen parameter to the HTML tags that are responsible for inserting the video into the page. The simplest way to do this if you are unfamiliar with HTML is to select the Flash Only – Allow Full Screen template in the Publish Settings dialog box.

Note
See either the section "Using the FLVPlayback Component Visually" or "Using the FLVPlayback Component in Code" for details.
Note
Be sure to select or set a skin that contains either "Full Screen" or "All" as part of its name.
The Publish Settings dialog box appears.

The default Web browser opens and displays the page.

The video expands and plays full screen.
If you want to use your own HTML page, you need to slightly modify the HTML <object> tag's parameters to allow for full-screen display. The <object> tag contains a set of parameters that control the playback of the SWF. To allow full screen, you need to add an additional <param> tag somewhere within the <object> tag:
<param name="allowFullScreen" value="true" />
If you use Adobe Dreamweaver CS4 to create your Web pages, you can simply insert the SWF from the Insert panel, then switch to Code view, and add the necessary <param> tag. You can follow a similar process if you use another editor for creating your pages.
You must always take into account the reality that many of your users will be unable to hear the audio track of your video. Although the most obvious cause of this is a user with a hearing impairment, the disabled are not the only ones who may not be able to hear your video's audio. Many users whose hearing is perfectly fine may be in an environment where they either do not have speakers attached to their computers or their speakers are turned off. You can provide an alternative means for all of these users — disabled or not — to still benefit from the information in your video by adding closed captioning.
Before you can add captions to your video, you need to create the captions themselves. Flash Video supports an XML standard created by the World Wide Web Consortium known as the timed text (TT) format or, more formally, the distribution format exchange profile, or DFXP.
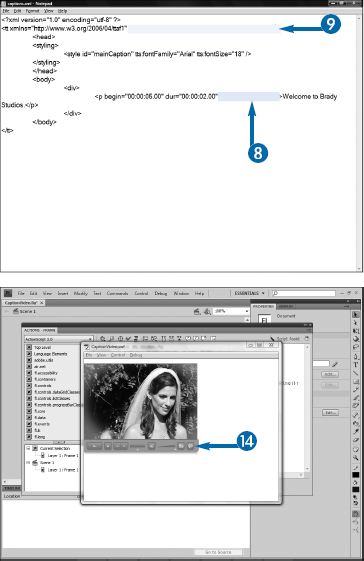
The TT document is simply an XML file. XML is a format similar to HTML that allows you to define data. The TT document actually looks very much like an HTML page. It has both a head and a body, and the body, where the captions are actually defined, is made up of div and p tags. However, the p tags, each of which represents a specific caption, will contain a begin attribute with a time code to note when the caption appears and usually either a dur attribute for the caption's duration or an end attribute for the time code for the caption to disappear. Both the dur and end attributes are optional; if omitted, the caption will vanish as soon as the next caption needs to appear.
Note
This example shows using Notepad, but any simple text editor will work. HTML editors such as Dreamweaver or dedicated XML editors will work as well.

You can add as many captions as you need using the same format as in step 8.


Note
Be sure to give it an .xml extension.
The first line of the code in this section simply declares the document as being XML. The second is the opening tag of the document, similar to the <html> tag. The xmlns attribute defines the namespace for the tags; in essence, it provides a reference to the document, in this case one on the servers for the W3C, that defines the TT format. More details on XML can be found in Chapter 17 and in XML: Your visual blueprint for building expert Web sites with XML, CSS, XHTML, and XSLT, published by Wiley.
The time codes are given in full clock format, which is "HH:MM:SS.m", where m is milliseconds. You can also use partial clock format, "MM:SS.m", or offset time, where "1s" is one second. Full clock format will be used throughout this text for clarity.
Video editing tools such as Adobe Premiere Pro and many audio editing tools such as Adobe Soundbooth will allow you to "scrub" through video to find the precise times at which text is being spoken to help synchronize your captions.
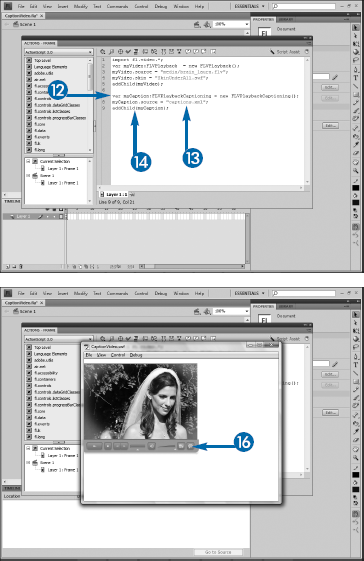
After you have created your TT document, you need to add the captions to your Flash Video file. The FLVPlayback component contains a built-in text field for captions, but it cannot interface with the TT document directly. Rather, you need an instance of the FLVPlaybackCaptioning component. This is a nonvisual component and is responsible for reading the TT document and passing the text into the FLVPlayback's text field at the appropriate time.
Like the FLVPlayback component, the FLVPlaybackCaptioning component can be added to the Stage either visually, by dragging an instance of it from the Components panel, or through code, although as before the component must exist in the movie's library before it can be added in code. Also note that even though the component will not be visible, you must still call the addChild() method to add it to the movie if using the code-based approach.
Once added, you can simply set the captioning component's source to the path to the TT document. As long as you have only a single instance of the FLVPlayback component on the Stage, the captioning component will automatically associate itself with the playback component.
The playback component has a showCaption property that allows you to turn the captions on or off when the movie first loads; the default is for captions to be off. Unless you set this to on, you need to be sure that the playback component is using a skin that either contains "Caption" or "All." Otherwise, the user will be unable to turn captions on and view them.
In the United States, Section 508 of the Rehabilitation Act of 1973 provides that any agency of the U.S. government must make content provided on Web sites accessible to people with disabilities. Many state and local governments in the United States have similar policies, and many other governments around the world have adopted statutes requiring accessible content. In addition, several lawsuits against private corporations have been filed and in some cases won to force them to provide for accessibility. Captioning is the primary method by which video content can be made accessible, so it is a good idea to always provide it.
Adobe Soundbooth CS4, which is included with Flash in both the Production Premium and Web Premium suites, has an audio transcription feature that will "listen" to audio files and provide a text transcription. Unfortunately, this transcription is not automatically formatted using the TT standard, but it can at least save you from having to type in the text manually, as you can copy and paste it from Soundbooth.
The default appearance of captions is similar to what you see on TV: a black bar along the bottom of the screen with white text. Although this might work in certain situations, at other times you may like to have control over the appearance of the captions.
You can change many properties of the captions by using a slightly modified version of cascading style sheets within the TT document that contains your captions. Within the head of the document, you can add a pair of styling tags. Inside the tag, you can add one or more style tags. Each style tag must contain a unique ID. You can then set the appearance of the captions using a series of additional attributes. All attributes will begin with a tts prefix, followed by a colon and the name of the style. The style names have adopted standard CSS names, with the exception that multiword names in CSS use hyphens, and the tts standard combines the words into a single word using camel case. Therefore, the CSS color property can be set with tts:color, and the CSS background-color becomes tts:backgroundColor.
You can apply the styles to selected captions by referencing the style's unique ID in the style attribute of the caption's p tag. You can also add a <span> around selected words and apply the style there.
You will need to add an additional attribute to the opening tt tag in your caption document to establish the tts namespace. This attribute will always read xmlns:tts="http://www.w3.org/2006/04/ttaf1#styling".
Flash supports only a subset of the tts standard. You can view a list of the attributes that are and are not supported online at http://help.adobe.com/en_US/ActionScript/3.0_UsingComponentsAS3/WS5b3ccc516d4fbf351e63e3d118a9c65b32-7ee5.html.

You can add as many style tags and attributes as needed using the same format as in steps 3 to 6.

The movie plays. The video begins.

Closed captions appear, showing the styles.
You can apply multiple styles to the same text by grouping them. For example, if you wanted captions to be a consistent color and size but use different alignment, you could create a style for the first two attributes:
<style id="colorAndSize" tts:color="#FF9900" tts:fontSize="18" />
Then create separate styles for the alignment:
<style id="alignLeft" tts:textAlign="left" />
<style id="alignCenter" tts:textAlign="center" />
Finally, create two styles for the combinations that you want:
<style id="leftCaption" style="colorAndSize alignLeft" />
<style id="centerCaption" style="colorAndSize alignCenter" />
You could then apply "leftCaption" to one set of captions and "centerCaption" to the other. All captions would be 18 pixels and orange, but one group would be left-aligned and the other centered.