
You can use shapes to create drawings, buttons, and other graphic objects in Flash. Flash includes a wide variety of drawing tools, including a pencil, pen, and line tool to draw lines or, as they are called in Flash, strokes, and a brush tool to draw fills, or colored areas between strokes. For more uniform shapes, such as circles, ovals, squares, rectangles, and polygons, you can use the shape tools.
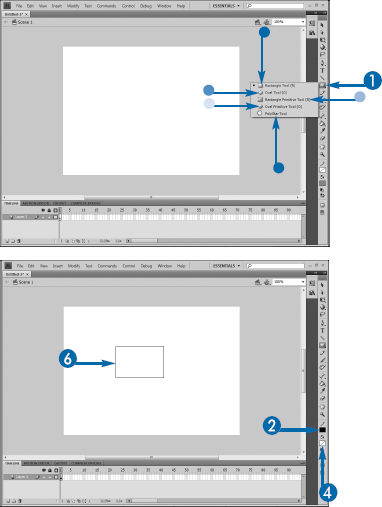
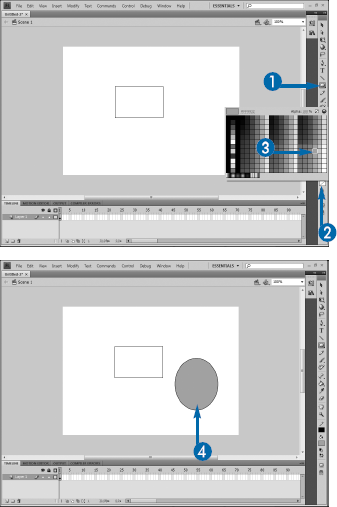
Flash offers five different shape tools: Rectangle, Oval, Rectangle Primitive, Oval Primitive, and PolyStar, all of which share space on the Tools panel. The Rectangle tool can create square or rectangular shapes, and the Oval tool can create oval or circular shapes.
Objects that you draw with the Oval, Rectangle, and PolyStar tools consist of a stroke and a fill. Flash contains two drawing models. When you use the Merge Drawing model, the stroke and fill are separate objects, so if you move the stroke, for example, the fill remains in place on the Stage. Also, objects drawn on the same layer will interact with one another; if you move a shape on top of another shape and then move it away, the shape you are moving will cut itself out of the shape you moved it over. In the Object Drawing model, shapes are automatically grouped, so the fill and stroke will act as a single shape, and multiple shapes on the same layer will not interact.
You can use the PolyStar tool to draw multisided shapes (polygons) or stars. With any shape tool you select, the Property Inspector displays related options for fine-tuning the shape, such as controlling the corner radius and line style.


Note
Flash always displays the button for the last shape tool you used.


Note
To draw a perfect circle or square, press and hold Shift as you draw the shape.
Flash creates the shape.
You can use the Rectangle Settings or Oval Settings dialog box to create rectangles and ovals of a preset size. In the Rectangle Settings dialog box, you can also specify a corner radius to draw rectangles with rounded corners. To open the Rectangle or Oval Settings dialog box, click the Rectangle or Oval tool and then press Alt + click (or press Option + click) the Stage. The Settings dialog box appears. Type the width, height, and, if applicable, the radius. When you click OK, Flash places the oval or rectangle at the location you clicked on the Stage.
The Rectangle Primitive tool draws a rectangle with small dots in the corners. Using the Selection tool, you can drag any of these dots to create a rectangle with rounded corners. The Oval Primitive tool creates an oval with similar dots; dragging them allows you to create an oval with a missing section, something that will sort of resemble the classic arcade game character Pac-Man.
You can get much more detailed information on using the drawing tools in Flash in the book Master VISUALLY Dreamweaver CS4 and Flash CS4 Professional, published by Wiley.
In Flash, a symbol is a reusable element that you can store in the Flash library. You can repeatedly reuse a symbol throughout your movie by inserting an instance of the symbol in the frame in which you want it to appear. An instance is simply a copy of the original symbol. Drawings you create using the tools in Flash, text, and imported graphics can all be converted to a symbol.
The primary purpose of using symbols in Flash is animation, but you also need symbols if you want to control objects on the Stage through ActionScript: You must convert shapes and imported objects to symbols if you want them to be seen or controlled through ActionScript.
Animating objects through ActionScript is covered in Chapter 13. Animating through traditional techniques such as tweening is beyond the scope of this book.
Every file that you create in Flash has a library that stores elements you want to reuse in your project. You can manage these elements from the Library panel by organizing them into related folders, much like organizing files on the hard drive of your computer.
You can open, close, expand, and collapse the Library panel as you work with various symbols and instances in your document. The Library panel lists the symbols alphabetically. You can drag symbols from the panel and drop them onto the Stage to use in a frame. You can also add and delete symbols as needed.
All instances of a symbol are copies of the object in the library. Each instance is linked back to the original, so any changes made to the original are applied to all instances. There are certain edits that can be made to individual instances, such as their position on the Stage, their scale, and their rotation. However, more complex edits, such as changing the shapes that make up the symbol, must be made to the actual symbol.
You can either edit symbols in place, where you still have a visual reference to other objects on the Stage, or you can edit them individually on their own Stage.
You can reuse symbols to create animation in your Flash movies. Every time you reuse a symbol, you must specify how you want the symbol to behave. Flash classifies symbols into three types: graphics, buttons, or MovieClips.
You can create graphic symbols using the Flash drawing tools or by importing graphics from other programs to use in Flash. You can make graphic symbols as simple as a basic shape or as complex as a highly detailed drawing. You can also turn text into graphic symbols that you can manipulate and animate in your movies.
Graphic symbols have their own Timeline that closely resembles the Timeline of the main movie. However, the graphic symbol's Timeline is synchronized with the movie's Timeline, so while a graphic symbol can contain its own animation, that animation cannot play independently of the movie.
Most importantly, graphic symbols cannot be given instance names and thus cannot be controlled through ActionScript. You can use graphic symbols inside other symbols as visual building blocks, but you cannot rely on them as your primary type of symbol if you plan to use ActionScript.
You can add interactivity to your movie through buttons. Like graphic symbols, buttons have their own Timeline. However, the button's Timeline is very different from that of the movie and the other symbol types, as it contains only four special frames, which enable you to create effects when the user mouses over the button or clicks it.
You can create a button by drawing shapes on the Stage or importing graphics and then converting them to a symbol, or you can draw shapes or import graphics directly into the button. You can also use other symbols, such as graphics or MovieClips, within buttons.
Buttons are one of the two types of symbols you can control through ActionScript. To work with buttons, you need to add an event listener to the button and then write an event handler to describe what should happen when the button is clicked. Events are covered in Chapter 7.
By far the most powerful symbol type is the MovieClip. Like graphic symbols, MovieClips have their own Timeline, which looks like the main movie's Timeline. However, unlike graphics, the Timeline of a MovieClip is independent of the main movie's Timeline; a MovieClip can also contain its own animation that is independent of the main movie's animation.
MovieClips can be created by converting existing drawings or imported graphics to a symbol or by drawing or importing graphics directly onto the MovieClip's Timeline. You can also use graphic symbols, buttons, or other MovieClips within a MovieClip. MovieClips can also be created through ActionScript code.
MovieClips are controlled through ActionScript. In fact, the majority of the symbols that you use in a script-driven movie will be MovieClips. You can even create MovieClips directly in code, without drawing anything on the Stage. The rest of this chapter, and most of the following chapters, will deal with working with MovieClips.
Most of the elements that you plan to use in your movies will be symbols. Most of the symbols you create in a movie in which you will rely on scripting will be MovieClips, but you can also use Buttons to provide clickable objects for your user.
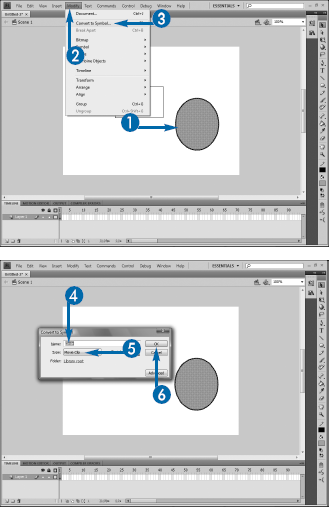
You can convert existing objects on your Stage to a symbol by following the steps below or by using the keyboard shortcut F8. Any items on the Stage can be converted to a symbol. You can nest symbols within symbols, so you can for example use a button within a MovieClip or a MovieClip within another MovieClip.
When you convert an item, a dialog box appears that enables you to name the symbol, select the symbol type, and set the registration point. The registration point is a reference marker on the symbol. It is used for setting the location of the symbol on the Stage and is the point from which references to the size and location of the symbol will be relative when changing those properties in script.
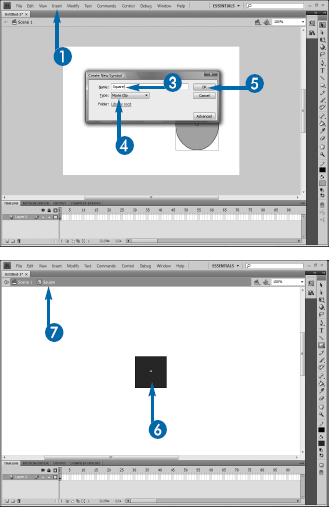
You can also create an empty symbol. When you do this, Flash opens the symbol in its editing mode, with a new, blank copy of the Stage and the symbol's Timeline visible. The crosshair marker in the center of the symbol's Stage represents its registration point. You can use Flash's drawing tools, import graphics, or insert other symbols onto the symbol's Stage.
Every symbol contains its own Timeline. The Timeline of a MovieClip looks exactly like the Timeline of the movie, while buttons have a special Timeline that contains only four frames. All symbols can be made of multiple layers.

Note
See "Draw Shapes in Flash" for information on the drawing tools.
The Convert to Symbol dialog box appears.
The object is converted to a symbol.
When you create a symbol, it is stored in the library. You can access the Library panel by clicking Window
There are no specific rules for naming symbols; however, Flash developers have established a set of best practices, or guidelines, for symbol names. First and foremost, the symbol name should be descriptive of its purpose. You should be able to glance at the library and, from the name alone, be able to determine how and why you would use the symbol. Second, the symbol name should begin with a capital letter. This is due to how symbols are treated in ActionScript; see Chapter 6 for more information. Third, most Flash designers and developers prefer to not use spaces in their symbol names.
When you create a symbol, you are actually creating a custom class within the ActionScript code underlying your movie. In object-oriented programming, you need to create an instance of a class in order to use it. See Chapter 2 for more details on object-oriented programming terminology and concepts.
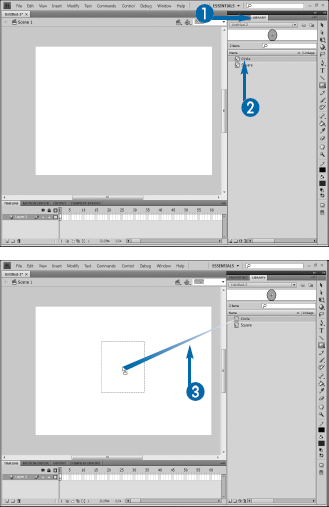
You can create an instance of a symbol by simply dragging it from the Library panel to the Stage. You can have as many instances of a single symbol as you want at any given time in your movie. In order for ActionScript to be able to reference these instances, however, you must provide them with an instance name. This name in essence becomes a variable name by which you can reference the instance of the symbol in your code. Each instance must have a unique name.
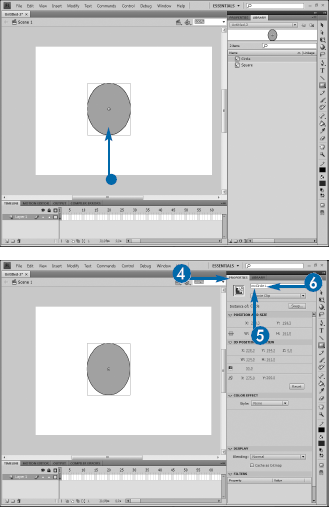
You can type the name of the instance into the Properties panel. The instance name should follow the guidelines outlined in Chapter 2 for naming variables: They need to begin with a letter, and contain only letters, numbers, and underscores. Your instance names need to follow your variable casing scheme; most developers prefer camel casing.
Instance names for MovieClips can be constructed by starting with an mc prefix, then adding the name of the symbol itself, and then an identifying number. In other words, instances of a Box symbol might be called mcBox1 and mcBox2. Buttons are usually named with a btn prefix, followed by a descriptive name based on the button's purpose in the movie, such as btnHomePage.
The library opens.
The Properties panel opens.
The instance name is assigned.
You can break the link between an instance and a symbol by selecting the instance and clicking Modify
If you want to exchange an instance of a symbol with an instance of a different symbol, you can select the instance of one symbol, click the Swap button in the Property Inspector to open the Swap Symbol dialog box, select the other symbol, and then click OK.
Remember that ActionScript is completely case sensitive. Always pay attention to the case you use in your instance names and always be consistent throughout your movie.
A symbol is a class in ActionScript. Like any other class, it has a series of properties that define it. Some properties of the symbol are static and cannot be changed for individual instances, whereas others can. You can set most of these properties of symbol instances visually using the Properties panel in Flash. By default, the panel appears on the right side of the screen in the Flash window. You must select an instance by clicking it with the Selection tool before you can set its properties. The selection tool is the black arrow at the top of the Tools panel.
Most of the settings on the panel can be adjusted by "scrubbing" their values, or dragging over them with the mouse button held down. Dragging to the left decreases the value, and dragging to the right increases it. You can also click directly on the current value, which will make it an editable text box so that you can type values in directly.
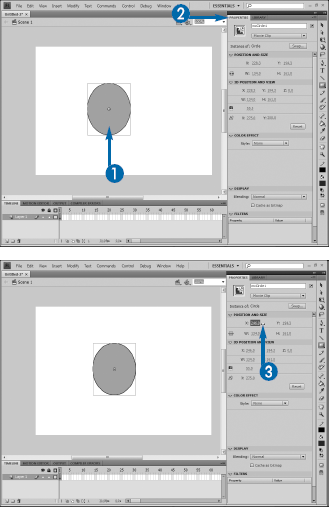
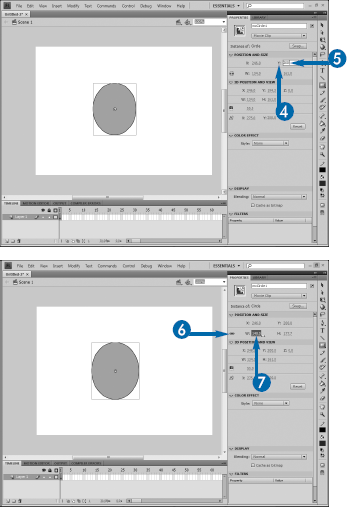
The Properties panel is divided into four sections. The first allows you to set the x and y coordinates, which determine the location of the symbol on the Stage. The top-left corner of the Stage is the zero point for both. You can also adjust the width and height of an instance; an icon to the left of the width setting allows you to adjust either relative to the other to maintain the symbol's original proportions.
You can adjust the colors using the settings in the Color Effect section and blend the instance with its background using the Display section. Filters enable you to apply effects such as drop shadows, bevels, or glows.
Note
See the preceding section, "Insert and Name an Instance," for details.
The Properties panel opens.
The instance moves to a new location on the stage.
The instance moves to a new location on the stage.

The width changes, and the height adjusts accordingly.
In the Color Effect section of the Properties panel, you can choose to change the color of the instance in one of four ways. First, you can change the brightness, which allows you to make the entire shape of the instance either lighter or darker. Second, you can apply a new tint, in which you will select a new color that will be mixed, based on a percentage you select, with the original colors. Third, you can change the alpha of the instance, which is its transparency: 0% is completely transparent, whereas 100% is completely opaque. Fourth, you can choose to apply an advanced effect, which is simply a method that combines the ability to set the tint and the alpha together. You must make these changes as a whole on the symbol; you cannot apply them to an individual portion of the symbol without editing the symbol itself.
The x and y coordinates of an instance refer to the registration point of the instance. This point is established when you create the symbol.
In addition to setting properties using the Properties panel, you can set them in code through ActionScript. You can change any of the properties that are available through the panel, plus many more. Some properties, such as x, y, width, and height require only a single line each to change; others, such as colors, require much more code. Setting the color of a shape in code is discussed in Chapter 19.
In order to set the properties of an instance in code, you must have given it an instance name. See the earlier section "Insert and Name an Instance" for details on how to do this.
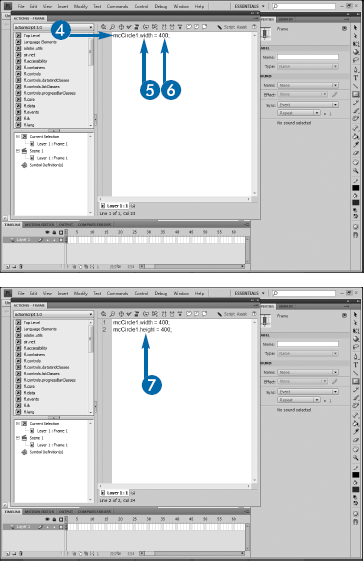
In the Actions panel, you can type the name of the instance, a dot, and the name of the property that you want to set. Then, type an equals sign and the new value. For example, you can set the x and y locations of an instance of a MovieClip named mcBox1 like this:
mcBox1.x = 15;
mcBox1.y = 30;
As you set properties, you will need to be sure that the value you provide is the correct data type for that property. Properties such as x, y, width, and height logically take numbers, whereas others may take strings or, at times, even other object references or constants. If you are unsure about the allowed values for a property, you can easily find them by looking the property up either in the Flash help file or in Adobe's online ActionScript documentation at http://livedocs.adobe.com/flash/9.0/ActionScriptLangRefV3.
Note
See the section "Insert and Name an Instance" for details.

The new properties are set on the instance.
You cannot see the properties applied through ActionScript until you actually play the movie. The Stage within Flash will continue to show the instance with only those properties that are set on the Properties panel. This is because ActionScript executes only at runtime, and it plays within Flash Player, not the Flash-authoring tool.
Oddly, although the settings for the Alpha value on the Properties panel scale from 0% to 100%, in ActionScript the values range from 0 to 1. Therefore, if you want to make an instance semitransparent in script, you would apply a value of, say, .5, whereas in the panel, you would set it to 50%. This is the only case where the panel uses a different set of values from the script.