Chapter 6: Managing Active Directory Users
Users and groups are, undeniably, the bread and butter of Active Directory (AD). When there is something wrong, missing, or absent in these two object types, service desk personnel will be the first to know because colleagues will ring the number for help. On the other hand, when an error is in a colleague's personal interest, due to lingering privileges or absent identity and access management (IAM) processes, don't expect a call.
It's imperative to get users right. It is estimated that 20% of all information technology (IT) costs in typical organizations are related to password resets and account lockouts. As colleagues use their accounts for authentication, any hiccup will inevitably result in a loss of productivity.
A best practice is to cooperate with the Human Resources (HR) department for user creation and user expiration. HR people know when a contract is (to be) terminated, which can help in setting up account expiration. They also know when a person is on maternity leave or taking a sabbatical. We wouldn't want to automatically delete the accounts of these people based on their apparent inactivity, right?
It's also important to get group memberships right. In most organizations, groups govern access to applications and roles and/or privileges within applications. Colleagues without the right privileges might not be productive. Colleagues with too many privileges might inadvertently cause the application to be unavailable, delete data, or have access to data they shouldn't have access to. These confidentiality, integrity, and availability issues can easily be avoided by revoking access through regular access review processes by application owners.
The following recipes are covered in this chapter:
- Creating a user
- Deleting a user
- Modifying several users at once
- Moving a user
- Renaming a user
- Enabling and disabling a user
- Finding locked-out users
- Unlocking a user
- Managing userAccountControl
- Using account expiration
Let's jump into the recipes. Many recipes offer a couple of ways to achieve the same goal. While using Active Directory Users and Computers (dsa.msc) is still commonplace, some administrators have discovered the benefits of using the Active Directory Administrative Center (dsac.exe) and its Windows PowerShell History Viewer to learn the underlying PowerShell cmdlets of their clicks. PowerShell can then be used to automate everything as efficiently as possible; for complex actions you have to perform three times or more, it's better to automate.
Creating a user
Use this recipe to create a User object.
Getting ready
To create a user object, sign in to a domain controller or a member server and/or device with the Remote Server Administration Tools (RSAT) for Active Directory Domain Services installed.
Sign in with an account that is a member of the Domain Admins group or the Account Operators group or with an account that is delegated to create user objects in the domain or scope of the organizational unit (OU) in which user objects are to be created.
How to do it...
There are four ways to create a user object:
- Using Active Directory Users and Computers
- Using the Active Directory Administrative Center
- Using command-line tools
- Using Windows PowerShell
Using Active Directory Users and Computers
To create a user using Active Directory Users and Computers, follow these steps:
- Press Start.
- Search for Active Directory Users and Computers and select it from the search results or run dsa.msc. The Active Directory Users and Computers window appears.
- In the left navigation pane, navigate to the OU or container in which you want to create a user object.
- Perform one of these actions to open the New Object - User screen:
- From the Taskbar, click the New User icon.
- Right-click an empty space in the main window and select New and then User from the menu.
- Right-click the OU or container in which you want to create a new user and select New and then User from the menu.
- In the New Object - User screen, specify values for the following fields:
- Specify a value for Full name by either typing a full name or by filling the First name and Last name fields.
- Specify a value for User logon name in the top field of the two available fields. This will create a userPrincipalName attribute (a combination of the two top fields) and a sAMAccountName attribute (a combination of the two bottom fields, referred to as the Pre-Windows 2000 user log-on name field in the user interface (UI)).
- Click Next >.
- In the second New Object - User screen, specify a Password value and then confirm it in the second field. Click Next > when done.
- In the third New Object - User screen, click Finish.
Using the Active Directory Administrative Center
To create a user using the Active Directory Administrative Center, follow these steps:
- Press Start.
- Search for Active Directory Administrative Center and select it from the search results or run dsac.exe. The Active Directory Administrative Center window appears.
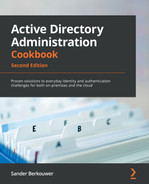
- In the left navigation pane, right-click the domain name and select New and then User from the menu. The Create User window appears:
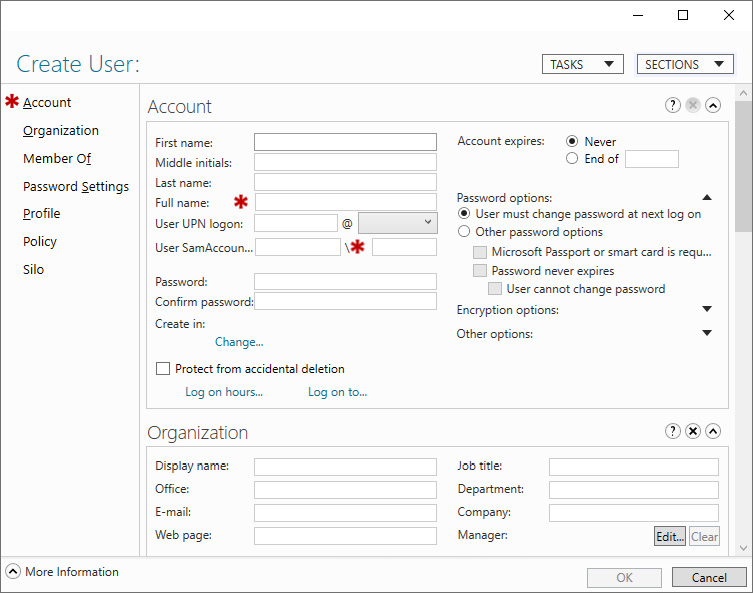
Figure 6.1 – Create User window
- In the Account area, specify values for the following fields:
- Specify a Full name value for the user by either typing a full name or by filling the First name and Last name fields.
- Specify the user's sign-in name in the User UPN logon field. This will create a userPrincipalName attribute (a combination of the two top fields) and a sAMAccountName attribute (a combination of the two bottom fields, referred to as the User SamAccountName logon field in the UI).
- Click OK.
Using command-line tools
Use the following command to create a user object in Active Directory:
dsadd.exe user 'CN=User,CN=Users,DC=LucernPub,DC=com' -upn [email protected] -fn 'User's First Name' -ln 'User's Last Name' -display 'User' -pwd 'PasswordHere'
Replace DC=LucernPub,DC=com to represent your environment. Replace the other fields to represent your user's properties.
Using Windows PowerShell
Use the following line of PowerShell code on a system with the Active Directory module for Windows PowerShell installed:
New-ADUser -Name User -Path 'CN=Users,DC=LucernPub,DC=com' -GivenName 'User's First Name' -Surname 'User's Last Name' -sAMAccountName user
Replace DC=LucernPub,DC=com to represent your environment. Replace the other fields to represent your user's properties.
How it works...
When you create a user object, some fields are automatically populated and many settings are default settings, including the User must change password at next logon setting. These settings are recommended but can be changed after creating a user, either in the UI or through commands.
A descriptive name for every user object is mandatory to ensure the user object can be identified in the graphical interface and in auditing scenarios. Many applications, including Microsoft Exchange Server, use the first, last, and/or full name to create their own default attributes and settings.
When you create a user object, the object consumes a relative identifier (RID) and Distinguished Name Tag (DNT). Pre-Windows 2000 username is usually the username people in the organization use to sign in, but userPrincipalName can also be used in most scenarios. userPrincipalName is used when modern authentication protocols are utilized.
There's more...
All organizations create user accounts differently. Configuration steps may vary and may or may not include profile-, Microsoft Exchange Server-, Terminal Server-, or Microsoft 365-specific steps. When additional steps are required, a work instruction is usually present.
Deleting a user
Use this recipe to delete a previously created user object.
Getting ready
To delete a user account, sign in to a domain controller or a member server and/or device with RSAT for Active Directory Domain Services installed.
Sign in with an account that is a member of the Domain Admins group or the Account Operators group or with an account that is delegated to delete user objects in the domain or scope of the OU where the user account is to be deleted.
How to do it...
There are four ways to delete a user object:
- Using Active Directory Users and Computers
- Using the Active Directory Administrative Center
- Using command-line tools
- Using Windows PowerShell
Using Active Directory Users and Computers
To delete a user using Active Directory Users and Computers, follow these steps:
- Press Start.
- Search for Active Directory Users and Computers and select it from the search results or run dsa.msc. The Active Directory Users and Computers window appears.
- In the View menu, enable Advanced Features.
- In the left navigation pane, select a domain or a specific OU.
- From the Action menu, select Find…. The Find Users, Contacts, and Groups window appears.
- In the Name field, type the name of the user object you intend to delete and press Enter. From the Search results list, select the user object:
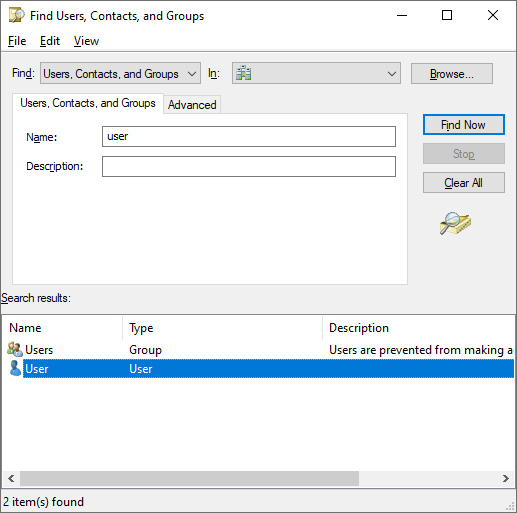
Figure 6.2 – Selecting the user object from the Search results list

Figure 6.3 – Object tab of a user's properties
- Disable the Protect object from accidental deletion option if it is enabled.
- Click OK to close the properties window for the object.
- Right-click the user object again. This time, select Delete from the menu. The Active Directory Domain Services pop-up window appears:
Figure 6.4 – Active Directory Domain Services pop-up window
- Click Yes in the Active Directory Domain Services pop-up window.
Using the Active Directory Administrative Center
To delete a user using the Active Directory Administrative Center, follow these steps:
- Press Start.
- Search for Active Directory Administrative Center and select it from the search results or run dsac.exe. The Active Directory Administrative Center window appears.
- Perform one of these series of actions:
- In the left navigation pane, switch to the tree view. Navigate to the OU or container where the user object that you intend to delete resides. In the main pane, select the user object.
- From the main pane menu, under Global Search, type the name of the user object you intend to delete and press Enter. From the list of Global Search results, select the user object.
- Right-click the user object and select Properties from the menu. The user object's properties window appears:
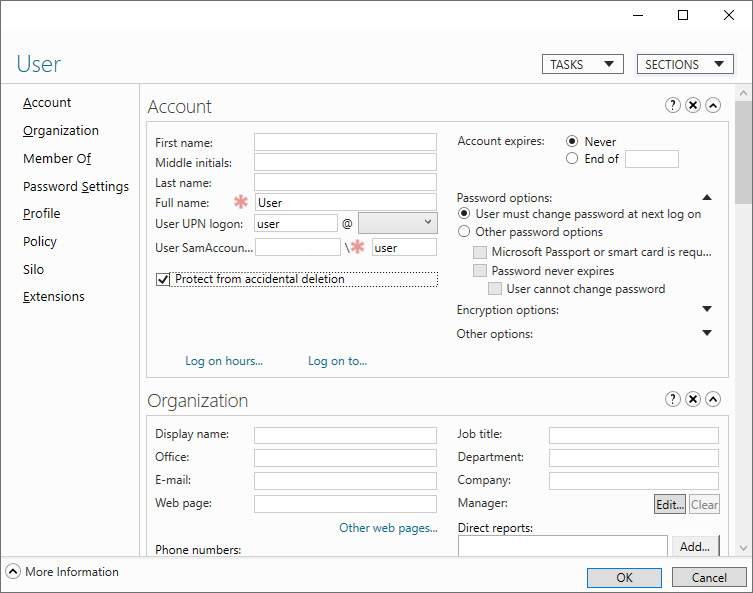
Figure 6.5 – User object's properties window
- Disable the Protect object from accidental deletion option if it is enabled.
- Click the TASKS button at the top of the window. Select Delete from the menu. The Delete Confirmation pop-up window appears:

Figure 6.6 – Delete Confirmation pop-up window
- Click Yes in the Delete Confirmation pop-up window.
Using command-line tools
Use the following command to delete a user object in Active Directory:
dsrm.exe user 'CN=User,CN=Users,DC=LucernPub,DC=com'
Replace DC=LucernPub,DC=com to represent your environment. Replace the other fields in the distinguished name (DN) of the user object to represent your user's properties.
Using Windows PowerShell
Use the following line of PowerShell code on a system with the Active Directory module for Windows PowerShell installed to delete a user object in Active Directory:
Remove-ADUser -Identity 'CN=User,CN=Users,DC=LucernPub,DC=com'
Replace DC=LucernPub,DC=com to represent your environment. Replace the other fields in the DN of the user object to represent your user's properties. Alternatively, you can specify the objectGUID, objectSid, or sAMAccountName attribute to represent the user.
How it works...
When you delete a user object, the object no longer uses its RID, but the RID and the corresponding security identifier (SID) and DNT in the domain partition cannot be reused.
When you attempt to delete a user object that has the Protect from accidental deletion option enabled, you will not be able to delete the object. The option needs to be disabled before this can be done.
Many organizations are wary of deleting user objects because they fear their auditing systems may no longer be able to put a name to the RID or corresponding SID. Instead, most of them opt to disable user objects. Unfortunately, many admins forget to actually delete user objects beyond the auditing retention period, getting stuck with numerous objects that take up space in the Active Directory database, making Active Directory more complex to manage.
When the Active Directory Recycle Bin is enabled, the deleted user object emerges in the Deleted Objects container.
See also
Refer to the following recipes for more information:
- The Enabling the Active Directory Recycle Bin recipe from Chapter 1, Optimizing Forests, Domains, and Trusts
- The Enabling and disabling a user recipe from this chapter
Modifying several users at once
Once a few user objects have been created, a need might arise to modify one attribute for all previously created user objects. Other scopes of user objects might also apply.
Modifying one user object is as simple as double-clicking on it in Active Directory Users and Computers or in the Active Directory Administrative Center. Modifying multiple objects at once is slightly different, and there are a couple of neat tricks you can use.
Getting ready
To modify user objects, sign in to a domain controller or a member server and/or device with RSAT for Active Directory Domain Services installed.
Sign in with an account that is a member of the Domain Admins group or the Account Operators group or with an account that is delegated to manage user objects in the domain or scope of the OU where the user objects reside.
How to do it...
There are three ways to modify user objects:
- Using Active Directory Users and Computers
- Using the Active Directory Administrative Center
- Using PowerShell
Using Active Directory Users and Computers
Active Directory Users and Computers is ideal when you have simple scopes for user objects to modify. Through its selection mechanisms, admins can easily select all users in an OU or container (by pressing Ctrl + A) or select all users whose names start with A manually with the Shift button.
To modify multiple users using Active Directory Users and Computers, follow these steps:
- Press Start.
- Search for Active Directory Users and Computers and select it from the search results or run dsa.msc. The Active Directory Users and Computers window appears.
- In the left navigation pane, navigate to the OU or container where the user objects reside.
- In the main pane, select user objects while holding down the Shift button.
- Right-click the objects and select Properties from the menu.
- Change the attribute or attributes you want to modify.
- Click OK when done.
Using the Active Directory Administrative Center
The Active Directory Administrative Center allows for filters to scope user objects that you want to modify. Filters can be used on OUs and containers. Of course, you can use the same method for selecting users as you would in Active Directory Users and Computers.
To modify a selection of users using the Active Directory Administrative Center, follow these steps:
- Press Start.
- Search for Active Directory Administrative Center and select it from the search results or run dsac.exe. The Active Directory Administrative Center window appears.
- In the left navigation pane, switch to the tree view.
- Select an OU or container to use as the base scope for the filter.
- In the main pane, expand the top bar.
- Click the + Add criteria button:
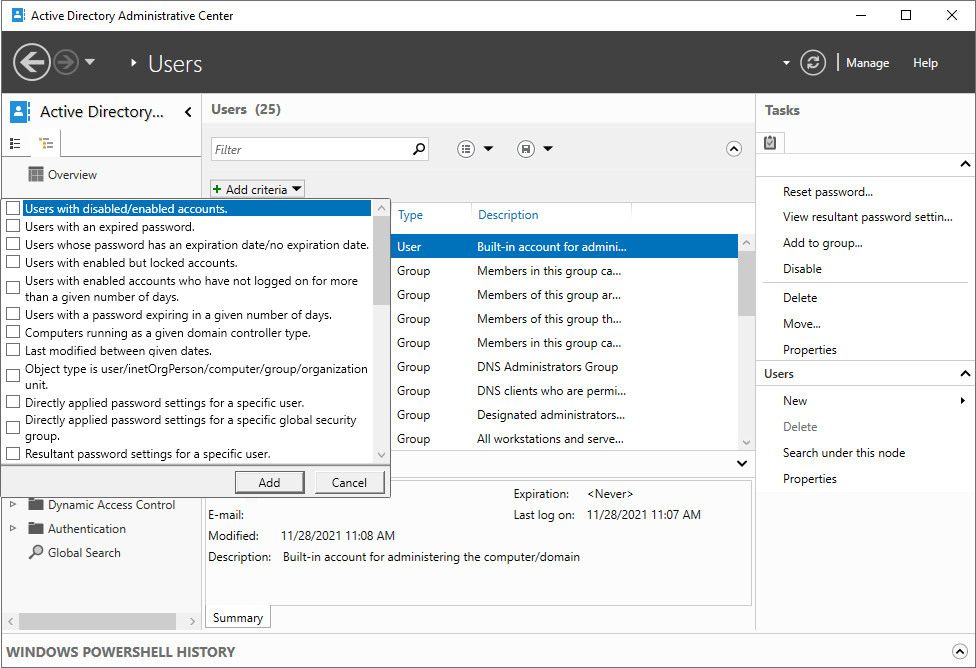
Figure 6.7 – Filters in the Active Directory Administrative Center
- Add criteria to select user objects you want to modify at once. Use one or more of the built-in filters or scroll down to create a filter based on the user-friendly names of one or more attributes. Click Add to add a filter.
Note
When filtering using attributes, you can use matches such as starts with, equals, does not equal, is empty, and is not empty.
- In the Search results pane, select all user objects that match the filter, by selecting one and then pressing Ctrl + A.
- In the right task pane, click Properties. The Multiple Users window appears:
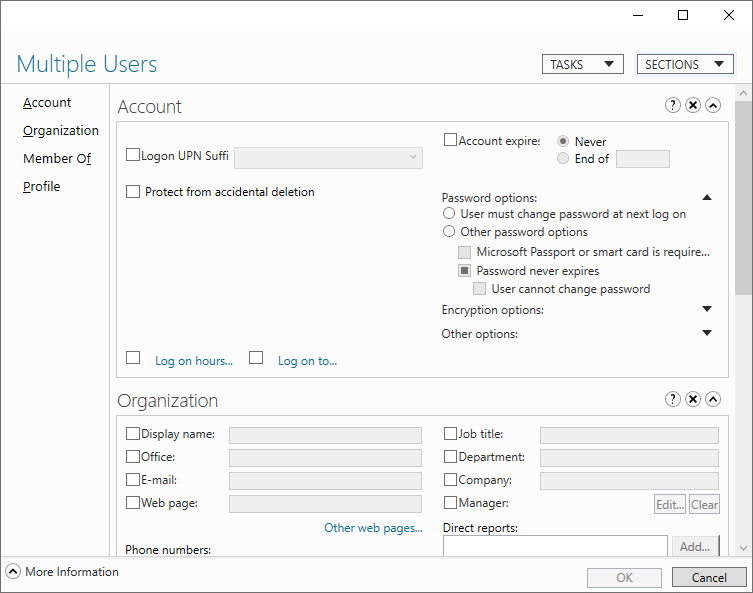
Figure 6.8 – Multiple Users window
Using Windows PowerShell
The Active Directory module for Windows PowerShell can be used to select multiple user objects. Modifications can then be applied to the scope of users using the piping mechanism in PowerShell.
As an example, use the following lines of PowerShell code on a system with the Active Directory module for Windows PowerShell installed to modify Prevent from accidental deletion for all user objects whose sAMAccountName attribute starts with service_:
Get-ADUser -ldapfilter '(sAMAccountName=service_*)' | Set-ADObject -ProtectedFromAccidentalDeletion $true
Since scoping in PowerShell is more advanced, this method is best used for modifying multiple user objects throughout the Active Directory forest and to modify user objects repeatedly.
How it works...
Using filters, several user objects can be modified at once.
Not all attributes can be changed when multiple user objects are selected using Active Directory Users and Computers or the Active Directory Administrative Center. Typical attributes include those that are unique to a user object, such as userPrincipalName, sAMAccountName, and securityIdentifier.
There's more...
When using the Active Directory Administrative Center (dsac.exe), the Windows PowerShell History feature can be used to find modifications on one user object from the UI in PowerShell. This way, modifications behind | can be found easily. To enable the Windows PowerShell History pane, perform these actions:
- Press Start.
- Search for Active Directory Administrative Center and select it from the search results or run dsac.exe. The Active Directory Administrative Center window appears.
- In the bottom bar, expand the Windows PowerShell History bar.
Moving a user
After creating a user, you might find that it should live in another OU or container. This recipe describes how to move a user object.
Getting ready
To move a user account, sign in to a domain controller or a member server and/or device with RSAT for Active Directory Domain Services installed.
Sign in with an account that is a member of the Domain Admins group or the Account Operators group or with an account that is delegated to create and delete user objects in the domain or scope of the OUs where user objects are to be moved.
How to do it...
There are four ways to move a user object:
- Using Active Directory Users and Computers
- Using the Active Directory Administrative Center
- Using command-line tools
- Using Windows PowerShell
Using Active Directory Users and Computers
To move a user using Active Directory Users and Computers, follow these steps:
- Press Start.
- Search for Active Directory Users and Computers and select it from the search results or run dsa.msc. The Active Directory Users and Computers window appears.
- In the View menu, enable Advanced Features.
- Perform one of these series of actions:
- In the left navigation pane, navigate to the OU or container where the user object that you intend to move resides. In the main pane, right-click the user object and select Properties from the menu. The user object's properties window appears.
- From the Action menu, select Find…. The Find Users, Contacts, and Groups window appears. In the Name field, type the name of the user object you intend to move and press Enter. From the Search results list, select the user object. Right-click the user object and select Properties from the menu. The user object's properties window appears.
- Navigate to the Object tab.
- Disable the Protect object from accidental deletion option if it is enabled.
- Click OK to close the properties window for the user object.
- Right-click the user object again. This time, select Move… from the menu. The Move pop-up window appears:
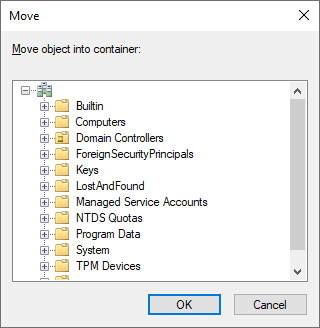
Figure 6.9 – Move pop-up window in Active Directory Users and Computers
- In the Move window, navigate to the OU or container where you want to move the user object to, and select it.
- Click OK to move the user.
If this is an important user object, re-enable the Protect object from accidental deletion option.
Using the Active Directory Administrative Center
To move a user using the Active Directory Administrative Center, follow these steps:
- Press Start.
- Search for Active Directory Administrative Center and select it from the search results or run dsac.exe. An Active Directory Administrative Center window appears.
- Perform one of these series of actions:
- In the left navigation pane, switch to the tree view. Navigate to the OU or container where the user object that you intend to move resides. In the main pane, select the user object.
- From the main pane menu, under Global Search, type the name of the user object you intend to move and press Enter. From the list of Global Search results, select the user object.
- Right-click the user object and select Properties from the menu. The user object's properties window appears.
- Disable the Protect object from accidental deletion option if it is enabled.
- Click the TASKS button at the top of the window. Select Move… from the menu. The Move Confirmation pop-up window appears, followed by a Move pop-up window:
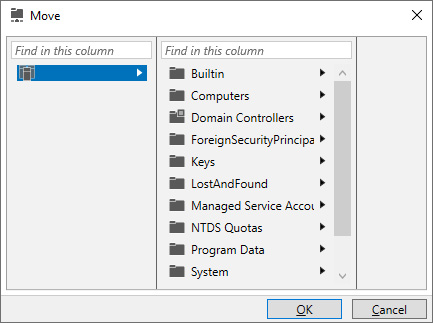
Figure 6.10 – Move pop-up window in the Active Directory Administrative Center
- In the Move window, navigate to the OU or container where you want to move the user object to, and select it.
- Click OK to move the object.
Using command-line tools
Use the following command to move a user object in Active Directory:
dsmove.exe 'CN=User,CN=Users,DC=LucernPub,DC=com' -newparent 'OU=Organizational Unit,DC=LucernPub,DC=com'
Replace DC=LucernPub,DC=com to represent your environment. Replace the other fields in the DN of the user object and a new location to represent your scenario.
Using Windows PowerShell
Use the following line of PowerShell code on a system with the Active Directory module for Windows PowerShell installed:
Move-ADObject -Identity:'CN=User,CN=Users,DC=LucernPub,DC=com' -TargetPath:'OU=Organizational Unit,DC=LucernPub,DC=com'
Replace DC=LucernPub,DC=com to represent your environment. Replace the other fields in the DN of the user object and a new location to represent your scenario.
How it works...
When you move a user object in Active Directory, it will effectively fall out of the scope of the parent OU or container. Therefore, the user object that is used for this purpose must have (delegated) permissions to delete user objects in the original location of the user object. Also, the user object cannot have the Protect from accidental deletion option enabled. This option needs to be disabled to avoid permissions errors.
Renaming a user
Use this recipe to rename a previously created user object.
Getting ready
To rename a user object, sign in to a domain controller or a member server and/or device with RSAT for Active Directory Domain Services installed.
Sign in with an account that is a member of the Domain Admins group or the Account Operators group or with an account that is delegated to modify user objects in the domain or scope of the OU where the user object resides.
How to do it...
There are four ways to rename a user object:
- Using Active Directory Users and Computers
- Using the Active Directory Administrative Center
- Using command-line tools
- Using Windows PowerShell
Using Active Directory Users and Computers
To rename a user using Active Directory Users and Computers, follow these steps:
- Press Start.
- Search for Active Directory Users and Computers and select it from the search results or run dsa.msc. The Active Directory Users and Computers window appears.
- Perform one of these actions:
- In the left navigation pane, navigate to the OU or container where the user object resides. In the main pane, select the user object.
- From the Action menu, select Find…. The Find Users, Contacts, and Groups window appears. In the Name field, type the name of the user object you intend to rename, and press Enter. From the Search results list, select the user object.
- Right-click the user object and select Rename from the menu.
- Type a new name for the user object and press Enter. The Rename User pop-up window appears.
- In the Rename User pop-up window, type new values for other attributes that you want subsequently renamed:

Figure 6.11 – Renaming a user in Active Directory Users and Computers
- Click OK.
Using the Active Directory Administrative Center
To rename a user using the Active Directory Administrative Center, follow these steps:
- Press Start.
- Search for Active Directory Administrative Center and select it from the search results or run dsac.exe. The Active Directory Administrative Center window appears.
- Perform one of these series of actions:
- In the left navigation pane, switch to the tree view. Navigate to the OU or container where the user object that you intend to move resides. In the main pane, select the user object.
- From the main pane menu, under Global Search, type the name of the user object you intend to move and press Enter. From the list of Global Search results, select the user object.
- Right-click the user object and select Properties from the menu. The user object's properties window appears.
- Change one or more of the following fields for the user object:
- In the Account area:
- First name
- Last name
- Full name
- User UPN logon
- User SamAccountName logon
- In the Organization area, change the Display Name field.
- Click OK.
Using command-line tools
Use the following command to rename a user object in Active Directory:
dsmove.exe 'CN=User,CN=Users,DC=LucernPub,DC=com' -NewName 'User Account'
Replace DC=LucernPub,DC=com to represent your environment. Replace the other fields in the DN of the user object to represent your scenario.
Using Windows PowerShell
Use the following lines of PowerShell code on a system with the Active Directory module for Windows PowerShell installed:
Rename-ADObject -Identity 'CN=User,CN=Users,DC=LucernPub,DC=com' -NewName 'User Account'
Replace DC=LucernPub,DC=com to represent your environment. Replace the other fields in the DN of the user object to represent your scenario.
How it works...
When you rename a user object, you change its Canonical Name (CN), its DN, and its name attributes. When you perform this action using Active Directory Users and Computers (dsa.msc), a helpful popup allows you to change any other name-related attributes.
Even though you use the dsmove.exe command, when you rename a user object on the command line, the Protect from accidental deletion option does not come into effect like it does when you move a user object. You will not need to disable this option first to rename a user object.
Enabling and disabling a user
When you want a person in your organization to no longer be able to sign in interactively, you can disable the corresponding user object. Likewise, when a user object is disabled, you can opt to enable/re-enable it. Use this recipe to perform both actions.
Getting ready
To enable or disable a user object, sign in to a domain controller or a member server and/or device with RSAT for Active Directory Domain Services installed.
Sign in with an account that is a member of the Domain Admins group or the Account Operators group or with an account that is delegated to modify user objects in the domain or scope of the OU where the user object resides.
How to do it...
There are four ways to enable or disable a user object:
- Using Active Directory Users and Computers
- Using the Active Directory Administrative Center
- Using command-line tools
- Using Windows PowerShell
Using Active Directory Users and Computers
To enable or disable a user using Active Directory Users and Computers, follow these steps:
- Press Start.
- Search for Active Directory Users and Computers and select it from the search results or run dsa.msc. The Active Directory Users and Computers window appears.
- Perform one of these actions:
- In the left navigation pane, navigate to the OU or container where the user object resides. In the main pane, select the user object.
- From the Action menu, select Find…. The Find Users, Contacts, and Groups window appears. In the Name field, type the name of the user object you intend to enable or disable, and press Enter. From the Search results list, select the user object.
- Right-click the user object and select Enable account or Disable account from the menu. The Active Directory Domain Services pop-up window appears.
- In the Active Directory Domain Services pop-up window, dismiss the User Object has been disabled or User Object has been enabled message by clicking OK.
Using the Active Directory Administrative Center
To enable or disable a user using the Active Directory Administrative Center, follow these steps:
- Press Start.
- Search for Active Directory Administrative Center and select it from the search results or run dsac.exe. The Active Directory Administrative Center window appears.
- Perform one of these series of actions:
- In the left navigation pane, switch to the tree view. Navigate to the OU or container where the user object that you intend to enable or disable resides. In the main pane, select the user object.
- From the main pane menu, under Global Search, type the name of the user object you intend to move and press Enter. From the list of Global Search results, select the user object.
- Right-click the user object and select Properties from the menu. The user object's properties window appears.
- In the top bar of the user object's properties window, click the TASKS button.
- From the menu, select Disable or Enable:

Figure 6.12 – Disabling a user in the Active Directory Administrative Center
- Click OK.
Using command-line tools
Use the following command to disable a user object in Active Directory:
dsmod.exe user 'CN=User,CN=Users,DC=LucernPub,DC=com' -disabled yes
Replace DC=LucernPub,DC=com to represent your environment. Replace the other fields in the DN of the user object to represent your scenario.
Use the following command to (re-)enable a user object in Active Directory:
dsmod.exe 'CN=User,CN=Users,DC=LucernPub,DC=com' -disabled no
Replace DC=LucernPub,DC=com to represent your environment. Replace the other fields in the DN of the user object to represent your scenario.
Using Windows PowerShell
Use the following line of PowerShell code on a system with the Active Directory module for Windows PowerShell installed to disable a user object:
Disable-ADAccount -Identity 'CN=User,CN=Users,DC=LucernPub,DC=com'
Replace DC=LucernPub,DC=com to represent your environment. Replace the other fields in the DN of the user object to represent your scenario.
Use the following line of PowerShell code on a system with the Active Directory module for Windows PowerShell installed to (re-)enable a user object:
Enable-ADAccount -Identity 'CN=User,CN=Users,DC=LucernPub,DC=com'
Replace DC=LucernPub,DC=com to represent your environment. Replace the other fields in the DN of the user object to represent your scenario.
How it works...
When a user object is disabled, it can no longer be used to sign in.
When an account is enabled, you can use the right-click menu in Active Directory Users and Computers or use the TASKS menu in the user object's properties in the Active Directory Administrative Center to disable it. When it's disabled, you can enable it in the same menus. The two menu options are not available at the same time.
There's more...
Even though interactive sign-ins are disabled when a user object is disabled, they can still be used for Kerberos constrained delegation (KCD) and other delegation scenarios that don't check whether a user object is disabled.
Finding locked-out users
User accounts may get locked out. In this recipe, we will see how to find locked-out accounts.
Getting ready
To find locked-out user accounts, sign in to a domain controller or a member server and/or device with RSAT for Active Directory Domain Services installed.
By default, any user object in Active Directory can be used to find locked-out accounts, as this kind of information is available to the Everyone group.
How to do it...
There are two ways to find locked-out users:
- Using the Active Directory Administrative Center
- Using Windows PowerShell
Using the Active Directory Administrative Center
The Active Directory Administrative Center allows for filtering locked-out user objects. Filters can be used on OUs and containers.
To find currently locked-out user objects using the Active Directory Administrative Center, follow these steps:
- Press Start.
- Search for Active Directory Administrative Center and select it from the search results or run dsac.exe. The Active Directory Administrative Center window appears.
- In the left navigation pane, select an OU or container to use as the base scope for the filter.
- In the main pane, expand the top bar.
- Click the + Add criteria button.
- Select the Users with enabled but locked accounts criteria:
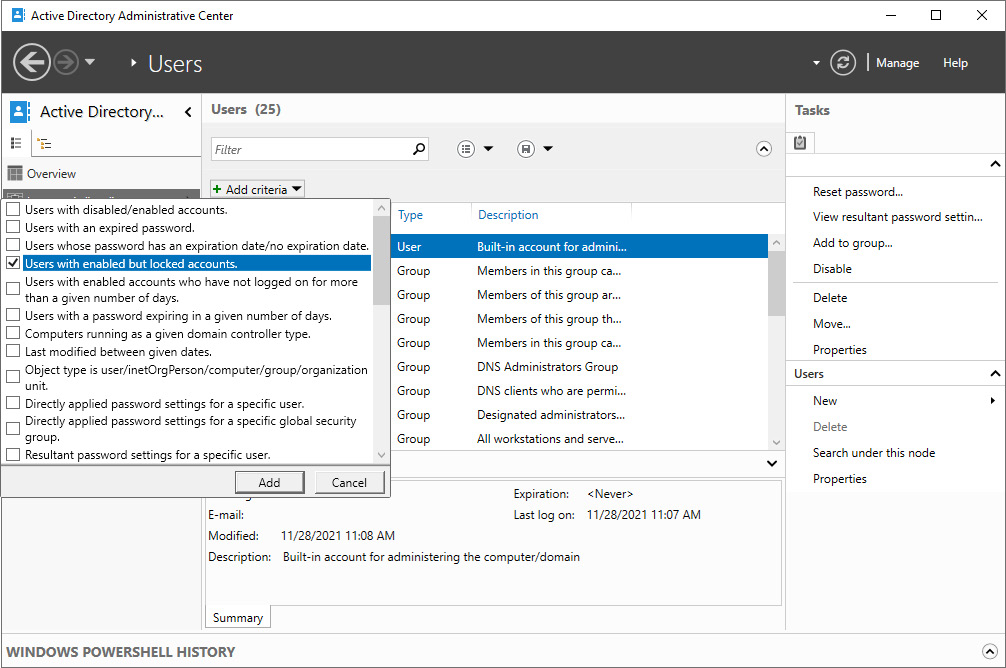
Figure 6.13 – Selecting the Users with enabled but locked accounts criteria
Using Windows PowerShell
Use the following line of PowerShell code on a system with the Active Directory module for Windows PowerShell installed to find locked-out user accounts:
Search-ADAccount -LockedOut -UsersOnly | Format-Table Name,LockedOut -AutoSize
Any locked users can be manually unlocked or unlocked using a piping mechanism, as shown in the next recipe.
How it works...
The Default Domain Policy contains password and account lockout policies. By default, the password part of these policies is enabled, but the lockout part is not. For some organizations, this makes sense. Other organizations might consider enabling account lockout, as it prevents brute-force password attacks; when a malicious person uses the maximum number of passwords within a certain time for a user account, the user account is locked out for a specified time. All three metrics can be set in the lockout part of password and account lockout policies.
For example, when an attacker or a clumsy colleague hits a maximum of five wrong passwords attempts in 2 minutes, the user object is locked out for 30 minutes.
From Windows Server 2008 Active Directory onward, fine-grained password and account lockout policies can be used to set the metrics for a specific user object or specific groups.
See also
To unlock the user object(s) found in this recipe, see the Unlocking a user recipe.
Unlocking a user
In many organizations with account lock-out policies enabled, the number of passwords that can be mistyped is set to a high value (such as 50), and then the lock-out period is set to indefinitely. This way, a locked-out account hinders the productivity of colleagues since they can't sign in until the account is unlocked. Manual unlocks need to be performed to enable affected colleagues to sign in again.
Getting ready
To modify user objects, sign in to a domain controller or a member server and/or device with RSAT for Active Directory Domain Services installed.
Sign in with an account that is a member of the Domain Admins group, the Account Operators group, or with an account that is delegated to manage user objects in the domain or scope of the OU where the user object resides.
How to do it...
This recipe shows two ways to unlock a user object:
- Using the Active Directory Administrative Center
- Using Windows PowerShell
Using the Active Directory Administrative Center
To unlock a user object using the Active Directory Administrative Center, follow these steps:
- Press Start.
- Search for Active Directory Administrative Center and select it from the search results or run dsac.exe. The Active Directory Administrative Center window appears.
- In the left navigation pane, navigate to the OU or container where the user objects reside.
- In the main pane, select the user object you want to unlock.
- Right-click the object and select Properties from the menu. The User window appears.
- Click Unlock account:
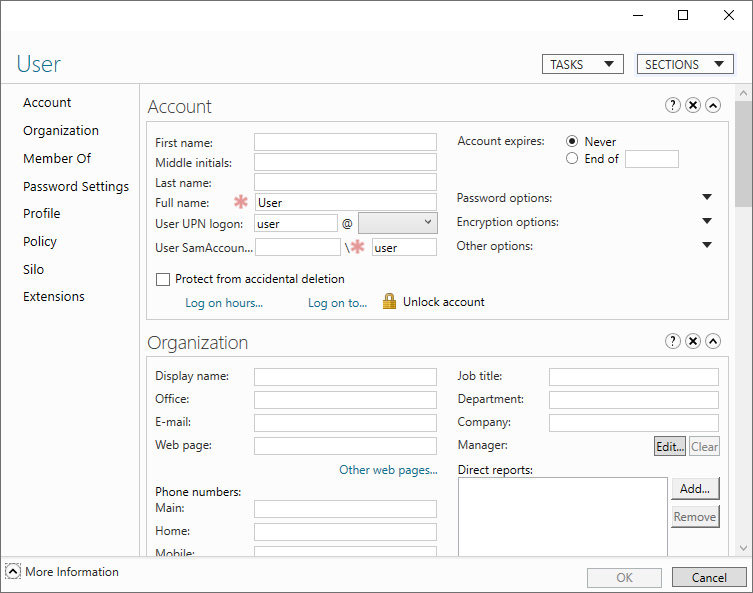
Figure 6.14 – Unlock account option in the Active Directory Administrative Center
- Click OK.
To unlock all locked-out accounts in a certain OU or container, combine the steps from the Finding locked-out accounts recipe with steps 5 through 7.
Using Windows PowerShell
Use the following line of PowerShell code on a system with the Active Directory module for Windows PowerShell installed to unlock a user object:
Unlock-ADAccount -Identity 'CN=User,CN=Users,DC=LucernPub,DC=com'
Replace DC=LucernPub,DC=com to represent your environment. Replace the other fields in the DN of the user object to represent your scenario.
To unlock all locked-out accounts throughout the Active Directory domain, combine the commands from the Finding locked-out users recipe with the preceding lines of code in the following way:
Search-ADAccount -LockedOut -UsersOnly | Unlock-ADAccount
The preceding line of PowerShell code is specifically useful in situations where accounts are locked out after a brute-force password guessing attack, once the initial attack vector has been neutralized.
Managing userAccountControl
Many user objects' settings can be controlled using the userAccountControl attribute.
Getting ready
To set the userAccountControl attribute for users, sign in to a domain controller or a member server and/or device with RSAT for Active Directory Domain Services installed.
Sign in with an account that is a member of the Domain Admins group.
How to do it...
The userAccountControl attribute can be managed in the following two ways:
- Reading the userAccountControl attribute
- Setting the userAccountControl attribute
Reading the userAccountControl attribute
There are three ways to read the userAccountControl attribute for users:
- Using Active Directory Users and Computers
- Using the Active Directory Administrative Center
- Using Windows PowerShell
Using Active Directory Users and Computers
To read the userAccountControl attribute for users using Active Directory Users and Computers, follow these steps:
- Press Start.
- Search for Active Directory Users and Computers and select it from the search results or run dsa.msc. The Active Directory Users and Computers window appears.
- Perform one of these series of actions:
- In the left navigation pane, navigate to the OU or container where the user object resides. In the main pane, select the user object.
- From the Action menu, select Find…. The Find Users, Contacts, and Groups window appears. In the Name field, type the name of the user object whose userAccountControl attribute you intend to read, and press Enter. From the Search results list, select the user object.
- Right-click the user object and select Properties from the menu. The User Properties window appears.
- Navigate to the Attribute Editor tab.
- In the Attributes list, scroll down until you reach the userAccountControl attribute:
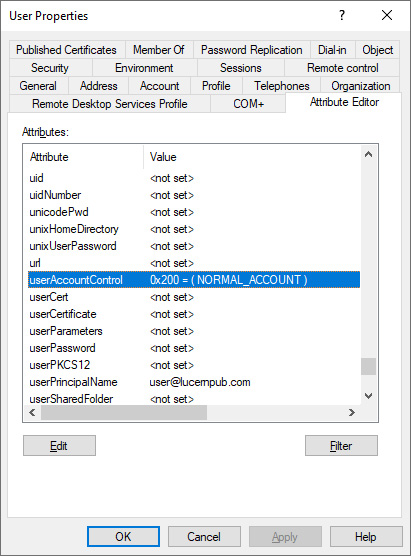
Figure 6.15 – userAccountControl attribute for a user object in Active Directory Users and Computers
Using the Active Directory Administrative Center
To read the userAccountControl attribute for users using the Active Directory Administrative Center, follow these steps:
- Press Start.
- Search for Active Directory Administrative Center and select it from the search results or run dsac.exe. The Active Directory Administrative Center window appears.
- Perform one of these series of actions:
- In the left navigation pane, switch to the tree view. Navigate to the OU or container where the user object whose userAccountControl attribute you intend to read resides. In the main pane, select the user object.
- From the main pane menu, under Global Search, type the name of the user object whose userAccountControl attribute you intend to read, and press Enter. From the list of Global Search results, select the user object.
- Right-click the user object and select Properties from the menu. The User Properties window appears.
- In the User Properties window, click Extensions in the left navigation pane.
- Navigate to the Attribute Editor tab.
- In the Attributes list, scroll down until you reach the userAccountControl attribute:
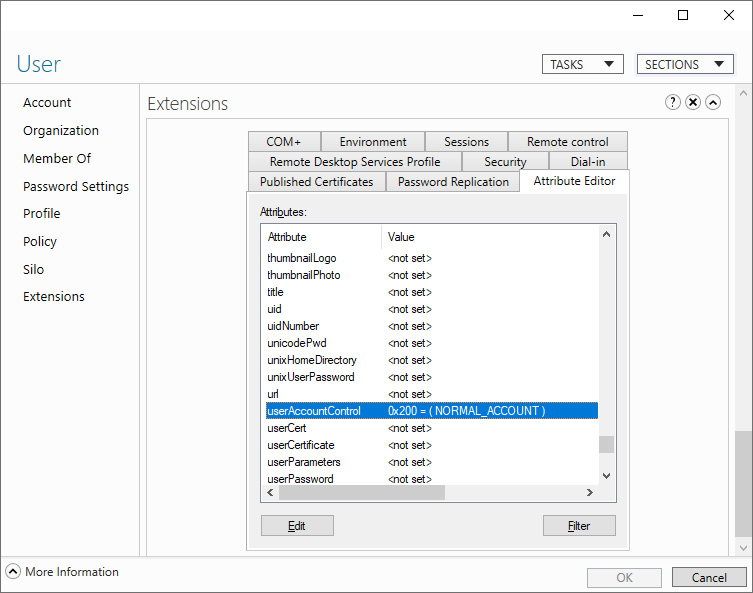
Figure 6.16 – userAccountControl attribute for a user object in the Active Directory Administrative Center
- Click Cancel to close the User Properties window.
Using Windows PowerShell
To read the userAccountControl attribute for a specific user object using Windows PowerShell, use the following line of PowerShell code on a system with the Active Directory module for Windows PowerShell:
Get-ADUser -Identity 'CN=User,CN=Users,DC=LucernPub,DC=com' -Properties userAccountControl | Format-Table name,useraccountcontrol
Replace 'CN=User,CN=Users,DC=LucernPub,DC=com' with the DN property of the user account. This line of PowerShell code returns a table with the display name of the user object and the userAccountControl attribute.
To read the userAccountControl attribute for all users using Windows PowerShell, use the following line of PowerShell code on a system with the Active Directory module for Windows PowerShell:
Get-ADUser -Filter * -Properties userAccountControl | Format-Table name,useraccountcontrol
This line of PowerShell code returns a table with the display names of all user objects and their corresponding userAccountControl attributes.
Setting the userAccountControl attribute
There are two ways to set the userAccountControl attribute for users:
- Using ADSI Edit
- Using Windows PowerShell
Using ADSI Edit
To set the userAccountControl attribute for users using ADSI Edit, follow these steps:
- Press Start.
- Search for ADSI Edit and select it from the search results or run adsiedit.msc. The ADSI Edit window appears.
- Right-click ADSI Edit in the left navigation pane and select Connect to… from the menu.
- Click OK to accept connecting to the Default Naming Context.
- In the left navigation pane, expand the Default Naming Context.
- In the left navigation pane, expand the DN of the domain.
- In the left navigation pane, expand the container or OU (structure) where the user object resides.
- In the main pane, select the user object.
- Next, right-click the user object and select Properties from the menu.
- In the Attributes list, scroll down to the userAccountControl attribute and select it.
- Click the Edit button:
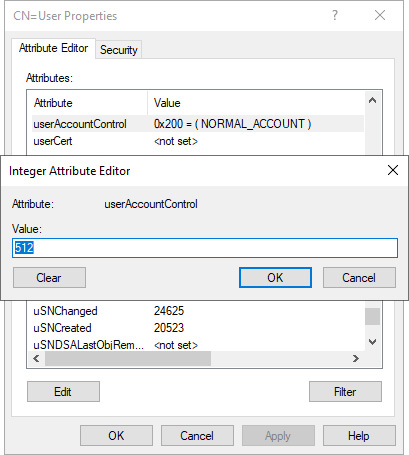
Figure 6.17 – Editing a user object's userAccountControl attribute in ADSI Edit
- Type a new value for the userAccountControl attribute for the object.
- Click OK to save the new value.
- Click OK to save the changes to the user object.
Using Windows PowerShell
To set the userAccountControl attribute for users using Windows PowerShell, use the following lines of PowerShell code on a system with the Active Directory module for Windows PowerShell. Each of the following lines of code represents setting one of the bits in the userAccountControl attribute for user objects:
Set-ADAccountControl -Identity User -Enable $false
Set-ADAccountControl -Identity User -HomedirRequired $true
Set-ADAccountControl -Identity User -PasswordNotRequired $true
Set-ADAccountControl -Identity User -CannotChangePassword $true
Set-ADAccountControl -Identity User -AllowReversiblePasswordEncryption $true
Set-ADAccountControl -Identity User -PasswordNeverExpires $true
Set-ADAccountControl -Identity User -MNSLogonAccount $true
Set-ADAccountControl -Identity User -TrustedForDelegation $true
Set-ADAccountControl -Identity User -AccountNotDelegated $true
Set-ADAccountControl -Identity User -UseDESKeyOnly $true
Set-ADAccountControl -Identity User -DoesNotRequirePreAuth $true
Set-ADAccountControl -Identity User -TrustedToAuthForDelegation $true
Within Windows PowerShell, the userAccountControl attribute is not directly changed. Instead, the major implications of changing the attribute define how to achieve this.
How it works...
Many individual settings and options for user objects are stored in the userAccountControl attribute. While administrators can set these options through the UI, they can also be set by modifying the userAccountControl attribute itself.
Additionally, the userAccountControl attribute can also be used in scripts to find user objects with specific sets of values.
The userAccountControl attribute defines a lot of properties for any user and/or computer object. The value for this attribute is built up of bits; every value is a (combination of) 2x value(s):

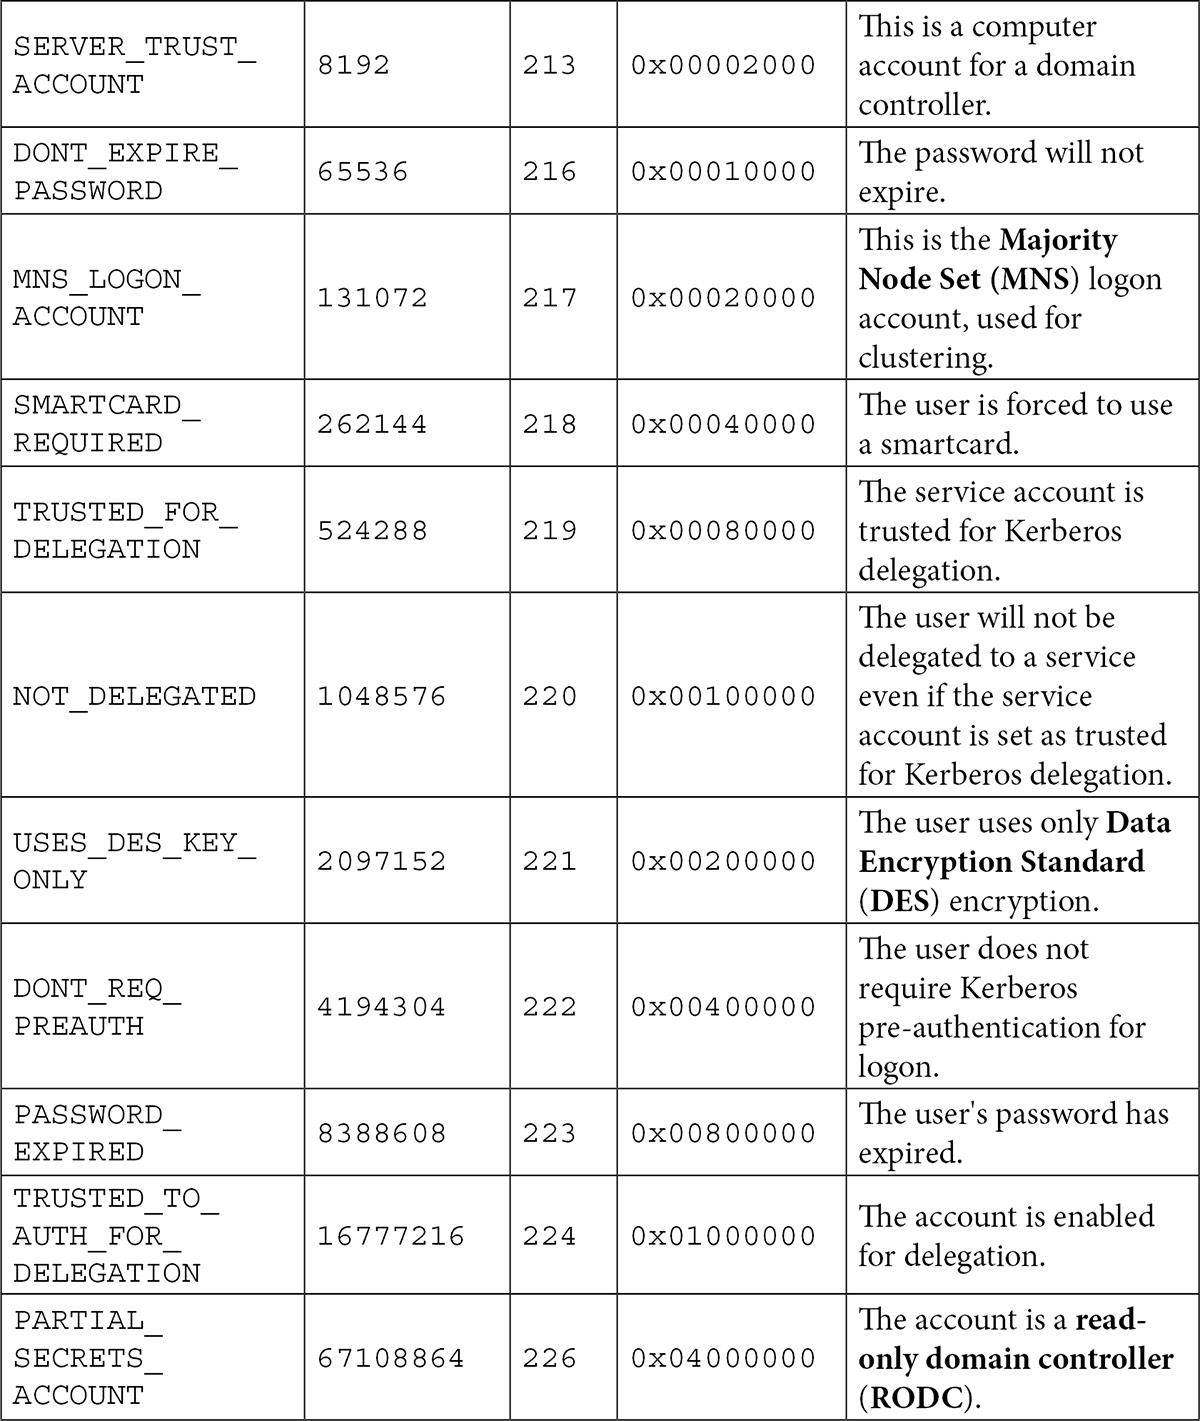
Table 6.1 - Values for the userAccountControl attribute and their properties
Except for SCRIPT, LOCKOUT, TEMP_DUPLICATE_ACCOUNT, and PASSWORD_EXPIRED, all flags can be set on user objects by an administrator. NORMAL_ACCOUNT doesn't need to be set, as it is set by default on user objects.
SMARTCARD_REQUIRED isn't set this way because it requires certificates and other prerequisites. It would make for an excellent denial-of-service (DoS) attack vector if this flag could be set.
The INTERDOMAIN_TRUST_ACCOUNT, WORKSTATION_TRUST_ACCOUNT, SERVER_TRUST_ACCOUNT, and PARTIAL_SECRETS_ACCOUNT flags do not apply to user objects.
Using account expiration
User objects can be set to automatically expire.
Getting ready
To set account expiration for a user object, sign in to a domain controller or a member server and/or device with RSAT for Active Directory Domain Services installed.
Sign in with an account that is a member of the Domain Admins group or the Account Operators group or with an account that is delegated to modify user objects in the domain or scope of the OU where the user object resides.
How to do it...
There are four ways to do this:
- Using Active Directory Users and Computers
- Using the Active Directory Administrative Center
- Using command-line tools
- Using Windows PowerShell
The two graphical tools are useful for configuring account expiration on individual accounts, although the Active Directory Administrative Center can be used to retrieve the Windows PowerShell cmdlets through the Windows PowerShell History feature.
The command-line tool is particularly useful when you want to configure a time frame (in days) for the account to live on, instead of defining an end date.
Using Active Directory Users and Computers
To set account expiration for a user using Active Directory Users and Computers, follow these steps:
- Press Start.
- Search for Active Directory Users and Computers and select it from the search results or run dsa.msc. The Active Directory Users and Computers window appears.
- Perform one of these series of actions:
- In the left navigation pane, navigate to the OU or container where the user object resides that you intend to have automatically expire. In the main pane, select the user object.
- From the Action menu, select Find…. The Find Users, Contacts, and Groups window appears. In the Name field, type the name of the user object you intend to have automatically expire, and press Enter. From the Search results list, select the user object.
- Right-click the user object and select Properties from the menu. The User Properties window appears.
- Navigate to the Account tab.
- At the bottom of the tab, change the Never option in the Account expires field to End of by selecting the latter option:
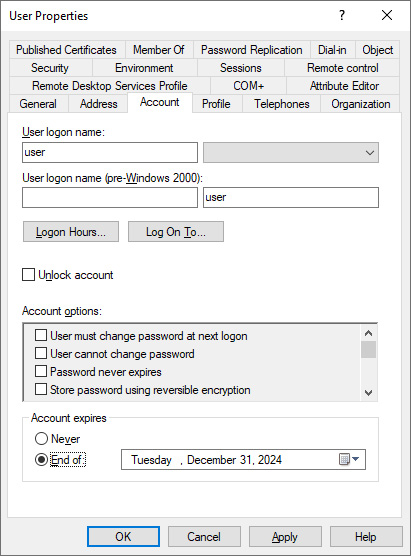
Figure 6.18 – Configuring account expiration in Active Directory Users and Computers
- Using the calendar icon to the right of the field, select an expiration date for the user object.
- Click OK to save the settings and close the User Properties window.
Using the Active Directory Administrative Center
To set account expiration for a user using the Active Directory Administrative Center, follow these steps:
- Press Start.
- Search for Active Directory Administrative Center and select it from the search results or run dsac.exe. The Active Directory Administrative Center window appears.
- Perform one of these series of actions:
- In the left navigation pane, switch to the tree view. Navigate to the OU or container where the user object that you intend to have automatically expire resides. In the main pane, select the user object.
- From the main pane menu, under Global Search, type the name of the user object you intend to have automatically expire, and press Enter. From the list of Global Search results, select the user object.
- Right-click the user object and select Properties from the menu. The user object's properties window appears.
- In the top-right corner of the Account section, change the Never option for Account expires to End of by selecting the latter option. A red ribbon appears to indicate the Account section is missing information.
- Type the date in the date format specified for the operating system:
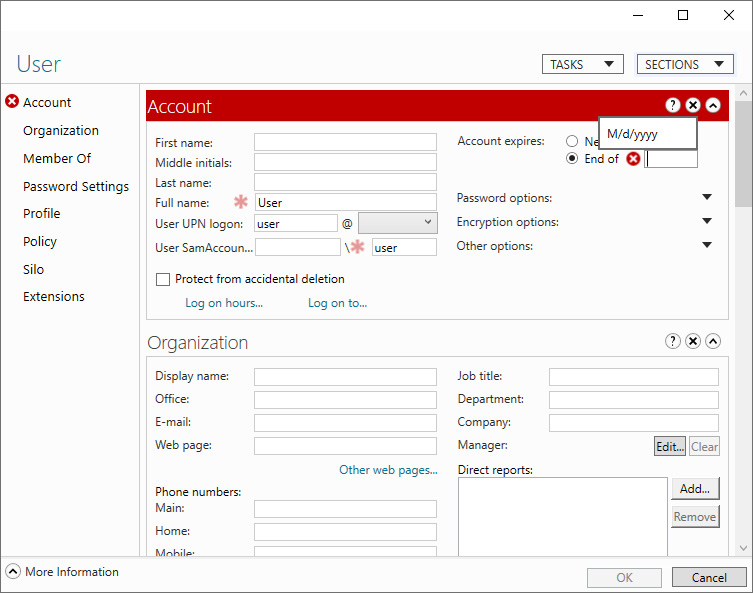
Figure 6.19 – Configuring account expiration in the Active Directory Administrative Center
- Below the End of field, the Active Directory Administrative Center indicates the number of days until the user account expires. Click OK to save the settings and close the User Properties window.
Using command-line tools
Use the following command to set the days before an account expires in Active Directory:
dsmod.exe user 'CN=User,CN=Users,DC=LucernPub,DC=com' -acctexpires 90
Replace DC=LucernPub,DC=com to represent your environment. Replace the other fields in the DN of the user object to represent your scenario.
Using Windows PowerShell
Use the following line of PowerShell code on a system with the Active Directory module for Windows PowerShell installed to set account expiration for a user object:
Set-ADAccountExpiration -Identity "CN=User,OU=Organizational Unit,DC=LucernPub,DC=com" -DateTime "03/01/2027 00:00:00"
Replace DC=LucernPub,DC=com to represent your environment. Replace the other fields in the DN of the user object to represent your scenario.
How it works...
User objects can be configured with expiration dates. After this moment in time, the user object can no longer be used to authenticate, including when using KCD.
After the expiration date is set, it is stored in the accountExpires attribute. The 64-bit value stored for this attribute represents the number of 100-nanosecond intervals since January 1, 1601 (Coordinated Universal Time, or UTC).
Account expiration is a good way to fill in communication gaps between HR and IT in the joiners, movers, and leavers process for IAM.
In an organization where account expiration is used, the end date of the HR contract is typically used to ensure the user object automatically expires when the person would normally leave the organization. Of course, in some organizations, a couple of days are added to allow access to the expenses system and other services the organization offers to people leaving the organization.
There are some caveats, though. For external hires who are normally hired based on project contracts, account expiration may be bothersome. Additionally, people who are on extended leave or travel beyond the end of their contract may be impacted too.