Chapter 10: Getting the Most Out of Group Policy
Group Policy allows administrators to manage one device or many thousands of devices and/or servers through a centralized management console. You can use it to secure domain-joined devices, make them more useful for end users, and make them look and feel identical as per your organization's standards.
Granularity in Group Policy objects offers you the ability to manage these settings for devices in the entire Active Directory domain, for an Active Directory site (but please refrain from linking Group Policy objects on the site-level), per Organizational Unit (OU), and beyond that by using Windows Management Instrumentation (WMI) filters.
Group Policy has been around since the beginning of Active Directory in Windows 2000 Server. It has seen many improvements in the last two decades, such as Group Policy preferences and many new settings relating to all the new client and server operating system possibilities.
Although currently considered archaic because of trends such as bring your own device and solutions such as Mobile Device Management (MDM) and Mobile Application Management (MAM), Group Policy should be considered an essential tool in every Active Directory admin's toolbox.
The following recipes are covered in this chapter:
- Creating a Group Policy Object (GPO)
- Copying a GPO
- Deleting a GPO
- Modifying the settings of a GPO
- Assigning scripts
- Installing applications
- Linking a GPO to an OU
- Blocking inheritance of GPOs on an OU
- Enforcing the settings of a GPO link
- Applying security filters
- Creating and applying WMI Filters
- Configuring loopback processing
- Refreshing GPO settings
- Restoring a default GPO
- Creating a Group Policy Central Store
Creating a GPO
This recipe shows how to create a GPO.
Getting ready
To create a GPO, sign in to a system with the Group Policy Management feature installed with an account that is either of the following:
- A member of the Domain Admins group
- Delegated to create GPOs
Besides permission to create GPOs, additional permissions are needed to use a Starter GPO or link a GPO to an OU.
How to do it...
This recipe shows two ways to create a GPO:
Using Group Policy Management
To create a GPO, perform the following steps:
- Press Start.
- Search for Group Policy Management and click its search result, or run gpmc.msc. The Group Policy Management window appears.
- In the left navigation pane, expand the Forest node.
- Expand the Domains node, and then navigate to the domain where you want to create the GPO.
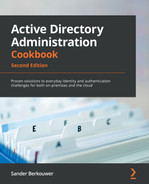
- Expand the domain name and select the Group Policy Objects node:
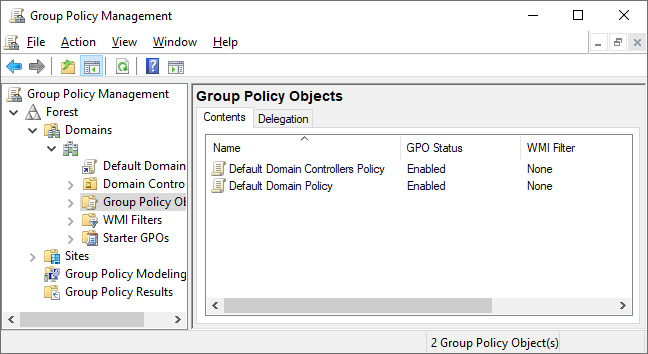
Figure 10.1 – The Group Policy Objects node in Group Policy Management
- Right-click the Group Policy Objects node and select New from the menu. The New GPO pop-up window appears.
- In the New GPO pop-up window, enter the name of the GPO in the Name: field. Make sure that you don't select Source starter GPO.
- Click OK to create the GPO.
You now have a GPO. However, it doesn't have any settings, and it isn't linked – at least not yet.
Using Windows PowerShell
To create a GPO using Windows PowerShell, use the following line of PowerShell:
New-GPO -Name "New GPO Name"
Replace New GPO Name with the name of the new GPO.
How it works...
Group Policy Management is the tool of choice to manage GPOs.
Regardless of the tool used, GPOs are created in the Policies container in Active Directory.
Group Policy Management is a great tool to use when creating one GPO. When creating multiple GPOs or automating creating GPOs, Windows PowerShell proves more efficient.
See also
To get things going with the GPO, refer to the Linking a GPO to an OU recipe.
Copying a GPO
This recipe shows how to copy an existing GPO to a new GPO. This is useful when you have configured the perfect GPO but want to adjust just a single setting to apply to legacy versions of the operating system or a test version in another OU.
Getting ready
To copy a GPO, sign in to a system with the Group Policy Management feature installed with an account that is either of the following:
- A member of the Domain Admins group
- Delegated to create GPOs and has at least read permissions on the GPO to be copied
How to do it...
This recipe shows two ways to copy a GPO:
- Using Group Policy Management
- Using Windows PowerShell
Using Group Policy Management
To copy a GPO, perform the following steps:
- Press Start.
- Search for Group Policy Management and click its search result, or run gpmc.msc. The Group Policy Management window appears.
- In the left navigation pane, expand the Forest node.
- Expand the Domains node, and then navigate to the domain where you want to copy a GPO.
- Expand the domain name and then expand the Group Policy Objects node.
- Locate the GPO that you want to copy.
- Right-click the GPO and select Copy from the menu.
- Right-click the Group Policy Objects node and select Paste from the menu. The Copy GPO pop-up window appears:
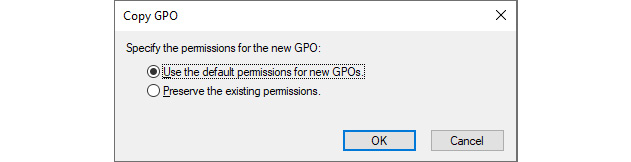
Figure10.2 – The Copy GPO pop-up window
- In the Copy GPO pop-up window, select either the Preserve the existing permissions. or the Use the default permissions for new GPOs. option.
- Click OK. The Copy window appears.
- In the Copy window, click OK to acknowledge that copying has succeeded.
- The new GPO is now named Copy of…, referencing the source GPO name. Right-click the GPO in the left navigation menu or the main pane and select Rename from the menu.
- Enter the new name of the GPO. Press Enter when done.
Using Windows PowerShell
To copy a GPO using Windows PowerShell, use the following line of PowerShell:
Copy-GPO -Sourcename "Existing GPO Name" -TargetName "New GPO Name"
Replace Existing GPO Name and New GPO Name with the names of the GPO to copy and the new GPO. Optionally, add the -CopyAcl parameter to switch from the Use the default permissions for new GPOs. option to the Preserve the existing permissions. option.
How it works...
Copying a GPO is a sure way to create a GPO that is slightly different from an existing GPO.
After copying a GPO, only the name is different when you choose the Preserve the existing permissions. option. If you choose the Use the default permissions for new GPOs. option, your permissions on top of the default permissions apply, and the account used to copy the GPO would be the Group Policy owner.
There's more...
In a multi-domain Active Directory forest, copying a GPO between the Group Policy Objects node in one domain to the Group Policy Objects node in another domain is a sure way to keep settings identical across domains. Copying GPOs is especially useful in networking environments consisting of development, testing, acceptance, and production environments to stage GPOs.
Deleting a GPO
This recipe shows how to delete a GPO. As part of this recipe, any GPO links that are present are first deleted to ensure that no stale references occur in multi-domain environments.
Getting ready
To delete a GPO, sign in to a system with the Group Policy Management feature installed with an account that is either of the following:
- A member of the Domain Admins group
- The current owner of the GPO
- Delegated the Edit settings, delete, modify security permission on the GPO
How to do it...
This recipe shows two ways to delete a GPO:
- Using Group Policy Management
- Using Windows PowerShell
Using Group Policy Management
To delete a GPO, perform the following steps:
- Press Start.
- Search for Group Policy Management and click its search result, or run gpmc.msc. The Group Policy Management window appears.
- In the left navigation pane, expand the Forest node.
- Expand the Domains node, and then navigate to the domain where you want to delete the GPO.
- Expand the domain name and then expand the Group Policy Objects node.
- Locate the GPO that you want to delete and select it.
- In the main pane, on the Scope tab, check that the GPO is not linked to any GPO by inspecting the field for The following sites, domains and OUs are linked to this GPO:. If it's not empty, the GPO is still linked to OUs, sites, and/or domains. Remove these links by right-clicking them and selecting Delete Link(s) from the menu before deleting the GPO. In the Group Policy Management pop-up window, click OK.
- In the left navigation pane, right-click the GPO and select Delete from the menu. The Group Policy Management pop-up window appears.
- In the Group Policy Management pop-up window, click Yes to answer the Do you want to delete this GPO and all links to it in this domain? This will not delete links in other domains. question.
Using Windows PowerShell
To delete a GPO using Windows PowerShell, use the following line of PowerShell:
Remove-GPO -Name "Existing GPO Name"
Replace Existing GPO Name with the name of the GPO to delete.
How it works...
A GPO not linked to an OU, site, or domain and not part of the development or testing process cannot be justified and can be deleted without repercussions.
When you delete a GPO, its links are not automatically deleted when the user account performing the deletion, does not have the permissions to manage the link, or when the link refers to another domain in the forest. GPO links should be removed before deleting a GPO to avoid lingering links.
See also
For more information, refer to the Linking a GPO to an OU recipe.
Modifying the settings of a GPO
This recipe shows how to modify settings in a GPO.
Getting ready
To manage settings in a GPO, sign in to a system with the Group Policy Management feature installed with an account that is either of the following:
- A member of the Domain Admins group
- The current owner of the GPO
- Delegated the Edit settings or Edit settings, delete, modify security permission on the GPO
How to do it...
Perform the following steps:
- Press Start.
- Search for Group Policy Management and click its search result or run gpmc.msc. The Group Policy Management window appears.
- In the left navigation pane, expand the Forest node.
- Expand the Domains node, and then navigate to the domain where you want to modify the GPO.
- Expand the domain name and then expand the Group Policy Objects node.
- Locate the GPO that you want to manage and select it.
- In the main pane, on the Settings tab, inspect the settings. Use the show, hide, and show all buttons to display the settings under their respective Group Policy setting nodes.
- In the left navigation pane, right-click the GPO and select Edit… from the menu.
- The Group Policy Management Editor window appears:
Figure 10.3 – The Group Policy Management Editor window
- Edit the settings and/or preferences you want to edit in the Group Policy Management Editor window.
- Close the Group Policy Management Editor window to save the settings.
How it works...
When you manage the settings and/or preferences in a GPO, they become active immediately. There are slight delays due to replication and the Group Policy background refresh timeout (90 minutes by default but with a 30-minute window of additional time, or 5 minutes for GPOs applied to domain controllers).
Some settings and/or preference patterns cause GPOs to apply slowly. This might slow down device startups and user sign-ins. Here are some tips:
- Avoid configuring settings and policies in one GPO.
- Avoid setting the Computer Configuration and User Configuration settings in one GPO, unless the GPO targets Remote Desktop Session Hosts.
- When you create a GPO with only Computer Configuration, disable User Configuration processing, and vice versa.
Assigning scripts
This recipe shows how to assign a logon script using Group Policy.
Getting ready
To manage settings for a GPO, sign in to a system with the Group Policy Management feature installed with an account that is either of the following:
- A member of the Domain Admins group
- The current owner of the GPO
- Delegated the Edit settings or Edit settings, delete, modify security permission on the GPO
How to do it...
Perform the following steps:
- Press Start.
- Search for Group Policy Management and click its search result, or run gpmc.msc. The Group Policy Management window appears.
- In the left navigation pane, expand the Forest node.
- Expand the Domains node, and then navigate to the domain where you want to assign a logon script.
- Expand the domain name and then expand the Group Policy Objects node.
- Locate the GPO that you want to manage and select it.
- In the left navigation pane, right-click the GPO and select Edit… from the menu. The Group Policy Management Editor window appears.
- In the Group Policy Management Editor window, expand User Configuration, then Policies, and Windows Settings.
- Select Scripts.
- In the main pane, right-click the Logon script and select Properties from the menu. The Logon Properties window appears.
- Click the PowerShell Scripts tab to use a Windows PowerShell script as the logon script.
- In the Logon Properties window, click the Add… button. The Add a Script pop-up window appears:
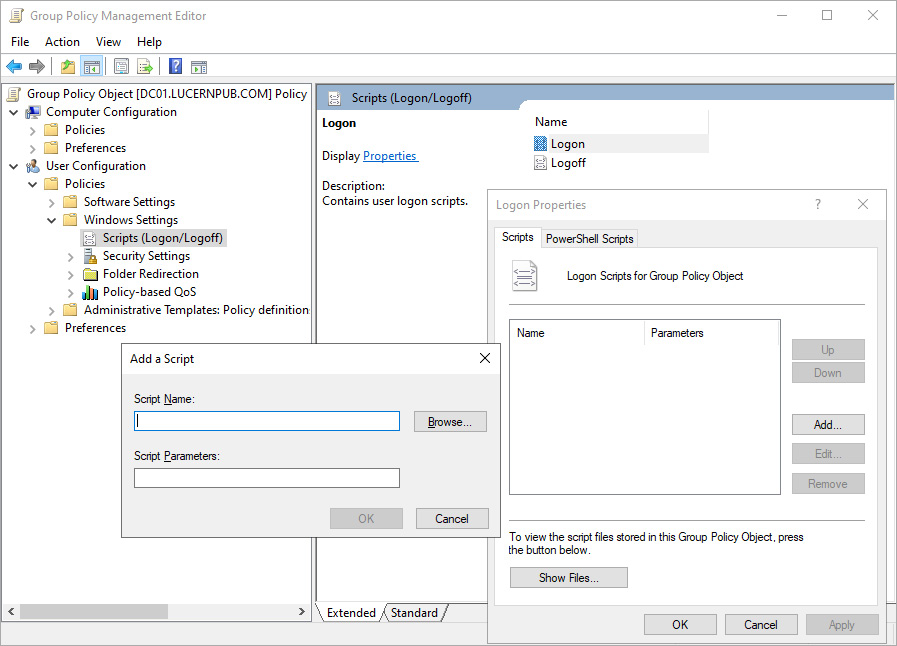
Figure 10.4 – The Add a Script pop-up window
- Type the executable in the Script Name: field or browse to its location.
- In the Script Parameters: field, type any optional script parameters.
- Click OK to save the script settings.
- Click OK to close the Logon Properties window.
- Close the Group Policy Management Editor window.
How it works...
This recipe describes four types of script you can use with Group Policy:
- Logon scripts (User Configuration)
- Logoff scripts (User Configuration)
- Startup scripts (Computer Configuration)
- Shutdown scripts (Computer Configuration)
It is good practice to reference a script name in the Active Directory System Volume (SYSVOL). This way, the unavailability of a server doesn't mean the unavailability of scripts used to manage (part of) an environment. By default, when you type a script into the Script Name: field, Group Policy assumes that the script is located in the Scripts folder in the SYSVOL.
Windows PowerShell scripts require at least Windows 7 or Windows Server 2008 R2.
Installing applications
This recipe shows how to install an application using Group Policy.
Getting ready
To manage settings for a GPO, sign in to a system with the Group Policy Management feature installed with an account that is either of the following:
- A member of the Domain Admins group
- The current owner of the GPO
- Delegated the Edit settings or Edit settings, delete, modify security permission on the GPO
How to do it...
Perform the following steps:
- Press Start.
- Search for Group Policy Management and click its search result, or run gpmc.msc. The Group Policy Management window appears.
- In the left navigation pane, expand the Forest node.
- Expand the Domains node, and then navigate to the domain where you want to install the application.
- Expand the domain name and then expand the Group Policy Objects node.
- Locate the GPO that you want to manage and select it.
- In the left navigation pane, right-click the GPO and select Edit… from the menu. The Group Policy Management Editor window appears.
- Expand Computer Configuration or User Configuration, depending on the kind of object that is the target of the software installation.
- Expand the Policies node, and then the Software Settings node.
- Right-click the Software Installation node, select New, and then Package… from the menu. The Open window appears.
- In the Open window, type the Universal Naming Convention (UNC) path of the network share that has the package for the application with the .msi extension – for instance, \server.domain.tldshare. Select the application and click Open. The Deploy Software pop-up window appears:
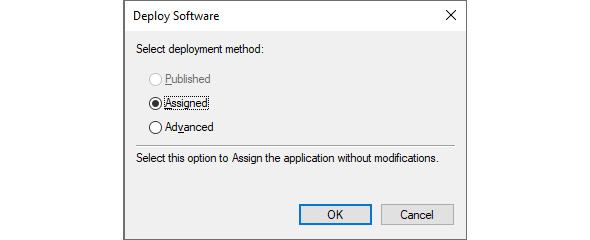
Figure 10.5 – The Deploy Software pop-up window for User Configuration
- In the Deploy Software pop-up window, select the deployment method.
- Click OK to save the settings. The package will be listed with its version, its deployment state, and source path.
- Close the Group Policy Management Editor window.
How it works...
Applications can be distributed to devices and user accounts using Group Policy. However, more advanced solutions are used in medium and large organizations, such as Microsoft Endpoint Manager, because of the lack of advanced features, controls, and reporting in Group Policy.
To install an application package, point to the package on a shared folder, which is accessible to the objects you target the GPO to. For users, the default Everyone – Full Control share permissions suffice, and default folders on Windows Server installations have Users – Read NT File System (NTFS) permissions. However, when deploying a package to devices, ensure that the UNC path is accessible to domain computers with read permissions.
Assigned applications will deploy at logon (when this option is selected) or when a user clicks the shortcut for the application or a filetype associated with the application. Published applications (only available under User Configuration) will be installed when a user clicks the shortcut for the application or a filetype associated with the application. Published applications can also be installed using Apps and Features on domain-joined devices.
Software installation settings are not processed when slow links are detected.
The Advanced button can be used to further specify settings for application installation, including but not limited to the presence of other application installations and versioning requirements.
Linking a GPO to an OU
This recipe shows how to link an existing GPO to an OU.
Getting ready
To link a GPO to an OU, sign in to a system with the Group Policy Management feature installed with an account that is either of the following:
- A member of the Domain Admins group
- The current owner of the GPO, and has the Link GPOs permission on the OU(s), site(s), and/or domain(s) where the GPO is to be linked
- Delegated the Edit settings or Edit settings, delete, modify security permission on the GPO, and has the Link GPOs permission on the OU(s), site(s), and/or domain(s) where the GPO is to be linked
How to do it...
Perform the following steps:
- Press Start.
- Search for Group Policy Management and click its search result or run gpmc.msc. The Group Policy Management window appears.
- In the left navigation pane, expand the Forest node.
- Expand the Domains node, and then navigate to the domain where you want to link the GPO.
- Expand the domain name.
- Navigate to the OU where you want to link an existing GPO.
- Right-click the OU and select Link an Existing GPO… from the menu:
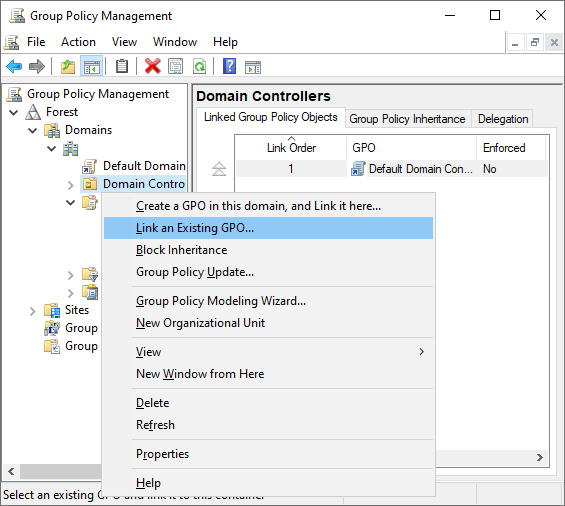
Figure 10.6 – Link an Existing GPO
- The Select GPO window appears. In the window, select the GPO you want to link from the Group Policy objects: list.
- Click OK to link the GPO.
How it works...
A GPO is not applied to computer or user objects without a link.
Despite the name Group Policy, GPOs cannot be linked to groups.
When a domain-joined device processes Group Policy, it processes GPOs in this order:
- Locally defined Group Policy settings
- GPOs linked to sites
- GPOs linked to the domain the device resides in
- GPOs linked to the OUs in the OU structure down to the computer object
When a user signs in, Group Policy is processed in the same order, except this time, the domain and OU structure are defined by the location of the user object instead of the computer object.
When there are overlapping settings in different GPOs linked in the preceding order, the last processed GPO with the settings applies.
When multiple GPOs are linked to the same OU, the GPO with the lowest link order is applied, as the settings are applied in the reverse sequence of the link order. Link order can only really be considered a priority when link enforcement and block inheritance don't come into play.
There's more...
GPOs can be linked to sites, domains, and OUs. It's a bad idea to link a GPO to a site due to the nature of intra-domain replication of GPOs.
Blocking inheritance of GPOs on an OU
This recipe shows how to block inheritance of GPOs on an OU.
Getting ready
To block inheritance of GPOs on an OU, sign in to a system with the Group Policy Management feature installed with an account that is either of the following:
- A member of the Domain Admins group
- The current owner of the GPO
- Delegated the Edit settings or Edit settings, delete, modify security permission on the GPO
How to do it...
Perform the following steps:
- Press Start.
- Search for Group Policy Management and click its search result, or run gpmc.msc. The Group Policy Management window appears.
- In the left navigation pane, expand the Forest node.
- Expand the Domains node.
- Expand the domain name.
- Navigate to the OU where you want to configure inheritance.
- Right-click the OU and select Block Inheritance from the menu.
How it works...
The Block Inheritance and Enforce settings are two ways to manage how GPOs are processed.
Group Policy inheritance can be used in situations where an OU structure, site, or domain governs settings through GPOs, and where none of these settings are undesired. This way, any GPO will no longer be processed by computer objects and/or user objects in the OU and underlying OU structure that has inheritance blocked.
Managing inheritance is useful where you want to strictly manage test environments. However, it does add complexity to Group Policy and may result in situations that are harder to troubleshoot.
When not all settings are undesired, you can link the GPOs with the desired settings to the OU that has Block Inheritance configured.
Enforcing the settings of a GPO Link
This recipe shows how to enforce a GPO link to ensure that its settings always apply.
Getting ready
To enforce a GPO link, sign in to a system with the Group Policy Management feature installed with an account that is either of the following:
- A member of the Domain Admins group
- The current owner of the GPO
- Delegated the Edit settings or Edit settings, delete, modify security permission on the GPO
How to do it...
Perform the following steps:
- Press Start.
- Search for Group Policy Management and click its search result, or run gpmc.msc. The Group Policy Management window appears.
- In the left navigation pane, expand the Forest node.
- Expand the Domains node, and then navigate to the domain where you want to link the GPO.
- Expand the domain name.
- Navigate to the OU where you want to enforce the GPO link.
- Expand the OU.
- Right-click the GPO link you want to enforce, and toggle Enforced on or off in the menu to enable or disable it. A check mark indicates whether Enforced is enabled or not:
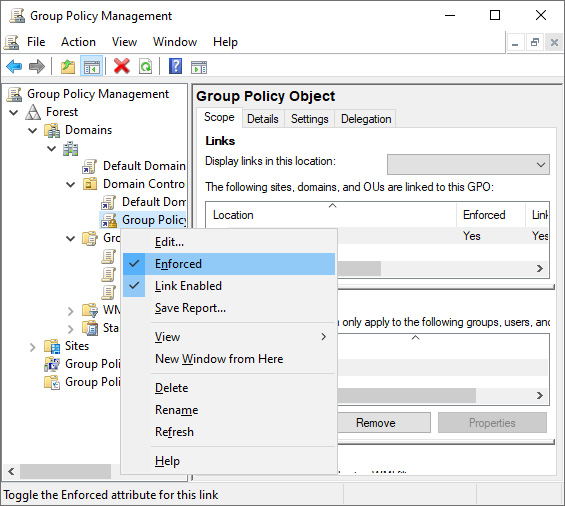
Figure 10.7 – Enforced enabled for a GPO
How it works...
The Block Inheritance and Enforce settings are two ways to manage how GPOs are processed.
In a complex environment where multiple conflicting GPOs may be applied, enforcing a GPO link ensures the GPO is processed and its settings are applied, regardless of Group Policy inheritance settings. It always takes precedence.
Applying security filters
Group Policy can be linked to OUs but, despite its name, not to groups. However, this recipe shows how a security filter can be applied so that the GPO link only applies to members of a specific group.
Getting ready
To apply security filters on a GPO, sign in to a system with the Group Policy Management feature installed with an account that is either of the following:
- A member of the Domain Admins group
- The current owner of the GPO
- Delegated the Edit settings or Edit settings, delete, modify security permission on the GPO
How to do it...
Perform the following steps:
- Press Start.
- Search for Group Policy Management and click its search result, or run gpmc.msc. The Group Policy Management window appears.
- In the left navigation pane, expand the Forest node.
- Expand the Domains node, and then navigate to the domain where you want to apply security filters to the GPO.
- Expand the domain name and then expand the Group Policy Objects node.
- Locate the GPO that you want to manage and select it.
- In the main pane, on the Scope tab in the Security Filtering area, click the Add… button to add a group for security filtering. The Select User, Computer or Group window appears.
- In the Select User, Computer or Group window, type the name of a security group and click the Check Names button.
- Click OK to add the group to the Security Filtering field for the GPO.
- Select the default Authenticated Users entry and click Remove. The Group Policy Management pop-up window appears:

Figure 10.8 – The Group Policy Management pop-up window
- In the Group Policy Management pop-up window, click OK to answer the Do you want to remove this delegation privilege? question.
How it works...
By default, all GPOs have the GpoApply permission assigned to the Authenticated Users group. This permission can be scoped down to a specific group by removing the default permission and adding a scoped group. When the GpoApply permission is absent, the settings in the GPO don't apply to each of its GPO links.
Since groups can be nested, security filtering can make Group Policy processing slow, especially in multi-forest environments.
Creating and applying WMI filters
This recipe shows how to apply a WMI filter so that GPOs only apply to specific domain-joined devices and systems. In this recipe, a WMI filter is shown that targets the domain controller with the Primary Domain Controller Emulator (PDCE) Flexible Single Master Operations (FSMO) role only.
Getting ready
To create WMI filters on a GPO, sign in to a system with the Group Policy Management feature installed with an account that is either of the following:
- A member of the Domain Admins group
- Delegated the Edit settings, delete, modify security permission on the GPO
How to do it...
- Press Start.
- Search for Group Policy Management and click its search result, or run gpmc.msc. The Group Policy Management window appears.
- In the left navigation pane, expand the Forest node.
- Expand the Domains node, and then navigate to the domain where you want to apply WMI Filters.
- Expand the domain name.
- Right-click the WMI Filters node and select New… from the menu. The New WMI Filter window appears.
- In the New WMI Filter window, enter a name for the new WMI filter in the Name: field.
- Optionally, enter a description for the WMI filter in the Description: field.
- Click Add. The WMI Query window appears.
- In the WMI Query window, accept the rootCIMv2Namespace: to target with the WMI filter or click Browse… to select another.
- Enter the WMI query in the Query: field:
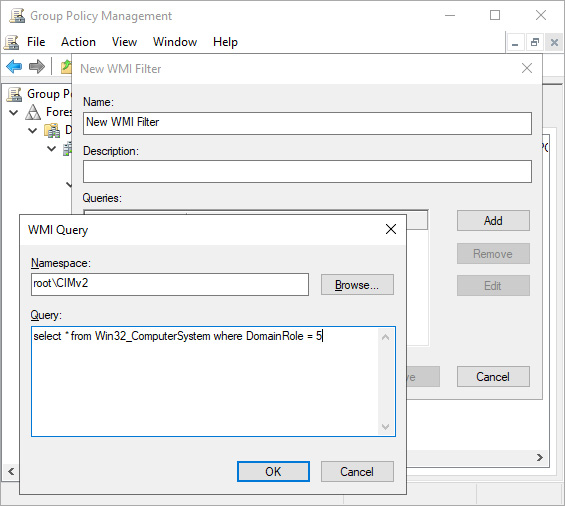
Figure 10.9 – Enter the WMI query
- Click OK to save the WMI query.
- Click Save to create the WMI filter.
- In the left navigation pane, navigate to the Group Policy Objects node.
- Select the GPO you want to apply the WMI filter to.
- In the main pane, on the Scope tab in the WMI Filtering area, select the WMI filter from This GPO is linked to the following WMI filter: drop-down list. The Group Policy Management pop-up window appears.
- In the Group Policy Management pop-up window, click Yes to answer Would you like to change the WMI Filter to [WMI filter name].
How it works...
WMI filters can be used to target specific systems in the scope of a GPO throughout all its GPO links, based on the specifications of the device.
Only one WMI filter can be applied at a time for a GPO. Use WMI filters with caution because they can seriously impact the performance of Group Policy processing.
There's more...
A WMI filter is very useful for targeting only the domain controller holding the PDCE FSMO role for a Group Policy that sets the Windows time service to synchronize time with a reliable external time source.
Refreshing GPO settings
This recipe shows how to refresh Group Policy settings on domain-joined hosts after changing and/or adding GPOs.
This recipe shows two ways to refresh GPO settings:
- Using Group Policy Management, centrally
- Using the command line on a domain-joined host
Getting ready
To refresh Group Policy settings using Group Policy Management, sign in to a system with the Group Policy Management feature installed with an account that is a member of the Domain Admins group.
To refresh Group Policy settings using the command line on a domain-joined host, sign in to the host with an account that has local administrator privileges.
How to do it…
To refresh the GPO settings, choose between the two ways – using Group Policy Management and using the command line on a domain-joined host.
Using Group Policy Management
Perform these steps to refresh the GPO settings for an OU using Group Policy Management:
- Press Start.
- Search for Group Policy Management and click its search result, or run gpmc.msc. The Group Policy Management window appears.
- In the left navigation pane, expand the Forest node.
- Expand the Domains node, and then navigate to the domain where you want to link the GPO.
- Expand the domain name.
- Navigate to the OU where you want to refresh settings.
- Right-click the OU and select Group Policy Update… from the menu. The Force Group Policy update window appears:
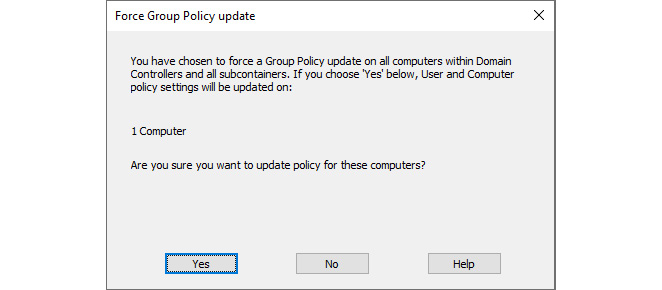
Figure 10.10 – The Force Group Policy update window
- Click Yes. The Remote Group Policy update results window appears.
- Review the results and click Close when done.
Using the command line on a domain-joined host
Use the following command to update Group Policy settings on an elevated Command Prompt (cmd.exe) on a domain-joined host:
gpupdate.exe
If you want to refresh all Group Policy settings, instead of merely the settings that have changed, add the /Force parameter to this command.
How it works…
The Group Policy client on domain-joined hosts typically refreshes Group Policy settings in the background. By default, GPOs are refreshed in the background every 90 minutes, with a 30-minute window of additional time to avoid clobbering the domain controllers. Domain controllers refresh GPOs every 5 minutes.
Using the methods in this recipe, the refresh is immediate. This allows for expedited testing of Group Policy settings and/or a more passionate troubleshooting.
Configuring loopback processing
This recipe shows how to configure Group Policy loopback processing.
Getting ready
To configure Group Policy loopback processing, sign in to a system with the Group Policy Management feature installed with an account that is either of the following:
- A member of the Domain Admins group
- The current owner of the GPO
- Delegated the Edit settings or Edit settings, delete, modify security permission on the GPO
How to do it...
- Press Start.
- Search for Group Policy Management and click its search result, or run gpmc.msc. The Group Policy Management window appears.
- In the left navigation pane, expand the Forest node.
- Expand the Domains node, and then navigate to the domain where you want to create the GPO.
- Expand the domain name and then expand the Group Policy Objects node.
- Locate the GPO that you want to manage and select it.
- In the left navigation pane, right-click the GPO and select Edit… from the menu. The Group Policy Management Editor window appears.
- In the Group Policy Management Editor window, expand Computer Configuration, Policies, Administrative Templates, System, and finally, Group Policy.
- In the main pane, locate the Configure user Group Policy loopback processing mode setting and double-click it. The Configure user Group Policy loopback processing mode properties window appears:

Figure 10.11 – The Configure user Group Policy loopback processing mode window
- In the Configure user Group Policy loopback processing mode window, change the default Not Configured value to Enabled.
- From the Mode: drop-down menu, select either Merge or Replace (default).
- Click OK to save the setting.
- Close the Group Policy Management Editor window.
How it works...
In Group Policy loopback processing mode, Group Policy processing is changed. With default settings, the computer object processes the Computer Configuration parts of GPOs and the user object processes the User Configuration parts of GPOs. In loopback processing mode, though, Group Policy processing is different. It can be configured in two ways:
- Merge mode: In merge mode, any GPOs that are applicable to the user object will be processed first. The GPOs applicable to the computer object will be applied afterward. This way, the user account will still correctly process any settings applicable to the account, but user settings in GPOs configured with loopback processing and linked to the computer account override when there are conflicts.
- Replace mode: In replace mode, any GPOs that are applicable to the user object will not be processed. Only the settings within the GPOs configured with loopback processing and linked to the computer object will be applied.
Group Policy loopback processing is ideal for the implementations of Remote Desktop Session Hosts and other Remote Desktop, Terminal Server, and Virtual Desktop Infrastructure (VDI) implementations. The user settings configured in the GPOs linked to the computer objects only apply when users sign in to these hosts but not when they sign in to other domain-joined devices.
Restoring a default GPO
This recipe shows how to restore the Default Domain Policy and the Default Domain Controllers Policy to default settings.
Getting ready
To restore the Default Domain Policy and the Default Domain Controllers Policy to default settings, sign in to a non-read-only domain controller with an account that is a member of the Domain Admins group.
How to do it...
The dcgpofix.exe command-line utility can be used to restore the Default Domain Policy and the Default Domain Controllers Policy to their default settings.
Restoring the Default Domain Policy
Use the following command to restore the Default Domain Policy to its default settings on an elevated Command Prompt (cmd.exe):
dcgpofix.exe /target:Domain
Type Y followed by Enter twice to continue and restore the Default Domain Policy.
Restoring the Default Domain Controllers Policy
Use the following command to restore the Default Domain Controllers Policy to its default settings on an elevated Command Prompt (cmd.exe):
dcgpofix.exe /target:DC
Type Y followed by Enter twice to continue to restore the Default Domain Controllers Policy.
Restoring the Default Domain Policy and the Default Domain Controllers Policy
Use the following command to restore the Default Domain Policy and the Default Domain Controllers Policy to their default settings on an elevated Command Prompt (cmd.exe):
dcgpofix.exe /target:BOTH
Type Y followed by Enter twice to restore the Default Domain Policy and the Default Domain Controllers Policy.
How it works...
When you want to revert to the default settings for the Default Domain Policy and the Default Domain Controllers Policy, or if you've deleted them, they can be easily restored using the dcgpofix.exe command-line utility.
There's more...
As there have been changes to the Default Domain Policy and the Default Domain Controllers Policy across versions of Windows Server and the Active Directory schema, dcgpofix.exe checks the schema version. If the schema level is different from the current domain controller operating system, dcgpofix.exe displays the following message:
The Active Directory schema version for this domain and the version supported by this tool do not match. The GPO can be restored using the /ignoreschema command-line parameter. However, it is recommended that you try to obtain an updated version of this tool that might have an updated version of the Active Directory schema. Restoring a GPO with an incorrect schema might result in unpredictable behavior.
In this case, add the /ignoreschema parameter to the previous command-line examples.
Creating the Group Policy Central Store
This recipe shows how to configure the Group Policy Central Store in the SYSVOL to optimize Group Policy authoring and replication.
Getting ready
Implement or locate a default Windows client device with Microsoft Office and any other software that supports Group Policy management. Install language packs for the languages that are used by admins in your organization. Update this system with the latest available Windows updates.
To create the Group Policy Central Store, sign in to a non-read-only domain controller or access the SYSVOL over the network with an account that is a member of the Domain Admins group.
How to do it...
- Sign in to the default Windows client device for your organization.
- Press Start.
- Search for File Explorer and select it from the search results, or run explorer.exe. The File Explorer window appears.
- Navigate to the Windows folder – typically, C:Windows.
- Locate the PolicyDefinitions folder.
- Right-click the PolicyDefinitions folder and select Copy from the menu.
- Navigate the current File Explorer window to the Active Directory SYSVOL – for instance, \lucernpub.comSYSVOLlucernpub.com.
- In the SYSVOL, navigate to the Policies folder.
- Right-click an empty space in the main pane and select Paste from the menu.
- Navigate to the C:Program Files (x86)Microsoft Group Policy folder, if it exists.
- This folder may contain multiple versions of downloaded Group Policy administrative templates. Copy the PolicyDefinitions folder in the latest version folder and paste it into the same location by repeating steps 7 through 9.
How it works...
Since Windows Server 2008 and Windows Vista, Group Policy settings in the Administrative Templates parts of GPOs are represented on the filesystem by the *.admx and *.adml files. The first type of file defines settings. The latter type of file provides language-dependent labels, so administrators can work together seamlessly using different languages.
Beyond the language benefit, the new file types also allow a central store to store all Group Policy settings and language settings in the SYSVOL. This way, files for configured settings no longer have to be stored with each GPO in the SYSVOL, only once in the SYSVOL. This optimizes Group Policy replication between domain controllers significantly.
There's more...
Creating the Group Policy Central Store requires a process that is revisited when new software versions are introduced within an organization. Overwrite the *.adml and *.admx files with the newer versions.