Chapter 12: Managing Certificates
Certificates, as part of a Public Key Infrastructure (PKI), have several practical uses:
- They can be used to encrypt network traffic.
- They can be used to sign in.
- They can be used to sign code.
- They can be used to encrypt files and folders.
Certificates are based on cryptographic public keys and private keys. This key pair is generated upon the creation of a certificate by a Certification Authority (CA). When used to encrypt data, files, and folders, only with the right private key can data be decrypted that was encrypted with a given public key, and vice versa. When used to sign in, only the right key can be used to verify the identity.
Every certificate has a subject and a lifespan. A typical lifespan is one year. However, once a certificate is issued to you or a system, it can be revoked during its lifespan. Every time a certificate action is performed, the certificate revocation status is checked with the CA that issued the certificate. CAs offer a Certificate Revocation List (CRL) for this purpose.
A certificate can also be renewed. In this case, a new certificate is generated and issued.
In Microsoft-oriented networking environments, Active Directory Certificate Services (AD CS) can be used as a CA. It can be deployed to issue and revoke certificates. AD CS can function as a standalone CA but can also be configured as an Active Directory-integrated CA. This latter deployment scenario offers several benefits.
In this chapter, we cover the following recipes:
- Deciding between your own CA and a public CA
- Setting up a CA
- Setting up an online responder
- Removing a certificate template
- Duplicating and editing a certificate template
- Requesting a web server certificate
- Issuing domain controller certificates
- Managing certificate autoenrollment
- Revoking a certificate
- Decommissioning a CA
Deciding between your own CA and a public CA
When you need a certificate, you can choose between a certificate issued by your own CA implementation or a public CA.
How to do it…
To decide between a certificate issued by your own CA implementation or a public CA, use the flow chart in the following figure:
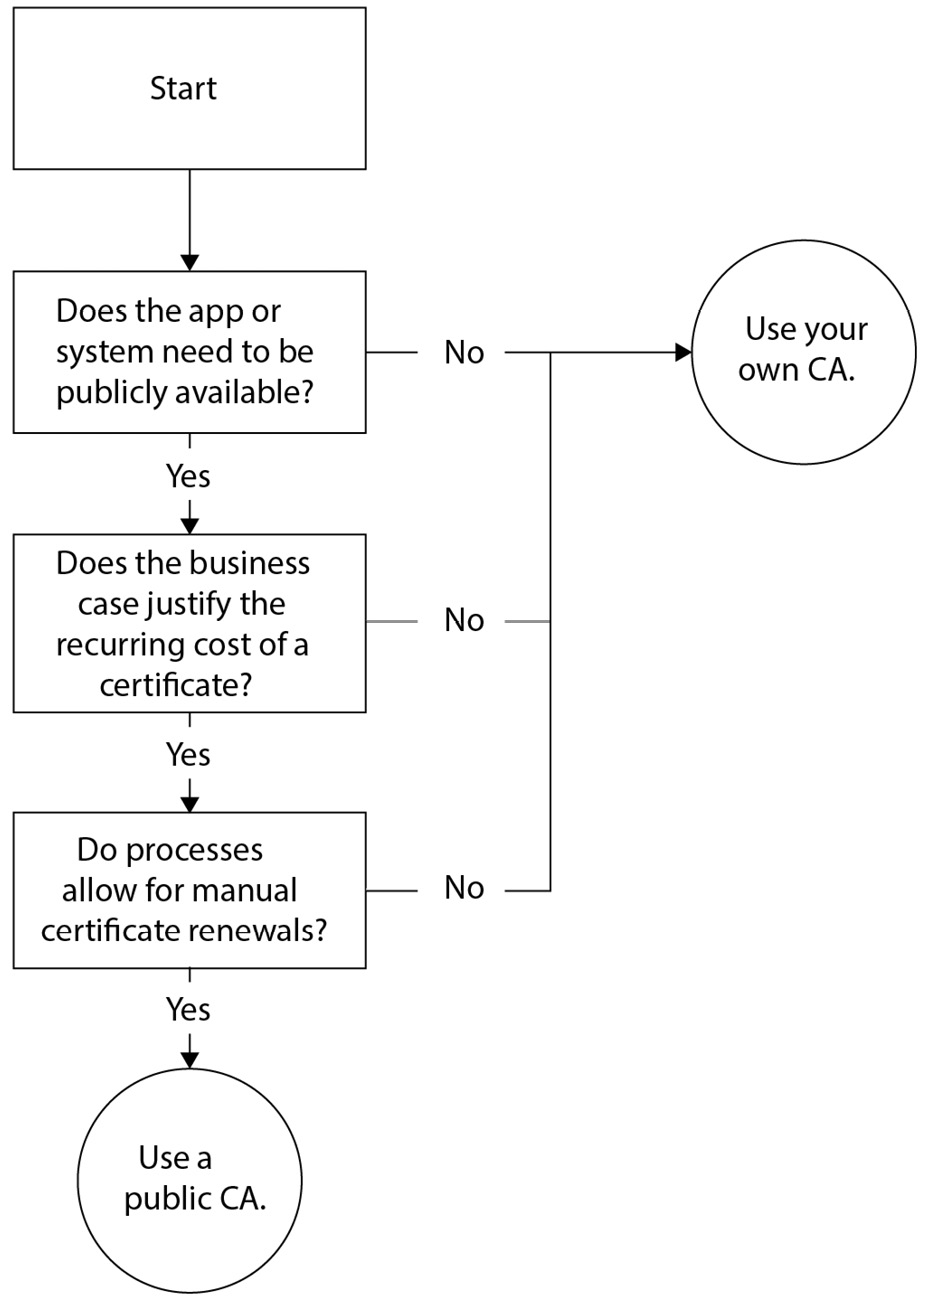
Figure 12.1 – A flowchart to decide between your own CA and a public CA
How it works…
There are two main types of CAs:
- Public CAs
- Private CAs
Public CAs are trusted by operating systems, browsers, applications, and services. For this purpose, public CAs are part of the list of trusted root CAs that comes bundled with the Windows and Windows Server operating systems.
Of course, maintaining a place on the list of trusted root CAs involves rigorous security measures. Public CAs will only conduct business with legitimate organizations. As an organization, you will be asked to show proof of existence, tax registration, or incorporation.
The measures taken by public CAs cost money. Therefore, a certificate from most public CAs costs money. This is a recurring cost, as the lifespan of public certificates on the internet is configured to a maximum of 13 months.
Private CAs are not widely trusted. When you want to trust certificates issued by private CAs, you'll need to add the CA certificate to the Trusted Root Certificate Authorities Certificate Store for your system, browser, apps, and/or service accounts.
An AD CS implementation within your own networking infrastructure is a private CA. When it is integrated with Active Directory, your own CA can offer automatic renewals of certificates.
See also
If you want to use certificates from your own CA, check out the following recipes in this chapter:
- Setting up a CA
- Setting up an online responder
If you decide you no longer need your own CA, check the Decommissioning a certification authority recipe in this chapter.
There's more…
DigiCert (https://digicert.com) is a public CA that issues certificates that are widely trusted. Let's Encrypt (https://letsencrypt.org) is a public CA that also issues certificates that are trusted in most scenarios. However, Let's Encrypt issues their certificates for free, as they are an open source CA.
Setting up a CA
If you decide to issue certificates from your own CA, use this recipe to set it up using AD CS.
Getting ready
Sign in with local administrator privileges to a Windows Server installation that you intend to use as a CA.
If you intend to implement an enterprise CA, ensure the server is domain-joined and you're signed in with a domain account that is a member of the Enterprise Admins group. Ensure that Active Directory replication works adequately.
How to do it…
Setting up a CA consists of the following steps:
- Installing the AD CS role
- Configuring the CA
Installing the AD CS role
Perform these steps to install the AD CS role using the Add Roles and Features wizard:
- Press Start.
- Search for Server Manager or run servermanager.exe. The Server Manager window appears.
- In the gray top bar of Server Manager, click Manage.
- Select Add Roles and Features from the menu. The Add Roles and Features Wizard window appears.
- On the Before you begin screen, click Next >.
- On the Select installation type screen, select Role-based or feature-based installation and click Next >.
- On the Select destination server screen, select the local Windows Server installation from the server pool list and click Next >.
- On the Select server roles screen, select the Active Directory Certificate Services role from the list of available roles. The Add Roles and Features Wizard pop-up screen appears:

Figure 12.2 – The Add Roles and Features Wizard pop-up window
- On the pop-up screen, click the Add Features button to add features that are required for AD CS. This installs Certification Authority Management Tools and then closes the pop-up window.
- Click Next >.
- On the Select features screen, click Next >.
- On the Active Directory Certificate Services screen, click Next >.
- On the Select role services screen, click Next >.
- On the Confirm installation selections screen, click Install.
- When configuration of the AD CS server role is done, click Close to close Add Roles and Features Wizard.
Alternatively, you can install the AD CS role using the following line of PowerShell in an elevated Windows PowerShell window:
Install-WindowsFeature ADCS-Cert-Authority -IncludeManagementTools
The preceding line of PowerShell is the preferred way to install the AD CS role on Server Core installations.
Configuring the CA
Perform these steps to configure the CA:
- Press Start.
- Search for Server Manager or run servermanager.exe. If the Server Manager window is still open, return to it.
- In the left navigation pane, click AD CS.
- Click the More… link in the yellow ribbon titled Configuration required for Active Directory Certificate Services at server. The All Servers Task Details and Notifications screen appears:
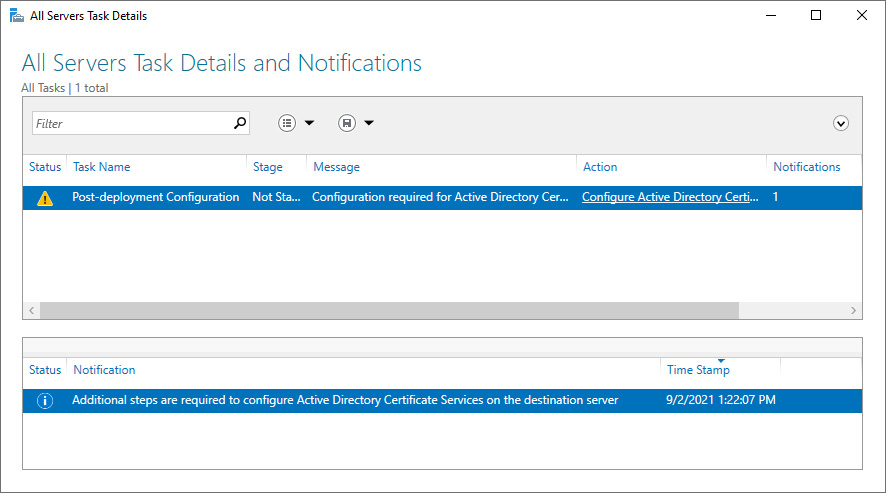
Figure 12.3 – The All Servers Task Details and Notifications window
- Click the Configure Active Directory Certificate Services on the destination server link in the Action column. The AD CS Configuration window appears.
- On the Specify credentials to configure role services screen, click Next >.
On the Select Role Services to configure screen, select the Certification Authority from the list of role services available to be configured and click Next >.
- On the Specify the setup type of the CA screen, select the Enterprise CA or the Standalone CA option. To configure an enterprise CA, the Windows Server installation needs to be domain-joined.
- Click Next >.
- On the Specify the type of the CA screen, select the Root CA or Subordinate CA option. If this is the first CA you're configuring and you're not aiming for a multi-tier CA hierarchy, select the Root CA option:
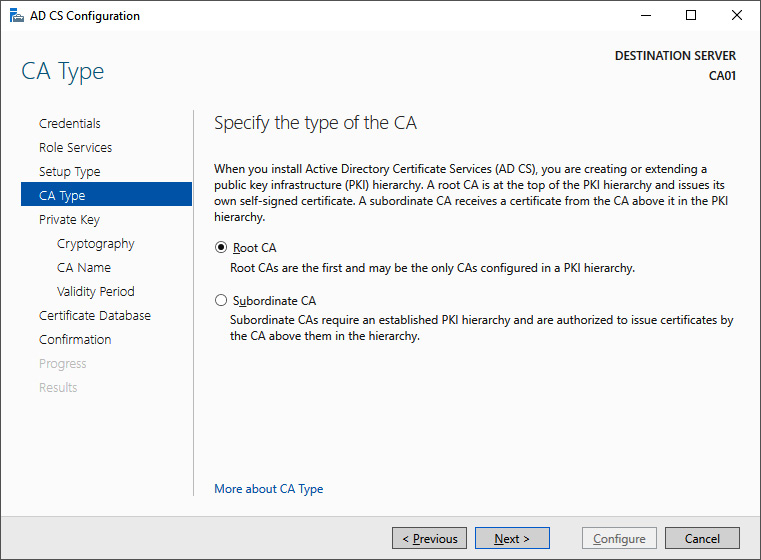
Figure 12.4 – Specifying the type of CA
- Click Next >.
- On the Specify the type of private key screen, click Next >.
- On the Specify the cryptographic option screen, click Next >.
- On the Specify the name of the CA screen, specify a meaningful name in the Common name for this CA: field. This name will be used to denote the CA for all certificates.
- Click Next >.
- On the Specify the validity period screen, click Next >.
- On the Specify the database locations screen, click Next >.
- On the Confirmation screen, click Configure.
- On the Results screen, click Close.
Alternatively, you can configure the CA with default settings using the following line of PowerShell in an elevated Windows PowerShell window:
Install-AdcsCertificationAuthority -CAType StandaloneRootCA
To configure an enterprise root CA, use the following line in PowerShell:
Install-AdcsCertificationAuthority -CAType EnterpriseRootCA
The preceding lines of PowerShell are the preferred ways to configure a CA on Server Core installations.
How it works…
There are four ways you can install a CA with AD CS:
- A standalone root CA
- A standalone subordinate CA
- An enterprise root CA
- An enterprise subordinate CA
An enterprise CA is Active Directory-integrated. This means that AD CS stores additional information in Active Directory that allows systems and people within your Active Directory environment to request and (automatically) renew certificates, and that makes issued certificates trusted within the environment. A standalone CA is not integrated with Active Directory. For standalone CAs, the certificate with the public key for the root certificate needs to be manually distributed to devices and persons that use certificates issued by the CA. This certificate needs to be placed in their Trusted Root Certification Authorities Certificate Store.
A root CA acts as the top CA in a hierarchy of CAs. A subordinate CA is a CA that is below the root CA in that hierarchy.
By default, a Windows Server 2022-based CA uses an SHA-256 RSA private key from the Microsoft Software Key Storage Provider with a 2,048-bit key length. Its default validity period is 5 years.
There's more…
Once you've installed the AD CS role on a Windows Server installation, its domain membership can no longer be changed. It cannot be joined to a domain from a workgroup and it cannot be removed from an Active Directory domain.
Setting up an online responder
When a lot of certificates are revoked on a CA, certification revocation checks may become slow. In this case, you can add the Online Responder role service to the CA. Use this recipe to configure the Online Responder role on an existing CA.
Getting ready
Sign in with local administrator privileges to the Windows Server-based CA that you intend to add the Online Responder feature to.
How to do it…
Setting up an online responder consists of the following steps:
- Installing the Online Responder role service
- Configuring the online responder
Installing the Online Responder role service
Perform these steps to configure an online responder for the CA:
- Press Start.
- Search for Server Manager or run servermanager.exe. The Server Manager window appears.
- In the gray top bar of Server Manager, click Manage.
- Select Add Roles and Features from the menu.
- The Add Roles and Features Wizard window appears.
- On the Before you begin screen, click Next >.
- On the Select installation type screen, select Role-based or feature-based installation and click Next >.
- On the Select destination server screen, select the local Windows Server installation from the server pool list and click Next >.
- On the Select server roles screen, expand the Active Directory Certificate Services role.
- Select the Online Responder role service:
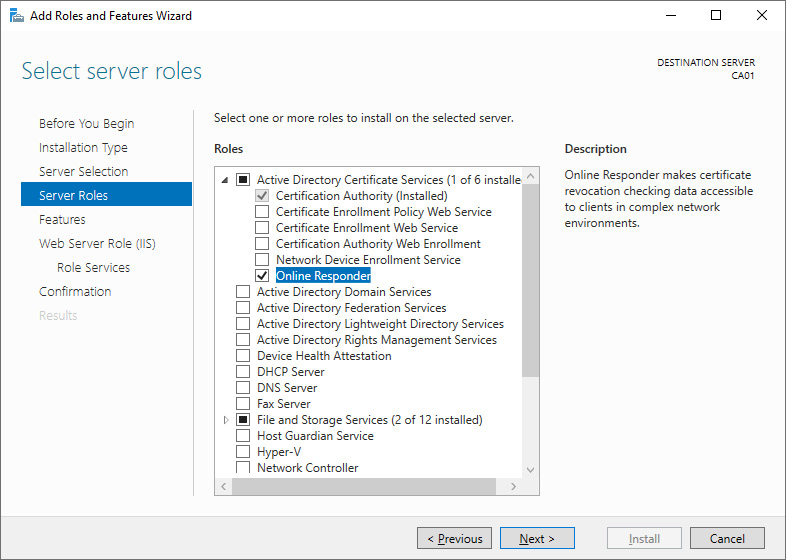
Figure 12.5 – The Online Responder role service selected on the Select server roles screen
The Add Roles and Features Wizard pop-up screen appears.
- In the pop-up screen, click the Add Features button to add features that are required for the online responder. This installs the Online Responder Tools, the IIS Management Console, and default Web Server features, and then closes the pop-up window.
- On the Select features screen, click Next >.
- On the Web Server Role (IIS) screen, click Next >.
- On the Confirm installation selections screen, click Install.
- On the Results screen, click Close.
Alternatively, you can install the Online Responder role service using the following line of PowerShell in an elevated Windows PowerShell window:
Add-WindowsFeature Adcs-Online-Cert
The preceding line of PowerShell is the preferred way to install the Online Responder role service on Server Core installations.
Configuring the online responder
With the role service installed, we can configure the online responder. Perform these steps:
- Press Start.
- Search for Server Manager or run servermanager.exe. If the Server Manager window is still open, return to it.
- In the left navigation pane, click AD CS.
- Click the More… link in the yellow ribbon titled Configuration required for Active Directory Certificate Services at server. The All Servers Task Details and Notifications screen appears.
- Click the Configure Active Directory Certificate Services on the destination server link in the Action column. The AD CS Configuration window appears.
- On the Specify credentials to configure role services screen, click Next >.
- On the Select Role Services to configure screen, select Online Responder in the list of role services available to be configured and click Next >.
- On the Confirmation screen, click Configure.
- On the Results screen, click Close.
Alternatively, you can configure the Online Responder role service using the following line of PowerShell in an elevated Windows PowerShell window:
Install-AdcsOnlineResponder
The preceding line of PowerShell is the preferred way to configure an online responder on Server Core installations.
How it works…
When a certificate is used, the CA is contacted to check whether the certificate was revoked during its lifetime. When a certificate is revoked, it means the certificate should no longer be used and should be considered compromised. Each certificate carries the location of the revocation information in its CRL distribution point.
By default, the CRL is shared through CRL distribution points via the CertEnroll file share and the CertEnroll IIS virtual folder.
However, the CRL can achieve quite an extensive length over the years. As the CRL is downloaded in its entirety from the distribution point every time a certificate is used, this can strain the CA and lead to slow CRL checks.
An online responder can be configured to remove the need to download the CRL in its entirety. Instead, when the revocation information is needed, the online responder checks its cached copy of the CRL and answers using the Online Certificate Status Protocol (OCSP), described in RFC 6960.
See also
OCSP is explained in more detail in RFC 6960: https://datatracker.ietf.org/doc/html/rfc6960.
Removing a certificate template
On enterprise CAs, the Active Directory integration offers certificate template functionality. These templates define the certificates that are issued by the CA. Use this recipe to remove a certificate template that was issues by an enterprise CA.
Getting ready
Sign in to the enterprise CA with a domain account that is a member of the Enterprise Admins group.
How to do it…
Perform the following steps to manage certificate templates:
- Press Start.
- Search for the Certification Authority management console or run certsrv.msc.
- The Certification Authority window appears:

Figure 12.6 – The Certification Authority management console
- In the left navigation pane, expand the node representing the CA.
- Click the Certificate Templates node. The main pane lists the certificate templates that this CA issues certificates for. Usual certificate templates that are available by default include User, Computer, and Web Server templates.
- Right-click a certificate template here and select Delete from the context menu. This will not delete the certificate template or any certificates issued based on the template.
- Close the Certification Authority management console.
Alternatively, you can use Windows PowerShell on a Windows Server installation configured as a CA to remove a certificate template:
Remove-CATemplate -Name 'Name of no longer needed certificate'
Using PowerShell, you can automate the removal of certificate templates or remove certificate templates using filters.
How it works…
Certificate templates act as templates for certificates. Certificate templates are stored in Active Directory.
The Certificate Templates node in the Certification Authority management console provides a list of the certificate templates that can be requested from the CA and, thus, can be issued from the CA.
You might want to remove a certificate template for a CA when you don't want a particular CA issuing that type of certificate. Another CA can then be used to issue that type of certificate. This is useful when you want to start issuing user certificates from a new CA with an optimized CRL distribution point or when you want dedicated CAs for certain types of certificates.
Duplicating and editing a certificate template
Certificate templates can be edited. However, it is a bad idea to edit the built-in certificate templates. Use this recipe to duplicate and edit a certificate template to be issued from an enterprise CA.
Getting ready
Sign in to the enterprise CA with a domain account that is a member of the Enterprise Admins group.
How to do it…
Perform the following steps to manage certificate templates:
- Press Start.
- Search for the Certification Authority management console or run certsrv.msc.
- In the left navigation pane, expand the node representing the CA. Right-click the Certificate Templates node and select Manage from the context menu to manage certificate templates. Alternatively, run certtmpl.msc.
The Certificate Templates Console (certtmpl.msc) window appears:
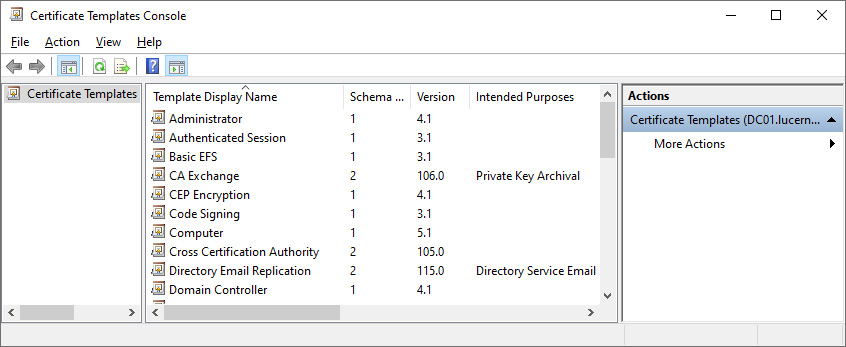
Figure 12.7 – The Certificate Templates Console window
- If you want to change the audience for a certificate template, right-click the certificate template in the main pane and select Properties. The Security tab of the certificate's properties allows you to change the permissions for users and computers in Active Directory. You can allow or deny Full Control, Read, Write, Enroll, and/or Autoenroll permissions to the certificate template.
- If you want to change other settings for a certificate template, right-click a certificate template in the main pane and select Duplicate Template from the context menu to create a copy of a template and change the properties of the duplicate template.
- Close the Certificate Templates Console window when done.
When you've duplicated a certificate template, you'll need to instruct at least one CA to issue the certificate template. Perform these steps to do so:
- Switch to the Certification Authority management console, or open it on the CA from which you want to issue certificates using the newly created certificate template.
- In the left navigation pane, expand the node representing the CA.
- Right-click the Certificate Templates node and select New, and then Certificate Template to Issue from the context menu. The Enable Certificate Template window appears.
- Select the newly created certificate template from the list and click OK.
Alternatively, you can use Windows Powershell on a Windows Server installation configured as a CA to add the certificate template to a CA:
Add-CATemplate -Name 'Name of certificate template to issue'
Using PowerShell, you can automate adding certificate templates or add multiple certificate templates at once.
How it works…
Certificate templates act as templates for certificates. Certificate templates are stored in Active Directory.
The Certificate Templates Console provides a way to manage certificate templates in Active Directory. Changes to certificate templates are picked up by all enterprise CAs.
As software may rely on requesting certain types of certificates with certain settings, it is recommended to not alter the built-in certificate templates. Instead, duplicating a certificate template to meet your needs and naming the certificate template appropriately is the way to go.
Deny permissions overrule allow permissions. Denying permissions in certificate templates is not recommended, as it adds complexity and makes issuing and managing certificates harder.
Requesting a web server certificate
One of the most common certificate uses is to encrypt web traffic. A web server certificate can be used for this purpose. This recipe shows how to request a web server certificate from an enterprise CA from a domain-joined Windows server.
Getting ready
Sign in to the web server with a domain account.
How to do it…
Perform these steps to request a web server certificate from an enterprise CA:
- Press Start.
- Type mmc.exe and press the Enter key.
- This starts an empty Microsoft Management Console window titled Console1.
- From the File menu, click Add/Remove Snap-in…. The Add or Remove Snap-ins pop-up window appears.
- Select Certificates from the Available snap-ins list and click Add >.
- Select Computer account and click Next >.
- Select Local Computer and click Finish. The Certificates (Local Computer) snap-in is now visible in the Selected snap-ins column:

Figure 12.8 – Adding or removing snap-ins
- Click OK. This closes the Add or Remove Snap-ins pop-up window.
- In the left pane of the Console1 window, expand Certificates (Local Computer), then Personal, and then Certificates.
- In the Action pane to the right, click More Actions, select All Tasks from the context menu, and then click Request New Certificate….
The Certificate Enrollment window appears.
- On the Before you begin screen, click Next.
- On the Select Certificate Enrollment Policy screen, ensure that Active Directory Enrollment Policy is selected:

Figure 12.9 – The Select Certificate Enrollment Policy window for certificate enrollment
- Click Next.
- On the Request certificates screen, select the Web Server certificate. Click the More information is required to enroll for this certificate. Click here to configure settings. link underneath the web server certificate.
- The Certificate Properties screen appears.
- On the Subject tab, add the way or ways the web server is going to be addressed. Specify the fully qualified DNS name as the Common Name type in the Subject Name: area and as the DNS name in the Alternative name: area. Add more DNS names for the web server, too:
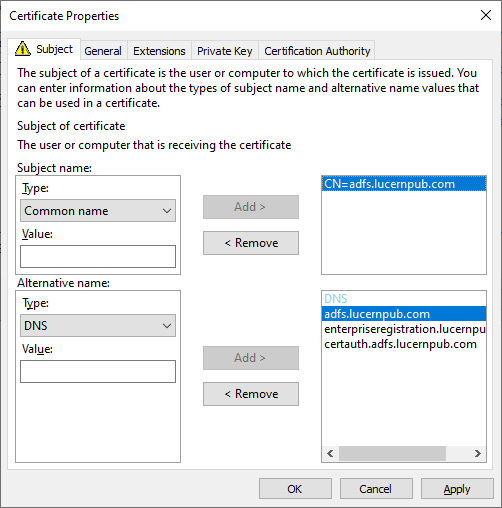
Figure 12.10 – Certificate Properties when requesting the default web server certificate
- Click OK when done. This closes the Certificate Properties window.
- On the Request certificates screen, click Enroll.
- On the Certificate Installation Results screen, click Finish.
How it works…
Web servers typically use a certificate that is stored in the local computer's personal certificate store.
The web server certificate template is the quintessential certificate to encrypt TLS traffic between web servers and web browsers. For this purpose, its key usage is set to digital signature and key encipherment. Its application policy is configured as server authentication. These settings allow the web server to verify its identity and encrypt traffic.
The web server certificate template is not readily available from an enterprise CA. This prevents any domain-joined device from requesting a certificate and acting as a web server. To allow domain-joined devices to request the web server certificate, allow the Enroll permission on the web server certificate template to the computer account(s) for the web server or a specific group containing web servers in Active Directory.
See also
See also the Duplicating and editing a certificate template recipe in this chapter.
Issuing domain controller certificates
Domain controllers use certificates. However, the certificate may not fulfill all of the requirements set out for it. This recipe shows how to issue the right certificates to domain controllers.
Getting ready
To issue Kerberos Authentication certificates to domain controllers, the CA needs to run Windows Server 2003 or a newer version.
Sign in to the enterprise CA with a domain account that is a member of the Enterprise Admins group.
To issue the necessary certificates for Windows Hello for Business, all domain controllers that request the new certificate template need to run Windows Server 2016. The CA needs to run at least Windows Server 2008 R2 in this scenario.
How to do it…
Before enabling the certificate autoenrollment policy through Group Policy, configure the Kerberos Authentication certificate template to supersede the domain controller and domain controller authentication certificate templates.
Perform these steps to do so:
- Press Start.
- Search for the Certification Authority management console or run certsrv.msc. The Certificate Authority window appears.
- In the left navigation pane, expand the node representing the CA. Right-click the Certificate Templates node and select Manage from the context menu to manage certificate templates.
- The Certificate Templates Console (certtmpl.msc) window appears.
- In the main pane, select the Kerberos Authentication certificate template.
- Right-click the certificate template and select Duplicate Template from the context menu. The Properties of New Template window appears:
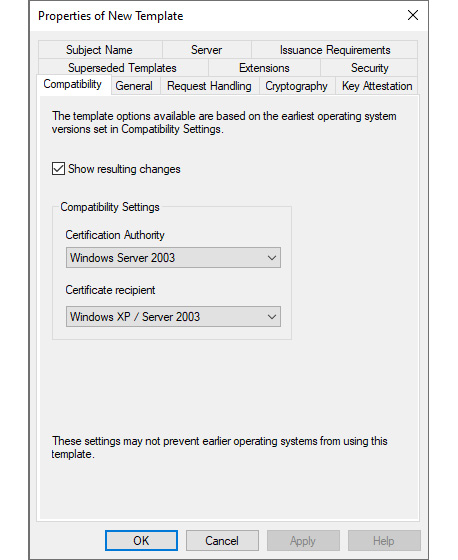
Figure 12.11 – The Properties of New Template window
- On the Compatibility tab, make the following changes in the Compatibility Settings area:
- Change the value for Certification Authority to at least Windows Server 2008 R2, specifying the earliest Windows Server version acting as the CA that will issue this certificate template. The Resulting changes pop-up window appears. Click OK to dismiss it.
- Change the value for Certification recipient to at least Windows 7 / Windows Server 2008 R2, specifying the earliest Windows Server version acting as the CA that will issue this certificate template. The Resulting changes pop-up window appears. Click OK to dismiss it.
- Navigate to the Subject Name tab.
- Ensure the settings for the certificate template's subject name are configured as shown in the following screenshot:

Figure 12.12 – The Subject Name tab for the new certificate template
- Navigate to the Cryptography tab.
- On the Cryptography tab, make the following changes:
- Change Provider Category to Key Storage Provider. This should change Algorithm name to RSA and the Minimum key size value to 2048.
- Change the value for the request hash to SHA256.
- Navigate to the Superseded Templates tab.
- Click the Add… button. The Add Superseded Template pop-up window appears:

Figure 12.13 – The Add Superseded Template pop-up window
- Select the following certificate templates using the Shift button to select multiple templates:
- Directory Email Replication
- Domain Controller
- Domain Controller Authentication
- Kerberos Authentication
- Click OK.
- Navigate to the General tab.
- Provide a meaningful name for the certificate template in the Template display name: and Template name: fields.
- Click OK to save the new template. The Properties of New Template window closes.
- In the Certification Authority management console, select the Certificate Templates node in the left navigation menu.
- From the Action menu, select New, and then click Certificate Template to Issue. The Enable Certificate Templates window appears:

Figure 12.14 – The Enable Certificate Templates window
- Select the newly created certificate template from the list of available certificate templates and click OK.
With these steps completed, disable the superseded certificate templates using the steps in the Removing a certificate template recipe.
With these steps completed, perform the steps for configuring the group policy for autoenrollment in the next recipe.
Any previously enrolled certificate based on the superseded certificate templates will be removed and replaced by a certificate based on the new certificate template.
How it works…
Domain controllers use certificates for several purposes:
- To verify their identities as domain controllers for the Active Directory domain
- To provide smart card authentication
- To encrypt traffic when acting as a host offering the secure Lightweight Directory Access Protocol (LDAPS)
Optionally, they can use their certificates for IPsec communications.
All certificates used by domain controllers are stored in the local computer's personal certificate store.
Throughout the history of Active Directory, several superseding certificate configurations have been issued to domain controllers. The domain controller certificate template, initially requested by Windows 2000 Server-based domain controllers and issued by Windows 2000 Server-based CAs, was superseded by the domain controller authentication certificate template. Since Windows Server 2008, the Kerberos Authentication certificate template is recommended to issue to domain controllers.
The domain controller certificate template is a v1 template. It cannot be modified. The domain controller authentication certificate template is a v2 template. It can be modified but does not support the new Microsoft Cryptographic API (CAPI) with the latest encryption and hashing algorithms. The Kerberos Authentication certificate is a v3 template. Unlike the v2 template, v3 templates and beyond can use the latest cryptographic abilities.
Since Windows Server 2012, v4 templates allow the option to renew with the same key on the Request Handling tab of the Properties for a certificate template.
LDAP and LDAPS are typically used by non-domain-joined devices and services. LDAPS provides encryption based on TLS, whereas LDAP doesn't provide encryption of the traffic exchanged with the domain controller.
For offering LDAPS, by default, a domain controller uses a self-signed certificate with a validity period of one year.
To provide a valid certificate for this purpose, a proper certificate should be enrolled. The Kerberos Authentication certificate template provides the necessary certificate for this purpose, too.
The Kerberos Authentication certificate template is recommended, as it includes both the Active Directory domain name and the domain controller's fully qualified domain name as its subject and, by default, supports the following purposes:
- Server authentication
- Client authentication
- Smart card logon
- Key Distribution System (KDS) authentication
For Windows Hello for Business, a new feature in Windows 10, the built-in Kerberos Authentication certificate template needs to be updated to comply with the certificate template settings outlined in Microsoft Docs.
The certificate templates that are superseded by the new certificate template are hard-coded for a domain controller to autoenroll. The enrollment for these certificates occurs, despite the lack of an autoenrollment policy. However, to have new certificate templates autoenroll, an autoenrollment policy needs to be created using Group Policy.
Managing certificate autoenrollment
Certificate autoenrollment allows admins to configure users and computers to automatically enroll and renew certificates. This recipe shows how to configure certificate autoenrollment.
Getting ready
Certificate autoenrollment is a feature of enterprise CAs. It cannot be configured on a standalone CA.
For certificate autoenrollment to work, the CA that issues the certificate needs to run Windows Server 2003 or a newer version. Active Directory needs to run the Windows Server 2003 schema or a newer version.
To create a Group Policy Object (GPO) and manage its settings, sign in to a system with the Group Policy Management Console installed with an account that is a member of the Domain Admins group.
To configure certificates for autoenrollment, sign in to an enterprise CA with an account that is a member of the Enterprise Admins group.
How to do it…
Certificate autoenrollment is based on Group Policy. Perform these steps to configure Group Policy settings for autoenrollment:
- Press Start.
- Search for Group Policy Management or run gpmc.msc. The Group Policy Management window appears.
- In the left navigation pane, expand the Forest node.
- Expand the Domains node, and then navigate to the domain where you want to create the GPO.
- Expand the domain name and select the Group Policy Objects node.
- Right-click the Group Policy Objects node and select New from the context menu. The New GPO pop-up window appears.
- Enter the name for the GPO.
- Ensure that you don't select Starter GPOs.
- Click OK to create the GPO.
- Locate the newly created GPO in the main pane.
- Right-click the GPO and select Edit from the context menu. The Group Policy Management Editor window appears.
- Expand either the Computer Configuration or the User Configuration node, depending on whether you want to configure autoenrollment for user accounts or devices.
- Expand the Policies node.
- Expand the Windows Settings node.
- Expand the Security Settings node.
- Select the Public Key Policies node.
- In the main pane, right-click the Certificate Services client – Auto-Enrollment setting and select Properties from the context menu. The Certificate Services Client – Auto-Enrollment Properties window appears:
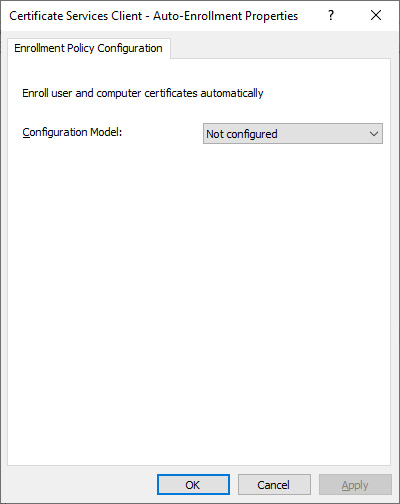
Figure 12.15 – The Certificate Services Client – Auto-Enrollment Properties window
- Change the Configuration Model: setting to Enabled.
- Select the Renew expired certificates, update pending certificates, and remove revoked certificates option.
- Select the Update certificates that use certificate templates option.
- Click OK to save the Group Policy setting and close the Certificate Services Client – Auto-Enrollment Properties window.
- Close the Group Policy Management Editor window.
- In the Group Policy Management window, in the left navigation pane, select the Domain Controllers OU.
- Right-click the Domain Controllers OU and select Link an Existing GPO… from the context menu. The Select GPO pop-up window appears.
- Select the newly created GPO from the Group Policy objects: list and click OK.
How it works…
When the Group Policy setting is enabled within the Computer Configuration part of a GPO, a computer will automatically enroll certificates that are configured for autoenrollment when the following occurs:
- The device reboots.
- A Group Policy refreshes in the background.
- The certutil.exe -pulse command is performed.
When the Group Policy setting is enabled within the User Configuration part of a GPO, the device will automatically enroll a user certificate for the user account when the following occurs:
- The user signs in interactively with the account.
- A Group Policy refreshes in the background.
- The certutil.exe -pulse command is performed.
See also
To extend the schema to meet the requirements for certificate autoenrollment, refer to the Extending the schema recipe in Chapter 1, Optimizing Forests, Domains and Trusts.
To change the settings for a certificate template to allow autoenrollment, refer to the Security tab in the Duplicating and editing a certificate template recipe.
Revoking a certificate
Every certificate issued by a CA is stored in its database. From there, it can be reissued and revoked. This recipe shows how to revoke a previously issued certificate.
Getting ready
Sign in with local administrator privileges when the CA on which you want to revoke one or more certificates is a standalone CA. Sign in with a domain account that is a member of the Enterprise Admins group when the CA on which you want to revoke one or more certificates is an enterprise CA.
How to do it…
Perform these steps to revoke a previously issued certificate:
- Press Start.
- Search for the Certification Authority management console or run certsrv.msc.
- In the left navigation pane, expand the node representing the CA.
- Click the Issued Certificates node.
- In the main pane, select the certificate you want to revoke.
- Right-click the certificate. From the context menu, select All Tasks and then Revoke Certificate. The Certificate Revocation pop-up window appears:
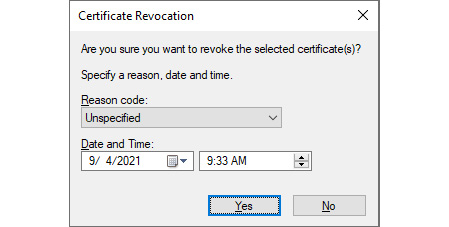
Figure 12.16 – The Certificate Revocation pop-up window
- Select a Reason code option from the list.
- Select a date and time as the end of the validity time period for the certificate. The certificate will not be trusted beyond this date and time. Click Yes.
- In the left navigation pane, click the Revoked Certificates node. The revoked certificate should appear in the list of revoked certificates in the main pane.
- In the left navigation pane, right-click the Revoked Certificates node. From the context menu, select All Tasks and then click Publish. The Publish CRL pop-up window appears.
- Click OK. This closes the Publish CRL pop-up window and publishes a new CRL.
- Close the Certification Authority management console.
How it works…
A certificate is valid for its validity period, as specified in the certificate template and certificate. However, a certificate can be revoked before the end of the validity period.
Every time a certificate action is performed, the certificate revocation status is checked with the CA that issued the certificate. The CA offers a CRL for this purpose.
When you revoke a certificate, it is important to publish a new CRL that includes the revocation information for the newly revoked certificate(s). Otherwise, when the revocation status for the certificate is checked, the certificate is not included in the CRL and remains valid.
In the Certification Authority management console, multiple certificates can be selected using the Shift and Ctrl keys. This way, multiple certificates can be revoked at once.
Decommissioning a CA
When a CA is no longer needed, it can be decommissioned. This recipe shows how to decommission a CA.
Getting ready
Sign in with local administrator privileges to the standalone CA you intend to decommission.
If you intend to decommission an enterprise CA, sign in with a domain account that is a member of the Enterprise Admins group. Ensure that Active Directory replication works adequately.
How to do it…
Perform these steps to decommission a CA:
- Press Start.
- Search for Server Manager or run servermanager.exe. The Server Manager window appears.
- In the gray top bar of Server Manager, click Manage.
- Select Remove Roles and Features from the menu. The Remove Roles and Features Wizard window appears.
- On the Before you begin screen, click Next >.
- On the Select destination server screen, select the local Windows Server installation from the server pool list and click Next >.
- On the Remove server roles screen, deselect the Active Directory Certificate Services role. The Remove Roles and Features Wizard pop-up window appears.
- Click Remove Features to remove the features and close the pop-up window.
- Click Next >.
- On the Remove features screen, click Next >.
- On the Confirm removal selections screen, click Remove.
- On the Removal progress screen, click Close.
Alternatively, you can decommission the CA using the following line of PowerShell in an elevated Windows PowerShell window:
Uninstall-WindowsFeature ADCS-Cert-Authority -IncludeManagementTools
The preceding line of PowerShell is the preferred way to decommission a CA on Server Core installations.
How it works…
Just like demoting a domain controller, decommissioning a CA revolves around removing the server role from the Windows Server installation. The Remove Roles and Features wizard performs all the configurations needed.
Ensure that all certificates issued by the CA to be decommissioned are either expired, revoked, or removed. Renew any necessary certificates from another CA before decommissioning a CA. Otherwise, certificates that may be required for continued operations will no longer be trusted.