
Chapter 10. Deploying ActiveMQ in the enterprise
The first three parts of this book covered how to use ActiveMQ as a messaging and integration platform. This chapter is the first to cover advanced ActiveMQ configuration, so if you’re new to messaging or ActiveMQ, you should read the first three parts before reading this chapter.
This chapter will focus on the enterprise deployment of ActiveMQ message brokers, the type of deployments that are used in production environments where applications need to be available without message loss at a 24/7 service level. This chapter will demonstrate how to configure ActiveMQ for high availability so that an ActiveMQ deployment can survive machine or network loss.
For many organizations, application deployment is global, spanning multiple offices across large geographical areas. So we’ll show you how ActiveMQ can be used as a reliable global information conduit by using the technique of store and forward to pass messages from one geographic location to another.
Finally, we’ll examine deploying ActiveMQ for massively concurrent applications, where large numbers of concurrent connections and queues are a requirement. We’ll examine the different configuration and deployment options of ActiveMQ and look at the pros and cons for each one.
10.1. Configuring ActiveMQ for high availability
When an application is deployed into a production environment, it’s important to plan for disaster scenarios—network failures, hardware failures, software failures, or power outages. ActiveMQ can be deployed defensively, to prevent such failures from inhibiting your application in production. Typically you need to run multiple ActiveMQ brokers on different machines, so that if one machine or one ActiveMQ broker fails, a secondary one can take over. Using ActiveMQ terminology, such deployments are known as master/slave, where one broker takes the role of the primary or master and there are one or more slave brokers that wait for the master to fail, at which point one will take over to become the new master. The ActiveMQ Java and C++ clients provide a built-in failover transfer, so that they’ll automatically switch over from the failed master to the new master without message loss.
ActiveMQ currently supports two different types of master/slave configurations: shared nothing, where each ActiveMQ broker has its own unique message storage, and shared storage, where multiple ActiveMQ brokers can connect to the shared message store (a relational database or a shared file system) but only one broker will be active at a time. We’ll discuss these deployment scenarios in this section.
10.1.1. Shared nothing master/slave
A shared nothing master/slave refers to a deployment where both the master and the slave have their own message storage. This is probably the easiest option to use for providing high availability of message brokers. A slave is configured to connect to the master broker. Whereas the slave needs a special configuration denoting its special state, the master broker needs no special configuration. There is some optional configuration for the master, which we’ll cover at the end of this section.
All message commands (messages, acknowledgements, subscriptions, transactions, and so on) are replicated from the master to the slave as depicted in figure 10.1. Such replication takes place before the master acts upon any command it receives.
Figure 10.1. A shared nothing master/slave

A slave broker will connect to the master at startup, so ideally the master should be running first. The slave broker won’t start any transports (so it can’t accept any client or network connections) and won’t itself initiate any network connections unless the master fails. A failure of the master is detected by loss of connectivity from the slave to the master.
A shared nothing master/slave configuration does impose some extra overhead on message processing, but this overhead is small considering the benefit that it provides. When a message producer sends a persistent message to the master, it’ll wait for a receipt from the master until it can send the next message. The master won’t send the receipt until it has replicated the message to the slave, and in turn wait for the slave to finish its processing of the message (which will typically involve the slave persisting it to storage). The master will then process the message (persist it to storage and dispatch it to any interested consumers) before sending back a receipt to the message producer that it has successfully processed the message.
When a master broker fails, the slave has two choices:
- Shut itself down —Hence, it’s only acting to preserve the state of the master. In this scenario, an administrator will typically have to manually configure the slave to be the master, and configure a new message broker to take the role of the slave.
- Start up its transports and initiate any network connections —Hence, the slave automatically becomes the new master.
If the slave broker takes over the role of the master broker, all clients using the failover transport will fail over to the new master. For JMS clients to ActiveMQ, the default transport used by the client’s connection is the failover transport and is typically configured to be able to connect to both the master and the slave, as shown:
failover://(tcp://masterhost:61616,tcp://slavehost:61616)?randomize=false
ActiveMQ’s shared nothing master/slave configuration has some limitations. A master will only replicate its active state from the time the slave connects to it. So if a client is using the master before the slave is attached, any messages or acknowledgements that have been processed by the master before the slave has attached itself can potentially be lost if the master then fails. You can avoid this by setting the waitForSlave property on the master configuration. This property forces the master to not accept any client connections until a slave broker has attached to it. Other limitations are that a master is allowed to have only one slave, and that a slave itself can’t have another slave.
If you already have a running broker that you want to use in a shared nothing master/slave configuration, it’s recommended that you first stop that broker, copy all message store files (usually in the data directory) to the slave machine, and, after configuring, restart the master broker and the slave broker. You also need to do the same when introducing a new slave after a master has failed. The shared nothing broker configuration should only be used when you want to ensure that you don’t lose messages for your application, but you can afford to have some down time to attach a new slave after the master has failed and the old slave has become the master.
When to Use Shared Nothing Master/Slave
You should use a shared nothing master/slave configuration in production environments when some down time on failure is acceptable. Manual intervention by an administrator will be necessary after a master fails, as it would be advisable to set up and configure a new slave for the new master after the old master has failed.
Having covered the theory, let’s look at how to configure a shared nothing master/slave.
Configuring Shared Nothing Master/Slave
Designating that a broker is a slave is straightforward. You configure a master-Connector service that accepts the following parameters:
- remoteURI —The URI on which the master broker is listening
- userName —Optional username if the master has authentication configured
- password —Optional password if the master has authentication configured
The following example of slave configuration shows how to configure the slave broker with a masterConnector:
<services>
  <masterConnector remoteURI="tcp://remotehost:62001"
    userName="Rob" password="Davies"/>
</services>
You’d normally configure the slave to have duplicate transport and network configurations as the master broker.
One additional optional property can be useful for a slave in a shared nothing configuration: the shutdownOnMasterFailure property. When this property is enabled, the slave will safely shut down, ensuring no message loss, allowing an administrator to manual set up a new slave. The slave broker properties are shown in table 10.1.
Table 10.1. Slave broker properties
|
Property name |
Default value |
Description |
|---|---|---|
| shutdownOnMasterFailure | false | The slave will shut down when the master does. |
You can designate a broker to be a master without any additional configuration; some optional properties may be useful. The master broker properties are shown in table 10.2.
Table 10.2. Master broker properties
|
Property name |
Default value |
Description |
|---|---|---|
| waitForSlave | false | The master won’t allow any client or network connections until a slave has attached itself. |
| shutdownOnSlaveFailure | false | If true, the master will shut down if a slave becomes detached. This ensures that a slave is only ever in sync with the master. |
In addition to the shared nothing master/slave configuration, ActiveMQ also offers a shared storage master/slave configuration.
10.1.2. Shared storage master/slave
Whereas the shared nothing master/slave offers the ability for brokers to remain independent of one another, the shared storage master/slave allows many brokers to share the storage mechanism, but only one broker can be live at any given time. Using a shared resource storage will ensure that in the event of a master broker failure, no manual intervention will be required to maintain the integrity of your application in the event of an additional failure. Another benefit is that there’s no limitation on the number of slave brokers that can be active at one time with shared storage master/slave.
The ActiveMQ shared storage master/slave configuration comes in two flavors: a relational database or a file system–based storage.
Shared Database Master/Slave
If you’re already using a relational database for message storage, then providing broker high availability is extremely straightforward. When an ActiveMQ message broker uses a relational database, it grabs an exclusive lock on a table to ensure that no other ActiveMQ broker can access the database at the same time. This is due to the fact that the state of a broker is held in the storage mechanism and is only designed to be used by a single broker at a time. The shared database master/slave configuration is depicted in figure 10.2.
Figure 10.2. Using a shared relational database for ActiveMQ master/slave high availability

If you’re running more than one broker that’s trying to access the same database, only the first broker to connect will grab the lock. Any subsequent brokers will poll until they can get access to the lock. While in this polling state, the ActiveMQ broker assumes that it’s a slave, so it won’t start any transport connections or network connections.
You can run multiple brokers, and only one broker will ever be the master at any given time. All the brokers in this configuration can use the same configuration file, which makes setup easy. If a master broker fails, a slave broker will be able to grab the lock on the database and will then take over as the new master broker. Since all the ActiveMQ brokers are using the same shared database, no additional manual intervention is required to introduce new brokers or remove existing ones.
When to Use Shared Database Master/Slave
Shared database master/slave is an ideal configuration if you’re already using an enterprise relational database. Although generally slower than a shared nothing configuration, it requires no additional configuration, and there are no limitations on the number of slave brokers that can be run or when they can be run.
If access to an enterprise database isn’t an option, or performance is a consideration, you can use a shared file system instead, where conceptually ActiveMQ brokers can be set up in the same way as the shared database.
Shared File System Master/Slave
An alternative to using a shared database is to use a shared file system. The setup is similar to the shared database master/slave, in that no additional configuration of an ActiveMQ broker is required. Also, there are no limitations on the number of slaves that can be run or when they can be introduced into the system. It’s recommended that you use the KahaDB message store, but use an underlying shared file system for the message storage. When the KahaDB message store starts, it’ll attempt to grab a file lock, to prevent any other broker from accessing the file-based message store at the same time. The shared file system master/slave configuration is shown in figure 10.3.
Figure 10.3. Using a shared file system for ActiveMQ master/slave high availability
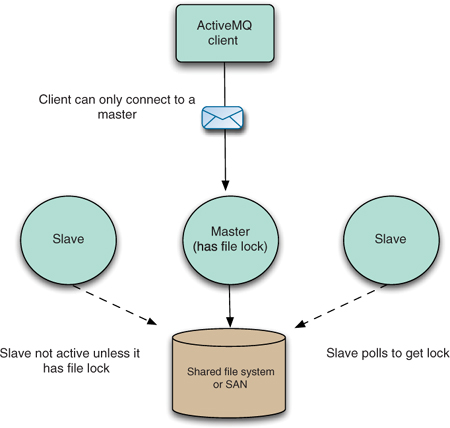
Just like the shared database master/slave configuration, there’s no restriction on the number of slaves that can be started. The first broker to get the lock on the file store automatically becomes the master, and any brokers that try to connect after that automatically become slaves.
There are some technical restrictions regarding where you can run a shared file system master/slave configuration. The shared file system requires the semantics of a distributed shared file lock. So if you’re not using a storage area network (SAN), there are some alternatives such as Network File System (NFS)—available on Mac OS X, OpenVMS, Microsoft Windows (from third parties), Solaris, and AS/400. If you’re using Fedora or RedHat Enterprise (5.3 and above), it’s recommended you use the Global File System (GFS) 2, which requires a cluster locking protocol, such as dlm, the distributed lock manager, which is a Linux kernel module.
When to Use Shared File System Master/Slave
Using a shared file system is probably the best solution for providing high availability for ActiveMQ to date. It combines the high throughput of KahaDB and the simplicity that you get from using a shared resource. KahaDB is only limited by the performance of the underlying shared file system. The only caveat is that you’re restricted to environments that support distributed locking on a shared file system.
So ActiveMQ provides features to make it resilient to failures in production using the shared nothing master/slave and the shared storage master/slave configurations. You should now have a good understanding of the different ActiveMQ high availability options and be able to choose the best configuration for your application’s needs.
The next section will examine how to use ActiveMQ to reliably pass messages from broker to broker to support applications that need to use messaging to communicate across geographically distributed locations.
10.2. How ActiveMQ passes messages across a network of brokers
ActiveMQ supports the concept of linking ActiveMQ message brokers together into different topologies, or networks of brokers as they’re known. Often it’s a requirement that geographically dispersed applications need to communicate in a reliable way. This is a situation where having a centralized broker architecture into which all the clients connect isn’t the optimal messaging paradigm.
Through the rest of this section, the ActiveMQ store and forward concept will be examined in detail. We’ll look at how brokers discover each other in a network and how to configure an ActiveMQ broker to cooperate in a network.
10.2.1. Store and forward
ActiveMQ networks use the concept of store and forward, whereby messages are always stored in the local broker before being forwarded across the network to another broker. This means that if messages can’t be delivered due to connectivity issues, when the connection is reestablished, a broker will be able to send any undelivered messages across the network connection to the remote broker. By default, a network only operates in a unidirectional manner and logically pushes messages across its network connection, as shown in figure 10.4.
Figure 10.4. Passing messages between ActiveMQ brokers using store and forward

When a network is established from a local broker to a remote broker, the remote broker will pass information containing all its durable and active consumers’ destinations to the local broker. The local broker uses this information to determine what messages the remote broker is interested in and forward them to the remote broker. It’s possible to define filters on the network connection and to always include or exclude messages for a particular destination—we’ll cover this in the configuration section later in this chapter.
Having networks operate in one direction allows for networks to be configured for message passing in a one-way fashion. If you want networks to be bidirectional, you can either configure the remote broker with a network connector to point to the local broker, or configure a network connector to be duplex so it sends messages in both directions.
Suppose you have a deployment scenario where you have many supermarkets that need to connect to a back office order system. It would be hard to configure new supermarkets and inflexible for the broker(s) at the back office to be aware of all the remote brokers in each new supermarket. Typically the back office brokers would be located behind a firewall with only a limited number of ports open to accept connections inward, as depicted in figure 10.5.
Figure 10.5. Supermarket communicates to its back office using an ActiveMQ bidirectional network

The diagram of the supermarket broker in figure 10.5 requires that the network connector be configured in duplex mode. The single network connection, established from the supermarket broker to the back office, would be able to pass messages in both directions and would behave in the same way as if the back office broker had established a normal network connection back to the supermarket broker.
The configuration for the supermarket broker would include configuration for the network connector that would look something like the following.
Listing 10.1. Configuring a store network broker
<networkConnectors>
  <networkConnector uri="static://(tcp://backoffice:61617)"
      name="bridge"
      duplex="true"
      conduitSubscriptions="true"
      decreaseNetworkConsumerPriority="false">
  </networkConnector>
</networkConnectors>
Please be aware that the order in which you specify the network connections and the persistence you use in the ActiveMQ broker configuration is important. Always configure networks, persistence, and transports in the following order:
- Networks —They need to be established before the message store.
- Message store —Should be configured before transports.
- Transports —Should be the last in the broker configuration.
An example broker configuration in the correct order is shown next.
Listing 10.2. An example of the correct broker configuration order
<?xml version="1.0" encoding="UTF-8"?>
<beans xmlns="http://activemq.apache.org/schema/core">

 <broker brokerName="receiver" persistent="true" useJmx="true">
   <networkConnectors>
    <networkConnector uri="static:(tcp://backoffice:61617)"/>
   </networkConnectors>

   <persistenceAdapter>
     <kahaDB directory = "activemq-data"/>
   </persistenceAdapter>

   <transportConnectors>
    <transportConnector uri="tcp://localhost:62002"/>
   </transportConnectors>
 </broker>

</beans>
In large deployment scenarios, it makes sense to combine high availability and network configurations, as shown in figure 10.6.
Figure 10.6. Combining high availability and networks for an enterprise deployment of ActiveMQ

In this scenario, the local master and slave brokers both need to be configured to create network connections to both the remote master and the slave to cater to the possibility of the remote master failing. Only when a slave becomes active (becomes the new master) will it start its transports and network connections.
If a network can’t establish a connection to a remote broker (as in the case of a remote slave), or the network connection fails, the network will poll the connection until it can establish a connection.
In this section you’ve seen how store and forward works, as well as message passing over networks, with an example use case of supermarkets communicating with their back office systems. In the next section, we’ll look at how brokers in a network discover each other.
10.2.2. Network discovery
When a network connection is established to a remote broker, that connection uses a discovery agent to locate the remote broker and (re-)establish that connection. Two main types of network discovery are provided with ActiveMQ:
- Dynamic —Searches for brokers using multicast or rendezvous
- Static —Configured with list of broker URLs with which to establish a connection
Using multicast discovery to create network connections is straightforward. When you start an ActiveMQ broker with a multicast transport on a network connector, it will search for another broker using IP multicast and establish a connection. A network configuration for multicast discovery is shown in the following listing.
Listing 10.3. A network connector using multicast
<networkConnectors>
     <networkConnector uri="multicast://default"/>
</networkConnectors>
The default name in the multicast:// URI denotes the group to which the broker belongs. When using multicast discovery, it’s strongly recommended that you use a unique group name so that your brokers don’t connect to other application brokers unbeknownst to you. Not only can this lead to surprising results, but you can spend a great deal of time chasing a red herring!
There are a couple of limitations with multicast discovery, including the ability to control which brokers are discovered, and the fact that it’s usually restricted to the discovery of brokers on the local network segment. This is because IP multicast doesn’t extend through routers.
Most of the example configurations used previous to this chapter have used static discovery for establishing networks. Although they require a little more configuration and they wouldn’t be suitable for a large number of networks, they’re typically used for most deployments. Static discovery accepts a list of broker URIs and will try to connect to the remote brokers in the order they’re determined in the list.
For example, to configure the local master broker and the local slave broker to connect to the remote master, but fail over to the remote slave (see figure 10.6), you’d configure the local brokers as shown next.
Listing 10.4. An example network connector
<networkConnectors>
  <networkConnector
    uri="static:(tcp://remote-master:61617,tcp://remote-slave:61617)"/>
</networkConnectors>
The static network discovery agent can be configured to control which frequency it will try to reestablish a connection with on failure. The configuration properties for the static transport are shown in table 10.3.
Table 10.3. Configuration properties for a static transport
A network connection will always try to establish a connection to a remote broker, so there’s no concept of just giving up! You can set the configuration options for the static transport as part of the URI. An example of this is provided in the following listing.
Listing 10.5. An example of configuring the static transport
<networkConnectors>
  <networkConnector
    uri="static:(tcp://remote:61617)?useExponentialBackOff=false"/>
</networkConnectors>
The multicast and the static discovery mechanisms are shown here, along with some of the trade-offs between them. Many configuration options are available when setting up networks in ActiveMQ; these will be reviewed in more detail in the next section.
10.2.3. Network configuration
Networks by default rely on the remote broker to inform them when the broker is interested in their local messages. For existing active and new message consumers, the destination to which the message consumer is listening is propagated to the local broker’s network connection. The local network connection will then subscribe on behalf of the remote broker’s message consumers for messages to be forwarded across the network. In order for networks to function properly in a dynamic environment, the broker property advisorySupport needs to be enabled (it’s possible to have a statically configured network without enabling advisories). ActiveMQ uses advisory messages to communicate state between brokers (more on this in chapter 14). Because of this, advisory messages are used to forward information about changing message consumers across broker networks as well as clients.
There may not be any active durable subscribers or consumers for an existing destination on the remote broker. So when the network connection is initialized to the remote broker, the remote broker will read through its message store for existing destinations and pass those to the local broker. Then the local broker can forward messages for those destinations as well.
It’s important to note that a network will use the name of the broker to create a unique durable subscription proxy on behalf of a remote broker. Hence, if at a later point in time you change the name of the broker, you could lose messages over networks for durable topic subscribers. To avoid this, make sure to use a unique name for the brokerName attribute on the <broker> element. See the following for a brief example.
Listing 10.6. Make sure to use unique names for the broker
<broker xmlns="http://activemq.apache.org/schema/core"
  brokerName="brokerA"
  dataDirectory="${activemq.base}/data">
...
  <networkConnectors>
    <networkConnector
      name="brokerA-to-brokerB" uri="tcp://remotehost:61616" />
  </networkConnectors>
</broker>
With a basic understanding of how networks operate, you’ll be able to comprehend some of the side effects if you change the default network configuration. A network has several important configuration properties, in addition to the duplex property.
Network Property: Dynamiconly
All networks are dynamic only in the sense that they depend on advisories. The dynamicOnly option configures whether inactive durable subs are networked on a restart; with dynamicOnly=true, a networked durable sub will not be enabled till it is again activated. The dynamicOnly property is false by default.
Network Property: Prefetchsize
The prefetchSize effects message dispatch to forwarding consumers, but message acknowledgement always uses INDIVIDUAL_ACK mode on each message receipt. The default value for this property is 1000.
Network Property: Conduitsubscriptions
An ActiveMQ message broker will send a copy of a message to every interested consumer of which it’s aware, even across networks. But this can be a problem, as the remote broker will send every message it receives to any of its interested consumers. So it’s possible to end up with duplicate messages on the remote broker. The conduitSubscriptions property is used to inform the network connection that it should treat multiple matching destinations as a single destination to avoid this problem. The conduitSubscriptions property is true by default.
Network Property: Excludeddestinations
You can tell the network to exclude certain destinations from passing messages across a network. This property can be used, for example, to prevent destinations that should only be used by local consumers from being propagated to a remote broker. Excluded destinations are denoted inside of the <excludedDestinations> element as either a <queue> or a <topic> element. Each one uses a physicalName attribute for the name of the queue or topic to exclude. You can combine a list of excluded destinations, and use wildcards to denote the names of the destinations to exclude, too.
Excluded destinations take priority over both the <staticallyIncluded-Destinations> element and <dynamicallyIncludedDestinations> element. So if you have matching destinations in either of those lists, they’ll be excluded. Here’s an example configuration using the <excludedDestinations> element.
Listing 10.7. Creating a list of excluded destinations
<networkConnectors>
  <networkConnector
    uri="static:(tcp://remote:61617)?useExponentialBackOff=false">
    <excludedDestinations>
      <queue physicalName="audit.queue-1"/>
      <queue physicalName="audit.queue-2"/>
      <queue physicalName="local.>"/>
      <topic physicalName="local.>"/>
    </excludedDestinations>
  </networkConnector>
</networkConnectors>
Network Property: Dynamicallyincludeddestinations
You can ask the network to only pass messages to the remote broker for active message consumers that match the list of destinations for dynamicallyIncludedDestinations. The format is the same as the excludedDestinations. An empty list denotes that all messages will be passed to the remote broker, as long as they’re not in the excludedDestinations list.
Network Property: Staticallyincludeddestinations
You can ask the network to only pass messages to the remote broker if they match the list of destinations for staticallyIncludedDestinations. The format is the same as the excludedDestinations; an example is provided in the following listing.
Listing 10.8. Setting options for included destinations
<networkConnectors>
  <networkConnector
    uri="static:(tcp://remote:61617)?useExponentialBackOff=false">
    <staticallyIncludedDestinations>
      <queue physicalName="management.queue-1"/>
      <queue physicalName="management.queue-2"/>
      <queue physicalName="global.>"/>
      <topic physicalName="global.>"/>
    </staticallyIncludedDestinations>
  </networkConnector>
</networkConnectors>
Network Property: Decreasenetworkconsumerpriority
The decreaseNetworkConsumerPriority property influences the algorithm used to determine which message consumer for a queue should receive the next dispatched message. When enabled, it’ll give a network consumer the lowest priority, meaning that messages from a local broker queue will only be sent to a remote broker if there are no local consumers or they’re all busy. But the decrease in priority depends on the broker path. For example, if a consumer is two hops away from the broker it will be given the priority of –7, a consumer one hop away will be given the priority of –5, and a local consumer will be given priority 0. The decreaseNetworkConsumerPriority property is false by default.
Network Property: Networkttl
The networkTTL property denotes the maximum number of remote brokers a message can pass through before being discarded. This is useful for ensuring messages aren’t forwarded needlessly, if you have a cyclic network of connected brokers. The default value for the networkTTL property is 1.
Network Property: Name
The default name for a network connector is bridge. It’s a good idea to give this property a unique value when the broker is first configured, so it can be found easily from JMX.
There are cases when it makes sense to have more than one network connection between the same local and remote brokers. In this case, each connector requires a unique name. So why have more than one network connection between the two same brokers? It comes down to performance.
A network connection uses a single transport connection, and if you’re anticipating a heavy load across a network, it makes sense to have more than one transport connection. You do need to be careful that you don’t get duplicate messages, so you have to set up the network connections with the appropriate filters. Using one for queues and one for topics can often improve throughput for general messaging use cases, as depicted in figure 10.7.
Figure 10.7. Using more than one network connection for message passing between ActiveMQ brokers

The corresponding configuration for figure 10.7 is shown next.
Listing 10.9. Setting options for included destinations
<networkConnectors>
  <networkConnector uri="static://(tcp://remotehost:61617)"
     name="queues_only"
     duplex="true"
    <excludedDestinations>
        <topic physicalName=">"/>
    </excludedDestinations>
  </networkConnector>
  <networkConnector uri="static://(tcp://remotehost:61617)"
     name="topics_only"
     duplex="true"
    <excludedDestinations>
        <queue physicalName=">"/>
    </excludedDestinations>
  </networkConnector>
</networkConnectors>
Having looked at how networks operate and how to configure them, we can now use this knowledge to help scale your ActiveMQ applications.
10.3. Deploying ActiveMQ for large numbers of concurrent applications
Scaling your applications that make use of ActiveMQ can take some time and require some diligence. In this section, we examine three techniques to help you with this task. We’ll start with vertical scaling, where a single broker is used for thousands of connections and queues. Then we’ll look at scaling to tens of thousands of connections by horizontally scaling your applications using networks. Finally we’ll examine traffic partitioning, which will balance scaling and performance, but will add more complexity to your ActiveMQ application.
10.3.1. Vertical scaling
Vertical scaling is a technique used to increase the number of connections (and therefore load) that a single ActiveMQ broker can handle. By default, the ActiveMQ broker is designed to move messages as efficiently as possible to ensure low latency and good performance. But you can make some configuration decisions to ensure that the ActiveMQ broker can handle both a large number of concurrent connections and a large number of queues.
By default, ActiveMQ will use blocking I/O to handle transport connections. This results in a thread being used per connection. You can use nonblocking I/O on the ActiveMQ broker (and still use the default transport on the client) to reduce the number of threads used. Nonblocking I/O can be configured via the transport connector in the ActiveMQ configuration file. An example of this is shown next.
Listing 10.10. Configure the NIO transport connector
<broker>
  <transportConnectors>
    <transportConnector name="nio" uri="nio://localhost:61616"/>
  </<transportConnectors>
</broker>
In addition to using a thread per connection for blocking I/O, the ActiveMQ broker can use a thread for dispatching messages per client connection. You can tell ActiveMQ to use a thread pool instead by setting the system property named org.apache.activemq.UseDedicatedTaskRunner to false. Here’s an example:
ACTIVEMQ_OPTS="-Dorg.apache.activemq.UseDedicatedTaskRunner=false"
Ensuring that the ActiveMQ broker has enough memory to handle lots of concurrent connections is a two-step process. First, you need to ensure that the JVM in which the ActiveMQ broker is started is configured with enough memory. This can be achieved using the -Xmx JVM option as shown:
ACTIVEMQ_OPTS="-Xmx1024M
-Dorg.apache.activemq.UseDedicatedTaskRunner=false"
Second, be sure to configure an appropriate amount of the memory available to the JVM specifically for the ActiveMQ broker. This adjustment is made via the <system-Usage> element’s limit attribute. A good rule of thumb is to begin at 512 MB as the minimum for an ActiveMQ broker with more than a few hundred active connections. If your testing proves that this isn’t enough, bump it up from there. You can configure the memory limit in the ActiveMQ configuration file as shown in the following listing.
Listing 10.11. Setting the memory limit for the ActiveMQ broker
<systemUsage>
    <systemUsage>
        <memoryUsage>
           <memoryUsage limit="512 mb"/>
        </memoryUsage>
        <storeUsage>
           <storeUsage limit="10 gb" name="foo"/>
        </storeUsage>
        <tempUsage>
           <tempUsage limit="1 gb"/>
        </tempUsage>
   </systemUsage>
</systemUsage>
It’s also advisable to reduce the CPU load per connection. If you’re using the Open-Wire wire format, disable tight encoding, which can be CPU intense. Tight encoding can be disabled on a client-by-client basis using URI parameters. Here’s an example:
String uri = "failover://(tcp://localhost:61616?"
  + wireFormat.tightEncodingEnabled=false)";
ConnectionFactory cf = new ActiveMQConnectionFactory(uri);
We’ve looked at some tuning aspects for scaling an ActiveMQ broker to handle thousands of connections. So now we can look at tuning the broker to handle thousands of queues.
The default queue configuration uses a separate thread for paging messages from the message store into the queue to be dispatched to interested message consumers. For a large number of queues, it’s advisable to disable this by enabling the optimize-Dispatch property for all queues, as shown next.
Listing 10.12. Setting the optimizeDispatch property
<destinationPolicy>
      <policyMap>
        <policyEntries>
          <policyEntry queue=">" optimizedDispatch="true"
/>
        </policyEntries>
      </policyMap>
</destinationPolicy>
Note the use of the wildcard > character in listing 10.11, which denotes all queues recursively.
To ensure you can scale not only to thousands of connections, but also to tens of thousands of queues, use either a JDBC message store or the newer and much faster KahaDB message store. KahaDB is enabled by default in ActiveMQ.
So far we’ve looked at scaling connections, reducing thread usage, and selecting the right message store. An example configuration for ActiveMQ, tuned for scaling, is shown in the following listing.
Listing 10.13. Configuration for scaling
<broker xmlns="http://activemq.apache.org/schema/core"
  brokerName="amq-broker"
  dataDirectory="${activemq.base}/data">

  <persistenceAdapter>
    <kahaDB directory="${activemq.base}/data"
      journalMaxFileLength="32mb"/>
  </persistenceAdapter>

  <destinationPolicy>
    <policyMap>
      <policyEntries>
        <policyEntry queue=">" optimizedDispatch="true"/>
      </policyEntries>
    </policyMap>
  </destinationPolicy>

  <systemUsage>
    <systemUsage>
      <memoryUsage>
        <memoryUsage limit="512 mb"/>
      </memoryUsage>
      <storeUsage>
        <storeUsage limit="10 gb" name="foo"/>
      </storeUsage>
      <tempUsage>
        <tempUsage limit="1 gb"/>
      </tempUsage>
    </systemUsage>
  </systemUsage>

  <transportConnectors>
    <transportConnector name="openwire" uri="nio://localhost:61616"/>
  </transportConnectors>
</broker>
Note the use of all the suggested items for tuning ActiveMQ. Such tuning isn’t enabled in the default configuration file, so be sure to give yours some attention.
Having looked at how to scale an ActiveMQ broker, now it’s time to look at using networks to increase horizontal scaling.
10.3.2. Horizontal scaling
In addition to scaling a single broker, you can use networks to increase the number of ActiveMQ brokers available for your applications. As networks automatically pass messages to connected brokers that have interested consumers, you can configure your clients to connect to a cluster of brokers, selecting one at random to connect to. This can be configured using a URI parameter as shown:
failover://(tcp://broker1:61616,tcp://broker2:61616)?randomize=true
In order to make sure that messages for queues or durable topic subscribers aren’t orphaned on a broker, configure the networks to use dynamicOnly and a low network prefetchSize. Here’s an example:
<networkConnector uri="static://(tcp://remotehost:61617)"
    name="bridge"
    dynamicOnly="true"
    prefetchSize="1"
</networkConnector>
Using networks for horizontal scaling does introduce more latency, because potentially messages have to pass through multiple brokers before being delivered to a consumer.
Another alternative deployment provides great scalability and performance, but requires more application planning. This hybrid solution, called traffic partitioning, combines vertical scaling of a broker with application-level splitting of destinations across different brokers.
10.3.3. Traffic partitioning
Client-side traffic partitioning is a hybrid of vertical and horizontal partitioning. Networks are typically not used, as the client application decides what traffic should go to which broker(s). The client application has to maintain multiple JMS connections, and decide which JMS connection should be used for which destinations.
The advantages of not directly using network connections is that you reduce the overhead of forwarding messages between brokers. You do need to balance that with the additional complexity that results in a typical application. A representation of using traffic partitioning can be seen in figure 10.8.
Figure 10.8. Using traffic partitioning with ActiveMQ master/slave deployment

We’ve covered both vertical and horizontal scaling, as well as traffic partitioning. You should now have a good understanding of how to use ActiveMQ to provide connectivity for thousands of concurrent connections and tens of thousands of destinations.
10.4. Summary
In this chapter you’ve learned how to configure ActiveMQ brokers to provide high availability in production deployments, utilizing either a shared nothing or shared storage system. You’ve also learned options for failover for ActiveMQ clients and the performance trade-offs for having high availability configured for your applications.
We examined ActiveMQ for store and forward. This is used to provide global distribution of messages across wide area networks. We also demonstrated ActiveMQ configurations to filter out or filter in destinations that are required to be global for your application.
Finally we’ve seen how the configure ActiveMQ to scale for thousands of connections and tens of thousands of destinations.
Having read this chapter, you should now have a good understanding of how to deploy ActiveMQ to meet most deployment scenarios for any messaging application that you develop with ActiveMQ.
In the next chapter we’ll look at advanced configuration of ActiveMQ to increase the flexibility of your applications that use ActiveMQ. We’ll also examine some different ways to extend the functionality of ActiveMQ through the use of interceptors and Apache Camel.