CHAPTER 10: TECHNIQUES
This is what Agile says
Agile has a looser definition of what a technique is. Sometimes it is a meeting, sometimes a management product and sometimes a way of working. Let me explain by looking at two slightly different explanations of Agile techniques.
Lucidchart lists some Agile techniques as:
•Plan. The sprint begins with a sprint planning meeting, where team members come together to lay out components for the upcoming round of work. The product manager prioritizes work from a backlog of tasks to assign the team.
•Develop. Design and develop the product in accordance with the approved guidelines.
•Test/QA. Complete thorough testing and documentation of results before delivery.
•Deliver. Present the working product or software to stakeholders and customers.
•Assess. Solicit feedback from the customer and stakeholders and gather information to incorporate into the next sprint.15
A second approach has a different list specific to the Scrum technique:
Scrum is a management framework for incremental product development using one or more cross-functional, self-organizing teams of about seven people each.
Scrum provides a structure of roles, meetings, rules, and artifacts. Teams are responsible for creating and adapting their processes within this framework.
Scrum uses fixed-length iterations, called Sprints, which are typically two weeks or 30 days long. Scrum teams attempt to build a potentially shippable (properly tested) product increment every iteration.16
Prioritised backlog and product backlog are obviously the same. Both lists contain retrospectives (see section 2.6 for an explanation). Sprint planning and iteration planning are two names for the same thing.
This is what PM4A says
PM4A has a tighter definition of what a technique is. It has only two definitions: product-based planning and quality review.
The difference matters because …
We need to sort out our use of terminology. There is too much confusion in Agile over the use of the word ‘technique’ and too much jargon. Our method will stick to the two PM4A techniques, cover meetings in the Progress chapter and put ways of planning in the Plans chapter.
Here is what APM should do
APM explains six techniques to be used in the life of the project:
1.MoSCoW prioritisation.
2.Modelling.
3.Product-based planning.
4.Iterative development.
5.Timeboxing.
6.Quality reviews.
Product-based planning is covered in the Plans chapter and the quality review technique is covered in the Quality chapter.
10.1 MoSCoW prioritisation
It is necessary before looking further into planning to understand the MoSCoW principle. MoSCoW stands for:
MoSCow prioritisation
M – MUST have this time
S – SHOULD have this if at all possible
C – COULD have this if it does not affect anything else
W – WON’T have this time but WOULD like this in the future
10.1.1 Must haves
•Fundamental to the end product.
•Without them the end product will be unworkable or useless.
•Guaranteed to be delivered.
10.1.2 Should haves
•Important requirements.
•Not absolutely essential. Would add a lot of value to the end product; but there is a workaround in the short term.
10.1.3 Could haves
•Would add business benefit.
•More easily left out than ‘Should haves’.
10.1.4 Won’t haves
Valuable but can wait until a later enhancement.
Case study example
If we think back to our case study, we can see some possible MoSCoW decisions:
Case study
•The new health and safety regulations are a ‘Must have’.
•The certificates are a ‘Should have’, in that we can proceed as long as we have the test results and supply the certificates at a later date if time runs out.
•The web-based course itself is a ‘Must have’, having made the decision to use this approach, but within the work to deliver the course, we could have the health and safety information as ‘Must haves’, but presentation, font usage, background colours and other ‘dressing up’ as ‘Could haves.’
Work is continually re-prioritised on this basis to ensure that the available work is focused on what brings most value to the users. Clearly, the initial aim is to satisfy all requirements, including changes that arrive during the project life cycle, but delivering on a required date without compromising quality may mean that some of what was originally envisaged for delivery may have to be left out. Essential work must be done and only less critical work omitted.
The ‘Must haves’ on their own must form a coherent solution. If not, then whatever ‘lower priority’ features are needed to form a coherent solution must be regarded as ‘Must haves’.
Work packages should contain a mixture of ‘Must haves’, ‘Should haves’ and ‘Could haves’ to give the flexibility of what can be dropped in order to meet the deadline. It is the de-scoping of lower priority requirements that enables teams to deliver on time when problems arise.
10.2 Modelling
A model can be defined as:
•A description or an analogy used to help visualise something that cannot be directly observed;
•A small but exact copy of something; or
•A pattern or figure of something to be made.
Modelling can be used to:
•Gain a common understanding of requirements;
•Confirm expectations; and
•Test the achievability of objectives.
Prototyping is a kind of modelling, but a model may not be a prototype. A prototype may be an early vision of what the final product might look or act like. A model may be presented in a diagram with its own rules and symbols. You can model an existing situation, whereas a prototype usually implies a new structure.
What is a Prototype?
•An incomplete part of the total solution.
•Used to learn more about what is required.
•Evolutionary (evolving into the final solution) or disposable.
•The intent is to build something visible, valuable and working as soon as possible.
Models or prototypes help communication to ensure that we are on the right track or give the users a vision of what the end product will be like. They are used to make elements of the product visible as early as possible. The danger is in getting carried away and spending too much time on the detail of the model beyond what is needed to satisfy its purpose. A model may deliberately omit some details to provide a clearer focus on another aspect. An example would be the London Underground map, showing the lines and stations, but ignoring the different levels, signals, wiring, etc.
A product flow diagram is an example of a model of a project’s work.
10.2.1 Modelling in the project lifecycle
In the Propose phase, a model could offer a ‘big picture’ to convey the scope and essence of the project subject. If we take our sample case study, we might present the model in Figure 10.1 to show the basic products of the project.

Figure 10.1: Case study model
In the Plan phase we might make use of a model to discuss with the users the options for the project approach. The model shows the possibilities of creating a computer-based course, a lecture course or a booklet to explain the new regulations. At the end a certificate would be awarded to those who have undergone the training.

Figure 10.2: Case study model product breakdown structure
10.3 Product-based planning
Product-based planning is a recommended planning technique. There are two reasons for this. Firstly, a project delivers products, not activities, so why begin at a lower level? The second reason is quality. We can measure the quality of a product. The quality of an activity can only be measured by the quality of its outcome (the product).
Product-based planning has three key components:
1.Product breakdown structure.
2.Product descriptions.
3.Product flow diagram.
10.3.1 Product breakdown structure
A product breakdown structure is a hierarchy of the products that the plan is required to produce. At the top of the hierarchy is the final end product, e.g. a computer system, a new yacht, a department relocated to a new building. This is then broken down into its major constituents at the next level. Each constituent is then broken down into its parts, and this process continues until the planner has reached the level of detail required for the plan.
There can be three types of ‘product’ in a product breakdown structure.
10.3.1.1 Simple products
Products at the lowest level of any branch of the hierarchy are ‘simple products’. The number of levels in a product breakdown structure depends on the level of detail required to allow the client, project or team manager to exercise an appropriate level of control. Simple products are shown in the diagrams inside a rectangle.
10.3.1.2 Intermediate products
‘Intermediate product’ is a term used to describe everything that appears in a product breakdown structure between the final product and the simple products at the bottom of the various branches of the hierarchy.
An intermediate product may be a ‘real’ product, such as one where activities such as assembly or testing must be applied to that product after the simple products below it have been produced. Such products will appear in the product flow diagram and a product description must be written for them.
Other intermediate products may not be ‘real’ products, but memory joggers for a group of simple products. An example of such a ‘product’ might be ‘required tools’; not a product in itself but used as a starting point to think of real products, such as drill, drill bits, hammer. This type of intermediate product is not carried forward into the product flow diagram, nor is a product description written for it.
Intermediate products are also drawn in the diagrams in a rectangle.
Training products
10.3.1.3 External products
Apart from the products that a project must create or obtain, it may rely on products that already exist or products that are to be provided by another project. A key question to recognising that a product is external is to ask if the project has control over its creation. As an example, a company may have a standard template that is used for all invitations to tender. If yours is a procurement project, you will gather a list of your specific requirements and then use the company template as the basis for your invitation to suppliers. The template would be an external product to your project because it already exists. Take another example; your project is building an office and you will need connection to a telephone line. This will be supplied by a specialist telephone company and you have no control over the telephone staff nor do you develop the telephone connection product.
A different symbol should be used to identify external products. An ellipse (see Figure 10.3) is used in the example in this book to indicate an external product in both the product breakdown structure and the product flow diagram. It should be noted that it is the product that is shown, not the source of the product. For example, if a plan needs an electric generator, ‘electric generator’ would be the external product, not the relevant manufacturer of the generator.
Having described external products, just a word of warning. You may have external suppliers building and providing some of your project products to specifications that you provide. They are under the control of the project as a development team, so the products involved are not external, they are developed as part of your project. Just because a supplier is external does not mean that the products they create for your project are external products.
In our case study, the health and safety ‘new regulations’ would be an external product, one over which the project has no control.
10.3.2 Product description
For each significant product, at all levels of the product breakdown structure, a description is produced. Its creation forces the planner to consider if enough is known about the product in order to plan its production. It is also the first time that the quality of the product is considered. The quality criteria indicate how much and what type of quality checking will be required.
The purposes of this are, therefore, to provide a guide:
•To the planner in how much effort will be required to create the product;
•To the author of the product on what is required; and
•Against which the finished product can be measured.
These descriptions are a vital checklist to be used at a quality check of the related products.
The description should contain:
•The purpose of the product;
•The products from which it is derived;
•The composition of the product;
•Any standards for format and presentation;
•The quality criteria to be applied to the product; and
•The quality verification method to be used.
The product description is given to both the product’s creator and those who will verify its quality.
Case study example product description
10.3.3 Product flow diagram
A product flow diagram is a diagram showing the sequence in which products must be produced and the dependencies between them.
A product flow diagram normally needs only three symbols: a rectangle to contain products developed within the plan, an ellipse for external products and an arrow to show the dependencies.
10.3.4 Case study project plan example
Case study
Our case study is a project whose objective is to devise a course to train the company’s staff in some new health and safety regulations (see chapter 3).
A presentation to the staff needs to be created and a handbook on the new regulations will be given to each staff member who completes the course. You will have to find out from the HR department which members of staff need to go on the course. Each attendee will receive a certificate of attendance and a list of trained staff will be passed back to the HR department. In making the plan, you are aware that legislation is still being finalised and this may cause late additions to material and the number of staff to be trained.
The development team has no control over the creation of the new regulations, so this is an external product.
Later in the Propose phase, more detail will be available for consideration of the project approach.

Figure 10.3: More detail appears
You will note that ‘training products’ and ‘course products’ are not actual products, just memory joggers, and are not carried forward into any product flow diagram.
At the end of initiation, the start-up team should be able to present a project plan such as the ones in Figures 10.4 and 10.5.

Figure 10.4: Final project plan

Figure 10.5: Project product flow diagram
An assumption is made here that identification of the staff that need training will be part of the project, not provided by an external source.
10.4 Iterative development
Iterative development is a fundamental part of APM. It allows the high-level requirements established during the Propose and Plan phases to be explored and evolve in increasing detail during the planning stages and work packages. It includes a feedback loop into the next iteration.
Iterative development cycles are short, typically days or even hours. The steps within iteration are:
•Identify – the team agrees the objective of the work.
•Plan – the team works out what needs to be done, by whom, to meet that objective.
•Evolve – the team work on the solution.
•Review – the work is tested to see if the objective has been met.

Figure 10.6: The iteration cycle
Anything planned for delivery but not completed within the work package must be addressed. It may be agreed by the development team to become a ‘Won’t have’; or it may be included in a later work package, but something else may need to be de-scoped to include this. If ‘Must have’ requirements have not been completed, re-planning should include these in exchange for later ‘Could haves’ or ‘Should haves’. This is done during the re-prioritisation in the Create phase at the end of each stage.
Management of the iterative development cycle is achieved through:
•Timeboxed work packages;
•Change control (together with MoSCoW prioritisation);
•Version control; and
•Quality testing.
Iterative development is dependent on continuous involvement and feedback from the product owner role.
10.5 Timebox
This is a finite period for work to be carried out to meet an objective or deliver a product. It is a key concept that the time allowed is never extended. Instead, the work allocated is prioritised and done in that order (see MoSCoW in section 10.1). If all the work is not complete by the end of the timebox, the unfinished part is returned to the PRL to be re-prioritised, and re-estimated or sized to reflect the remaining effort required.
Key points:
•The work in the timebox is to deliver the selected features.
•Timeboxes should also be used for work other than work packages, such as identifying the project approach and defining the business case.
10.6 Quality review
A quality review is a team method of checking the quality of something by a review process. It applies to all documents and products created by the project in order for the end products to be accepted by the users. For simplicity’s sake, we will refer to these as ‘products’, given that, for example, the project mandate and project justification, etc. are also ‘products’ that need quality checking. Knowing that a product has been checked and declared error-free, provides a more confident basis to move ahead and use that product as the basis of future work. It is also a requirement of ISO – the International Organisation for Standardization – that the client at any time can check a project’s quality records.
The purpose of a quality review is to gain sign-off or approval that a product is ‘fit for purpose’. The objective is to inspect a product for errors in a planned, independent, controlled and documented manner, and ensure that any errors found are fixed. It needs to be used with common sense to avoid the dangers of an over-bureaucratic approach, but with the intent to follow the process laid down (to ensure nothing is missed).
Quality review documentation should be filed with the product description to provide a record that the product was inspected, that any errors found were corrected and that the corrections were themselves checked, reviewed and signed off. All products must pass a quality review and be signed off for the end products to be accepted by the client.
10.6.1 Quality review planning
Quality reviews, which occur in the Create phase, are planned during the Plan phase. The planning includes not only the moment when a quality review should be applied to a product, but also the resources to be used and their roles as part of the review.
10.6.2 People involvedin a quality review
The parties whose interests should be considered when drawing up a list of attendees required at a quality review are:
•The creator(s) of the product;
•The client;
•Those who will use, operate or maintain the end product;
•Members of staff whose work will be affected by the end product;
•Specialists in the relevant end product area; and
•Any business or developer standards representatives.
The first two of these, the creator and the client, are members of the project team. The remainder are likely to be people from outside the project team, users and/or stakeholders.
10.6.3 Quality review roles and steps

Figure 10.7: Quality review roles and steps
The roles involved in a typical quality review are:
•The lead – the person responsible for ensuring that the quality review is properly organised and controlled.
•The creator(s) of the product being reviewed –this role must ensure that the reviewers have all the required information to perform their role at the review. This means forwarding a copy of the product description to them during the preparation step, and, if physically possible, a copy of the product to be reviewed and any other documents needed to put it in context. The creator must then answer any questions about the product or document during the review so a decision can be reached on whether the product is ‘fit for purpose’ or not. If not, then the creator will do most, if not all, of the correcting work – ‘follow-on-actions’. The creator must not be allowed to be defensive about the product.
•Reviewer(s) – one or more people who have either a vested interest in the quality of the product or who have the skills and experience necessary to assess the quality of the product.
•A recorder – Someone to take notes of what happened at the review, and any follow-on-actions required, etc.
It must be remembered that these are roles …
Must all be represented at a quality review, but again, depending on the size of your business and type of project, a person may take on more than one role.
10.6.4 Quality review steps
There are three distinct steps within the quality review procedure: preparation, review and follow-up.
Step 1 – Preparation
The objective of this step is for the reviewers to examine the product under review and to create a question list for the review.
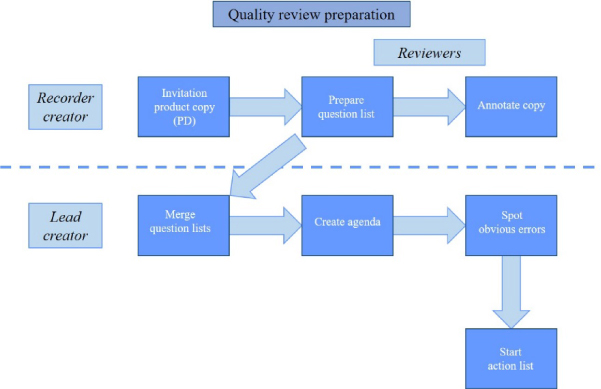
Figure 10.8: Quality review preparation
The lead checks that the product is ready for its planned review. The recorder sends out an invitation to the reviewers. The creator must provide a copy of the product description and the product (or its location where copying the product is impractical) to each reviewer.
Each reviewer will compare the product and any supporting documents against the product description; annotate the product with any typos, grammar or other minor errors; and fill in a question list of any points where they feel there is a mistake or they have a question.
The question lists are submitted to the creator, who discusses them with the lead before the review. The questions are collated to form an agenda. The creator may be able to see that some of the questions identify errors in the product and will need corrective work. These can be put on an action list and placed at the top of the agenda to be acknowledged as errors at the review, thus avoiding needless discussion.
Step 2 – Review
The objective of the review is to either agree that a product is ‘fit for purpose’ and can be ‘signed off’, or to agree an action list of any follow-on work required, if any, that may be needed to correct the product. The lead and the creator do not have to resolve these actions at the meeting – it is sufficient for the lead and reviewers to agree that a particular item needs correction or at least re-work. Provided that the action is logged, the reviewers have an opportunity in the next step to confirm that corrective action has been taken and that the action has resolved the problem. The product description is updated with the actual date and result of the review. The product copies are returned to the creator, who will correct any minor typos. These should not need discussion. At the end of the review the lead should add to each item on the action list the name(s) of the reviewers who wish to confirm that the correction has been done.
Step 3 – Follow-up
The objective of the follow-up step is to ensure that all actions identified on the action list during the review step have been dealt with.

Figure 10.9: Quality review follow-up
The person who has the role of recorder will ‘progress chase’ the other people involved to ensure that there are no delays in the corrective work and that everything is done.
When an error has been fixed, the creator will obtain sign-off from whoever is nominated on the action list. This person may be the reviewer who raised the initial query, but other reviewers also have the option of checking the correction.
When all errors have been reconciled and sign-off obtained, the lead will confirm that the product is complete, sign off the action list and notify the project manager of the result. At this point the version number of the product is updated to reflect its sign-off and approval, and the product version control records are updated with the date of final sign-off (see section 14.4). The schedule is updated accordingly to reflect the outcome of the review.
10.6.5 Formal and informal reviews
A variation on a formal review is to have the reviewers submit their question lists but the actual review is only done by the lead and the creator.
Depending on the size of the project and business, quality reviews can be either formal (that is, a scheduled meeting conducted as described above) or informal (that is, a ‘get-together’ between two people to informally review a product).
Informal quality reviews follow a similar format to the formal quality review and the paperwork emerging from both meetings is similar. The main difference is the number of people involved, the informality of the proceedings during the three steps and the overall time required. As a minimum, a quality review requires two people: one to take the roles of the lead and the reviewer, the other to take the roles of the creator and recorder.
15 www.lucidchart.com/blog/agile-software-development-life-cycle.
16 www.agilestrategicsolutions.com/wp-content/uploads/2014/09/Six-Pages-About-Scrum.pdf.