GoLive provides extensive control over the placement and sizing of graphics and text. In this lesson you’ll learn how to use GoLive to create pages that look great.
In this lesson you will discover how to create HTML page layouts using a variety of GoLive methods, including the new GoLive CS2 layout grid, HTML tables, CSS (Cascading Style Sheets) layers, and liquid layouts.
In this lesson, you will learn how to do the following:
Use the layout grid as a style sheet object.
Use the layout grid as a table object.
Use traditional tables for page layout.
Use the Table palette.
Span rows and columns.
Create and save table styles.
Import and export table data.
The Layout Editor in the document window provides the work area on which you create layouts for your page. GoLive layout grids, tables, layers, and new CSS liquid layouts provide the containers for holding and positioning text, images, animations, and movies.
GoLive CSS-based or table-based layout grids enable you to create designs by freely positioning objects anywhere on the page. You can convert a CSS-based layout grid to a table-based layout grid. You can also convert a table-based layout grid to an HTML table.
All Web browsers can display HTML tables, so they are often used for page layouts. You can position images, text, and other objects on the page by placing them in table cells. You can create custom tables using the Table Object in GoLive, or convert the layout grid to a table-based object.
You can take advantage of the new CSS-based layout grid or use the new CSS layout objects that allow you to create liquid layouts. These are layouts that resize to accommodate the viewer’s screen settings. Liquid layouts offer designers and viewers more flexibility than table-based designs. In GoLive, you can instantly create a liquid layout by simply dragging a CSS layout object from the CSS tab of the Objects palette to a page.
By creating objects on your page using either tables or CSS, you can accurately control size and placement of your text and objects on a Web page.
Tables, on the other hand, can contain more source code to achieve the same basic layout, and don’t offer as many options. Also, keep in mind that there are issues regarding the use of tables and accessibility. According to the W3C’s (World Wide Web Consortium) CSS Techniques for Web Content Accessibility Guidelines, it is recommended that CSS-based layouts be used instead of HTML tables for page layout.
In this lesson you will learn both CSS and HTML table methods, as some older browsers may not support CSS-based technology.
In this lesson, you will create a new blank site and add provided images to the site window. You will then use the new Layout Grid object to create a page layout.
GoLive layout grids make it easy to create CSS-based and table-based designs for your Web pages. Instead of hand coding CSS or setting up table cells, you can add a single layout grid to the page, draw text boxes or layers, or drag objects anywhere on the grid. GoLive adjusts the properties of the layout grid as you add content and reposition it.
Using layout grids, you can position multiple objects on your page with 1-pixel accuracy.
Before starting, open the finished file to see what you will create using the layout grid.
To ensure that the tools and palettes function exactly as described in this lesson, delete or deactivate (by renaming) the Adobe GoLive CS2 preferences file. See “Restoring default preferences” on page 3.
Start Adobe GoLive CS2. Close the Welcome Screen if it appears.
Choose File > Open.
Navigate to the Lesson03 folder, and open the lesson03_site_folder. Select the lesson03.site file and choose Open.
The site window appears.
Double-click to open the index.html page.
The index page of this site was created using the Layout Grid object with the Layout Text box. You will create a page similar to this in this lesson. You can leave this page open for reference, or choose File > Close.
Click on the site window and choose File > Close. When the Adobe GoLive CS2 alert window appears, click OK; you do want to close the site “lesson03.”
Now you will create your own Web site by following the steps in this lesson.
Choose File > New to open the New options window.
Choose Site > Create Site and select Blank Site. Click Next.
In the Specifying a Site Name and Location window, type student in the Name text field.
Choose the Browse button beneath the “Save To” text field and locate the Lesson03 folder. Click OK (Windows) or Choose (Mac OS), then click Next.
The “Use a Version Control System?” window appears. Choose “Don’t Use Version Control.” Click Next. Read about Version Cue in Lesson 13, “Using Version Cue and Adobe Bridge with GoLive CS2.”
In the “Publish Server Options” window, choose “Specify Server Later.” Click Finish.
Keep the site window open.
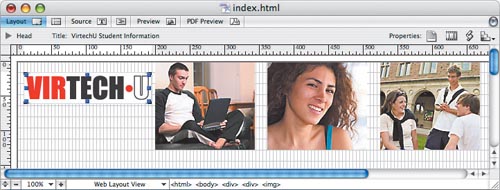
Double-click on the index.html page to open the blank document.
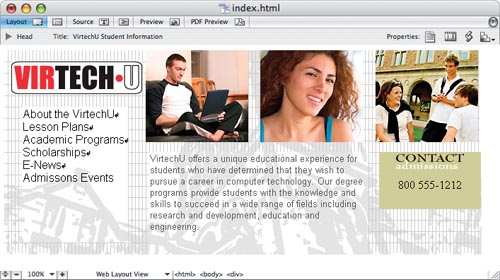
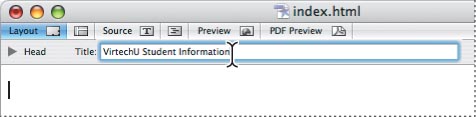
Start this page by assigning a proper title. Select the text, Untitled Page to the right of Title: in the top portion of your document window. Replace the text with VirtechU Student Information. Press Enter.
If the Objects palette is not visible, choose Window > Objects, or use the keyboard shortcut Ctrl+2 (Windows) or Command+2 (Mac OS). Click on the Palette options button in the lower right to verify that the Basic objects are visible.

Select the Layout Grid object (
 ) and drag and drop it to the open index page. The Layout Grid object falls into place in the upper left-hand corner.
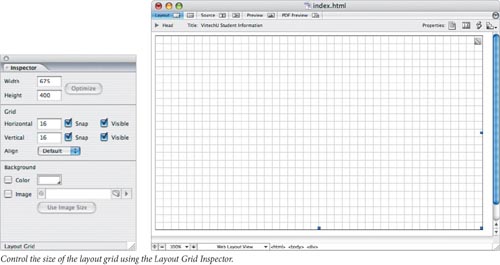
If the Layout Grid Inspector is not visible, choose Window > Inspector or use the keyboard shortcut Ctrl+1 (Windows) or Command+1 (Mac OS).
Type 675 in the Width text field and 400 in the Height text field. Press Enter. If necessary, expand the document window to show the entire layout grid.
Now you will import images to your GoLive site and place them on the layout grid.
Click on the Select window button (
 ) in the Main toolbar to bring the student.site window forward.
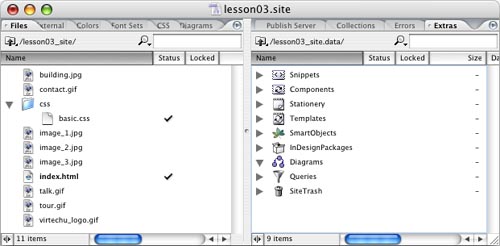
Make sure the Files tab is forward. Choose File > Import > Files to Site. Browse to locate the Lesson03 folder. Open the folder named lesson03_images. Select the first listed image in the window and Shift+click the last item to select all the images in this folder. You can also use Ctrl+A (Windows) or Command+A (Mac OS). Click Open (Windows) or Choose (Mac OS).
The eight images are added to your site window.
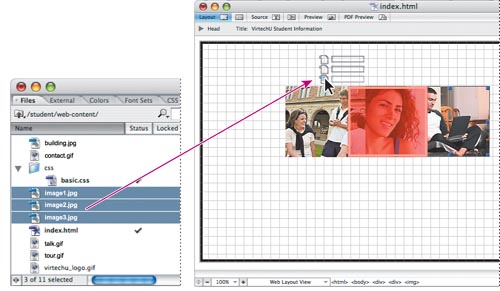
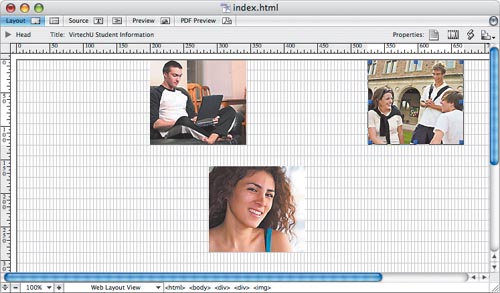
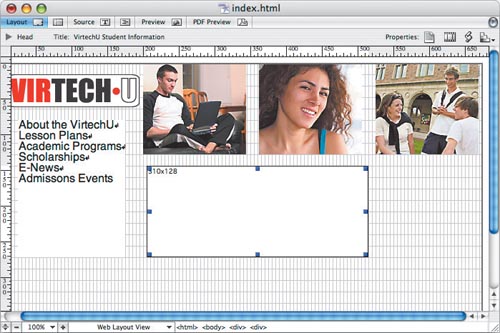
Position the student.site window so that you can see part of the index.html page. Select image_1 and Shift+click on image_2 and image_3 in the Files. Click and drag the three image files directly to the layout grid on the page. Exact positioning at this point is unnecessary.
Note
If the images overlap, they may appear red. The red error alert will disappear after the images are repositioned.
Click on the Select window button in the Main toolbar to bring the index.html page forward.
Using the Object Selection tool (
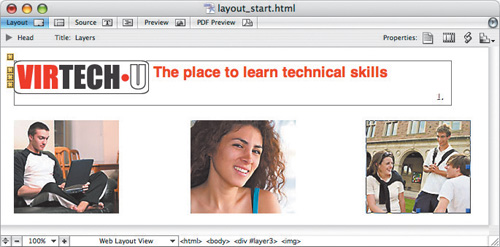
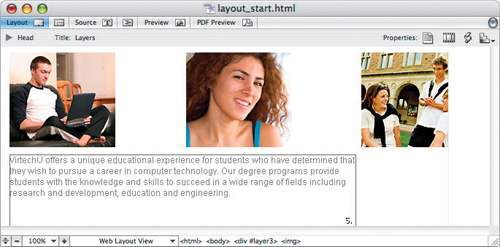
 ), click and drag to separate the three images. Also, drag the images down, as you will be aligning them above their current location. Arrange the images so that image_1 (student on laptop) is the leftmost image, image_2 (female student) is the center, and image_3 (group of students) is the rightmost image. Again, exact positioning is not important at this point.
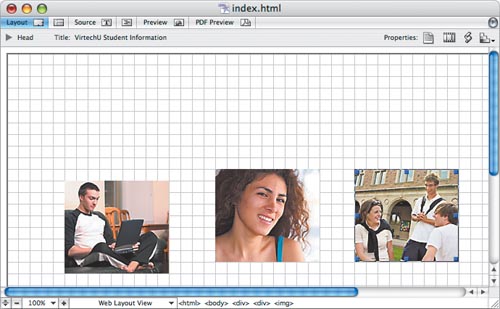
Note
If you do not know which image each object is referencing, select the image and read the Source text field in the Basic tab of the Image Inspector. The Inspector should be left open at all times; if you do not see it, choose Window > Inspector.
You will now use the rulers and grid to guide the placement of your images.
Using the layout grid, you can precisely position objects on the grid as well as take advantage of align and distribute features.
Choose View > Show Rulers, or use the keyboard shortcut Ctrl+R (Windows) or Command+R (Mac OS) to show rulers on the left and top side of your document window.
Using the Standard Editing tool (
 ), click and drag any one of the three images; note the light guide lines that appear in the ruler. Also, notice that as you drag, the object snaps to the grid lines in the layout grid.
Note
Image objects on a layout grid cannot overlap, so there may be some restrictions as you click and drag.
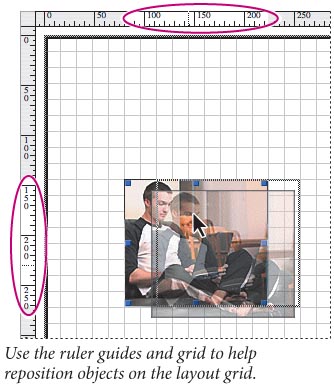
Still using the Standard Editing tool, click on the layout grid. The Inspector changes to a Layout Grid Inspector. Under the Grid section, change the Horizontal Grid to 5. The grid lines running horizontally are now closer together. You can also control the visibility and snap of the grids in the Inspector. For this example you will leave them checked.
Using the Standard Editing tool, select image_1 (student on laptop). Click and drag the image to the top of the layout grid. Using the Horizontal ruler, click and drag the image object until you see the white guide space start at approximately the 200 pixel mark.
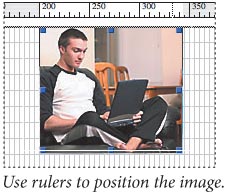
Now select image_3 (group of students) and position it at the top of the layout grid and at approximately the 525 pixel mark on the horizontal ruler.
You will use image_1 and image_3 to set the boundary of all three images when you use GoLive’s distribute feature. Image_2 can be positioned below, but should be between image_1 and image_3.
Still using the Standard Editing tool, Shift+click on any unselected images; all three images should be selected.
Select Window > Align. The Align palette appears. This palette can be used to align and distribute selected objects on the layout grid.
In the Distribute Objects section of the Align palette, choose Horiz. align centers (Windows) or Horiz. distribute center (Mac OS). Then choose Align tops (
 ) from the Align Objects section. If one or both of these choices are grayed out, the items are already aligned and/or distributed evenly.
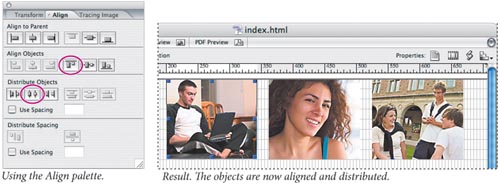
Choose File > Save.
GoLive provides a target insertion point to make it easier to place objects precisely on a layout grid. You will use this feature to place the VirtechU logo on the page.
Using the Object Selection tool (
), click on the layout grid one grid line from the top left and two grid lines in from the left. A blinking target insertion point appears.In the Basic section of the Objects palette, double-click on the Image object (
 ). It is placed precisely where the blinking target insertion point appeared.
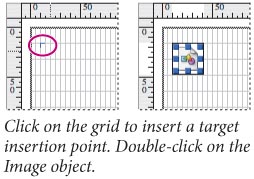
With the Image Object still selected, choose the Browse button (
 ) to the right of the Source text field in the Inspector palette. Navigate to the student folder created in your Lesson03 folder when the student.site was created. Open the student folder and the web-content folder. Select the image named virtechu_logo.gif and click Open.
The VirtechU logo is placed in the page.
Choose File > Save; leave the file open for the next part of this lesson.
Next you will place text on the layout grid using the Layout Text Box object.
Select the Layout Text Box object (
 ) in the Basic section of the Objects palette.
Click and drag the Layout Text Box object to the area beneath the VirtechU logo.
Using the Set position text fields in the Main toolbar, enter the value of 25 in the Horizontal Position text field and 80 in the Vertical Position text field. Press Enter.
Using the Standard Editing tool (
), use the handles to click and drag the right middle handle to expand the text box to 150 px wide. Then use the bottom middle handle to expand the height of the box to 192 px high. Use the pixel values displayed in the text box for more accuracy. You can also use the Set width/height text fields in the Main toolbar.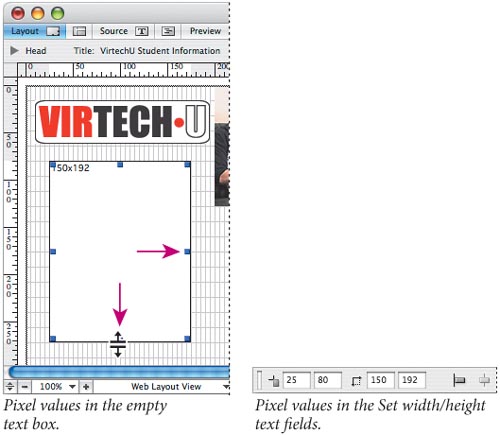
The text that is to go into this layout text box is saved as a .txt file. Choose File > Open and navigate to the Lesson03 folder. Select the file named student.txt and choose Open.
Click and drag to select the text above the dotted line. Choose Edit > Copy.
Click and hold down on the arrow to the right of the Select window button on the Main toolbar, and select index.html.
Using the Standard Editing tool (
), click in the text box. A blinking text insertion point appears. Choose Edit > Paste. The text is now in the text box.You will now create a larger text area in the center of the page.
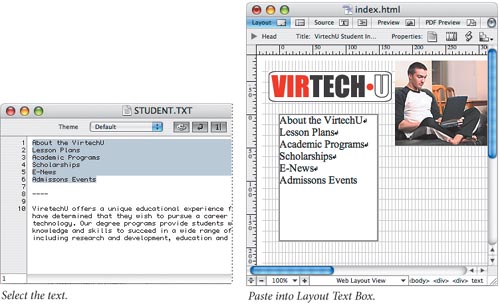
Click and drag another Layout Text Box object onto the page, anywhere under the image_1 (student on laptop).
Using the top middle handle, expand the new text box to start one grid line under the images. Then use the handles to expand the text box to start at the same grid line as image_1 and end on the right side of image_2. Notice the guide lines that appear as you drag the handles to help you resize and position the text box more accurately. Using the handles, make the width and height approximately 310 pixels wide × 128 pixels high.
Click and hold down on the arrow to the right of the Select window button (
) on the Main toolbar and select student.txt. The text file is brought forward.Select the text underneath the dashed line and choose Edit > Copy, then choose Window > index.html to return to the index.html page. Using the bottom of the Window menu is another method for selecting which document is forward.
Using the Standard Editing tool, click in the large text box to insert the cursor. Then choose Edit > Paste.
Return to the student.txt file and choose File > Close.
In this section you will use traditional HTML coding to assign a font set and color to your text in the text boxes. Text attributes can also be changed using Cascading Style Sheets. Read more about Cascading Style Sheets in Lesson 5, “Adding and Formatting Text.”
Using the Standard Editing tool (
), click in the text box on the left side of your page. Choose Edit > Select All, or use the keyboard shortcut Ctrl+A (Windows) or Command+A (Mac OS) to select all the text.Choose Type > Font > Helvetica Set. The text is changed to a sans serif typeface.
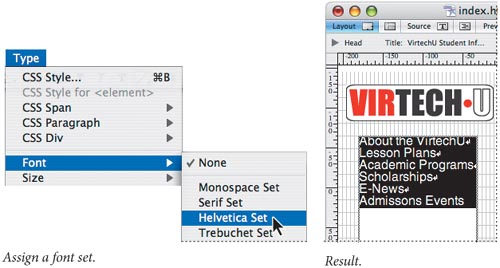
Now you will change the text in the text box in the center of the page.
Still using the Standard Editing tool, click inside the text box in the center of the page.
Choose Edit > Select All.
Choose Type > Font > Helvetica Set.
Assign a smaller text size by choosing 2 from the Set font size drop-down menu on the Main toolbar. Read more about text formatting in Lesson 5, “Adding and Formatting Text.”

With the text still selected, change the text color by double-clicking on the Set text color box (
 ) in the Main toolbar. When the Color Picker window appears, type the hexadecimal value of 555555 (dark gray) in the hexadecimal color text field, then press the Tab key. Click OK.
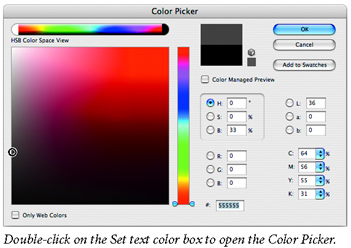
Choose File > Save. Leave the page open.
In this part of the lesson you will add a background image to the layout grid.
Using the Standard Editing tool (
), click on a blank area of the layout grid.If the Layout Grid Inspector is not visible, choose Window > Inspector. Check the box to the left of Image in the Background section of the Layout Grid Inspector.
Using the Browse button (
) to the right of the Image text field in the Inspector, locate the image named building.jpg in the web-content folder of your site.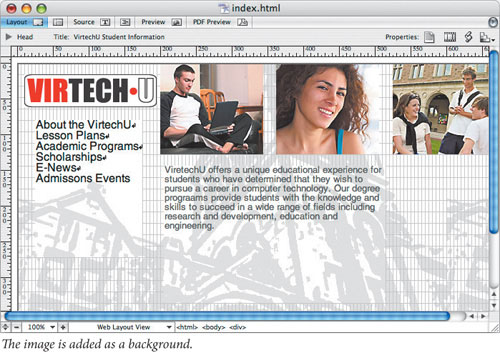
Now you will change the background color of the individual Layout Text Box objects.
If the Objects palette is not forward, choose Window > Objects. The Basics section should still be visible.
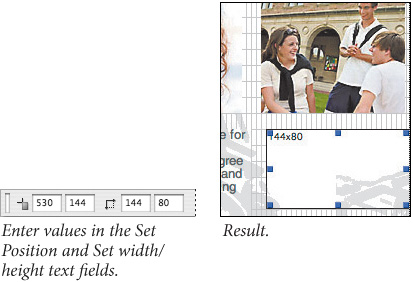
Select the Layout Text box object and drag it from the Objects palette to the right side of the large text box, underneath image_3.

You can reposition the Layout Text box object manually by crossing the edge of the text box; when a hand appears (
 ), click and drag.
In this example, you will use the positioning tools on the Main toolbar.
Using the Set Position text fields in the Main toolbar, enter the value of 530 in the Horizontal Position text field and 144 in the Vertical Position field. GoLive will not allow you to input numbers that cause overlap of elements on the grid. If you cannot use the numbers in bold, use the closest value possible.
Using the Set width/height text fields in the toolbar, enter 144 in the Width text field and 80 in the Height text field. Press the Return or Enter key.
With the Layout Text Box still selected, double-click the box to the right of Color in the Inspector. The Color Picker window opens.
Enter the hexadecimal value of cccc99 in the hexadecimal text field, to the right of the # sign. Press Tab, then click OK.
Choose File > Save. Keep the file open.
Next you will change the default alignment of the layout text box and add an image and text.
Using the Standard Editing tool (
), click to insert the cursor in the new colored text box. Click on the Align Center button ( ) in the Main toolbar.
With the cursor still in the layout text box, double-click on the Image Object in the Basic section of the Objects palette. An Image object appears where the cursor was located.
You will use the Fetch URL button (
 ), sometimes referred to as the pick whip, to link to an image. The Fetch URL button is located to the left of the Source text field in the Image Inspector.
Click and hold on the Fetch URL button. Do not release, but drag the directional line up to the Select window button (
) in the Main toolbar or directly to the site window. The site window comes forward. Do not release—drag the directional line over to the Files tab and release when the image contact.gif is highlighted. The image is placed inside the Layout Text Box.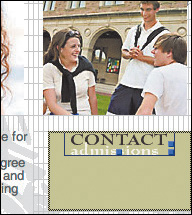
Using the Standard Editing tool, click to the right of the image you just placed, staying inside the same layout text box. A blinking cursor appears. Press the Return key to create a new line. Type 800 555-1212.
As a final step you will optimize the layout grid. Optimizing a grid automatically reduces the size of the grid to its minimum size, fitting around the outer borders of all the objects.
Using the Object Selection tool (
), click on a blank area of the layout grid, then press the Optimize button on the Layout Grid Inspector.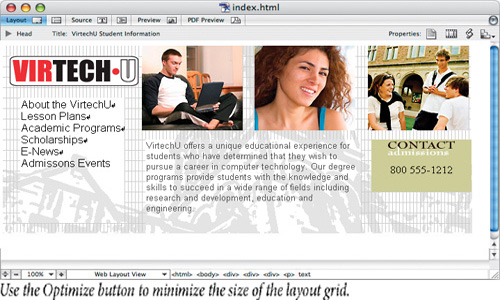
Choose File > Save. Leave the index page and student.site open for the rest of this lesson.
You are finished with the layout of this page; now you will learn how to take advantage of GoLive’s table features.
Up until this section, you have used the default CSS-based layout grid. In this section you will convert your CSS layout grid to a table-based layout grid.
With the index.html file open, choose File > Save As. Type table_grid for the file name.
Click on the Site Folder button (
 ) at the bottom of the Save As window and choose Root (Windows) or Root folder (Mac OS) from the drop-down menu. This directs you to the web-content folder of the student.site. Press Save.
Now you will convert this page version to a table-based layout grid.
Using the Standard Editing tool (
), click on a blank area of the layout grid.Right-click (Windows) or Ctrl+click (Mac OS) to show the contextual menu, choose Convert to Table based Grid.
You may not initially notice a difference in your file, but if you were to click on the Source tab of the document window you would see that the code creating this page is now table-based. Also, in the Layout view, the icon in the upper right corner of the layout grid changes from a CSS icon (
 ) to a table icon (
 ). This icon is behind image_3, so you will not see it unless you extend the grid to the right.
If you have switched to the Source view, choose the Layout tab to return to the working page view.
You will now take this layout grid one step further toward looking more like a traditional HTML table.
Using the Object Selection tool (
), click on a blank area of your layout grid.Choose Special > Convert > Layout Grid to Table.
When the Convert window appears, leave at the defaults and click OK.
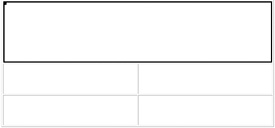
The layout grid is now replaced with a traditional table. Rows and columns are automatically created based upon placement of your text and images.
Choose File > Save, then File > Close. Keep your student.site window open for the rest of this lesson.
Now you will discover how to use HTML tables. Tables are useful for organizing large amounts of data, and can be used for traditional layouts.
First you will open an existing page to see the final Web page.
Choose File > Open.
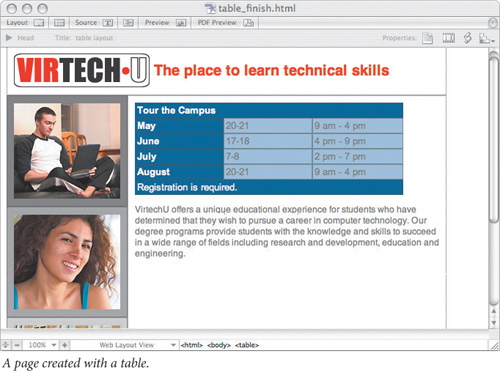
Browse to the Lesson03 folder, and select the table_finish.html page. Select Open.
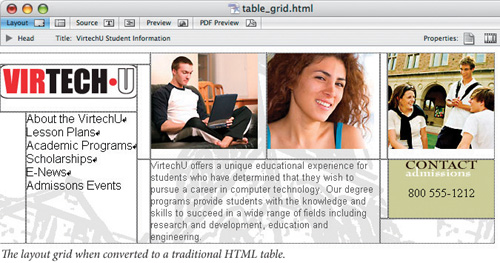
A page created with an HTML table appears. Notice the page layout was created by a number of cells organized in rows and columns.
You can leave this page open for reference, or choose File > Close.
Make sure that you still have your student.site window open from earlier in this lesson. If you do not, choose File > Open Recent and select student.site, or choose File > Open > Lesson03 > student.site.
To start the next page, you will open an existing page on which to build your table.
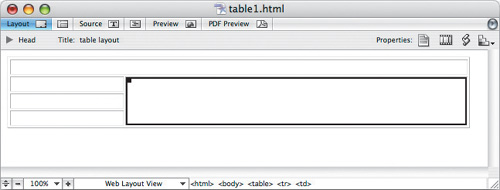
Choose File > Open. Select the file named table_start.html in the Lesson03 folder and click Open.
Choose File > Save As. Type table1 for the file name.
Click on the Site Folder button (
) at the bottom of the Save As window and choose Root (Windows) or Root folder (Mac OS) from the drop-down menu. This directs you to the web-content folder of the student.site. Press Save.Make sure the Objects palette is open and the Basic Objects are visible. If the Objects palette is not visible, choose Window > Objects.
Select the Table Object (
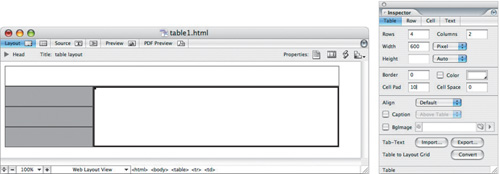
 ) and drag it to the page. A default table appears on your page and the Inspector is now a Table Inspector. The Table tab of the Inspector should be forward.
In the Table Inspector, change the Rows text field to 4 and the Columns text field to 2.
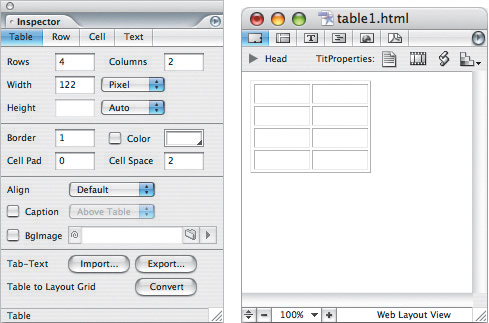
In the Table Inspector, select the Width drop-down menu and select Pixel. Enter 600 into the Width text field. In the Height drop-down menu leave the height at Auto. Press Enter.
As a default, table cells are set to automatically adjust as you add content or text to the individual cells. To fix the size, you will assign a pixel dimension to all the cells at one time. The dimensions can be changed later.
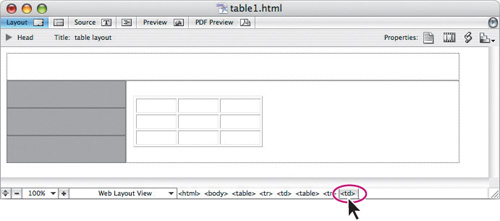
Using the Standard Editing tool (
), click inside the top left cell. The blinking cursor appears.Ctrl+Enter (Windows and Mac OS) to select the top left cell, not the text area inside. The cell becomes highlighted with a dark border.
Select the Cell tab of the Table Inspector and select the Width drop-down menu; change it from Auto to Pixel. Then type in the value of 145.

Using the Standard Editing tool, click in the top right cell. Choose Special > Table > Select Cell to select the cell.
In the Cell tab of the Table Inspector, change the Width drop-down menu from Auto to Pixel, then type the value 441.

Choose File > Save.
At this point your table is in the standard grid pattern of a table. In this section you will find out how to span rows and columns to create larger areas that expand over several rows or columns.
Before you span rows and columns on your page, you will open a practice file.
Leave the file table1.html open and choose File > Open. Open the file named table_practice in the Lesson03 folder.
A page with a simple table appears.
You will now discover how to use the Table & Boxes palette to easily select cells.
Insert your cursor into any cell, then choose Window > Table & Boxes. The Table & Boxes palette appears. Make sure you are on the Select tab.
The Select Tab of the Tables & Boxes palette provides you with a frame, or outline, of the table. You can use this outline to select cells, rows, and columns. You can also use the Select parent table button (
 ) in the lower left to zoom into and out of tables within tables. This button is grayed out since there are no tables placed inside of this table.
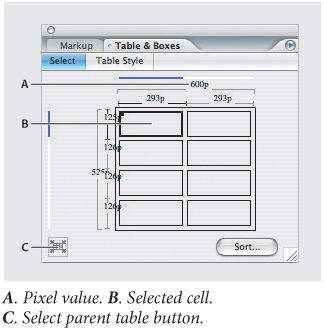
Note
The Select tab of the Table & Boxes palette lets you review the size and units of every row and column within a table, as well as those of the entire table. This tab also lets you identify and quickly fix conflicts in your column, row, and table sizes. These conflicts can occur when the dimensions of content within a table exceed the table properties, or when the table properties do not add up properly. To fix a conflict, click on any pixel values shown highlighted in red.
In the Table & Boxes palette, click on the top left cell to select that cell.
Practice by clicking on other cells. You can Shift+click to select multiple cells using this palette.
Note
By positioning the cursor on the outer edge of a row (side) or column (top), you can select an entire row or column. Just click when the cursor changes into an arrow.
If you selected other cells, select only the upper left cell.
Locate the Table Inspector. Choose the Cell tab and type 2 in the Row Span text field.
The cell now spans two rows.
With the same cell still selected, type 2 in the Column Span text field, press Return or Enter. The cell is now expanded to the size of four cells.
Type 1 in both the Row Span and Column Span text fields to bring the cell back to its original size. Press Enter.
Next you will use keyboard shortcuts to span rows and columns.
Using the Table & Boxes palette, select the upper left cell again.
Hold down the Shift key and press the right arrow key (→). The cell is spanned to two columns.
Now select the right cell in the second row.
Press Shift+Down arrow (↓) to span the row to two rows. Repeat this again to span three rows.
Now practice undoing the row and column spans by pressing Shift+Left arrow (←), and then Shift+Up arrow (↑). You can also undo spans by changing the Row Span and Column Span text fields in the Cell tab of the Table Inspector.
Choose File > Close and do not save. You will now apply what you practiced on this page to your table_layout.html page.
Now apply column and row spans as part of your layout.
Return to the table1.html page and using the Object Selection tool (
) select the upper left cell. Press Shift+Right Arrow (→) one time. The column now spans the entire table.Now select the right cell in the second row and press Shift+Right Down Arrow (↓). Repeat this one more time. The cell is now spanned three rows.
Choose File > Save. Leave this file open.
In this section you will add color to some table cells.
If your Table & Boxes palette is not open, choose Window > Table & Boxes.
In the Select tab of the Table & Boxes palette, click to select the first cell in the second row. Then, Shift+click to select the two cells directly underneath.
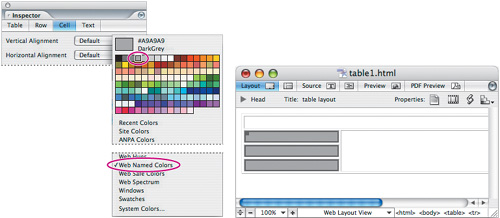
In the Cell tab of the Table Inspector, click the lower right corner of the Color field and choose the Web Named Colors library from the drop-down menu. Click the corner again, and select the color #A9A9A9 DarkGrey from the swatches displayed above the list of swatch libraries. GoLive displays the swatches from the swatch library you chose.
In the Table tab of the Table Inspector, eliminate the border on this table by typing 0 in the Border text field, and pressing Return or Enter.
Create some padding by typing 10 the Cell Pad text field. This adds a 10-pixel margin around the interior of all cells.
Eliminate the spacing between the cells by typing 0 in the Cell Space text field. Press Return or Enter.
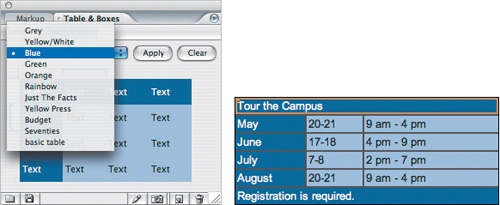
Make it easy to recreate tables by saving table attributes such as: Border, Color, Cell Pad, and Cell Space, Vertical Alignment, Horizontal Alignment, and Color.
If not visible, choose Window > Table & Boxes. If not already selected, click the Table Style tab.
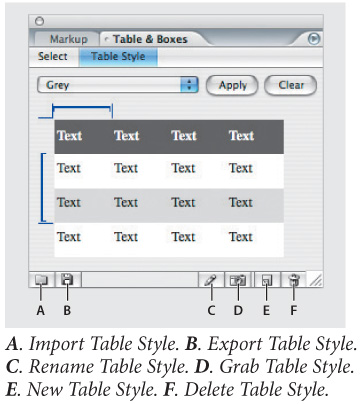
Make sure the table is selected by inserting the cursor in any cell. Then, click on the word <table> in the line of source code that appears in the document bar at the bottom of the screen. This is a hierarchical display of your source code, and is yet another way of selecting a table in GoLive.

Click on the New table style button (
 ) in the Table Style tab of the Table & Boxes palette. Type in basic table in the New Table Style dialog window and click OK.
The table attributes are captured and a preview is visible in the Table Styles tab.
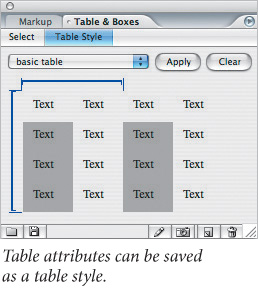
Later in this lesson you will apply an existing style to a table.
Typing directly into table cells is relatively simple. You type data directly into a cell and then press Tab to position the text cursor in the next cell and so on. A more efficient way to add text is to import a .txt (text) file directly into a table. In this part of the lesson, you will import data into a new table and then apply an existing table style.
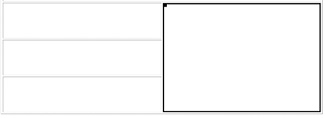
Using the Standard Editing tool (
), click in the large cell in the right side of the table. The blinking insertion point appears in the cell. This is the cell that spans three rows.Double-click on the Table object (
) in the Objects palette. The table is inserted into the cell.Using the Table Inspector, change the rows value to 3, if it’s not already.
Using the Standard Editing tool, click on the upper left cell in the new table.
Click on <td>, furthest to the right, in the source code hierarchy in the document bar at the bottom of the page.
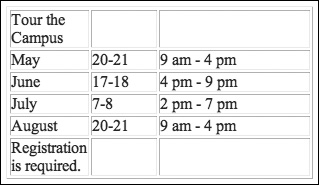
Choose Special > Table > Import Tab-delimited text. When the Open dialog window appears, browse to locate the Lesson03 folder and choose the text file named tour.txt. Select Open.
The text is automatically input into appropriate rows and columns. The default setting is that each tab stop is automatically read as a new column, and each paragraph return is read as a new row.
You can change this default in the CoL Separator drop-down menu in the Open dialog window as you import the text. Other choices are Comma, Space, and Semicolon.
Position your cursor over the right border of the table. When you see the double arrow icon (
 ) click and drag to make the table wider. A specific size is not necessary, just adjust the table to be larger and allow a better fit for the text.
Insert the cursor into the cell containing the text “Tour the Campus,” then choose Special > Table > Select Cell.
Press Shift+Right arrow twice, to span the column. Span the bottom left cell containing the text “Registration is required” using the same method.
Choose File > Save and leave the file open for the next part of this lesson.
You will now apply a table style to your new table.
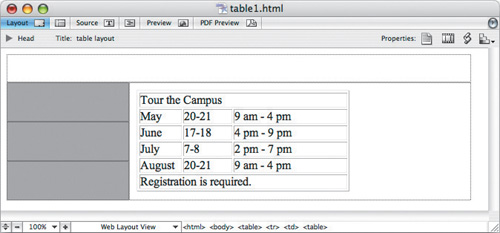
Now that you have a table, you will add images to the layout.
Using the Standard Editing tool (
), click in the upper left cell of the large table. This is the table created to form the layout of the Web page. The blinking insertion point appears in the cell.Double-click on the Image Object (
) located in the Basic section of the Objects palette. The Image Object appears where the insertion point was located.If the Inspector palette is not visible, choose Window > Inspector or use the shortcut Ctrl+1 (Windows)/Command+1 (Mac OS). Using the Basic tab of Image Inspector, click on the Browse button (
). When the Open dialog window appears, locate the image named virtechu_logo in the web-content folder inside the student folder you created when the site was created. Click Open.Using the Standard Editing tool, click on the VirtechU logo and choose Middle from the Alignment drop-down menu in the Basic tab of the Image Inspector.
Using the Standard Editing tool (
), click after the VirtechU logo to insert the type cursor. Press the spacebar once and type The place to learn technical skills.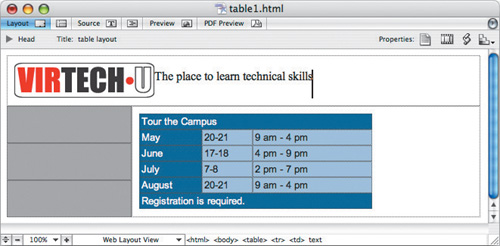
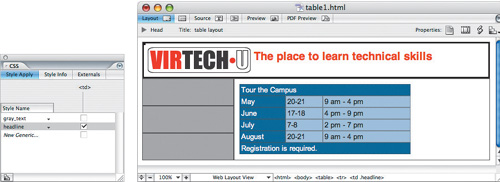
Select the cell containing the VirtechU logo and headline text.
If you do not see the CSS palette, choose Window > CSS to display the CSS palette. It may be docked below the Inspector. There are two class styles already created in this document. For more information about creating a CSS class style, see Lesson 5, “Adding and Formatting Text.”
Since you have a cell selected, it gives you only one option: to apply the style to the entire cell. In the source code, a table cell is represented by the tag <td>, which stands for table data.
Check the <td> checkbox to the right of headline. The text in the cell is now changed to represent the attributes assigned to the headline class style. You may have to undock the CSS palette in order to see the checkbox.
In this next section you will add the remaining imagery and text to complete this page.
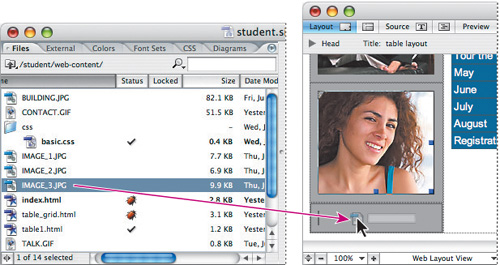
Position the site window so that you can see the list of files at the same time as your page. Then drag image_1.jpg from the site window to the second cell down on the left.
Drag image_2.jpg into third cell down on the left.
Drag image_3.jpg into last cell down on the left.
Choose File > Open. When the Open dialog window appears, browse to locate and select the file named student.txt in the Lesson03 folder. Click Open.
Select all the text under the dashed line on the text document and choose Edit > Copy. Choose File > Close to close the document.
Return to the table1.html file. Using the Standard Editing tool (
), click to the right of your “Tour the Campus” table, a large cursor appears. Press Return.Choose Edit > Paste. The copy appears under the table.
With the cursor still blinking, press Ctrl+Enter (Windows and Mac OS). This selects the table cell.
If the CSS palette is not already open, choose Window > CSS, and the CSS palette appears.
Check the <td> checkbox to the right of the class style named “gray_text.” The text changes to the style attributes assigned to the gray_text class style.
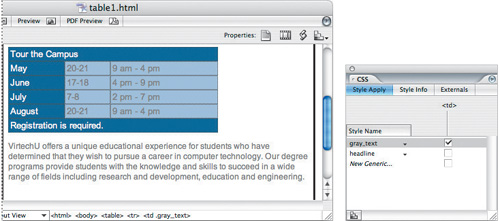
With the cell still selected, choose the Cell tab of the Table Inspector. Choose Top from the Vertical Alignment drop-down menu.
Note
 You can also assign class styles to a table cell using your contextual menu. With the table cell selected, right-click (Windows) or Ctrl+click (Mac OS).
You have completed the section of the lesson that pertains to layouts using tables. Read on to see how you can use Cascading Style Sheets for layout.
Choose File > Save, and then File > Close.
You can use layers to divide your page into rectangles that can be formatted and positioned individually, much as you can with a traditional page layout application like Adobe InDesign. Layers can contain any HTML element that a page can contain, such as an image or simple HTML text with formatting. You use the Layer tool and the Layers palette to add and manage multiple layers on the page.
Note
Viewers may not be able to see CSS layout objects if their browser doesn’t support CSS, the browser’s CSS support has been turned off, or the browser is set to override page styles with a CSS file supplied by the viewer. Web browser support for CSS varies greatly between browser vendors and browser versions.
For this document you will create a layout similar to the table lesson, but use layers.
Make sure that the student.site window is still open. If it is not, choose File > Open Recent Items and locate the student.site file, or choose File > Open and browse to locate the saved student.site file in Lesson03 > student folder.
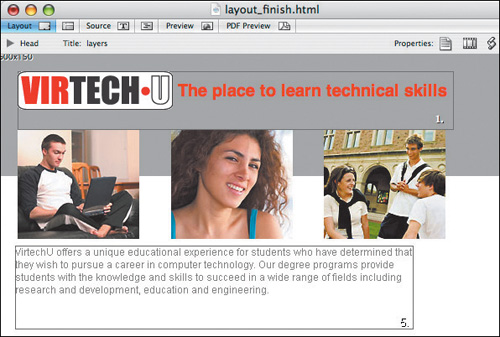
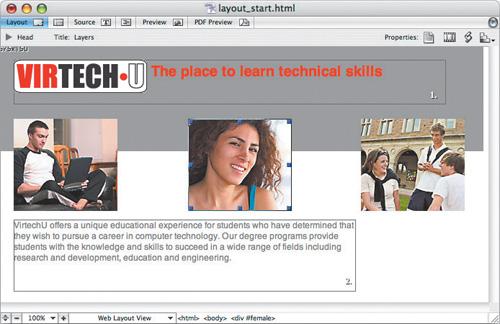
Choose File > Open. Browse to locate the file named layout_finish.html in the Lesson03 folder. Press Open. The finished layer file appears.
This is the page you will create using layers. You will learn how to create, name, and arrange stacking order of the layers along with other layer features.
Choose to leave this file open as a reference, or choose File > Close.
Choose File > Open and browse to locate the file named layout_start.html in the Lesson03 folder. The start page appears.
Choose File > Save As. Keep the name the same and click on the Site Folder (
) and select Root (Windows) or Root folder (Mac Os). Click Save.Begin this page by selecting the Layer object (
 ) from the Basic section of the Objects palette.
Click and drag the Layer object to the layer_start.html page.
A layer appears in the upper left of the page.
If the Inspector is not visible, choose Window > Inspector. While the layer is selected, the Inspector is a Layer Inspector.
Change the name from layer1 to logo in the Name text field; press Return. This will help you identify the layer later.
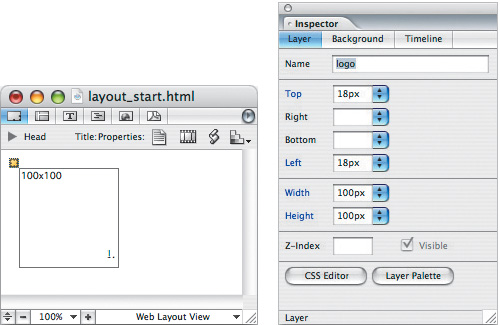
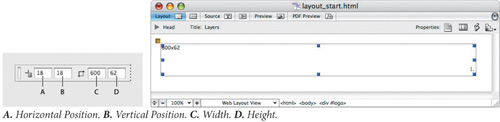
Drag the right center handle to the right to make the layer approximately 600 pixels wide. As you drag, observe the value in the Width text field in the Main toolbar. You can also type the value of 600 into the Width text field. Type 62 in the Height text field.
Use the Main toolbar for accurate layer coordinates and size controls.
Now you will insert an image and text into the layer.
Using the Standard Editing tool (
), click to insert the blinking cursor inside the layer.Double-click on the Image Object in the Basic section of the Objects palette. The image Object appears in the layer.
Using the Image inspector, click on the Browse button (
) to the right of (EmptyReference!) When the Open dialog window appears, navigate to locate the image file named virtechu_logo.gif in the web-content folder of the student folder inside of Lesson03. Choose Open. The logo appears inside the layer.Using the Standard Editing tool, click once on the VirtechU logo image. Use the Alignment drop-down menu in the Basic tab of the Image Inspector to change the alignment to Middle. Alignment determines the position of the text that follows the image.
Click to the right of the logo; a large blinking cursor appears. Press the spacebar once and type The place to learn technical skills.
Position the cursor over the edge of the layer. When the hand icon (
) appears, click to select the layer.Just as with table cells, you can apply a class style to the contents of a layer.
Choose Type > CSS Style for <div> select headline. The text is changed to red.
Note
You can use the Select tab of the Table & Boxes palette to navigate in CSS layout objects. Click the Select Parent Table tool () to select the parent CSS layout object, or click in a row or column of a CSS layout object in the tab to place an insertion point.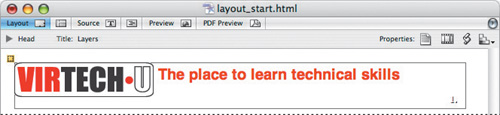
In this next section, you will add the imagery in three separate layers which you will then align and distribute.
Click and drag a Layer object from the Basic section of the Objects palette to your HTML page. Make sure that you do not drag the new layer into the existing layer.
Note
You can tell if you have dragged one layer into another by referencing the yellow layer marker (
 ). If the marker is not loose in the upper left corner, it is probably nested inside an existing layer. You can choose to Edit > Undo, or drag the marker out of the layer to an open area of your page.
Reposition the new layer by positioning the cursor over the edge of the layer. When a hand icon (
) appears, click and drag to move the layer beneath the logo layer. Use the grid that appears to align the left sides of the two layers. Type 100 in the Vertical Position text field of the Main toolbar.
Select Edit > Duplicate to duplicate this layer and put a copy directly on top of the existing layer.
Choose Edit > Duplicate again. This will provide you with three layers, all positioned on top of one another.
Using the Object Selection tool (
), click on the topmost layer and drag it to the right of the page. Then select the next layer and position it in between the left and right layer. Exact positioning is not important.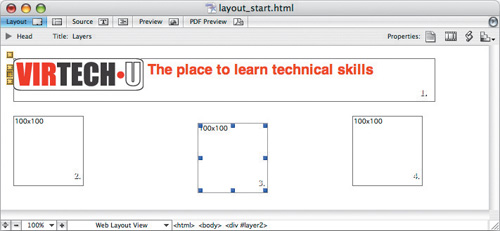
Note
Grid rules appear as you drag layers to help you with alignment. You can use these as an aid, or use the Align palette as directed in the next part of this lesson. If you prefer not to see the grid, choose Window > Layout and select Layout Grid Settings from the Layer’s palette menu. Uncheck “Visible when Dragging,” click OK.
Using the Object Selection tool, select the left layer and type laptop in the Name text field of the Layer Inspector.
Select the center layer. Type female into the Name text field in the Layer inspector.
Select the right layer. Type group into the Name text field.
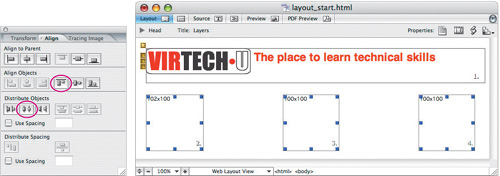
Using the Object Selection tool, select the first layer, now named laptop. Hold down the Shift key and click on the layer named female and the last layer named group.
All three layers are selected.
Choose Window > Align. The Align palette becomes visible. Select Horiz. align centers (Windows) or Horiz. distribute center (Mac OS) from the Distribute Objects section of the Align palette. Then select the Align Tops button under Align Objects.
Choose File > Save. Leave the file open for the next part of this lesson.
Position the student.site window so that you can see it at the same time as the layout_start.html file.
Click on image_1.jpg and drag it into the leftmost layer.
Drag image_2 into the middle layer.
Drag image_3 into the rightmost layer.
You will now add another layer that will be used for text.
Make sure that the Basic section of the Objects palette is visible. Select the Layer object (
) and drag it to an empty spot on your layout_start.html page, making sure that you do not drag the new layer into an existing layer. It is positioned in the upper left of the page.After placing the Layer object, cross your cursor over the side and click when you see the hand icon (
). This selects the layer. Use the position and size text fields in the Main toolbar for an accurate-sized layer. Enter 18 for the Horizontal Position and 240 for the Vertical Position. Enter 475 in the Width text field and 150 in the Height. Press Enter.
With the layer still active, type text into the Name text field in the Layer tab of the Layer Inspector. Press Enter.
Choose File > Open. When the Open dialog window appears, browse to locate the file named student.txt in the Lesson03 folder, and choose Open.
Select the paragraph text located under the dashed line and choose Edit > Copy. Then choose File > Close.
Return to the layer_start.html file, and using the Standard Editing tool (
), click inside the new text layer you created. Then choose Edit > Paste.Choose Type > CSS DIV select gray_text. The text is changed to gray.
Choose File > Save. Leave the file open.
In this next section you will create a new layer with a colored background. Since layers’ default stacking order is such that this layer will cover the existing layers, you will learn how to change the stacking order.
Select the Layer object (
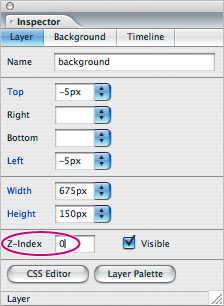
) from the Basic section of the Objects palette and drag it to an empty spot on your layout_start.html page, making sure that you do not drag the new layer into an existing layer. The new layer is positioned in the upper left of the page.After placing the layer object, select it and use the position and size text fields in the Main toolbar. Enter -5 for the Horizontal Position and -5 for the Vertical Position. Enter 675 in the Width text field and 150 in the Height. Press Enter.
With the layer still active, type background into the Name text field in the Layer tab of the Layer Inspector. Press Enter.
Click on the Background tab of the Layer Inspector and double-click on the color box. Enter 9F9F9F into the hexadecimal text field. Press the Tab key and then press OK.

Note
For the Color Picker to appear, you may have to position the Inspector away from your other palettes.
The background of the new layer is now gray.
The newly created layer is covering the existing layers. To change this, you need to understand the concept of layer arrangement using Z-index.
Choose Window > Layers to make the Layers palette visible.
In the Layers palette, select the background layer.
With the background layer selected, type 0 in the Z-index text field located in the Layer tab of the Layer Inspector. Press Enter.
Changing just this layer will not affect where it appears in the stacking order until we also change the other layers’ Z-index values. To make selecting the layers easier, you will use the Layers palette.
You can use the Layers palette (Window > Layers) to quickly select multiple layers for alignment and grouping. You can also use the Layers palette to temporarily lock, hide, or show a layer as you work. (Unlike similar settings in the Layer Inspector, lock, hide, and show settings in the Layers palette do not affect the display of layers in the browser.)
Note
Some settings in the Layers palette are only temporary and will be overridden when you switch document views.
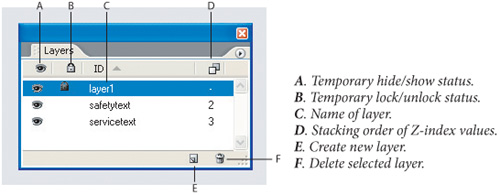
Click on the layer “logo” in the Layers palette. This selects the layer and allows you to make changes in the Layer Inspector. In the Z-index text field, type 5, then press Return or Enter. This brings the logo layer in front of the background layer.
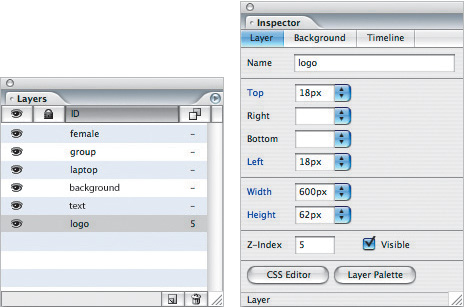
Select the layer named laptop and type 5 into the Z-index text field.
Individually select the layers female and group, and type 5 into the Z-index field. Press Return or Enter.
With the layers’ Z-index assigned to higher numbers, they are now forward of the background layer.
Choose File > Save and File > Close. Leave the student.site window open for the next part of this lesson.
GoLive lets you add a predesigned CSS layout object, based on layers, to a page, and then add text and objects to the layout just as you would in any other page. CSS layout objects are liquid layouts—they adjust to accommodate the viewer’s screen settings. You don’t need to know how to code CSS to create CSS layout objects, but you can customize them by using the CSS Object Inspector and the CSS Editor.
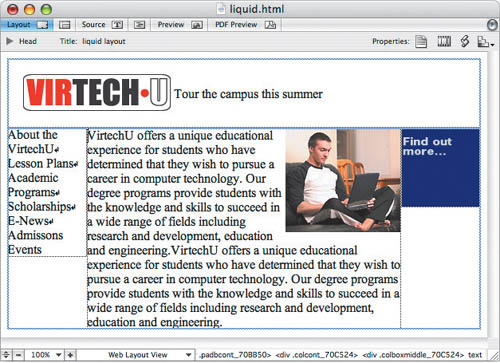
Choose File > Open and double-click on the page named liquid.html located in the Lesson03 folder. A page using liquid layouts appears.
Select the Preview tab in GoLive and drag the document window to a larger size, then smaller. Note that the liquid layout feature used to create this page allows the CSS elements to adjust to the size as needed.
You can leave this page open for reference or choose File > Close.
In this next section you will create a simple page using the liquid layout feature.
Create a new page by selecting File > New. When the New dialog window appears, choose Web > Pages > HTML Page, then click OK.
Choose File > Save As. When the Save As dialog window appears, type the name liquid_virtechu. Click on the Site Folder button (
) and select Root Windows) or Root folder (Mac OS), then choose Save.When the Set Title dialog window appears, type the title liquid layout, then press Set.
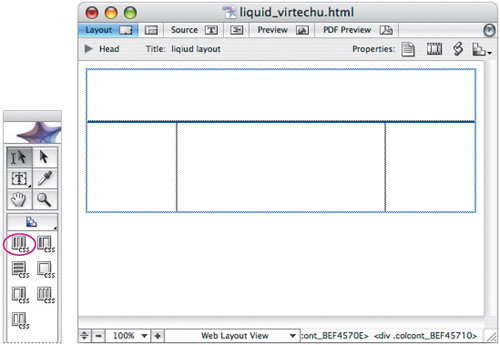
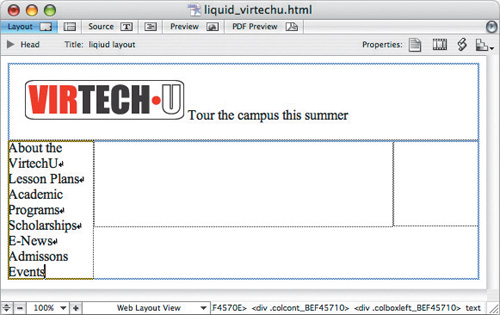
Choose the CSS section of the Objects palette and select the Padded Box object (padded); drag and drop it on the page.
Now select the Three Columns: Scaling Center object (3col) and drag that into the lower section of the Padded box object already placed on your page.
Position the liquid_virtechu page so that you can see the Files tab of the student.site.
Select virtechu_logo.gif and drag and drop it to the top box in the liquid layout.
Click to the right of the VirtechU logo, and then using the Standard Editing tool (
), select the VirtechU logo. In the Basic tab of Image Inspector, select Left from the Alignment drop-down menu.Click to the right of the VirtechU logo to insert the text cursor. Press the spacebar once and type Tour the campus this summer.
Choose File > Open. When the Open dialog window appears, browse to locate the text file named student.txt in the Lesson03 folder.
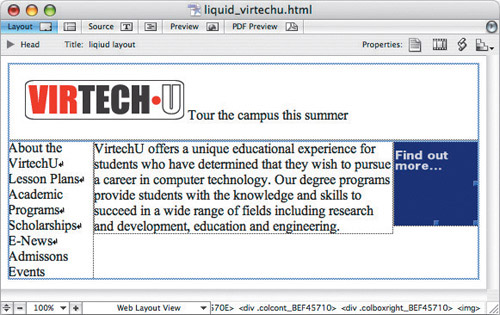
When the student.txt file opens, select the text above the dashed line and choose Edit > Copy. Return to the virtechu_liquid.html page and insert the cursor into the lower left cell and choose Edit > Paste.
Return to the student.txt file and select the text beneath the dashed line. Choose Edit > Copy. Return to the virtechu_liquid.html page and insert the cursor into the lower center cell and choose Edit > Paste.
Note
When referencing frequently used artwork or text, you can choose to save the elements as Snippets, making it easy to retrieve the elements frequently. Read more about Snippets in Lesson 10, “Using Stationeries, Components, Page Templates, and Snippets.”Position the liquid_virtechu page so that you can also see the Files tab of the student.site.
Select tour.gif and drag and drop it to the box on the right in the liquid layout.
Choose File > Save.
Choose the Preview tab and drag the document window larger, then smaller to see how the page you created dynamically changes to fit the available space.
Note
If your text doesn’t look accurate in the GoLive Layout Preview window, click on the Preview in Browser button (![]() ) on the Main toolbar.
) on the Main toolbar.
Congratulations! You have finished the lesson.
In this section you can open existing files to experiment with additional table and CSS options.
Choose File > Open and open the document named liquid.html.
Choose Window > CSS to open the CSS palette.
Notice the named CSS elements that are included as part of the liquid layouts on this page. Double-click on .colboxmiddle; the CSS Editor is displayed. Experiment with the various attributes to discover how each box in a liquid layout can be unique and contain many custom attributes.
Choose File > Save.