
8. Creating a Slideshow
Lesson overview
Once you’ve spent time in Lightroom getting the best out of your photos, showing them off on-screen in a slideshow is one of the easiest and most effective ways to share them with friends and family or present them to a client. Choose a template as a starting point; then customize the layout, color scheme, and timing. Add backdrops, borders, text—even music—to create a dynamic, stylish presentation that will complement your work and captivate your audience.
In this lesson, you’ll create your own slideshow by following these easy steps:
• Grouping the images for your slideshow as a collection
• Choosing a slideshow template
• Adjusting the slide layout and setting a backdrop image
• Adding a text overlay
• Adding music and adjusting the playback settings
• Previewing and playing your slideshow
• Saving your slideshow and your customized template
• Exporting your presentation
• Viewing an impromptu slideshow
You’ll probably need between one and two hours to complete this lesson.

In the Slideshow module you can quickly put together an impressive on-screen presentation complete with stylish graphic effects, transitions, text overlays, and even music. Lightroom 3 makes it easier than ever to share your images with family and friends, clients, or the world at large by giving you the option of exporting your slideshow as a video.
Getting started
This lesson assumes that you are already familiar with the Lightroom workspace and with moving between the different modules. If you find that you need more background information as you go, refer to Lightroom Help, or review the previous lessons in this book.
Before you start on the exercises in this section, make sure that you have correctly copied the Lessons folder from the CD in the back of this book onto your computer’s hard disk as detailed in “Copying the Classroom in a Book files” on page 2, and created the LR4CIB Library Catalog file to manage the lesson files as described in “Creating a catalog file for working with this book” on page 3.
1. Start Lightroom.
2. In the Adobe Photoshop Lightroom - Select Catalog dialog box, make sure that the file LR4CIB Library Catalog.lrcat is selected under Select A Recent Catalog To Open, and then click Open.

3. Lightroom will open in the screen mode and workspace module that were active when you last quit. If necessary, switch to the Library module by clicking Library in the Module Picker at the top of the workspace.

The first time you enter any of the Lightroom modules, you’ll see module tips that will help you get started by identifying the components of the Lightroom workspace and stepping you through the workflow. Dismiss the tips by clicking the Close button. To reactivate the tips for any module, choose [Module name] Tips from the Help menu.
Importing images into the library
The first step is to import the images for this lesson into the Lightroom library.
1. In the Library module, click the Import button below the left panel group.

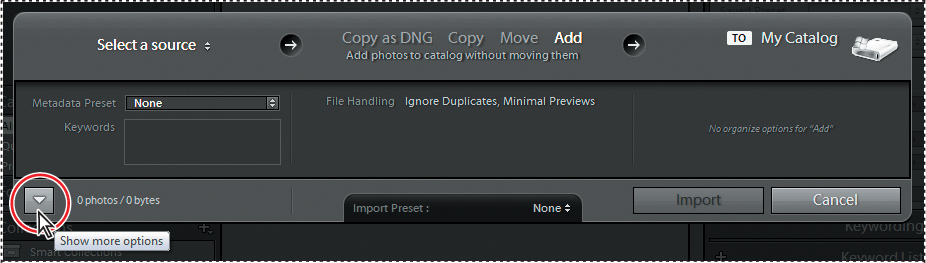
2. If the Import dialog box appears in compact mode, click the Show More Options button at the lower left of the dialog box to see all the options in the expanded Import dialog box.
3. At the top of the Source panel, just below the Select A Source menu, activate the option Include Subfolders; then, navigate to and select the LR4CIB > Lessons > Lesson 8 folder. Ensure that all twelve images are checked for import.
4. In the import options above the thumbnail previews, select Add so that the imported photos will be added to your catalog without being moved or copied. Under File Handling at the right of the expanded Import dialog box, choose Minimal from the Render Previews menu and ensure that the Don’t Import Suspected Duplicates option is activated. Under Apply During Import, choose None from both the Develop Settings menu and the Metadata menu and type Lesson 8, Egypt, Art in the Keywords text box. Make sure that your import is set up as shown in the illustration below, and then click Import.

The twelve images are imported from the Egypt 1 and Egypt 2 subfolders inside the Lesson 8 folder and now appear in the Grid view of the Library module and also in the Filmstrip across the bottom of the Lightroom workspace.
Assembling photos for a slideshow
The first step in creating a slideshow is to assemble the images you wish to include. Having just been imported, the images for this lesson are already isolated from the rest of your catalog. In the Catalog panel, the Previous Import folder is selected as the active image source.

Although you could move to the Slideshow module now, the result would be less than ideal. The Previous Import folder is merely a temporary grouping and, as an image source, it is not flexible—you can’t rearrange the images inside it, or exclude a photo from your slideshow without removing it from the catalog entirely.
1. In the Folders panel, click to select the Lesson 8 folder. If you don’t see the twelve lesson images in the Grid view and the Filmstrip, activate the option Show Photos In Subfolders in the Library menu.
2. In the Grid view or the Filmstrip, drag any of the lesson images to a new position in the group. An alert message appears to let you know that you can’t reorder the images in a folder that contains subfolders; click OK to dismiss it.

If the selected image source for your slideshow was a folder without subfolders, you would be able to rearrange photos in the Grid view or the Filmstrip to create a custom order for your slideshow, but you would still not be able to exclude an image without removing it from the catalog.
You can reorder photos in a collection by simply dragging the thumbnails in the Grid view or the Filmstrip. Your custom display order will be saved with the collection.
The solution is to create a collection to group the photos for your project, where you can rearrange the image order—just as you can with a single folder—and also remove an image from the virtual grouping, without deleting it from your catalog. A collection has a permanent listing in the Collections panel, making it easy to retrieve the set of images you’ve assembled at any time, even if they’re stored across multiple folders, as is often the case for the results of a complex search.
3. Check that the Lesson 8 folder is still selected in the Folders panel; then, press Ctrl+A / Command+A or choose Edit > Select All.
4. Click the New Collection button (![]() ) in the header of the Collections panel and choose Create Collection from the menu. In the Create Collection dialog box, type Egypt as the name for the new collection, and make sure that Top Level is selected in the Placement options. Under Collection Options, activate Include Selected Photos and disable Make New Virtual Copies; then, click Create.
) in the header of the Collections panel and choose Create Collection from the menu. In the Create Collection dialog box, type Egypt as the name for the new collection, and make sure that Top Level is selected in the Placement options. Under Collection Options, activate Include Selected Photos and disable Make New Virtual Copies; then, click Create.
Your new collection appears in the Collections panel, where it is automatically selected as the active image source. The image count indicates that the Egypt collection contains twelve photos.

5. Choose Edit > Select None; then, press Ctrl+Alt+5 / Option+Command+5, or click Slideshow in the Module Picker to switch to the Slideshow module.
Working in the Slideshow module
At center stage in the Slideshow module is the Slide Editor view where you can work on your slide layouts and preview your slideshow in operation.
In the left panel group, the Preview panel displays a thumbnail preview of the layout template that is currently selected (or under the pointer) in the Template Browser panel, while the Collections panel offers easy access to your photos.

The Toolbar below the Slide Editor view presents controls for navigating the images in your collection, previewing your slideshow, and adding text to your slides.
The settings and controls in the right panel group enable you to customize the selected template by tweaking the layout, adding borders, shadows, and overlays, changing the backdrop, adding title screens, and adjusting the playback settings.
Choosing a slideshow template
Each of the preset Lightroom slideshow templates incorporates a different combination of layout settings, such as image size, borders, backgrounds, shadows, and text overlays, and can be customized to create your own slide designs.
1. In the Template Browser panel, expand the Lightroom Templates folder, if necessary; then, move the pointer over the list of Lightroom templates. The Preview panel shows you how the selected image looks in each template layout. Select a different image in the Filmstrip, and then preview the templates again.
The Plus sign (+) after the name of the Default template is not part of its name but denotes that this template will be used when you launch the Impromptu Slideshow from another module. To specify a different template for this purpose, right-click / Control-click the name in the Template Browser and choose Use For Impromptu Slideshow.

2. When you’re done previewing the options in the Template Browser, click to select the Widescreen template.
3. In the Filmstrip, select the first image, Slideshow-01.jpg. From the Use menu in the Toolbar, choose All Filmstrip Photos.
4. Click the Preview button at the bottom of the right panel group to preview your presentation in the Slide Editor view. When you’re done, press the Esc key on your keyboard, or click in the Slide Editor view to stop the preview.
Customizing your slideshow template
For the purposes of this lesson, you won’t be adding an identity plate or metadata information to your slides, so the Widescreen template will serve as a good basis. You’ll customize the template by tweaking the layout, creating a background, and overlaying text, and then liven up the show by adding a soundtrack.
Adjusting the slide layout
Once you’ve chosen a slide template, you can use the controls in the right panel group to customize it. For this project you’ll start by modifying the layout, and then change the background to set up the overall look of the design before you make decisions about the style and color of borders and overlaid text. The Layout panel enables you to change the size and position of the photo in the slide layout by setting the margins that define the image cell.
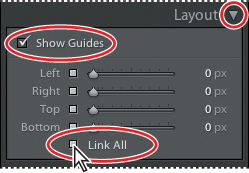
1. If the Layout panel in the right panel group is currently collapsed, expand it by clicking the triangle beside its name. Make sure that the Show Guides and Link All options are activated.
2. Move the pointer over the lower edge of the image in the Slide Editor view. When the pointer changes to a double-arrow cursor, drag the edge of the image upwards. As you drag, grey layout guide lines appear against the black background around the scaled-down image. All four guides move at the same time because the Link All option is activated in the Layout panel. As you drag upwards, watch the linked sliders and numerical values change in the Layout panel and release the mouse button when the values reach 75 px (pixels).

You could also drag the sliders in the Layout panel—or click the pixel values at the right and type new numbers—to adjust the size of the image in the slide layout. In this case you would only need to drag one slider or enter one value because the settings are linked.
Now you can increase the width of the slide’s top margin to create a space where you can add text later in the lesson.
3. In the Layout panel, disable the Link All option, and then either drag the Top slider to the right, type over the adjacent pixel value, or drag the top guide in the Slide Editor, to set a value of 150 px (pixels). Disable the Show Guides option, and then collapse the Layout panel.
Setting up the slide background
In the Backdrop panel you can set a flat background color for your slides, apply a graduated color wash, or place a background image—you can even mix all three elements to create an atmospheric frame for your photos.
1. In the Filmstrip, select any photo other than the second in the series.
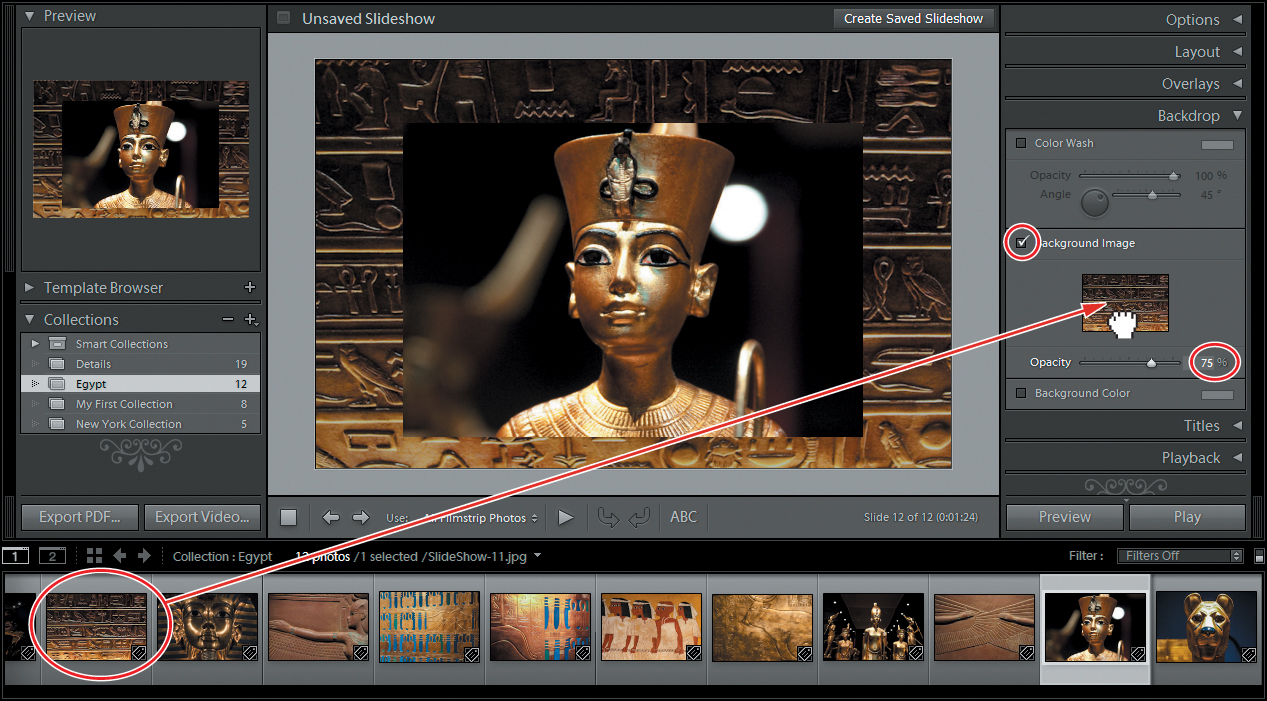
2. If necessary, expand the Backdrop panel in the right panel group. Activate the Background Image option, and then drag the second image, Slideshow-02.jpg, from the Filmstrip into the Background Image pane. Drag the Opacity slider to the left to reduce the value to 75%, or click the Opacity value and type 75.
You can also drag an image from the Filmstrip directly onto the slide background in the Slide Editor view.
The background image is still competing too much with the featured photos. You can use the Color Wash to darken the backdrop a little more and to create an angled lighting effect. The Color Wash option applies an angled graduated wash over the background. The overlaid gradient fades from whatever color is set in the Color Wash swatch to the background color or, as in our example, to the background image that you set for the slide.
3. Activate the Color Wash option. Click the Color Wash swatch, and then click the black swatch in the row at the upper right of the Color Picker.
4. Click the Close button at the upper left of the Color Picker, and then use the Opacity slider to set the color wash opacity to 75%. Set the Angle of the wash to 135°. When you’re done, collapse the Backdrop panel.

With the background photo set to partial transparency, your backdrop design is now a composite of all three optional elements: a graduated color wash, an image, and the default background color.
A sophisticated backdrop design that includes a related background image can be a stylish and effective way to create an overall theme or atmosphere for your slideshow.
Adjusting stroke borders and shadows
Now that you’ve established the overall layout and feel for your slides, you can “lift” the images to make them stand out more against the background by adding a thin stroke border and a drop shadow. We’ll stay within our established color scheme, so that the design doesn’t become too busy.
1. In the right panel group, expand the Options panel. Activate the Stroke Border option, and then click the color swatch beside it to open the Color Picker.
2. To set a dull gold color for the stroke border, click to select the R, G, and B percentages at the lower right of the Color Picker in turn and type values of 55, 45, and 20 respectively. Click outside the Color Picker to close it.

3. Use the Width slider to set a width of 2 pixels or type 2 in the text box.
4. Activate the Cast Shadow option in the Options panel and experiment with the controls. You can adjust the opacity of the shadow, the distance the shadow is offset from the image, the angle at which it is cast, and the Radius setting, which affects the softness of the shadow’s edge. When you’re done experimenting, set the controls as in the illustration at the right and collapse the Options panel.

Adding a text overlay
In the Overlays panel you can add text, an identity plate, or a watermark to your slides and have Lightroom display the rating stars you’ve assigned to your images or the captions that you’ve added to their metadata. In this exercise, you’ll add a simple headline that will be overlaid on the background of every slide.
For this exercise, you won’t incorporate an identity plate in your slideshow. For more information on identity plates, refer to Lesson 2, Lesson 10, or the Lightroom Help topic “Add your identity plate to a slideshow.”
1. In the Filmstrip, select the last image, Slideshow-12.jpg; this is one of the narrower photos in the series, so we’ll use it as reference when placing text. Expand the Overlays panel and activate the Text Overlays option.
2. If the Toolbar is not visible just below the Slide Editor view, press the T key. In the Toolbar, click the Add Text To Slide button (ABC).

3. Type TREASURES FROM THE TOMB in the Custom Text box.
4. Press Enter / Return. The text appears in the lower left corner of the Slide Editor view, surrounded by a bounding box. The Text Overlays settings are updated to show the font details (Myriad Web Pro is selected in the illustration below).

5. Click the double triangle beside the font name and choose a different font. We chose Papyrus, but Optima or even Lithos Pro would suit our design. From the Face menu, we chose Bold on Windows, and Black on Mac OS.
6. Drag the text upwards and allow it to attach itself to the anchor at the center of the upper edge of the slide. Drag the handle at the bottom of the text bounding box upwards to scale the text to the width of the photo; then, use the up and down arrow keys to center the text vertically in the space above the image.

As you drag text on a slide, Lightroom tethers the bounding box either to the nearest of various reference points around the edge of the slide, or to a point on the border of the image itself.
7. To see this in operation, drag the text around the slide, both inside and outside of the image, and watch the white tether-line jump from point to point. When you’re done, return the text to its original position.
Throughout a slideshow, the tethered text will maintain the same position either relative to the slide as a whole or to the border of each image, whatever its shape.
You can use this feature to ensure that a caption, for instance, will always appear just below the left corner of each image no matter what its size or orientation, while a title that applies to the presentation as a whole—as does the text in our example—will remain in a constant position on the screen.
The color and opacity controls in the Text Overlays operate just as they do for the Color Wash and Stroke Border. On Mac OS, you can also set up a drop shadow for your text. For this exercise, we’ll use the default white at 100% opacity.
8. Collapse the Overlays panel and deselect the text box in the Slideshow Editor.
9. Select the first slide in the Filmstrip and click the Preview button at the bottom of the right panel group to preview your slideshow in the Slideshow Editor view. When you’re done, press Esc to stop playback.


Creating a Saved Slideshow
Since you entered the Slideshow module, you’ve been working with an unsaved slideshow, as is indicated in the bar across the top of the Slideshow Editor view.
Until you save your slideshow, the Slideshow module works like a scratch pad. You can move to another module, or even close Lightroom, and find your settings unchanged when you return, but if you click a new slideshow template—or even the one you started with—in the Template Browser, the “scratch pad” will be cleared and all your work will be lost.
Converting your project to a Saved Slideshow not only preserves your layout and playback settings, but also links your design to the particular set of images for which it was designed. Your slideshow is saved as a special kind of collection—an output collection—with its own listing in the Collections panel. Clicking this listing will instantly retrieve the images you were working with, and reinstate all of your settings, no matter how many times the slideshow scratch pad has been cleared.
Once you’ve saved your slideshow, any changes you make to the layout or playback settings are auto-saved as you work.
1. Click the Create Saved Slideshow button in the bar at the top of the Slideshow Editor view, or click the New Collection button (![]() ) in the header of the Collections panel and choose Create Slideshow.
) in the header of the Collections panel and choose Create Slideshow.
2. In the Create Slideshow dialog box, type Egypt Slideshow as the name for your saved presentation. In the Placement options, activate Inside and choose the collection Egypt from the associated menu; then, click Create.

The Make New Virtual Copies option is useful if you wish to apply a particular treatment, such as an antique monochrome developing preset, to all the pictures in your slideshow, without affecting the photos in the source collection.
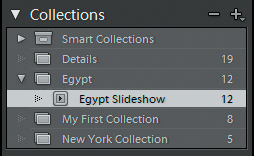
Your saved slideshow appears in the Collections panel, marked with a Saved Slideshow icon (![]() ), and nested inside the original source collection, Egypt. The image count shows that the new output collection, like the source, contains twelve photos.
), and nested inside the original source collection, Egypt. The image count shows that the new output collection, like the source, contains twelve photos.
Adding more photos to your saved slideshow is easy: simply drag images to the slideshow’s listing in the Collections panel. Click the white arrow that appears to the right of the image count when you move the pointer over your saved slideshow in the Collections panel to jump from the Library to your presentation in the Slideshow module.
The title bar above the Slide Editor now displays the name of your saved slideshow, and no longer presents the Create Saved Slideshow button.
Depending on the way you like to work, you can save your slideshow at any point in the process; you could create a Saved Slideshow as soon as you enter the Slideshow module with a selection of images or wait until your presentation is polished.
For the purposes of this lesson, saving the project at this stage enables you to go ahead and delete or rearrange slides to refine your presentation, without affecting the original source collection—any image you exclude from the slideshow now will be removed from the Egypt Slideshow output collection, but will remain a part of your Egypt collection. This could be useful if you also intended to use the photos in the Egypt collection to produce a print layout and a web gallery, for instance—your original collection will remain intact, while the output collection for each project might contain a different subset of images, arranged in a different order.
Refining your slideshow
It’s a good idea to finalize the photo set for your slideshow at this point, before you go on to specify playback settings—if you remove an image later, you might need to readjust the time allocated for each slide and transition, especially if your slideshow is timed to match the duration of a sound file.
1. In the Filmstrip, right-click / Control-click the image Slideshow-02.jpg—the photo you used as a background image—and choose Remove From Collection.
Note that although the photo disappears from the Filmstrip, and will not feature on any slide in the presentation it is not removed from the slide background in the Slide Editor view. The background image has become part of the slide layout, rather than merely one of the selection photos to be displayed. Even if you “re-fill” your slideshow with a different set of photos entirely, the background image will remain in place. Your saved slideshow includes a link to the photo that is independent of the output collection or its parent collection.
In the Collections panel, the nested Egypt Slideshow output collection now shows an image count of eleven photos, while its parent collection still contains the original count of twelve.

2. In the Filmstrip, drag the photo Slideshow-07 to a new position between the images Slideshow-05 and Slideshow-06, releasing the mouse button when the black insertion bar appears.

Adjusting the playback settings
Now that you’ve finalized the photo set for the slideshow, you can go ahead and fine-tune your presentation by specifying the playback settings.
In the Playback panel you can add a soundtrack to your presentation, set the duration for slides and transitions, or set the slideshow to display your images in random order. Adding a soundtrack can make your slideshow much more dynamic and compelling, so let’s start with that.
If you have more than one screen attached to your computer you’ll see the Playback Screen pane in the Playback panel. You can choose which screen will be used when your slideshow is played at full-screen and whether to blank the other screens during playback.
Adding music to your slideshow
You’ll find a sound file named Iteru.m4a in your Lesson 8 folder. This piece of music will underline the middle-eastern feel of the slideshow. However, feel free to choose any other file from your music library that you’d like to audition.
1. Expand the Playback panel in the right panel group, and then activate the Soundtrack option.
2. Click the Select Music button; then, navigate to your LR4CIB > Lessons > Lesson 8 folder, select the file Iteru.m4a, and click Open / Choose.

The name of the sound file and its duration are now displayed in the Soundtrack pane of the Playback panel.
3. Click the Preview button at the bottom of the right panel group to preview the slideshow in the Slideshow Editor view. The new soundtrack adds atmosphere to the slideshow. When you’re done, press Esc to stop playback.
The next step is to fine-tune the timing of the slideshow by setting the duration of slides and fades to match the length of the music file.
4. In the Soundtrack pane, click the Fit To Music button, keeping an eye on the default Slides and Fades values in the Slide Duration settings towards the bottom of the Playback panel as you do so.
Lightroom adjusts the Slides and Fades values to fit the duration of the music file.
5. Drag the Fades slider to the right to increase the duration of the fade transitions by two seconds, and then click the Fit To Music button once more, keeping an eye on the Slides value in the Slide Duration settings as you do so.
The Playback Settings panel’s Slide Duration pane also includes a color control for setting the color to which images will fade during slide transitions.
Lightroom automatically re-calculates the duration for which each slide will be shown so that the slideshow still fits to the music file despite the lengthened fades.
6. At the bottom of the Playback panel, disable Random Order and Repeat.
7. Select the first photo in the Filmstrip, and then click the Play button at the bottom of the right panel group to see the slideshow in full-screen mode.
8. Play the slideshow once more; this time, press the spacebar to pause and resume playback, the Right Arrow key to advance to the next slide, the Left Arrow key to return to the previous slide, and the Esc key to end the slideshow.
Saving a customized slideshow template
Having spent so much time customizing your slideshow template, you should now save it so that it becomes available as a new choice in the Template Browser menu.
This is different from saving your slideshow, as you did earlier.
A saved slideshow is actually an output collection—an arranged grouping of images, saved together with a slide layout, text overlays, and playback settings. In contrast, a saved custom template records only your slide layout and playback settings—it is an empty container that is not linked to any particular set of images.
Saving your customized slideshow template will save you a lot of time later should you wish to put together a related presentation, or simply use the template as a starting-point for creating a new design.
By default, your customized template will be listed with the User Templates in the Template Browser panel.
1. With your slideshow still open, click the Create New Preset button (![]() ) in the header of the Template Browser panel, or choose Slideshow > New Template.
) in the header of the Template Browser panel, or choose Slideshow > New Template.
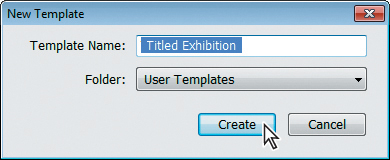
2. In the New Template dialog box, type Titled Exhibition as the new template name. Leaving the default User Templates folder selected as the destination folder in the Folder menu, click Create.
When saving a customized template it’s a good idea to give it a descriptive name. This will make it easier to find as you add more choices to the Template Browser menu.
Your new customized template is now listed under User Templates in the Template Browser panel.

Exporting a slideshow
To send your slideshow to a friend or client, play it on another computer, or share it on the Web, you can export it as a PDF file or as a high-quality video file.
1. In the Slideshow module, click the Export PDF button at the bottom of the left panel group.
2. Review the options available in the Export Slideshow To PDF dialog box, noting the settings for size and quality, and then click Cancel.

PDF slideshow transitions work when viewed using the free Adobe Reader® or Adobe Acrobat®. However, slideshows exported to PDF will not include music, randomized playback order, or your customized slide duration settings.
3. Repeat the process for the Export Video button. Review the Export Slideshow To Video dialog box, noting the range of options available in the Video Preset menu. Select each export option in turn to see a brief description below the Video Preset menu.
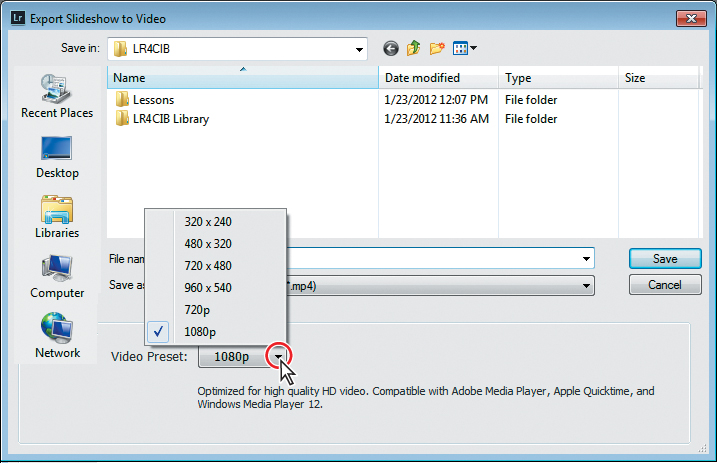
Lightroom exports slideshows in the mp4 movie format so that you can share your slideshow movies on popular video sharing sites or optimize them for playback on mobile media. Preset size and quality settings range from 320 x 240, optimized for personal media players and email, to 1080p, optimized for high quality HD video.
4. In the Export Slideshow To Video dialog box, type a name for your exported video and specify a destination folder. Choose an option from the Video Preset menu, and then click Export.
A progress bar in the upper left corner of the workspace shows the status of the export process.

Playing an impromptu slideshow
Even outside the Slideshow module you can play an impromptu slideshow. In the Library module, for instance, this makes a convenient way to see a full-screen preview of the photos you’ve just imported.
The Impromptu Slideshow can be launched from any of the Lightroom modules. The slide layout, timing, and transitions for the Impromptu Slideshow will depend on the template currently set in the Slideshow module for use with the Impromptu Slideshow.
To change the slideshow template used for the impromptu slideshow, right-click / Control-click a template in the Slideshow module Template Browser and choose Use For Impromptu Slideshow.
1. Switch to the Library module.
2. Use the Sort menu in the Grid view Toolbar to set the sorting order to either Capture Time or File Name. Choose View > Sort > Ascending, or click the Sort Direction button (![]() ) beside the Sort menu, if necessary, to set an ascending sort direction (the Sort Direction button should show an “a” above a “z”).
) beside the Sort menu, if necessary, to set an ascending sort direction (the Sort Direction button should show an “a” above a “z”).
3. Press Ctrl+A / Command+A or choose Edit > Select All to select all of the images that you’ve just imported.
4. Choose Window > Impromptu Slideshow or press Ctrl+Enter / Command+Return to start the impromptu slideshow.
5. Press the Right Arrow key to advance to the next slide or the Left Arrow key to return to the previous slide. Use the spacebar to pause and resume playback. The slideshow will repeat, cycling through the selected images until you either press the Esc key on your keyboard or click the screen to stop playback.
In the Library and Develop modules, you can also use the Impromptu Slideshow button in the Toolbar. If you don’t see the Impromptu Slideshow button in the Toolbar, choose Slideshow from the content menu at the right end of the Toolbar.

Well done! You have successfully completed another Lightroom lesson. In this lesson you learned how to create your own stylish slideshow presentation.
In the process, you’ve explored the Slideshow module and used the control panels to customize a slideshow template—refining the layout and playback settings and adding a backdrop, text, borders, and a soundtrack.
In the next chapter you’ll find out how to present your work in printed format, but before you move on, take a few moments to reinforce what you’ve learned by reading through the review questions and answers on the next page.
Review questions
1. How can you change which template is used for an Impromptu Slideshow?
2. Which Lightroom slideshow template would you pick if you wished to display metadata for your images?
3. What options do you have when customizing a slideshow template?
4. What are the four Cast Shadow controls and what are their effects?
5. What is the difference between saving your customized slideshow template and saving the slideshow you’ve created?
Review answers
1. In the Slideshow module, right-click / Control-click the name of a slideshow template in the Template Browser and choose Use For Impromptu Slideshow.
2. The EXIF Metadata template, which centers photos on a black background and displays star ratings and EXIF information for the images, as well as an identity plate.
3. In the right panel group you can modify the slide layout, add borders and text overlays, create shadow effects for images or text, change the background color or add a backdrop image, adjust the durations of slides and fades, and add a soundtrack.
4. The four Cast Shadow controls have the following effects:
• Opacity: Controls the opacity of the shadow ranging from 0% (invisible) to 100% (fully opaque).
• Offset: Affects the distance that the shadow is offset from the slide. As the offset is increased, more shadow becomes visible.
• Radius: Controls how sharp (lower settings) or soft (higher settings) the edges of the shadow appear.
• Angle: Sets the direction of the light source, which affects the angle at which the shadow is cast.
5. A saved custom template records only your layout and playback settings—it is like an empty container that is not linked to any particular set of images, whereas a saved slideshow is actually an output collection—an arranged grouping of images, saved together with a slide layout, text overlays, and playback settings.