
6. Reading Commented Documents
The previous chapter described how to annotate a PDF file with circles, arrows, and paragraphs of explanatory text. We covered how to mark up the text in your PDF files to indicate insertions, deletions, and replacements.
In this chapter, we discuss what to do when you receive such a marked-up document. Of course, you can always just double-click an annotation and read the text in the resulting pop-up window. However, Acrobat gives you several more-efficient ways of examining a document’s annotations.
Let’s see what they are.
Examining the Comments List
The Comments List is a navigation pane you can view by clicking the appropriate icon to the left of your document page (Figure 6.1). Unlike the other navigation panes, the Comments List displays across the bottom of the document window.
Figure 6.1. The Comments List itemizes all the comments in your document.
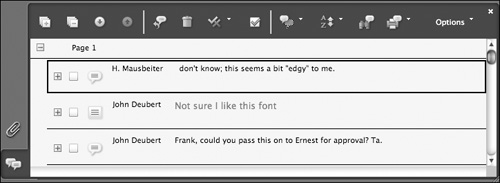
The Comments List itemizes all the comments in your document. It also has a toolbar across the top that provides easy access to a variety of tasks common to working with comments. This pane is invaluable when you’re working with a document that has more than one or two comments.
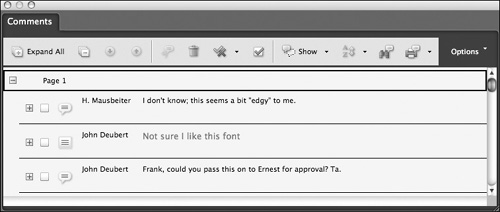
Like all navigation panes, the Comments List pane can be dragged off the left edge of the document window to become a stand-alone palette (Figure 6.2).
Figure 6.2. When you drag the Comments List away from the document window, it becomes a stand-alone floating palette.
Each entry in the Comments List has two states. Initially, the entry is collapsed, showing only the comment’s author, date, and text (Figure 6.3).
Figure 6.3. When collapsed, an entry in the Comments List shows a comment’s author and text.

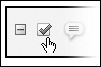
The collapsed item has a Expand button, the boxed plus sign visible in Figure 6.3. When you click it, you see additional information associated with the comment. This can include the comment’s status and any replies that have been made to that comment (Figure 6.4). Note in Figure 6.4 that the Expand button becomes a Collapse button—a minus sign in a box.
Figure 6.4. An expanded entry displays all the information for a comment, including any replies.

 Tip
Tip
• I find it useful to use the Comments List as a palette. When it’s docked to the bottom of the window, the list obscures too much of the document’s page for my liking.
To expand and collapse entries in the Comments List
- Select the comment in which you’re interested.
- Click the Expand button to display that comment’s additional information.
- Click the Collapse button to hide the additional information.
The Comments List toolbar also has a pair of buttons (Figure 6.5) that will expand and collapse all of the entries in the list.
Figure 6.5. The Expand All and Collapse All buttons do just what their names imply.
![]()
To expand and collapse all entries in the Comments List
- Click the Expand All button to expand all the comments in the list.
- Click the Collapse All button to collapse all the comments in the list.
Replying to a Comment
Having read a comment, you may want to reply to it—answer a question posed in the comment, deny any wrongdoing implied by the comment, and so on.
To reply to a comment in the Comments List
- Select the comment to which you want to reply.
- Click the Reply to Comment icon in the toolbar (Figure 6.6).
Figure 6.6. Click the Reply to Comment icon to reply to a comment.

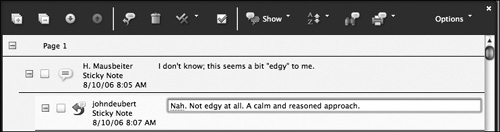
Acrobat expands the comment entry and adds a new line with a text box for your reply (Figure 6.7).
Figure 6.7. When you click the Reply to Comment button, Acrobat expands the comment entry and gives you space to type your reply.
- Type the text of your reply.
Tip
• You can also reply to a comment by right-clicking the comment’s icon and selecting Reply in the contextual menu.
Tip
• You can also check-mark a comment by right-clicking the comment’s icon and selecting Mark with Checkmark in the contextual menu. This menu item becomes Remove Checkmark if the comment is already checked.
Marking Comments
The Comments List toolbar lets you indicate that you have reviewed a comment. Setting a comment’s review status indicates that you have come to some decision regarding that comment, such as accepting it as true or rejecting it as an outright lie.
To set the review status of a comment
- Select the comment in the Comments List.
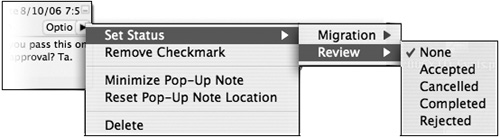
- In the Comments List toolbar, select the Set Status tool (Figure 6.8).
Figure 6.8. The Review submenu of the Set Status tool lets you assign a status state to a comment.
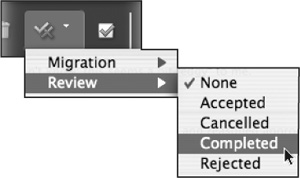
A menu drops down from the tool.
- In the Review submenu, select the status you want for this comment.
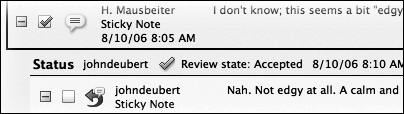
The comment’s new status appears in the Comments List (Figure 6.9).
Figure 6.9. A comment’s status state is among the information displayed when you expand a comment’s entry.
Tips
• You can also set the review status of a comment from the Option menu in the comment’s pop-up window, as in Figure 6.10.
Figure 6.10. You can also set a comment’s status state from its pop-up window.
• Acrobat provides five review status values: None, Accepted, Cancelled, Completed, and Rejected. The precise meaning of these status values is up to the reviewer. Acrobat doesn’t define the difference between, for example, Cancelled and Rejected.
Each comment in the Comments List has a check box whose significance is up to the reviewer (Figure 6.11). If you were keeping track of which comments mention bunnies, you could set each comment’s checkmark as you encounter a “bunny” reference.
Figure 6.11. Each comment entry has a check box whose significance is up to you.
To set or clear a comment’s checkmark
• Click the comment’s check box.
This action toggles the checked state; it turns on if it was off and vice versa.
Managing the Comments List
The Comments List toolbar gives you considerable control over which comments it displays and how it displays them. In this section you’ll see how to modify the visibility of items in the Comments List.
The Show tool (Figure 6.12) lets you choose which comments you want to appear on the PDF page and in the Comments List. The menu attached to this tool consists of a series of submenus allowing you to choose visible comments by type, reviewer, status, and whether the comment is checked.
Figure 6.12. You may select among a variety of criteria to determine which comments are displayed on the page and in the Comments List.

Each submenu allows you to choose among the available comment types, reviewers, and so on. Note in Figure 6.12 that you can have multiple selections scattered among the submenus. You can choose to see all the Notes and Text Editing Markups from reviewer Quentin P. Fonebotham, for example.
To choose which comments should be visible
- In the Comments List toolbar, click the Show tool (Figure 6.12).
- Choose the type, review, status, or checked state you want to make visible in the Comments list.
If you want to make all the comments visible again, there is a bit of a trick to it. The “Show All Comments” item in the Show tool’s menu is not available unless all the document’s comments are hidden.
To make all comments visible
- In the Show menu, select Hide All Comments.
All comments in the document disappear, and the Show All Comments item appears in the Show tool menu.
- In the Show tool menu, select Show All Comments.
All of the document’s comments become visible.
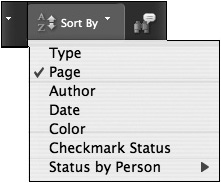
The Comments List toolbar allows you to sort the comments in the list by a variety of criteria, including type, page number, and author.
To sort the items in the Comments List
- In the Comments List toolbar, click the Sort By tool (Figure 6.13).
Figure 6.13. You can sort the Comments List several ways.
A menu drops down from the tool button.
- Select the criterion by which you want to sort the comments.
The list will immediately redraw itself in the new order.
Searching for Text in Comments
The Comments List allows you to search for words or phrases in the document’s comments. The process is much like searching for text in the PDF file as a whole.
To search for a word among a document’s comments
- In the Comments List toolbar, click the Search tool (Figure 6.14).
Figure 6.14. The Search tool allows you to search for a word or phrase in a document’s comments.

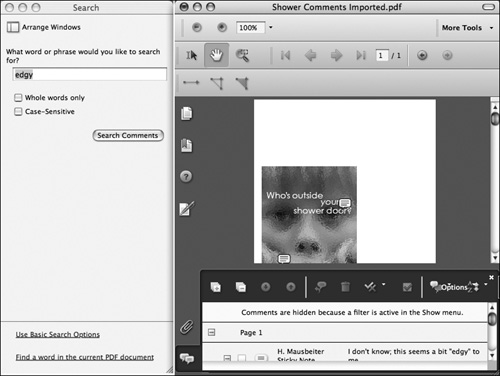
Acrobat resizes your document window and opens the Search window next to it (Figure 6.15). The two windows together take up the entire screen. (This can be disconcerting the first time you see it.)
Figure 6.15. When you click the Search tool, Acrobat resizes your document window and displays the Search window.
- Type the word or phrase for which you want to search into the Search window.
- Click the Search Comments button.
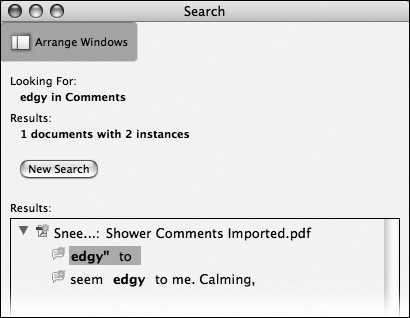
Acrobat searches through your comments and returns a list of hits in the Search window (Figure 6.16).
Figure 6.16. The Search window displays all the comments in your document that contain the target phrase.
- To view one of the found comments, click its entry in the hit list.
Acrobat highlights that comment in the document window, changing pages as needed.
- To do another search, click the New Search button in the Search dialog box and then repeat steps 2–4.
- To finish searching, click the Search window’s standard Close control (the red button on the Mac or the X button in Windows).
Acrobat closes the Search window and returns the document window to its original size and position on the screen.
Printing Comments
You can print the comments in a document two ways:
• Print the PDF file as usual, with the comments in place on the printed pages.
• Print a summary of the comments, printing the comment text and, optionally, a reduced image of each document page showing where the comment occurs in the document.
To print a PDF file with comments in place
- Select File > Print.
Acrobat will present you with the Print dialog box (Figure 6.17).
Figure 6.17. The Print dialog box lets you print your document together with its comments.

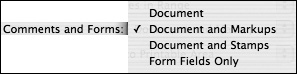
- In the Comments and Forms pop-up menu (Figure 6.18), select one of the following:
• To print the document and annotations other than stamps, choose Document and Markups.
• To print the document and stamps, choose Document and Stamps.
Figure 6.18. You can print the document and either its markups or its stamps.
You can’t print both markups and stamps; I don’t know why.
- Click Print.
Acrobat prints the document and annotations.
Summarizing comments
Acrobat can also print a summary of all the comments in the document. It can print the summary in one of four formats (Figure 6.19):
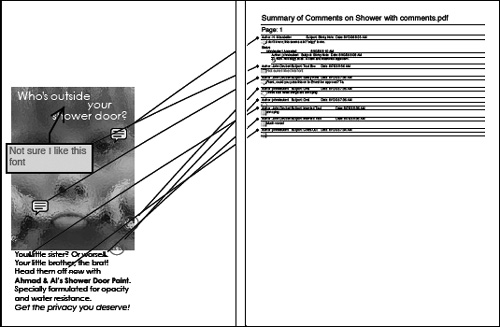
• Each document page alternating with a page of comment text. Lines connect the comment text to the corresponding place on the document page when the pages are placed side by side (Figure 6.20).
• A thumbnail of each page printed side-by-side on a single page with the comment text for that page. Lines connect each comment with the corresponding position on the document page.
• A list of all the comment text, sorted by page number.
• Each document page alternating with a page of comment text. Each comment is numbered, and a corresponding number is placed at the comment’s position on the document page.
Figure 6.19. Acrobat offers four formats for printing a summary of a document’s comments.

Figure 6.20. Most of the summary formats print each comment’s text and indicate its position on the document page.
To print a summary of a document’s comments
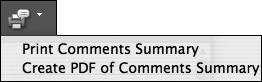
- In the Comments List toolbar, click the Print Comments tool.
A menu drops down from the tool (Figure 6.21).
Figure 6.21. You can print a comment summary on paper or save it as a PDF file.
- Select Print Comments Summary.
The Summarize Options dialog box opens (Figure 6.22).
Figure 6.22. The Summarize Options dialog box lets you select the format you want for the summary.

- Select the radio button corresponding to the type of summary you want.
- Click Print Comment Summary.
Acrobat prints the comment summary.
Tip
• If you select Create PDF of Comments Summary in the Print Comments menu (Figure 6.21), Acrobat creates a PDF file of the summary in the format you’ve chosen, rather than printing the summary on the page.
Migrating Comments
In the previous chapter, we discussed importing comments from an FDF file into a PDF document. The imported comments are placed onto the document’s pages in their original locations—the same x and y coordinates as in the reviewer’s copy of the file.
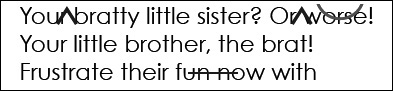
Unfortunately, if the PDF file has been revised since the review so it’s no longer identical to the reviewer’s copy, the imported comments may no longer line up with the text or graphic elements to which they pertain (Figures 6.23 and 6.24).
Figure 6.23. This text has a variety of markups added to it.

Figure 6.24. Importing the markups from Figure 6.23 into a revised version of the PDF file results in many of the markups no longer lining up with the original text.
Migrating comments into the revised document, instead of importing them, solves this problem. With migration, Acrobat attempts to place each comment in the same position relative to the page’s contents. Even if text has been reflowed, illustrations have moved to different pages, and images have been repositioned, the comments pertaining to those items still find their proper targets.
Migrating comments has a requirement, however: Both the commented and the revised versions of the PDF file must be tagged. A tagged PDF file contains internal information identifying significant part of the document structure: paragraphs of text, graphics, chapter titles, and so on. Some applications, such as Adobe InDesign, place tags into the PDF files they create; most don’t. Acrobat can add tags to PDF files that are missing them.
To tag a PDF file for comment migration
• Select Advanced > Accessibility > Add Tags to Document.
To migrate comments into a modified PDF file
- Select Comments > Migrate Comments.
The Migrate Comments dialog box opens (Figure 6.25).
Figure 6.25. You migrate comments from the reviewer’s copy of the PDF file.

- Select the file to be tagged by doing one of the following:
• From the drop-down menu, choose a PDF file that’s currently open.
• Click the Choose button, and select a PDF file on your disk.
- Click OK.
Acrobat analyzes the PDF file, placing tags into the file. Acrobat may also report any problems it had interpreting the document’s structure.
Acrobat reads the comments in the file you selected, placing them in the appropriate place on the current documents pages.