
11. Creating an Acrobat Presentation
Acrobat provides a range of features that makes it easy to use a PDF document as a presentation for a variety of situations:
• Group presentations, in which you’re displaying the PDF pages using a computer projector. In this case, the PDF file replaces the more common (though not as graphically sophisticated) PowerPoint file.
• Distributed presentation files that are intended to be viewed by readers on their own computers. This may be an electronic brochure, distributed on the Web.
• Kiosk presentations, in which the PDF document is viewed in a public place on a dedicated computer. A “Where to Go” kiosk in an airport is a good example.
PDF documents can be viewed full-screen with all the transitions and navigational control offered by any other presentation software. Furthermore, graphic and typographic control in Acrobat documents is much better than in other presentation software.
This chapter covers the features that allow you to turn an Acrobat document into a presentation file.
Setting Open Options
In a presentation, the Acrobat toolbars and navigation panes are a distraction. You want readers to see only your document and just enough of an interface to let them move around in the document.
Acrobat gives you the ability to control what should be displayed when a document is opened. These open options are stored with the document, so whenever readers open that document, you control exactly what they see.
To set a document’s open options
- Choose File > Properties.
The Document Properties dialog box opens.
- Click the Initial View tab to see the controls that determine how the document will be presented to the user (Figure 11.1).
Figure 11.1. The Initial View pane in the Document Properties dialog box lets you specify what readers see when they first opening your document.

- In the “Navigation tab” pop-up menu, choose Page Only.
This option specifies that all the navigation panes should be hidden.
- In the “Page layout” pop-up menu, choose Single Page.
The alternatives, which display multiple pages side-by-side or vertically, aren’t good for a presentation.
- In the Magnification pop-up menu, choose Actual Size.
- Choose the “Resize window to initial page” check box.
The document will open in a window that exactly matches the page size. There won’t be a gray border around the page in the document window.
- Choose “Center window on screen.”
- If you want your presentation to take over the entire computer screen, choose the “Open in Full Screen mode” check box.
- Choose “Hide tool bars.”
The toolbars are distracting in a presentation.
- Choose “Hide window controls.”
This option hides the navigation pane icons, which are also distracting during a presentation.
Steps 9 and 10 leave your document window displaying only page content, as in Figure 11.2.
Figure 11.2. You should minimize the distractions in an Acrobat presentation by hiding the toolbars and other user interface elements.

 Tip
Tip
• Full Screen mode is useful for corporate presentations or for kiosk documents. I recommend against it if you’ll be distributing your PDF document to other readers; most people find it annoying when a document covers everything else on their computers. We’ll talk more about Full Screen documents in the next section.
Creating a Full Screen Slide Show
If you’re using a PDF file for a group presentation, you will often want Acrobat to display your document as a full-screen display, masking all user-interface items. This eliminates distractions and makes the document’s contents large and legible. In effect, you’re presenting a slide show to your audience.
If your document will only be used full-screen, then you can set its Initial View properties to automatically display the document full screen, as described in the previous section.
On the other hand, if this document is one you use in a variety of circumstances—or you just don’t like having full-screen display invoked automatically—then you should turn on Full Screen mode only as needed.
To turn on Full Screen mode
• With the document open, choose View > Full Screen Mode (Figure 11.3).
Figure 11.3. You can manually open a document in Full Screen mode from the View menu.

Acrobat displays your document zoomed so it fills the entire screen.
To exit Full Screen mode
• Press the Escape key.
Acrobat returns you to viewing the document in a window.
Moving around in Full Screen mode
Full Screen mode hides the entire Acrobat user interface, leaving you no buttons or other visual controls you can use to navigate through the document. How do you move through your full-screen presentation?
In fact, there are several ways you can navigate a full-screen document:
• To move to the next page, click anywhere on the screen or press the Right Arrow or Down key.
• To move to the previous page, Shift-click anywhere on the page, right-click anywhere on the page, or press the Left Arrow or Up key.
• To go to the beginning of the document, press the Home key.
• To go to the end of the document, press the End key.
Adding transitions
Acrobat supplies a number of transition effects you can use when moving from one page to another in Full Screen mode. These have name evocative of what they look like, such as Dissolve, Fade, and Split. They’re next to impossible to describe, so I recommend you experiment with them to see what they do.
To specify a transition for Full Screen mode
- With your document open, choose Advanced > Document Processing > Page Transitions.
Acrobat displays the Set Transitions dialog box (Figure 11.4).
Figure 11.4. The Set Transitions dialog box lets you apply special effects that are used when you move from one page to another in your Full Screen document.

- Select the transition you want from the Transition pop-up menu (Figure 11.5).
Figure 11.5. You can choose from among a variety of transitions built into Acrobat.

- Select a direction (horizontal or vertical) for the transition, if appropriate.
Not all transitions have a direction.
- Choose a transition speed (slow, medium, or fast) from the Speed pop-up menu.
- If you want the document to turn the page automatically, then choose Auto Flip and specify a duration.
- Use the Page Range controls to choose the pages to which the transition should apply.
- Click OK.
Keep in mind that these settings do not affect viewing the document unless you’re in Full Screen mode.
Creating a Next Page Button
Acrobat provides a variety of keys and clicks that let you go from one page to the next in Full Screen mode. However, most people find it comforting to have visible controls to navigate within the document (Figure 11.6). Here you’ll see how to add Next Page and Previous Page buttons to your document.
Figure 11.6. If a document is intended to be read in Full Screen mode, you should provide buttons that the reader can use to move within the document.

The easiest way to create a Next Page button is to make the button artwork part of the original page design, as in Figure 11.6, and then lay on top of the button a link that does the work.
The following task steps through the creation of a Next Page button. You can use nearly the same steps to create a Previous Page button.
These steps assume the button artwork is already on the page.
To create a Next Page button
- Click the Link tool in the Advanced Editing toolbar.
- Click and drag a link rectangle around the Next Page button’s artwork.
The Create Link dialog box opens.
- Choose the following settings:
• For Link Type, choose Invisible Rectangle.
• For Highlight Style, choose Inset.
• For Link Action, choose Custom link (Figure 11.7).
Figure 11.7. A Next Page button needs Custom Link as its action.

- Click Next.
The Link Properties dialog box opens.
- Click the Actions tab (Figure 11.8).
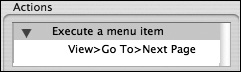
Figure 11.8. The Link Action for a Next Page button is “Execute a menu item.”

- In the Select Action pop-up menu, choose “Execute a menu item.”
- Click Add.
The Menu Item dialog box opens. This dialog box lists all the menu items in all of Acrobat’s menus.
- From the list in the Menu Item dialog box, choose View > Go To > Next Page (Figure 11.9).
Figure 11.9. The menu item your link should execute is View > Go To > Next Page.

For a Previous Page button, you would choose View > Go To > Previous Page.
- Click OK.
Acrobat returns to the Link Properties dialog box, now showing your chosen menu item in its list of Actions (Figure 11.10).
Figure 11.10. When you return to the Link Properties dialog box, the menu item appears in the Actions list.
- Click OK.
Acrobat returns you to your document page. The Next Page artwork is now surrounded by a link’s red border rectangle and handles, as in Figure 11.11.
Figure 11.11. With the Link tool still active, a rectangle surrounds the link that lets you position and resize the link so it fits the button artwork.

- Reposition and resize the link as necessary by dragging the rectangle and its handles.
- Click the Hand tool (or any other tool) to indicate that you’re finished creating the link.
When you click the Next Page button, Acrobat moves the document view to the next page.
Tip
• You can easily reproduce the Next Page link by copying it and then pasting it on other pages. Select the link with the Link tool, and then choose Edit > Copy (or use whatever technique you prefer to do a copy). Now, go to each page that has a Next Page button and paste the link onto the page.
Creating a Self-Running Presentation
Acrobat lets you turn your document into a self-running slide show that moves from page to page without human intervention. This is extremely useful in retail situations, where a computer can run a presentation for passers-by to watch.
To turn a file into a self-running presentation, you must do two things, both of which apply to Full Screen mode: auto-flip the pages, so the document automatically moves from one page to the next; and tell Acrobat to loop the last page back to the first, so that the document plays itself indefinitely.
To create a self-running presentation
- Choose Advanced > Document Processing > Page Transitions.
Acrobat displays the Set Transitions dialog box (Figure 11.4).
- Choose Auto Flip, and specify a duration.
Each page will be visible for the number of seconds specified.
- Set the other Page Transition controls as described in the task “To specify a transition for Full Screen mode.”
- Click OK.
- Choose Edit > Preferences in Windows or Acrobat 8 > Preferences on the Mac.
The Preferences dialog box opens.
- Choose Full Page in the Categories list.
Acrobat displays Full Screen controls.
- In the Full Screen Navigation section, choose “Loop after last page” (Figure 11.12).
Figure 11.12. About halfway down the set of check boxes in the Full Screen controls is “Loop after last page,” which is important for self-running presentations.

All your full-screen documents will wrap from the last page to the first. Unfortunately, there is no way to set this option for just a single document.
- Click OK.
This document will always play as a self-running presentation when you put it into Full Screen mode.
Tips
• If you want the current document to always act as a full-screen presentation, remember that the Document Properties dialog box (Figure 11.1) has an “Open in Full Screen mode” check box among its Initial View options.
• Note that the Preferences dialog box also allows you to specify a transition and auto-flip. If you select these as preferences, then every time you enter Full Screen mode, Acrobat applies the transition and automatically flips the page. I recommend against this unless you are creating a kiosk or have another situation in which you always want the same transition and the same auto-flip setting.
Placing a Movie on a Page
Acrobat Pro Only: Multimedia is becoming increasingly common in presentations. Marketing presentations and stand-alone kiosk displays often feature an animated walk-through or demonstration of a product.
Acrobat supports this marketing need by letting you place movies on your PDF pages. On the Macintosh, this can be any movie playable with QuickTime, including MPEG and most AVI files; in Windows, this can be any movie playable with QuickTime, Windows Media Player, RealPlayer, or Flash.
To place a movie on a PDF page
- Click the Movie tool in the Advanced Editing toolbar (Figure 11.13).
Figure 11.13. You place movies on a PDF page with the Movie tool in the Advanced Editing toolbar.

The mouse pointer turns into a crosshair.
- Click and drag a rectangle on the page where you want the movie to go.
The size of the rectangle doesn’t matter, since Acrobat will resize it to match the movie’s native size.
Acrobat will present you with the Add Movie dialog box (Figure 11.14).
Figure 11.14. The Add Movie dialog box lets you specify the details of the movie you want to place on the page.

- In the Content Settings, choose between Acrobat 6 and later or Acrobat 5 and earlier compatibility.
I suggest Acrobat 6 unless you have a strong reason for retaining compatibility with old copies of Acrobat. See the “Movie File Compatibility” sidebar.
- Click the Choose button.
The Open dialog box opens.
- Select the movie file you want to place on the PDF page, and click OK.
- Choose “Embed content in document.”
This is the safest choice, but see the sidebar “To Embed or Not to Embed” for a discussion of why you want to embed your movie (or not).
The other settings in this dialog box default to reasonable values and should usually be left alone.
- Click OK.
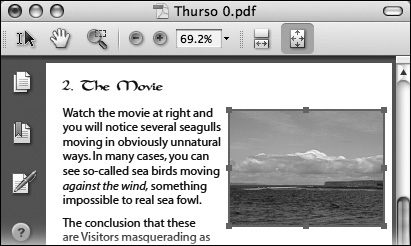
Acrobat places the movie on the page. The placed movie is surrounded by a red rectangle with handles at its sides and corners (Figure 11.15). The picture showing in the rectangle is the movie’s first frame.
Figure 11.15. Your newly placed movie is surrounded by a rectangle that lets you reposition and resize it.
The rectangle and handles remain visible while the Movie tool is selected. You can get them back at any time later by clicking the movie with the Movie tool.
- Drag the movie to its correct place on the page, and resize it by dragging the handles.
You can retain the rectangle’s original proportions when resizing it by holding down the Shift key as you drag its handles.
- To add a border around the movie, right-click the movie with the Movie tool and choose Properties from the contextual menu.
The Multimedia Properties dialog box opens. Its Appearance tab lets you specify the thickness and color of the border (Figure 11.16).
Figure 11.16. The Multimedia Properties dialog box lets you specify the thickness, style, and color of a rectangular border around your movie.

- Click the Hand tool to finish placing the movie.
Tip
• The picture visible on the page when the movie isn’t playing is called its poster. The default poster is the movie’s first frame. Some movie files have a poster picture embedded in them, which Acrobat can use. If you wish, you can also choose “Create poster from file” in the Add Movie dialog box, click Choose, and pick a JPEG or other image file to use as the poster.
Playing a Movie
Once a movie has been placed, you can play it by clicking it with the Hand tool. Of course, it’s nice to give the reader some visible Play/Pause/Stop controls. That’s easily done with links.
The easiest way to create a Play Movie button is to place the button artwork on the page in the original document design (Figure 11.17). You can then lay links on top of the button graphic to do the actual work.
Figure 11.17. It’s often easiest to have your button artwork as part of the page design and then lay links on top of it.

The following task steps through the creation of a Play button. Making buttons for Stop, Pause, and other commands is done virtually the same way. The steps presume the Play button’s artwork is already on the PDF page.
To create a Play button
- Follow steps 1–5 in the task “To create a Next Page button.”
- In the Select Action pop-up menu of the Link Properties dialog box, choose either Play Media (Acrobat 6 Compatible) or Play Media (Acrobat 5 Compatible), according to the way you placed your movie (Figure 11.14).
- Click Add.
Acrobat will present you with the Play Media dialog box (Figure 11.18).
Figure 11.18. A link’s Play Media action let you specify an action (Play, Pause, and so on) to perform on one of the movies in your document.
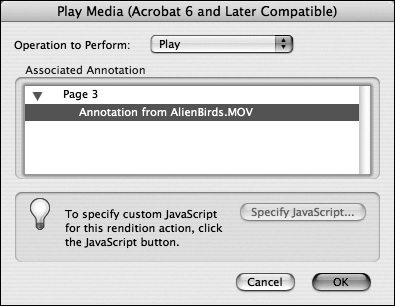
- In the Operation to Perform pop-up menu, choose Play.
Note that this pop-up menu has all the other actions you might perform with a movie: Pause, Stop, and so on (Figure 11.19).
Figure 11.19. The Operation to Perform pop-up menu lets you choose from all the actions you can reasonably apply to a movie.

- The list in the Play Media dialog box contains all the movies placed in the document; in this list, click the movie you want to play.
- Click OK.
Acrobat returns you to the Link Properties dialog box, which now lists Play Media in its Actions list (Figure 11.20).
Figure 11.20. When you return to the Link Properties dialog box, the Actions list includes your new Play Media action.

- Click OK.
Acrobat returns you to your page, which now has a link rectangle with handles that you can use to reposition and resize the link, as needed (Figure 11.21).
Figure 11.21. Your Play button is initially surrounded by the link’s bounding rectangle, letting you reposition and resize the link.

- Click the Hand tool to finalize the link.
When you click the Play button, Acrobat plays the movie.
In some cases, you might want the movie to automatically play when the reader opens its page. You do this by creating a Page Action that Acrobat will carry out when the reader enters a particular page. Our page action will play our movie.
To automatically play a movie when a page opens
- With your document open, display the Pages navigation pane by clicking the Pages icon.
- Right-click the thumbnail of the page that has your movie.
- Choose Page Properties from the contextual menu (Figure 11.22).
Figure 11.22. The first step in having a movie automatically play when the page opens is to access the Page Properties from the Pages navigation pane.

The Page Properties dialog box opens.
- Click the Actions tab.
- In the Select Trigger pop-up menu, choose Page Open (Figure 11.23).
Figure 11.23. The Page Properties dialog box has an Actions pane virtually identical to that for links.

This option tells Acrobat to play the movie when the reader opens the page, rather than when the reader closes it.
- Follow steps 2–8 in the task “To create a Play button,” but assign the Play Media action.
Acrobat will now play the movie every time the page is opened.
Adding Sound to a PDF Page
Acrobat Pro Only: The movie file formats supported by Acrobat might contain only a soundtrack, making them, in effect, sound files. You can place these sound files on the page like any other movie.
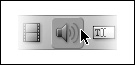
The Sound tool (Figure 11.24) in the Advanced Editing toolbar lets you attach a sound to a page in your PDF file. The steps are identical to embedding a movie, except you start with the Sound tool rather than the Movie tool.
Figure 11.24. You place a multimedia sound on the page with the Sound tool in the Advanced Editing toolbar.
To place a sound on a document page
- Click the Sound tool in the Advanced Editing toolbar.
- Click and drag a rectangle on the page.
The location of this rectangle is usually irrelevant, because most sounds have no visible marker.
The Add Sound dialog box opens (Figure 11.25).
Figure 11.25. The Add Sound dialog box is virtually identical to the Add Movie dialog box, and you should use the same settings.

- Follow the steps in the task “To place a movie on a PDF page.”
You can place on the page any sound playable by QuickTime (including AIFF and MOV) and, in Windows, sounds playable by Windows Media Player, RealPlayer, and Flash.
When you’re finished, your sound is on the page, but no visible cue indicates that it is there. (Unlike videos, there is no first frame that Acrobat can use as a poster on the page.) You should provide a Play button on the page so a reader can play the sound. You do this the same way you made the Play button for your placed movie.
Tips
• Although sounds don’t automatically get a poster, you can provide a picture to use as a marker on the page. In the Add Sound dialog box, choose “Create poster from file,” and select a TIF, JPEG, or other picture file to use as a poster.
• As with videos, you can have Acrobat automatically play a sound (a bugle fanfare, perhaps) when the user opens the page. Follow the earlier directions for attaching a movie to a page, but choose a sound-only file as your movie.
• Use automatic sounds with restraint. A sound that plays every single time a reader passes through a page can get really annoying after the first hundred repetitions.