
1. Starting with Acrobat
We’ll start with the basics: how to open Acrobat, what you’ll be looking at when you do so, and how to quit the application. You’ll also learn how to customize some of the Acrobat user interface to your taste.
We’ll explore the details and use of Acrobat’s toolbars, menus, and other interface items throughout this book; here, we’ll orient you so you become comfortable with the layout of the software’s windows.
Opening and Quitting Acrobat 8
You open and quit Adobe Acrobat 8 the way you open or close any application on the Macintosh or Windows.
To open Acrobat 8
• Do one of the following:
• Double-click the Acrobat 8 application icon (Figure 1.1).
Figure 1.1. Launch Acrobat 8 by clicking either the application or a PDF document icon.

• Double-click a PDF file icon.
• In Windows, choose Acrobat 8 in the Start menu’s Programs submenu.
In all three cases, Acrobat 8 launches. If you double-clicked a PDF file icon, Acrobat presents you with that document’s first page.
To quit Acrobat 8
• Do one of the following:
• On the Macintosh, choose Acrobat > Quit Acrobat.
• In Windows, choose File > Exit.
• On either platform, press Command/Ctrl-Q.
Examining the Getting Started Window
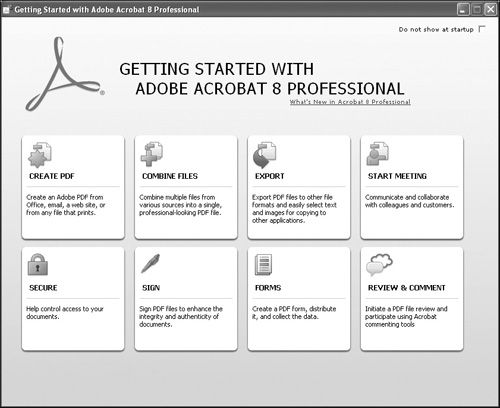
The first window you see when you launch Acrobat 8 is the Getting Started window (Figure 1.2). This is a part of Acrobat’s help section whose purpose is to introduce you to the many features of Adobe Acrobat.
Figure 1.2. When you launch Acrobat 8, you’re presented with the Getting Started window.
The Getting Started window presents you with a set of buttons that link to information on a variety of topics regarding significant Acrobat features. When you click one of these buttons, you will be looking at a topic window, similar to that in Figure 1.3.
Figure 1.3. A Getting Started Topic window contains links that provide information or carry out a task.
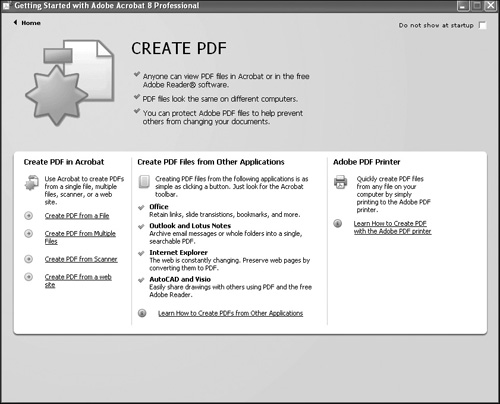
The contents of a Getting Started topic window fall into three categories:
• Informational text and pictures. This is often text that describes the benefits of Acrobat features. In Figure 1.3, this includes the box labeled “Create PDF Files from Other Applications.”.
• Links to help topics. The text associated with these links start with “Learn more,” such as the link at the end of the “Adobe PDF Printer” section in Figure 1.3.
• Links that invoke an Acrobat feature. These links tell Acrobat to do something. For example, the links in the “Create PDF in Acrobat” section take you to Acrobat tools that create PDFs.
You’ll want to explore the topics in this window while you’re new to Acrobat; it’s an extremely helpful boost to learning Acrobat’s features.
 Tip
Tip
• The Getting Started window will be unnecessary (and annoying) once you become familiar with Acrobat. If you choose the “Do not show at startup” check box, Acrobat will stop automatically displaying this window. You can always get it back by selecting Help > Getting Started.
Examining the Initial Screen
When you open a document in Acrobat (you’ll see how to do this in Chapter 2), you see a window similar to Figure 1.4. The parts of this window are as follows:
Figure 1.4. You’ll see something like this when you open a document in Acrobat 8.
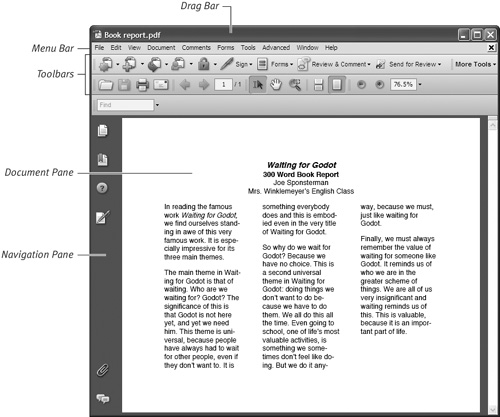
Drag bar. This is a standard Macintosh or Windows drag bar. In it are all the controls you’ll find in any application’s document window, including the Close, Minimize, and Zoom buttons.
Document pane. This is where Acrobat displays the pages of your PDF document.
Menu bar. The location of the menu bar conforms to your platform’s standards. In Windows, the menu bar is at the top of the document window, as shown in Figure 1.4; on the Macintosh, the menu bar runs along the top of the screen, as usual.
Toolbars. In Acrobat 8, each document window has its own collection of toolbars. You may customize the exact set of toolbars that is visible and the contents and location of each toolbar; you’ll see how to do this shortly.
Navigation panes. This is a series of icons that, when clicked, reveal a variety of tools and information, such as thumbnails of all the pages (as in Figure 1.5), all the document’s comments, and bookmarks to locations within the document.
Figure 1.5. Clicking the Pages icon reveals thumbnails of the document’s pages.

Tip
• The drag bar’s Close button behaves differently on the Macintosh and Windows. On the Macintosh, the Close button closes the document window but doesn’t exit the Acrobat application; in Windows, if no other documents are open, then the Close button closes the document and also exits Acrobat. These are standard behaviors on the Macintosh and in Windows.
Examining the Menus
Acrobat has 10 menus stretching the width of each document window in Windows; it has 11 menus spanning the screen on the Macintosh (Figure 1.6). You’ll eventually be using items from every one of these menus. For the moment, let’s see what these menus are and what kinds of tasks they make possible:
Acrobat menu. This Macintosh-only menu contains items that affect the operation of the application as a whole. In particular, this is where you set the application preferences and exit Acrobat on the Macintosh.
File menu. This menu contains commands to open, close, save, and otherwise manipulate the PDF files on your computer’s hard disk. This menu is similar to the File menu in other applications. In Windows, this is where you exit the application.
Edit menu. This is a reasonably standard Macintosh or Windows Edit menu, containing Cut, Copy, Paste, and other common commands. In Windows, this is where you set the application preferences.
View menu. The commands in this menu allow you to change how Acrobat presents your documents. You may choose such things as page display and zoom level. This is also where you can specify which toolbars and navigation panes are visible.
Document menu. Here you may choose commands that manipulate the document’s structure, delete or rearrange pages, add headers and footers.
Comments menu. Here are all the commands you’ll use in commenting on a PDF document and reading the comments of others.
Forms menu. The items in this menu allow you to create and distribute interactive forms.
Tools menu. This menu contains a set of submenus that provide menu access to features that otherwise are available only through toolbars, such as creating articles or measuring areas and lengths of items on a page. Other submenus enable features important to specific professions, such as prepress.
Advanced menu. The features available through this menu will be used mostly by advanced users. This menu lets you do such things as create a searchable index spanning a collection of PDF files and preflight a document.
Window menu. This menu allows you to specify the details of document windows. You can do such things as tile or stack the windows, bring a particular document to the front, and choose a zoom level.
Help menu. This menu provides access to Acrobat’s extensive help system, which includes a full Acrobat reference and the Getting Started window. It also lets you check for updates and register your Acrobat software.
Figure 1.6. The Acrobat menu bar provides access to all the capabilities of the application.
![]()
Examining the Toolbars
Acrobat 8 has a very large number of toolbars that supply access to the application’s many features (Figure 1.7).
Figure 1.7. Acrobat 8 toolbars are fixed to document windows.
One change in the user interface from previous Acrobat versions is that each document window in Acrobat 8 has a copy of all the currently visible toolbars, rather than having a single set of toolbars available to the application as a whole.
Most of Acrobat’s toolbars aren’t initially visible. Showing a toolbar and then hiding it again entails the simple selection of a menu item.
All the toolbars may be “torn off” the document window to become standalone palettes.
To make a toolbar visible
- Choose a toolbar in the View > Toolbars submenu (Figure 1.8).
Figure 1.8. You specify the toolbars you want visible by selecting them in the Toolbars submenu.

Acrobat makes the toolbar visible as a stand-alone palette (Figure 1.9).
Figure 1.9. Toolbars may be displayed as stand-alone palettes. Here is the File toolbar.
- If you want the toolbar docked, drag the palette to the collection of toolbars at the top of a document window. (We talk more about toolbars and palettes next.)
Acrobat adds the palette to the window as a toolbar.
Tip
• You may want to leave the toolbar in its palette form; this is useful if you’re going to use the toolbar only once and then hide it again.
To convert a toolbar into a palette
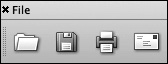
- Click and hold toolbar’s drag area.
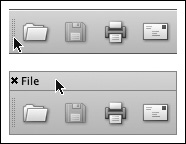
This is the pair of vertical dotted lines at the left edge of each toolbar, indicated in the top image of Figure 1.10.
Figure 1.10. The vertical dotted lines at the left of a toolbar are the drag area.
- Drag the toolbar off the collection of toolbars at the top of the document window.
Acrobat converts the toolbar into a palette, as in the bottom image of Figure 1.10.
To convert a palette into a toolbar
- Click and hold the drag bar at the top of the palette, as in the bottom of Figure 1.10.
- Drag the palette onto the toolbar in the position you want for the resulting toolbar.
Acrobat adds the palette to the toolbar.
Acrobat 8 toolbars
• Advanced Editing. Contains tools for advanced Acrobat features, such as placing movies and adding links on a page.
• Comment & Markup toolbar. Tools for adding comments to a page.
• Edit toolbar. The tools here allow you to perform a variety of tasks that change the contents of the page: add articles and links, crop, and place movies, and other actions that modify the page.
• File toolbar. Tools to open, close, and otherwise work with files available to your computer.
• Find toolbar. This contains a text field you may use to search in the current document.
• Forms toolbar. This contains tools for adding interactive form fields to your document.
• Measuring toolbar. This contains tools that let you measure the size and area of objects in your document.
• Object Data toolbar. This toolbar contains a single tool that lets you view object data associated with an image or artwork with Microsoft Visio.
• Page Display toolbar. This toolbar lets you specify whether Acrobat should display your pages one at a time or as a scrolling column of pages.
• Page Navigation toolbar. Here are the controls that let you move from page to page within your document.
• Print Production toolbar. This contains a number of tools with features important to professional printing.
• Redaction toolbar. These tools let you mark sensitive text within your document for hiding or removal.
• Select & Zoom toolbar. Contains the most-routinely used tools: the Hand, Selection, and Zoom tools.
• Tasks toolbar. Here are a set of drop down menus that allow convenient access to frequent tasks, such as creating a PDF or accessing commenting tools.
• Typewriter toolbar. This toolbar has tools that let you fill in a scanned paper form without explicitly adding PDF form fields to the document.
• Properties bar. Not properly a toolbar, the Properties bar presents information that is useful when you are creating links, form fields, and other objects within Acrobat.
Customizing Toolbars
You can control which tools appear in a toolbar. Each toolbar has a set of tool buttons associated with it, and you can choose which of these buttons are visible. The new collection of toolbars you specify will appear in every new document window you open from now on.
To add or remove toolbar tools
- Select View > Toolbars > More Tools.
Acrobat displays the More Tools dialog box (Figure 1.11). This dialog box displays all the tools that can appear in each of the toolbars.
Figure 1.11. Select or deselect each of the tools to make them visible or hidden in Acrobat’s toolbars.
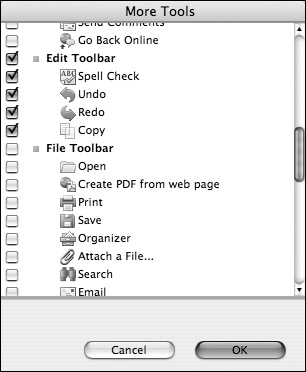
- Select the check box next to each of the tools that you want visible in your toolbars.
- Deselect the check box next to each of the tools that you don’t want visible.
- Click OK.
Tip
• A couple of common tools are inexplicably missing in the default setup of their corresponding toolbars. I strongly recommend that you enable the following tools: in the Select & Zoom toolbar, Actual Size, Fit Width, and Fit Page; in the Page Navigation toolbar, Next View and Previous View.
Working with Navigation Panes
The navigation panes occupy an area along the left side of every document window. Normally, the panes are retracted, showing only a column of icons called tabs in Acrobat parlance, one for each available pane (Figure 1.12). When a pane is opened, it allows you to move around within your document in a specific way, such as moving from page to page using thumbnails, moving among the document’s bookmarks, and so on (as shown earlier in Figure 1.4).
Figure 1.12. The navigation panes are initially visible as a column of icons called tabs, along the left edge of each window.
To open and close a navigation pane
- Click the tab of a closed navigation pane to open it.
Acrobat opens the navigation pane (Figure 1.13).
Figure 1.13. Clicking one of the navigation tabs exposes the pane associated with that tab.
- Click the tab of an open pane to close it again.
The navigation pane collapses down into a tab.
Acrobat defines a large number of navigation panes that may be available to the user. Most of them aren’t initially visible; Acrobat starts out showing only the most commonly used panes.
It’s easy to choose which panes Acrobat should make available in document windows so that you have convenient access to them.
To customize the list of navigation panes
• Choose the pane you want to make visible in the View > Navigation Panels submenu (Figure 1.14).
Figure 1.14. The Navigation Panels submenu allows you to toggle the visibility of navigation panes.

Acrobat will toggle the visibility of the navigation tab you choose; if it was visible, it will become hidden, and vice versa.
Acrobat 8 navigation panes
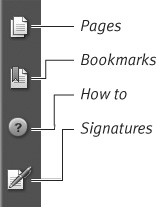
Many of the navigation panes have a somewhat specialized purpose, and won’t be covered in this book. Here we’ll list the navigation panes that are most useful:
Articles. Lists all the articles that exist in the document. Articles are a useful tool for making documents readable; we’ll discuss them in Chapter 10.
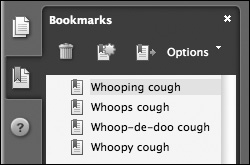
Bookmarks. Lists all the bookmarks placed in the document. These form a clickable table of contents for the PDF file. In Chapter 10, you’ll see how to make and use bookmarks.
Comments. Lists all the annotations that have been placed on pages in the document.
How to. Part of the Acrobat help system, which steps you through carrying out certain tasks.
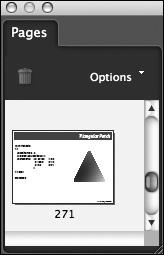
Pages. Presents thumbnail views of each page in the document. Double-clicking a thumbnail takes you to that page.
Signatures. Lists all of the document’s electronic signatures.
Any of the navigation panes may be converted to a stand-alone palette, as in Figure 1.15.
Figure 1.15. All the navigation tabs may be converted to stand-alone palettes.
To convert a navigation pane into a palette
• Click and drag the pane’s tab away from the left edge of the window.
Acrobat converts the pane into a palette.
To convert a palette into a navigation pane
• Click and drag the palette into the navigation pane area of a document window.
Acrobat converts the palette into a navigation pane.
Setting Preferences
As is true of all applications, Acrobat maintains a set of preferences that determine how the application should behave when you start a session. This can include such things as the default zoom, the color to be used for comments, and whether Acrobat should report distances in pixels, inches, or centimeters. Some of the tasks in this book require you to set preferences relevant to that task. In the meantime, you may find it useful to look at the preference controls available in Acrobat. (There are a lot of them.)
To set Acrobat’s preferences
- On the Macintosh, choose Acrobat > Preferences. In Windows, choose Edit > Preferences
Acrobat will display the Preferences dialog box (Figure 1.16).
Figure 1.16. You can change Acrobat’s default behavior in the Preferences dialog box.

- Click the category name in the list running down the left side of the dialog box.
Acrobat presents the controls that apply to that category.
- Make whatever changes you wish to the preferences controls in that category.
Repeat steps 2 and 3 for as many categories as you want.
- Click OK.
Tip
• In your idle moments, you should browse the preference controls available in the Preferences dialog box. It may not sound entertaining, but you’ll be surprised how much you can learn about an application’s capabilities from the preference controls it provides.