Acrobat lets you choose among several ways to create a PDF file from within other applications, and these capabilities expand with each revision of Acrobat. After you install Acrobat, you’ll find new menus and toolbars in most Microsoft Office programs, such as Word, Excel, PowerPoint, and Outlook. The menus and toolbars make up PDFMaker 9, which you can use to configure settings and create PDF content right from your Office program. Acrobat also installs the Adobe PDF printer driver, which lets you print PDF documents from many programs, as well as Adobe Distiller, a program that converts PostScript or Encapsulated PostScript (EPS) files, such as those created in Adobe Illustrator, to PDF format. Read about creating PDF files with Distiller in Chapter 3 “Creating PDF Files in Distiller and Acrobat.”
Note
In Acrobat 9, the PDFMaker feature is no longer included in Mac systems. Because of differences in system architectures, the Mac PDFMaker doesn’t have the functionality of the Windows PDFMaker; converting to PDF in Mac can be done using system tools. Also, Acrobat no longer supports PDFMaker in Office 2000 and earlier.
Conversions can be controlled by PDFMaker settings, by Acrobat Distiller, and by source programs that export PDF-formatted files directly. You configure conversion settings according to the material you are working with—and according to what you intend to do with it. Preparing information for print use, for example, is different than preparing information for online use. You have a lot of choices!
If you can print a file in a program, you can usually generate a PDF file. The key is the Adobe PDF printer driver included as part of the Acrobat 9 installation process. For convenience, the Adobe PDF printer is included in your system’s printer list and is available through your Print dialog.
To create a PDF file from a source program in Windows, follow these steps:
Open your program and the document you want to convert to a PDF. Choose File > Print to open the Print dialog.
Choose Adobe PDF from the Printer Name menu.
Select from a number of options for printing using the Print what radio buttons at the lower left of the dialog. Printing choices include the entire document, or you can specify components based on the type of document you are converting.
Click Options at the bottom left of the Print dialog to open a list of different print options (such as field codes, XML, and document properties) that vary according to the type of file you are converting. When you’ve made selections, click OK to dismiss the dialog and return to the main Print dialog.
Click OK to process the file, choose a name and storage location depending on the program’s print command process, and click Save. The file saves to PDF, rather than to your printer, and you have a PDF version of the source file.
Click Properties in the Print dialog to open the Adobe PDF Document Properties dialog, which displays the Adobe PDF Settings tab by default. Here you can choose additional print options that vary according to the type of file you are converting (Figure 9):
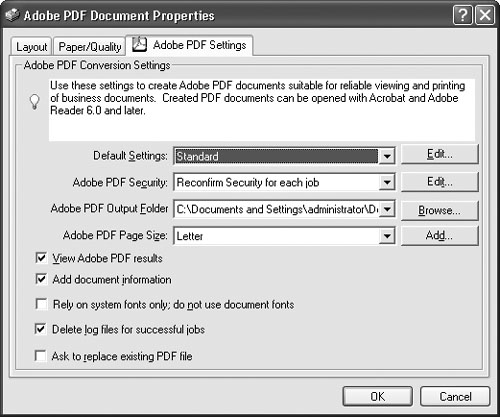
Use the four settings at the top of the dialog to save time. If you always produce basic PDF conversions, leave the Standard Default Settings, or choose an alternate from the pull-down list.
Automatically attach password protection to all your files at conversion using an option from the Adobe PDF Security pull-down list. Choose from either “Reconfirm Security for each job” or “Use the last known settings.”
Click Browse and locate a consistent output folder, displayed in the Adobe PDF Output Folder setting. This is a great timesaver if you routinely convert files and leave them in a staging area before further work.
Choose an alternate page size from the Adobe PDF Page Size drop-down list if your work requires it.
Click OK to dismiss the secondary dialog and return to the Print dialog.
One of the most common programs used with Acrobat is Microsoft Word. You can use the PDFMaker that Acrobat automatically installs into Word on Windows to quickly generate a PDF version of the document. If your workflow includes merging documents on a regular basis, try out the Mail Merge to Adobe PDF feature, which not only merges database content with a Word file but also converts the merged documents to PDF.
The Standard conversion setting, the default used by PDFMaker, produces a PDF file that is both suitable for printing and small enough for easy distribution. Once you specify the settings, they remain until you adjust them again. Converting a Word document to PDF is a one-click process.
When your document is ready for conversion, save it and then click Convert to PDF ![]() on the PDFMaker 9.0 toolbar in Windows or choose Adobe PDF > Convert to Adobe PDF. Using the default PDFMaker settings, a Save As dialog opens displaying the same name as your Word document; change the filename and location if necessary and then click Save to close the dialog and convert the file.
on the PDFMaker 9.0 toolbar in Windows or choose Adobe PDF > Convert to Adobe PDF. Using the default PDFMaker settings, a Save As dialog opens displaying the same name as your Word document; change the filename and location if necessary and then click Save to close the dialog and convert the file.
To view the settings, choose Adobe PDF > Change Conversion Settings to open the dialog (Figure 10a).
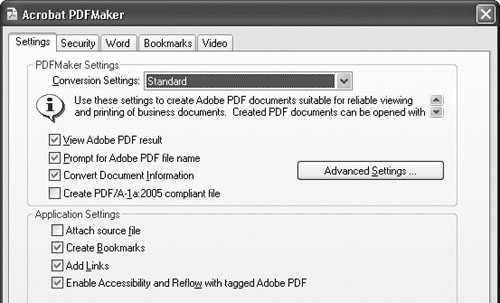
The dialog displays five tabs: Settings, Security, Word, Bookmarks, and Video (read about inserting video and 3D in #14, “Adding Specialized Media Content”). Choose an alternate group of settings from the Conversion Settings pop-up menu. Regardless of the conversion setting you select, the Settings tab selections remain much the same. Most of the PDFMaker Settings are common in all PDFMakers (see the sidebar “Simple Settings”); the Application Settings vary among programs, as described in the sidebar “Application Settings for Conversions.”
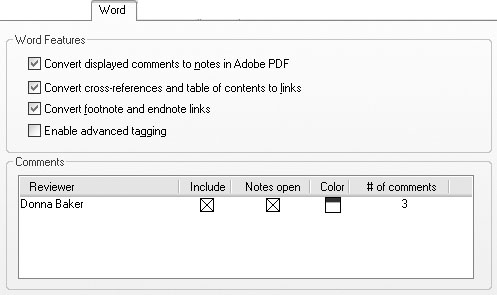
Each PDFMaker installed into Microsoft Office programs on Windows includes settings specific to the program, either in separate tabs or as options in the Settings tab. In Word, you can convert content such as bookmarks and comments, as well as text. Select the Word tab to display Word-specific options:
To preserve comments in your converted Word documents, select “Convert displayed comments to notes in Adobe PDF.” (See Chapter 10 “Commenting in a PDF Document,” to learn about using comments.) Comments in the source document are listed in the Word tab (Figure 10b). Use the options to configure the comment appearance.
Preserve referencing work you have done, such as cross-references, a table of contents, footnotes, and endnotes, by choosing one of the convert options. Click “Enable advanced tagging” to integrate the tags for selected features into the converted PDF file. Read about using tags in #46, “Basic Document Tagging.”
The Word PDFMaker in Windows gives you three choices for generating bookmarks, depending on your document’s structure. Bookmarks are created from document styles or from headings you select from the default template. If you have added bookmarks to the document, you can use them in the PDF document automatically. Open the Conversion Settings dialog and select the Bookmarks tab (Figure 10c).
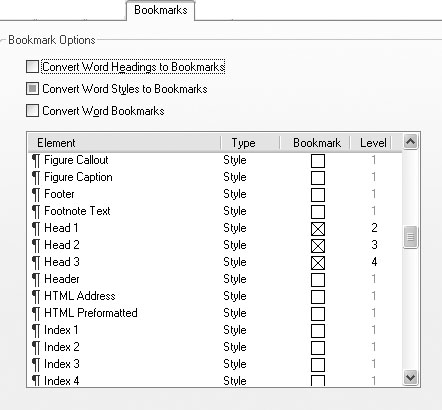
The options on this tab let you do the following:
Convert bookmarks you created in Word to PDF bookmarks.
Convert Word headings by selecting/deselecting heading levels in the list.
Convert specific styles by selecting them in the list.
If you use styles or headings, it’s much quicker to scroll through the list to check off the specific styles or headings you want to convert rather than selecting a check box at the top of the dialog and then deselecting the elements you want to exclude.
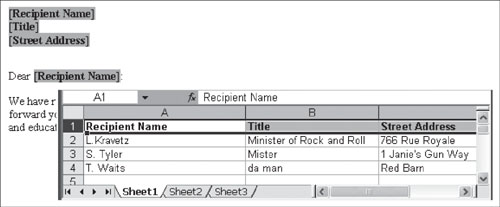
The Word PDFMaker in Windows also produces merged documents. This feature, first introduced in Acrobat 8, can attach the merged PDF files to e-mail messages. Be sure your source data and the merge document containing the merge fields are ready first (Figure 11a). When you’re ready, test the merge first before running the PDFMaker process. If you don’t have the Word source files prepared properly, you’ll see an Acrobat PDFMaker message outlining the error of your ways, and the merge won’t proceed.
Once the documents are ready and you have tested the merge, follow these steps:
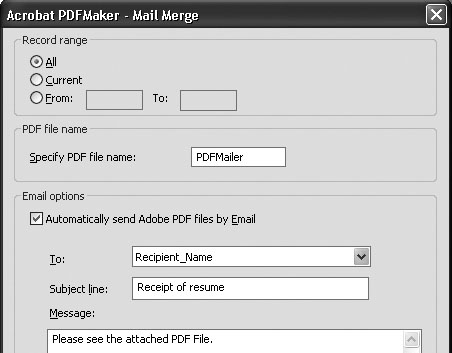
Choose Adobe PDF > Mail Merge To Adobe PDF to open the Acrobat PDFMaker—Mail Merge dialog (Figure 11b).
Choose the records to use for the merge, as well as a name in the “Specify PDF file name” field.
To create merged PDF files and attach them to e-mail messages, select “Automatically send Adobe PDF files by Email” to activate the remaining fields in the dialog and specify the e-mail options.
Click OK to close the dialog. The data is processed, and a Browse For Folder dialog opens. Locate and select the folder where you want to save the finished files, and click OK to close the dialog.
When the files are processed, the Choose Profile dialog opens. Select your e-mail profile and click OK. The dialog closes, and the e-mail messages are created and sent. On completion, a message dialog opens, explaining that the process was successful. Click OK to close the dialog. The job is done!
The data-oriented programs in Microsoft Office in Windows, including Excel, Access, and Project, offer only the Settings and Security tabs in the Acrobat PDFMaker dialog.
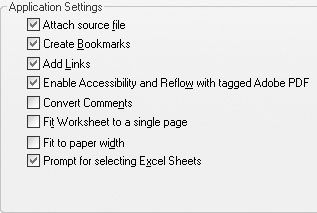
Choose Adobe PDF > Change Conversion Settings in Excel to open the Conversion Settings dialog. The Settings tab includes the options described in the sidebar “Simple Settings” in #10.
Figure 12 shows the Application settings in the Settings tab of Excel’s Conversion Settings dialog. Select the Fit Worksheet to a single page option to rescale the contents of your Excel worksheet to fit one page. You can also convert Comments and add Links if you select those options.
Note
The Excel PDFMaker in Windows also allows you to insert a 3D model into a spreadsheet. Read about using 3D models in Office programs in #14, “Adding Specialized Media Content.”
In Access, the conversion options depend on whether the file is an Access 2002–2003-format file, or an Access 2000-format file:
In an Access 2002, 2003, or newer file, select the reports, tables, queries, or forms for conversion, and then choose a command from the Adobe PDF menu. Access 2000 files only convert reports to PDF.
Bookmarks can be created from report titles. Select Add Bookmarks to Adobe PDF on the Settings tab of the Acrobat PDFMaker dialog.
The Adobe PDF menu in Access includes one report option used to combine a selection of reports into a single PDF document automatically (read more in the sidebar “Pick a Report”).
The Adobe PDF menu in Microsoft Project in Windows includes the three basic conversion options available in Windows: converting to PDF, converting and e-mailing, and converting and sending for review. In the Conversion Settings dialog, the Application settings include an option for attaching the source file to the PDF.
How would you like to distribute a PowerPoint slide show—complete with slide transitions and animation—without having to pack the files and add a player?
PowerPoint’s PDFMaker in Word has several options you can configure for converting a presentation to a PDF document (Figure 13).
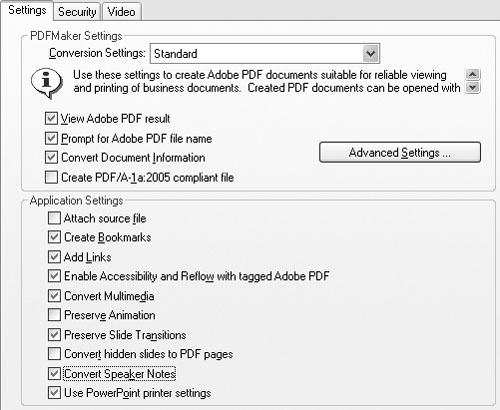
Like a Word document, a PowerPoint document allows for comment, tag, and bookmark conversions. These options include the following:
Convert Multimedia adds any linked audio or video files to the PDF file. Read about using different media in Acrobat in Chapter 13, and see how to use video in PowerPoint in #14.
Preserve Animation converts animations in the presentation to PDF animations. The settings allow for overlapping shapes and graphics, Action Buttons, and Action Settings.
Preserve Slide Transitions converts the PowerPoint transition effects to PDF transition effects.
“Convert hidden slides to PDF pages” converts any slides designated as hidden (they don’t play in the regular presentation) to pages in the PDF file.
Convert Speaker Notes converts the notes added to your slides to text note comments in the PDF. Read about text notes and other types of comments in Chapter 10.
“Use PowerPoint printer settings” uses the same printer settings in the PDF document as in the original file. Read more about printer settings in the sidebar “Using Print Settings.”
The ability to use and manipulate media increases with every new version of Acrobat, and Acrobat 9 is certainly no exception. If you are working with Acrobat 9 Pro Extended in Windows, the PDFMakers in Word and PowerPoint contain new commands that allow you to embed a Flash movie in FLV (Flash video) format. As part of the installation, Acrobat also installs 3D ActiveX controls in Word, PowerPoint, and Excel that let you insert a 3D model into your source file.
To embed a movie in a source Office file, follow these steps:
Display the page or slide where you want to embed the movie.
Choose Adobe PDF > Embed Video and Convert to Flash Format, or click Video to Flash
 on the Acrobat PDFMaker toolbar to display the Insert Video dialog.
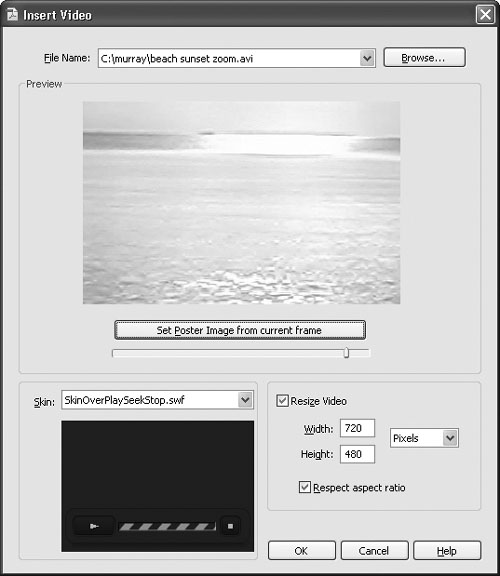
Click Browse to locate and select the video you want to use. You’ll see the video in the Preview area (Figure 14a).
Choose settings for the movie playback that include the following:
Select a poster frame, which is shown on the page when the movie isn’t playing. To choose, drag the slider below the preview until you see the desired frame display, and then click Set Poster Image from Current Frame.
Click the Skin pull-down arrow and choose an option from the list. The list offers different sets of playback tools that are displayed on the finished PDF document.
To reset the size of the movie, click Resize Video to activate the settings, and make width and height changes in either percentage or pixel values.
Click OK to close the dialog. You see the video object on the page or slide.
Convert the file to PDF to view the page (Figure 14b).

Note
In addition to the new menu and toolbar commands, both the Word and PowerPoint PDFMakers now include a separate tab in the Acrobat PDFMaker settings dialog you use to set video settings. Read about the settings in the sidebar “Specify Video Settings.”
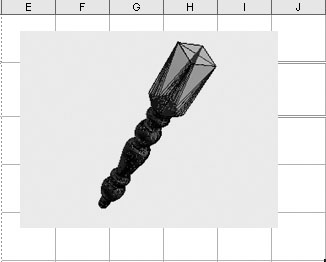
To insert a 3D model, click Insert Acrobat 3D Model ![]() or choose Adobe PDF > Insert Acrobat 3D Model to open the dialog. Click Browse for Model to locate a 3D file (choose from many major CAD formats); click Browse for Script to locate a JavaScript for the model if required, and click OK to place the model on the page (Figure 14c). When you convert the document to PDF, the PDFMaker uses your settings to generate a 3D PDF document.
or choose Adobe PDF > Insert Acrobat 3D Model to open the dialog. Click Browse for Model to locate a 3D file (choose from many major CAD formats); click Browse for Script to locate a JavaScript for the model if required, and click OK to place the model on the page (Figure 14c). When you convert the document to PDF, the PDFMaker uses your settings to generate a 3D PDF document.
Both 3D models and Flash video (inserted as FLV format) can be inserted either in the source files or after a file has been converted to PDF. There are many more options for configuration in Acrobat—check them out in Chapter 13 “Using Flash Video and 3D Media.”
A PDFMaker is installed in Internet Explorer when you install Acrobat 9 in Windows. To create a PDF file from a Web page displayed in Internet Explorer, click the down arrow on the Adobe PDF toolbar to display the menu and choose Convert Web Page to PDF (Figure 15a). If the page includes frames, all the content is flattened into one PDF document page.
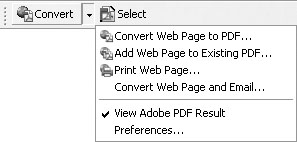
To attach the displayed Web page to an existing PDF document, click Add Web Page to Existing PDF. A dialog opens that lets you select the document to use for the attached page. Click Save to convert the Web page and append it to the end of the selected document. You can also right-click (Control-click) the page to display the shortcut menu, which includes both the Convert to PDF and Add to Existing PDF commands.
Have you ever spent time converting Web pages to PDF, and then spent more time in Acrobat selecting objects like navigation buttons and ads to remove them? Well, wait until you see the new PDFMaker feature for Internet Explorer. Click Select Object ![]() on the PDFMaker toolbar, and then click to select all the items you want to convert (Figure 15b). Each item you click is framed in blue; the active area under the tool is outlined with a red hatched box.
on the PDFMaker toolbar, and then click to select all the items you want to convert (Figure 15b). Each item you click is framed in blue; the active area under the tool is outlined with a red hatched box.

When you’ve made your selections, right-click (Control-click) and choose either Convert to PDF or Add to Existing PDF options. Very slick!
Acrobat 9 Pro lets you archive your Outlook e-mail messages, which you can then index and search or add to other PDF documents. There are several ways to archive your e-mail messages manually:
You can select individual e-mails in Outlook and then click “Create Adobe PDF From selected messages”
 . The Save Adobe PDF File As dialog opens. Browse to the location where you want to save the file. Type a name for the file, and click Save.
To convert all the e-mails in a folder at once, select the folder in Outlook and click “Create Adobe PDF from folders”
 . Name the file, specify the storage location in the Save Adobe PDF File As dialog, and click Save to save the file.
You can add files to existing archives by selecting the file you want to add from the Outlook messages, selecting Adobe PDF > Convert and Append to Existing PDF Messages, and choosing either Selected Messages or Selected Folders. Again the Save Adobe PDF File As dialog opens. Select the file you want to add the additional document to. Click Save to process the file(s).
Acrobat 9 offers an automatic archival process that automatically converts e-mail to PDF in the background, letting you continue to work. You can choose specifics such as real e-mail addresses from mailto data; embed header information as metadata; include fields like To, CC, and BCC; or even download images via PDFMaker and hide them in Outlook.
To set up the archives, follow these steps:
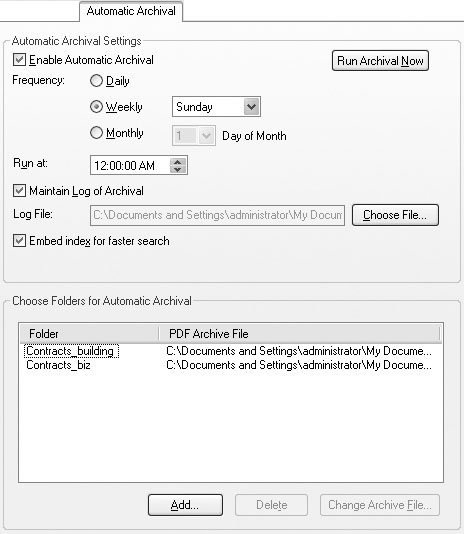
Select Adobe PDF > Setup Automatic Archival to open the Acrobat PDFMaker dialog with the Automatic Archival tab active.
Choose the settings for your requirements:
Select Enable Automatic Archival to activate the options; specify the frequency, the time, a log file, and whether to embed an index.
Click Add to open a dialog listing the Outlook folders and select the folder or folders to include in an archive. Click OK to dismiss the dialog, and open the Save PDF Archive As dialog.
Specify a name and location for the archive, and click Open to dismiss the dialog and return to the Acrobat PDFMaker. You see the Outlook folder as well as the PDF Archive File listed in the dialog (Figure 16a).
Automatic Attachments, Anyone?
Here’s a nifty timesaver for those of us who like to send PDF attachments with e-mail messages but don’t like to take the time to convert the files first. Choose Adobe PDF > Change Conversion Settings to open the Acrobat PDFMaker dialog and look for this option at the bottom of the dialog: Show “Attach as PDF” button. Select the check box and click OK to close the dialog. When you start a new e-mail message, notice that there are two Attachment icons on the toolbar—the regular one, and a new Attach as Adobe PDF icon
Continue adding folders and archive files as required; if you want to create archives immediately, click Run Archival Now. Otherwise, click OK to close the dialog and PDFMaker will process the files according to your schedule.
Whether you archive e-mail messages manually or using the automatic archiving, the files are combined into a PDF Portfolio, named using the folder’s name (Figure 16b). You can locate the contents of the archive based on folder location for the source file, sender, date, subject, and whether there are file attachments. Read about constructing a PDF Portfolio in Chapter 4, “Producing a PDF Portfolio.”