
Traditionally, the preflight process tests files for compliance with certain printers or standards. The concept of preflight has changed from that of a testing tool to one of the most powerful features in Acrobat. Along with evaluation, you can also employ fixups, which modify your document for everything from flattening form fields to moving comments off the printing area.
Acrobat 9 Pro takes the evaluation and fixup process further than ever before, letting you specify a particular area or view to evaluate or repair, or even create layers to separate your document’s objects. Just as you might certify a document with a digital signature to indicate you are the author or approve the content, Acrobat 9 includes a preflight audit trail, adding a digital signature automatically to certify your document’s standards compliance.
If you find opening dialogs and running preflight profiles repetitious, make yourself a program to run features automatically from the desktop.
Output standards also apply to accessibility features. Acrobat 9 offers a range of features that allow users who are visually or motion impaired to work with PDF documents. You’ll find testing options to establish whether a document complies with different accessibility standards, and evaluation reports that help you correct accessibility issues.
Tags are a key element in making accessible documents. Acrobat contains a number of ways in which you can apply tags to a document, evaluate the status of the document, and use the tags for manipulating the document and its contents.
Preparing a print job, whether intended for prepress or your company’s annual report, can be a laborious and time-consuming process. Acrobat 9 Pro includes a suite of preflight tools you can use to evaluate your files for problems, compliance with standards, and analysis of objects like hidden text and transparency. The Preflight dialog includes preflight profiles (groups of settings), as well as individual checks and fixups.
To test a document for compliance with a profile, follow these steps:
Choose Advanced > Preflight or click the Preflight button
 on the Print Production toolbar to open the Preflight dialog and load the profiles.
Click Select Profiles
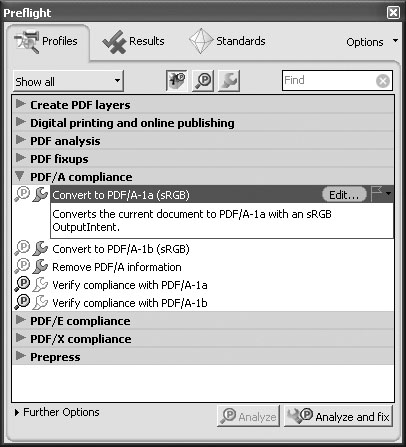
 on the Preflight toolbar to load the existing profiles. Click Show All and choose an option from the pop-up menu—view a list of the Preflight categories in the sidebar “Preflight Profile Categories.”
Click the arrow next to a category label to view the profile list and select the profile to apply (Figure 39a). You’ll see information about the profile display in the dialog.
Click Analyze if you’ve chosen a profile that verifies or evaluates some aspect of the file; click Analyze and Fix if you choose a profile that tests and makes changes. Acrobat evaluates and applies changes as required.
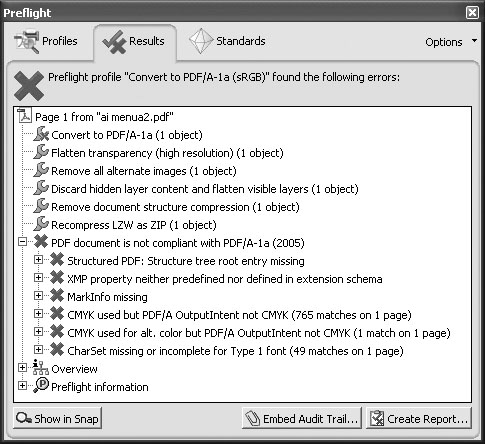
The Results tab displays the results. As you see in Figure 39b, there are some errors, and the source file, although an RGB file, isn’t successfully converted to a PDF/E-compliant document.
Click the plus sign (+) to the left of any error message to display detailed information.
Every version of Acrobat introduces more standards, as well as methods for evaluating a document according to those standards. Acrobat 9 is no exception, as you can see in the sidebar “Variations on a Theme.”
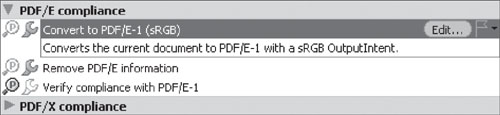
To test a document for compliance with a profile, follow the steps outlined in #39, “Testing and Fixing a Document with Preflight.” For the PDF standards, you’ll usually find profiles that let you convert to the standard, verify that the file complies with the standard, or remove the standard’s information (Figure 40a).
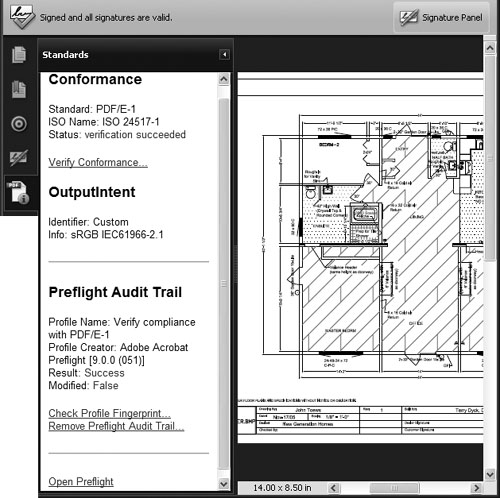
Once the file is saved, your recipient can guarantee its conformance with the standard by viewing the information in the Standards pane, new in Acrobat 9. Once you open a PDF file that conforms to a standard, the Standards pane opens automatically (Figure 40b).
In the Standards pane, you can do the following:
Click Verify Conformance to evaluate the file. If the Status is listed as “verification succeeded,” you know the file complies with the standard and the listed OutputIntent.
Click Check Profile Fingerprint to be sure the audit trail matches the listed profile.
Click Remove Preflight Audit Trail to delete the content, which you may want to do if you are the final recipient of a file.
Along with testing a file for compliance with different standards or analyzing the content of a file, you can fix problems that prevent a file from meeting your PDF file goals. Click either “Select single checks” ![]() or “Select single fixups”
or “Select single fixups” ![]() on the Preflight dialog’s toolbar, and follow the steps listed in #39, “Testing and Fixing a Document with Preflight.”
on the Preflight dialog’s toolbar, and follow the steps listed in #39, “Testing and Fixing a Document with Preflight.”
You don’t have to use one of the presupplied profiles for making repairs. Instead, create one from scratch like this example fixup, following these steps:
Click one of the Profile buttons in the Preflight dialog, then click the Options menu. The choices in the menu depend on whether you’ve clicked Select profiles, “Select single checks,” or “Select single fixups.” Read about which option to use in the sidebar “Which to Choose?”
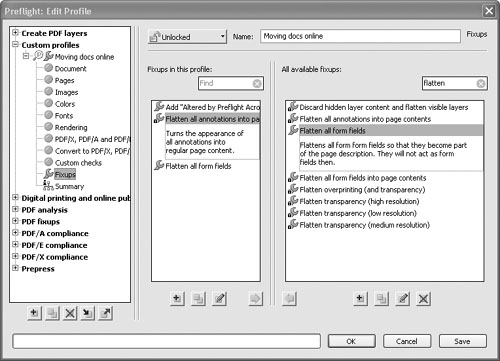
Choose Create New Preflight Profile to open the Preflight: Edit Profile dialog (Figure 41).
Type a name for your new profile; the default is New Profile 1. The example is named Moving docs online.
Click the icon to the left of the profile category name in the left column of the dialog to open the nested list of components.
Select Fixups from the items under the profile to display the “Fixups in this profile” and “All available fixups” lists at the right of the dialog. Select a fixup from the “All available fixups” column and click the left-facing arrow just below the “All available fixups” column to move the fixup to the column on the left, as shown in Figure 41. You can read information about the selected fixup in either list.
Continue adding fixups as required.
Click Save to store your new profile and continue working in the dialog; click OK to save your new profile and close the dialog.
Click OK. Your new profile is added to the list alphabetically.
Not only is preflight one of the most powerful features in Acrobat 9, but it’s also one of the more misunderstood and underutilized features.
To help make preflight work for you, here are some ideas to keep in mind:
Filter the list of profiles to decrease confusion. There are literally hundreds of profiles, checks, and fixes. To start, click the Select profiles, “Select single checks,” or “Select single fixups” button on the Preflight toolbar to choose the area you want to work in. Then, click the Show All button and select a category.
If you need to reuse a profile that you applied last week, click Show All, and choose “Most recently used”; for a profile that you use regularly, choose “Most frequently used.”
Share and Share Alike
To use a profile provided by your printer, choose Import Preflight Profile from the Options pop-up menu in the Preflight dialog. In the resulting dialog, locate the file and click Open to add it to the Preflight dialog’s Profile list. To share profiles, select Export Preflight Profile from the Options menu. Name the file and locate the storage folder. Then click Save to save the profile using its .kfp extension. If you have the Preflight: Edit Profile dialog open, use the buttons at the bottom of the profiles list—click Import Preflight Profile
 to locate a new file, or click Export Preflight Profile
  to export an existing profile.
Designate profiles as favorites. Locate the profile you want to use as a favorite, and click its listing. You’ll see a description of the profile’s action and a flag icon at the right of the listing. Click the flag to designate it as a favorite (Figure 42a). The next time you are searching for profiles, simply choose Favorites from the Show All menu.
Specify a subset of a document for Preflight. In the Preflight dialog, click Further Options and choose “Run Preflight checks for visible layers only” in a layered file, or select a page range in a multipage document.
For some items, such as images, you can select the object in the Results list, and click Show in Snap to view a close-up of the error. The Snap view is useful if you have a lot of graphics in close proximity to one another.
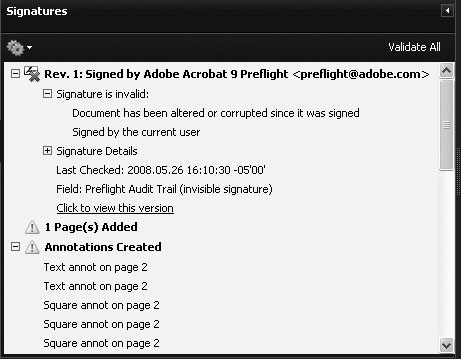
Acrobat 9 Pro offers a new method for tracking the integrity of a document. Click Embed Audit Trail at the bottom of the Results tab to embed information about the Preflight profile and the results, and then add an invisible digital signature that confirms the status of the document at the time you ran the Preflight profile. Click OK in the information dialog, and save the signed file.
Click Create Report to open a Save As dialog where the file is renamed as [filename]_report.pdf. Choose PDF report options, such as how to highlight error details, and click Save.
If you create the report after embedding an audit trail, the resulting report defines the audit trail’s signature as invalid. In the Signatures pane, you’ll see the extra page added for the report, as well as all the comments identifying errors in the file (Figure 42b). By the way, notice that the document was signed by Adobe Acrobat 9 Preflight, not using a personal signature.

A Preflight droplet is a special application you build to modify or evaluate documents. With a droplet on your desktop, you don’t even have to open Acrobat dialogs to process a file! In addition to using droplets to evaluate files, you can use them to separate your files by their results and create reports automatically. Build the droplet in Acrobat through the Preflight dialog.
Note
If you intend to create folders to store both files that have been processed successfully and those that generate errors, add and name the folders before building the droplet to save time.
Follow these steps to construct the droplet:
In Acrobat, choose Advanced > Preflight. When the profiles are loaded, select the profile you want to convert to a droplet.
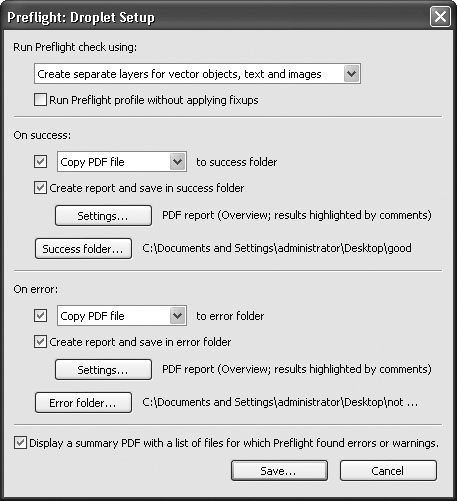
Click Options in the Preflight dialog and choose Create Preflight Droplet. The Preflight: Droplet Setup dialog opens (Figure 43a).
Choose options for a successful test. You can move, copy, or create an alias of the document in a specified folder. Click the Success folder button to choose a folder in which to hold the successfully processed files.
Select the “Create report and save in success folder” check box and then click Settings to open the Preflight: Report Settings dialog:
Specify the type of report—PDF, XML, or Text.
Include an overview or details.
For a detailed report, select a method for highlighting problems using a mask, a comment, or layers.
Click OK and return to the Droplet Setup dialog. The report settings now appear in the dialog.
Choose options for a test that generates errors. Your choices are duplicates of the ones offered for a successful test.
Click Save; the “Save droplet as” dialog opens. Choose a location to store the droplet and click Save to create it.
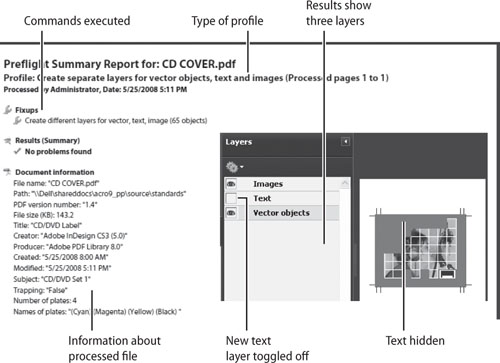
When you want to test a file, locate and select the file on your computer. Then drag it to the Droplet icon. Acrobat starts and tests the file. Depending on the outcome and your settings, the file is processed and saved, and reports are generated (Figure 43b).
One of the Acrobat Preflight tools you may not have used before—but should be taking advantage of—is the Output Preview tool.
Click Output Preview ![]() to open the Output Preview dialog. From the Simulation Profile menu, choose options to show you how your document would look using different types of paper, different monitors, different color profiles, and so on (Figure 44a).
to open the Output Preview dialog. From the Simulation Profile menu, choose options to show you how your document would look using different types of paper, different monitors, different color profiles, and so on (Figure 44a).
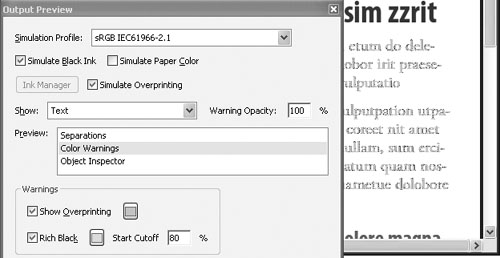
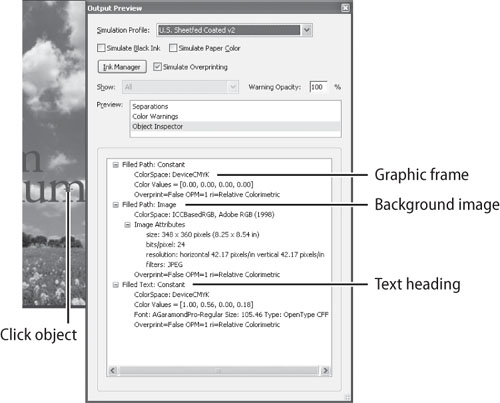
If you aren’t sure of some aspect of your document—be it an image, the font used, or why an image doesn’t print correctly—discover what’s happening in your document with the Object Inspector, a new feature in Acrobat 9 Pro.
Here’s how it works:
Choose Advanced > Print Production > Output Preview, or click Output Preview on the Print Production toolbar to open the dialog.
Click Object Inspector in the Preview list.
Click an object on the page that you’d like to examine. The contents of the object are listed in the dialog.
Check out the results (Figure 44b). The Object Inspector describes the following:
The stacking order of the objects below the cursor; the objects are listed from background to top layer.
Fill and stroke information for objects, as well as details like color space, overprinting, and so on.
Text object information includes the color space and color value, font name, font size, and so on.
Transparency settings, types of blending modes, and other image manipulation settings applied.
Close the dialog when you’ve finished examining your file.
Using a mouse isn’t the only way to move around a page. Acrobat can also magnify and reflow documents, automatically scroll, read the page aloud, or enable the use of keystrokes.
Magnification and reflow. For some, it’s important to zoom in to a very high magnification in order to read the screen. Acrobat offers reflow, which wraps text automatically regardless of the magnification. Reflow is great if you are reading a single column on a page. For complex layouts, you need to define articles, which create a reading path through a document. Read about reflow in the sidebar “Wrapping with Reflow”; read about articles in the sidebar “Organize Reading with Articles.”
Automatic Scroll. Use scrolling when you’re looking for a particular element such as an image. Choose View > Automatic Scroll, or press Ctrl+Shift+H (Command+Shift+H). The scrolling starts at the current location in the document, and stops when you reach the end of the document.
Automatic scrolling uses Continuous page layout. To change speed, press the up arrow key to increase or the down arrow key to decrease, or you can type a number from 0 to 9—the higher the number, the faster the speed. Want to reverse? Press the minus key (–) on the keyboard or number pad; press Esc to stop the scrolling.
Tip
Since Acrobat pauses the scrolling and applies the selected tool if you use the mouse, be sure the Hand tool is selected. That way, you aren’t adding extra steps to deselect a tool.
Read Aloud. Acrobat can use system resources to read a document aloud—terrific when your goal is to make your documents more accessible as Acrobat simulates some features of a full-blown screen-reader program:
Choose View > Read Out Loud > Activate Read Out Loud to get started; choose View > Read Out Loud > Deactivate Read Out Loud to stop.
Locate the page you want to read and then choose View > Read Out Loud > Read This Page Only, or choose View > Read Out Loud > Read To End Of Document.
Tip
You can also have the voice read a selected object. Click a paragraph on the page with the Hand tool and it is read aloud.
You can customize a few reading features in the Preferences dialog (Figure 45). Read about the customizations in the sidebar “Read It Your Way.”
Keystrokes. Acrobat offers full keystroke access to navigation and program items. Unlike other Adobe programs, like Photoshop and InDesign, Acrobat doesn’t have you define keystrokes yourself. Choose Help > Adobe Acrobat 9 Pro Extended Help to open the Adobe Help Viewer. Scroll down to the Keyboard shortcuts listing in the left frame of the window—you’ll find lists of shortcuts for work areas, getting around the program, and using tools. (For a short list of keystrokes used to activate features like Read Aloud, check out Table 49.1 in #49, “Enhancing PDF Accessibility”).
Both Acrobat 9 and Adobe Reader 9 offer a wizard for configuring the programs to optimize display and interaction for assistive devices.
To run the wizard, choose Advanced > Accessibility > Setup Assistant to open the five-screen wizard. Click Next to move to each screen; click Done when you have made selections on all screens.
Note
The wizard is the same in both Acrobat and Adobe Reader, aside from references to the programs’ names. In Adobe Reader, choose Document > Accessibility Setup Assistant.
Look for these features on each screen:
Screen 1. Choose the device you are working with: a screen reader, a screen magnifier, or all options. You can also click the “Use recommended settings and skip setup” button to close the wizard and apply the preprogrammed settings.
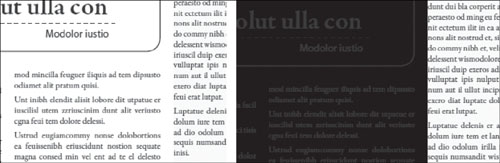
Screen 2. On this screen choose a high-contrast color scheme and colors for fields, producing a page like the example shown in Figure 46. Choose the option to disable text smoothing (producing sharper-looking text). Since some assistive devices can have problems with Acrobat’s use of different cursors for different tools, you can select “Always display the keyboard selection cursor.”
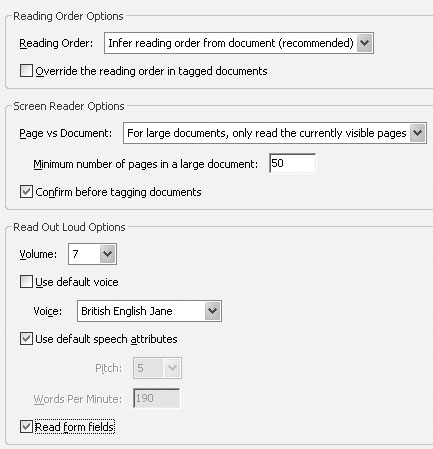
Screen 3. Choose tagging options. You can choose to let Acrobat infer the reading order or specify a preference. Also in this panel, choose to override reading order in a tagged document, or confirm tagging in an untagged document.
Screen 4. Select an option for viewing large documents. You can choose to deliver the visible pages or the entire document, or you can let Acrobat decide. If you prefer, you can have all the pages delivered for a small document. Click the Maximum number of pages in a small document field and type a number. The default is 50 pages. Choose an option to have Acrobat override a page layout style and use the single page default, which is best for many screen readers. Finally, specify a default document zoom value.
Screen 5. The fifth and final screen gives you an option to disable document auto-save, which, when enabled, can cause the document to reload and begin reading from the start of the document. You can choose to reopen the document from the last viewed page—which is terrific when you’re working with long documents. Finally, you can also choose to open a PDF document in Acrobat or a browser; opening a document in Acrobat is less confusing for some assistive devices.
Some program features that are used to enhance accessibility don’t work properly or predictably unless a document is tagged, which means it has a logically defined structure. Tags are a part of the document’s information that defines relationships among elements in the document, including tables, lists, images, and text.
Tagging can be done in the source document (if you’re using a PDFMaker) or in Acrobat. To tag a document using a PDFMaker, choose Adobe PDF > Change Conversion Settings. In the Settings tab, select “Enable accessibility and reflow with Tagged PDF” and then click OK. The tags are created when the PDF file is generated.
Open the document in Acrobat and choose View > Navigation Panels > Tags. Click the Tags icon to display the document’s tags in a hierarchy (Figure 47). The figure shows a section of the Tags pane for an Excel spreadsheet. The parent tag <Workbook> holds a <Worksheet> that contains a <Table>, which contains tags for the table rows <TR>, which in turn contain tags for table cells <TD>, which contain the cell’s <Content>, which are text objects.
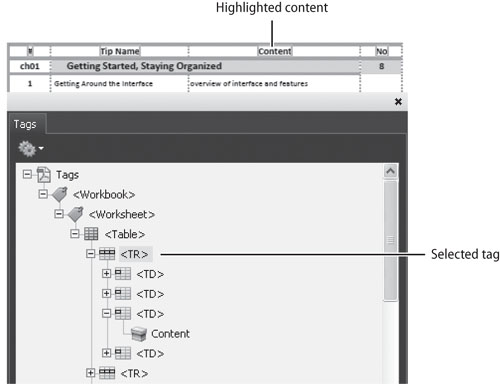
In the figure, notice that the top row of text is highlighted—a useful behavior for locating content on the page quickly. Choose Highlight Content from the Options menu. Selecting a parent tag, such as the <TR> tag, automatically selects the child <TD> tags.
Many document-creation programs don’t offer tagging options. You can easily add tags from within Acrobat:
Choose Advanced > Accessibility > Add Tags to Document. Acrobat processes the document and adds tags. An Accessibility Report displays in the How To area at the right of the Document pane in the program window. Refer to #48, “Reporting On and Repairing a Document,” for information on working with tags and reports.
Check the document again by selecting Advanced > Accessibility > Quick Check. The new message will state that there are no accessibility problems with the document, meaning it is tagged.
Choose File > Save to save the document with its tagged structure.
In addition to tagging your document, Acrobat can evaluate the accessibility level and generate a report with repair hints. Use these advanced evaluation methods if you are preparing documents that must comply with government or other regulatory accessibility standards. Before you start, ensure that the document is tagged (refer to #47, “Basic Document Tagging,” for instructions).
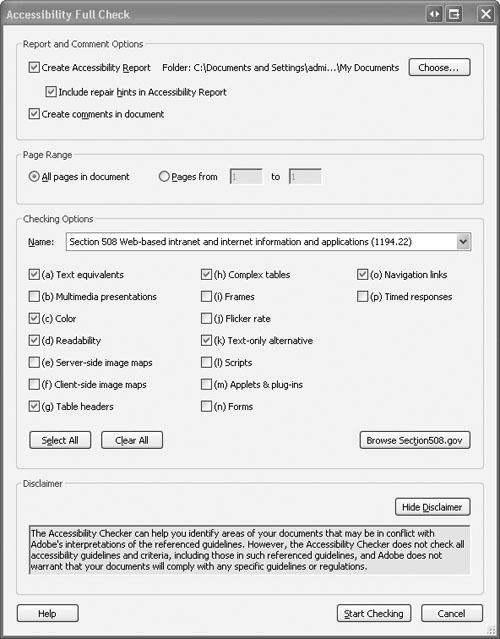
Choose Advanced > Accessibility > Full Check to open the Accessibility Full Check dialog (Figure 48a).
Evaluating Against Standards
Prior to Acrobat 8 Professional, forms were tested according to Adobe PDF accessibility only. Now, test a document against these standards, selected in the Accessibility Full Check dialog:
Adobe PDF standards. These are the default standards, and they consider such features as alternative descriptions, character encoding, tab order, and list and table structure.
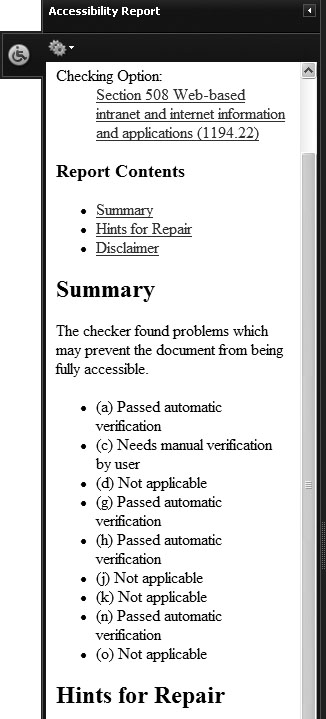
Section 508 Web-based intranet and Internet information and applications (1194.22). These are U.S. government standards subsequent to the Rehabilitation Act. As you see in Figure 48b, the standards are numbered. Click “Browse Section508.gov” for information on the standards.
W3C® Web Content Accessibility Guidelines 1.0. These standards include options defined in three categories of priority, with Priority 1 standards required for accessible use, and Priority 3 standards useful for accessible use. Click “Browse WCAG Guidelines” for more information.
W3C® Web Content Accessibility Guidelines 2.0 (Working Draft 27 April 2006). This is the successor to the original guidelines, arranged in three levels. Click “Browse WCAG Guidelines” for more information.
Select from the options according to your requirements:
Report and Comment Options. In this area, you can select whether or not to create the report and define a storage location for the report (which is automatically named using the PDF document’s name). The option “Include repair hints in Accessibility Report” is selected by default—leave the option selected to save time repairing your document. If you are the type of person who likes to see what’s what close up, select the “Create comments in document” check box to show the found errors and irregularities in comments.
Page Range. Here you can choose the visible page, a specified range, or the entire document.
Checking Options. In the Name pop-up menu, you can choose a testing option according to a set of standards (see the sidebar “Evaluating Against Standards” for more details).
You can further specify options according to the format you select. The default option is to check all options for compliance. You can check for options such as alternative descriptions, text languages, object structures, and so on. Deselect the items that aren’t in your document for faster processing. For example, if your document doesn’t contain JavaScript, deselect (l) Scripts from the Section 508 guidelines, or if you don’t have a form, deselect “All form fields have descriptions” in the Adobe PDF guidelines.
Click the Start Checking button to start the evaluation. When the check is complete, a results summary displays; click OK to close the summary and open the report.
The Accessibility Report opens in the Navigation pane at the left of the program window (Figure 48b). The report is an HTML document, and contains links within it to help you identify and correct errors. If the option to include repair hints was active when the report is generated, you see information on how to repair your document. Click Collapse to close the Accessibility Report when you have finished.
There are several conditions to consider when making a PDF document accessible. Forms, for example, offer specific challenges in their design, such as their tabbing order, the way a user moves through the form using the keyboard. For any document, examine the reading order, which defines how a document is read.
Forms. Forms are handled differently from regular documents with regard to accessibility. The form fields have to be configured correctly so that a screen reader or other device can recognize them (Figure 49a). When designing a form, be sure to do the following:
Label each field on the form.
Draw text fields and lines using graphic tools; typing characters, such as a string of underscores, confuses the structure of the field and its content.
Include instructions or descriptions as necessary.
Include alternate text for form fields.
Add tags to the fields either in the source program or in Acrobat.
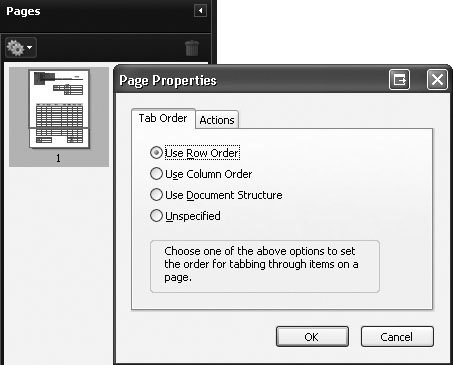
Tab order. Be sure a user can move through a form logically using the keyboard. You can test the tab order in Acrobat Pro 9 following these steps:
Click the Pages icon in the Navigation pane to display the Pages pane, and select the form’s thumbnail.
Choose Options > Page Properties to open the Page Properties dialog.
Choose a tabbing option that is logical for your form:
Use Row Order to move left to right across the page.
Use Column Order to move through the columns from left to right and top to bottom.
Use Document Structure to move the tab in the order specified in the document.
Click OK to close the dialog and test the tab order. Check out the sidebar “Tabbing Through” for a list of keystrokes to use for testing.
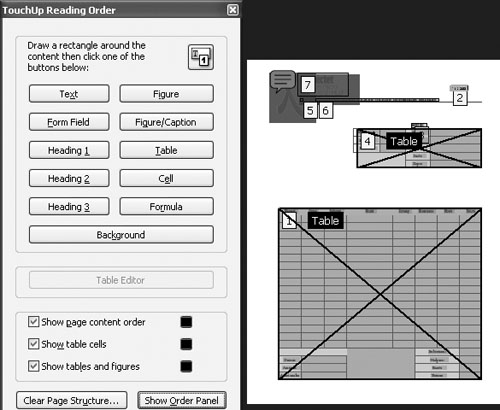
Reading Order. The path taken through a document is called its reading order. Acrobat offers the TouchUp Reading Order tool to define and order individual content elements on a page.
Select the TouchUp Reading Order tool ![]() on the Advanced Editing toolbar. Alternatively, you can choose Tools > Advanced Editing > TouchUp Reading Order Tool or Advanced > Accessibility > TouchUp Reading Order.
on the Advanced Editing toolbar. Alternatively, you can choose Tools > Advanced Editing > TouchUp Reading Order Tool or Advanced > Accessibility > TouchUp Reading Order.
Click the PDF page with the tool. The TouchUp Reading Order dialog opens, and the content of the page is shown in separate gray numbered blocks. The numbers identify the document’s reading sequence (Figure 49b). Read some tips for using the tool and touchup process in the sidebar “Order Up Reading Order.”
As with other features and processes in Acrobat, you can use keystrokes to activate accessibility tools and commands (Table 49.1).
Table 49.1. Accessibility Keystrokes
Action | Windows Action | Mac OS Action |
|---|---|---|
Change reading settings for the current document | Shift+Ctrl+5 | Shift+Command+5 |
Quick Check tool | Shift+Ctrl+6 | Shift+Command+6 |
Reflow a tagged PDF and return to unreflowed view | Ctrl+4 | Command+4 |
Activate and deactivate Read OutLoud | Shift+Ctrl+Y | Shift+Command+Y |
Pause reading out loud | Shift+Ctrl+C | Shift+Command+C |
Read only the current page out loud | Shift+Ctrl+V | Shift+Command+V |
Read out loud from the current page to the end of the document | Shift+Ctrl+B | Shift+Command+B |
Stop reading out loud | Shift+Ctrl+E | Shift+Command+E |