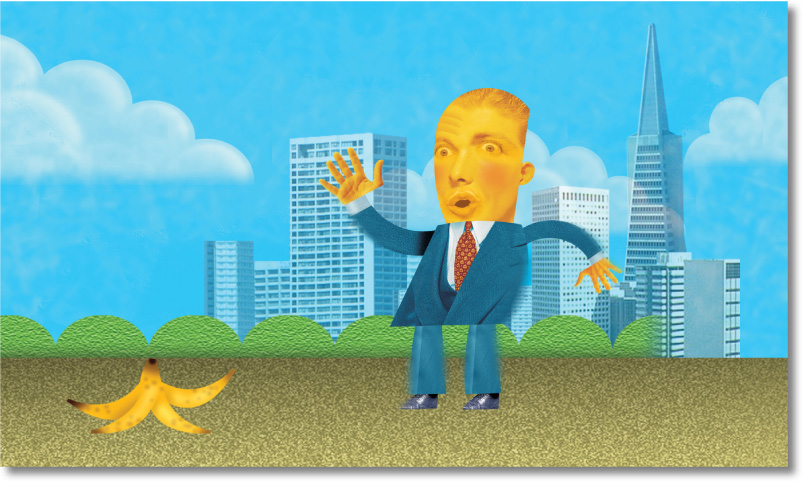
8. Distorting Objects with the Puppet Tools
Lesson overview
In this lesson, you’ll learn how to do the following:
• Place Deform pins using the Puppet Pin tool.
• Define areas of overlap using the Puppet Overlap tool.
• Stiffen parts of an image using the Puppet Starch tool.
• Animate the position of Deform pins.
• Record animation using the Puppet Sketch tool.
This lesson will take approximately an hour to complete. Download the Lesson08 project files from the Lesson & Update Files tab on your Account page at www.peachpit.com, if you haven’t already done so. As you work on this lesson, you’ll preserve the start files. If you need to restore the start files, download them from your Account page.
Pull, squash, stretch, and otherwise deform objects on the screen using the Puppet tools. Whether you’re creating realistic animations, fantastic scenarios, or modern art, the Puppet tools will expand your creative freedom.
Getting started
The Puppet tools in After Effects let you add natural motion to raster images and vector graphics. Three tools create pins to define the point of deformation, areas of overlap, and areas that should remain more rigid. An additional tool, the Puppet Sketch tool, lets you record animation in real time. In this lesson, you’ll use the Puppet tools to animate a character slipping on a banana peel.
Start by previewing the final movie and then setting up the project.
1. Make sure the following files are in the Lessons/Lesson08 folder on your hard disk, or download them from your Account page at www.peachpit.com now:
• In the Assets folder: backdrop.psd, banana.psd, man.psd
• In the Sample_Movie folder: Lesson08.mov
2. Open and play the Lesson08.mov file to see what you will create in this lesson. When you are done, quit QuickTime Player.
When you begin this lesson, restore the default application settings for After Effects. See “Restoring default preferences” on page 2.
3. Start After Effects, and then immediately hold down Ctrl+Alt+Shift (Windows) or Command+Option+Shift (Mac OS). When prompted, click OK to delete your preferences. Click Close to close the Welcome screen.
After Effects opens to display a blank, untitled project.
4. Choose File > Save As > Save As.
5. In the Save As dialog box, navigate to the Lessons/Lesson08/Finished_Project folder.
6. Name the project Lesson08_Finished.aep, and then click Save.
Importing footage
You’ll import three Adobe Photoshop files, which you’ll use to create the scene.
1. Choose File > Import > File.
2. Navigate to the Lessons/Lesson08/Assets folder. Shift-click to select the backdrop.psd, banana.psd, and man.psd files, and then click Import or Open. The footage items appear in the Project panel.
3. Click the Create A New Folder button (![]() ) at the bottom of the Project panel.
) at the bottom of the Project panel.
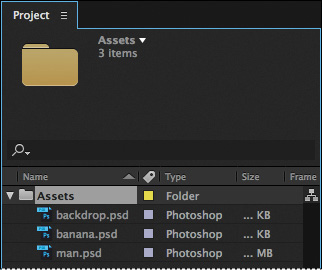
4. Name the new folder Assets, and then drag the footage items into the folder.
5. Expand the Assets folder to see its contents.
Creating the composition
As with any project, you need to create a new composition.
1. Choose Composition > New Composition.
2. Name the composition Walking Man.
3. Choose NTSC DV from the Preset pop-up menu. The preset automatically sets the width, height, pixel aspect ratio, and frame rate for the composition.
4. In the Duration field, type 500 to specify 5 seconds, and then click OK.
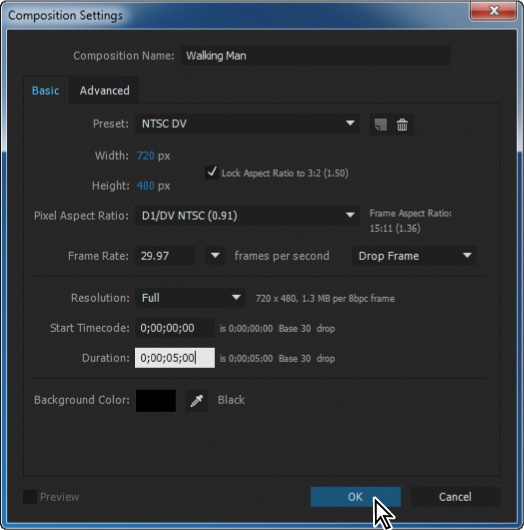
After Effects opens the new composition in the Timeline and Composition panels.
Adding the background
It’s easier to animate a character in context, so first you’ll add the background to the composition.
1. Press the Home key, or move the current-time indicator to the beginning of the composition.
2. Drag the backdrop.psd file to the Timeline panel.
3. Lock the layer to prevent accidental changes to it.

Scaling an object
Next, you’ll add the banana peel. At its default size, it’s large enough to do real damage to anyone who slips on it. You’ll scale it to a more proportional size for the scene.
1. Drag the banana.psd file from the Project panel to the top layer in the Timeline panel.

2. Select the banana.psd layer in the Timeline panel, and press S to display its Scale property.
3. Change the Scale value to 15%.
4. Press P to display the layer’s Position property.
5. Change the Position to 160, 420. The banana peel moves to the left side of the composition.

6. Hide the properties for the banana.psd layer.
Adding the character
The last element in the scene is the character himself. You’ll add him to the composition and then scale and position him appropriately.
![]() Note
Note
In the original drawing, the character had already slipped on the banana peel and was falling. To make it easier to animate, the character has been modified to be more upright. Sometimes you can make your work easier by making some adjustments before animation.
1. Drag the man.psd footage item from the Project panel to the Timeline panel at the top of the layer stack.
2. Select the man.psd layer, and press S to display its Scale property.
3. Change the Scale value to 15%.
4. Press P to display the Position property, and change the Position to 575, 300.

5. Press P again to hide the Position property for the layer.
6. Choose File > Save to save your work so far.
About the Puppet tools
The Puppet tools turn raster and vector images into virtual marionettes. When you move the string of a marionette, the body part attached to that string moves; pull the string attached to the hand, and the hand goes up. The Puppet tools use pins to indicate where strings would be attached.
The Puppet effect deforms parts of an image based on the positions of pins that you place and animate. These pins determine which parts of the image should move, which parts should remain rigid, and which parts should be in front when areas overlap.
There are three kinds of pins, each placed by a different tool:
• The Puppet Pin tool (![]() ) places and moves Deform pins, which deform a layer.
) places and moves Deform pins, which deform a layer.
• The Puppet Overlap tool (![]() ) places Overlap pins, which indicate the parts of an image that should be in the front when areas overlap.
) places Overlap pins, which indicate the parts of an image that should be in the front when areas overlap.
• The Puppet Starch tool (![]() ) places Starch pins, which stiffen parts of the image so that they are distorted less.
) places Starch pins, which stiffen parts of the image so that they are distorted less.
![]() Note
Note
The mesh is calculated at the frame where the Deform pins are applied. If you add more pins anywhere in the timeline, they are placed based on the original position of the mesh.
As soon as you place a pin, the area within an outline is automatically divided into a mesh of triangles. Each part of the mesh is associated with the pixels of the image, so as the mesh moves, so do the pixels. When you animate a Deform pin, the mesh deforms more in the area closest to the pin, while keeping the overall shape as rigid as possible. For example, if you animate a pin in a character’s hand, the hand and arm will be deformed, but most of the character will remain in place.
Adding Deform pins
Deform pins are the main component of the Puppet effect. Where you place these pins and how you position them determine how the objects move on the screen. You’ll place Deform pins and display the mesh that After Effects creates to determine the area of influence for each pin.
When you select the Puppet Pin tool, the Tools panel displays the Puppet tool options. Each pin has its own properties in the Timeline panel, and After Effects automatically creates an initial keyframe for each pin.
1. Select the Puppet Pin tool (![]() ) in the Tools panel.
) in the Tools panel.

2. In the Composition panel, place a Deform pin in the character’s right arm, near the wrist. You may find it helpful to zoom in to see the character more clearly.
![]() Note
Note
Be careful! The character’s right arm is on the left side of the image, and vice versa. Pin the character according to his left and right, not yours!
A yellow dot representing the Deform pin appears in the Composition panel. If at this point you were to use the Selection tool (![]() ) to move the Deform pin, the entire character would move with it. You need more pins to keep the other parts of the mesh in place.
) to move the Deform pin, the entire character would move with it. You need more pins to keep the other parts of the mesh in place.
3. Using the Puppet Pin tool, place another Deform pin in the left arm near the wrist.

Now you can move the right hand with the Selection tool. The more pins you place, the smaller the area of influence for each pin, and the less each area will stretch. If you experimented, undo any stretching by pressing Ctrl+Z (Windows) or Command+Z (Mac OS).
4. Place additional Deform pins in the man’s right and left legs (near the ankles), torso (near the bottom of the tie), and forehead.
5. In the Timeline panel, expand the Mesh 1 > Deform properties. Each Deform pin is listed. To keep track of each pin, you’ll rename them.
6. Select Puppet Pin 1, press Enter or Return, and rename the pin Right Arm. Press Enter or Return again to accept the new name.
7. Rename the remaining pins (Puppet Pin 2 through Puppet Pin 6) Left Arm, Right Leg, Left Leg, Torso, and Head, respectively.
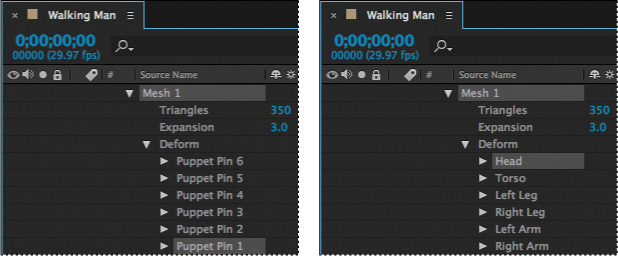
8. Select Show in the options section of the Tools panel to display the distortion mesh.
![]() Tip
Tip
You can extend the mesh beyond the outline of the layer in order to ensure a stroke is included in the deformation. To expand the mesh, increase the Expansion property in the options section of the Tools panel.
9. Change the Triangles value in the options section of the Tools panel to 300.
The Triangles setting determines how many triangles are included in the mesh. Increasing the number of triangles results in a smoother animation, but also increases rendering time.

Defining areas of overlap
![]() Note
Note
You must select the Show option separately for each Puppet tool. You can also place pins without viewing the mesh.
Normal human movement requires the arms to swing, so as the character walks across the screen, portions of his right arm and leg will be behind other areas of his body. You’ll use the Puppet Overlap tool to define the areas that should appear in front when areas overlap.
1. Zoom in, and use the Hand tool (![]() ) to position the man in the Composition window so that you can see his torso and legs clearly.
) to position the man in the Composition window so that you can see his torso and legs clearly.
2. Select the Puppet Overlap tool (![]() ), which is hidden behind the Puppet Pin tool in the Tools panel.
), which is hidden behind the Puppet Pin tool in the Tools panel.
3. Select Show in the options area of the Tools panel to view the distortion mesh.
![]() Tip
Tip
If the mesh doesn’t appear when you select Show, click outside the path shape in the Composition panel.
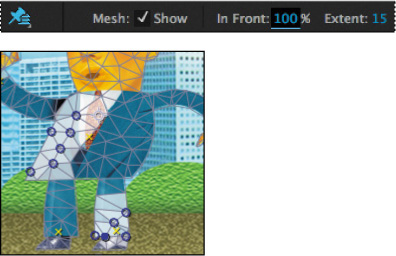
4. In the options area of the Tools panel, change In Front to 100%.
The In Front value determines the apparent proximity to the viewer; setting the value to 100% prevents those parts of the body that are overlapped from showing through.
5. Click intersections in the mesh to place Overlap pins on the right side of the character’s torso and left leg, which are the areas that should remain in the front. As you add a pin, you may want to adjust its Extent value in the options area of the Tools panel. The Extent value determines how far the overlap influence extends for the pin; the affected area appears lighter in the Composition panel. Use this image as a guide.
Stiffening an area
The character’s arms and legs should move as he walks, but his torso should stay fairly firm. You’ll use the Puppet Starch tool to add Starch pins where you want the character to be stiffer.
1. Select the Puppet Starch tool (![]() ), which is hidden behind the Puppet Overlap tool in the Tools panel.
), which is hidden behind the Puppet Overlap tool in the Tools panel.

2. Select Show in the options area of the Tools panel to display the distortion mesh.
![]() Note
Note
The Amount value determines how rigid the area will be. Typically, a low value is fine; higher values make the area more rigid. You can also use negative numbers to reduce the rigidity of another pin.
3. Place Starch pins on intersections to stiffen the lower half of the torso, as in the image at right.
4. Hide the properties for the man.psd layer in the Timeline panel.
5. Choose File > Save to save your work so far.
Animating pin positions
The Deform, Overlap, and Starch pins are in place. Now you can change the Deform pin positions to animate the character. The Overlap pins keep the front areas in the front, and the Starch pins keep specific areas (in this case, the torso) from moving too much.
Creating a walking cycle
Initially, the character should be walking across the screen. To create a realistic walking cycle, keep in mind that as humans walk, wave patterns develop in the motion path. You’ll create a wave pattern in the pin positions. However, the values will vary slightly to add a bit of randomness, and to keep the character from looking too much like a robot.
1. Select the man.psd layer in the Timeline panel, and then press U to display all the keyframes for the layer.
2. Press Home, or move the current-time indicator to the beginning of the timeline.
3. In the Timeline panel, change the position of the Deform pins as follows:
![]() Note
Note
After Effects automatically creates keyframes when you place Deform pins, so you don’t need to click the stopwatch for each pin before setting its initial position.
• Head: 845, 295
• Torso: 821.5, 1210
• Left Leg: 1000.5, 1734
• Right Leg: 580.5, 1734
• Left Arm: 1384.5, 1214.7
• Right Arm: 478.5, 1108

4. To complete the walking cycle, move the pins to the positions at the times indicated in the chart below. Where the chart says “Add keyframe,” click the Add Or Remove Keyframe At Current Time button (![]() ) in the Timeline panel to create a keyframe at the pin’s current position.
) in the Timeline panel to create a keyframe at the pin’s current position.
![]() Note
Note
To add a keyframe, click the diamond (between two arrows) on the left side of the Timeline panel.

![]() Tip
Tip
The Timeline panel measures time in seconds and frames, depending on the frames-per-second (fps) rate. So 1:15 equals 1 second and 15 frames. At 29.97 fps, 1:15 is frame 45.
Animating a slip
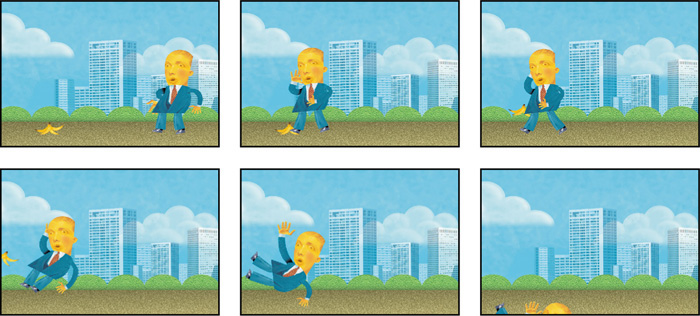
The character steps on a banana peel, loses his balance, and falls. The falling movements occur more quickly than the walking cycle. To surprise the viewer, you’ll animate the character to fall off the screen.
1. Choose File > Save to save the work you’ve just done.
2. Move the current-time indicator to 2:11, and then change the position of the Left Leg pin to −2281, 1495.3.
3. At 2:15, move the Deform pins to the following positions:
• Head: −1298, 532.7
• Torso: −1667.5, 1246.3
• Left Leg: −2398.8, 1282.7
• Right Leg: −2277.5, 874
• Left Arm: −1219.5, 1768
• Right Arm: −1753.5, 454.7
4. At 2:20, make the character fall off the screen by moving the Deform pins to the following positions:
• Head: −1094, 2452.7
• Torso: −1643.5, 3219.7
• Left Leg: −2329.5, 2682
• Right Leg: −2169.5, 2234
• Left Arm: −1189.5, 3088
• Right Arm: −1597.5, 2654.7
5. Hide the properties for the man.psd layer, and save your work so far.
Moving an object
Of course, when the man slips on the banana peel, the banana peel moves, too. It should slide out from beneath the man’s feet and fly off the screen. You didn’t add any pins to the banana, and you don’t need them. Instead, you’ll move the entire layer, using its Position and Rotation properties.
1. Move the current-time indicator to 2:00.
2. Select the banana.psd layer in the Timeline panel, and press P to display its Position property.
3. Press Shift+R to also display the layer’s Rotation property.
![]() Tip
Tip
To view multiple layer properties at the same time, press the Shift key while you press the keyboard shortcut for the additional layer property.

4. Click the stopwatches (![]() ) next to Position and Rotation to create initial keyframes for each property.
) next to Position and Rotation to create initial keyframes for each property.
5. Move to 2:06, and change the Position to 80, 246 and the Rotation to 19 degrees.
6. Move to 2:15, and change the Position to −59, 361, so that the banana peel moves completely off the screen.
7. At 2:15, change the Rotation to 42 degrees, so that the peel continues to rotate slightly as it moves off the screen.

8. Choose Fit Up To 100% in the Magnification pop-up menu at the bottom of the Composition panel so you can see the entire composition. Then make a RAM preview, and view your animation. If necessary, adjust the Position property for the Deform pins in the Timeline panel. Then choose File > Save.
![]() Tip
Tip
To make the animation appear more natural, you can use roving keyframes. Roving keyframes aren’t linked to a specific time; they change according to the keyframes near them. To make a keyframe a roving keyframe, right-click or Control-click it, and choose Rove Across Time.
Recording animation
Changing the Position property for each pin at each keyframe worked, but you probably found the process to be slow and tedious. If you were creating a much longer animation, you’d quickly tire of entering precise numbers for each keyframe. Instead of manually animating keyframes, you can use the Puppet Sketch tool to drag the objects into position in real time. After Effects starts recording the motion as soon as you begin dragging a pin, and it stops recording when you release the mouse button. The composition moves forward through time as you move the pin. When you stop recording, the current-time indicator returns to the point at which you began recording, so that you can record the path for another pin during the same time period.
Experiment with this method of animation as you re-create the slipping motion using the Puppet Sketch tool.
![]() Tip
Tip
By default, the motion is played back at the speed at which it was recorded. To change the ratio of recording speed to playback speed, click Record Options in the Tools panel, and change the Speed value before recording.
1. Choose File > Save As > Save As, and name the project Motionsketch.aep. Save it in the Lesson08/Finished_Project folder.
2. Move the current-time indicator to 2:08.
3. In the man.psd layer, delete all keyframes after 2:08.
The walking cycle remains, but you’ve removed the keyframes that animate the character slipping and falling.
4. Select the Puppet Pin tool (![]() ) in the Tools panel.
) in the Tools panel.
5. In the Timeline panel, expand the man.psd layer, and then expand Effects. Select Puppet to see the pins in the Composition panel.
6. Select a pin in the Composition panel, and press Ctrl (Windows) or Command (Mac OS) to activate the Puppet Sketch tool (a clock icon appears next to the pointer).
7. Continue to hold down Ctrl or Command as you drag the pin into a new position. Release the mouse button when you’ve finished. The current-time indicator returns to 2:08.
8. Press Ctrl or Command, and drag another pin into position. Use the outline of the character to guide you.
9. Continue using the Puppet Sketch tool to move all the pins through the animation until you’re satisfied with the movement.
10. Create a RAM preview to view the final animation.
Now you’ve used all the Puppet tools to create a realistic, engaging animation. Remember that you can use the Puppet tools to deform and manipulate many kinds of objects, not just drawn art. And watch out for banana peels!
Review questions
1. What’s the difference between the Puppet Pin tool and the Puppet Overlap tool?
2. When would you use the Puppet Starch tool?
3. Describe two methods of animating pin positions.
Review answers
1. The Puppet Pin tool creates Deform pins, which define the position of a portion of the image as the image is deformed. The Puppet Overlap tool creates Overlap pins, which determine which areas of an object remain in front when two areas overlap.
2. Use the Puppet Starch tool to add Starch pins to an area that you want to remain more rigid while other areas of the object are distorted.
3. You can manually animate pin positions by changing the value of the Position property for each pin in the Timeline panel. To animate pin positions more quickly, use the Puppet Sketch tool: With the Puppet Pin tool selected, press Ctrl or Command, and drag a pin to record its movement.

