
10 Performing Color Correction
Lesson overview
In this lesson, you’ll learn how to do the following:
Use a transition to move from one clip to another.
Use the Levels effect to correct the color in a shot.
Use the mask tracker to track part of a scene.
Remove an area using the Keylight (1.2) effect.
Use the Auto Levels effect to remove a color cast.
Key out an area using the Color Range effect.
Correct colors using the Lumetri Color effect.
Use the CC Toner effect to create a mood.
Copy an object in the scene with the Clone Stamp tool.
This lesson will take approximately an hour to complete. Download the project files for this lesson, following the instructions in the Getting Started section under “Accessing the lesson files and Web Edition,” if you haven’t already done so. As you work on this lesson, you’ll preserve the start files. If you need to restore the start files, download them from your Account page.
PROJECT: SEQUENCE FROM A MUSIC VIDEO
Most shots require some degree of color correction and color grading. With Adobe After Effects, you can easily remove color casts, brighten images, and change the mood of a clip.
Getting started
As the term implies, color correction is a way of altering or adapting the color of a captured image. Strictly speaking, color correction is the act of adjusting the color in a shot to correct errors in white balance and exposure, and to ensure color consistency from one shot to another. However, you can use the same color-correction tools and techniques to perform color grading, which is the subjective manipulation of color to focus attention on a key element in a shot or to create a color palette for a specific visual look.
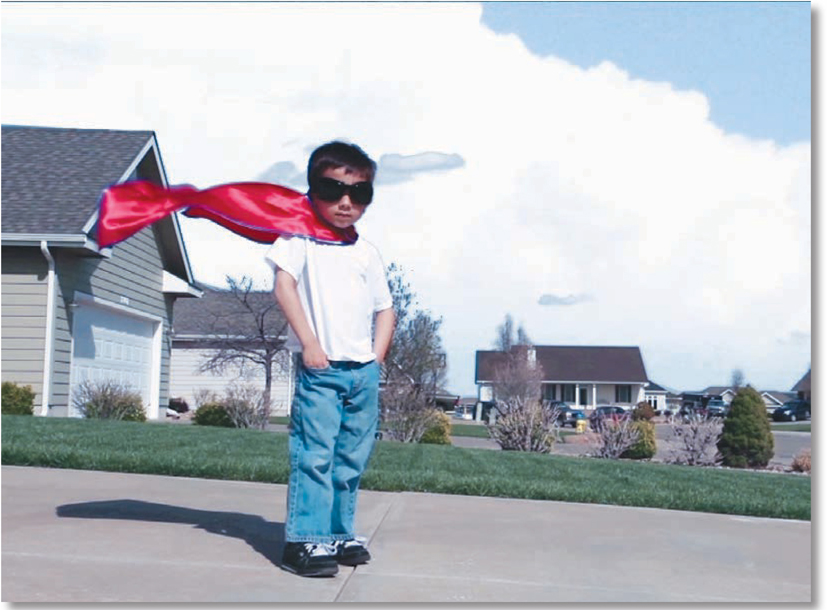
In this lesson, you will correct the color of a video clip that was shot without the proper white-balance setting. First, you’ll combine two clips from a longer video of a young superhero taking off and flying through the sky. Then, you’ll apply a variety of color-correction effects to clean up and enhance the image. You’ll also use mask tracking and motion tracking to replace the sky with more dramatic clouds.
First, you’ll preview the final movie and set up your project.
Make sure the following files are in the Lessons/Lesson10 folder on your hard disk, or download them from your Account page at www.peachpit.com now:
In the Assets folder: storm_clouds.jpg, superkid_01.mov, superkid_02.mov
In the Sample_Movies folder: Lesson10.avi, Lesson10.mov
Open and play the Lesson10.avi sample movie in Windows Movies & TV or the Lesson10.mov sample movie in QuickTime Player to see what you will create in this lesson. When you are done, close Windows Movies & TV or QuickTime Player. You may delete the sample movies from your hard disk if you have limited storage space.
When you begin this lesson, restore the default application settings for After Effects. See “Restoring default preferences” on page 3.
Start After Effects, and then immediately hold down Ctrl+Alt+Shift (Windows) or Command+Option+Shift (macOS). When prompted, click OK to delete your preferences.
Click New Project in the Home window.
After Effects opens to display an empty, untitled project.
Choose File > Save As > Save As.
In the Save As dialog box, navigate to the Lessons/Lesson10/Finished_Project folder. Name the project Lesson10_Finished.aep, and then click Save.
Creating the composition
You’ll create a new composition based on the two superkid movie files.
Choose File > Import > File.
Navigate to the Lessons/Lesson10/Assets folder, Shift-click to select the storm_clouds.jpg, superkid_01.mov, and superkid_02.mov files, and then click Import or Open.
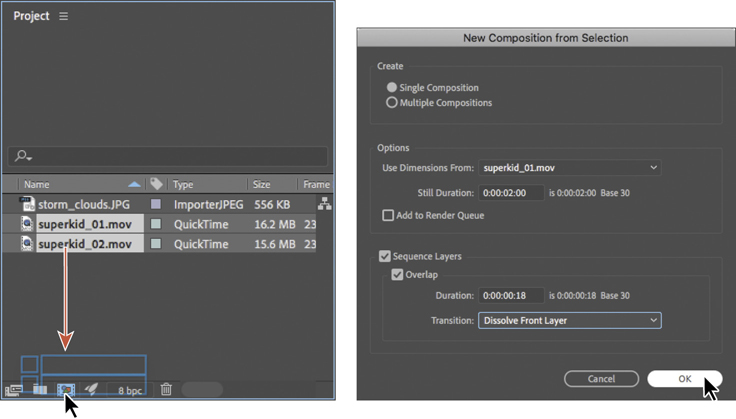
In the Project panel, deselect the assets you imported. Select the superkid_01. mov file and Shift-click the superkid_02.mov file, and drag the files onto the Create A New Composition button (
 ) at the bottom of the Project panel.
In the New Composition From Selection dialog box, do the following:
Make sure Single Composition is selected.
In the Options area, choose superkid_01.mov from the Use Dimensions From menu.
Select Sequence Layers.
Select Overlap.
For Duration, enter 0:18.
Choose Dissolve Front Layer from the Transition menu.
Click OK.
![]() Note
Note
You can add transitions after you’ve created a composition by selecting the layers, choosing Animation > Keyframe Assistant > Sequence Layers, and then selecting the options.
Previewing your project on a video monitor
If possible, perform color correction on a video monitor instead of a computer monitor. The gamma values between a computer monitor and a broadcast monitor vary greatly. What may look good on a computer screen may be too bright and washed out on a broadcast monitor. Always be sure your video or computer monitor is properly calibrated before performing color correction. For instructions on calibrating a computer monitor, see After Effects Help.
Mercury Transmit is a software interface that Adobe digital video applications use to send video frames to external video displays. Video device manufacturers AJA, Blackmagic Design, Bluefish444, and Matrox provide plug-ins that route the video frames from Mercury Transmit to their hardware. The same Mercury Transmit plug-ins work in Adobe Premiere Pro, Prelude, and After Effects. Mercury Transmit can also use monitors connected to your computer’s video card and FireWire-connected DV devices without an additional plug-in.
With a video monitor connected to your computer system, start After Effects.
Choose Edit > Preferences > Video Preview (Windows) or After Effects CC > Preferences > Video Preview (macOS). Then select Enable Mercury Transmit.
Choose a device from the list. Devices with names such as AJA Kona 3G or Blackmagic Playback represent video devices connected to your computer. Adobe Monitor devices are the computer monitors connected to your video card. Adobe DV requires a DV device connected to a FireWire port on your computer.
To change the options for your video device, click Setup next to its name. More options may be available in the device’s control panel or management application.

Click OK to close the Preferences dialog box.
When Sequence Layers is selected, After Effects places the layers in sequence rather than placing them both to start at 0:00. You specified an overlap of 18 frames and a transition so that the first clip dissolves into the second.
After Effects creates a new composition named for the superkid_01.mov file, and displays it in the Composition and Timeline panels.
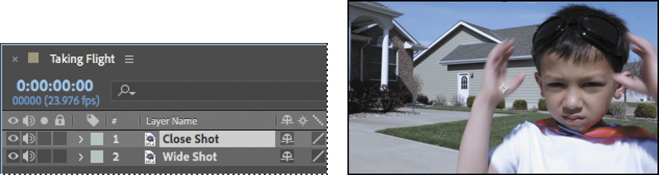
Select the superkid_01 composition in the Project panel, press Enter or Return, and rename the composition Taking Flight. Press Enter or Return again to accept the change.

Press the spacebar to preview the clips, including the transition, and then press the spacebar again to stop the preview.
Choose File > Save to save your work so far.
Adjusting color balance with levels
After Effects provides several tools for color correction. Some may do the job with a single click, but understanding how to adjust colors manually gives you the greatest freedom to achieve the look you want. You’ll use the Levels effect to adjust the shadows, remove the blue cast, and make the image pop a little more. You’ll work on the clips individually, starting with the second clip.
Go to 4:00 in the time ruler.
Click in an empty area of the Timeline panel to deselect the layers. Then, select the superkid_02.mov layer.
Press Enter or Return, rename the layer Wide Shot, and then press Enter or Return to accept the new name.

With the Wide Shot layer selected, choose Effect > Color Correction > Levels (Individual Controls).
The Levels (Individual Controls) effect may be a little intimidating at first, but it can give you great control over your shot. It remaps the range of input color or alpha channel levels onto a new range of output levels, functioning much the same as the Levels adjustment in Adobe Photoshop.

The Channel menu specifies the channel to be modified, and the histogram shows the number of pixels with each luminance value in the image. When the selected channel is RGB, you can adjust the overall brightness and contrast of the image.
To remove a color cast, you must first know which areas of the image are supposed to be gray (or white or black). In this shot, the driveway is gray, the shirt is white, and the shoes and goggles are black.
Open the Info panel. Then, move the cursor over the white frame of the garage door. As you move the cursor, the RGB values change in the Info panel.

![]() Note
Note
You may need to resize the Info panel to see the values.
In one area of the garage door frame, the RGB values are R=186, G=218, B=239. To determine what the values should be, divide 255 (the highest possible RGB value) by the highest value in the sample. That gives you 255 divided by 239 (the blue value), or 1.08. To equalize the colors so that blue is no longer prominent, multiply 1.08 by the original red and green values (186 and 218, respectively). The new values (rounded) are 200 for red and 233 for green.
![]() Tip
Tip
For an even more accurate number, sample multiple areas of the image that are gray or white, average those values, and then use those numbers to determine the adjustments.
In the Effect Controls panel, expand the Red and Green properties.
For the Red Input White value, enter 200; for the Green Input White value, enter 233.
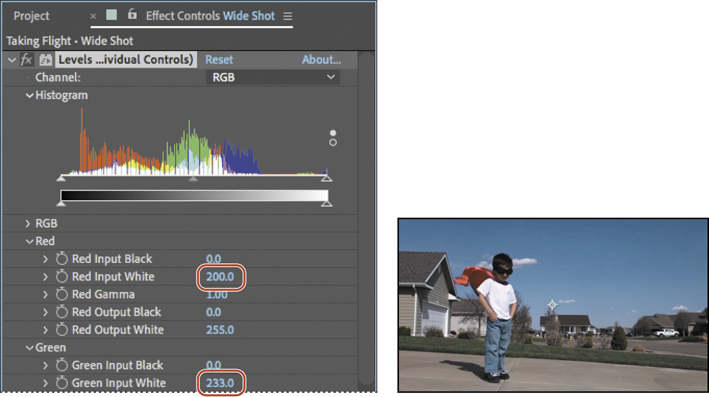
The blue cast is gone, and the image appears warmer.
For each channel, the Input settings increase the value, while the Output settings decrease the value. For example, lowering the Red Input White value adds red to the highlights in the shot, and increasing the Red Output White value adds red to the shadows or dark areas in the shot.
Performing the math lets you zero in on the appropriate settings quickly. If you prefer, you could experiment with the settings to find the best values for the footage you’re using.
Hide the Levels (Individual Controls) properties in the Effect Controls panel.
Adjusting color with the Lumetri Color effect
You used the Levels effect to adjust the color balance in the second clip. Now you’ll use the Lumetri Color effect to do the same for the first clip.
![]() Note
Note
The Lumetri Color effect in After Effects is similar to the color panel in Premiere Pro. To learn more about the Lumetri Color effect, search for “Color workflows” in After Effects Help.
The Lumetri Color effect provides professional-quality grading and color correction tools that you can use to adjust color, contrast, light, and curves. You can apply simple color corrections or use more advanced color correction tools. The Lumetri Color effect in After Effects works the same as the color panel in Premiere Pro.
The clip is in pretty good shape, but some fine-tuning will result in a better project.
Press the Home key or move the current-time indicator to the beginning of the time ruler.
Select the superkid_01.mov layer in the Timeline panel, press Enter or Return, rename the layer Close Shot, and press Enter or Return to accept the new name.
With the Close Shot layer selected, choose Effect > Color Correction > Lumetri Color.
The Lumetri Color effect options appear in the Effect Controls panel.
In the Effect Controls panel, expand the Basic Correction category.
Click the eyedropper next to WB Selector in the White Balance section. Then click a white area on the boy’s shirt to adjust the white balance.
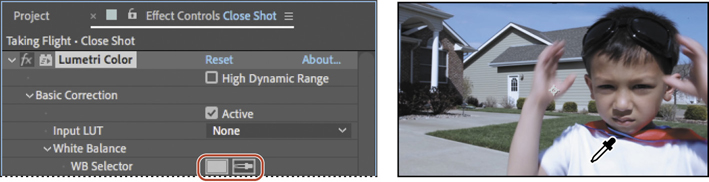
The White Balance setting determines what the Lumetri Color effect identifies as white, which affects the relationship of all other colors. When the white balance is appropriate for your image, colors are rendered accurately.
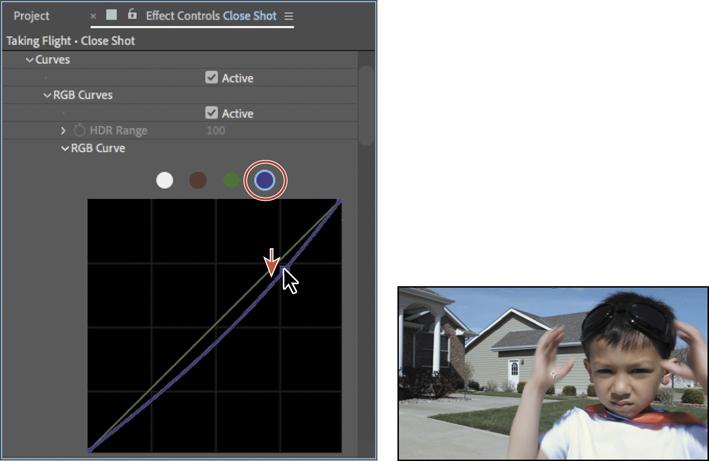
Collapse the Basic Correction category, and expand Curves.
The curves feature in the Lumetri Color effect lets you adjust color and brightness in your video image. You can adjust the curves for the entire image to change the black and white levels, or brighten or darken midtones. You can also adjust the curve for a specific color channel to balance color or make stylized changes.
To adjust a curve, click an anchor point and drag. Changes in the image appear immediately in the Composition panel.
Select the blue color channel, and then click an anchor point and drag the curve down slightly to remove the blue color cast in the image.
Hide the Lumetri Color options in the Effect Controls panel.
Choose File > Save to save your work.
Replacing the background
These shots were taken on a clear day with few clouds. To add a little drama, you’ll key out the sky and replace it with storm clouds. You’ll start by using the rigid mask tracker to mask the sky, and then key out the sky color. Then you’ll replace it with another image.
Using the mask tracker
The mask tracker transforms a mask so that it follows the motion of an object or objects in a movie. It’s similar to the face tracker you used in the Extra Credit project in Lesson 9. You can use it to mask a moving object so that you can apply a special effect to it, for example. In this case, you’ll use it to track the sky as it shifts in a handheld camera. There is a great deal of blue in this clip—in shadows, the cape, and other areas—so it would be difficult to key out the sky without first isolating it.
Go to 2:22—the last frame in the first clip before the transition begins.
Select the Close Shot layer in the Timeline panel. Then select the Pen tool (
 ) from the Tools panel.
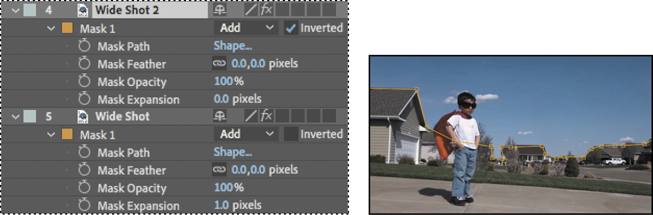
In the Composition panel, draw a mask that follows the roofline of the buildings. Complete the mask outside the image in the Composition panel, as shown below. It’s okay if the mask cuts off the boy’s head, because his head doesn’t contain blue and won’t be keyed out.

With the Close Shot layer selected in the Timeline panel, press the M key to display the Mask properties.
Choose None from the Mask Mode menu.
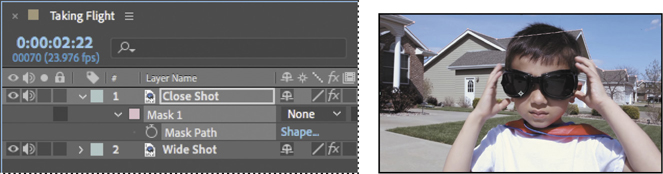
Mask modes (blending modes for masks) control how masks within a layer interact with one another. By default, all masks are set to Add, which combines the transparency values of any masks that overlap on the same layer. While Add is chosen, areas outside the mask disappear. Choosing None from the Mask Mode menu reveals the entire clip in the Composition panel, not just the masked area, so it’s easier to edit.
Right-click or Control-click Mask 1, and choose Track Mask.
After Effects opens the Tracker panel. The mask tracker does not alter the shape of the mask to follow a shape; the mask remains the same shape but the tracker can change its position, rotation, or scale based on the motion in the clip. You’ll use it to track the edges of the buildings without having to manually adjust and track the mask. Because the scene was shot without a tripod, you’ll track the position, scale, and rotation of the mask.
In the Tracker panel, choose Position, Scale & Rotation from the Method menu. Click the Track Selected Masks Backward button (
 ) to begin tracking backward from 2:22.

When the tracking is complete, manually preview the clip to see the mask. If it slips out of place, adjust the mask on individual frames. You can shift the entire mask or reposition individual points, but don’t delete any points, as that will change the mask for all the frames that follow.
![]() Note
Note
If the mask requires adjustment on more than a few frames, delete it and draw the mask again.

Keying out the sky with Keylight (1.2)
Now that you’ve masked the sky, you’ll key out the blue in the area that you masked. First, you’ll duplicate the layer, and then apply mask modes to isolate the mask.
Go to 2:02. Then, select the Close Shot layer, and choose Edit > Duplicate.
After Effects adds an identical layer, named Close Shot 2, above the Close Shot layer.
Select the Close Shot layer, and choose Subtract from its Mask Mode menu.
Select the Close Shot 2 layer, press M to display its Mask properties, and choose Add from its Mask Mode menu.
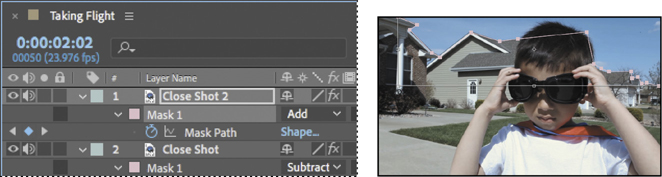
When you apply the Subtract mask mode, the influence of the mask is subtracted from the masks above it in the stacking order. The Add mask mode adds the mask to the masks above it. In this case, you’re ensuring that only the sky will be selected in the Close Shot 2 layer. If you zoom in to the Composition window while no layers are selected, you can see a faint line where the two layers intersect.
Select the Close Shot layer, and press the M key twice quickly to show all of the mask properties for the layer. Reduce the Mask Expansion value to –1.0 pixel.
The Mask Expansion setting determines how far, in pixels, from the mask path the influence of the mask on the alpha channel extends. You’ve shrunk the mask on the Close Shot layer so that the two masks don’t overlap.
Hide the properties for the Close Shot layer.
Select the Close Shot 2 layer, and choose Effect > Keying > Keylight (1.2).
The Keylight 1.2 effect options appear in the Effect Controls panel.
Select the eyedropper next to Screen Colour, and then sample an area of the sky near the boy’s head.
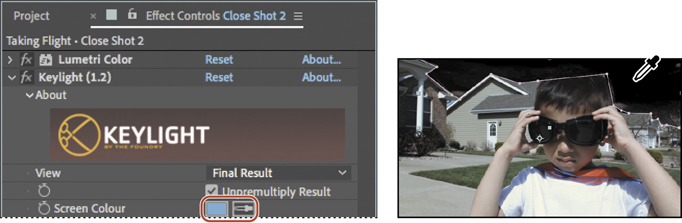
Most of the sky is keyed out, but if your mask overlapped any of the shadowy areas of the buildings, they’re probably affected too. You’ll use Screen Balance to fix that.
Change the Screen Balance to 0.
The buildings lighten up.
Screen Balance determines how saturation is measured: With a balance of 1, saturation is measured against the smaller of the other two components in the color; with a balance of 0, it’s measured against the larger of the two; with a balance of 0.5, it’s measured from the average of the two. Generally speaking, blue screens work best with a balance around .95 and green screens with a balance around 0.5, but it varies depending on the colors in the image. For many clips, try setting the balance closer to 0, and then closer to 1, to see what works best.
Click the Toggle Transparency Grid button (
 ) in the Composition panel to see the keyed-out area clearly.
Expand the Screen Matte category in the Effect Controls panel, and then change the Clip White value to 67.
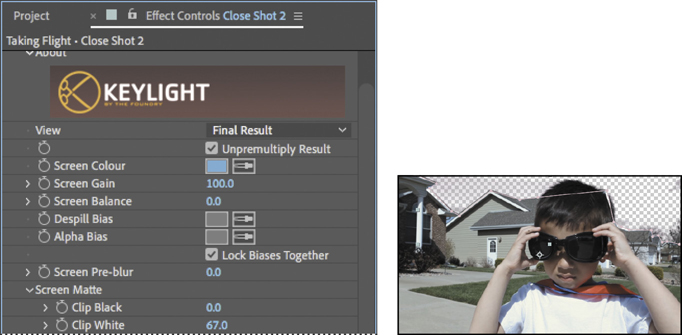
The screen matte is the matte that remains when you’ve keyed out other parts of the image. Sometimes parts of the matte are accidentally keyed out. The Clip White value turns the gray (transparent) pixels to white (opaque).
This process is very similar to adjusting Levels for a layer. Anything above the Clip White value is considered pure white. Likewise, the Clip Black value makes anything below the value completely black.
Make sure Final Result is chosen in the View menu at the top of the Keylight (1.2) area in the Effect Controls panel.
Hide the properties for the Close Shot 2 layer.
Adding a new background
With the original sky keyed out, you’re ready to add the clouds to the scene.
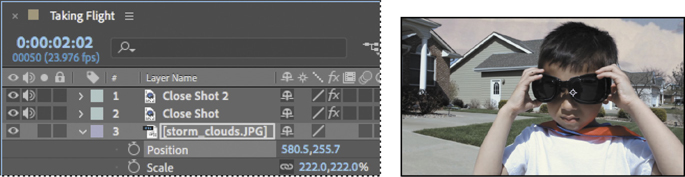
Click the Project tab to display the Project panel, and then drag the storm_clouds.jpg file to the Timeline panel, placing it below the Close Shot layer.
Drag the end of the storm_clouds layer to align with the end of the Close Shot layer.

Now the clouds are there, but they’re not very dramatic. You’ll make them larger and adjust their position.
Press the S key to display the Scale property for the layer, and change the amount to 222%.
Press Shift+P to display the Position property for the layer, and change the value to 580.5, 255.7.
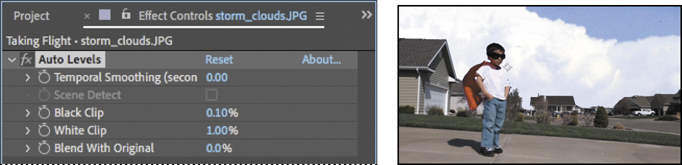
Color-correcting using Auto Levels
Although the storm clouds are dramatic, the contrast of the image and the color cast don’t really match the foreground elements. You’ll use the Auto Levels effect to correct that.
The Auto Levels effect automatically sets highlights and shadows by defining the lightest and darkest pixels in each color channel as white and black, and then redistributing intermediate pixel values proportionately. Because Auto Levels adjusts each color channel individually, it may remove or introduce a color cast. In this case, with the default settings applied, Auto Levels removes the orange cast and balances the shot.
With the storm_clouds layer selected in the Timeline panel, choose Effect > Color Correction > Auto Levels.
To brighten the clouds just a bit, change the White Clip value to 1.00%.

The Black Clip and White Clip values determine how much of the shadows and highlights (respectively) are clipped to the new extreme shadow and highlight colors in the image. Setting the clipping values too high reduces detail in the shadows or highlights; 1% is as high as is typically recommended.
Choose File > Save to save your work.
Motion tracking the clouds
The clouds are in place, and they’re looking good. But if you scrub through the clip, you’ll notice that the clouds are static while the foreground moves due to camera motion. The clouds should travel with the foreground. You’ll use motion tracking to solve this problem.
After Effects tracks motion by matching pixels from a selected area in a frame to pixels in each succeeding frame. Tracking points designate the areas to track.
Press the Home key or move the current-time indicator to the beginning of the time ruler.
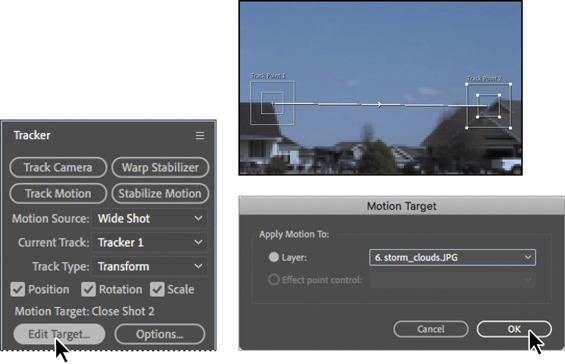
Select the Close Shot layer in the Timeline panel, right-click or Control-click the layer, and choose Track & Stabilize > Track Motion.
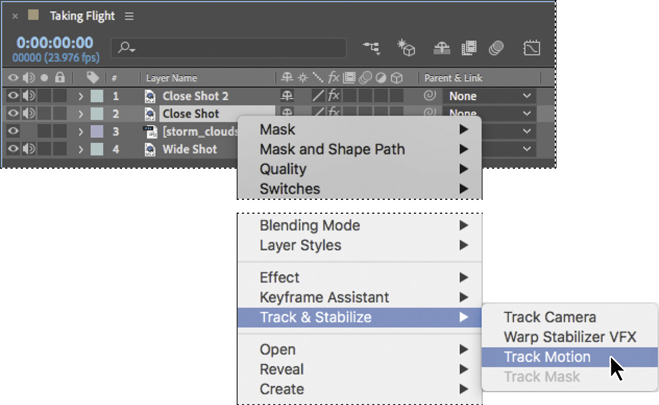
After Effects displays the Close Shot layer in the Layer panel and makes the Tracker panel active.
In the Tracker panel, select the Position, Rotation, and Scale options.

After Effects displays two track points in the Layer panel. The outer box in each track point represents the search region (the area After Effects scans); the inner box is the feature region (what After Effects is searching for); the center “x” is the attach point.
![]() Note
Note
You’ll learn more about tracking objects in Lesson 14, “Advanced Editing Techniques.” For help working with track points, see “Moving and resizing the track points” on page 350.
Click an empty area in the inner box (the feature region) of the first track point, and drag the entire track point to the corner of the house on the left. You want to track an area with strong contrast.
Click an empty area in the feature region of the second track point, and drag the entire track point to the peak of the roof across from the first track point.
In the Tracker panel, click Edit Target. Then, in the Motion Target dialog box, choose 3. storm_clouds.jpg from the Layer menu. Click OK.

After Effects applies the tracking data to the target layer. In this case, it will track the motion of the Close Shot layer, and apply that tracking data to the storm_clouds.jpg layer so that they move in sync.
Click the Analyze Forward button (
 ) in the Tracker panel. You may need to scroll down to see all the options in the panel.
After Effects analyzes the positions of the tracking regions frame by frame to track the camera movement in the clip.
When the analysis is complete, click Apply in the Tracker panel. Click OK to apply the data for both the x and y dimensions.
Switch back to the Composition panel, and scrub backward through the timeline. The clouds move with the foreground elements. Hide the Close Shot layer properties to keep the Timeline panel tidy.
Because you selected Scale in the Tracker panel, After Effects resized the layer as necessary to sync it with the Close Shot layer. The clouds are no longer in the same position. You’ll adjust the anchor point for the layer.
Select the storm_clouds.jpg layer in the Timeline panel, and press the A key to display its Anchor Point property. Change the Anchor Point position to 313, 601.
Press A to hide the Anchor Point property, and choose File > Save to save your work so far.
Replacing the sky in the second clip
You’ll use a similar process to replace the sky in the second clip, with a few differences. You’ll use the Color Range effect to key out the sky instead of the Keylight (1.2) effect.
Creating the masks
As you did with the first clip, you’ll start by drawing a mask to isolate the sky so you won’t key out all the blue in the image. You’ll use the mask tracker to ensure the mask stays in the right position throughout the clip.
Go to 2:23 in the time ruler—the first frame in the second clip.
Click the Video switch (
 ) in the Timeline panel for the Close Shot, Close Shot 2, and storm_clouds.jpg layers to hide them so that you can see the full Wide Shot clip clearly.
Select the Wide Shot layer in the Timeline panel.
Select the Pen tool (
) in the Tools panel, and then follow the edges of the buildings to draw a mask around the bottom of the image, omitting the sky. Make sure the boy’s blue pants are entirely within the shape you draw, so they won’t be keyed out with the sky.Select the Wide Shot layer again, and then press Ctrl+D (Windows) or Command+D (macOS) to duplicate the layer.

A new Wide Shot 2 layer appears above the original Wide Shot layer in the Timeline panel.
Select the original Wide Shot layer, and press the M key twice to reveal the mask properties for the layer. Change the Mask Expansion value to 1 pixel.
The influence of the mask expands by 1 pixel beyond its outline.
Select the Wide Shot 2 layer, press the M key twice to reveal the mask properties for the layer, and then select Inverted.
The area that is masked in the Wide Shot 2 layer is inverted: What is masked in the Wide Shot layer is not in the Wide Shot 2 layer, and vice versa. To see this clearly, temporarily hide the Wide Shot layer and then show it again.
Select Mask 1 in the Wide Shot 2 layer, right-click or Control-click Mask 1, and then choose Track Mask.
In the Tracker panel, choose Position from the Method menu, and then click the Track Selected Masks Forward button (
).
The mask tracker tracks the mask as the camera moves.
When the analysis is complete, go to 2:23 in the time ruler again. Under the Wide Shot layer, right-click or Control-click Mask 1, and choose Track Mask.
In the Tracker panel, choose Position from the Method menu, and then click the Track Selected Masks Forward button (
).Hide the properties for all layers.
Keying out an area with the Color Range effect
The Color Range effect keys out a specified range of colors. This key effect is especially useful where the color to be keyed is unevenly lit. The sky in the Wide Shot clip ranges in color from a deep blue to a lighter shade near the horizon—a perfect candidate for the Color Range effect.
Go to 2:23 in the time ruler.
Select the Wide Shot 2 layer in the Timeline panel, and choose Effect > Keying > Color Range.
Select the Key Color eyedropper, next to the Preview window in the Effect Controls panel. Then, in the Composition panel, click a midtone blue color in the sky to sample it.
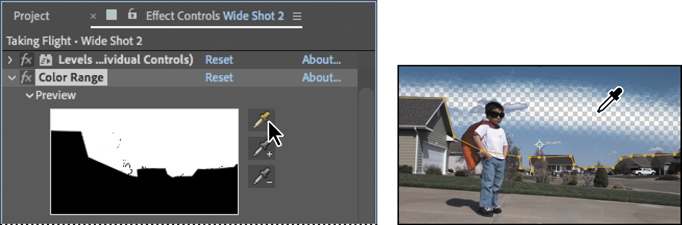
The keyed-out area appears black in the Preview window in the Effect Controls panel.
Select the Add To Key Color eyedropper in the Effect Controls panel, and then click another area of the sky in the Composition panel.
Repeat step 4 until the entire sky has been keyed out.

![]() Tip
Tip
Select the blue areas of the sky, but not the clouds. You don’t want to key out parts of the boy’s shirt.
Adding a new background
With the original sky keyed out, you’re ready to add the clouds to the scene.
![]() Tip
Tip
If you’re typing the values, press Tab to jump between the fields.
Click the Project tab to display the Project panel. Then drag the storm_clouds.jpg item from the Project panel to the Timeline panel, placing it below the Wide Shot layer.
With the storm_clouds layer selected in the Timeline panel, press the S key to display its Scale property, and then increase the Scale values to 150, 150%.
With the storm_clouds layer still selected in the Timeline panel, press P to display its Position property. Then change the position values to 356, 205 or the position you prefer.
With the storm_clouds layer selected, choose Effect > Color Correction > Auto Levels. Change the White Clip value to 1.00%.
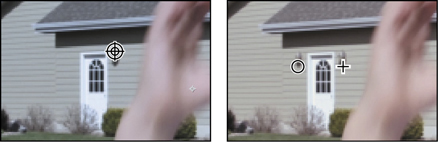
Motion tracking the shot
Again, because the clip was shot without a tripod, the camera shifts. The clouds should shift with it. You’ll track the motion to sync the clouds with the foreground elements, just as you did for the other clip.
Make sure the current-time indicator is at 2:23. Then select the Wide Shot layer, right-click or Control-click it, and choose Track & Stabilize > Track Motion.
In the Tracker panel, select the Position, Rotation, and Scale options.
Click in the feature region (the inner box) of one of the track points, and drag it to the peak of the roof of the house on the far right. Then, drag the feature region of the other track point to the peak of the house straight across from it, as in the illustration.
In the Tracker panel, click Edit Target. In the Motion Target dialog box, choose 6. storm_clouds.jpg from the Layer menu, and click OK. Make sure you select the second storm_clouds.jpg file, and not the first one (layer 3); you want the one that is associated with the Wide Shot layer.
Click the Analyze Forward button in the Tracker panel.
When the analysis is complete, click Apply in the Tracker panel. Click OK to apply the data to both the x and y dimensions.
Click the Composition: Taking Flight tab in the Composition panel to make it active. Then scrub through the clip to watch the clouds in sync with the other elements.
The clouds follow the movement of the camera, but because the layer was scaled, they may not be in the right position.
Hide the properties for all layers.
Make sure no layers are selected. Then, select the storm_clouds.jpg layer at the bottom of the layer stack, and press the A key to reveal the Anchor Point property. Adjust it so that it looks right. We used 941, 662.
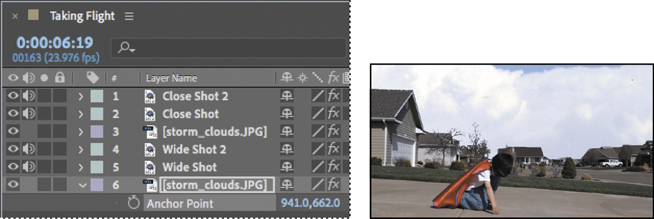
Make the Close Shot, Close Shot 2, and first storm_clouds.jpg layers visible again.
Choose File > Save to save your work so far.
Color grading
So far, the color changes you’ve made have been to correct inaccurate white balances or to match color between clips. You can also change color and tone to create a mood or otherwise enhance a movie. You’ll make some final adjustments to give the entire movie a steely blue color, make the image soft and dreamy, and add a vignette.
Using CC Toner to map colors
CC Toner is a color-mapping effect based on the luminance of the source layer. You can map two (duotone), three (tritone), or five (pentone) colors. You’ll use it to map a cold blue color to bright areas of the clip, a steely blue to the midtones, and a darker blue to darker areas of the clip.
Choose Layer > New > Adjustment Layer.
You can use an adjustment layer to apply an effect to all the layers beneath it at once. Because it’s on a separate layer, you can also hide or edit the layer and automatically affect its influence on all the other layers.
Move the Adjustment Layer 1 layer to the top of the Timeline panel, if it’s not already there.
Select the Adjustment Layer 1 layer, press Enter or Return, rename the layer Steel Blue, and press Enter or Return again.
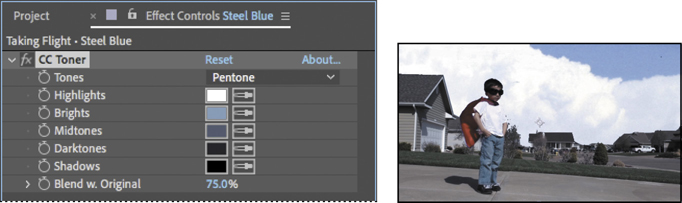
Select the Steel Blue layer, and choose Effect > Color Correction > CC Toner.

In the Effect Controls panel, choose Pentone from the Tones menu. Then do the following:
Click the Brights color swatch, and choose a cold blue color. (We used R=120, G=160, B=190.)
Click the Midtones color swatch, and choose a darker, steely blue . (We used R=70, G=90, B=120.)
Click the Darktones color swatch, and choose a much darker blue. (We used R=10, G=30, B=60.)
Change the Blend With Original value to 75%.
Adding a blur
You’ll add a blur to the entire project. First you’ll precompose the layers, and then you’ll create a partially visible blurred layer.
Select all of the layers in the Timeline panel, and choose Layer > Pre-Compose.
Precomposing layers moves them to a new composition, making it easier to affect all the layers in a composition at once.
In the Pre-Compose dialog box, name the composition Final Effect, and select Move All Attributes Into The New Composition. Then click OK.

After Effects replaces all the layers in the Taking Flight composition with a single layer named Final Effect.
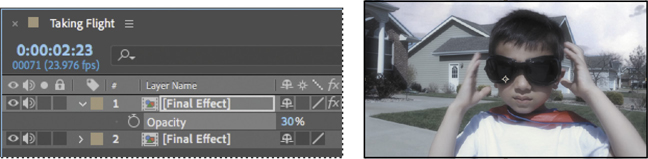
Select the Final Effect layer, and choose Edit > Duplicate to make a copy of it.
With the top layer selected, choose Effect > Blur & Sharpen > Gaussian Blur.
In the Effect Controls panel, change the Blurriness to 40.
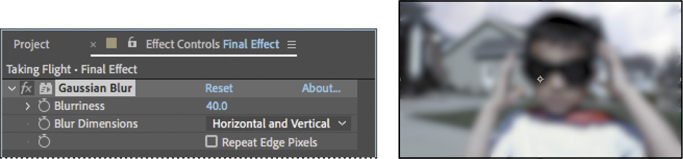
The effect is too strong. You’ll reduce the opacity of the layer that contains the effect.
With the top layer selected, press the T key to reveal the Opacity property for the layer. Change its value to 30%.
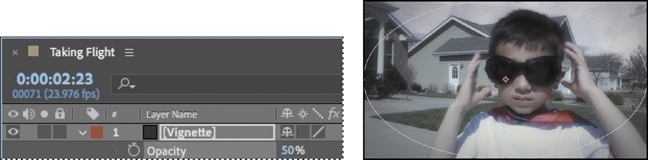
Adding a vignette
You’ll use a new solid layer to create a vignette for the movie.
Choose Layer > New > Solid.
In the Solid Settings dialog box, do the following:
Name the layer Vignette.
Click the Make Comp Size button.
Change the color to black (R=0, G=0, B=0).
Click OK.

Select the Ellipse tool (
 ), hidden beneath the Rectangle tool (
 ) in the Tools panel, and then double-click the Ellipse tool to add an elliptical mask that is automatically sized to fit the layer.
In the Timeline panel, select the Vignette layer, and press the M key twice to reveal the mask properties. Change the Mask Mode to Subtract, and change the Mask Feather value to 300 pixels.
Press the T key to reveal the Opacity property, and change its value to 50%.
Hide the properties for all layers.
Preview your movie!
Save the file.
Extra credit
Cloning an object in a scene
You can copy an object, and then use motion tracking to ensure it remains in sync with the rest of the scene. You’ll use the Clone Stamp tool to place a second light on the other side of the door in the background of the Close Shot clip. Cloning in After Effects is similar to cloning in Photoshop, but in After Effects, you can clone across the entire timeline, rather than in a single image.
Press the Home key or move the current-time indicator to the beginning of the time ruler.
Double-click the lower Final Effect layer in the Timeline panel to open the Final Effect composition.
You want to make the change to the copy of the composition that is not blurred.
Double-click the Close Shot layer in the Timeline panel to open it in the Layer panel.
You can paint only on individual layers—not on the composition as a whole.
Select the Clone Stamp tool in the Tools panel.
The Clone Stamp tool samples the pixels on a source layer and applies the sampled pixels to a target layer; the target layer can be the same layer or a different layer in the same composition.
When you select the Clone Stamp tool, After Effects adds the Brushes and Paint panels to the stack.
Open the Brushes panel and enlarge it if necessary. Then change the Diameter to 10 pixels and the Hardness value to 60%.
Enlarge the Paint panel. Make sure the Mode is set to Normal and the Duration to Constant. The source should be set to Current Layer. Select Aligned and Lock Source Time, and make sure the Source Time is set to 0 frames.

The Constant setting applies the Clone Stamp effect from the current time forward. Because you’re starting at the beginning of the timeline, the changes you make will affect every frame in the layer.
When Aligned is selected in the Paint panel, the position of the sample point—the clone position—changes for subsequent strokes to match the movement of the Clone Stamp tool in the target Layer panel so you can use multiple strokes to paint the entire cloned object. The Lock Source Time option lets you clone a single source frame.
In the Layer panel, position the cursor at the top of the lamp. Alt-click (Windows) or Option-click (macOS) to designate a source point for cloning.
Click next to the left side of the door, and then click and drag to clone the light. Be careful not to clone part of the door in the process. If you make a mistake, undo and start over with a new source point.
![]() Tip
Tip
If you make a mistake, just press Ctrl+Z (Windows) or Command+Z (macOS) to undo the stroke, and then try again.
When the second light is in place, scrub through the clip. The cloned light remains stationary while the rest of the scene moves; it isn’t in sync with the side of the building. You’ll use tracking data to fix the problem.
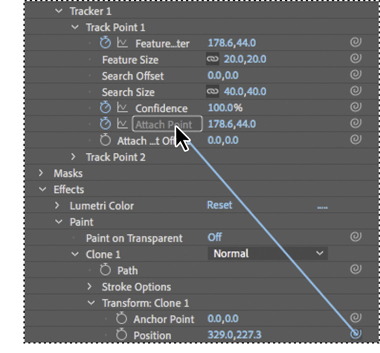
In the Timeline panel, expand the properties for the Close Shot layer, and then expand the Motion Trackers, Tracker 1, and Track Point 1 properties. Then, still in the Close Shot layer, expand the Effects, Paint, Clone 1, and Transform Clone 1 properties.
Drag the pick whip for the Transform Clone 1 Position property to the Track Point 1: Attach Point property, and release it. (You may need to enlarge the Timeline panel to see both properties at once.)
The expression you created ties the position of the cloned light to the tracking data you created for the clip earlier in the lesson. The light will travel with the image. But it may be in the wrong place. You can correct its relationship to the door by adjusting its anchor point.
Adjust the Transform: Clone 1: Anchor Point property until the light is positioned next to the door.
You might need to zoom out to see where the light is while adjusting the anchor point values. Your values will probably be different from ours.
Scrub through the clip to verify that the light is positioned properly. When you’re satisfied that it is, close the Close Shot tab in the Layer panel and the Final Effect composition tab in the Timeline panel. Preview the entire composition to see your work.
Choose File > Save to save your work.
Review questions
1 What’s the difference between color correction and color grading?
2 How can you key out a background in After Effects?
3 When would you use the mask tracker?
Review answers
1 Color correction is performed to correct errors in white balance and exposure or to ensure color consistency from one shot to another. Color grading is more subjective; its goals are to optimize the source material, to focus attention on a key element in the shot, or to create a color palette to match the visual look the director prefers.
2 There are multiple options in After Effects for keying out a background. In this lesson, you used Keylight (1.2) and the Color Range effect to key out the background so that you could replace it with another.
3 Use the mask tracker when you need to track a mask that does not change shape, but that does change position, scale, or rotation through a clip. For example, you can use it to track a person in an action shot, a wheel, or an area of the sky.