14. Advanced Editing Techniques
Lesson overview
In this lesson, you’ll learn how to do the following:
Stabilize a shaky camera shot.
Use single-point motion tracking to track one object in a shot to another object in a shot.
Remove unwanted objects from video using content-aware fill.
Create a particle system.
Use the Timewarp effect to create slow-motion video.

This lesson will take about two hours to complete. If you haven’t already done so, download the project files for this lesson from adobepress.com/AfterEffectsCIB2022, following the instructions in the Getting Started section under “Accessing the lesson files and Web Edition.”


PROJECT: Special Effects and Editing Techniques
After Effects provides advanced motion stabilization, motion tracking, high-end effects, and other features for the most demanding production environments.
Getting started
In previous lessons, you’ve used many of the essential 2D and 3D tools you need for motion graphics design. But Adobe After Effects also offers motion stabilization, motion tracking, advanced keying tools, distortion effects, the capability to retime footage using the Timewarp effect, support for high dynamic range (HDR) color images, network rendering, and much more. In this lesson, you will learn how to use Warp Stabilizer VFX to stabilize a handheld camera shot, how to track one object to another in an image so that their motion is synchronized, and how to remove unwanted objects using content-aware fill. Finally, you will explore two of the high-end digital effects available in After Effects: a particle system generator and the Timewarp effect.
This lesson includes multiple projects. Take a peek at all of them before beginning.
Make sure the following files are in the Lessons/Lesson14 folder on your hard disk, or download them from adobepress.com now:
In the Assets folder: cat.psd, koala.mov, snowday.mov, spinning_dog.mov, ticktock.mov
In the Sample_Movies folder: Lesson14_Content-Aware.mp4, Lesson14_Particles.mp4, Lesson14_Stabilize.mp4, Lesson14_Timewarp.mp4, and Lesson14_Tracking.mp4.
Play the sample movies in Windows Movies & TV or QuickTime Player to see the projects you will create in this lesson.
When you’re done, quit Windows Movies & TV or QuickTime Player. You may delete these sample movies from your hard disk if you have limited storage space.
 Note
NoteYou can view these movies all at once or, if you don’t plan to complete these exercises in one session, you can watch each sample movie just before you are ready to complete the associated exercise.
Stabilizing a shot
If you shoot footage using a handheld camera, you will probably end up with shaky shots. Unless this look is intentional, you’ll want to stabilize your shots to eliminate unwanted motion.
Warp Stabilizer VFX in After Effects automatically removes extraneous jitters. When played back, the motion appears smooth, because the layer itself is scaled and moves incrementally to offset the unwanted movement.
Setting up the project
As you start After Effects, restore the default application settings for After Effects. See “Restoring default preferences” on page 3.
Start After Effects, and then immediately hold down Ctrl+Alt+Shift (Windows) or Command+Option+Shift (macOS) to restore default preferences settings. When prompted, click OK to delete your preferences.
Click New Project in the Home window.
After Effects opens to display a new, untitled project.
Choose File > Save As > Save As.
In the Save As dialog box, navigate to the Lessons/Lesson14/Finished_ Projects folder.
Name the project Lesson14_Stabilize.aep, and then click Save.
Creating the composition
You’ll start by importing footage and creating the composition.
Click New Composition From Footage in the Composition panel.
Navigate to the Lessons/Lesson14/Assets folder. Select the snowday.mov file, and click Import or Open.

After Effects creates a new composition named snowday with the same pixel size, aspect ratio, frame rate, and duration of the source clip.
Click the Play button in the Preview panel to preview the footage. Press the spacebar to stop the preview when you’ve seen the whole clip.
This clip was shot with a smartphone camera. A dog runs toward the camera, but the camera moves, too, resulting in an unsteady shot. Before you apply stabilization, you’ll remove the unnecessary section of the video that occurs after the dog leaves the frame.
Move the Work Area End bracket to 5:00.
Choose Composition > Trim Comp To Work Area, and then save the file.
Applying Warp Stabilizer VFX
Warp Stabilizer VFX starts analyzing footage as soon as you apply it. Stabilization is a background process, so you can work on other compositions while it finishes. How long it takes depends on your system. After Effects displays a blue banner while it analyzes the footage and an orange banner while it applies stabilization.
Select the snowday.mov layer in the Timeline panel, and choose Animation > Warp Stabilizer VFX. The blue banner appears immediately.
When Warp Stabilizer VFX has finished stabilizing and the orange banner has disappeared, press the spacebar to preview the changes.
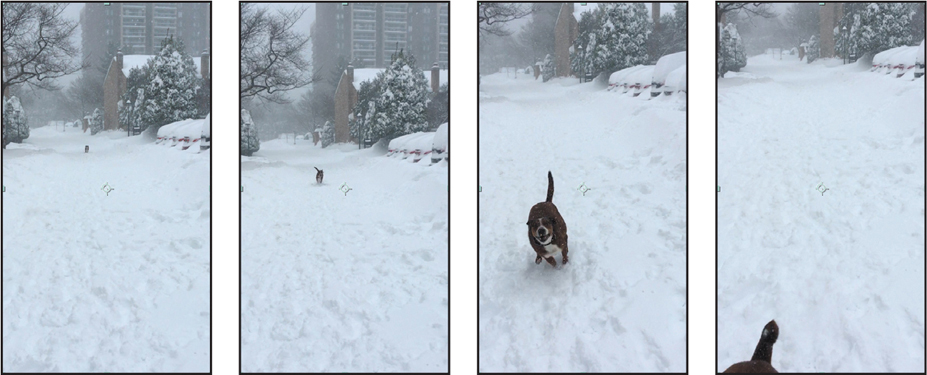
Press the spacebar to stop the preview.
The clip is still shaky, but it’s smoother than it was initially.
Choose Window > Effect Controls to open the Effect Controls panel if it’s not already open.
Warp Stabilizer VFX moved and repositioned the footage using its default settings. To see how it applied changes, view the effects in the Effect Controls panel. For example, the clip’s borders were scaled up (to about 142%) to hide black gaps that occur when the image is repositioned in the stabilization process. You’ll change the Framing setting to see how stabilization affects the image without scaling.
Choose Stabilize Only from the Framing menu in the Effect Controls panel.

Press the spacebar to preview the clip. The border shifts throughout the clip. Press the spacebar again to stop the preview.
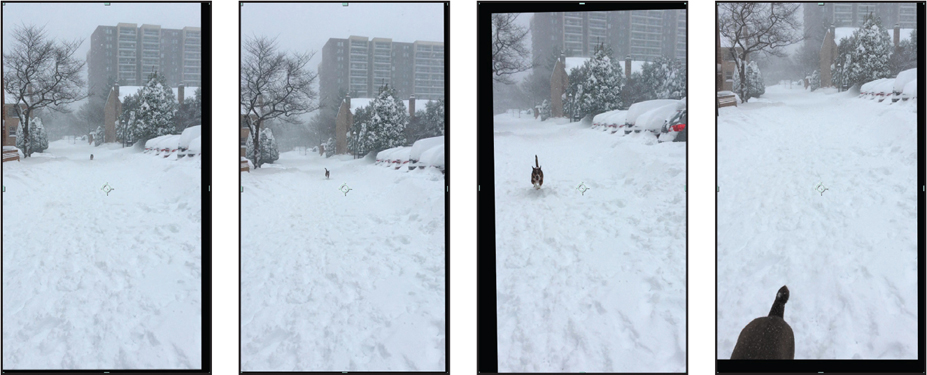
Choose Stabilize, Crop, Auto-Scale from the Framing menu again.
Adjusting the Warp Stabilizer VFX settings
You’ll change the settings in the Effect Controls panel to make the shot smoother.
In the Effect Controls panel, choose No Motion from the Result menu.
With this setting, Warp Stabilizer VFX attempts to lock the camera in position. This requires even more scaling. When No Motion is selected, the Smoothness option is dimmed.
Warp Stabilizer VFX immediately begins stabilizing again. It doesn’t need to analyze the footage, because the initial analysis data is stored in memory.
When the orange banner disappears, preview the changes again. Press the spacebar to stop the playback.
The camera is much steadier. But in order to achieve this effect, Warp Stabilizer VFX had to scale the clip considerably and it warps the clip in some distracting ways. You’ll manually adjust the settings to have more control.
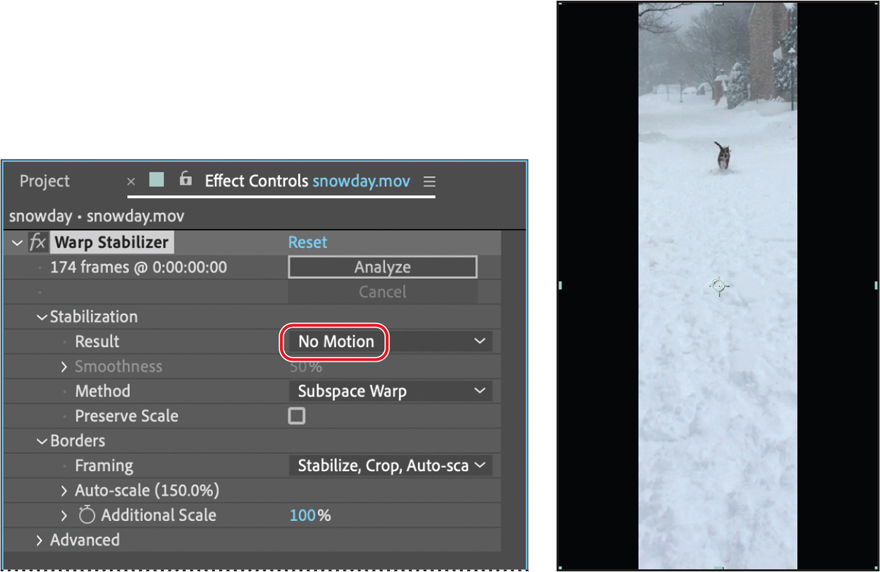
In the Effect Controls panel, choose Smooth Motion from the Result menu. Then increase the Smoothness amount to 100%.

Again, Warp Stabilizer VFX begins stabilizing the image immediately.
When Warp Stabilizer VFX has finished, preview the changes again.
Fine-tuning the results
The default analysis works well most of the time, but sometimes you may need to massage the end results even further. You’ll change the method that Warp Stabilizer VFX uses for an even smoother result.
In the Effect Controls panel, choose Position from the Method menu.
 Note
NoteScaling a video layer up degrades the image. Scale only as much as you need to in order to hide black gaps that appear from stabilization.
Choose Stabilize, Crop from the Framing menu, and then increase the Additional Scale to 155%.

Preview the changes one more time, and press the spacebar to stop the playback when you’re done.

Choose File > Save to save your work, and then choose File > Close Project.
As you have discovered, stabilizing a shot can have drawbacks. To compensate for the movement or rotation data applied to the layer, the frames must be scaled, which could ultimately degrade the footage. However, if you must use a shaky shot in your production, this may be the best compromise.
Using single-point motion tracking
When productions incorporate digital elements into final shots, compositors need an easy way to synchronize computer-generated effects with film or video backgrounds. After Effects lets you do this with the capability to follow, or track, a defined area in the shot, and to apply that movement to other layers. These layers can contain text, effects, images, or other footage. The resulting visual effect precisely matches the original moving footage.
When you track motion in an After Effects composition that contains multiple layers, the default tracking type is Transform. This type of motion tracking tracks position and/or rotation to apply to another layer. When tracking position, this option creates one track point and generates Position keyframes. When tracking rotation, this option creates two track points and produces Rotation keyframes.
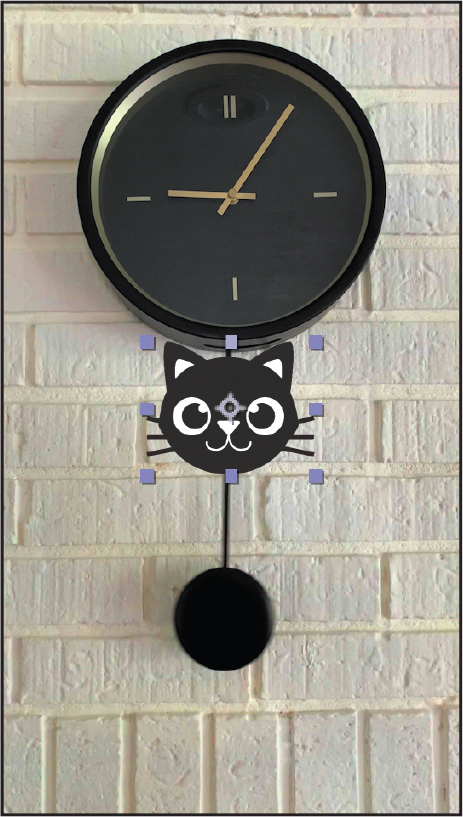
In this exercise, you will track an object layer (the cat face) to the pendulum weight as it swings. This will be a little challenging, as there aren’t distinctive characteristics within the pendulum weight itself.
Setting up the project
If you’ve just completed the first project, and After Effects is open, skip to step 3. Otherwise, restore the default application settings for After Effects. See “Restoring default preferences” on page 3. You’ll start by importing assets and creating the composition.
Start After Effects, and then immediately hold down Ctrl+Alt+Shift (Windows) or Command+Option+Shift (macOS) to restore default preferences settings. When prompted, click OK to delete your preferences.
Click New Project in the Home window.
After Effects opens to display a new, untitled project.
Choose File > Save As > Save As.
In the Save As dialog box, navigate to the Lessons/Lesson14/Finished_ Projects folder.
Name the project Lesson14_Tracking.aep, and then click Save.
Click New Composition From Footage in the Composition panel.
Navigate to the Lessons/Lesson14/Assets folder. Select the ticktock.mov file, and click Import or Open.


After Effects creates a new composition named ticktock with the same pixel size, aspect ratio, frame rate, and duration of the source clip.
Click the Play button in the Preview panel to preview the footage. Press the spacebar to stop the preview when you’ve seen the whole clip.
Double-click an empty area of the Project panel to open the Import File dialog box, and then navigate to the Lessons/Lesson14/Assets folder.
Select the cat.psd file, and then click Import or Open.
Drag the cat.psd file into the Timeline panel, and place it at the top of the layer stack.
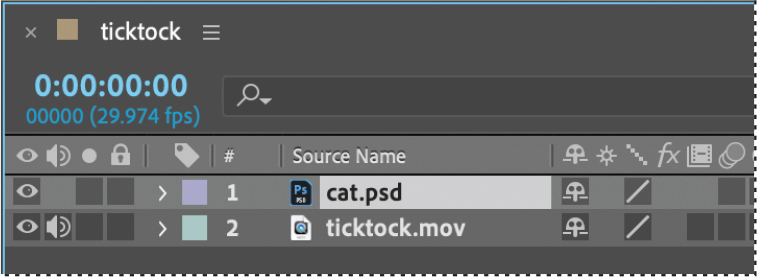

In the Timeline panel, select the cat.psd layer and press S to reveal the Scale property. Change the Scale value to 50%.

Positioning the track point
After Effects tracks motion by matching pixels from a selected area in a frame to pixels in each succeeding frame. You create track points to specify the area to track. A track point contains a feature region, a search region, and an attach point. After Effects displays the track point in the Layer panel as it tracks.
You will track the pendulum by placing tracking regions around the area that you’ll track another layer to. The key to successful tracking is to position the feature region over an area with distinct characteristics. The cat layer is above the ticktock layer in the composition, so you are ready to position the track point.
Press the Home key or move the current-time indicator to the beginning of the time ruler.
Select the ticktock layer, and choose Animation > Track Motion. The Tracker panel opens; increase its size if you can’t see all the options.
After Effects opens the selected layer in the Layer panel. The Track Point 1 indicator is in the center of the image.


Notice the settings in the Tracker panel: ticktock.mov is selected in the Motion Source menu. The Current Track is Tracker 1, and the Motion Target is cat.psd, because After Effects automatically sets the Motion Target to the layer immediately above the source layer.
Now, you’ll position your track point.
Choose 200% from the Magnification Ratio menu at the bottom of the Composition panel so you can see the track point clearly.
Select the Hand tool (
 ), and shift the image up so you can see both the pendulum weight and the track point. You may also need to resize the Composition panel.
Select the Selection tool (
 ), and then move the Track Point 1 indicator (drag the empty portion of the inner box) in the Composition panel to the top of the pendulum weight, as in the image on the next page.
Enlarge the search region (the outer box) to encompass the entire pendulum weight and part of the leader.

Analyzing and applying tracking
Now that the search and feature regions are defined, you can apply the tracker.

The tracking analysis may take quite a while. The larger the search and feature regions, the longer After Effects takes to analyze tracking.
Click the Analyze Forward button (
 ) in the Tracker panel. Watch the analysis to ensure the track point stays with the pendulum. If it doesn’t, press the spacebar to stop the analysis, and reposition the feature region. (See the sidebar “Checking for drift.”)
When the analysis is complete, click the Apply button.


In the Motion Tracker Apply Options dialog box, click OK to apply the tracking to the x and y dimensions.
The motion-tracking data is added to the Timeline panel, where you can see that the track data is in the ticktock layer, but the results are applied to the Position property of the cat layer.
Choose Fit from the Magnification Ratio menu in the Composition panel, and resize it if you enlarged it earlier. The Composition panel should be active again.
Go to the beginning of the time ruler, and preview the movie.
The cat head moves with the pendulum, but it’s too high. You want it to cover the pendulum weight. You’ll adjust the cat layer’s anchor point.
Select the cat layer in the Timeline panel, and then select the Pan Behind (
 ) tool in the Tools panel.
Drag the anchor point to the middle of the cat’s forehead.
Select the Selection tool (
 ), and move the cat’s head so it covers the pendulum weight.
Preview the movie again. The cat’s head covers the pendulum weight as it swings. Where the anchor point should be depends on the precise location of your track point. If the head doesn’t cover the weight as it swings, undo steps 7 and 8, and reposition the anchor point.

Hide the properties for both layers in the Timeline panel, choose File > Save, and then choose File > Close Project.
Removing unwanted objects
It can be frustrating and tedious to remove unwanted objects from video, especially if the object moves between frames. The Content-Aware Fill feature in After Effects makes it possible to remove distractions such as microphones or other filming equipment, incongruous landscape elements, or even people. The feature removes the area you select, and then it analyzes frames over time to synthesize new pixels from other frames. You can adjust settings in the Content-Aware Fill panel to help the new fill blend seamlessly with the rest of the image. For information about the options available in the panel and techniques to use for different types of video, see After Effects Help.
You’ll remove a bolt from the tree in a video of a koala so that the koala’s environment appears to be a more natural setting. If you haven’t already watched the sample movie for this exercise, do so now.
Setting up the project
Start by launching After Effects and creating a new project.
If it’s not already open, start After Effects, and then immediately hold down Ctrl+Alt+Shift (Windows) or Command+Option+Shift (macOS) to restore default preferences settings. When prompted, click OK to delete your preferences, and click New Project in the Home window.
After Effects opens to display an empty, untitled project.
Choose File > Save As > Save As.
In the Save As dialog box, navigate to the Lessons/Lesson14/ Finished_Projects folder.
Name the project Lesson14_Content-Aware.aep, and then click Save.
Double-click an empty area of the Project panel to open the Import File dialog box, and then navigate to the Lessons/Lesson14/Assets folder.
Select the koala.mov file, and then click Import or Open.
In the Project panel, drag the koala.mov file onto the New Composition button in the Composition panel.
In the Timeline panel, manually preview the footage. Notice the bolt in the tree.
Press the Home key or move the current-time indicator to the beginning of the time ruler.
Creating a mask
You’ll start by identifying the area to be filled. You can use any technique you like to create a transparent area, but for this clip, it’s easiest to create and track a mask.
Zoom in to see the bolt clearly.
Select the koala.mov layer in the Timeline panel. Selecting the layer ensures you’ll draw a mask instead of creating a new shape layer.

Select the Ellipse tool (
 ), hidden behind the Rectangle tool (
 ) in the Tools panel.
Drag an ellipse so that it completely covers and is slightly larger than the bolt.

Choose Subtract from the Mask Mode menu in the Timeline panel.

Right-click or Control-click Mask 1, and choose Track Mask.
After Effects opens the Tracker panel.
In the Tracker panel, select Position from the Method menu. Click the Track Selected Masks Forward button.

Go to the beginning of the time ruler. Press the spacebar to preview the mask. Press the spacebar again to stop preview. If the mask slips from the bolt, adjust it as needed.
Choose File > Save to save your work so far.
Applying Content-Aware Fill
You’re ready to replace the masked area with content-aware fill.
Select the koala.mov layer in the Timeline panel.
Choose Window > Content-Aware Fill. After Effects open the Content-Aware Fill panel in the panel dock.
In the Content-Aware Fill panel, do the following:

Set Alpha Expansion to 10.
Choose Object from the Fill Method menu.
Choose Entire Duration from the Range menu.
The Alpha Expansion setting increases the size of the area to fill. Content-Aware Fill often performs better when the selected area includes pixels outside the object you’re removing. The Fill Method determines how the feature samples pixels and accommodates motion in the video. Range determines whether the fill layer is rendered for only the work area or for the entire composition.
Click Generate Fill Layer.
After Effects analyzes each frame and fills the transparent area. It places the sequence of images it analyzed in a Fill layer in the Timeline panel, with the name including the number of images in that sequence.
Deselect all layers, and choose Fit from the Magnification Ratio menu so you can see the full video.
Move the current-time indicator to the beginning of the timeline, and preview the movie to see the results of the fill.

When you’re done watching the preview, press the spacebar to stop playback.
Hide the layer properties to keep the Timeline panel neat, and choose File > Save to save your work.
Choose File > Close Project.
Creating a particle simulation
After Effects includes several effects that do an excellent job of creating particle simulations. Two of them—CC Particle Systems II and CC Particle World—are based on the same engine. The major difference between the two is that Particle World enables you to move the particles in 3D space rather than in a 2D layer.
In this exercise, you’ll learn how to use the CC Particle Systems II effect to create a supernova that could be used as the opening of a science program or as a motion background. If you haven’t already watched the sample movie for this exercise, do so now before continuing.
Setting up the project
Start by launching After Effects and creating a new composition.
If it’s not already open, start After Effects, and then immediately hold down Ctrl+Alt+Shift (Windows) or Command+Option+Shift (macOS) to restore default preferences settings. When prompted, click OK to delete your preferences, and click New Project in the Home window.
After Effects opens to display an empty, untitled project.
Choose File > Save As > Save As.
In the Save As dialog box, navigate to the Lessons/Lesson14/ Finished_Projects folder.
Name the project Lesson14_Particles.aep, and then click Save.
You don’t need to import any footage items for this exercise. However, you do need to create the composition.
Click New Composition in the Composition panel.
In the Composition Settings dialog box, do the following, and then click OK:
Type Supernova in the Composition Name field.
Choose HDTV 1080 29.97 from the Preset pop-up menu.
Set the Duration to 10:00.

Creating a particle system
You will build the particle system from a solid layer, so you’ll create that next.
Choose Layer > New > Solid to create a new solid layer.
In the Solid Settings dialog box, type Particles in the Name box.
Click Make Comp Size to make the layer the same size as the composition. Then click OK.

With the Particles layer selected in the Timeline panel, choose Effect > Simulation > CC Particle Systems II.
Go to 4:00 to see the particle system.

A large stream of yellow particles appears in the Composition panel.
Customizing the particle effect
You will turn this stream of particles into a supernova by customizing the settings in the Effect Controls panel.
If the Effect Controls panel isn’t open, choose Window > Effect Controls to open it.
Expand the Physics property group in the Effect Controls panel. The Explosive Animation setting works fine for this project, but instead of the particles falling down, you want them to flow out in all directions, so change the Gravity value to 0.0.

Hide the Physics property group, and expand the Particle property group. Then choose Faded Sphere from the Particle Type menu.
Now the particles look intergalactic. Don’t stop there, though.
Change the Death Size to 1.50, and increase the Size Variation to 100%.
This allows the particles to change birth size randomly.
Reduce the Max Opacity to 55% to make the particles semitransparent.

Click the Birth Color swatch, and change the color to R=255, G=200, B=50 to give the particles a yellow hue at birth.
Click the Death Color swatch, and change the color to R=180, G=180, B=180 to give the particles a light gray hue as they fade out.

 Note
NoteEven though they’re at the top of the Effect Controls panel, it is often easier to adjust the Longevity and Birth Rate settings after you have set the other particle properties.
To keep the particles from staying onscreen too long, decrease the Longevity value to 0.8 seconds.

The Faded Sphere particle type softens the look, but the particle shapes are still too sharply defined. You will fix that by blurring the layer to blend the particles with one another.
Hide the CC Particle Systems II effect properties.
Choose Effect > Blur & Sharpen > Gaussian Blur.
In the Gaussian Blur area of the Effect Controls panel, increase the Blurriness value to 10. Then select Repeat Edge Pixels to keep the particles from being cropped at the edge of the frame.

Creating the sun
You will now create a bright halo of light that will go behind the particles.
Go to 7:00.
Press Ctrl+Y (Windows) or Command+Y (macOS) to create a new solid layer.
In the Solid Settings dialog box, do the following:
Type Sun in the Name box.
Click Make Comp Size to make the layer the same size as the composition.
Click the color swatch, and make the layer the same yellow as the Birth Color of the particles (R=255, G=200, B=50).
Click OK to close the Solid Settings dialog box.

Drag the Sun layer below the Particles layer in the Timeline panel.
Select the Ellipse tool (
 ), which may be hidden behind the Rectangle tool (
 ) in the Tools panel, and Shift-drag in the Composition panel to draw a circle with a radius of roughly 100 pixels, or one-fourth the width of the composition. You’ve created a mask.
Using the Selection tool (
 ), click the mask shape and then drag it to the center of the Composition panel.
With the Sun layer selected in the Timeline panel, press the F key to reveal its Mask Feather property. Increase the Mask Feather amount to 100, 100 pixels.

Press Alt+[ (Windows) or Option+[ (macOS) to set the In point of the layer to the current time.

Hide the properties for the Sun layer.
Lighting the darkness
Since the sun is bright, it should illuminate the surrounding darkness.
Make sure the current-time indicator is still at 7:00.
Press Ctrl+Y (Windows) or Command+Y (macOS) to create a new solid layer.
In the Solid Settings dialog box, name the layer Background, click the Make Comp Size button to make the layer the same size as the composition, and then click OK to create the layer.
In the Timeline panel, drag the Background layer to the bottom position in the layer stack.
With the Background layer selected in the Timeline panel, choose Effect > Generate > Gradient Ramp.

The Gradient Ramp effect creates a color gradient, blending it with the original image. You can create linear ramps or radial ramps, and vary the position and colors of the ramp over time. Use the Start Of Ramp and End Of Ramp settings to specify the start and end positions. Use the Ramp Scatter setting to disperse the ramp colors and eliminate banding.
In the Gradient Ramp area of the Effect Controls panel, do the following:
Change Start Of Ramp to 960, 538 and End Of Ramp to 360, 525.
Choose Radial Ramp from the Ramp Shape menu.
Click the Start Color swatch, and set the start color to dark blue (R=0, G=25, B=135).
Set the End Color to black (R=0, G=0, B=0).

Press Alt+[ (Windows) or Option+[ (macOS) to set the In point of the layer to the current time.
Adding a lens flare
To tie all the elements together, you’ll add a lens flare to simulate an explosion.
Press the Home key or move the current-time indicator to the beginning of the time ruler.
Press Ctrl+Y (Windows) or Command+Y (macOS) to create a new solid layer.
In the Solid Settings dialog box, name the layer Nova, click the Make Comp Size button to make the layer the same size as the composition, set the Color to black (R=0, G=0, B=0), and then click OK.
Drag the Nova layer to the top of the layer stack in the Timeline panel. Then, with the Nova layer selected, choose Effect > Generate > Lens Flare.

In the Lens Flare area of the Effect Controls panel, do the following:
Change Flare Center to 960, 538.
Make sure 50–300mm Zoom is selected in the Lens Type menu.
Decrease Flare Brightness to 0%, and then click the Flare Brightness stopwatch icon (
 ) to create an initial keyframe.
Go to 0:10.
Increase the Flare Brightness to 240%.
Go to 1:04, and decrease the Flare Brightness to 100%.

With the Nova layer selected in the Timeline panel, press the U key to see the animated Lens Flare property.
Right-click or Control-click the ending Flare Brightness keyframe, and choose Keyframe Assistant > Easy Ease In.
Right-click or Control-click the beginning Flare Brightness keyframe, and choose Keyframe Assistant > Easy Ease Out.

Finally, you need to make the layers under the Nova layer visible in the composition.
Press F2 to deselect all layers, and choose Columns > Modes from the Timeline panel menu. Then choose Screen from the Mode menu for the Nova layer.

Preview the movie. When you’re done, press the spacebar to stop the preview.
Choose File > Save, and then choose File > Close Project.
Retiming playback using the Timewarp effect
The Timewarp effect in After Effects gives you precise control over a wide range of parameters when changing the playback speed of a layer, including interpolation methods, motion blur, and source cropping to eliminate unwanted artifacts.
In this exercise, you will use the Timewarp effect to change the speed of a clip, slowing it down and speeding it up at different points. If you haven’t already watched the sample movie for this exercise, do so now.
Setting up the project
Start by launching After Effects and creating a new project.
If After Effects isn’t open, start it, and then immediately hold down Ctrl+Alt+Shift (Windows) or Command+Option+Shift (macOS) to restore default preferences settings. When prompted, click OK to delete your preferences, and click New Project in the Home window.
After Effects opens to display an empty, untitled project.
Choose File > Save As > Save As.
In the Save As dialog box, navigate to the Lessons/Lesson14/ Finished_Projects folder.
Name the project Lesson14_Timewarp.aep, and then click Save.
Click New Composition From Footage in the Composition panel. Then navigate to the Lessons/Lesson14/Assets folder on your hard disk, select the spinning_dog.mov file, and click Import or Open.
After Effects creates a new composition named for the source file, and displays it in the Composition and Timeline panels.
Choose File > Save to save the project.
Using Timewarp
In the source footage, a dog spins as she moves from room to room. At around 4 seconds, you’ll slow the motion down to 10%, and then ramp up to twice the original speed before slowing back to full speed at the end of the clip.
With the spinning_dog.mov layer selected in the Timeline panel, choose Effect > Time > Timewarp.
If the Effect Controls panel isn’t open, choose Window > Effect Controls.
In the Timewarp area of the Effect Controls panel, make sure Pixel Motion is selected in the Method menu and Speed is selected in the Adjust Time By menu.

With Pixel Motion selected, Timewarp creates new frames by analyzing the pixel movement in nearby frames and creating motion vectors. The Speed option controls the time adjustment by percentage rather than by a specific frame.
Go to 2:00.
In the Effect Controls panel, set the Speed to 100, and click the stopwatch icon (
 ) to set a keyframe.
The Timewarp effect will keep the speed of the clip at 100% until the 2-second mark.
With the spinning_dog.mov layer selected in the Timeline panel, press the U key to see the animated Timewarp Speed property.
Go to 5:00, and set the Speed to 10. After Effects adds a keyframe.

Go to 7:00, and set the Speed to 100. After Effects adds a keyframe.

Go to 9:00, and set the Speed to 200. After Effects adds a keyframe.

Go to 11:00, and set the Speed to 100. After Effects adds a keyframe.

Press the Home key or move the current-time indicator to the beginning of the time ruler, and then press the spacebar to watch a preview of the effect.
 Note
NoteBe patient. The first time through, After Effects is caching information in RAM. The second time it plays, playback will be more accurate.
The speed adjustments are rather abrupt—not the smooth, slow-motion curve you would expect to see in a professional effect. This is because the keyframes are linear instead of curved. You’ll fix that next.
Press the spacebar to stop playback when you’re ready.
Click the Graph Editor button in the Timeline panel to display the Graph Editor instead of the layer bars. Make sure the Speed property name for the spinning_dog layer is selected. The Graph Editor displays its graph.

Click to select the first Speed keyframe (at 2:00), and then click the Easy Ease icon (
 ) at the bottom of the Graph Editor.
 Note
NoteIf you click the Speed property a second time, all the keyframes are selected and changes you make to one affect all of them.
 Tip
TipClose columns in the Timeline panel to see more icons in the Graph Editor. You can also apply an Easy Ease adjustment by pressing the F9 key.

This adjusts the influence into and out of the keyframe to smooth out sudden changes.
Repeat step 14 for the other Speed keyframes in the motion graph, at 5:00, 7:00, 9:00, and 11:00.
 Tip
TipYou can tweak a motion graph by dragging the Bezier handles. You used Bezier handles in Lesson 7, “Working with Masks.”
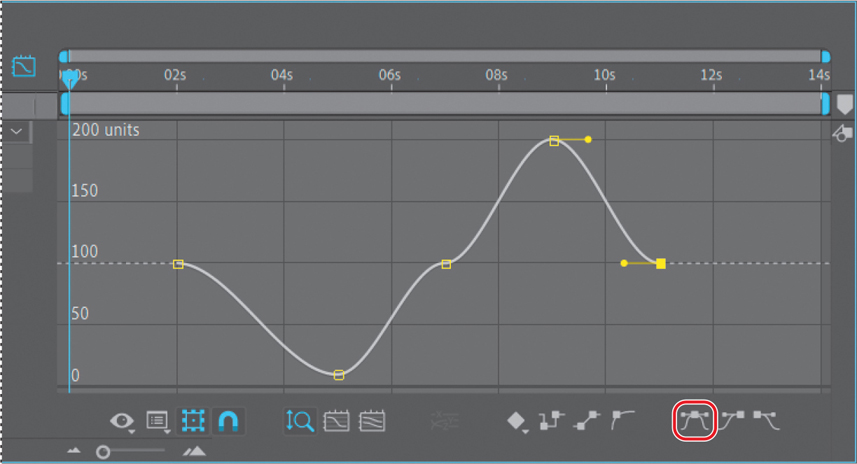
Preview the movie again. This time, the slow-motion Timewarp effect transitions are smoother.


Choose File > Save to save the project, and then choose File > Close Project.
You’ve now experimented with some of the advanced features in After Effects, including motion stabilization, motion tracking, particle systems, content-aware fill, and the Timewarp effect. To render and export any or all of the projects you completed in this lesson, see Lesson 15, “Rendering and Outputting,” for instructions.
Review answers
1 Shooting footage using a handheld camera typically results in shaky shots. Unless this look is intentional, you will want to stabilize the shots to eliminate unwanted motion. Warp Stabilizer VFX in After Effects analyzes the movement and rotation of the target layer, and then makes adjustments to it. When played back, the motion appears smooth, because the layer itself moves incrementally to offset the unwanted motion. You can change the way Warp Stabilizer VFX crops, scales, and performs other adjustments by modifying settings for the effect.
2 Drifting occurs when the feature region loses the feature that’s being tracked. As an image moves in a shot, the lighting, surrounding objects, and angle of the object can change, making a once-distinct feature unidentifiable at the subpixel level. Even with careful planning and practice, the feature region often drifts away from the desired feature. Readjusting the feature and search regions, changing the tracking options, and trying again are all standard procedures in digital tracking.
3 The birth rate in a particle effect determines how often new particles are created.
4 The Timewarp effect gives you precise control over a wide range of parameters to change the playback speed of a layer, including interpolation methods, motion blur, and source cropping to eliminate unwanted artifacts.
