
4. Animating Symbols
Lesson Overview
• Animate the position, scale, and rotation of objects
• Adjust the pacing and timing of your animation
• Animate transparency and special effects
• Change the path of an object’s motion
• Create nested animation
• Split a motion tween
• Change the easing of an object’s motion
• Animate in 3D space
• Animate camera moves with the Camera tool
This lesson will take approximately 2 hours to complete. Download the project files for this lesson from the Registered Products tab on your Account page at www.peachpit.com (click the Access Bonus Content link) and store them on your computer in a convenient location, as described in the Getting Started section of this book. Your Account page is also where you’ll find any updates to the lessons or to the lesson files.

Use Adobe Animate CC to change almost any aspect of an object—position, color, transparency, size, rotation, and more—over time. Motion tweening is the basic technique of creating animation with symbol instances.
Getting Started
Start by viewing the finished movie file to see the animated title page that you’ll create in this lesson.
1. Double-click the 04End.html file in the Lesson04/04End folder to play the animation in a browser.

![]() Note
Note
If you have not already downloaded the project files for this lesson to your computer from your Account page, make sure to do so now. See Getting Started at the beginning of the book.
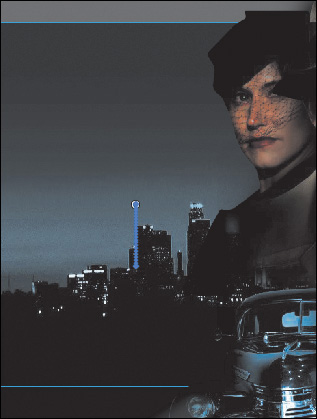
The project is an animated splash page for an imaginary soon-to-be-released motion picture. In this lesson, you’ll use motion tweens to animate several components on the page: the cityscape, the main actors, several old-fashioned cars, and the main title.
2. Close the 04End.html file.
3. Double-click the 04Start.fla file in the Lesson04/04Start folder to open the initial project file in Animate. This file is an ActionScript 3.0 document that is partially completed and already contains many of the graphic elements imported into the library for you to use.
4. From the view options above the Stage, choose Fit In Window, or View > Magnification > Fit In Window, so that you can see the entire Stage on your computer screen.
5. Choose File > Save As. Name the file 04_workingcopy.fla, and save it in the 04Start folder.
Saving a working copy ensures that the original start file will be available if you want to start over.
About Animation
Animation is the movement, or change, of objects through time. Animation can be as simple as moving a box across the Stage from one frame to the next. It can also be much more complex. As you’ll see in this lesson, you can animate many different aspects of a single object. You can change an object’s position on the Stage, change its color or transparency, change its size or rotation, or animate the special filters that you saw in the previous lesson. You also have control over an object’s path of motion, and even its easing, which is the way an object accelerates or decelerates.
In Animate, the basic workflow for animation goes like this: Select an object on the Stage, right-click, and choose Create Motion Tween from the context menu. Move the red playhead to a different point in time and move the object to a new position or change one of its properties. Animate takes care of the rest.
Motion tweens create animation for changes in position on the Stage and for changes in size, color, or other attributes. Motion tweens require you to use a symbol instance. If the object you’ve selected is not a symbol instance, Animate will automatically ask to convert the selection to a symbol.
Animate also automatically separates motion tweens on their own layers, which are called tween layers. There can be only one motion tween per layer without any other element in the layer. Tween layers allow you to change various attributes of your instance at different key points over time. For example, a spaceship could be on the left side of the Stage at the beginning keyframe and at the far-right side of the Stage at an ending keyframe, and the resulting tween would make the spaceship fly across the Stage.
The term “tween” comes from the world of classic animation. Senior animators would be responsible for drawing the beginning and ending poses for their characters. The beginning and ending poses were the keyframes of the animation. Junior animators would then come in and draw the “in-between” frames, or do the “in-betweening.” Hence, “tweening” refers to the smooth transitions between keyframes.
Understanding the Project File
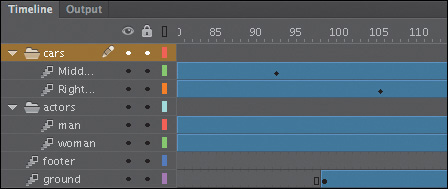
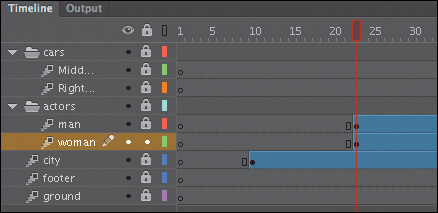
The 04Start.fla file contains a few of the animated elements already or partially completed. Each of the six layers—man, woman, Middle_car, Right_car, footer, and ground—contains an animation. The man and woman layers are in a folder called actors, and the Middle_car and Right_car layers are in a folder called cars.
You’ll be adding more layers to create an animated cityscape, refining the animation of one of the actors, as well as adding a third car and a 3D title. All the necessary graphic elements have been imported into the library. The Stage is set at a generous 1280 pixels by 787 pixels, and the Stage color is black. You might need to choose a different view option to see the entire Stage. Choose View > Magnification > Fit In Window, or choose Fit In Window from the view options at the upper-right corner of the Stage, to view the Stage at a magnification percentage that fits your screen.

Animating Position
You’ll start this project by animating the cityscape. It will begin slightly lower than the top edge of the Stage, and then rise slowly until its top is aligned with the top of the Stage.
1. Lock all the existing layers so you don’t accidentally modify them. Create a new layer above the footer layer and rename it city.

2. Drag the bitmap image called cityBG.jpg from the bitmaps folder in the Library panel to the Stage.
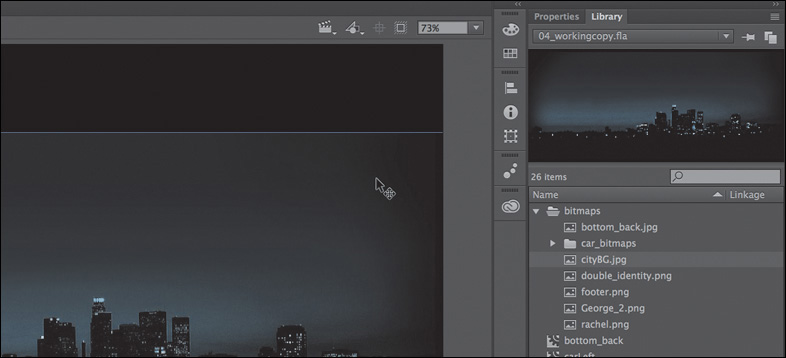
3. In the Properties panel, set the value of X to 0 and the value of Y to 90.

This positions the cityscape image just slightly below the top edge of the Stage.
4. Right-click the cityscape image and choose Create Motion Tween or choose Insert > Motion Tween.

5. A dialog box appears warning you that your selected object is not a symbol. Motion tweens require symbols. Animate asks if you want to convert the selection to a symbol so it can proceed with the motion tween. Click OK.

Animate automatically converts your selection to a symbol with the default name Symbol 1, and stores it in your Library panel. Animate also converts the current layer to a tween layer so you can begin to animate the instance. Tween layers are distinguished by a special icon in front of the layer name, and the frames are tinted blue. The range of frames covered by the tween is the tween span. The tween span is represented by all the colored frames from the first keyframe to the last keyframe. Tween layers are reserved for motion tweens, and hence, no drawing is allowed on a tween layer.
6. Move the red playhead to the end of the tween span at frame 191.
7. Select the instance of the cityscape on the Stage, and while holding down the Shift key, move the instance up the Stage.
Holding down the Shift key constrains the movement to right angles.
8. For more precision, set the value of Y to 0 in the Properties panel.
A small black diamond appears in frame 191 at the end of the tween span. This indicates a keyframe at the end of the tween.

Animate smoothly interpolates the change in position from frame 1 to frame 191 and represents that motion with a motion path.
9. Drag the red playhead back and forth at the top of the Timeline to see the smooth motion. You can also choose Control > Play (or press Enter/Return) to make Animate play the animation.
![]() Tip
Tip
Hide all the other layers to isolate the cityscape and to better see the results of the motion tween.
Animating changes in position is simple, because Animate automatically creates keyframes at the points where you move your instance to new positions. If you want to have an object move to many different points, simply move the red playhead to the desired frame, and then move the object to its new position. Animate takes care of the rest.
![]() Tip
Tip
Remove a motion tween by right-clicking the motion tween on the Timeline or the Stage and choosing Remove Tween.
Preview the animation
Integrated into the bottom of the Timeline is a set of playback controls. These controls allow you to play, rewind, or go step-by-step backward or forward through your Timeline to review your animation in a controlled manner. You can also use the playback commands on the Control menu.
1. Click any of the playback buttons on the Controller below the Timeline to go to the first frame, go to the last frame, play, stop, or move forward or backward one frame.
2. Select Loop Option (to the right of the Controller) and then click the Play button.
The playhead loops, allowing you to see the animation over and over for careful analysis.

3. Move the start or end markers in the Timeline header to define the range of frames that you want to see looped.
The playhead loops within the marked frames. Click Loop Option again to turn it off.
Changing the Pacing and Timing
You can change the duration of the entire tween span or change the timing of the animation by dragging keyframes on the Timeline.
Changing the animation duration
If you want the animation to proceed at a slower pace (and thus take up a much longer period of time), you need to lengthen the entire tween span between the beginning and end keyframes. If you want to shorten the animation, you need to decrease the tween span. Lengthen or shorten a motion tween by dragging its ends on the Timeline.
1. Move your mouse pointer close to the end of the tween span in the city layer.

Your pointer’s cursor changes to a double-headed arrow, indicating that you can lengthen or shorten the tween span.
2. Drag the end of the tween span back to frame 60.
Your motion tween shortens to 60 frames, reducing the time it takes the cityscape to move.

3. Move your mouse pointer close to the beginning of the tween span (at frame 1).

4. Drag the beginning of the frame span forward to frame 10.
Your motion tween begins at an earlier time, so it now plays only from frame 10 to frame 60.

![]() Note
Note
If you have multiple keyframes in a tween, changing the length of the tween span by dragging one end or the other will distribute all your keyframes uniformly. The timing of your entire animation remains the same; only the length changes.
Adding frames
You’ll want the last keyframe of your motion tween to hold for the remainder of the animation. Add frames by Shift-dragging the end of a tween span.
1. Move your mouse cursor close to the end of the tween span.
2. Hold down the Shift key and drag the end of the tween span forward to frame 191.

The last keyframe in the motion tween remains at frame 60, but Animate adds frames through frame 191.

![]() Tip
Tip
You can also add individual frames by choosing Insert > Timeline > Frame (F5), or remove individual frames by choosing Edit > Timeline > Remove Frames (Shift+F5).
Moving keyframes
If you want to change the pacing of an animation, you can select individual keyframes, and then drag the keyframes to new positions.
1. Click the keyframe at frame 60.

The keyframe at frame 60 is selected. A tiny box appears next to your mouse pointer, indicating that you can move the keyframe.
2. Drag the keyframe to frame 40.
The last keyframe in the motion tween moves to frame 40, so the motion of the cityscape proceeds more quickly.

Span-based vs. frame-based selections

Animating Transparency
In the previous lesson, you learned how to change the color effect of any symbol instance to change the transparency, tint, or brightness. You can change the color effect of an instance in one keyframe and change the value of the color effect in another keyframe, and Animate will automatically display a smooth change, just as it does with changes in position.
You’ll change the cityscape in the beginning keyframe to be totally transparent but keep the cityscape in the ending keyframe opaque. Animate will create a smooth fade-in effect.
1. Move the red playhead to the first keyframe of the motion tween (frame 10).
2. Select the cityscape instance on the Stage.
3. In the Properties panel, Color Effect section, choose Alpha from the Style menu.

4. Set the Alpha value to 0%.
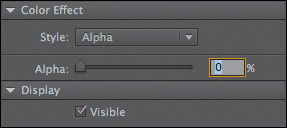
The cityscape instance on the Stage becomes totally transparent.

5. Move the red playhead to the last keyframe of the motion tween (frame 40).
6. Make sure that the cityscape instance on the Stage is still selected.
7. In the Properties panel, in the Color Effect section, set the Alpha value to 100%.
The cityscape instance on the Stage becomes totally opaque.

8. Preview the effect by choosing Control > Play (Enter/Return).
Animate interpolates the changes in both position and transparency between the two keyframes.
Animating Filters
Filters, which give instances special effects such as blurs and drop shadows, can also be animated. You’ll refine the motion tween of the actors next by applying a blur filter to one of them to make it appear as if the camera changes focus. Animating filters is no different from animating changes in position or changes in color effect. You simply set the values for a filter at one keyframe and set different values for the filter at another keyframe, and Animate creates a smooth transition.
1. Make sure that the actors layer folder on the Timeline is visible.
2. Unlock the woman layer.
3. Move the red playhead to the beginning keyframe of the motion tween in the woman layer, at frame 23.
4. Select the instance of the woman on the Stage. You won’t be able to see her because she has an alpha value of 0% (totally transparent). Click the upper-right side of the Stage to select the transparent instance. Or, click the woman layer in the Timeline to highlight it; then click within the outline that appears on the Stage.

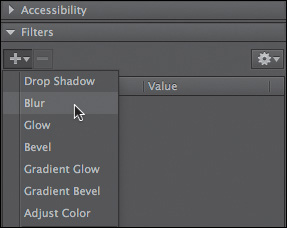
5. In the Properties panel, expand the Filters section.
6. Click the Add Filter button in the Filters section and choose Blur from the menu to add a blur to the instance.
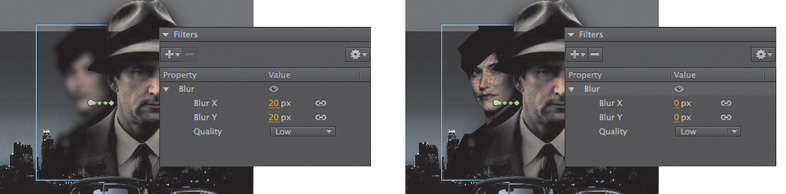
7. In the Filters section of the Properties panel, make sure that the link icons are selected in order to to constrain the blur values to both the x and y directions equally. Set the Blur X and Blur Y values to 20 pixels.

8. Move the red playhead across the entire Timeline to preview the animation.
The woman instance is blurred throughout the motion tween.

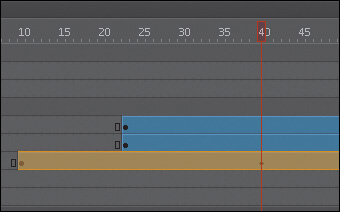
9. Right-click the woman layer at frame 140, and choose Insert Keyframe > Filter.

Animate establishes a keyframe for filters at frame 140.
10. Move the red playhead to frame 160, and right-click the woman layer and choose Insert Keyframe > Filter to add another filter keyframe.

11. Select the instance of the woman on the Stage at frame 160.
12. In the Properties panel, change the value of the Blur filter to X=0 and Y=0.
The Blur filter changes from the keyframe at frame 140 to the keyframe at 160. Animate creates a smooth transition from a blurry instance to an in-focus instance.
Understanding property keyframes

Animating Transformations
Now you’ll learn how to animate changes in scale or rotation. These kinds of changes are made with the Free Transform tool or with the Transform panel. You’ll add a third car to the project. The car will start small, and then become larger as it appears to move forward toward the viewer.
1. Lock all the layers on the Timeline.

2. Insert a new layer inside the cars folder and rename it Left_car.
3. Select frame 75 and insert a new keyframe (F6).

4. Drag the movie clip symbol called carLeft from the Library panel to the Stage at frame 75.
5. Select the Free Transform tool.
The transformation handles appear around the instance on the Stage.
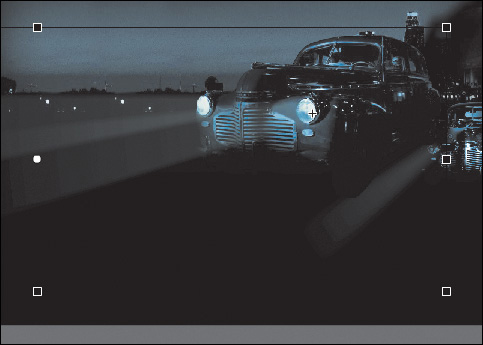
6. While holding down the Shift key, click and drag a corner handle inward to make the car smaller.
7. In the Properties panel, make sure that the width of the graphic is about 400 pixels.
8. Alternatively, you can use the Transform panel (Window > Transform) and change the scale of the car to about 29.4%.
9. Move the car to its starting position at about X=710 and Y=488.

10. In the Properties panel, Color Effect section, choose Alpha from the Style menu.
11. Set the value of the Alpha to 0%.

The car becomes totally transparent.
12. Right-click the car on the Stage and choose Create Motion Tween.
The current layer becomes a tween layer.
13. Move the red playhead on the Timeline to frame 100.

14. Select the transparent instance of the car on the Stage, and in the Properties panel, change the Alpha value to 100%.
A new keyframe is automatically inserted at frame 100 to indicate the change in transparency.
15. While holding down the Shift key, drag a corner handle outward to make the car larger. For more precision, use the Properties panel and set the dimensions of the car to width=1380 pixels and height=445.05 pixels.
![]() Tip
Tip
Holding down the Alt/Option key while dragging one corner handle of the bounding box causes the box to resize relative to the opposite corner rather than relative to the object’s transformation point (usually the center).
16. Position the car at X=607 and Y=545.

You have used Animate to tween the change in position and the change in scale as well as the change in transparency from frame 75 to frame 100.
17. Move the Left_car layer in between the Middle_car and Right_car layers so that the car in the center overlaps the cars on the side.

Save your progress so far in this document 04_workingcopy.fla. In the next section, you’ll work with a different file.
Motion presets
1. Create your transition using the first slide in your show.
2. Select that slide’s motion tween on the Timeline or the slide’s instance on the Stage.
3. In the Motion Presets panel, click the Save Selection As Preset button at the bottom of the panel. Alternatively, right-click the motion tween and choose Save As Motion Preset.
4. Name your motion preset, and it will be saved in the Motion Presets panel.
5. Select a new instance on the Stage and choose the motion preset.
6. Click Apply, and Animate will apply your saved motion preset to the new instance.

Changing the Path of the Motion
The motion tween of the left car that you just animated shows a colored line with dots indicating the path of the motion. You can edit the path of the motion easily to make the car travel in a curve, or you can move, scale, or rotate the path just like any other object on the Stage.
To better demonstrate how you can edit the path of the motion, open the sample file 04MotionPath.fla in the Lesson04/04Start folder. The file contains a single tween layer with a rocket ship moving from the top left of the Stage toward the bottom right.

Moving the path of the motion
You will move the path of the motion so the relative movement of the rocket ship remains the same but its starting and ending positions change.
1. Select the Selection tool.
2. Click the path of the motion to select it.
The path of the motion becomes highlighted.

3. Drag the motion path to move it to a different place on the Stage.
The relative motion and timing of the animation remain the same, but the starting and ending positions are relocated.

Changing the scale or rotation of the path
You can also manipulate the path of the object’s motion using the Free Transform tool.
1. Select the path of the motion.
2. Select the Free Transform tool.
Transformation handles appear around the path of the motion.

3. Scale or rotate the path of the motion as desired. You can make the path smaller or larger, or rotate the path so the rocket ship starts from the bottom left of the Stage and ends at the top right.

Editing the path of the motion
Making your objects travel on a curved path is a simple matter. You can either edit the path with Bezier precision using anchor point handles, or you can edit the path in a more intuitive manner with the Selection tool.
1. Select the Convert Anchor Point tool, which is hidden under the Pen tool.

2. Click the starting point or the ending point of the motion path on the Stage and drag the control handle out from the anchor point.

The handle on the anchor point controls the curvature of the path.
3. Choose the Subselection tool.
4. Drag the handle at each end of the path to edit its curve. Make the rocket ship travel in a wide curve.
![]() Tip
Tip
You can also directly manipulate the path of the motion with the Selection tool. Select the Selection tool and make sure the path is deselected. Move your pointer close to the path of the motion. A curved icon appears next to your pointer, indicating that you can edit the path. Drag the path of the motion to change its curvature. Choose the spots where you drag carefully! Each drag breaks the path into smaller segments, making it harder to achieve a smooth curve. Mastery will come with practice.

Orienting objects to the path
Sometimes the orientation of the object traveling along the path is important. In the motion picture splash page project, the orientation of the car is constant as it moves forward. However, in the rocket ship example, the rocket ship should follow the path with its nose pointed in the direction in which it is heading. Orient To Path in the Properties panel gives you this option.
1. Select the motion tween on the Timeline (Shift-click to select the whole tween).

2. In the Properties panel, under Rotation, select the Orient To Path option.
Animate inserts keyframes for rotation along the motion tween to orient the nose of the rocket ship to the path of the motion.

![]() Tip
Tip
To direct the nose of the rocket ship, or any other object, along the path of its motion, you must orient its position so that it is facing in the direction that you want it to travel. Use the Free Transform tool to rotate its initial position so that it is oriented correctly.
Swapping Tween Targets
The motion tween model in Animate CC is object based. This means that an object and its motion are independent of each other, and you can easily swap out the target of a motion tween. If, for example, you’d rather see an alien moving around the Stage instead of a rocket ship, you can replace the target of the motion tween with an alien symbol from your Library panel and still preserve the animation.
1. Drag the movie clip symbol of the alien from the Library panel onto the rocket ship.

Animate asks if you want to replace the existing tween target object with a new object.

2. Click OK.
Animate replaces the rocket ship with the alien. The motion remains the same, but the target of the motion tween has changed.

![]() Note
Note
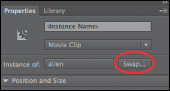
You can also use the Properties panel to swap instances. Select the object that you want to swap on the Stage. In the Properties panel, click the Swap button. In the dialog box that appears, choose a new symbol and click OK. Animate will swap the target of the motion tween.
![]() Note
Note
If your symbol instance disappears from view after the symbol swap, choose View > Magnification > Show All (Ctrl+3/Cmd+3) to change the zoom level to show all objects on the Stage.
Creating Nested Animations
Often, an object that is animated on the Stage will have its own animation. For example, the wings of a butterfly moving across the Stage may flap as it moves. Or the alien that you swapped with the rocket ship could be waving his arms. These kinds of animations are called nested animations, because they are contained inside the movie clip symbols. Movie clip symbols have their own Timeline that is independent of the main Timeline.
In this example, you’ll give the alien his own independent movement, so he can wave as he flies across the Stage.
Creating animations inside movie clip symbols
We’ll animate some of the symbols that make up the alien’s body to allow him to wave.
1. In the Library panel, double-click the alien movie clip symbol icon.
You are now in symbol-editing mode for the alien movie clip symbol. The alien appears in the middle of the Stage. In the Timeline, the parts of the alien are separated in layers.

2. Select the Selection tool.
3. Right-click the alien’s left arm and choose Create Motion Tween.

Animate converts the current layer into a tween layer and inserts 1 second’s worth of frames so you can begin to animate the instance.

4. Select the Free Transform tool.
5. Move the mouse pointer near the corner transformation handle until the cursor changes to the rotation icon. Drag the corner handle near the hand to rotate the arm upward to the alien’s shoulder height.
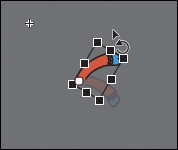
A keyframe is inserted at the end of the motion tween. The left arm rotates smoothly from the resting position to the outstretched position.
6. Move the red playhead back to frame 1.
7. Now create a motion tween for the alien’s other arm. Right-click his right arm and choose Create Motion Tween.
The current layer is converted into a tween layer and 1 second’s worth of frames are inserted.
8. Choose the Free Transform tool if it’s not selected already.

9. As you did for the left arm, drag the corner transformation handle near the right hand to rotate the arm upward to the alien’s shoulder height.
Animate inserts a keyframe at the end of the motion tween. The arm rotates smoothly from the resting position to the outstretched position.
10. Select the last frame in all the other layers and insert frames (F5) so that the head, body, and feet all remain on the Stage for the same amount of time as the moving arms.

11. Click the Scene 1 button in the Edit bar at the top of the Stage to exit symbol-editing mode.
Your animation of the alien raising his arms is complete. Wherever you use the movie clip symbol, the alien’s nested animation will continue to play.
12. Preview the animation by choosing Control > Test.
Animate opens a window showing the exported animation. The alien moves along the motion path while the nested animation of his arms moving plays and loops.

![]() Note
Note
Animations inside of movie clip symbols won’t play on the main Timeline. Choose Control > Test to preview nested animations.
![]() Note
Note
Animations inside movie clip symbols will loop automatically. To prevent the looping, you need to add code to tell the movie clip Timeline to stop on its last frame. You’ll learn to control the Timeline with ActionScript or JavaScript in later lessons.
Graphic Symbols
You’ve been using movie clip symbols for your animation, and you’ve seen how they allow for independent, nested animations. But you can also have nested animations and graphics inside of graphic symbols, although they work a little differently.
An animation inside a graphic symbol doesn’t play independently as it does in a movie clip symbol. It will only play if there are sufficient frames on the main Timeline where the instance is placed. And while you can control the internal playhead of a movie clip’s Timeline with ActionScript, you can control the playhead of a graphic symbol directly in the Properties panel. Because of the ease with which you can pick and choose what frame inside a graphic symbol shows, graphic symbols are ideal for lip syncing or other character variations.
Using the Frame Picker for phonemes
If animated characters talk, their mouth will be synchronized with their words. Each sound, or phoneme, is produced by a different mouth shape. For example, an explosive “p” or “b” sound will be made by closing the lips, or an “o” sound will be made by a rounded open mouth. Animators draw a collection of these mouth positions to be used to synchronize to the soundtrack.
You can store each mouth position as a keyframe in a graphic symbol. Animate’s Frame Picker panel lets you choose the frame in the graphic symbol’s Timeline that matches each sound.
In this task, you’ll animate the alien’s mouth using the Frame Picker.
1. Open the sample file 04FramePicker_start.fla in the Lesson04/04Start folder. The file contains your familiar alien character on the Stage.
The alien is not animated on a path, but his head is a graphic symbol with multiple keyframes inside of its Timeline.

2. Double-click the alien_head graphic symbol in the library.
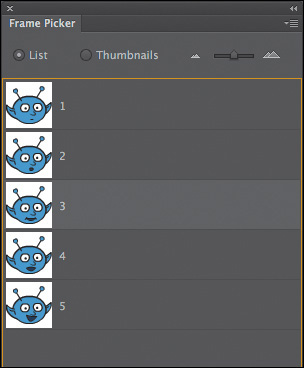
Animate takes you to symbol-editing mode for the alien_head graphic symbol. Notice that the Timeline contains five keyframes in the mouth layer.

3. Examine each keyframe in the mouth layer by advancing the playhead from frame 1 to frame 5.
Each keyframe shows the mouth in a different position. Frame 1 has a small closed mouth, frame 2 a rounded mouth, frame 3 a wide open mouth, and so on.

4. Return to Scene 1 and choose Control > Test.
Animate creates a SWF to play the animation. Nothing happens because there is only a single frame on the main Timeline, and a graphic symbol needs frames on the main Timeline to play its own Timeline.
5. Close the test movie panel and return to your Animate document.
6. Select frames 45 in the head and body layer and choose Insert > Timeline > Frame (F5).
Frames are added to both layers up to frame 45.

7. Choose Control > Play (Enter/Return).
Animate plays the animation. Your alien now can’t stop talking! The graphic symbol plays all of its five keyframes repeatedly during the 45 frames of the main Timeline. The graphic symbol is, by default, set to loop, but you’ll select a single frame to play instead.
8. Select the alien’s head on the Stage and in the Properties panel, Looping section, select Single Frame from the Options menu. Leave the value of the First field at 1.

Now the Stage displays only one frame from the alien_head graphic symbol, which is frame 1.
9. Select frame 10 of the head layer and insert a new keyframe (F6).

10. With the playhead at your new keyframe on frame 10, select the alien head on the Stage. In the Properties panel, Looping section, click Use Frame Picker.

The Frame Picker panel opens. The Frame Picker shows thumbnail images of all the frames inside the graphic symbol.
11. You’ll have the alien mouth the word “hello.” For the first part of the word, select frame 3 in the Frame Picker.
Now, when the animation reaches frame 10 the alien head symbol will switch from displaying frame 1 (the closed mouth) to frame 3 for the beginning of the word, “h”.

12. Insert a new keyframe in frame 12 of the main Timeline.
13. In the Frame Picker, select frame 4.

When the animation plays frame 12, the alien head graphic symbol will change to frame 4. His mouth opens a little wider for the “eh” part of “hello.”

14. Insert a new keyframe in frame 14 of the main Timeline.
15. In the Frame Picker, select frame 2.
When the animation reaches frame 14, the head symbol will switch to displaying frame 2. His mouth is rounded for the “oh” sound.

16. In a new keyframe at frame 17, use the Frame Picker to change the mouth back to frame 1.
17. Finally, in a new keyframe at frame 30, use the Frame Picker to change the mouth to frame 5 so the alien gives us a broad smile.

18. Choose Control > Play (Enter/Return).
Animate plays the animation. Your alien lip syncs “hello,” pauses, and then smiles.
You’re done with this document, so you can save and close it.
![]() Note
Note
If you add frame labels to your graphic symbol’s Timeline, those labels will also appear in the Frame Picker to make it easier to select the frames you want.
Easing
Easing refers to the way in which a motion tween proceeds. You can think of easing as acceleration or deceleration. An object that moves from one side of the Stage to the other side can start off slowly, then build up speed, and then stop suddenly. Or, the object can start off quickly and then gradually slow to a halt. Your keyframes indicate the beginning and end points of the motion, but the easing determines how your object gets from one keyframe to the next.
A simple way to apply easing to a motion tween is to use the Properties panel. Easing values range from –100 to 100. A negative value creates a more gradual change from the starting position (known as an ease-in). A positive value creates a gradual slowdown (known as an ease-out).
A more advanced way of applying easing is to use the new Motion Editor, which you’ll learn about in the next lesson.
Splitting a motion tween
Easing affects the entire span of a motion tween. If you want the easing to affect only frames between keyframes of a longer motion tween, you should split the motion tween. For example, return to the 04_workingcopy.fla file of the cinematic animation. The motion tween of the car in the Left_car layer begins at frame 75 and ends at frame 191, at the very end of the Timeline. However, the actual movement of the car starts at frame 75 and ends at frame 100. You’ll split the motion tween so you can apply an ease to the tween just from frame 75 to frame 100.
1. In the Left_car layer, select frame 101, which is the frame just after the second keyframe where the car ends its movement.

2. Right-click frame 101 and choose Split Motion.

The motion tween is cut into two separate tween spans. The end of the first tween is identical to the beginning of the second tween.

3. In the Middle_car layer, select frame 94, right-click, and choose Split Motion to cut the motion tween into two separate tween spans.
4. In the Right_car layer, select frame 107, right-click, and choose Split Motion to cut the motion tween into two spans.
The motion tweens of all three cars have now been split.

Applying eases to motion tweens
You’ll apply an ease-in to the motion tweens of the approaching cars to give them a sense of weight and and to make them decelerate as real cars would.
1. In the Middle_car layer, select any frame between the first and second keyframes of the first motion tween (frame 70 to frame 93).

2. In the Properties panel, Ease section, enter 100 for the Ease value.

This applies an ease-out to the motion tween.
3. In the Left_car layer, select any frame between the first and second keyframes of the first motion tween (frame 75 to frame 100).

4. In the Properties panel, enter 100 for the Ease value to apply an ease-out to the motion tween.
5. In the Right_car layer, select any frame between the first and second keyframes of the first motion tween (frame 78 to frame 106).

6. In the Properties panel, enter 100 for the Ease value to apply an ease-out to the motion tween.
7. Select Loop at the bottom of the Timeline and move the start and end markers in the Timeline header to frames 60 and 115, respectively.

8. Click Play (Enter/Return).
Animate plays the Timeline in a loop between frames 60 and 115 so you can examine the ease-out motion of the three cars.
Frame-by-Frame Animation
Frame-by-frame animation is a technique that creates the illusion of movement by making incremental changes between every keyframe. Frame-by-frame animation in Animate is similar to traditional hand-drawn cel animation where each drawing is on a separate sheet of paper, and it’s just as tedious.
Frame-by-frame animations increase your file size rapidly because Animate has to store the contents for each keyframe. Use frame-by-frame animation sparingly.
In the next section, you’ll insert a frame-by-frame animation inside the carLeft movie clip symbol to make it move up and down in a jittery fashion. When the movie clip loops, the car will rumble slightly to simulate the idle of the motor.
Inserting a new keyframe
The frame-by-frame animations inside the carMiddle and carRight movie clip symbols have already been done. You’ll finish the animation for the carLeft symbol.
1. In the Library panel, double-click the carRight movie clip symbol to examine its completed frame-by-frame animation.
Inside the carRight movie clip, three keyframes establish three different positions for the car and its headlights. The keyframes are spaced unevenly to provide the unpredictable up and down motion.

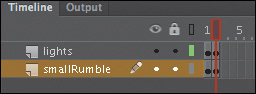
2. In the Library panel, double-click the carLeft move clip symbol.
You enter symbol-editing mode for the carLeft symbol.
![]() Tip
Tip
If the image of the car isn’t visible, select Fit In Window from the Zoom menu in the upper-right corner of the Stage.

3. Select frame 2 in both the lights layer and the smallRumble layer.

4. Right-click and choose Insert Keyframe (F6).
Animate inserts a keyframe in frame 2 of the lights layer and the smallRumble layer. The contents of the previous keyframes are copied into the new keyframes.
Changing the graphics
In the new keyframe, change the appearance of the contents to create the animation.
1. In frame 2, select all three graphics (the car and its two headlights) on the Stage (Edit > Select All, or Ctrl+A/Command+A) and move them down the Stage by 1 pixel. You can use the Properties panel to decrease the Y-position value by 1 pixel or press the Down Arrow key to nudge the graphics by 1 pixel.
The car and its headlights move down slightly.
2. Next, repeat the process of inserting keyframes and changing the graphics. For a random motion like an idling car, at least three keyframes are ideal.
3. Select frame 4 in both the lights layer and the smallRumble layer.
4. Right-click and choose Insert Keyframe (F6).
Keyframes are inserted into frame 4 of the lights and smallRumble layers. The contents of the previous keyframes are copied into the new keyframes.

5. Select all three graphics on the Stage (Edit > Select All, or Ctrl+A/Command+A) and move them up the Stage by 2 pixels. You can use the Properties panel or press the Up Arrow key twice to nudge the graphics by 2 pixels.
The car and its headlights move up slightly.
6. Test the idling motion by enabling the Loop Playback option at the bottom of the Timeline and click Play (Enter/Return).
![]() Note
Note
In this section, you created the car’s idling motion by manually moving the car’s position frame by frame. In the next lesson, you’ll learn to use the Refine Tween panel, which can automatically modify your motion tween to simulate natural movements such as bounces or random jitters like the idling of a car.
Animating 3D Motion
Finally, you’ll add a title and animate it in 3D space. Animating in 3D presents the added complication of a third (z) axis. When you choose the 3D Rotation or 3D Translation tool, you need to be aware of the Global Transform option at the bottom of the Tools panel. (The tools and the Global Transform option were introduced in the previous lesson, in “Positioning in 3D Space.”) Global Transform toggles between a global option (button depressed) and a local option (button raised). Moving an object with the global option selected makes the transformation relative to the global coordinate system, whereas moving an object with the local option on makes the transformation relative to itself.
1. Click Scene 1 in the Edit bar to return to the main Timeline. Insert a new layer at the top of the layer stack and rename it title.

2. Lock all the other layers.
3. Insert a new keyframe at frame 120.

4. Drag the movie clip symbol called movietitle from the Library panel onto the Stage.
The movietitle instance appears in your new layer in the keyframe at frame 120.
5. Position the title in the empty sky at x=180 and y=90.

6. Right-click the movie title and choose Create Motion Tween.
Animate converts the current layer to a tween layer so you can begin to animate the instance.
7. Move the red playhead to frame 140.

8. Select the 3D Rotation tool ![]() .
.

The 3D rotation control appears on the selected movie clip.
9. Deselect the Global Transform option at the bottom of the Tools panel ![]() to put the 3D Rotation tool into local mode.
to put the 3D Rotation tool into local mode.
10. Drag downward on the green Y control to rotate the title around the y axis to angle it so that it seems to recede into the distance. Its angle is at about –50 degrees. You can check the rotation values in the Transform panel (Window > Transform).

11. Move the red playhead to the first keyframe at frame 120.
12. Drag upward on the Y control to rotate the title around the y axis in the opposite direction so that the instance looks like just a sliver.

The change in the 3D rotation becomes a motion tween, so the title appears to swing in three dimensions.
![]() Note
Note
Animating the 3D rotation or translation of a symbol is currently not supported in HTML5 Canvas documents or in WebGL documents.
Animating Camera Moves
So far, you’ve learned to animate different properties of symbol instances on the Stage—their position, scale, rotation, transparency, filters, and 3D position.
However, as an animator, you’re not just directing the motion of your characters and objects on the Stage like a play. You’re also in control of the camera, making you more like the director of a movie. That means controlling where to point the camera to frame the action, zooming in or out, panning, or even rotating the camera for special effect. All of these camera movements are available in Animate with the Camera tool.
Enabling the camera
Enable the camera with the Camera tool in the Tools panel or with the Add/Remove Camera button below the Timeline. You’ll be animating the camera to simulate a zoom-out and a pan effect to focus on different parts of a larger static version of the movie opener that you worked on in this lesson.
1. Choose File/Open and navigate to Lesson04/04Start folder to open 04CameraStart.fla. This file is an ActionScript 3.0 document that is partially completed and contains the graphic elements already in place on the Stage. The Timeline contains added frames and a motion tween in the title layer.

2. Select the Camera tool on the Tools panel, or click Add Camera at the bottom of the Timeline.

A Camera layer is added to the top of your Timeline and becomes active. On the Stage, the camera controls appear.

Characteristics of the camera
The Camera layer operates a little differently than a normal layer in which you are accustomed to adding graphics.
• The size of your Stage becomes the frame of your camera view.
• You can only have one Camera layer, and it is always at the top of all your other layers.
• You cannot rename the Camera layer.
• You can’t add objects or draw in the Camera layer, but you can add classic or motion tweens to the layer, which allows you to animate the camera motion and camera filters.
• When your Camera layer is active, you cannot move or edit objects in other layers. Disable the Camera layer by choosing your Selection tool, or by clicking the Remove Camera button at the bottom of the Timeline.
![]() Note
Note
Clicking the Remove Camera button at the bottom of the Timeline doesn’t actually delete your Camera layer; it only hides it from view. You can click the button again to restore the Camera layer. To delete the Camera layer entirely, select it and click the Delete button (trash can icon).
Zooming the camera
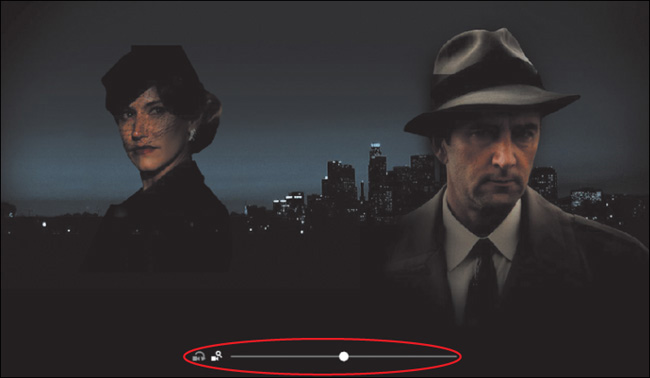
First, you’ll use the camera to zoom into a small part of the Stage to focus on the woman on the left. Your camera will initially hide a part of her face to create a little bit of mystery.
1. Make sure your Camera layer is active and the on-Stage controls are present. There are two modes on the controls, one for Rotate and another for Zoom. The Zoom mode should be highlighted.

2. Drag the slider to the right.

The Camera view zooms closer into the Stage.
3. When your slider reaches the edge of the slider, release your mouse.
The slider snaps back to the center, allowing you to continue dragging to the right to continue zooming.
You can also enter a numerical value for the zoom in the Properties panel in the Camera Properties section.

4. Continue zooming the camera until you’ve reached about 270%.
Your Stage shows a close-up view of the cityscape between the two main characters.

![]() Note
Note
When using the camera zoom mode, be aware of the image resolution. As with any bitmap, zooming in too dramatically will reveal the limitations of the original embedded image.
Moving the camera
You don’t want the camera to focus on the empty space between the two characters, so you’ll move the camera to focus on the woman.
1. With your pointer on the Stage, drag the camera to the left.
The contents of the Stage move to the right. It may feel a little counterintuitive, but remember, you’re moving the camera and not the contents of the Stage. So if you point your camera to the left, the objects in view will move to the right.

2. Continue dragging the camera to frame the woman so that she’s in the middle with her eyes cut off at the top edge of the camera.
Animating a pan
A pan is the motion of the camera left to right or up and down. In this next step, you’ll pan the camera slowly upward to reveal the woman’s face. You’ll use a motion tween to animate the camera movement.
1. On the Timeline, select any frame in the Camera layer and right-click. In the context menu that appears, choose Create Motion Tween.
A motion tween is added to the Camera layer, indicated by the blue-colored frames. You currently only have a single keyframe, so you’ll be adding additional keyframes further along the Timeline to complete the motion.

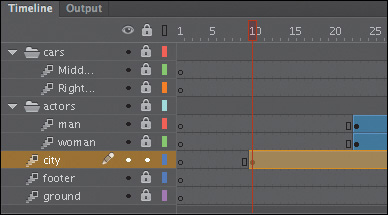
2. Move the playhead to frame 25.

3. With your pointer over the Stage, drag the camera upward to reveal the woman’s face. Hold down the Shift key to constrain the motion to a straight vertical line.

A new keyframe is established at frame 25, and Animate creates a smooth motion of the camera between the two keyframes.

4. Select Loop at the bottom of your Timeline and move the start marker to the first of the Camera layer keyframes and move the end marker a few frames beyond the second keyframe.

5. Press Enter/Return to preview the motion tween, which animates your camera panning upward to reveal the woman’s face.
Panning across the Stage
Your viewers now see this mystery woman, who is looking to her left. But who or what is she looking at? Next, you’ll animate the camera to pan across the Stage to reveal the target of her gaze.
1. On the Timeline, still in the Camera layer, create a keyframe (F6) at frame 40.

The camera will hold its position from frame 25 to frame 40.
2. Move the playhead to frame 70.
3. Hold down Shift and drag the camera to the right to reveal the man’s face.

A new keyframe is automatically created at frame 70 with the camera in its new position. The camera pans across the Stage from left to right between frames 40 and 70.

However, the man’s face isn’t completely in view. Next, you’ll zoom the camera out slightly and Animate will tween both the pan and the zoom together.
4. Drag the slider on the on-Stage camera control to the left to zoom out slightly.

The zoom positions the man’s face off-center, so you’ll have to adjust the framing slightly.
5. Drag the camera to re-center the man’s face.

6. Deselect the Loop option and preview your animation by pressing Enter/Return.
The Camera slowly pans upward on the woman’s face. It pauses a moment, and then pans to the right while slightly zooming out to show the man’s face.
Zooming out
To complete the animation, you’ll zoom the camera all the way out to reveal both characters and the whole Stage.
1. On the Timeline, create a keyframe (F6) at frame 90.
The camera will hold its position from frame 70 to frame 90.
2. Move the playhead to frame 140.

3. In the Properties panel, in the Camera Properties section, enter 100% for the Zoom.

4. Drag the camera on the Stage to re-center the view.

5. Preview the whole animation by pressing Enter/Return.
After the mystery man is revealed, the camera zooms out to show both characters, the cityscape, and the animation of the title fading into view.
![]() Note
Note
Although you only animated camera zoom and pans in this task, you can change and animate the rotation of the camera in much the same way with the Rotate on-Stage camera control or Rotate option in the Camera Properties section of the Properties panel.
Animating camera color effects
You can also apply and animate camera color effects to create a color tint or to change the contrast, saturation, brightness, or hue of the entire view on the Stage. In the next step, you’ll animate the camera to desaturate the view, emphasizing the film noir genre of this fictional movie promotion.
1. On the Timeline, create a keyframe (F6) at frame 160.

2. In the Properties panel in the Camera Color Effects section, select Adjust Color.
The Brightness, Contrast, Saturation, and Hue values appear, all of them with a value of 0.

3. Move the playhead to frame 190 and create a new keyframe (F6).

4. Change the Saturation to –100 by dragging on the value, or by double-clicking on the value and entering the number.

The view through the camera becomes desaturated and all the graphics on the Stage appear black and white. Animate creates a motion tween of the camera becoming more desaturated from frame 160 to frame 190.

Testing Your Movie
You can quickly preview your animation by “scrubbing” the red playhead back and forth on the Timeline or by choosing Control > Play. You can also use the integrated Controller at the bottom of the Timeline.
However, to preview your animation as your audience will see it and to preview any nested animations within movie clip symbols, you should test your movie. Choose Control > Test.
Animate exports the published files—in this case, a SWF file—and saves them in the same location as your FLA file. The SWF file is the compressed, final Animate media that you would embed in an HTML page to play in a browser with the Flash Player. Animate displays the SWF file in a new window with the exact Stage dimensions and plays your animation.
Test your movie for both your 04CameraStart.fla document and your 04_workingcopy.fla document.

![]() Note
Note
If you’ve targeted a different publishing platform with a different document type (such as Adobe AIR), those playback options will be available for you in the Control > Test Movie menu.
![]() Tip
Tip
The exported SWF In Test Movie mode will loop automatically. To prevent the looping in Test Movie mode, choose Control > Loop Playback while the movie is playing to deselect the Loop option.
To exit Test Movie mode, click the Close window button.
You can also preview your animation by choosing Control > Test Movie > In Browser, and Animate will export a SWF file and open it automatically in your default browser.
Generating PNG sequences and sprite sheets


Review Questions
1. What are two requirements of a motion tween?
2. What kinds of properties can a motion tween change in an ActionScript 3.0 document?
3. What are property keyframes, and why are they important?
4. How can you edit the path of an object’s motion?
5. What does easing do to a motion tween?
6. What kind of animation is possible with the Camera tool?
Review Answers
1. A motion tween requires a symbol instance on the Stage and its own layer, which is called a tween layer. No other tween or drawing object can exist on the tween layer.
2. A motion tween creates smooth transitions between different keyframes of an object’s location, scale, rotation, transparency, brightness, tint, filter values, or 3D rotation or translation.
3. A keyframe marks a change in one or more properties of an object. Keyframes are specific to each property, so that a motion tween can have keyframes for position that are different from keyframes for transparency.
4. To edit the path of an object’s motion, choose the Selection tool and click and drag directly on the path to bend it. You can also choose the Convert Anchor Point tool and Subselection tool to pull out handles at the anchor points. The handles control the curvature of the path.
5. Easing changes the rate of change in a motion tween. Without easing, a motion tween proceeds linearly, where the same amount of change happens over time. An ease-in makes an object begin its animation slowly, and an ease-out makes an object end its animation slowly.
6. The Camera tool can change the view of the Stage. Use the Camera tool to zoom in to a different part of the Stage, zoom out to show more, rotate, or pan. You can also use the Camera tool to adjust the tint or color effect of the view.