
9. Working with Sound and Video—Supplement
Supplement Contents
• Setting the quality of the sounds
• Using the Watch Folders panel and the Preset Browser settings
• Exporting video from Animate
Setting the quality of the sounds
You can control how much or how little your sounds are compressed in the final published file. With less compression, your sounds will be better quality. However, your final application size will be much larger. With more compression, you’ll have poor-quality sounds but a smaller file size. You must determine the balance of quality and file size based on your needs. Set the sound quality and compression in the Publish Settings options.
1. Choose File > Publish Settings.
The Publish Settings dialog box appears.

2. Select Flash (.swf) on the left if it’s not checked already to see the Audio stream and Audio event settings.
3. Click the Audio Stream settings to open the Sound Settings dialog box. Choose 64 kbps from the Bit Rate menu and deselect Convert Stereo To Mono. Click OK to accept the settings.

4. Click the Audio Event settings.
The Sound Settings dialog box appears again.
5. Choose 64 kbps from the Bit Rate menu and deselect Convert Stereo To Mono. Click OK to accept the settings.

Now both the Audio Stream and Audio Event settings should be at 64 kbps with stereo sounds preserved.
The Africanbeat.mp3 file in particular relies on stereo effects, so keeping both the left and right channels is important.
6. Select Override Sound Settings, and click OK to save the settings.
The sound settings in the Publish Settings will determine how all your sounds are exported.
7. Choose Control > Test.
Animate preserves the stereo effect of the sound and determines the quality based on your settings in the Publish Settings dialog box.
Using the Watch Folders panel and the Preset Browser settings
The Watch Folders panel can help you process multiple videos, whereas the Preset Browser stores predefined settings for specific target devices.
Adding a folder to the Watch Folders panel adds all of its contents to the queue, where they’re automatically encoded. You can also add a different Output setting to the same folder, which will result in multiple formats for the same set of videos. To add a new Output setting, select a watch folder, and then click the Add Output button at the top of the Watch Folders panel.

A duplicate selection appears in the list. Choose a new format and/or new preset options. If you want to apply a particular setting from the Preset Browser, choose the setting and simply drag and drop it on top of your selection in the Watch Folders panel.
The ability to define multiple outputs for a set of videos is useful when you need different video formats for high-bandwidth and low-bandwidth viewers, or for different devices such as tablets and mobile phones.
Cropping your video
If you want to show only a portion of your video, you can crop it. If you haven’t done so already, choose Edit > Reset Status to reset the Penguins.mov file, and then click the link under the Format or Preset column so you can experiment with the cropping settings.
1. Select the Source tab in the upper-left corner of the Export Settings dialog box, and then click the Crop button.
The cropping box appears over the video preview window.
2. Drag the sides inward to crop from the top, bottom, left, or right.
Animate discards the grayed-out portions outside the box and displays the new dimensions next to your cursor. You can also use the Left, Top, Right, and Bottom settings above the preview window to enter exact pixel values.
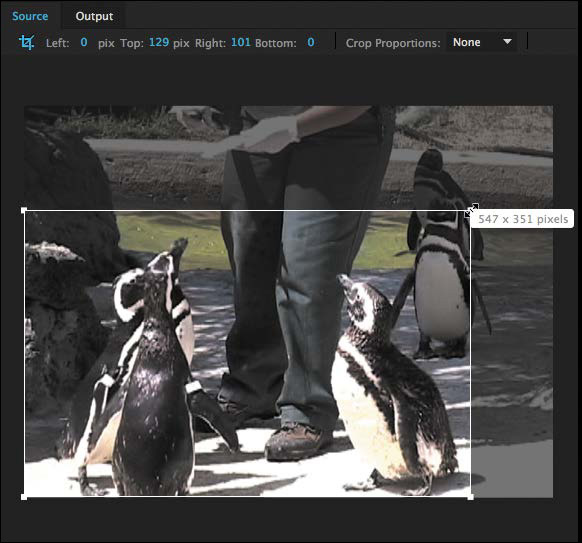
3. If you want to keep the crop in a standard proportion, click the Crop Proportions menu and choose an aspect ratio.

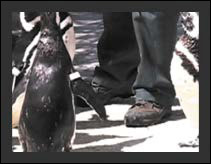
4. To see the effects of the crop, click the Output tab in the upper-left corner of the preview window.
5. The options on the Source Scaling menu allow you to choose how the crop will appear in the final output file:

If the video has the selected crop shown here, then the Crop Setting options will affect the outputted file as follows:

• Scale To Fit adjusts the dimensions of the crop and adds black borders to fit the output file.

• Scale To Fill adjusts the dimensions of the crop to fill the size of the output file.
• Stretch To Fill adjusts the dimensions of the crop by distorting the image, if necessary, to fill the size of the output file.

• Scale To Fit With Black Borders adds black bands on any of the sides to fit the crop in the dimensions of the output file.

• Change Output Size To Match Source changes the dimensions of the output file to match the crop dimensions.

6. Exit the cropping mode without making the crop by clicking the Crop button again under the Source tab to deselect it. You will not need to crop the Penguins.mov video for this lesson.
Exporting Video from Animate
So far, you’ve been using Adobe Media Encoder to prepare video to integrate within Animate. However, you can also use Media Encoder to export your Animate content to video.
For example, use the powerful drawing and animation tools within Animate to create animation, and then export it as an HD broadcast-quality video, or for playback on a variety of platforms such as an Apple iPhone, Barnes and Noble Nook, Amazon Kindle, or Google Android device.
Exporting video
For this part of the lesson, you’ll use one of the animations you created in Lesson 4. In that lesson, you created the cinematic splash screen for the fictional motion picture Double Identity.
As part of the promotion for the motion picture, the client requests that the animation run on multiple platforms. You’ll export the animation and encode the video to be compatible for a variety of devices.
1. Open the 04_workingcopy.fla file from Lesson 4, or if you haven’t completed that lesson, open the 04End.fla file in the Lesson04/04End folder.

2. Choose File > Export > Export Video.
The Export Video dialog box appears. Keep the resolution settings as they are. Deselect Ignore Stage Color, select Convert Video In Adobe Media Encoder, and select When Last Frame Is Reached for the Stop Exporting option.
Click Browse if you want to export the video to a different location. The default location is in the same folder as the 04End.fla file.

3. Click Export.
Animate exports and saves a MOV file, and automatically opens Adobe Media Encoder with the file added to the queue.

Choosing a target device for encoding
Now you can export the video to several target devices. You’ll export the video to files compatible with iPhone, Nook, Kindle, and Android devices.
1. In Adobe Media Encoder, in the Queue panel, leave the Format setting of the 04End.mov selection as H.264 and from the Preset menu choose Amazon Kindle Fire Native Resolution - 1024x580 29.97.

Adobe Media Encoder configures all the export options so the exported file is compatible with the Amazon Kindle Fire. The resolution is set at 1024 pixels by 580 pixels and the frame rate at 29.97 frames per second.
2. Select the 04End.mov file in the Queue display list. In the Preset Browser panel, in the Preset Name column, click the arrowhead next to System Presets to open the folder and display the list of presets included with Adobe Media Encoder. Click to open the Devices category, then open the Android sub-category and select the preset Android Phone & Tablet – 480p 23.976; then click Apply Preset at the upper-right corner of the panel.
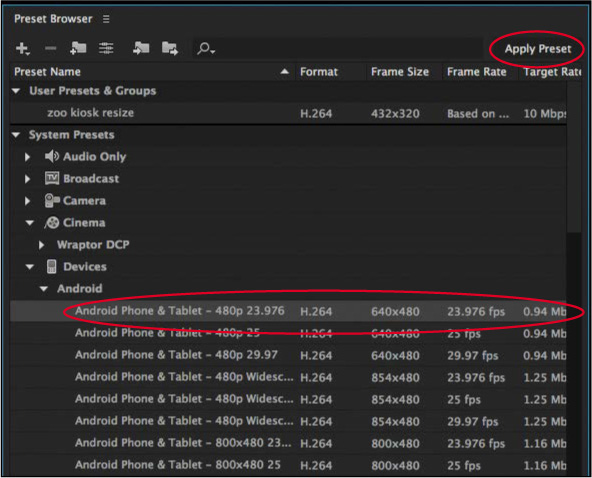
Adobe Media Encoder adds a second output, configured for the Android phone and tablet.

3. Apply additional presets from the Preset Browser panel. For this lesson, it doesn’t matter which ones you choose. It’s more important that you see the variety of options Media Encoder offers.
Your queue contains several outputs for the 04End.mov selection.

4. Click the Start Queue button at the top of the Queue panel.
Adobe Media Encoder begins encoding the 04End.mov file into the four specified formats, and saves the files in the path specified in the Output File column.

The exported videos wil be sized and made compatible for the specified devices.
