
6. Classic Tweening
Lesson overview
In this lesson, you’ll learn how to do the following:
Understand the differences between motion tweening and classic tweening
Animate the position, scale, and rotation of objects
Adjust the pacing and timing of your animation
Animate transparency and special effects
Create a motion guide for the path of an object’s animation
Apply custom eases to your animation
Synchronize dialogue with graphic symbols
This lesson will take about one and a half hours to complete. Please log in to your account on peachpit.com to download the lesson files for this chapter, or go to the Getting Started section at the beginning of this book and follow the instructions under “Accessing the Lesson Files and Web Edition.”

Sometimes an animation benefits from a simpler approach. Classic tweening, an older method favored among character animators, provides an easy way to animate symbol instances when you don’t need the subtle controls of motion tweens.
Getting Started
Start by viewing the two finished projects to see the short animation that you’ll create in this lesson.
Double-click the 06End.html file in the Lesson06/06End folder to play the animation in a browser.

The project is a simple looping animation of a cartoon bird flying past mountain ranges. Notice the up and down motion of the body as the wings flap, as well as the smooth motion of the background.
 Note
NoteIf you have not already downloaded the project files for this lesson to your computer from your Account page, make sure to do so now. See “Getting Started” at the beginning of the book.
Close the 06End.html file.
Double-click the 06End2.html file in the Lesson06/06End folder to play the animation in a browser.

The project is an animation diagramming the movement of a satellite going around the earth before being thrown out into space.
Close the 06End2.html file.
You’ll complete both animations. As you do so, you’ll learn how to animate with classic tweens, apply eases, and use motion guides.
Using Classic Tweens
In Lesson 4, you learned to animate an object with motion tweening, and in Lesson 5, you applied sophisticated eases to tweens for complex motions. In this lesson, you’ll learn to animate objects with classic tweens, an older, but still popular, way of creating animations. Classic tweens are similar to and a bit simpler than motion tweens. Both approaches use symbol instances, and both animate changes in symbol instance properties between two keyframes. For example, classic tweens can animate a symbol instance’s position, rotation, transformation, color effect, or filter, just as motion tweens can. So why use one over the other?
Classic tweens have retained their popularity with many animators, especially character animators, primarily because of the simplicity of the process. Classic tweens animate only instance properties between keyframes, and there are no property keyframes or Motion Editor to worry about. There is no motion path that is displayed on the Stage (editing the path requires a separate layer in classic tweens).
The key differences between classic tweens and motion tweens are as follows:
Classic tweens require a separate motion guide layer to animate along a path.
Classic tweens are not supported in the Motion Editor.
Classic tweens don’t support 3D rotations or translations.
Classic tweens are not separated onto their own tween layer. However, classic and motion tweens share the same restriction that no other object can exist in the same layer as the tween.
Classic tweens are Timeline-based, and not object-based, meaning you add, remove, or swap the tween or the instance on the Timeline and not on the Stage.
Learning to create animation with classic tweens will help you understand the full scope of the animator’s toolkit and better prepare you to choose the right approach for any project.
Understanding the first project file
Your 06Start.fla project already contains the assets for the bird animation. The animation is partially complete, and an instance of the movie clip of the bird animation is on the Stage. In this section, you’ll complete the animation by adding the scrolling background with classic tweens.
Double-click the 06Start.fla file in the Lesson06/06Start folder to open the initial project file in Animate.

From the view options above the Stage, choose Fit In Window, or choose View > Magnification > Fit In Window, so that you can see the entire Stage on your computer screen.
Choose File > Save As. Name the file 06_workingcopy.fla, and save it in the 06Start folder.
Saving a working copy ensures that the original start file will be available if you want to start over.
Creating the movie clip symbol
You’ll add an animation of scrolling mountains inside a movie clip symbol on the main Timeline.
On the main Timeline, insert a new layer, and name it landscape. Drag the new layer below the bird layer but above the sky layer.

Choose Insert > New Symbol (Ctrl+F8/Command+F8).
The Create New Symbol dialog box appears.
Enter scrolling landscape for the name, and choose Movie Clip from the Type menu.
Click OK.
The new movie clip symbol, named scrolling landscape, opens in symbol-editing mode. The Stage is blank, indicating that the movie clip symbol is currently empty.

Drag the graphic symbol called mountains from the Library panel to the Stage, and position it so its lower-left corner aligns with the registration point of the movie clip symbol.

In the Properties panel, in the Position And Size section, the position coordinates should read X=0, Y=−155.55.
Add frames (Insert > Timeline > Frame, or F5) up to frame 30.

Inserting a keyframe and changing the position of the instance
You’ll add another keyframe for the mountains, so you’ll have an initial keyframe for the mountains at their starting position, and an ending keyframe when the mountains are moved to the left.
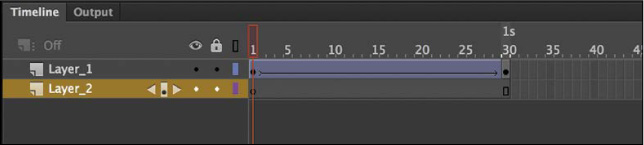
Select frame 30 in Layer 1 of your movie clip symbol, and insert a new keyframe (Insert > Timeline > Keyframe, or F6).
A new keyframe containing a copy of the mountains instance is inserted at frame 30.

At frame 30, move the instance of the mountain graphic symbol to the left so that the midpoint of the mountains image is centered over the registration point. The Properties panel should show X=−800.
The left and right edges of the graphic match up, so when the animation plays as a loop, the effect is a seamless scrolling mountain range.

Applying a classic tween
Apply a classic tween to the Timeline between two keyframes.
Right-click any frame between the first and second keyframe and choose Create Classic Tween.

Animate creates a tween between the first and second keyframe, indicated by an arrow extending along a blue background.

Press Enter/Return on your keyboard, or press the Play button under the Timeline, to preview the animation.
A smooth animation plays, showing the mountains moving from right to left.
To add a little more complexity to the animation, you’ll add a second layer of mountains. Insert a new layer, and drag it under the existing layer.
Drag another instance of the mountains symbol to the Stage. In the Properties panel, in the Position And Size section, make sure that the Lock Width And Height icon is broken, and change the width (W) to 2000 pixels and the height (H) to 200 pixels. Position the lower-left corner of the instance at the registration point of the symbol so that the Properties panel shows X=0, Y=−200.

You’ll have two mountain ranges, with the taller and wider one behind the first one.

Insert a new keyframe (Insert > Timeline > Keyframe, or F6) at frame 30 of the bottom layer.

In the end keyframe at frame 30, move the mountains instance to x=−1000.
Right-click any frame between the first and second keyframe, and choose Create Classic Tween.

Press Return/Enter on your keyboard, or press the Play button under the Timeline, to preview the animation. Select the Loop option to play the tween as a loop, and from the Modify Marker menu, choose Marker Range All.

The second mountain instance moves from right to left, but it’s slightly offset from the one in the foreground, creating a rich layered effect. Zoom in to the Stage so the edges of the graphics aren’t visible; this will give you a better idea of the seamless scrolling effect.
Deselect the Loop option. Exit symbol-editing mode to return to the main Timeline.
Adding the movie clip instance
Now that you’ve completed the classic tweens of the scrolling mountains, you’ll add the movie clip symbol to the main Stage.
Drag the movie clip symbol named scrolling landscape from the Library panel to the Stage, and position the instance so its left and bottom edges align with the left and bottom edges of the Stage. In the Properties panel, in the Position And Size section, the values should read X=0, Y=400.

Save your finished work and choose Control > Test to preview the animation.
Animate opens your default browser and shows the animation of the scrolling mountains that you created behind the bird flapping its wings.
NoteThe Output panel shows several warnings after you test your animation. Don’t worry about them. They are not errors, but only general precautions when working in HTML5 Canvas documents.
Animating scale
Finally, you’ll add a sun, which you’ll animate in a subtle way to give it a pulsating, lively appearance.
Choose Insert > New Symbol (Ctrl/Command+F8).
In the Create New Symbol dialog box that appears, enter animated sun for the Name, choose Movie Clip for the Type, and click OK.
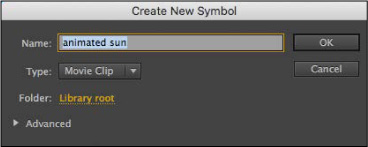
Animate creates a new movie clip symbol called animated sun and you enter symbol-editing mode on the Stage.
Select the Oval tool with no stroke and a yellow color for the fill.
Hold the Shift key down and drag out a circle on the middle of the Stage. Holding the Shift key constrains the oval to create a perfect circle. The circle fig06-020.jpgshould be about 100 pixels wide by 100 pixels high.
Select the Selection tool and select your yellow circle. In the Properties panel, enter –50 for X and –50 for Y to center the sun on the Stage.
With the sun still selected, choose Modify > fig06-021.jpgConvert To Symbol (F8).

In the Convert To Symbol dialog box that appears, enter sun for the Name and choose Movie Clip for the Type. Click OK.
Animate creates a movie clip symbol called sun, which you will animate inside the movie clip symbol that you’re currently editing, called animated sun.

On the movie clip symbol Timeline, select frame 72.
Choose Insert > Timeline > Keyframe (F6).
A new keyframe is created at frame 72 with an instance of the sun.

Select frame 48 and choose Insert > Timeline > Keyframe (F6).
Another keyframe is created at frame 48 with an instance of the sun. You now have three keyframes along the Timeline, each with identical instances of the sun. You’ll change the size of the sun in the middle keyframe and tween between the keyframes to make the sun slowly expand and contract.

Select the sun on the Stage in frame 48.
Choose the Free Transform tool.
Control handles appear around the instance of the sun.

Hold the Shift key and drag out the corner of the transformation bounding box slightly to make the sun about 10% bigger.

Select any frame between the first and second keyframe. Right-click, and choose Create Classic Tween.
A classic tween is created between the first and second keyframe.

Select any frame between the second and third keyframe. Right-click, and choose Create Classic Tween.
A classic tween is created between the second and third keyframe.

Press Enter/Return to play the animation on the movie clip timeline.
The sun slowly expands and contracts as if breathing. Because the first and last keyframes are identical, the movie clip timeline will loop seamlessly in the final animation.
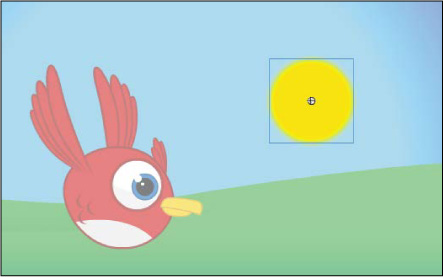
Exit symbol-editing mode. Drag the movie clip called animated sun from your library onto the Stage in the sky layer just above the mountains.

Choose Control > Test.
Animate launches your default browser and plays the animation. As the bird flies by the mountains, the mountains whiz by and the sun pulsates.
Adding a filter
Finally, you’ll make the sun look more like a sun by adding a Blur filter, which will soften its edges.
Double-click the instance of the animated sun on the Stage to edit the symbol in place.
All the other graphics on the Stage become dim, allowing you to edit the animated sun symbol in context with its surrounding graphics.

Move the playhead to frame 1 and select the instance of the sun on the Stage.
In the Properties panel, in the Filters section, click the Add Filter (+) button and choose Blur.
A Blur filter is applied to the sun.

Drag the X and Y Blur values to 10 pixels, and keep the Quality setting at Low.

The sun’s outer edges become fuzzy.
Click Scene 1 in the Edit bar to exit symbol-editing mode.
Choose Control > Test.
The sun now slowly expands and contracts with a slight blurred effect.

NoteIn HTML5 Canvas documents, filters and color effects are particularly difficult to render, so they are not animated. Instead, only the first keyframe of the applied filter or color effect is displayed. Hence, in this task, although you can animate your sun growing and shrinking, it can have only one state of blurriness. This is a limitation of HTML5 Canvas and not of classic tweening.
Motion Guides for Classic Tweens
Now that you’ve had a taste of how classic tweens can animate various properties of an object, such as its position or size, you’ll learn to move an object on a path. Save and close the 06_workingcopy.fla file, as you won’t need it anymore.
To move an object along a specific path, classic tweens require that you draw the path in a separate layer called a motion guide.
Understanding the second project file
Open 06Start2.fla to begin your second project, which features an orbiting satellite. You will animate the earth revolving around the sun and the satellite’s trajectory.
Double-click the 06Start2.fla file in the Lesson06/06Start folder to open the initial project file in Animate.
From the view options above the Stage, choose Fit In Window, or choose View > Magnification > Fit In Window, so that you can see the entire Stage on your computer screen.
The starting file contains five layers (some of them empty), and on the Stage is the sun. Off the Stage (not yet visible to the audience) is the trajectory of the satellite that is provided for you for later use.

Choose File > Save As. Name the file 06_workingcopy2.fla, and save it in the 06Start folder.
Saving a working copy ensures that the original start file will be available if you want to start over.
Animating an object along a path
A motion guide is a layer that you add to the Timeline. It tells an object in a classic tween how to move from its position in the first keyframe to its position in the last keyframe. Without a motion guide, a classic tween will animate an object’s position in a straight line from the first to the last keyframe. The motion guide contains a path that you draw and that can curve, zigzag, or make all sorts of detours to go from the first keyframe to the last, as long as the path doesn’t cross itself.
When using a motion guide, you must make sure that the object in the beginning keyframe is attached to the path and that the object in the ending keyframe is also attached to the path.
On the main Timeline, select the earth layer and drag the earth symbol from the Library onto the Stage. You can position the earth to the right of the sun at about X=420 and Y=80.

Select frame 48 in all the layers, and add frames (F5).

Select frame 48 in the earth layer and insert a new keyframe (F6).
You now have two keyframes, one at frame 1 and another at frame 48.

Select any frame between your two keyframes, right-click, and choose Create Classic Tween. In the Properties panel, make sure that the Snap option in the Tweening section is selected.
Animate creates a tween between the two keyframes, but since the position of the earth in the first and last keyframes is identical, there is no animation yet.

Right-click the name of the earth layer and choose Add Classic Motion Guide.

Animate adds a new layer above the earth layer. The new layer is a classic motion guide, which will contain the path that the tween will follow. The earth layer is indented, indicating that it belongs to the motion guide layer.
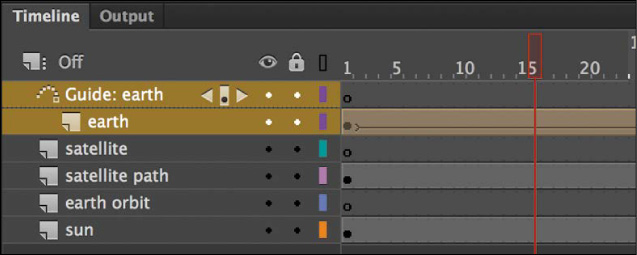
Select the motion guide layer called “Guide: earth.”
Select the Oval tool, and select None for the Fill color and any color for its Stroke.
Draw an oval around the sun that represents the orbit of the earth. Don’t make the oval more than 200 pixels wide or 100 pixels high. Make sure the sun is approximately in the middle.
As you draw your oval, Animate makes sure that the tweened object (the earth) stays on the path, since the Snap option in the Properties panel is selected. The final orbit should show the earth on the edge of the oval on the right side of the sun.

Select the last keyframe in the earth layer.
Select the Selection tool, and make sure that the Snap To Objects option (the magnet icon) at the bottom of the Tools panel is selected.
Move the instance of the earth in the last keyframe so that it snaps to the path of the oval. Position it slightly lower than it is in the first keyframe (in the clockwise direction).

Your earth is now attached to the oval in the first and last keyframe. The Snap To Objects option is critical because your object must always be on its path.
Preview your animation by pressing Enter/Return.
Your earth probably moves very slowly along the oval, moving clockwise from one spot along the rim to its destination close by. However, you want it to move counterclockwise, entirely around the sun, but Animate is choosing to animate your earth by the quickest route. How do you force it to move in the other direction?
There are two approaches. One, you could insert another keyframe in the middle to break up the revolution into two parts. The second way is to create a tiny break in the oval so that it is not a closed path, but becomes a path with a beginning and an end. For this task, you’ll proceed with the second way.
Use the Zoom tool to magnify the area where the earth is attached to its path in the first keyframe.
Lock the earth layer so you don’t disturb it.
With the Selection tool, drag around a small segment of the path to select it, and then delete it (press the Backspace/Delete key).
Your oval has a small gap.

Unlock the earth layer.
In the first keyframe of your earth layer, move the earth instance so that it snaps to the beginning of the path (above the gap), and in the last keyframe, move the earth so that it snaps to the end of the path (below the gap).

Preview your animation by pressing Enter/Return.
The earth now revolves around the sun counterclockwise, following the path in the motion guide layer.

NoteWhen you publish your final animation, the path drawn in the motion guide is not displayed.
NoteYou can have more than one tween follow the same motion guide. Simply drag your tween layer under a motion guide layer so that the tween layer is indented.
Animating the satellite trajectory
Next, you’ll add the satellite’s trajectory as it circles the earth once and then flies out into space.
On the main Timeline, select the layer named satellite and drag the satellite symbol named juno from the Library onto the Stage. Position the instance just to the right of the earth. Use the Free Transform tool to reduce it to a more comfortable size.

Select the last frame in the satellite layer and insert a new keyframe (F6).
You now have two keyframes, one at frame 1 and another at frame 48.

Select any frame between your two keyframes, right-click, and choose Create Classic Tween.
Animate creates a tween between the two keyframes.

Right-click the satellite layer and choose Add Classic Motion Guide.
Animate adds a motion guide layer above the satellite layer.

Select the Selection tool and double-click the satellite path that is placed off the Stage to select it.

Cut (Ctrl+X/Command+X) the path. Select the satellite motion guide, and paste (Ctrl+V/Command+V) the path onto it.
Position the path so that the beginning point (the inner end) is near the earth’s starting point and it entirely encircles the earth’s orbit.

Deselect the path by clicking an empty part of the Stage.
In the first keyframe, zoom in close and move the satellite so that it snaps to the starting point of the path.

In the last keyframe, move the satellite so that it snaps to the ending point of the path (far out in space).

Preview your animation by pressing Enter/Return.
As the earth makes its revolution around the sun, the satellite follows its own trajectory around and out the solar system.

NoteYou can edit the path in the motion guide with any of the editing tools, such as the Selection tool, Subselection tool, or Pen tool. Any change you make to the path will immediately change the object’s motion as long as the object remains snapped to the path in both the beginning and ending keyframes.
Copying and Pasting Tweens
So far, you’ve animated the earth and the satellite, but in reality, the satellite takes several years to make its journey to outer space. So in the next task, you’ll expand the time that the animation takes and add additional revolutions for the earth.
Adding additional earth revolutions
You have the earth going around the oval path once. Now, you’ll copy the tween and paste it on the Timeline to create three additional revolutions.
With the Selection tool, select the first keyframe, the classic tween, and the last keyframe in the earth layer.
Right-click and choose Copy Frames (Edit > Timelines > Copy Frames).

Select frame 49 in the earth layer, right-click, and choose Paste Frames (Edit > Timelines > Paste Frames).
Animate pastes the copied tween into frames 49 to 96. A second tween of the earth moving around the sun appears.

Select the next frame after the newly pasted tween, right-click, and choose Paste Frames again to paste a third tween.
Paste another tween at the end of the Timeline.
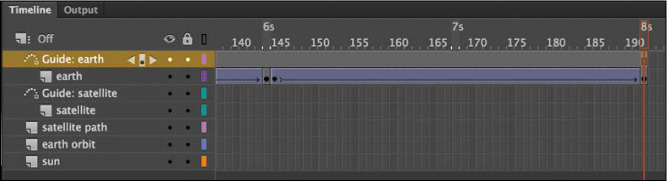
You’ll end up with a total of four tweens in the earth layer, extending all the way to frame 192.

Now you’ll need to extend the rest of the layers so they last as long as your earth layer. Select frame 192 in the Guide: earth layer and press F5.
Animate adds frames in the Guide: earth layer up to frame 192.
Select frame 192 in all other layers and press F5.
Animate adds frames to the rest of the layers.

Select the last keyframe of the satellite layer at frame 48.
Make sure that the box icon shows up near your mouse pointer, and then drag the keyframe to the very end of the layer’s Timeline (frame 192).

The satellite’s whole trajectory lasts from frame 1 to frame 192, and in the meantime, the earth orbits the sun four times.
Classic Tween Eases
You learned about eases in Lessons 4 and 5. Recall that eases are a way to affect the way a tween proceeds as it goes from its first keyframe to its next keyframe. A motion can start slow and speed up, or it can start quickly and then slow to a stop. Or an object can move through bouncing or other, more complex motions before settling into its last keyframe.
You can also apply eases to classic tweens, though the process is a bit different. For classic tweens, there is no Motion Editor on the Timeline. You add eases through the Properties panel.
Adding an ease
The satellite that you animated flies from the earth into outer space in a linear fashion—that is, it moves the same distance for every frame on the Timeline. To make the animation a little more realistic, you’ll slow down the satellite’s motion as it flies away from the earth, and then speed it up as it swings close to the earth. The gravitational boost that the satellite gains by flying close to the earth is known as a slingshot effect, which helps propel it on its journey to the outer reaches of the solar system.
Select any frame between the first and last keyframes of the satellite layer.
The Tweening section of the Properties panel displays all the tween options, including eases. The 0 value for the Classic Ease option indicates that there is currently no ease applied. You can drag the value to increase or decrease the ease from –100 (ease-in) to 100 (ease-out). Choosing a value this way applies a very simple ease in which an object begins slowly (ease-in) or ends slowly (ease-out). However, you’ll want a more complex ease. Click Classic Ease to open the Ease panel.

The Ease panel appears; it looks similar to the Ease panel in the Motion Editor for motion tweens. You can choose different types of eases, and for some, you can choose the intensity of the ease in a secondary menu. A graph shows the nonlinear relationship between time (along the horizontal axis) and the tween (along the vertical axis).

Select the Custom option, and double-click New in the adjacent pane to open the Custom Ease panel. Alternatively, you can click the Edit Easing button (the pencil icon) in the Properties panel.
The Custom Ease panel displays the graph with time along the horizontal axis and the percent of the tween along the vertical axis. It helps to think about what shape the line in the ease graph should be in order to accomplish the motion that you want. For the satellite, you want the motion to slow down as it moves away from the earth (around frame 48) and then speed up as it approaches earth (around frame 96). That means that at around frame 48 the ease graph should flatten out, and at frame 96 the graph should become a bit steeper.

Click the ease graph at about frame 48.
Animate adds a control point (a black square) with two handles (two empty circles) on the graph.

Grab the control handles and drag down slightly to flatten the curve.

The handles work like Bezier curves, controlling the curvature of the line.
Now click the ease graph at about frame 96.
Animate adds another control point and handles on the graph.
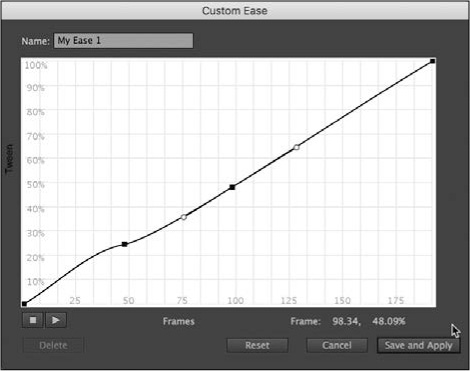
Grab the control handles and drag upward slightly to make the curve a little steeper.

Don’t overdo the curvatures. Small changes in the graph can dramatically affect the motion, and subtle eases often work the best.
NoteTo delete a single control point on the ease graph, select it and press Backspace/Delete.
NoteTo clear all your control points, click the Reset button below the ease graph.
Click the Play button (the triangle icon) below the ease graph to preview the animation.
On the Stage, the satellite slows down, and then speeds up when it swings by the earth at about frame 96. Save and close your file. You’re done with this animation.
Property easing
For a finer degree of control, you can apply different eases for each property of your tween separately. For example, if the satellite were to grow bigger as it flew out of the solar system, or if it were rotating as it made its journey, you could choose a different ease for its change in scale or its change in rotation.
In the Tweening section of the Properties panel, from the Easing menu choose Each Property Separately. Apply a preset ease or a custom ease for position, rotation, scale, color, or filters.

Graphic Symbols
You’ve been using movie clip symbols for your animation, and you’ve seen that they allow for independent nested animations. But you can also have nested animations and graphics inside graphic symbols, although they work a little differently.
An animation inside a graphic symbol doesn’t play independently, as it does in a movie clip symbol. It will only play if there are sufficient frames on the main Timeline where the instance is placed. And while you can control the internal playhead of a movie clip timeline with code, you can control the playhead of a graphic symbol directly in the Properties panel. Because of the ease with which you can choose what frames appear inside graphic symbols, they are ideal for lip-syncing or other character variations.
Using the Frame Picker for phonemes
When animated characters talk, their mouths should be synchronized with their words. Each sound, or phoneme, is produced by a different mouth shape. For example, an explosive “p” or “b” sound is made by closing the lips, and an “o” sound is made by a rounded open mouth. Animators draw a collection of these mouth positions to synchronize to the soundtrack.
You can store each mouth position as a keyframe in a graphic symbol. The Frame Picker panel lets you choose the frame on the Timeline that matches each sound.
In this task, you’ll use the Frame Picker to animate the mouth of the alien from Lesson 4.
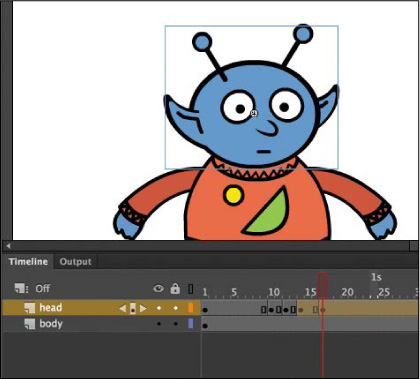
Open the sample file 06FramePicker_start.fla in the Lesson06/06Start folder. The file contains your familiar alien character on the Stage.
The alien is not animated, but his head is a graphic symbol with multiple keyframes inside its Timeline.

Double-click the alien_head graphic symbol in the library.
Animate takes you to symbol-editing mode for the alien_head graphic symbol. Notice that the Timeline contains five keyframes in the mouth layer.

Examine each keyframe in the mouth layer by advancing the playhead from frame 1 to frame 5.
Each keyframe shows the mouth in a different position. Frame 1 has a small closed mouth, frame 2 a rounded mouth, frame 3 a more open mouth, and so on.

Return to Scene 1 and choose Control > Test.
Animate creates a SWF to play the animation. Nothing happens because there is only a single frame on the main Timeline, and a graphic symbol needs frames on the main Timeline to play its own timeline.
Close the test movie panel and return to your Animate document.
Select frame 45 in the head and body layers, and choose Insert > Timeline > Frame (F5).
Frames are added to both layers up to frame 45.

Choose Control > Play (Enter/Return).
Animate plays the animation. Your alien now can’t stop talking! The graphic symbol plays all five of its keyframes repeatedly during the 45 frames of the main Timeline. The graphic symbol is, by default, set to loop, but you’ll select a single frame to play instead.
Select the alien’s head on the Stage, and in the Looping section of the Properties panel, choose Single Frame from the Options menu. Leave the value of the First field at 1.

Now the Stage displays only one frame from the alien_head graphic symbol, which is frame 1.
Move the playhead to frame 10 of the head layer.

With the playhead at frame 10, select the alien head on the Stage. In the Looping section of the Properties panel, click Use Frame Picker.

The Frame Picker panel opens and shows thumbnail images of all the frames inside the graphic symbol.

You’ll have the alien mouth the word “hello.” For the first part of the word, select frame 3 in the Frame Picker. Make sure Create Keyframe (at the top of the Frame Picker panel) is selected.
Animate automatically adds a keyframe at the current place on the Timeline, with a new instance of the graphic symbol on frame 3. Now, when the animation reaches frame 10 the alien head symbol will switch from displaying frame 1 (the closed mouth) to displaying frame 3, for the beginning sound in hello.

Move the playhead to frame 12 of the main Timeline.
In the Frame Picker, select frame 4.
When the animation plays frame 12, the alien head graphic symbol will change to frame 4. His mouth opens a little wider for the “eh” part of hello.

Move the playhead to frame 14 of the main Timeline.
In the Frame Picker, select frame 2.
When the animation reaches frame 14, the head symbol will switch to displaying frame 2. His mouth is rounded for the “oh” sound.

At frame 17, use the Frame Picker to change the mouth back to frame 1.
Finally, at frame 30, use the Frame Picker to change the mouth to frame 5 so that the alien gives us a broad smile.

Choose Control > Play (Enter/Return).
Animate plays the animation. Your alien lip-syncs “hello,” pauses, and then smiles.
You’re done with this document, so you can save and close it.
NoteIf you add frame labels to your graphic symbol’s timeline, those labels will also appear in the Frame Picker to make it easier to select the frames you want.
Review Questions
1 What are two ways in which classic tweening and motion tweening are similar?
2 What are two ways in which classic tweening and motion tweening are different?
3 Why is the Snap To Objects option in the Tools panel important when adding a motion guide to a classic tween?
4 How can you edit the path of an object’s motion?
5 What are the two axes of the ease graph?
6 How is a graphic symbol different from a movie clip symbol?
Review Answers
1 Both a motion tween and a classic tween require a symbol instance on the Stage. Another way in which they are similar is that they require their own layer; no other tween or drawing object can exist on the tween layer.
2 You can apply complex eases to motion tweens on the Timeline through the Motion Editor. For classic tweens, eases are applied from the Tweening section of the Properties panel. To change the path of motion of a motion tween, you can edit the path that appears on the Stage directly. To change the path of motion for a classic tween, you must create a separate motion guide layer and draw the path.
3 The Snap To Objects option forces an object to snap to other nearby objects. For an object to travel along a path in a motion guide, the object must be attached to the path in the first and the last keyframe.
4 To edit the path of an object’s motion, choose the Selection tool and drag directly on the path to bend it. You can also choose the Convert Anchor Point tool and Subselection tool to pull out handles at the anchor points. The handles control the curvature of the path.
5 The ease graph shows the amount of change in the tween versus the amount of time that has passed. The time (in frames) is shown horizontally and the percent of tween is shown vertically.
6 A graphic symbol plays an animation on its timeline only if there are sufficient frames on the main Timeline where the instance is placed. A movie clip symbol, on the other hand, contains an independent timeline, so it will play its animation regardless of how long the main Timeline lasts, as long as an instance remains on the Stage.