
1 Introducing Adobe Dimension
Lesson overview
In this lesson, you’ll explore the workspace and learn the following:
What Adobe Dimension is
How to open a Dimension file
How to work with the tools and panels
How to change your view of a scene
How to make simple edits to a scene
This lesson will take about 45 minutes to complete. Please log in to your account on peachpit.com to download the lesson files for this lesson, or go to the “Getting Started” section at the beginning of this book and follow the instructions under “Accessing the lesson files and Web Edition.” Store the files on your computer in a convenient location.
Your Account page is also where you’ll find any updates to the lesson files. Look on the Lesson & Update Files tab to access the most current content.
The modern, uncluttered interface of Adobe Dimension makes it easy to find the tools and options you need.
Introducing Adobe Dimension
Adobe Dimension is a desktop program for Macintosh and Windows for creating photorealistic images from 3D assets for branding, product shots, scene visualization, and abstract art.
Dimension makes 3D design, compositing, and rendering accessible to people with little or no 3D software experience. Wherever possible, special terminology that is unique to the 3D modeling world is avoided in both the Dimension program and this book. The Dimension interface should be familiar to users of other Adobe design tools, such as Adobe XD, Illustrator, Photoshop, and InDesign.
Dimension is a subscription product, available as part of the Adobe Creative Cloud product offering. Depending on your subscription plan, you might be paying only for Dimension, or you might have access to all the Creative Cloud applications, including Adobe Photoshop and Illustrator, which are particularly useful as companions to Adobe Dimension.
Where do 3D models come from?
Dimension isn’t intended for creating 3D models. 3D models are usually created with modeling software such as 3ds Max, Blender, Inventor, Maya, Rhino, Sketchup, SolidWorks, Strata 3D, and so on. Most of these products have a fairly steep learning curve, are quite technical, and, due to their complexity, aren’t well-suited for part-time or occasional use.
Dimension’s sweet spot is in importing models from these programs; it can then apply new materials to their surfaces, position them with other models, composite them into 2D scenes, and apply realistic lighting, reflections, and shadows. The result is then “rendered,” or converted into a flat 2D image, as a PSD or PNG file that can be used in print publications or on websites or for other digital uses. Dimension also includes a “beta” feature (at the time of this writing) that lets you export an interactive 3D version of the scene to a website to share with others.
1. Create a scene.
2. Adjust lighting, materials, size, position, rotation, etc.
3. Add background.

4. Output. Publish to Web (Beta). Render to PSD or PNG.

Starting Dimension and opening a file
In this lesson, you will open a finished Dimension scene and poke around a bit to learn how Dimension’s interface is designed.
Launch Adobe Dimension.
A start screen is displayed. Your screen may look different than the screenshot shown here, and that’s OK. The start screen contains links to various tutorials and other Dimension resources.
If you’ve worked on Dimension files previously, those files will be displayed in a list at the bottom of the start screen.
In the lower-left corner of this screen there are links to more helpful learning content, as well as links through which to provide feedback to Adobe about Dimension.
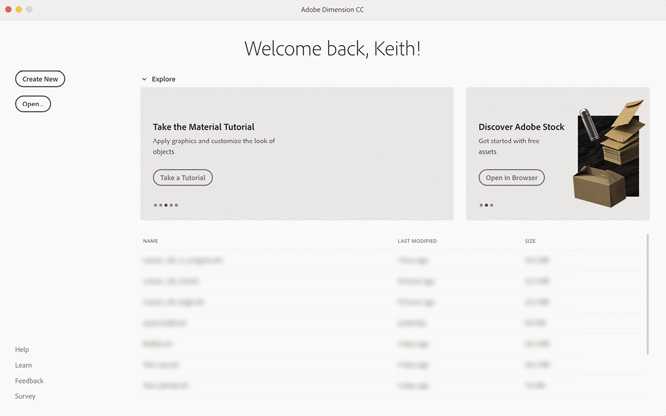
Click Open.
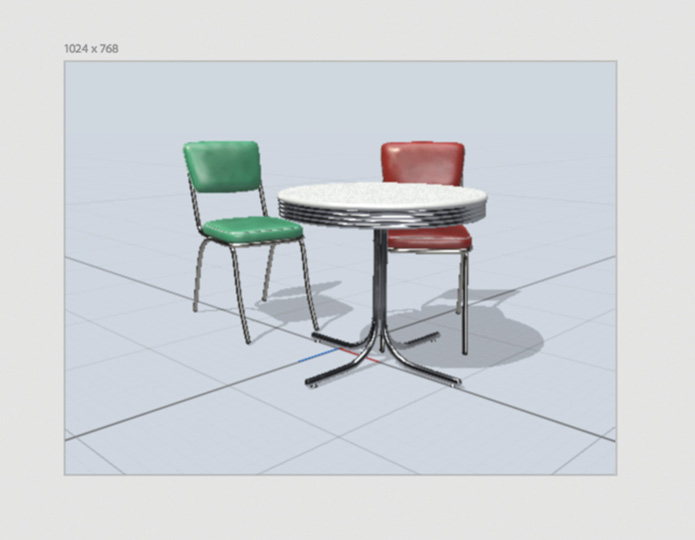
Select the file named Lesson_01_begin.dn, which is in the Lessons > Lesson01 folder that you copied onto your hard disk, and then click Open.
You’ll use this simple 3D scene to explore the Dimension interface.
Exploring the tools
The Tools panel on the far left side of the screen contains a handful of tools that you’ll use to create and edit your 3D scenes. Let’s take a tour of the Tools panel.
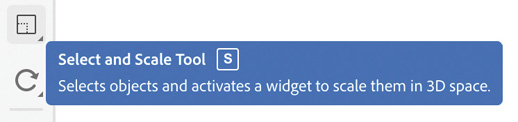
Hover over each of the tools in the Tools panel, and note that a blue tooltip is displayed. This tooltip tells you the name of the tool, the keyboard or mouse shortcut that can be used to access the tool, and what the tool is used for.
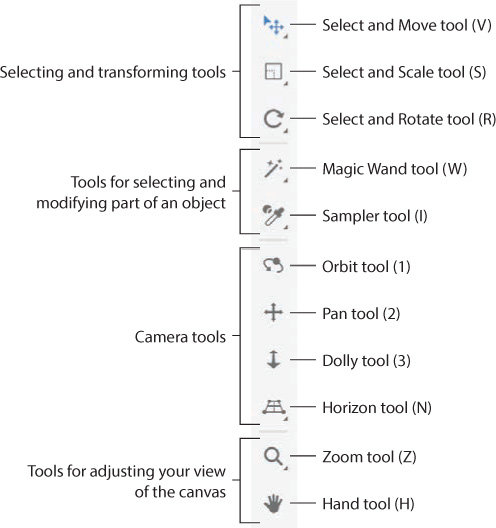
Note that the Tools panel is divided into four sections by subtle horizontal lines.
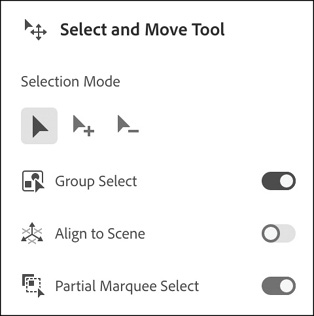
The top three tools—the Select and Move tool, the Select and Scale tool, and the Select and Rotate tool—are used for selecting and transforming 3D models. Note that there isn’t a separate Selection tool like in other Adobe design programs. Instead, each of these tools will allow you to both select 3D objects and transform them.
The next two tools—the Magic Wand and the Sampler—are grouped together because they are both used for selecting and changing the color or surface materials of just part of a larger 3D object, such as the cap on a bottle or the handle on a mug.
The next four tools—Orbit, Pan, Dolly, and Horizon—are used for adjusting the position of the “camera” in the 3D scene. These tools are often referred to as the camera tools.
The bottom two tools—the Zoom tool and the Hand tool—are used to adjust your view of the “canvas,” or work area, on the screen. These tools work similarly to the Zoom and Hand tools in Photoshop, Illustrator, and InDesign.
Right-click the Select and Move tool, and note that some additional options for this tool appear on the screen.
The small black arrow in the lower-right corner of a tool in the Tools panel indicates that additional tools or tool options will appear if you either right-click the tool or press and hold the mouse button on the tool.
Exploring the panels
As in many other Adobe design programs, panels on the right side of the screen display the properties of objects that you have selected in the work area; the panels allow you to edit those properties as well. Let’s see how this works in Dimension.
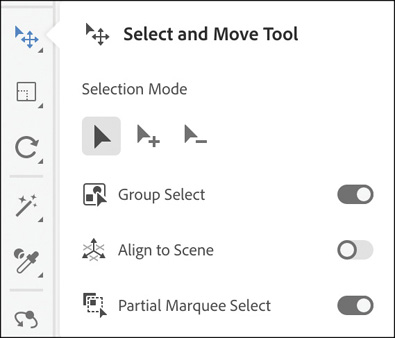
Select the Select and Move tool (keyboard shortcut: V) in the Tools panel.
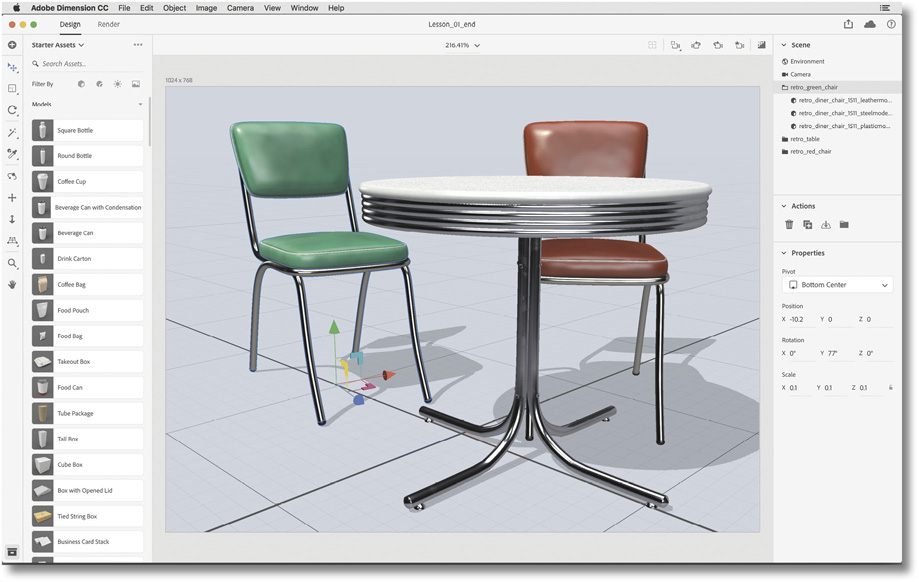
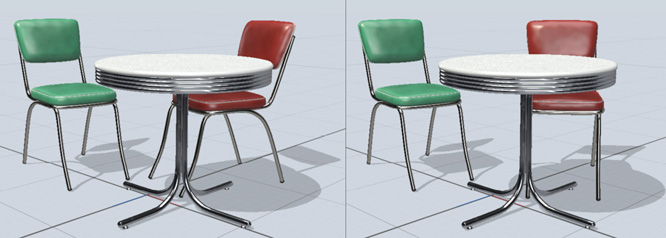
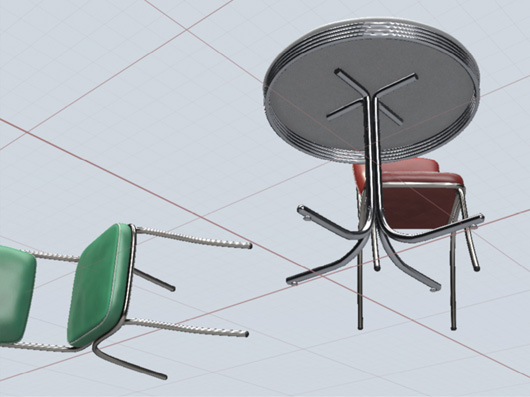
Click the red chair in the scene. Note that the chair displays with a blue highlight to indicate that it is selected.
Explore the Scene panel
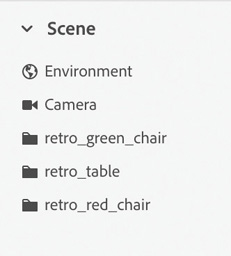
The Scene panel displays a list of all the components that make up the scene.
Look at the Scene panel on the right side of the screen. In this case, there are five objects in the scene: Environment, Camera, retro_green_chair, retro_table, and retro_red_chair.
Right-click the Select and Move tool in the Tools panel. In the tool options that appear, turn on the Group Select option. This causes the tool to select the entire group when you click a grouped object, similar to the Selection tool in Photoshop, Illustrator, and InDesign.
Click the green chair on the canvas (the “page” or the work area) to select it. This will highlight the retro_green_chair model in the Scene panel.
Hover over the retro_green_chair entry in the Scene panel, and you’ll see an eyeball icon
 to the right of the entry. Click this eyeball icon to hide the green chair on the canvas.
Click the eyeball icon again to show the model on the canvas.
Click the words “retro_ table” in the Scene panel, and the table will be selected on the canvas. Sometimes clicking an entry in the Properties panel is an easier and more precise way to select models than clicking the models on the canvas.
Explore the Actions panel
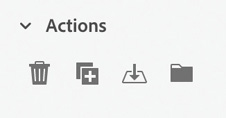
Depending on what you have selected in your scene, the Actions panel will display quick shortcuts to various “actions,” or things that you can do to your selection.
With the retro_table model selected, the Actions panel displays the Delete, Duplicate, Move to Ground, and Group actions.
Hover over each action icon to see the name of the action as well as a keyboard shortcut that can be used for each.
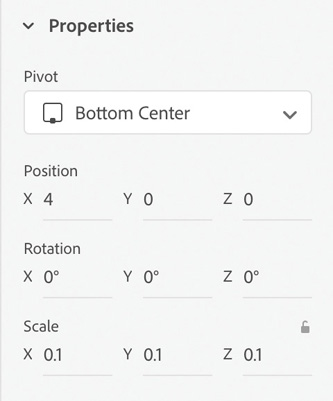
Explore the Properties panel
Depending on what you have selected in your scene, the Properties panel displays various properties of the selection.
With the retro_table object selected, the Properties panel displays the “pivot” point, as well as X, Y, and Z values for Position, Rotation, and Scale, respectively. Each of these values can be edited.
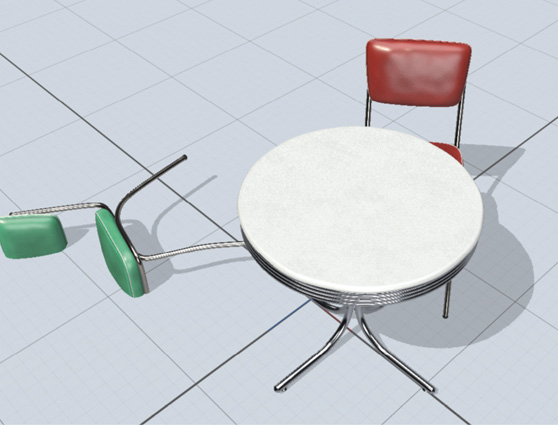
Enter a value of 4 in the X field for Position. This will move the table to the right in the scene.
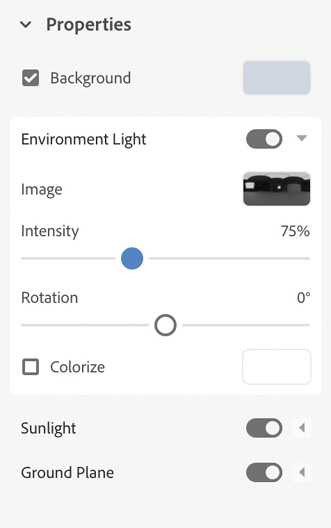
In the Scene panel, click Environment to select the environment, which is the area around the 3D models that controls the lighting and ground properties.
In the Properties panel, you’ll see settings for Background, Environment Light, Sunlight, and Ground Plane displayed.
Under Environment Light, drag the Intensity slider to the left to about 75% to reduce the amount of overall light in the scene.
![]() Note
Note
Unlike in some other Adobe products, these three panels (Scene, Actions, and Properties) cannot be closed or rearranged—they will always be displayed on the screen at the same location. You can collapse and expand each of these panels by clicking the disclosure arrow to the left of the panel name.
Understanding the Camera
Every Dimension project contains a single camera. You can manipulate the camera with the Orbit, Pan, Dolly, and Horizon tools to view the 3D scene from various angles, distances, and perspectives.
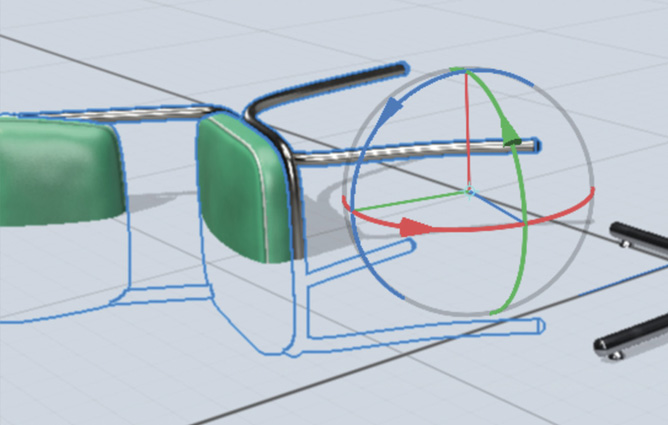
Choose the Select and Rotate tool in the Tools panel (keyboard shortcut: R).
Either click the red chair on the canvas or click the retro_red_chair object in the Scene panel to select the red chair.
In the Properties panel, enter ° for the Y value for Rotation, and press Return/Enter. Note that the chair rotates around the vertical (y) axis.
Choose Edit > Undo Edit Scene to undo the rotation.
Choose Edit > Redo Edit Scene to redo the rotation.
Note that as the chair rotates, the shadows change in length and appearance but are still cast in the same direction.
Choose the Dolly tool in the Tools panel (keyboard shortcut: 3). Drag down on the screen with your mouse to move the camera farther away from the object.
Choose Camera > Camera Undo to return to the original view of the object.
Choose the Orbit tool in the Tools panel (keyboard shortcut: 1).
Drag around on the scene with the Orbit tool. This changes your view of the scene. It is as if you are flying around the scene, viewing the models from different angles through a camera lens.
Note that as you rotate your view of the scene with the Orbit tool, the shadows change direction but stay the same length and appearance; this is because the models and light source remain the same relative to each other, and you are just moving around the scene.
Choose Camera > Camera Undo as many times as necessary to return to the initial view of the scene.
![]() Note
Note
Dimension has two undo commands. Edit > Undo reverses the last actual edit that you made to the objects in your scene. Camera > Camera Undo reverses the last movement of the camera.
Understanding the Canvas
So far, all our manipulation of our 3D scene has occurred inside a large rectangle that occupies most of your work area on the screen. This rectangle is called the “canvas.” Think of the canvas as your “page.” It’s the actual dimensions of the final 2D image that is being created from your 3D objects. Most of the time, you’ll probably just leave this canvas as it is on your screen, using the camera tools to change your view of the scene within the bounds of the canvas. Depending on what other software programs you may have used, it might be helpful to think of the canvas as the “viewport” into your 3D scene.
If you’ve used Adobe design tools such as Photoshop, Illustrator, or InDesign, you may want to manipulate your view of the canvas independent of the camera tools.
![]() Tip
Tip
It might be helpful to think of the canvas this way. The camera tools (Orbit, Pan, Dolly, and Horizon) manipulate your view of the scene within the canvas. The Zoom and Hand tools manipulate your view of the canvas itself.
![]() Tip
Tip
As with many other Adobe design tools, you can use the Command+plus and Command+minus (Mac) or Ctrl+plus and Ctrl+minus (Windows) keyboard shortcuts to zoom in and out. Use Command+1 (Mac) or Ctrl+1 (Windows) to see your design at 100%, and use Command+zero (Mac) or Ctrl+zero (Windows) to return to the “fit in window” view.
Select the Zoom tool in the Tools panel (keyboard shortcut: Z), and click the canvas or drag across the canvas to zoom in.
Select the Hand tool in the Tools panel (keyboard shortcut: H), and drag the scene to move the canvas around on the screen.
Select the Zoom tool in the Tools panel (keyboard shortcut: Z).
Hold down the Option key (Mac) or Alt key (Windows), and click the canvas a couple of times to zoom out.
Choose View > Zoom to Fit Canvas to fit the canvas on the screen.
Understanding the Ground Plane
The vanishing lines (the grid of squares that you see on the screen) represent the Ground Plane of the 3D scene. The Ground Plane is the “floor” that objects in the scene typically sit on, although objects can float above this floor or be buried below the floor.
Choose Camera > Switch to Home View to ensure that your camera view is back to the way it was at the beginning of this lesson.
Choose the Select and Rotate tool in the Tools panel (keyboard shortcut: R).
Select the retro_green_chair object in the Scene panel.
In the Properties panel, change the Z value for Rotation to 90°, and press Return/Enter. The chair rotates around the z-axis so that half of the chair disappears into the Ground Plane.
Choose the Orbit tool in the Tools panel (keyboard shortcut: 1).
Drag down on the screen with the Orbit tool. This changes your view of the scene so that you are viewing it from above.
Note that the grid lines on the Ground Plane are dark gray and that the Ground Plane is opaque. In other words, you can’t see through the floor to what is underneath.
Drag up on the screen with the Orbit tool until you can see the entire green chair. Now you are viewing the scene from below the Ground Plane, looking up at the bottom of the table.
Note that you can see both the part of the green chair that is sticking “up” from the ground and the part that is “buried” below the ground. When you are viewing the scene from below the Ground Plane, the Ground Plane appears transparent so that you can see through it to the objects above.
Note also that the grid lines on the underside of the Ground Plane are red. This can help reduce confusion in those instances when you aren’t sure if you are viewing a scene upside down or right-side up.
Choose the Dolly tool in the Tools panel (keyboard shortcut: 3). Drag down on the screen repeatedly with your mouse to move the camera farther away from the object. Note that the Ground Plane is “infinite.” The camera can be moved a long way away from the object.
Choose Camera > Switch to Home View to return the camera view back to the way it was at the beginning of this lesson.
![]() Tip
Tip
The grid lines on the Ground Plane can be toggled on and off with View > Toggle Grid. And, the Ground Plane itself can be turned on and off in the Properties panel when Environment is chosen in the Scene panel.
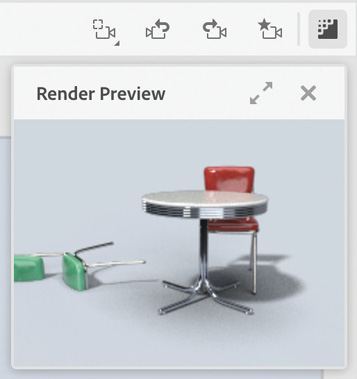
Using Render Preview
Getting an accurate view of the surfaces, colors, lighting, shadows, and reflections in a scene requires that a scene be rendered. Rendering is a processor-intensive, time-consuming task in which the computer analyzes how the objects in a scene interact with each other, the background, and the lighting in the scene, and then calculates accurate shadows, highlights, surface details, and reflections.
But even the fastest computers today are unable to render a complex scene in real time as you make edits to the scene. This is why rendering isn’t usually done until the final stages of a project. However, the Render Preview window gives you a quick, fairly accurate idea of what the final rendering will look like, almost in real time, as you work on a scene.
Click the Render Preview icon
 in the upper-right corner of the screen.
After a 15- to 20-second delay (depending on the speed of your computer), you’ll see a small thumbnail image of what the final render will look like.
Choose the Select and Rotate tool in the Tools panel (keyboard shortcut: R).
If it isn’t already selected, click the retro_green_chair in the Scene panel to select the chair.
In the Properties panel, change the Z value for Rotation to 0°, and press Return/Enter. After a brief delay, you’ll see the Render Preview window update to show the new, edited scene.

The two modes of Dimension
The Dimension interface consists of two modes: Design and Render. Design mode is where you’ll spend the lion’s share of your time creating and editing 3D scenes. Render mode is where you’ll create the final, high-quality pixel-perfect output of your scene. You’ll learn all about both of these modes throughout this book.
![]() Note
Note
At the time of this writing, Dimension includes a “Beta” feature called Publish to Web. To try this out, click the share button in the upper-right corner and choose Publish 3D Scene. Dimension will publish your scene to a Web server (hosted by Adobe), and return a URL that you can share. Anyone who follows the URL will be able to interactively change their view of the 3D scene.
In the upper-left corner of the screen, you’ll see a line underneath Design to indicate that we are currently in Design mode. Whenever you open a Dimension file or create a new file, Dimension will initially display the file in Design mode.

Click Render to switch to Render mode. Note that the 3D content disappears from view and that all the tools and panels are replaced with new panels for controlling the render settings.
We’ll cover the details of rendering in a later lesson. For now, I’ve rendered the exercise file used in this lesson for you.
Open the Lesson_01_final_render.psd file in Adobe Photoshop to examine the final render and compare it to what you saw in the small Render Preview window earlier.

Click Design to switch back to Design mode, making the 3D content visible again.
![]() Note
Note
You can switch between Design and Render modes at any time and as often as you wish. Although rendering is usually done at the end of a project, you may wish to occasionally render your work as it progresses so you can get an accurate view of how your project looks at the moment.
Getting help
The Learn icon ![]() in the far upper-right corner of the screen gives you access to online help content for Dimension, including tutorials, videos, keyboard shortcuts, and galleries of finished work.
in the far upper-right corner of the screen gives you access to online help content for Dimension, including tutorials, videos, keyboard shortcuts, and galleries of finished work.
Review questions
1 How many files can be open at one time in Dimension?
2 What is the purpose of Render mode?
3 Why isn’t there a selection tool in Dimension?
4 What is the “floor” that 3D objects rest on called?
Review answers
1 Only one file can be open at a time in Dimension. If you have one file open and then open a second file, the first file will close.
2 Render mode is used to create the final scene with accurate lighting, shadows, reflections, materials, and surface properties. Computers are unable to keep up with rendering in real time as you make edits to a scene, so rendering is a separate process that takes place in Render mode.
3 Dimension instead has the Select and Move, Select and Scale, and Select and Rotate tools, all of which will allow you to select an object in addition to moving, scaling, or rotating the object.
4 The imaginary “floor” in a 3D scene is called the Ground Plane.