
4 Creating Web Assets Using Photoshop Generator Bonus
Lesson overview
In this lesson, you will learn the following:
How to access and set up Photoshop Generator
How to create web assets using Photoshop Generator
This lesson will take about 30 minutes to complete. If you have not already done so, please log in to your account on peachpit.com to download the project files for this lesson as described in the “Getting Started” section at the beginning of this book and follow the instructions under “Accessing the Lesson Files and Web Edition.” Define a site based on the lesson04bonus folder.

There are tons of little-known productivity enhancements in Adobe apps—like Photoshop Generator—that can make mundane tasks like creating web image assets fast and easy.
Working with Adobe Photoshop Generator
Adobe Photoshop Generator is a web-oriented tool that allows you to export web assets from a Photoshop file in a variety of sizes, resolutions, and even file types. Best of all, this feature works in real time, exporting image assets from your file based on user-specified attributes added to the layer name. Let’s take a closer look at this great tool for web designers and developers.
![]() Note
Note
This exercise should work with any version of Photo-shop CC and the lesson04bonus lesson files. Be aware that if you use a different version than the one pictured, the dialog and menu options may vary.
![]() Note
Note
The sample file used in this exercise requires the font Bree Serif, which you can download and install for free from Adobe Type-kit. To access this font, and the entire Typekit library, choose Type > Add Fonts from Typekit in Photoshop CC 2015 or higher.
In this exercise, you’ll work with an Adobe Photoshop document to prepare assets for your web project.
Launch Photoshop CC (2019 release).
Open GreenStart-mockup.psd from the lesson04bonus/resources folder.
 Tip
TipIt’s a good idea to save the file under a different name so you can refer back to the original assets should you make an error.
The Photoshop file contains a complete mockup of the GreenStart site design, which is composed of various vector-based design components as well as image assets stored in separate layers. Note the use of colors and gradients in the design.
Choose File > Save As.
Navigate to the lesson04bonus folder.
Name the file myGreenStart-mockup.psd and save the file.
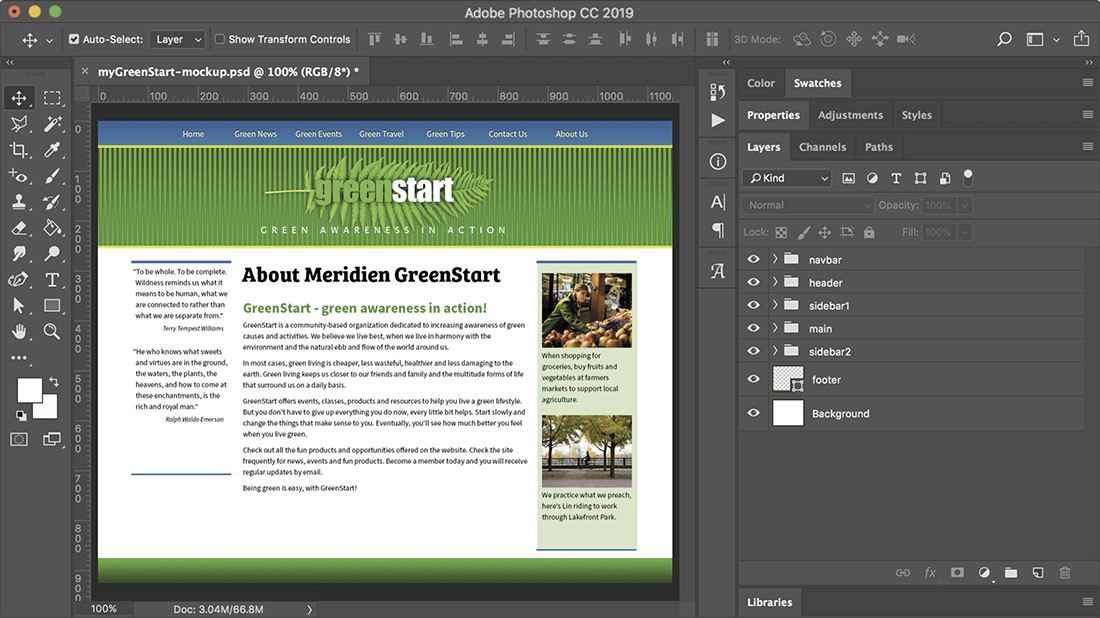
If necessary, choose Window > Layers to display the Layers panel. Observe the names and contents of the layers and layer groups.
The layers and layer groups are named for the webpage components.
 Note
NoteThe motto text uses the font Lucida Sans, which may not be installed on every computer and is not available from Typekit. Feel free to substitute Arial or Verdana for this font in this exercise.
Open the header layer group and observe the contents.
The header group contains two text elements and four graphical elements. Often, it’s difficult to understand how a graphic component is built or for what purpose it is intended by looking at the layer names alone.
In the GreenStart text layer, click the eye icon
 to toggle the layer visibility off.
The text “greenstart” disappears from the layout.
In the fern layer, click the eye icon
to toggle the layer visibility off.The image of the fern disappears. Using this method, you can identify each element of the header and see what role it plays in the creation of the overall design. The number and type of layers and the level of detail used here aren’t necessary for a mockup that you merely want to use for client approval. This file was set up specifically to create many of the final assets for the webpage design.
Click the eye icon
to toggle the GreenStart and fern layers back on.
There are several ways to create image assets from a Photoshop mockup; Generator is just one option.
Exporting assets from Photoshop
The fern layer will be used to create one component of the header background. Photoshop generates a web asset automatically if you add a file extension to the layer name.
Double-click the name of the fern layer; type fern.png and press Enter/Return to complete the name.

When activated, Generator works in the background, exporting assets in real time.
Choose File > Generate > Image Assets.
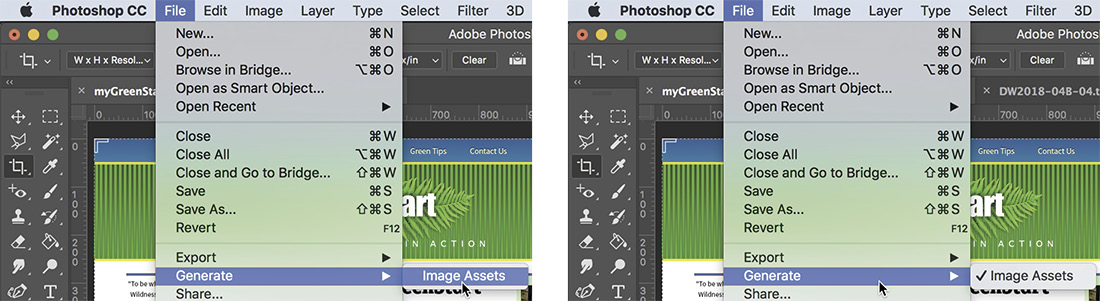
The next time you look at the Generate menu option, a checkmark will appear beside Image Assets, indicating that Generator is active.
Choose File > Open. Navigate to the lesson04bonus > resources folder.
A new folder has been created and named myGreenStart-mockup-assets by Generator. Whenever you add file extensions to the layer names and enable Generator, it creates a folder and fills it with assets automatically, based on the layer names and settings.
Navigate to the myGreenStart-mockup-assets folder created by Photoshop.
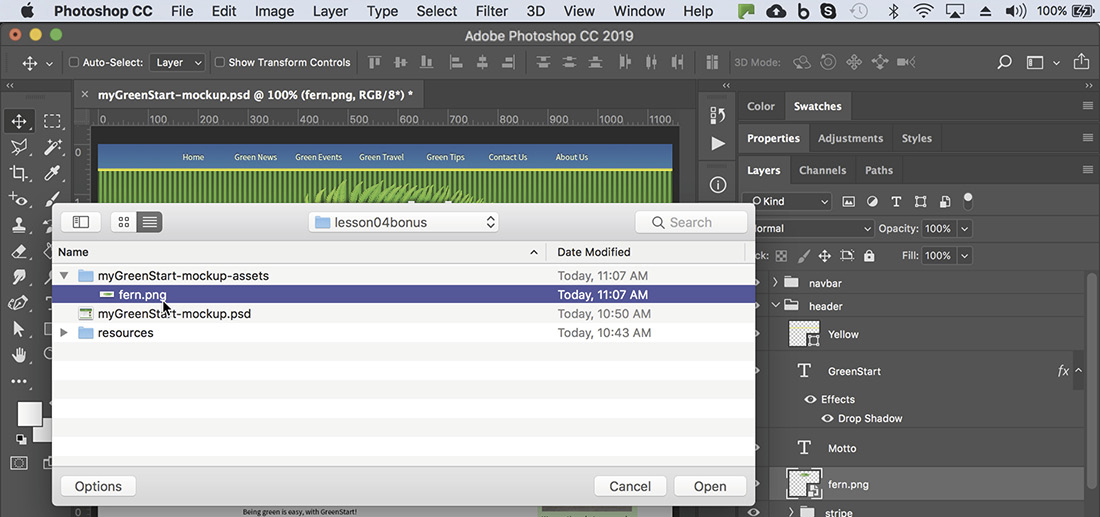
The folder contains a single image: fern.png.
Open fern.png.
The file contains the fern with a transparent background. Note that the image displays a drop shadow. The shadow is a permanent part of the image, no longer created by a Photoshop effect.
Choose Image > Image Size.
Note the dimensions and resolution of the image.

The image is 468 pixels by 157 pixels, at 72 pixels per inch (ppi).
Click OK to close the Image Size dialog. Close fern.png.
As you can see, Photoshop provides a powerful feature for creating web assets automatically simply based on the names you apply to image layers. But the feature doesn’t stop there.
Creating multiple assets using Generator
Generator can also modify the default export specifications and even create multiple assets at multiple resolutions all at the same time.
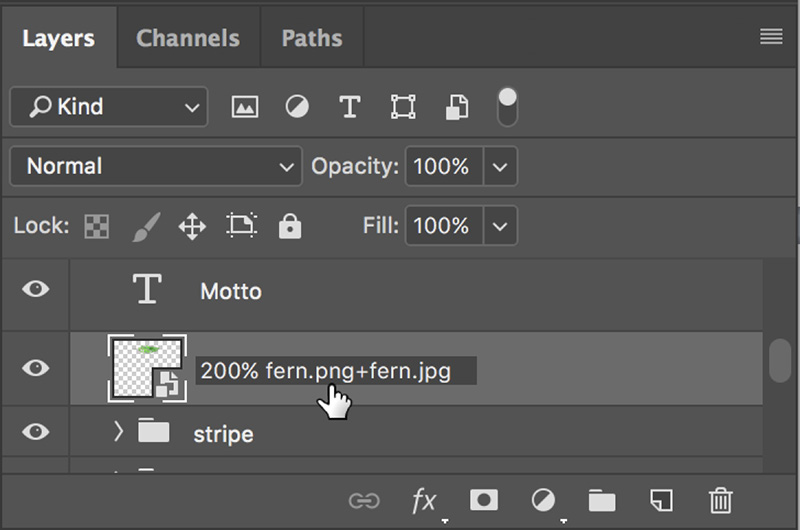
Change the layer name from fern.png to 200% fern.png+fern.jpg and press Enter/Return to complete the name.
Choose File > Open.
If necessary, navigate to the myGreenStart-mockup-assets folder.
The folder contains two images: fern.png and fern.jpg, both created by Generator. Older files with the same names are replaced automatically.
Select fern.png and open the file.
The file contains the fern, but it appears twice as large as the previous image.
Open fern.jpg.
The file contains the same fern image, but at the original size. JPEGs do not support transparency, so the background is white. There’s no need for the JPEG version of the image. Generator can remove assets automatically too.
Close fern.jpg and fern.png.
In myGreenStart-mockup.psd, change the layer name from 200% fern.png+fern.jpg to 150% fern.png and press Enter/Return to complete the name.

The specification creates a larger, higher-quality image that will display well in regular browsers and on new higher-resolution devices. Because you removed “fern.jpg” from the layer name, Generator automatically deleted the JPEG version of the file in the resources folder.
Choose File > Open. Navigate to the myGreenStart-mockup-assets folder.
The JPEG version of the file is no longer visible in the folder. As you can see, Photoshop generates assets based on the name of the layer. You can create an entire set of images for your site design from the layers in this file.
Press the Esc key or click Cancel to close the Save dialog.
In the Layers panel, open the header layer group, if necessary.
Change the name of the stripe layer group to stripe.png.

Open the sidebar2 layer group.
Change the layer shopping to shopping.jpg.
Change the layer biking to biking.jpg.
NoteIn Photo-shop, the background is mocked up using two layers: stripe and stripes group. You are exporting the web background from the smaller stripe (singular) layer group.

Choose File > Open. Navigate to the myGreenStart-mockup-assets folder.
NoteIf you do not see the images created as described, check to make sure that the command File > Generate > Image Assets is enabled as described in the previous exercise.

The myGreenStart-mockup-assets folder now contains four image files. These files are identical to the ones you will use to build the site template and populate articles in upcoming lessons.
Close the dialog. Close myGreenStart-mockup.psd.
Feel free to save your changes, if desired.
As you can see, Generator offers some handy tools for turning this mockup into real web design assets, but the tricks don’t stop there. Photoshop and Dreamweaver have even more collaboration tools to offer, as you will see in Lesson 5, “Creating a Page Layout,” and Lesson 8, “Working with Images.”
Check out https://helpx.adobe.com/photoshop/using/generate-assets-layers.html to see a complete explanation of Adobe Generator and how to use it.