Thanks to a process called tweening, not all animation has to be drawn frame by frame. If you give Flash two keyframes—one showing the way an object looks at the start of a sequence, and the other showing what it looks like at the end—Flash can compare the keyframes, analyze the differences between them, and gradually change one to the other by generating a series of in-between frames.
There are two kinds of tweens: shape and motion. Both types accomplish similar tasks, but they are suited to different types of objects: Shape tweens are used to animate editable paths; motion tweens are used primarily to animate instances of symbols. You’ll be grateful for the amount of time you save when you get into the habit of using tweens.
Shape tweening provides an automated way to change an object gradually from one shape to another—a process sometimes known as morphing. Shape tweening can also be used to make gradual changes in an object’s size, position, orientation, color, and opacity.
These are the basic steps for setting up a shape tween:
1. Draw an object on the stage in an empty keyframe. (Don’t group the object or convert it to a symbol. Shape tweens work only with editable paths, primitive shapes, or Drawing Objects.)
2. Decide on a duration for the shape tween, and calculate in which cell of the timeline the last keyframe should fall. (For example, if your frame rate is 15 fps, and you want the tween to take 3 seconds, the last keyframe should be 45 frames after the first keyframe.) Select that cell.
3. Press F6. Flash fills the in-between cells with regular frames, creates a new keyframe in the selected cell, and copies the object from the preceding keyframe into it.
4. With the second keyframe still selected, modify the object. You can reshape it, move it to a different place on the stage, transform it with the Free Transform tool, change its color or opacity, or do any combination of those things.
5. Select the first keyframe again. (This will also work if you select one of the intermediate frames, but selecting the first frame is recommended.)
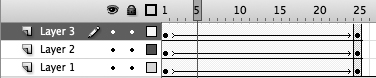
6. Choose Insert > Shape Tween. The frames between the two keyframes turn green, and an arrow points from the first keyframe to the last (Figure 40a). The arrow is your confirmation that you have a working shape tween.
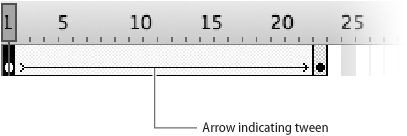
If you see a dotted line instead of an arrow, it means your tween is broken. See #46 for suggestions about how to fix it.
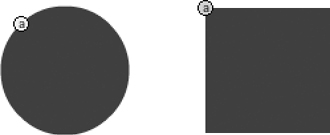
7. Scrub through or preview the movie. You’ll see that in each tweened frame, the object in the first keyframe incrementally takes on the characteristics of the object in the second keyframe (Figure 40b).
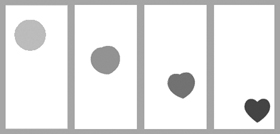
Shape tweens can be wild or tame (Figure 40c). Wild shape tweens are fun to watch because of the interesting patterns they produce; tame shape tweens are better for more realistic types of movement.
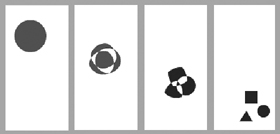
If wild shape tweens are what you want, here are some things to try:
• Make the object in the first keyframe and the object in the second keyframe as different as possible. In fact, instead of pressing F6 in Step 3, you can press F7, draw an entirely new object in the second keyframe, and then watch how Flash tweens one into the other.
• Have different numbers of objects in the two keyframes. This sort of tween is especially common with text—for example, morphing the word no (two objects) into yes (three objects). Keep in mind, though, that if you want to shape-tween text, you first have to break it apart into editable paths (see #20).
If you prefer tame, controlled shape tweens—as most serious animators do—you might consider the following suggestions:
• Tween only one object per layer. Remember that Flash considers the stroke and the fill to be separate objects. If your path has both, move the stroke and the fill to different layers, and tween them separately but simultaneously (Figure 40d). Alternatively, you could use a Drawing Object, in which Flash considers the stroke and fill to be part of a single object.
• Simplify each object as much as possible. The fewer anchor points there are, the smoother the tween will be.
• Use shape hints, which are explained in #41.
Shape tweens are notoriously unpredictable. It may be clear to you what the most logical way is to morph one object into another, but that doesn’t mean it’s apparent to Flash. Even a simple transformation may take place in a way you don’t expect (Figure 41a).

To help with this issue, Flash provides tools called shape hints. Shape hints always come in pairs: one to mark a point on a path in the first keyframe of a tween, the other to mark the corresponding point on the path in the second keyframe. You can use shape hints as follows:
1. Select the first keyframe of the tween.
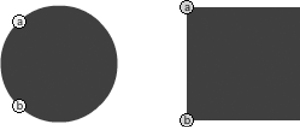
2. Choose Modify > Shape > Add Shape Hint. A red circle with the letter a on it appears in the center of the object.
3. Drag the shape hint to the first point you want to mark—in this case, the upper-left edge of the circle. When you release the shape hint, you should see it snap into place (Figure 41b).
If there’s no obvious snap, it means you may not have dragged the shape hint fully onto the path. Try dragging it and dropping it again.
4. Select the second keyframe of the tween. An identical red circle with the letter a on it is in the center of the object.
5. Drag this second shape hint to the point that corresponds to the point you marked in Step 3—in this case, the upper-left corner of the square. Once again, let it snap into place.
If everything has been done correctly, this shape hint should turn from red to green, and the first shape hint should turn from red to yellow. If the shape hints are not yet yellow and green, repeat the drag-and-snap process until they are.
6. Preview the movie to see whether the shape tween now does what you want. (In many cases—including this one—it won’t. Often one pair of shape hints is not enough.) (Figure 41c)

If necessary, repeat the entire process to add a second pair of shape hints (Figure 41d). Flash labels the second pair with the letter b, the third with the letter c, and so on.
Tip
If you add multiple shape hints, be sure to keep the shape hints in order as you work around the perimeter of the object.
In the example of the circle morphing into the square, using two pairs of shape hints is sufficient (Figure 41e). In other cases, more may be needed.

In general, if five or six pairs of shape hints don’t get you the result you want, it’s unlikely that adding more shape hints will help. In this case, you might consider deleting the shape tween entirely and trying a new one with simpler paths.
Motion tweens can accomplish many of the same things that shape tweens can (see #40). Here are the significant differences:
• Motion tweens work only with text objects and instances of symbols.
• Motion tweens can change an object’s position, size, orientation, color, and opacity, but they can’t morph one object into another as shape tweens can.
• Unlike a shape tween, which can include multiple objects in a single keyframe, a motion tween works with only one object at a time. If you want to motion-tween several objects simultaneously, each must be tweened separately on a separate layer.
• Motion tweens are more predictable, more reliable, and less processor intensive than shape tweens. If you have the option of using either a shape tween or a motion tween to achieve the same effect, use the motion tween.
To create a motion tween:
1. Place an instance of a symbol on the stage in an empty keyframe. Make sure that either the object (on the stage) or the keyframe (in the timeline) remains selected.
2. Choose Insert > Motion Tween. In the timeline, a series of frames—beginning with the selected keyframe—turns blue to represent the motion tween.
The default length of a tween is one second, but you can change that by dragging the last frame of the tween forward or backward.
3. Move the playhead to any frame within the tween. On the stage, change one or more of the object’s properties (including position, color, and so on). The corresponding frame in the timeline becomes a property keyframe, indicated by a small black diamond (Figure 42a).

Repeat this step as many times as you like.
4. Scrub through or preview the movie to see the motion tween in action.
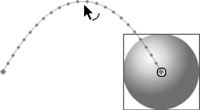
When you drag a motion-tweened object to a different place on the stage, Flash connects the object’s new location to its previous location with a thin, colored line called a motion path. The motion path is marked with a series of dots representing the number of frames in which the movement takes place. If you lengthen or shorten a tween by dragging its last frame in the timeline, the number of dots changes accordingly.
By default, a motion-tweened object moves in a straight line. To change the straight motion path to a curve, drag it from the middle with the Selection tool (Figure 42b), just as you do with the straight outlines of editable objects (see #6). If you’re comfortable working with the Pen tool, you can also reshape the line segment by treating its endpoints as the anchor points of a Bézier curve (see #12).
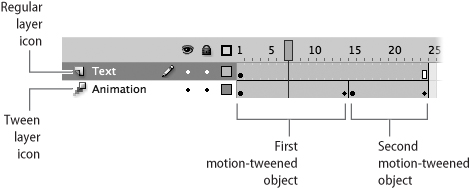
Creating a motion tween causes the layer the motion tween is on to become a tween layer. Unlike a regular layer, a tween layer can hold only one object at a time, and only if that object is motion-tweened. It’s possible to put several motion-tweened objects on one layer, but only if each tween ends before the next one begins (Figure 42c).
Flash allows you to enhance a motion tween in several ways. When you select a motion tween in the timeline by clicking anywhere within it, the following controls appear in Properties:
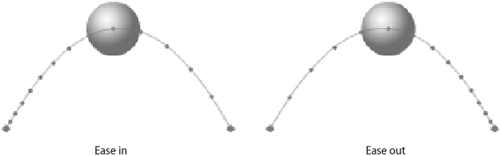
• Ease. By default, a tween moves at a constant speed. The Ease control allows you to vary the speed by choosing a number from –100 to 100. A negative number represents “easing in,” in which the tweened object starts moving slowly and gradually speeds up; a positive number represents “easing out,” in which the object starts quickly and gradually slows down. The differences in speed are reflected in the spacing of the dots along the motion path: Dots that are closer together represent slower movement; dots that are farther apart represent faster movement (Figure 43a).
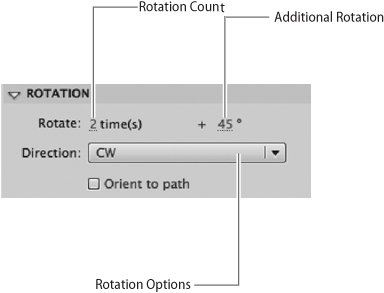
• Rotation. The Rotation Count and Additional Rotation controls determine how many times the tweened object rotates between the start and the end of the tween (Figure 43b). The default Rotation Count setting is 0—no rotation—but you can set the number of rotations as high as you like.
Tip
Flash needs several frames to animate the rotation of an object. Therefore, it’s best to limit the number of rotations to less than one-third of the number of frames in the tween.
The Additional Rotation control allows you to specify a partial rotation. For example, if you want the tweened object to rotate two-and-a-half times, you can set the Rotation Count to 2 and Additional Rotation to 180 degrees. (A full rotation is 360 degrees.) The direction of the rotation may be set on the Rotation Options menu.
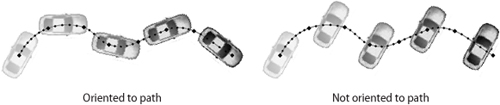
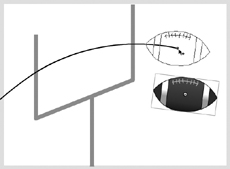
Selecting the Orient to Path option causes the tweened object to “face forward” along the motion path the way a car would follow a road (Figure 43c). With this option deselected, the object keeps a constant orientation regardless of the direction of the path.
• Path. These four controls allow you to change the horizontal position, vertical position, width, and height of the motion path. To keep the width and height in proportion to one another, click the link icon to the left of the width control.
• Options. The Sync Graphic Symbols option affects the behavior of graphic symbols that contain animation (see #36). If several symbol instances are tweened sequentially on a single layer (see Figure 42c in #42), selecting this option keeps the instances in step with one another. Let’s say you have two graphic symbols, each of which contains 36 frames of animation. If an instance of the first symbol is motion-tweened in the timeline for 24 frames, followed immediately by a tweened instance of the second symbol, selecting Sync Graphic Symbols causes the second instance’s internal animation to begin playing from frame 25 rather than from frame 1.
As you learned in #42, the changes you make to a motion-tweened object’s properties are marked by property keyframes. The Motion Editor, a new feature in Flash CS4, allows you to assign property keyframes, not just to an object’s position on the stage, but also to the object’s scale, skew, color effects, filters, and rate of easing (Figure 44a). You can access the Motion Editor by clicking its tab in the Timeline panel.
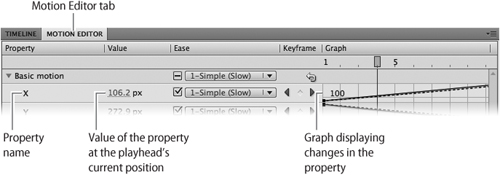
Each property in the Motion Editor is accompanied by a graph—essentially a miniature timeline—displaying the changes in that property. You can drag the playhead through the graph and watch the results on the stage, just as you would with the full timeline.
Tip
To enlarge the graph for a particular property, click the property name in the Motion Editor. Only one graph can be enlarged at a time.
A property that remains unchanged is indicated by a horizontal line in the graph. By right-clicking (Windows) or Command-clicking (Mac) anywhere along that line, you reveal a contextual menu containing an Add Keyframe command (Figure 44b). Choosing that command inserts a property keyframe at the point where you clicked. Dragging the property keyframe upward increases the setting for that property; dragging it downward decreases it. (If you prefer, you can adjust the setting by typing or selecting a number in the Value column.)

By default, property keyframes in the graph are connected by straight lines. Changing those lines to curves causes a property’s value to accelerate or decelerate—similar to easing in or easing out—instead of increasing or decreasing linearly. To make this change, right-click (Windows) or Command-click (Mac) a property keyframe and choose Smooth Point from the contextual menu (Figure 44c). Flash adds direction lines and direction points to the keyframe, allowing you to treat it as the anchor point of a Bézier curve (see #12).

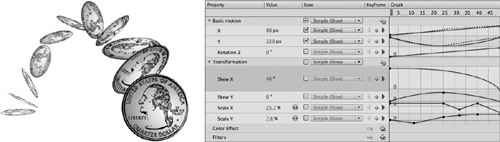
Each property in the Motion Editor can be adjusted independently. Keyframes and settings for one property don’t have to correspond to those for any of the other properties; even the use of easing can differ (Figure 44d).
Flash offers an alternative technique for creating motion tweens that’s similar to the process for creating shape tweens (see #40). Tweens created in this way are called classic tweens, because they are the only type of motion tween supported by prior versions of Flash.
Those of you who use Flash to do character animation—which traditionally is executed initially as a series of keyframes, with the in-between frames added later—may find that classic tweens fit your workflow better than the new-style motion tweens. However, using classic tweens has some significant drawbacks. The Motion Editor doesn’t work with classic tweens; a tween’s motion path isn’t visible or editable on the stage; and the Path controls aren’t available in Properties. Most important, classic tweens are more likely than their newer counterparts to have things go wrong. Some common problems are dealt with in #46.
Here are the usual steps for setting up a classic tween:
1. Place an instance of a symbol on the stage in an empty keyframe. (The tween won’t work if the keyframe contains more than one object.)
2. Decide on a duration for the motion tween, and select the cell in which the last keyframe should fall.
3. Press F6. Flash fills the in-between cells with regular frames, creates a new keyframe in the selected cell, and copies the object from the preceding keyframe into it.
Note
In order for a classic tween to work, the objects in both keyframes must be instances of the same symbol.
4. With the second keyframe still selected, modify the object. You can move it to a different place on the stage, transform it using the Free Transform tool, change its color or opacity with the Style menu in Properties, or do any combination of those things.
5. Select the first keyframe again. (As with shape tweens, the process will work if you select one of the intermediate frames, but selecting the first frame is recommended.)
6. Choose Insert > Classic Tween. The frames between the two keyframes turn blue (not green, as with a shape tween), and an arrow points from the first keyframe to the last.
7. Scrub through or preview the movie to see the classic tween in action.
When you tween an object from one location on the stage to another, the tweened object moves in a straight line. Since the Motion Editor doesn’t work with classic tweens, the only way to make the object to follow a more interesting path is to use a feature called a motion guide.
To create a motion guide:
1. Tween an object from one point to another. It doesn’t matter where the object starts and ends; you’ll adjust that later.
2. Right-click (Windows) or Control-click (Mac) the layer in the timeline that contains the tweened object, and choose Add Classic Motion Guide from the contextual menu. A new layer appears, with the layer you selected indented beneath it (Figure 45a).

The new layer’s icon indicates that it’s a specialized type of layer called a guide layer. The layer containing your tweened object has become a guided layer.
3. Select the empty keyframe at the beginning of the guide layer.
4. On the stage, draw the path you’d like the tweened object to follow. You can draw it with any tool, but the Pencil or Pen is recommended.
5. Drag the tweened object to one end of the motion guide and snap it to the guide (Figure 45b).
The snapping maneuver is tricky. Try to drag the object by its registration point and drop it a short distance inward from the beginning of the path.
6. Drag the playhead to the last keyframe of the tween and snap the object to the other end of the motion guide.
7. Scrub through or preview the movie. Instead of traveling in a straight line, the tweened object should follow the motion guide. If it doesn’t, try repeating Steps 5 and 6 a few more times.
By default, the tweened object maintains the same orientation no matter where it moves along the path. If you’d prefer that the object vary its orientation, always staying perpendicular to the portion of the path it’s on, select Orient to Path in Properties.
Every so often, when you create a shape tween or classic tween, the timeline fails to display the confirming arrow on a green or blue background; it displays a dashed line instead (Figure 46). The dashed line indicates that there’s something wrong with the tween. Despite notifying you of the problem, Flash won’t tell you why the tween is broken. Diagnosing and fixing the problem is left to you.
Here are some of the most common causes of broken tweens:
• The first or last keyframe of the tween is empty.
• You’ve tried to shape-tween groups or symbols, or you’ve tried to make a classic tween with editable paths.
• In a classic tween, the object in the first keyframe and the object in the last keyframe are different.
• You’ve tried to classic-tween more than one object on a single layer.
The last of these causes is often the most frustrating, because it’s not always obvious. At some point, without realizing it, you may have made a stray mark with the Pencil tool or failed to erase a path fully, leaving a tiny, unnoticeable object on the stage. If such an object is hiding out in the first or last keyframe of a classic tween, the tween will fail.
If you suspect that a barely visible object is what’s breaking your tween, here’s an easy way to solve the problem:
1. Move the playhead to the first keyframe of the tween.
2. On the stage, select the object that’s being tweened.
3. Choose Edit > Cut. The tweened object disappears.
4. In the timeline, look at the color of the circle in the keyframe. If it’s white, then the object you just cut was the only object in the keyframe. You can skip to Step 7. But if the circle is black, it means that the keyframe isn’t empty, and that there must be something else occupying the keyframe.
5. Click the keyframe in the timeline. Doing so selects all the objects in the keyframe.
6. Press Delete to clear the unwanted objects out of the keyframe. The circle in the keyframe turns white, indicating that the keyframe is empty.
7. Choose Edit > Paste in Place to return the original tweened object to the stage.
8. Look at the tween in the timeline. If the dashed line has been replaced by an arrow, you’ve solved the problem. If not, go to the last keyframe of the tween and follow Steps 2 through 7 again.
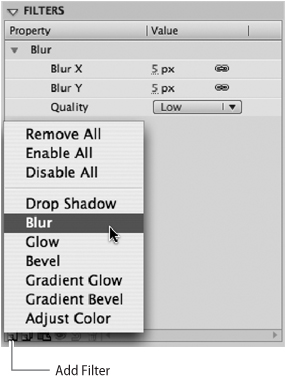
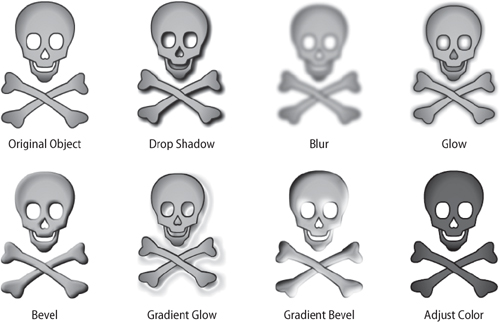
Filters are a powerful, yet easy way to add special effects to your movie. Flash offers seven filters: Drop Shadow, Blur, Glow, Bevel, Gradient Glow, Gradient Bevel, and Adjust Color. They can be applied to text objects or to instances of movie-clip or button symbols.
The simplest way to apply a filter is to select an appropriate object on the stage, go to the Filters section of the Properties panel, click the Add Filter icon, and choose a filter from the menu that appears (Figure 47a). You can then adjust the filter’s settings as desired.
However, to take full advantage of filters, you’ll want to apply them to motion-tweened objects in the Motion Editor (see #44). Doing so allows you to change a filter’s settings gradually over time (Figure 47b).

To apply a filter in the Motion Editor:
1. Motion-tween a text object or an instance of a button or movie-clip symbol (see #42).
2. In the timeline or the Motion Editor, select the keyframe where you want the filter to begin.
3. In the Filters section of the Motion Editor, click the Add Filter icon (which looks like a plus sign) and choose a filter from the pop-up menu. The chosen filter and its associated controls appear in the Motion Editor, and the motion-tweened object on the stage displays the filter’s effects.
4. Use the controls in the Motion Editor to modify the settings for the filter. As you do so, the appearance of the object on the stage updates in real time.
5. Repeat Steps 2 through 5 for any additional keyframes in which you want to change the filter’s settings.
Most of the filter names are self-explanatory. (You can see the effects of each filter in Figure 47c, and you can learn about their controls in the “Filterpedia” sidebar.) However, the two that you may find unfamiliar are Gradient Glow and Gradient Bevel:
• Gradient Glow. This filter is almost identical to the Drop Shadow filter. The only significant difference is that while a drop shadow must be a uniform color, Gradient Glow allows you to make a multicolor shadow. You do this by using a gradient slider similar to the one in the Color panel (see #8).
• Gradient Bevel. Like the standard Bevel filter, Gradient Bevel gives an object a three-dimensional appearance by adding a highlight to one edge and a shadow to the opposite edge. The difference between them is that Bevel allows you to choose independent colors for the highlight and shadow, while Gradient Bevel requires both colors to be part of a single gradient.
You can add multiple filters to a single object. Each time you add a filter, its controls are added to the Motion Editor. To remove a filter, click the Remove Filter icon (a minus sign to the left of the Add Filter icon) and choose the filter’s name from the pop-up menu.
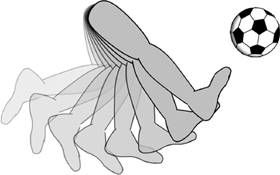
As you’ve seen throughout this chapter, Flash gives you all the tools you need to make objects move. However, making an object move in a natural way is much more of a challenge, especially if that object has a complex internal structure—as do, for example, the bodies of humans and animals.
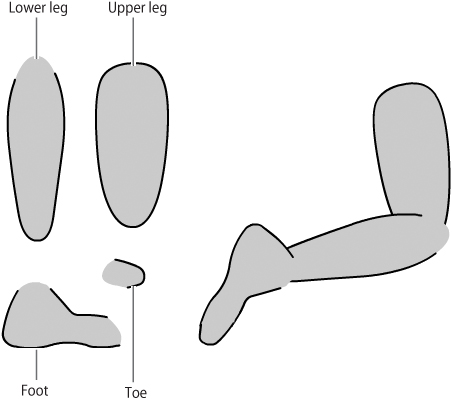
Experienced animators know that it’s easier to animate the movement of an arm or a leg by dividing it into parts. To create a leg, for example, they might create symbols for an upper leg, a lower leg, a foot, and a toe, and then overlap the instances where the joints belong (Figure 48a).
In previous versions of Flash, animating these instances would be a time-consuming process: In each keyframe, the animator would have to move and rotate each one individually, trying to maintain the illusion that they’re all parts of a single leg. This traditional way of animating—maneuvering the upper leg, then repositioning the lower leg in a way that relates naturally to the upper leg, and so on—is known as forward kinematics.
A powerful new feature in Flash CS4 allows you to attach these pieces together so that they function mechanically as a single leg, complete with bones and joints. This movable, jointed model is called an armature. Once the armature is in place on the stage, you can drag one part of the leg—for example, the knee—and the rest of it will bend at the joints the way a real leg would. This time-saving animation technique is called inverse kinematics, or IK for short.
Let’s imagine you want to use IK to animate a soccer player’s leg kicking a ball. The steps are as follows:
1. As illustrated earlier in Figure 48a, create a symbol for each part of the leg.
2. Insert a keyframe in the timeline at the point where the animation is to begin. In that keyframe, place instances of the symbols on the stage, arranged in the way you want the leg to be posed at the start of the kick.
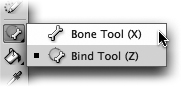
3. Select the Bone tool in the Tools panel (Figure 48b).
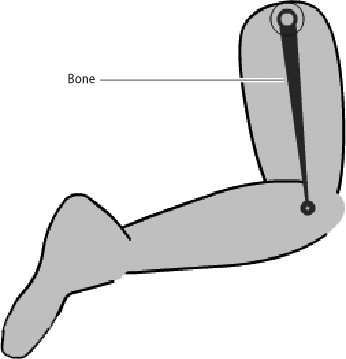
4. Click the upper leg at the point where you want its internal “bone” to begin; drag the mouse to the top of the lower leg, and release at the point where the knee should be.
Flash displays the bone as an inverted triangle, with circles at each end representing the joints (Figure 48c). It also creates a specialized pose layer in the timeline and moves the two newly connected instances to a keyframe in that layer. (The layer is labeled Armature_1 by default, but you can rename it to whatever you like.)
5. Repeat Step 4 twice more: once to add a bone connecting the knee and the ankle, and once to add a bone connecting the ankle and the toe. The newly connected instances join the others in the Armature_1 layer.
6. Click the Selection tool in the Tools panel. Test the armature by dragging it from various points and seeing how it responds. You’ll notice that the leg bends at the joints, but not in a realistic way; for example, the knee offers much more freedom of movement than a real knee would.
7. With the Selection tool still active, click the bone in the lower leg. In the Joint Rotation section of the Properties panel, select Constrain to limit the knee’s range of motion. Flash fills in default values of –45 and 45 degrees, but you can change those values to whatever you like. (In this case, 0 and 90 degrees might be more appropriate.) A small arc superimposed on the joint indicates the range of motion graphically (Figure 48d).

8. Repeat Step 7—this time on the foot—to constrain the motion of the ankle joint.
Note
Flash also permits you to enable X Translation and Y Translation, which allow a bone to move away from the bone it’s connected to. (Constraining these properties limits the distance the bone can travel.) In this example, however, both properties should remain disabled to keep the leg intact.
9. In the Armature_1 layer of the timeline, click in the frame in which you want the animation of the armature to end. Press F5 to insert a series of frames connecting that frame to the initial keyframe.
10. Right-click (Windows) or Control-click (Mac) the last frame in the series and choose Insert Pose from the contextual menu.
11. Reshape the armature to pose the leg in the way you want it to look at the end of the kick. Flash tweens the animation, repositioning the leg gradually from its pose in the first keyframe to its pose in the last frame (Figure 48e).