
If you’ve created artwork in Photoshop or Illustrator (or on paper, for that matter), you’re accustomed to drawing in visual space. What you may not be used to is drawing in time.
Time is what makes animation possible. Animation isn’t just cartoon characters running around; it’s any incremental change in visual elements over time. Text moving across the stage is animation; so is a black-and-white photo that blossoms into color.
If you’re planning to use Flash strictly as an ActionScript programming environment—for example, to make dynamic Web interfaces—you may think it’s not important to know how to create animation. In Flash, however, Web interfaces or online applications are animation. (After all, the user’s interaction with the computer takes place over time.) Whether you’re an aspiring animator, game developer, or interface designer, you’ll need to be familiar with the techniques in this chapter.
The timeline is where you control how the objects on the stage change over time. The vertical red line that crosses the timeline is called the playhead; it marks the passage of time as it sweeps across the timeline from left to right (Figure 30).
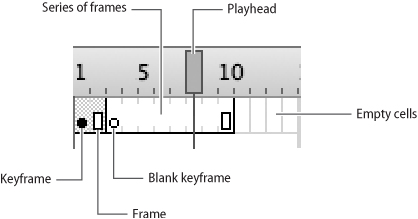
The timeline is divided into cells, each of which represents a unit of time. (The duration of that unit varies according to the frame rate—see #31—but it’s usually somewhere between one-twelfth and one-thirtieth of a second.) The contents of each cell (or each column of cells, if the timeline has more than one layer) determine what’s happening on the stage at the moment the playhead passes over it.
The cells in the timeline are empty by default, but you can fill them with either a keyframe or a regular frame:
• Keyframe. A keyframe signals to Flash that you want something in your movie to change. When the playhead passes over a keyframe, it updates the stage to display whatever is new in that keyframe. (A keyframe can also mark changes that aren’t visible on the stage, such as the start or end of a sound.)
To insert a keyframe into the timeline, select the cell in which you want the keyframe to appear and choose Insert > Timeline > Keyframe, or press F6. A small black circle appears in the cell.
On some occasions, you may want everything that was in the preceding keyframe to disappear, without being replaced by anything. You can make this happen by choosing Insert > Timeline > Blank Keyframe, or by pressing F7. A blank keyframe is represented in the timeline by a white circle instead of a black one.
• Frame. A frame (which we’ll sometimes refer to as a regular frame, to distinguish it from a keyframe) signals to Flash that you want to maintain the status quo. When the playhead passes over a regular frame, it tells the stage to continue displaying whatever was in the most recent keyframe.
To insert a frame into the timeline, select the cell in which you want the frame to appear and choose Insert > Timeline > Frame, or press F5. A white rectangle appears in the cell.
To insert a series of frames, select the empty cell in which you want the series to end. (Flash will assume that you want the series to begin in the cell immediately following the most recent keyframe.) When you choose Insert > Timeline > Frame or press F5, a white rectangle appears in the last cell in the series. The intermediate frames don’t contain white rectangles, but the dividing lines between the cells disappear; the absence of dividing lines is what allows you to distinguish a series of frames from a series of empty cells.
Note that you can’t have empty cells in the middle of a movie. If you insert a keyframe, skip a bunch of cells, and then insert another keyframe, Flash automatically fills the intervening cells with a series of regular frames.
Note also that there may be different things happening on different layers. When the playhead reaches any given point in the timeline—let’s say it’s frame 12—Flash looks at the entire column of cells and follows the instructions on each layer. For example, if frame 12 on Layer 1 is a keyframe, Flash will replace whatever was previously on that layer with whatever is new in that keyframe. If frame 12 on Layer 2 is a regular frame, Flash will continue to display whatever was in the previous keyframe in that layer. If frame 12 on Layer 3 is a blank keyframe, Flash will clear whatever was previously on that layer. All of these changes happen simultaneously when the playhead reaches a given frame, regardless of how few or how many layers there are.
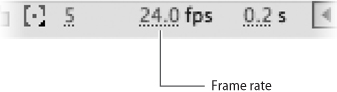
Every Flash movie has a frame rate, a measurement of how quickly the playhead moves through the timeline. Frame rates are expressed in frames per second, usually abbreviated as fps. Flash permits frame rates ranging from 120 fps (the fastest) to 0.01 fps (the slowest), which is equivalent to 100 seconds per frame. For comparison, the standard frame rate for a theatrical film is 24 fps.
A movie’s frame rate is displayed on the horizontal strip at the bottom of the timeline (Figure 31a). The default frame rate is 12 fps, but you can change it by double-clicking the frame-rate display or by choosing Modify > Document.
The smoothness of animation increases as the frame rate increases. For example, let’s say the process of opening a door takes 1 second. You might animate the door opening in 10 frames at 10 fps, or you might animate it in 30 frames at 30 fps. Both animations would have a duration of 1 second, but the latter would be smoother, because there would be less movement in each frame (Figure 31b).

A higher frame rate requires more frames, and hence a larger SWF file; it also puts more of a demand on the computer’s processor. Therefore, you’ll often want to use a lower frame rate to gain efficiency at the expense of smoothness. If you’re doing frame-by-frame animation (see #32), a lower frame rate also requires less work for you in creating the movie.
Keep in mind that the frame rate you set for a movie is only a target. For example, it’s unlikely that a typical computer will be able to play a movie at 120 fps. The lower you set the frame rate, the more likely it is that any given user will be able to see the movie as you intended. A frame rate of 12 fps is generally considered to be the minimum for acceptably smooth motion; most animation on the Web has a frame rate of about 15 fps.
When you set a frame rate, you set it for the entire movie; if you change it, you change it for the entire movie. You can’t start a movie with one frame rate and end it with another (at least not without some tricky ActionScript). If you want to slow down a particular sequence in your movie, the optimal solution isn’t to lower the frame rate, but to add more frames to the sequence.
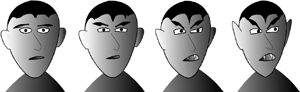
As you’ll see in Chapter 6, Flash can automate mechanical kinds of motion through a process called tweening. But animation is most interesting when its motion isn’t mechanical—when characters express their personality through the way they move (Figure 32a). To achieve that sort of expressive movement, you have to animate your characters one frame at a time.
The basic procedure for frame-by-frame animation is short and simple:
1. In the timeline, select the cell in which you want the animation to begin.
2. Press F7 to insert a blank keyframe.
3. Draw the first frame of animation on the stage.
4. Press F6. Flash inserts a new keyframe immediately after the first one, and it copies the contents of the first keyframe into the new keyframe.
5. Modify the drawing on the stage to represent the next incremental movement.
6. Repeat Steps 4 and 5 as many times as necessary.
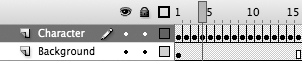
Naturally, elements that stay the same from one frame to the next don’t have to be redrawn in each new keyframe. Instead, put them on a separate layer in the timeline (Figure 32b).
Each time you draw a new frame of animation, you’ll want to make sure it flows smoothly from the frames that precede it. To do this, you can grab the pink rectangle at the top of the playhead and drag it back and forth through the timeline at varying rates of speed—a procedure called scrubbing. As you scrub, the corresponding frames of animation will play back on the stage. Scrubbing often reveals slight glitches in the animation that you can then go back and fix.
Once you have enough keyframes in place, you’ll want to preview the animation at its proper frame rate, in any of these ways:
• Press Enter (Windows) or Return (Mac) to start the playhead moving through the timeline. Press the same key again to stop it. To rewind—that is, to move the playhead back to the beginning of the timeline—press Control-Alt-R (Windows) or Command-Option-R (Mac).
• Make the Controller panel visible by choosing Window > Toolbars > Controller. The Controller offers a standard set of buttons for playing, stopping, and rewinding the movie.
• Use the menu commands Control > Play, Control > Rewind and Control > Go to End.
In none of these cases do you have to stop the playhead manually. As soon as the playhead passes through all the frames and encounters empty cells, it knows it’s at the end of the movie, and it stops on its own.
Another way to test your movie is to generate a sample SWF file (see #35).
Even the most experienced animators often need help in creating smooth motion. The help in this case is a technique called onion skinning, which lets you draw each new frame of animation directly on top of images of previous frames. (The images are dimmed—more so for the earlier ones—to make it possible to draw over them without getting confused about what’s new and what’s old.)
To use this feature:
1. Move the playhead to the keyframe in which you want to make a new drawing.
2. Click the Onion Skin icon to turn onion skinning on. The playhead is now bracketed by two markers—Start Onion Skin and End Onion Skin—with a dark gray area between them (Figure 33a).
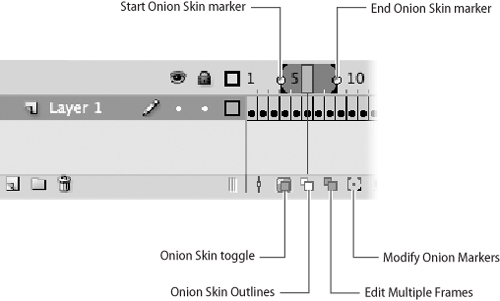
By default, the Start Onion Skin marker is two frames behind the playhead, and the End Onion Skin marker is two frames after the playhead. (If there are fewer than two frames available in either direction, the markers move in toward the playhead as necessary.) To see more or fewer frames, slide the markers.
The frames bracketed by the markers are visible on the stage, with increasing degrees of dimness depending on their distance from the playhead (Figure 33b).

3. Create or modify the drawing in the current keyframe, using the dimmed images for reference.
4. Press F6 to insert a new keyframe, or move the playhead to another existing keyframe. The Start Onion Skin and End Onion Skin markers move with it, keeping the same distance from the playhead.
5. Repeat Steps 3 and 4 as many times as necessary. When you’re finished, click the Onion Skin marker again to turn onion skinning off.
Here are some possible variations:
• To see just the paths in the onion-skinned frames, without seeing strokes and fills, click the Onion Skin Outlines icon.
• If you want the ability to edit all the frames between the markers—not just the one that the playhead is positioned on—click the Edit Multiple Frames icon.
• To change the behavior of the markers—for example, to keep them visible even when onion skinning is turned off—click the Modify Onion Markers icon and choose one of the listed options.
Once you’ve created and previewed an animated sequence, you’ll almost always decide to go back and modify it. You may want to make parts of it longer or shorter, change its position in the timeline, add more action to it, or take some action away.
This book doesn’t provide an exhaustive list of menu commands and keyboard shortcuts for editing; you can get that information from the Help menu. Instead, here are some general hints to help you deal with the less intuitive aspects of working in the timeline. (Note that any hints dealing with F6 apply to F7 as well.)
• If you want to insert a new keyframe between two sequential keyframes, don’t select one of the keyframes and press F6. (All that happens is that the playhead moves to the next keyframe; there are no changes at all in the timeline.) Instead, select the first of the two keyframes and press F5 to insert a regular frame after it. The second of the two keyframes, and everything beyond it, moves one frame to the right. Then select the newly inserted frame and press F6 to turn it from a regular frame to a keyframe.
• If you want to delete a selected keyframe, don’t choose Modify > Timeline > Clear Keyframe. (That menu command and its keyboard shortcut, Shift-F6, will turn the keyframe into a regular frame instead of deleting it and closing the gap.) Instead, choose Edit > Timeline > Remove Frames, or press Shift-F5, to delete the selected keyframe.
• If you want to move a keyframe to another location in the timeline, don’t try to click it and drag it in one motion. (Although this technique works in most programs, it doesn’t work in the Flash timeline—all you’ll end up doing is selecting a series of frames). Instead, click the keyframe to select it, release the mouse button, and then click again to drag the keyframe.
• If you want to cut and paste (or copy and paste) frames from one part of the timeline to another, don’t use the standard Edit > Cut, Edit > Copy, and Edit > Paste menu commands or their keyboard shortcuts. (Those commands work only for objects on the stage, not for frames in the timeline.) Instead, use the special commands Edit > Timeline > Cut Frames, Edit > Timeline > Copy Frames, and Edit > Timeline > Paste Frames.
• If you have a series of regular frames at the end of your movie, and you want to extend the series farther into the timeline, don’t select the last frame in the series and drag it. (If you do, Flash will insert a keyframe after it.) Instead, click the cell where you want the series to end, and press F5. The series of frames will extend to meet the cell you selected.
• Similarly, if you want to shorten a series of regular frames (that is, have it end sooner), don’t select the last frame in the series and drag it backwards. Instead, find the frame that you want to end the series, click the frame immediately following it, and Shift-click the current last frame in the series. Then choose Edit > Timeline > Remove Frames, or press Shift-F5, to delete the selected frames.
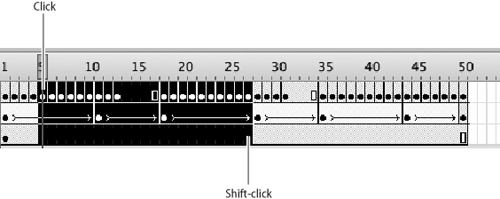
• If you want to extend a portion of a movie and still keep all of its layers in sync, select a block of frames by clicking the frame on the upper left and Shift-clicking the frame on the lower right (Figure 34a). Then drag the whole block of frames at once.
In #32, you learned several ways to preview your movie in Flash. All of these techniques have a drawback, however: They don’t show you what users’ experience will be when they watch your movie. When you watch a movie in the Flash authoring environment, it usually runs more slowly than it would outside, because Flash has to do so many other things at the same time (such as animating the playhead as it moves across the timeline). Also, you see things in the Flash environment that your users can’t see, such as where objects go when they leave the stage.
In contrast, the people who see your movie most likely won’t even own Flash; they’ll be playing it in their Web browsers using the Flash Player plug-in. To see the movie the way your users will see it, you too will have to preview it in the Flash Player. There are two ways to do this—one is more convenient, the other is more authentic.
The more convenient way is to choose Control > Test Movie, or press Command-Enter (Windows) or Control-Return (Mac). Flash generates a SWF file and opens it in a separate window representing the Flash Player. It’s not really the Flash Player, at least not the one your users will have—it’s actually a Flash Player module that’s built into your Flash application—but it still gives you a reasonably good idea of what your users will see.
The more authentic way is to choose File > Publish Preview > Default. As with Test Movie, Flash generates a SWF file, but then it opens it in your computer’s default Web browser and plays it with the real Flash Player plug-in. In this case, you’re seeing the same SWF file your users will see, under basically the same conditions.
Because the Test Movie command is so much quicker, you’ll probably want to use it when you’re first developing a movie. It’s only when you bring your movie into its final stages, and begin to refine and polish it, that the difference between Test Movie and Publish Preview becomes important.
Whenever you’re in symbol-editing mode (see #24), you might notice that all of the information in the timeline disappears. That’s because when you edit a symbol, you stop seeing your movie’s timeline and start seeing that symbol’s timeline. Every symbol in Flash has its own internal timeline. (As you saw in #27, the timeline inside button symbols is greatly simplified, but it’s a timeline nonetheless.)
The significance of symbol-specific timelines is that they allow you to put animation inside a symbol. Because instances of symbols appear in a movie’s timeline, and because instances of other symbols may appear in a symbol’s timeline, it’s possible (and actually common) to have several different levels of animation going on at once.
For example, suppose you want to animate a person running across the stage. If you had to do this frame by frame, it would take you forever, but the use of animated symbols streamlines the process.
Here’s all you have to do:
1. Create a new movie-clip symbol and give it a descriptive name such as m_running.
2. Go into symbol-editing mode and animate the person running inside the symbol m_running. (That is, use the symbol’s internal timeline, not the main movie’s timeline.)
You need only animate one cycle (that is, left foot forward and right foot forward). Make the cycle smooth enough that it can loop repeatedly without it being apparent where the cycle begins and ends (Figure 36a).
3. Drag an instance of m_running onto the movie’s stage.
4. Motion-tween the instance to make it travel across the stage.
5. Test or preview the movie. You’ll see two levels of animation going on at once: the animation within the symbol of the person running in place, and the animation outside the symbol of the running person moving across the stage (Figure 36b).
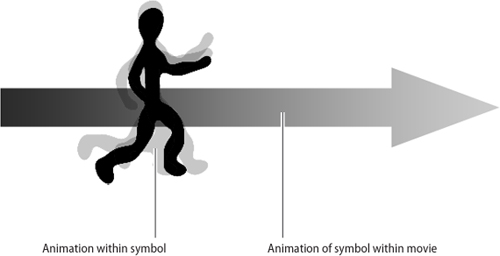
Placing animation inside symbols is powerful and convenient, especially if you’re creating an interactive movie in which the action is different every time. The timeline for many interactive movies is only one frame long, because all of the movie’s possible animation is contained within the symbols in the library.
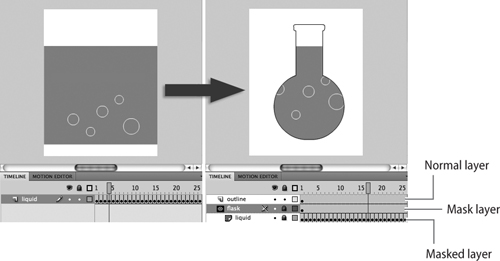
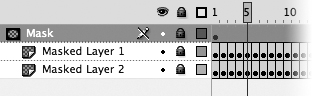
A mask is something that hides part of an object and exposes another part of the object. Creating a mask is simple:
1. Place the object to be masked on one layer, and the object that will act as a mask on the layer just above it.
The mask can be a path, a group, an instance of a symbol, a block of text, or just about anything else. Its stroke and fill colors don’t matter (Figure 37a).

2. Right-click (Windows) or Control-click (Mac) the name of the layer containing the mask, and select Mask from the context menu.
Flash converts the upper layer into a mask layer and the lower layer into a masked layer. The object on the stage appears masked.
Note
Flash locks the mask layer and the masked layer because that’s the only way the mask effect can be seen within Flash. If you unlock either layer, the masking effect disappears. In the SWF file, the masking effect is always visible, regardless of whether the layers in the FLA file are locked or unlocked.
A mask on its own is no big deal. What makes masks interesting is that you can animate the mask, the masked object, or both, thereby achieving complex effects quickly (Figure 37b).
It’s possible to have one mask layer affect multiple masked layers. If there’s a layer that you want to put under the control of an existing mask, drag and drop the layer between a mask layer and a masked layer in the timeline (Figure 37c). The masked layers can be arranged in any order, so long as the mask layer is above them all.
A blending mode is a tool for creating striking color effects quickly. Many design and animation problems can be solved simply by choosing the right blending mode.
To understand blending modes, consider what happens when you place one object on top of another: The upper object (assuming it’s opaque) blocks the view of the lower object. By applying a blending mode to the upper object, you can cause it to reveal all or part of the bottom object in multiple ways (Figure 38a).
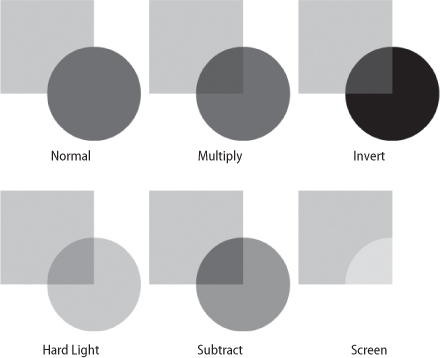
Blending modes are usually described as an interaction between a blend color (the one on top) and a base color (the one underneath). If the overlapping objects are multicolored, each area of blend color interacts with the base color directly beneath it. Each blending mode is essentially a mathematical formula that determines how the two colors interact.
To apply a blending mode, select a movie-clip instance on the stage, preferably one that has another movie clip partially or totally beneath it. A pop-up menu labeled Blending appears in the Display section of the Properties panel (Figure 38b). Choosing a blending mode from the menu applies it to the selected object.
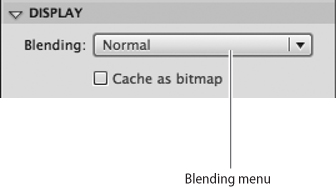
Blending modes work equally well whether the two objects are on different layers or are stacked on the same layer. The only limitation is that both objects must be instances of movie clips—if they’re not, the Properties panel won’t display the Blending menu. (If you want to blend a different kind of object—text, for example—convert it to a movie clip.)
Each blending mode has a precise technical description that you can read in Flash Help. However, only the most technically minded people find these descriptions useful in predicting what a blend will look like. Instead, when a blend is needed, most people try out all of the blending modes and see what happens with each. As you get more experienced with blending modes, you’ll begin to know which modes are most likely to be useful for a particular pair of objects.
The Alpha and Erase blending modes deserve special attention because they’re designed especially for masking. The masking feature in Flash (see #37) is limited to masks with hard edges, but the Alpha and Erase blending modes allow you to make masks with soft edges.
The following instructions assume that you know how to create symbols and convert objects to symbols (see #22). The symbol names here are just suggestions; you can call them whatever you want:
1. Create a movie-clip symbol and put something in it—for example, animation, a drawing, a bitmap, or text. This is the content that’s going to be masked, so name the symbol m_masked.
2. Drag an instance of m_masked from the library to the stage.
3. Select the instance of m_masked and choose Modify > Convert to Symbol. (Obviously m_masked is already a symbol, but this step nests the instance inside a new symbol.) In the Convert to Symbol dialog box, click the Movie Clip radio button, name the symbol m_sandwich, and click OK.
4. Double-click the symbol m_sandwich in the library to put it into editing mode. The symbol’s timeline should have one layer and one keyframe containing an instance of m_masked. Lock the layer.
5. Add a new layer above the existing layer on m_sandwich’s timeline. Flash inserts a blank keyframe.
6. With the blank keyframe selected, use the Rectangle tool to make a rectangle slightly larger than the content in m_masked. Fill the rectangle with the standard black-and-white radial gradient (the one that appears on all of the color menus in Flash). The filled rectangle will cover up the instance of m_masked, but that’s okay.
7. Select the rectangle’s fill. The radial gradient is now available for editing.
8. Open the Color panel (if it’s not already open) and click the white color tab on the gradient slider.
9. Just above the gradient slider is an Alpha control set to 100%. Use the slider or type in a value to bring Alpha down to 0%.
10. Deselect the rectangle on the stage. You can now see m_masked through the transparent portion of the gradient.
11. Using the gradient slider and/or the Gradient Transform tool, modify the gradient so that it neatly frames m_masked (Figure 38c).
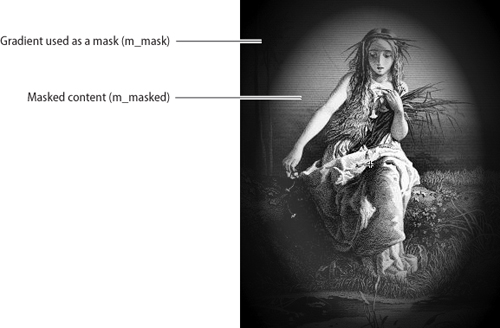
12. Deselect the rectangle on the stage. You can now see m_masked through the white portion of the gradient.
13. Reselect the rectangle and choose Modify > Convert to Symbol to convert it to a movie clip. Name the movie clip m_mask.
14. The rectangle (now an instance of m_mask) should still be selected. From the Blending menu in Properties, choose Erase.
The mask disappears temporarily, but that’s OK. The Erase blending mode has invisibly “erased” the areas of m_masked that are covered by the more opaque portions of the mask.
15. Click Scene 1 on the breadcrumb trail to return to the main timeline. The instance of m_sandwich should still be on the stage.
16. Select the instance of m_sandwich if it’s not already selected. From the Blending menu in Properties, choose Layer.
The content of m_masked is now framed by a soft-edged mask. If you wish, put some sort of background behind it to complete the effect (Figure 38d).

An alternate technique is to lower the alpha of the black in Steps 8 and 9, leaving the alpha of the white at 100%. In this case, you’d use the Alpha blending mode instead of Erase in Step 14.
Scenes are a prominent part of the Flash interface. There’s a Scene panel; there’s an Edit Scene menu (identified by a Hollywood clapper board icon) right above the timeline; and whenever you’re in group-editing or symbol-editing mode, you follow the breadcrumb trail back to Scene 1. Naturally, you want to know what scenes are and how to use them.
There’s one catch: Nobody uses scenes anymore. Even Adobe recommends that you not use them.
The original idea was that scenes would be a convenient way to organize the timeline. If you were working with a long movie, you wouldn’t have to scroll through thousands of frames; you could just divide the movie into short, manageable scenes. The default, when you opened a new document in Flash, was Scene 1; you then had the option of adding Scene 2, Scene 3, and so on. When you played the movie’s SWF file, Flash would concatenate the scenes into a single movie, in numerical order. (If you wanted to, you could even give the scenes descriptive names and rearrange their order; that’s what the Scene panel is for.)
There are, however, several drawbacks to using scenes:
• No matter how efficiently you divide your movie into scenes, they still add up to one very long SWF file. If your movie is posted on the Web, anybody who watches it has to download that large file, even if they don’t intend to see the whole movie.
• Scenes are confusing in collaborative environments. If you give someone a FLA file to edit, and it’s divided into scenes, that person has no way of getting a bird’s-eye view of the structure and organization of your movie. Instead of setting the timeline’s cell size to Tiny and seeing most or all of the timeline at once, the person has to go through the movie scene by scene.
• People tend to write their ActionScript scripts as if the current scene is the entire movie, thereby introducing coding errors that are sometimes difficult to debug. In theory, ActionScript works fine with scenes, but keeping track of scene names and numbers adds an unnecessary level of complexity to scripts.
A good alternative to using scenes is to structure your movie as a series of short, individual FLA files. With a line of simple ActionScript, you can instruct each movie to start playing the next one when it ends, so the end result looks the same to the user. But the user gets to download several small SWF files instead of one large one. In fact, you could post individual links to each file in the series, so users need only download the parts of your movie that they want to see.
A collection of FLA files doesn’t solve the problem of working in a collaborative environment, where what’s in each FLA file is no more apparent than what’s in each scene. However, you can have several FLA files open and visible at the same time. With a single FLA file, you can only see one scene at a time.