15. Using Illustrator with Other Adobe Applications
Lesson overview
In this lesson, you’ll learn how to do the following:
Place linked and embedded graphics in an Illustrator file.
Transform and crop images.
Create and edit clipping masks.
Use text to mask an image.
Make and edit an opacity mask.
Work with the Links panel.
Embed and unembed images.

This lesson will take about 60 minutes to complete. To get the lesson files used in this chapter, download them from the web page for this book at www.adobepress.com/IllustratorCIB2020. For more information, see “Accessing the lesson files and Web Edition” in the Getting Started section at the beginning of this book.
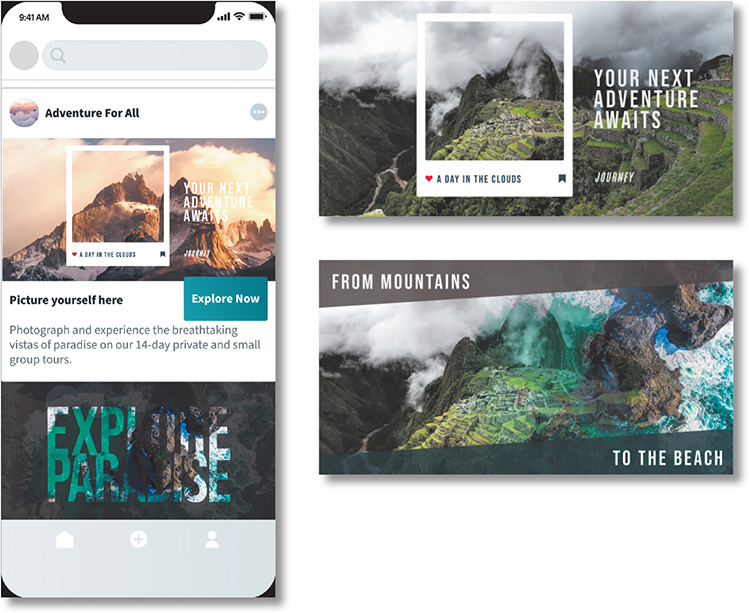
You can easily add images to an Adobe Illustrator file. This is a great way to incorporate raster images into your vector artwork to combine the two.
Starting the lesson
Before you begin, you’ll need to restore the default preferences for Adobe Illustrator. Then you’ll open the finished art file for this lesson to see what you’ll create.
![]() Note
Note
If you have not already downloaded the project files for this lesson to your computer from your Account page, make sure to do so now. See the “Getting Started” section at the beginning of the book.
To ensure that the tools function and the defaults are set exactly as described in this lesson, delete or deactivate (by renaming) the Adobe Illustrator preferences file. See “Restoring default preferences” in the “Getting Started” section at the beginning of the book.
Start Adobe Illustrator.
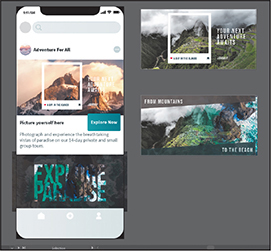
Choose File > Open, and open the L15_end.ai file in the Lessons > Lesson15 folder that you copied onto your hard disk.
This is a series of social images for a travel company. The fonts in the L15_end.ai file have been converted to outlines (Type > Create Outlines) to avoid having missing fonts, and the images are embedded.
Choose View > Fit All In Window and leave it open for reference, or choose File > Close.
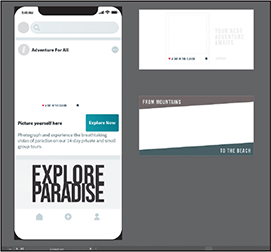
Choose File > Open. In the Open dialog box, navigate to the Lessons > Lesson15 folder, and select the L15_start.ai file on your hard disk. Click Open to open the file.
This is an unfinished version of the social content for a travel company. You will add and edit graphics to it in this lesson.
 Note
NoteYou need an internet connection to activate fonts. The process may take a few minutes.
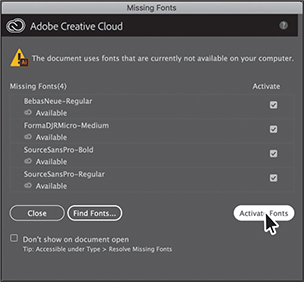
The Missing Fonts dialog box will most likely appear. Click Activate Fonts to activate all the missing fonts. After they are activated and you see the message stating that there are no more missing fonts, click Close.
If you can’t get the fonts to activate, you can go to the Creative Cloud desktop application and click the Fonts icon (
 ) in the upper-right to see what the issue may be (refer to the section “Changing font family and font style” in Lesson 9, “Adding Type to a Poster,” for more information on how to resolve it).
 Note
NoteYou can also go to Help (Help > Illustrator Help) and search for “Find missing fonts.”
You can also just click Close in the Missing Fonts dialog box and ignore the missing fonts as you proceed. A third method is to click the Find Fonts button in the Missing Fonts dialog box and replace the fonts with a local font on your machine.
Choose File > Save As. In the Save As dialog box, navigate to the Lesson15 folder, and open it. Name the file SocialTravel.ai. Leave Adobe Illustrator (ai) chosen from the Format menu (macOS) or Adobe Illustrator (*.AI) chosen from the Save As Type menu (Windows), and then click Save.
In the Illustrator Options dialog box, leave the Illustrator options at their default settings. Click OK.
Choose Window > Workspace > Reset Essentials to reset the Essentials workspace.
Choose View > Fit All In Window.
Combining artwork
You can combine Illustrator artwork with images from other graphics applications in a variety of ways for a wide range of creative results. Sharing artwork among applications lets you combine continuous-tone paintings and photographs with vector art. Illustrator lets you create certain types of raster images, and Adobe Photoshop excels at many additional image-editing tasks. The images edited or created in Photoshop can then be inserted into Illustrator.
This lesson steps you through the process of creating a composite image, including combining bitmap images with vector art and working between applications. You will add photographic images created in Photoshop to social content created in Illustrator. Then you’ll mask an image and replace a placed image.
Placing image files
You can bring raster artwork from Photoshop or other applications into Illustrator using the Open command, the Place command, the Paste command, drag-and-drop operations, and the Libraries panel. Illustrator supports most Adobe Photoshop data, including layer comps, layers, editable text, and paths. This means that you can transfer files between Photoshop and Illustrator and still be able to edit the artwork.
![]() Note
Note
Illustrator includes support for DeviceN rasters. For instance, if you create a Duotone image in Photoshop and place it in Illustrator, it separates properly and the spot colors are printed.
When placing a file using the File > Place command, no matter what type of image file it is (JPEG, GIF, PSD, AI, etc.), it can be either embedded or linked. Embedding files stores a copy of the image in the Illustrator file, which often increases the Illustrator file size to reflect the addition of the placed file. Linking files creates a link to external files, and that link is placed in the Illustrator file. A linked file does not significantly add to the size of the Illustrator file. Linking to files can be a great way to ensure that image updates are reflected in the Illustrator file. The linked file must always accompany the Illustrator file, or the link will break and the placed file will not appear in the Illustrator artwork.
Placing an image
First, you’ll place a JPEG (.jpg) image in your document.
Choose File > Place.
 Note
NoteOn macOS, you may need to click the Options button in the Place dialog box to reveal the Link option.
Navigate to the Lessons > Lesson15 > images folder, and select the Mountains2.jpg file. Make sure that Link is selected in the Place dialog box.
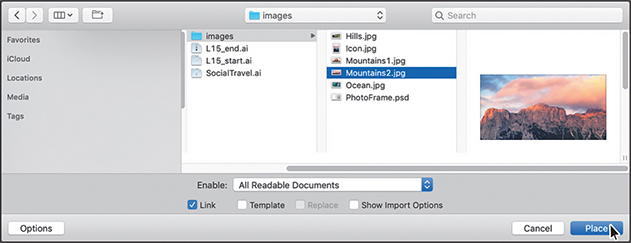
Click Place.
The pointer should now show the loaded graphics cursor. You can see “1/1” next to the pointer, indicating how many images are being placed (1 of 1), and a thumbnail so you can see what image you are placing.
Move the loaded graphics cursor off the left side of the mobile design on the artboard on the left (see the figure), and click to place the image. Leave the image selected.
 Tip
TipThe X on a selected image indicates that the image is linked (with edges showing, View > Show Edges).

The image appears on the artboard at 100% of its original size, with the upper-left corner of the image placed where you clicked. You could also have dragged with the loaded graphics cursor to size the image as you placed it.
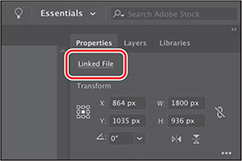
Notice in the Properties panel (Window > Properties) that, with the image selected, you see the words “Linked File” at the top, indicating that the image is linked to its source file. By default a placed image is linked to the source file, so if the source file is edited (outside of Illustrator), the placed image in Illustrator is also updated. Deselecting the Link option while placing embeds the image file in the Illustrator file.
Transforming a placed image
![]() Tip
Tip
To transform a placed image, you can also open the Properties panel or Transform panel (Window > Transform) and change settings in either.
You can duplicate and transform placed raster images just as you do other objects in an Illustrator file. Unlike with vector artwork, with raster images you need to consider the image resolution since raster images with lower resolution may look pixelated when printed. Working in Illustrator, if you make an image smaller, the resolution of the image increases. If you make an image larger, the resolution decreases. Transformations performed on a linked image in Illustrator, and any resulting resolution changes, do not change the original image. The changes affect only how the image is rendered in Illustrator. Next you’ll transform the Mountains2.jpg image.
![]() Tip
Tip
Much as with other artwork, you can also Option+Shift-drag (macOS) or Alt+Shift-drag (Windows) the image’s bounding box to resize from the center while maintaining the image proportions.
With the Selection tool (
 ) selected, press and hold the Shift key and drag the lower-right bounding point toward the center of the image until it is just wider than the artboard. Release the mouse button and then release the key.
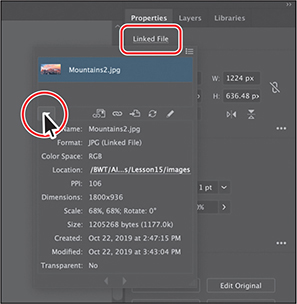
In the Properties panel, click the text “Linked File” at the top of the Properties panel to see the Links panel. With the Mountains2.jpg file selected in the Links panel, click the Show Link Info arrow in the lower-left corner of the panel to see information about the image.
You can see the scale percentage as well as rotation information, size, and much more. Specifically, notice the PPI (pixels per inch) value is approximately 100. PPI refers to the current resolution of the image. If you scale a placed raster image like you just did, the image resolution in Illustrator will change (the original placed image isn’t affected). Generally, if you scale the image to be larger, the resolution becomes lower. Conversely, if you scale an image to be smaller, the resolution becomes higher. Other transformations, like rotation, can also be applied to images using the various methods you learned in Lesson 5, “Transforming Artwork.”
Press the Escape key to hide the panel.
Click the Flip Along Horizontal Axis option (
 ) in the Properties panel to flip the image horizontally, across the center.
Leave the image selected, and choose File > Save.
Cropping an image
In Illustrator, you can mask or hide part of an image, as you’ll learn about in this lesson, but you can also crop images to permanently remove part of an image. While cropping an image, you can define the resolution, which can be a useful way to reduce file size and improve performance. When cropping an image, on Windows 64-bit and macOS, Illustrator automatically identifies the visually significant portions of the selected image. This is powered by Adobe Sensei and is called Content-Aware cropping. Next you’ll crop part of the image of the mountains.
![]() Tip
Tip
To crop a selected image, you can also choose Object > Crop Image or right-click the image and choose Crop Image from the context menu.
![]() Tip
Tip
You can turn off the Content Aware feature by choosing Illustrator > Preferences > General (macOS) or Edit > Preferences > General (Windows) and deselecting Enable Content Aware Defaults.
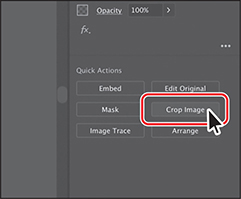
With the image still selected, click the Crop Image button in the Properties panel. Click OK in the warning dialog box that appears.
A linked image, like the mountain image, becomes embedded after you crop it. Illustrator automatically identifies the visually significant portions of the selected image, and a default cropping box is displayed on the image. You can adjust the dimensions of this cropping box, if needed. The rest of the artwork is dimmed, and you cannot select it until you are finished cropping.
Drag the crop handles so the bottom and top of the image are cut off and the image stops at the edge of the artboard on the right and left. The crop you see initially may be different from the figure and that’s okay. Use the second part of the following figure as a guide for the final crop.

You can drag the handles that appear around the image to crop different parts of the image. You can also define a size in the Properties panel (width and height) to crop to.
 Note
NoteA lower PPI may result in an image that is not suitable for printing.
 Note
NoteDepending on the size of your image, the “Medium (150 ppi)” option may not be dimmed, and that’s okay.
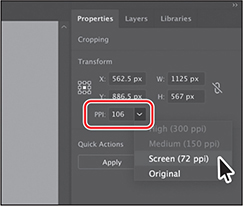
Click the PPI (resolution) menu in the Properties panel.
The PPI is the resolution of the image. Any options in the PPI menu that are higher than the original resolution of the image are disabled. The maximum value that you can enter equals the resolution of the original image or 300 PPI for linked artwork. Choosing a lower resolution than the original can be useful if you want to save file size.
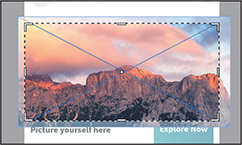
Move the pointer over the center of the image, and drag the crop area down a little to crop more of the top of the image.
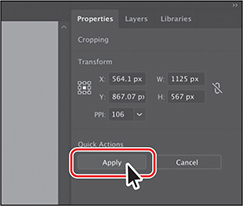
Click Apply in the Properties panel to permanently crop the image.
Since the image is embedded when cropping, the crop does not affect the original image file you placed.
If you need to, drag the image into place, as in the following figure.
To send the image behind the other content on the artboard, click the Arrange button in the Properties panel and choose Send Backward. Do this a few times so the image is behind the artwork and text, like you see in the figure.

Choose Select > Deselect and then choose File > Save.
Placing a Photoshop image with Show Import Options
When you place a Photoshop file with multiple layers in Illustrator, you can change image options when the file is imported. For instance, if you place a Photoshop file (.psd), you can choose to flatten the image or even to preserve the original Photoshop layers in the file. Next you’ll place a Photoshop file, set import options, and embed it in the Illustrator file.
Choose File > Place.
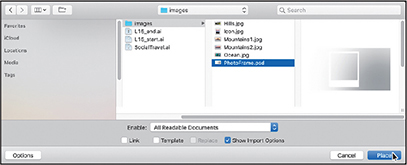
In the Place dialog box, navigate to the Lessons > Lesson15 > images folder, and select the PhotoFrame.psd file. In the Place dialog box, set the following options (on macOS, if you don’t see the options, click the Options button):
Link: Deselected (Deselecting the Link option embeds an image file in the Illustrator file. Embedding the Photoshop file allows for more options when it is placed, as you’ll see.)
Show Import Options: Selected (Selecting this option will open an Import Options dialog box where you can set import options before placing.)
 Note
NoteThe Import Options dialog box will not appear if the image only contains a locked Background layer, even though you select Show Import Options in the Place dialog box.
Click Place.
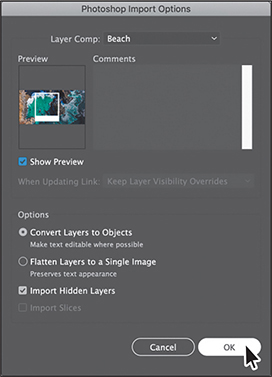
The Photoshop Import Options dialog box appears because you selected Show Import Options in the Place dialog box, and because the file has multiple layers.
 Tip
TipTo learn more about layer comps, see “Importing artwork from Photoshop” in Illustrator Help (Help > Illustrator Help).
In the Photoshop Import Options dialog box, set the following options:
Layer Comp: Beach (A layer comp is a snapshot of a state of the Layers panel that you create in Photoshop. In Photoshop, you can create, manage, and view multiple versions of a layout in a single Photoshop file. Any comments associated with the layer comp in Photoshop will appear in the Comments area.)
Show Preview: Selected (Preview displays a preview of the selected layer comp.)
Convert Layers To Objects: Selected (This option and the next one are available only because you deselected the Link option and chose to embed the Photoshop image.)
Import Hidden Layers: Selected (to import layers hidden in Photoshop)
Click OK.
Move the loaded graphics cursor into the upper-left corner of the top artboard on the right. Drag from the upper-left corner of the artboard to the lower-right corner of the artboard to place and size the image. Make sure it covers the artboard.

Rather than flatten the file, you have converted the PhotoFrame.psd Photoshop layers to layers that you can show and hide in Illustrator. When placing a Photoshop file in particular, if you had left the Link option selected (to link to the original PSD file), the only option in the Options section of the Photoshop Import Options dialog box would have been to flatten the content. Notice that, with the image still selected on the page, the Properties panel shows the word “Group” at the top. The Photoshop layers are grouped together when preserved and placed.
To send the image behind the content on the artboard, choose Object > Arrange > Send To Back.
Click the Layers panel tab in the upper-right of the application window to open the Layers panel. Drag the left edge of the Layers panel to the left to make it wider so you can read the names.
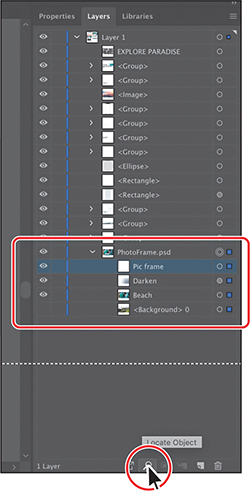
To reveal the image content in the Layers panel, click the Locate Object button (
 ) at the bottom of the panel.
Notice the sublayers of PhotoFrame.psd. These sublayers were layers in Photoshop and appear in the Layers panel in Illustrator because you chose not to flatten the image when you placed it.
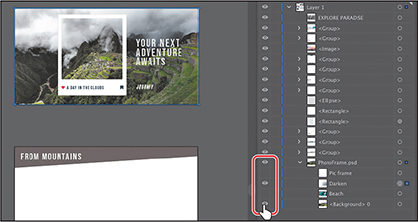
When you place a Photoshop file with layers and you choose to convert the layers to objects in the Photoshop Import Options dialog box, Illustrator treats the layers as separate sublayers in a group. The Photoshop image has a white picture frame in it, but there was already one on the artboard, so next you’ll hide the white frame that came with the Photoshop file along with one of the images.
In the Layers panel, click the eye icon (
 ) to the left of the Pic Frame sublayer and the Beach image to hide them both. Click the visibility column for the mountains image layer (my mountain layer is named “<Background> 0”) to show the image.
Placing multiple images
In Illustrator you can also place multiple image files in a single action. Next you’ll place several images at once and position them.
Choose File > Place.
 Tip
TipYou could also select a range of files in the Place dialog box by pressing the Shift key.
 Note
NoteThe Place dialog box you see in Illustrator may show the images in a different view, like List view, and that’s okay.
In the Place dialog box, in the Lessons > Lesson15 > images folder, select the Hills.jpg file. Command-click (macOS) or Ctrl-click (Windows) the image named Icon.jpg to select both image files. On macOS, click the Options button, if necessary, to reveal other options. Deselect Show Import Options, and make sure that the Link option is not selected.
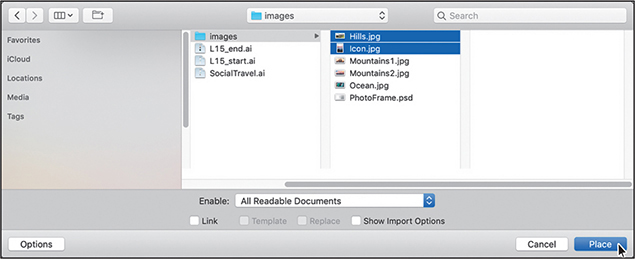
Click Place.
 Tip
TipTo discard an asset that is loaded and ready to be placed, use the arrow keys to navigate to the asset and then press the Escape key.
Move the loaded graphics cursor onto the left side of the artboard with the “Adventure For All” text. Press the Right or Left Arrow key (or Up and Down Arrow keys) a few times to see that you can cycle between the image thumbnails. Make sure that you see the Icon image thumbnail, then drag to place the image at a small size, like you see in the following figure.

You can either click to place an image at 100% or click and drag to place an image and size it as you place it in the Document window. By dragging when you place an image, you are resizing the image. Resizing an image in Illustrator will most likely result in a different resolution than the original. Also, whichever thumbnail is showing in the loaded graphics cursor when you click or drag in the Document window is the image that is placed.
Move the loaded graphics cursor into the right, bottom artboard. Move it over the upper-left corner of the artboard and drag past the lower-right corner of the artboard to place and scale the image. Leave the image selected.
Click the Properties panel tab to show the panel. To arrange the image behind the other content on the artboard, click the Arrange button in the Properties panel and choose Send To Back.

Leave the image selected and choose File > Save.
Masking images
![]() Note
Note
You will hear people use the phrases “clipping mask,” “clipping path,” and “mask.” Usually they mean the same thing.
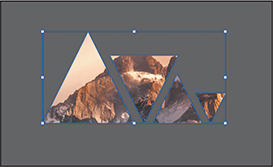
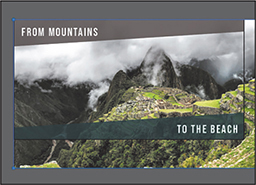
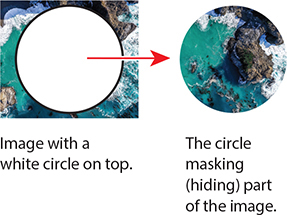
To achieve certain design effects, you can apply a clipping mask (clipping path) to content. A clipping mask is an object whose shape masks other artwork so that only areas that lie within the shape are visible. In the first part of the figure to the right is an image with a white circle on top. In the second part of the figure, the white circle was used to mask or hide part of the image.
Only vector objects can be clipping paths; however, any artwork can be masked. You can also import masks created in Photoshop files. The clipping path and the masked object are referred to as the clipping set.
Applying a simple mask to an image
In this section, you’ll see how to let Illustrator create a simple mask for you on the Hills.jpg image so that you can hide parts of the image.
![]() Tip
Tip
You can also apply a clipping mask by choosing Object > Clipping Mask > Make.
With the Hills.jpg image still selected, in the Properties panel, click the Mask button in the Quick Actions section.

Clicking the Mask button applies a clipping mask to the image in the shape and size of the image. In this case, the image doesn’t look any different.
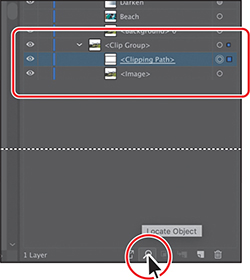
Click the Layers panel tab to show it again. Click the Locate Object button (
 ) at the bottom of the panel.
Notice the <Clipping Path> and <Image> sublayers that are contained within the <Clip Group> sublayer. The <Clipping Path> object is the clipping path (mask) that was created, and the <Clip Group> is a set that contains the mask and the object that is masked (the embedded image).
Editing a clipping path (mask)
To edit a clipping path, you need to be able to select it. Illustrator offers several ways to do this. Next you’ll edit the mask you just created.
![]() Tip
Tip
You can also double-click a clip group (object masked with a clipping path) to enter Isolation mode. You can then either click the masked object (the image in this case) to select it or click the edge of the clipping path to select the clipping path. After you are finished editing, you can then exit Isolation mode using a variety of methods, as discussed in previous lessons (like pressing the Escape key).
Click the Properties panel tab to show the panel. With the Hills.jpg image still selected on the artboard, click the Edit Contents button (
 ) at the top of the Properties panel.
Click the Layers panel tab, and notice that the <Image> sublayer (in the <Clip Group>) is showing the selected-art indicator (small color box) to the far right of the sublayer name. That means it’s selected on the artboard.

Click the Properties panel tab and in the Properties panel, click the Edit Clipping Path button (
 ) at the top of the Properties panel. Back in the Layers panel, the <Clipping Path> will now be selected.
When an object is masked, you can edit the mask, the object that is masked, or both. Use these two buttons to select which to edit. When you first click to select an object that is masked, you will edit both the mask and the masked object.
 Tip
TipYou can also edit a clipping path with transformation options, like Rotate, Skew, and so on, or by using the Direct Selection tool (
 ).
).With the Selection tool (
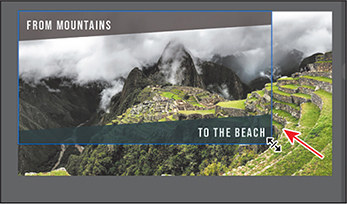
 ) selected, drag the lower-right bounding point of the selected mask so it fits the artboard.
With the Properties panel showing, click the Edit Contents button (
 ) at the top of the Properties panel to edit the Hills.jpg image, not the mask.
 Tip
TipYou can also press the arrow keys on the keyboard to reposition the image.
With the Selection tool (
 ), be careful to drag from within the bounds of the mask to reposition the image more in the center of the mask, and release the mouse button. Notice that you are moving the image and not the mask.
With the Edit Contents button (
 ) selected, you can apply many transformations to the image, including scaling, moving, rotating, and more.
Choose View > Fit All In Window.
Choose Select > Deselect and then choose File > Save.
Masking with a shape
You can also mask content with a shape that you create. In this section, you’ll take a circle and mask an image to make a small image icon.
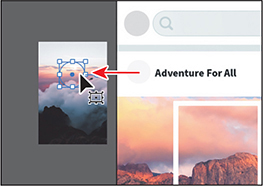
Select the gray circle to the left of the “Adventure For All” text and drag it on top of the Icon.jpg image.
The circle will be behind the image.
To zoom in to the circle, press Command and + (macOS) or Ctrl and + (Windows) four or so times.
To arrange the circle on top of the image, click the Arrange button in the Properties panel and choose Bring To Front.
Shift-click the image to select the circle and the image. To mask the image with the circle, click the Make Clipping Mask button in the Quick Actions section of the Properties panel.

Parts of the image that are outside the bounds of the circle are now hidden.
To resize and reposition the image, double-click in the circle to enter isolation mode. In isolation mode, you can edit the image and the mask (the circle) separately.
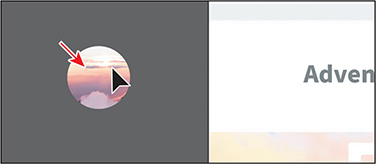
Move the pointer over the image and click to select it (be careful not to click the edge of the circle).
Shift-drag a corner of the image to make it smaller. Release the mouse button and then the key.
Move the pointer over the image and when the pointer looks like this:
 , drag the image to reposition it.
Press the Escape key to exit isolation mode.
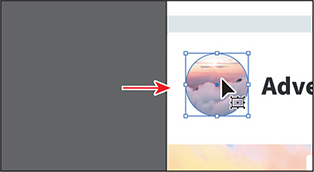
Click away from the masked image to deselect it, then drag the circle onto the artboard, to the left of the “Adventure For All” text.
Choose Select > Deselect, and then choose View > Fit All In Window to see everything again.
Masking an object with text
In this section, you’ll use text as a mask for an image you placed. In this example, the text will remain editable rather than converting to outlines. Also, you’ll use one of the images you previously placed as part of the Photoshop file.
With the Selection tool (
 ) selected, click the PSD file on the top-right artboard that you placed earlier.
In the Layers panel, click the Locate Object button (
 ) to highlight the image content in the Layers panel.
Click the visibility column to the left of the Beach image to show it. Then click the Selected Art column in the Layers panel to select only that image.

Choose Edit > Copy and then choose Edit > Paste.
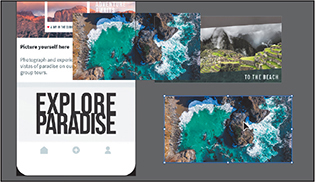
To paste another copy, choose Edit > Paste and drag it to an empty area.
In the Layers panel, click the eye icon (
 ) to the left of the Beach image in the PhotoFrame.psd group to hide it again.
Drag the first copy of the image on top of the large EXPLORE PARADISE text. Make sure that the image is positioned roughly as it is in the following figure.
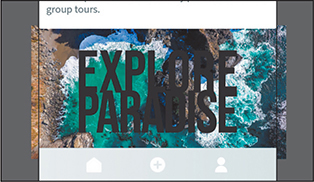
Click the Properties panel tab to show the panel. Click the Arrange button in the Properties panel and choose Send To Back.
You should see the EXPLORE PARADISE text now. To create a mask from text, the text needs to be on top of the image.
To duplicate the image, choose Edit > Copy, and then choose Edit > Paste In Front.
Hide the copy by choosing Object > Hide > Selection.
Click the image under the text and Shift-click the EXPLORE PARADISE text to select them both.
In the Properties panel, click the Make Clipping Mask button.

The image should now be masked by the text.
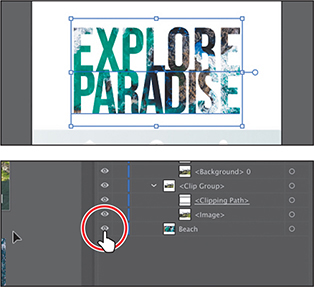
In the Layers panel, click the visibility column for the hidden Beach image at the bottom of the Layers panel to show it.
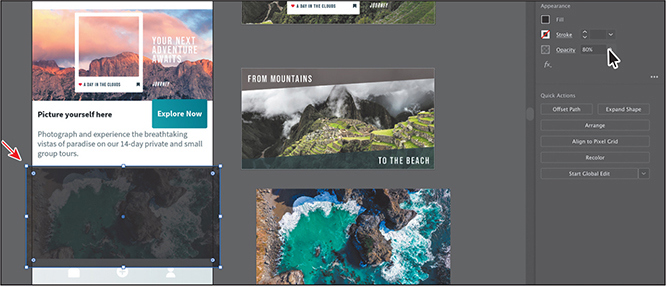
Select the Rectangle tool (
 ) in the toolbar and draw a rectangle as big as the image. Click the Fill box in the Properties panel and select a dark gray swatch.
Change the Opacity to 80% in the Properties panel.
To send the rectangle behind the masked image, click the Arrange button and choose Send To Back. To bring it in front of the image that is not masked, click the Arrange button and choose Bring Forward.
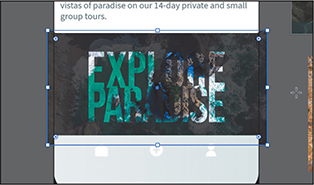
Choose Select > Deselect and then choose File > Save.
Creating an opacity mask
An opacity mask is different from a clipping mask because it allows you to mask an object and also alter the transparency of artwork. You can make and edit an opacity mask using the Transparency panel. In this section, you’ll create an opacity mask for the copied beach image, so that it fades into another image.
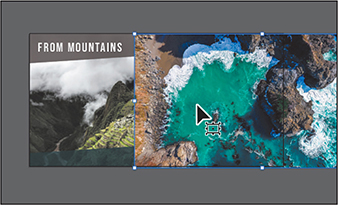
With the Selection tool (
 ) selected, select the copied beach image and drag it into the position you see in the figure.
Select the Rectangle tool (
 ) in the toolbar and drag to create a rectangle that covers most of the beach image. See the figure. This will become the mask.
Press the D key to set the default stroke (black, 1 pt) and fill (white) for the new rectangle to more easily select and move it.

Select the Selection tool (
 ) and, while pressing the Shift key, click the beach image to select it as well.
 Note
NoteIf you had wanted to create a mask with the same dimensions as the image, instead of drawing a shape, you could have simply clicked the Make Mask button in the Transparency panel.
Click the Properties panel tab to see the Properties panel again. Click the word “Opacity” to open the Transparency panel. Click the Make Mask button, and leave the artwork selected and the panel showing.

After clicking the Make Mask button, the button now shows as “Release.” If you were to click the button again, the image would no longer be masked.
Editing an opacity mask
Next you’ll adjust the opacity mask that you just created.
Choose Window > Transparency to open the Transparency panel.
By opening the Transparency panel, you will see the same panel you did when you clicked “Opacity” in the Properties panel. When you click Opacity to reveal the Transparency panel, you will need to hide the panel for the changes you make in this section to take place. In the free-floating Transparency panel, changes will happen automatically.
 Tip
TipTo disable and enable an opacity mask, you can also choose Disable Opacity Mask or Enable Opacity Mask from the Transparency panel menu.
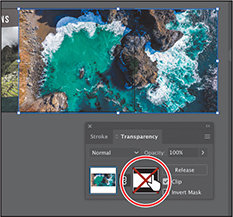
In the Transparency panel, Shift-click the mask thumbnail (as indicated by the white rectangle on the black background) to disable the mask.
Notice that a red X appears on the mask in the Transparency panel and that the entire beach image reappears in the Document window. Hiding the mask can be useful to see all of the masked object again (the image in this case) if you need to do anything with it.
In the Transparency panel, Shift-click the mask thumbnail to enable the mask again.
 Tip
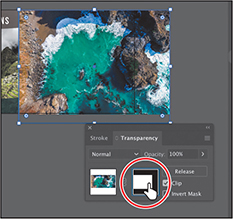
TipTo show the mask by itself (in grayscale if the original mask had color in it) on the artboard, you can also Option-click (macOS) or Alt-click (Windows) the mask thumbnail in the Transparency panel.
Click to select the mask thumbnail on the right side of the Transparency panel. If the mask isn’t selected on the artboard, click to select it with the Selection tool (
 ).
).Clicking the opacity mask in the Transparency panel selects the mask (the rectangle) on the artboard. With the mask selected, you can’t edit other artwork on the artboard. Also, notice that the document tab shows (<Opacity Mask>/Opacity Mask), indicating that you are now editing the mask.

Click the Layers panel tab to show the Layers panel, and click the disclosure triangle (
 ) for the <Opacity Mask> layer to reveal the contents, if necessary.
With the mask selected in the Transparency panel and on the artboard, use the Properties panel to change the fill color to a white-to-black linear gradient, called White, Black.

You’ll now see that where there is white in the mask, the beach image is showing, and where there is black, it is hidden. The gradient mask gradually reveals the image.
Make sure that the Fill box toward the bottom of the toolbar is selected.
Select the Gradient tool (
 ) in the toolbar. Move the pointer to the right side of the beach image. Drag to the left, just past the left edge of the image.
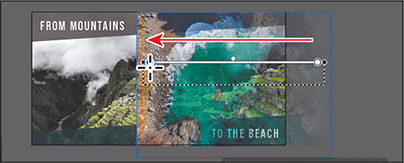
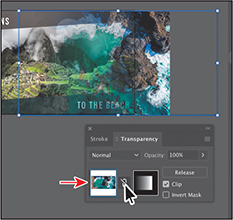
Notice how the mask thumbnail in the Transparency panel now shows the gradient. Next you’ll move the image but not the opacity mask. With the image thumbnail selected in the Transparency panel, the image and the mask are linked by default, so if you move the image, the mask moves as well.
 Note
NoteYou have access to the link icon only when the image thumbnail, not the mask thumbnail, is selected in the Transparency panel.
In the Transparency panel, click the image thumbnail so you are no longer editing the mask (an arrow is pointing to it in the figure). Click the link icon (
 ) between the image thumbnail and the mask thumbnail.
This allows you to move just the image or the mask, but not both.
 Note
NoteThe position of the beach image does not have to match the figure exactly.
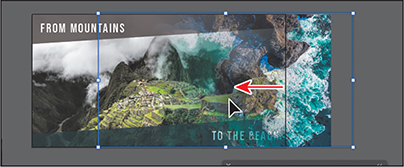
With the Selection tool, drag the beach image to the left. After dragging a little, release the mouse button to see where it’s positioned.
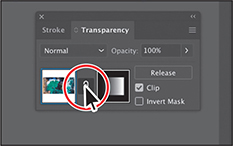
In the Transparency panel, click the broken link icon (
 ) between the image thumbnail and the mask thumbnail to link the two together again.
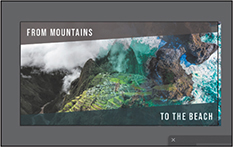
Drag the beach image to the left to cover more of the mountains image.
Shift-click the mountains image to select it as well and, to send both behind the text on the artboard, choose Object > Arrange > Send To Back.
Choose Select > Deselect and then choose File > Save.
Working with image links
![]() Note
Note
Learn about working with links and Creative Cloud library items in Lesson 14, “Creating Artwork for a T-Shirt.”
When you place images in Illustrator and either link to them or embed them, you can see a listing of these images in the Links panel. You use the Links panel to see and manage all linked or embedded artwork. The Links panel displays a small thumbnail of the artwork and uses icons to indicate the artwork’s status. From the Links panel, you can view the images that have been linked to and embedded, replace a placed image, update a linked image that has been edited outside of Illustrator, or edit a linked image in the original application, such as Photoshop.
Finding link information
When you place an image, it can be helpful to see where the original image is located, what transformations have been applied to the image (such as rotation and scale), and more. Next you’ll explore the Links panel to discover image information.
Choose Window > Workspace > Reset Essentials.
Choose Window > Links to open the Links panel.
 Tip
TipYou can also double-click the image in the Layers panel list to see the image information.
 Note
NoteThe link information you see may be different than what you see in the figure, and that’s okay.
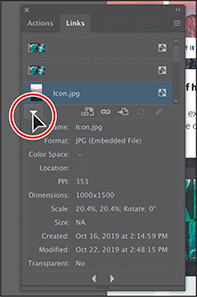
Select the Icon.jpg image in the Links panel. Click the disclosure triangle in the lower-left corner of the Links panel to reveal the link information at the bottom of the panel.
Looking in the Links panel, you’ll see a listing of all the images you’ve placed. You can tell whether an image has been embedded by the embedded icon (
 ) to the far right of the image name or thumbnail. If you don’t see a name for an image listed in the Links panel, it usually means it was embedded when placing or came in with a layered PSD file that you preserved the layers for, or it was pasted into Illustrator. You’ll also see information about the image, such as the fact that it’s embedded (Embedded File), the resolution, transformation information, and more.
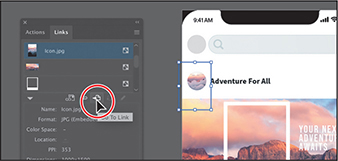
Click the Go To Link button (
 ) below the list of images.
The Icon.jpg image will be selected and centered in the Document window.
Choose Select > Deselect and then choose File > Save.
Embedding and unembedding images
As mentioned, if you choose not to link to an image when placing it, the image is embedded in the Illustrator file. That means that the image data is stored within the Illustrator document. You can choose to embed an image later, after placing and linking to it. Also, you might want to use embedded images outside of Illustrator or to edit them in an image-editing application like Photoshop. Illustrator allows you to unembed images, which saves the embedded artwork to your file system as a PSD or TIFF file (you can choose) and automatically links it to the Illustrator file. Next you will unembed an image in the document.
Choose View > Fit All In Window.
Click to select the Hills.jpg image (the mountains) on the right, lower artboard.
The Hills.jpg image was embedded when you originally placed it. With an embedded image, you may need to make an edit to that image in a program like Adobe Photoshop. You will need to unembed that image to make edits to it, which is what you’ll do next to the image.
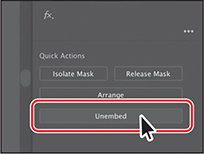
 Tip
TipYou can also choose Unembed from the Links panel menu (
 ).
). Note
NoteThe embedded Hills.jpg image data is unembedded from the file and saved as a PSD file in the images folder. The image on the artboard is now linked to the PSD file. You can tell it’s a linked graphic because of the X that appears in the bounding box when it’s selected.
Click the Unembed button in the Properties panel.
In the dialog box that appears, navigate to the Lessons > Lesson15 > images folder (if you are not already there). Make sure Photoshop (*.PSD) is chosen from the File Format menu (macOS) or the Save As Type (Windows) menu, and click Save.
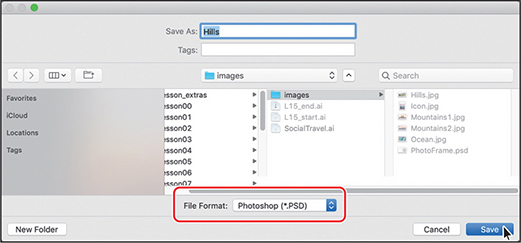
If you were to edit the Hills.psd file in Photoshop, for instance, the image would be updated in Illustrator since it is linked.
Choose Select > Deselect.
Replacing an image
You can easily replace a linked or embedded image with another image to update the artwork. The replacement image is positioned exactly where the original image was, so no adjustment should be necessary if the new image has the same dimensions. If you scaled the image that you are replacing, you may need to resize the replacement image to match the original. Next you’ll replace an image.
Click the Mountains2.jpg image on the artboard on the left. It was the first image you placed.
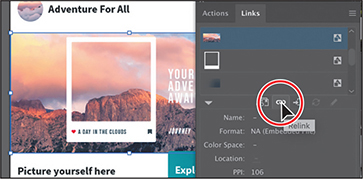
In the Links panel, click the Relink button (
 ) below the list of images.
In the dialog box that opens, navigate to the Lessons > Lesson15 > images folder, and select the Mountains1.jpg image. Make sure that the Link option is selected. Click Place to replace the image.
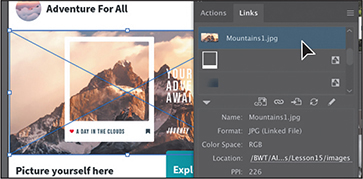
Choose Select > Deselect, and then choose File > Save.
Choose File > Close as many times as necessary to close all open files.
Review questions
1. Describe the difference between linking and embedding in Illustrator.
2. How do you show options when importing images?
3. What kinds of objects can be used as masks?
4. How do you create an opacity mask for a placed image?
5. Describe how to replace a placed image with another image in a document.
Review answers
1. A linked file is a separate, external file connected to the Illustrator file by a link. A linked file does not add significantly to the size of the Illustrator file. The linked file must accompany the Illustrator file to preserve the link and to ensure that the placed file appears when you open the Illustrator file. An embedded file becomes part of the Illustrator file. The increased Illustrator file size reflects the addition of the embedded file. Because the embedded file is part of the Illustrator file, no link can be broken. You can update linked and embedded files using the Relink button (![]() ) in the Links panel.
) in the Links panel.
2. When placing an image using the File > Place command, in the Place dialog box, select the Show Import Options option. Selecting this option will open an Import Options dialog box where you can set import options before placing. In macOS, if you don’t see the options in the Import Options dialog box, click the Options button.
3. A mask can be a simple or compound path, and masks (such as an opacity mask) may be imported with placed Photoshop files. You can also create layer clipping masks with any shape that is the topmost object of a group or layer.
4. You create an opacity mask by placing the object to be used as a mask on top of the object to be masked. Then you select the mask and the object(s) to be masked, and either click the Make Mask button in the Transparency panel or choose Make Opacity Mask from the Transparency panel menu.
5. To replace a placed image with a different image, select the image in the Links panel. Then click the Relink button (![]() ), and locate and select the replacement image. Click Place.
), and locate and select the replacement image. Click Place.
