14. Creating Artwork for a T-Shirt
Lesson overview
In this lesson, you’ll learn how to do the following:
Work with existing symbols.
Create, modify, and redefine a symbol.
Store and retrieve artwork in the Symbols panel.
Understand Creative Cloud libraries.
Work with Creative Cloud libraries.
Work with Global Edit.

This lesson will take about 45 minutes to complete. To get the lesson files used in this chapter, download them from the web page for this book at www.adobepress.com/IllustratorCIB2020. For more information, see “Accessing the lesson files and Web Edition” in the Getting Started section at the beginning of this book.

In this lesson, you’ll explore a variety of useful concepts for working smarter and faster in Illustrator by using symbols, working with Creative Cloud libraries to make your design assets available anywhere, and editing content using Global Edit.
Starting the lesson
In this lesson, you’ll explore concepts such as symbols and the Libraries panel to create artwork for a T-shirt. Before you begin, you’ll restore the default preferences for Adobe Illustrator. Then, you’ll open the finished art file for this lesson to see what you’ll create.
![]() Note
Note
If you have not already downloaded the project files for this lesson to your computer from your Account page, make sure to do so now. See the “Getting Started” section at the beginning of the book.
To ensure that the tools function and the defaults are set exactly as described in this lesson, delete or deactivate (by renaming) the Adobe Illustrator preferences file. See “Restoring default preferences” in the “Getting Started” section at the beginning of the book.
Start Adobe Illustrator.
Choose File > Open, and open the L14_end1.ai file in the Lessons > Lesson14 folder on your hard disk.
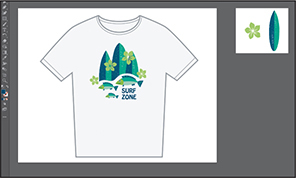
You’re going to create artwork for a T-shirt design.
Choose View > Fit All In Window and leave the file open for reference, or choose File > Close.
Choose File > Open. In the Open dialog box, navigate to the Lessons > Lesson14 folder, and select the L14_start1.ai file on your hard disk. Click Open to open the file.
Choose View > Fit All In Window.
Choose File > Save As. In the Save As dialog box, navigate to the Lesson14 folder, and name the file TShirt.ai. Leave Adobe Illustrator (ai) chosen from the Format menu (macOS) or Adobe Illustrator (*.AI) chosen from the Save As Type menu (Windows), and click Save.
In the Illustrator Options dialog box, leave the Illustrator options at their default settings and then click OK.
Choose Reset Essentials from the workspace switcher in the Application bar.
![]() Note
Note
If you don’t see Reset Essentials in the menu, choose Window > Workspace > Essentials before choosing Window > Workspace > Reset Essentials.
Working with symbols
![]() Note
Note
Illustrator comes with a series of symbol libraries, which range from tiki icons to hair to web icons. You can access those symbol libraries in the Symbols panel or by choosing Window > Symbol Libraries and easily incorporate them into your own artwork.
A symbol is a reusable art object that is stored in the Symbols panel (Window > Symbols). For example, if you create a symbol from a flower you drew, you can then quickly add multiple instances of that flower symbol to your artwork, which saves you from having to draw each flower. All instances in the document are linked to the original symbol in the Symbols panel. When you edit the original symbol, all instances of that symbol (a flower in this example) that are linked to the original are updated. You can turn all those flowers from white to red instantly! Not only do symbols save time, but they also greatly reduce file size.
Choose Window > Symbols to open the Symbols panel. The symbols you see in the Symbols panel are the symbols you can use with this document. Each document has its own set of saved symbols. The different options available in the Symbols panel are shown here:

Using default Illustrator symbol libraries
You’ll start by adding to your project a symbol from one of the many symbol libraries that come with Illustrator.
Select the Selection tool (
 ) in the toolbar and click in the larger artboard.
Choose View > Fit Artboard In Window to fit the active artboard in the Document window.

 Tip
TipYou can also choose View > Smart Guides to turn them off.
Click the Hide Smart Guides option in the Properties panel to turn the Smart Guides off temporarily.
In the Symbols panel (Window > Symbols), click the Symbol Libraries Menu button (
 ) at the bottom of the panel, and choose Tiki from the menu.
The Tiki library opens as a free-floating panel. The symbols in this library are not part of the file that you are working on, but you can import any of the symbols into the document and use them in the artwork.
TipIf you want to see the symbol names along with the symbol pictures, click the Symbols panel menu icon (
 ) and then choose Small List View or Large List View.
Move the pointer over the symbols in the Tiki panel to see their names as tool tips. Click the symbol named “Fish” to add it to the Symbols panel. Close the Tiki panel.

When you add symbols to the Symbols panel, they are saved with the active document only.
TipYou can also copy a symbol instance on the artboard and paste as many as you need. This is the same as dragging a symbol instance out of the Symbols panel onto the artboard.
With the Selection tool (
) selected, drag the Fish symbol from the Symbols panel onto the artboard into the approximate center of the artboard. Do this a total of two times to create two instances of the fish next to each other.
Each time you drag a symbol like the fish onto the artboard, an instance of the original symbol is created. Next you’ll resize one of the symbol instances.
 Note
NoteAlthough you can transform symbol instances in many ways, specific properties of instances from static symbols like the fish cannot be edited. For example, the fill color is locked because it is controlled by the original symbol in the Symbols panel.
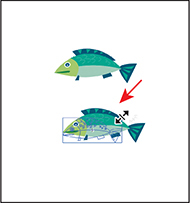
With one of the Fish symbol instances selected, Shift-drag the upper-right bounding point toward the center to make it a little smaller while also constraining its proportions. Release the mouse button and then the key.
A symbol instance is treated like a group of objects and can have only certain transformation and appearance properties changed (scale, rotate, move, transparency, and more). You cannot edit the individual artwork that makes up an instance without breaking the link to the original symbol. With the symbol instance still selected on the artboard, notice that, in the Properties panel, you see “Symbol (Static)” and symbol-related options.

With the same fish instance still selected, make a copy of it by pressing Option (macOS) or Alt (Windows) and dragging a copy. Release the mouse button and then the key.
Creating a copy of an instance is the same thing as dragging an instance of a symbol from the Symbols panel.

To resize the new fish instance, Shift-drag a corner to make it smaller. Release the mouse button and then the key.
Drag all three fish instances into position, as in the figure. Choose Select > Deselect.

Editing a symbol
In this next section, you’ll edit the original Fish symbol, and all instances in the document will be updated. There are several ways to edit a symbol, and in this section you will focus on one method.
![]() Tip
Tip
There are a lot of ways to edit a symbol. You can select the symbol instance on the artboard and then click the Edit Symbol button in the Properties panel, or double-click a symbol thumbnail in the Symbols panel to edit the symbol.
With the Selection tool (
) selected, double-click any of the Fish symbol instances on the artboard. A warning dialog box appears, stating that you are about to edit the original symbol and that all instances will update. Click OK.
This takes you into symbol editing mode, so you can’t edit any other objects on the page. The Fish symbol instance you double-clicked will show as the size of the original symbol artwork. That’s because in symbol editing mode, you are looking at the original symbol artwork rather than the transformed instance (if you double-clicked one that was resized). You can now edit the artwork that makes up the symbol.
Select the Zoom tool (
 ), and drag across the symbol content to zoom in closely.
Select the Direct Selection tool (
 ), and click to select the light green head of the fish. An arrow is pointing to it in the following figure.
Click the Fill color box in the Swatches panel, and select the Color Mixer (
 ). Press the Shift key and drag the Cyan (C) slider to the right a little, to change the color.
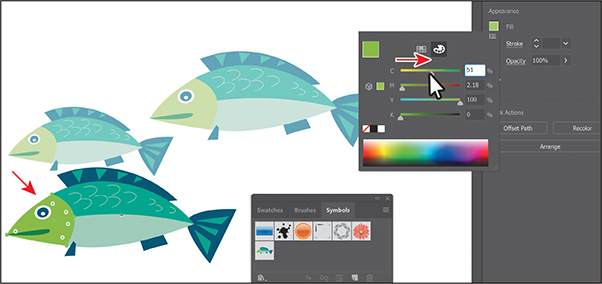
Pressing the Shift key when dragging a slider changes all of the colors (CMYK, for instance) proportionally.

Double-click away from the symbol content, or click the Exit Symbol Editing Mode button (
 ) in the upper-left corner of the Document window until you exit symbol editing mode so that you can edit the rest of the content.
Notice that all of the Fish symbol instances on the artboard have been changed.
Working with dynamic symbols
As you just saw, editing a symbol updates all of the instances in your document. Symbols can also be set to be dynamic, which means you can change certain appearance properties of individual instances using the Direct Selection tool (![]() ) without editing the original symbol. In this section, you’ll edit the properties of the Fish symbol so that it is dynamic, and then you’ll edit each instance separately.
) without editing the original symbol. In this section, you’ll edit the properties of the Fish symbol so that it is dynamic, and then you’ll edit each instance separately.
In the Symbols panel, click the Fish symbol thumbnail to select it, if it’s not already selected. Click the Symbol Options button (
 ) at the bottom of the Symbols panel.
In the Symbol Options dialog box, select Dynamic Symbol, and click OK. The symbol and its instances are now dynamic.
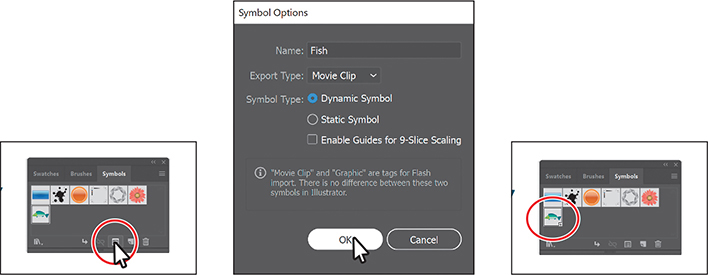
You can tell if a symbol is dynamic by looking at the thumbnail in the Symbols panel. If there is a small plus sign (+) in the lower-right corner of the thumbnail, it is a dynamic symbol.
Select the Direct Selection tool (
) in the toolbar. Click within the fish head of the smallest fish instance. See the following figure.With part of the symbol instance selected, notice the words “Symbol (Dynamic)” at the top of the Properties panel, telling you it’s a dynamic symbol.
Click the Fill box in the Properties panel. With the Swatches option selected, change the fill color to a blue green swatch in the Swatches panel.

One fish now looks a little different from the others. Know that if you were to edit the original symbol, like you did previously, all symbol instances would still update, but that blue-green part of the smallest fish instance would remain different.
Creating a symbol
Illustrator also lets you create and save your own symbols. You can make symbols from objects, including paths, compound paths, text, embedded (not linked) raster images, mesh objects, and groups of objects. Symbols can even include active objects, such as brush strokes, blends, effects, or other symbol instances. Next you’ll create your own symbol from existing artwork.
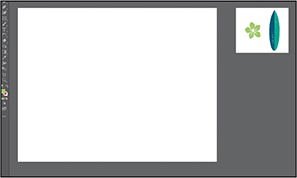
Choose 2 Symbol Artwork from the Artboard Navigation menu in the Status bar below the Document window.
With the Selection tool (
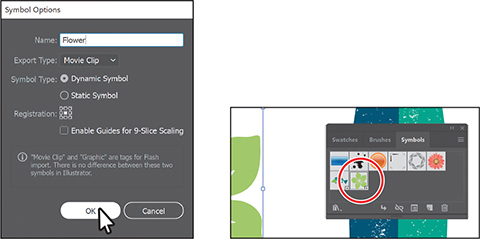
) selected, click the flower on the artboard to select it.Click the New Symbol button (
 ) at the bottom of the Symbols panel to make a symbol from the selected artwork.
In the Symbol Options dialog box that opens, change the name to Flower. Ensure that Dynamic Symbol is selected, just in case you want to edit the appearance of one of the instances later. Click OK to create the symbol.
 Tip
TipYou can drag the symbol thumbnails in the Symbols panel to change their ordering. Reordering symbols in the Symbols panel has no effect on the artwork. It can simply be a way to organize your symbols.
In the Symbol Options dialog box, you’ll see a note that explains that there is no difference between a movie clip and a graphic type in Illustrator. If you don’t plan on exporting this content to Adobe Animate, you don’t need to worry about choosing an export type. After creating the symbol, the flower artwork on the artboard is converted to an instance of the Flower symbol. The symbol also appears in the Symbols panel.
Now you’ll create another symbol by dragging artwork into the Symbols panel.
Drag the surfboard artwork into a blank area of the Symbols panel. In the Symbol Options dialog box, change the name to Surfboard and click OK.

Choose 1 T-Shirt from the Artboard menu in the Status bar below the Document window.
Drag the Flower symbol from the Symbols panel onto the artboard four times, and position the instances around the fish, as you see in the following figure.


Resize and rotate each of the flower instances on the artboard using the Selection tool, making them different sizes. Make sure to press the Shift key to constrain the proportions as you scale.
Choose Select > Deselect and then choose File > Save.
Breaking a link to a symbol
At times you will need to edit a specific instance on the artboard in ways that require you to break the link between the original symbol artwork and an instance. As you’ve learned, you can make certain changes, such as scaling, opacity, and flipping, to a symbol instance, and saving the symbol as dynamic only lets you edit certain appearance attributes using the Direct Selection tool. When you break the link between a symbol and an instance, that instance will no longer update if the symbol is edited.
Next you’ll see how to break the link to a symbol instance so you can make a change to just that one.
Turn on the Smart Guides by choosing View > Smart Guides.
TipYou can also break the link to a symbol instance by selecting the symbol instance on the artboard and then clicking the Break Link To Symbol button (
 ) at the bottom of the Symbols panel.
With the Selection tool (
) selected, drag three copies of the Surfboard symbol on top of the other artwork already on the artboard. Arrange them like you see in the following figure.Select each symbol instance and resize it, making the center artboard taller than the other two. I wound up making all three larger. Don’t forget to Shift-drag a corner in order to resize proportionally.
Select the center surfboard, and in the Properties panel, click the Break Link button.
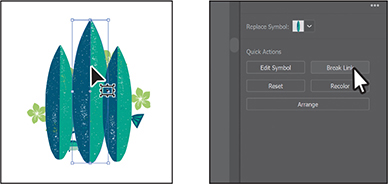
This surfboard is now a series of paths; if you click to select the artwork, you’ll see “Group” at the top of the Properties panel. You should be able to edit the artwork directly now. This content will no longer update if the Surfboard symbol is edited.
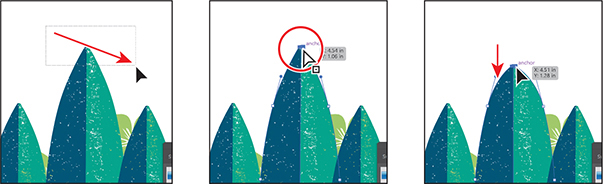
Select the Zoom tool (
), and drag across the top of the selected surfboard artwork on the artboard to zoom in.Choose Select > Deselect.
Select the Direct Selection tool, and drag across the top of the middle surfboard. Move the pointer over the anchor points at the top of the surfboard and when you see the word “anchor,” drag one of them down a little to reshape the top.
Choose Select > Deselect.
Now you’ll arrange the surfboards behind the flowers and fish.
Select the Selection tool (
) and Shift-click all three of the surfboards to select them all. Choose Object > Arrange > Send To Back.Click the Group button in the Properties panel to group them together.
Choose File > Save.
![]() Note
Note
The Symbolism tools are not in the default toolbar. To access them, click the Edit Toolbar option (![]() ) at the bottom of the toolbar and drag any of the Symbolism tools into the toolbar.
) at the bottom of the toolbar and drag any of the Symbolism tools into the toolbar.
The Symbolism tools
The Symbol Sprayer tool (![]() ) in the toolbar allows you to spray symbols on the artboard, creating symbol sets.
) in the toolbar allows you to spray symbols on the artboard, creating symbol sets.
A symbol set is a group of symbol instances that you create with the Symbol Sprayer tool. This can be really useful if, for instance, you were to create grass from individual blades of grass. Spraying the blades of grass speeds up this process greatly and makes it much easier to edit individual instances of grass or the sprayed grass as a group. You can create mixed sets of symbol instances by using the Symbol Sprayer tool with one symbol and then using it again with another symbol.
You use the symbolism tools to modify multiple symbol instances in a set. For example, you can disperse instances over a larger area using the Symbol Scruncher tool or gradually tint the color of instances to make them look more realistic.
—From Illustrator Help
Replacing symbols
You can easily replace a symbol instance in the document with another symbol. You can also replace a symbol like a fish if you made changes to the dynamic symbol instance. That way, the symbol instance matches the original symbol artwork again. Next you’ll replace one of the Fish symbol instances.
With the Selection tool (
), select the smallest Fish symbol instance, the one whose head you recolored.When you select a symbol instance, you can tell which symbol it came from because the symbol for the selected instance is highlighted in the Symbols panel.
In the Properties panel, click the arrow to the right of the Replace Symbol field to open a panel showing the symbols in the Symbols panel. Click the Flower symbol in the panel.

If the original symbol instance you are replacing had a transformation applied, such as a rotation, the symbol instance replacing it would have the same transformations applied.
 Note
NoteAfter making edits to a dynamic symbol instance with the Direct Selection tool, you can reselect the entire instance with the Selection tool and click the Reset button in the Properties panel to reset the appearance to the same as the original symbol.
With the Flower symbol instance still selected on the artboard, in the Properties panel click the arrow to the right of the Replace Symbol field and click the Fish symbol in the panel.
The change you made to the Fish symbol instance earlier (changing the color of the head) is gone and the original Fish symbol artwork replaces the flower.
Choose Select > Same > Symbol Instance.
This is a great way to select all instances of a symbol in the document.
Click the Group button in the Properties panel to keep them together as a group.
Choose Select > Deselect and close the Symbols panel group.
Symbol layers
When you edit a symbol using any of the methods described, open the Layers panel, and you will see that the symbol has its own layering.
Similar to working with groups in Isolation mode, you see the layers associated with that symbol only, not the document’s layers. In the Layers panel, you can rename, add, delete, show/hide, and reorder content for a symbol.

Working with Creative Cloud libraries
Creative Cloud libraries are an easy way to create and share stored content such as images, colors, text styles, Adobe Stock assets, and more between Adobe applications like Photoshop, Illustrator, InDesign, and most Adobe mobile apps.
![]() Note
Note
To use Creative Cloud libraries, you will need to be signed in with your Adobe ID and have an internet connection.
![]() Note
Note
The Missing Fonts dialog box may appear. You need an internet connection to activate the fonts. The activation process may take a few minutes. Click Activate Fonts to activate all of the missing fonts. After they are activated and you see the message stating that there are no more missing fonts, click Close. If you have an issue with activation, you can go to Help (Help > Illustrator Help) and search for “Find missing fonts.”
Creative Cloud libraries connect to your Creative Profile, putting the creative assets you have saved at your fingertips. When you create content in Illustrator and save it to a Creative Cloud library, that asset is available to use in all of your Illustrator files. Those assets are automatically synced and can be shared with anyone with a Creative Cloud account. As your creative team works across Adobe desktop and mobile apps, your shared library assets are always up to date and ready to use anywhere. In this section, you’ll explore libraries and use assets you save there, in your project.
Adding assets to a Creative Cloud library
The first thing you’ll learn about is how to work with the Libraries panel (Window > Libraries) in Illustrator and add assets to a Creative Cloud library. You’ll open an existing document in Illustrator and capture assets from it.
Choose File > Open. In the Open dialog box, navigate to the Lessons > Lesson14 folder, and select the Sample.ai file on your hard disk. Click Open.
Choose View > Fit All In Window.
Using this document, you will capture artwork, text, and colors to be used in the TShirt.ai document.

Choose Window > Libraries, or click the Libraries panel tab to open the Libraries panel.
To start you have one library to work with, called “My Library.” You can add your design assets to this default library and you can create more libraries—maybe to save assets for specific clients or projects.
Choose Select > Deselect, if anything is selected.
Select the Selection tool (
), and click the text object that contains the text “PLAY ZONE.” Drag the text into the Libraries panel. When a plus sign (+)appears in the panel, release to save the text object in the default library. If you see a missing profile warning dialog box, click OK.
The text object is now saved in the currently selected library and is still editable as text—retaining the text formatting as well. As you save assets and formatting in the Libraries panel, the content is organized by asset type.
Make sure that View By Type is chosen from the View By menu.
TipYou can change the appearance of the items in the library (icons or list) by clicking the buttons to the right of the View By Type option.
To change the name of the saved text object, double-click the name “Text 1” in the Libraries panel, and change it to SURF ZONE. Press Enter or Return to accept the name change. That name will make more sense when you update the text to “SURF ZONE” later in the lesson.

You can change the names of other assets like graphics, colors, character styles, and paragraph styles saved in the Libraries panel as well. In the case of character and paragraph styles you save, you can also move the pointer over the asset and see a tool tip that shows the saved formatting.
With the PLAY ZONE text still selected on the artboard, click the plus sign (+) at the bottom of the Libraries panel and choose Text Fill Color to save the blue color.

Click the T-shirt artwork to select it. Drag the selected artwork into the Libraries panel. When a plus sign (+) and a name (such as “Artwork 1”) appear, release the mouse button to add the artwork as a graphic.

The assets you store as graphics in a Creative Cloud library remain editable vectors wherever you use the graphic.

Click the shape on the artboard above the PLAY ZONE text. You’ll simply copy this artwork since you will use it to mask or hide parts of the surfboards. Choose Edit > Copy.
TipYou can share a copy of your library with others by choosing the library you want to share in the Libraries panel and then choosing Share Link from the panel menu.
Choose File > Close to close the Sample.ai file and return to the TShirt.ai file. Don’t save the file if asked.
Notice that even with a different document open, the Libraries panel still shows those assets in the library. The libraries and their assets are available no matter which document is open in Illustrator.
Choose Edit > Paste to paste the shape. Drag it to the right of the surfboards.
Using library assets
Now that you have some assets in the Libraries panel, once synced with your Creative Cloud account, those assets will be available to other applications and apps that support libraries, as long as you are signed in with the same Creative Cloud account. Next you’ll use some of those assets in the TShirt.ai file.
While still on the 1 T-Shirt artboard, choose View > Fit Artboard In Window.
TipTo apply the color or styles saved in the Libraries panel, select artwork or text and click to apply. When it comes to text styles in the Libraries panel, if you apply them to text in a document, a style of the same name and formatting will appear in the Paragraph Styles panel or Character Styles panel (depending on which you selected in the Libraries panel).
Drag the SURF ZONE asset from the Libraries panel onto the artboard.

Click to place the text.

With the Type tool selected, click in the PLAY ZONE text, select the word “PLAY,” and type SURF.
Select the Selection tool (
 ), and drag the T-shirt graphic asset from the Libraries panel onto the artboard. You will need to click the artboard after dragging to place it. Don’t worry about position for now.
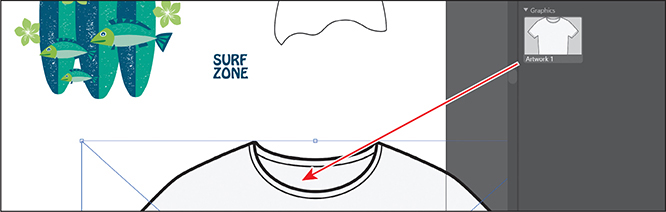
Choose Select > Deselect.
Updating a library asset
When you drag a graphic from your Creative Cloud library to an Illustrator project, it is automatically placed as a linked asset. You can tell that an asset you dragged from a library is linked by the X that appears on the object bounding box when it’s selected in the document. If you make a change to a library asset, the linked instances will update in your projects. Next you’ll see how to update the asset.
![]() Tip
Tip
You can also edit a linked library asset like the T-shirt by clicking Edit Original (![]() ) at the bottom of the Links panel.
) at the bottom of the Links panel.
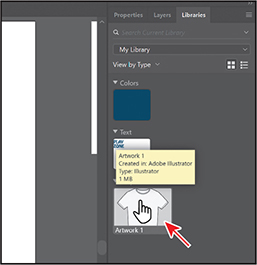
In the Libraries panel, double-click the T-shirt asset thumbnail. The artwork will appear in a new, temporary document.
With the Selection tool (
) selected, click to select the T-shirt shape. Change the stroke color to a lighter gray with the tool tip “C=0, M=0, Y=0, K=40” in the Properties panel.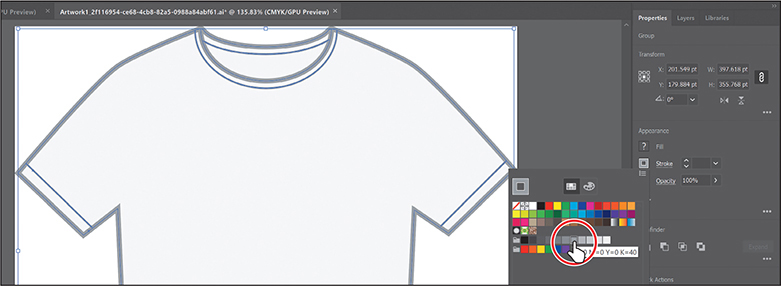
Choose File > Save and then choose File > Close.
In the Libraries panel, the graphic thumbnail should update to reflect the appearance change you made. Back in the TShirt.ai document, the T-shirt graphic on the artboard should have updated. If it hasn’t, with the T-shirt artwork still selected on the artboard, click the text “Linked File” at the top of the Properties panel. In the Links panel that shows, with the T-shirt asset row selected, click the Update Link button (
 ) at the bottom of the panel.`
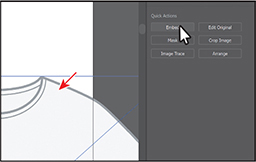
Click the T-shirt artwork. To embed the graphic, click the Properties panel tab to see the panel again. Click the Embed button in the Quick Actions section of the panel.
The asset is no longer linked to the library item and will not update if the library item is updated.
That also means the artwork is now editable in the TShirt.ai document. Libraries panel artwork that is embedded after it has been placed will typically have a clipping mask applied. Next you’ll move and scale the artwork.
With the Selection tool (
) selected and the T-shirt artwork also selected, click the Arrange button in the Properties panel and choose Send To Back. The artwork is now behind all other content. Drag it into the approximate center of the artboard.To lock the T-shirt artwork, press Command+2 (macOS) or Ctrl+2 (Windows).

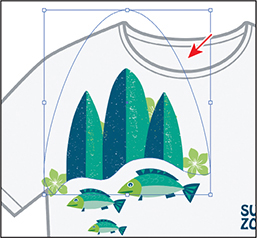
Click the shape you pasted into the document and drag it on top of the surfboards. Shift-drag a corner to make it bigger; then release the mouse button and key when finished. See the figure for approximate position and size.
The shape will be used as a mask to hide parts of the surfboards. You’ll learn more about creating and editing masks in Lesson 15.
With the shape selected, Shift-click the artwork in the surfboard group.
Choose Object > Clipping Mask > Make.
The surfboard artwork that’s outside of the shape is now hidden.
To arrange the surfboard group behind the fish and flowers, click the Arrange button in the Properties panel and choose Send To Back. This will put the artwork behind the T-shirt. Then click the Arrange button and choose Bring Forward.
Drag across the flowers, fish, and surfboards to select it all. Click the Group button in the Properties panel to group it.
 Tip
TipYou may also want to adjust text formatting like leading, font size, and more in the Properties panel.
Drag that new group into position, along with the text. You may want to enlarge the text in the Properties panel. If you do make it larger, you will need to resize the text area so all of the text shows.
Choose Select > Deselect.
Choose File > Save and then choose File > Close.
Working with Global Edit
![]() Note
Note
The final version of the file, L14_end2.ai, is in the Lessons > Lesson14 folder.
There will be times where you create multiple copies of artwork and use it across multiple artboards within a single document. If you need to make changes to an object everywhere it’s used, you can use Global Edit to edit all similar objects. In this section, you’ll open a new file with icons and make a global edit to its content.
Choose File > Open, and open the L14_start2.ai file in the Lessons > Lesson14 folder on your hard disk.
Choose File > Save As. In the Save As dialog box, navigate to the Lesson14 folder, and name the file Icons.ai. Leave Adobe Illustrator (ai) chosen from the Format menu (macOS) or Adobe Illustrator (*.AI) chosen from the Save As Type menu (Windows), and click Save.
In the Illustrator Options dialog box, leave the Illustrator options at their default settings and then click OK.
Choose View > Fit All In Window.
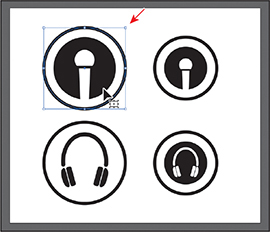
With the Selection tool selected, click the black circle behind the larger microphone icon.
TipYou can also start global editing by choosing Select > Start Global Edit.
If you need to edit all of the circles found behind each of the icons, you can select them using several methods, including the Select > Similar commands, assuming they all share similar appearance attributes. To make use of Global Edit, you can select objects that share attributes, such as stroke, fill, or size, on the same artboard or all artboards.
Click Start Global Edit in the Quick Actions section of the Properties panel.

All circles (in this case) are now selected, and you can edit them. The object you originally selected has a red highlight, and the similar objects have a blue highlight. You can also use the Global Edit options to further narrow down the objects that will be selected, which is what you’ll do next.
NoteThe Appearance option is enabled by default when the selection includes a plug-in art or a mesh art.
Click the arrow to the right of the Stop Global Edit button to reveal a menu of options. Select Appearance to select all of the content that has the same appearance attributes as the selected circle. Leave the menu showing.
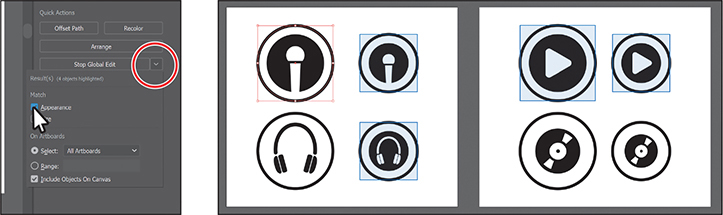
Select Size from the Global Edit options menu to further refine the search to include objects that have the same shape, appearance properties, and size. There should now only be two circles selected.

You can further refine your selection by choosing to search for similar objects on certain artboards.
Click the Stroke color in the Properties panel, make sure the Swatches option is selected, and apply a color to the stroke. If you see a warning dialog, click OK.

Click away from the panel to hide it, and both of the selected objects should change appearance.

Choose Select > Deselect and then choose File > Save.
Choose File > Close.
Review questions
1. What are three benefits of using symbols?
2. How do you update an existing symbol?
3. What is a dynamic symbol?
4. In Illustrator, what type of content can you save in a library?
5. Explain how to embed a linked library graphic asset.
Review answers
1. Three benefits of using symbols are as follows:
You can edit one symbol, and all instances are updated.
You can map artwork to 3D objects (not discussed in the lesson).
Using symbols reduces file size.
2. To update an existing symbol, double-click the symbol icon in the Symbols panel, double-click an instance of the symbol on the artboard, or select the instance on the artboard and then click the Edit Symbol button in the Properties panel. Then you can make edits in Isolation mode.
3. When a symbol is saved as dynamic, you can change certain appearance properties of instances using the Direct Selection tool (![]() ) without editing the original symbol.
) without editing the original symbol.
4. In Illustrator, currently you can save colors (fill and stroke), type objects, graphic assets, and type formatting.
5. By default, when a graphic asset is dragged from the Libraries panel into a document, a link is created to the original library asset. To embed a graphic asset, select the asset in the document and click Embed in the Properties panel. Once embedded, the graphic will no longer update if the original library asset is edited.