7. Drawing with the Pen Tool
Lesson overview
In this lesson, you’ll learn how to do the following:
Draw straight and curved lines with the Pen tool.
Edit curved and straight lines.
Add and delete anchor points.
Convert between smooth points and corner points.

This lesson will take about 60 minutes to complete. To get the lesson files used in this chapter, download them from the web page for this book at www.adobepress.com/IllustratorCIB2020. For more information, see “Accessing the lesson files and Web Edition” in the Getting Started section at the beginning of this book.
In the previous lesson you started working with the basic drawing tools in Illustrator. In this lesson, you’ll learn how to create and refine artwork using the Pen tool.
Starting the lesson
In this lesson, you’ll focus on creating paths with the Pen tool. You’ll start by working with a practice file to learn the fundamentals of the tool, then you’ll put the Pen tool into practice by drawing a swan.
![]() Note
Note
If you have not already downloaded the project files for this lesson to your computer from your Account page, make sure to do so now. See the “Getting Started” section at the beginning of the book.
To ensure that the tools function and the defaults are set exactly as described in this lesson, delete or deactivate (by renaming) the Adobe Illustrator preferences file. See “Restoring default preferences” in the “Getting Started” section at the beginning of the book.
Start Adobe Illustrator.

Choose File > Open, and open the L7_practice.ai file in the Lessons > Lesson07 folder on your hard disk.
Choose File > Save As. In the Save As dialog box, navigate to the Lesson07 folder, and open it. Rename the file to Pen_practice.ai. Choose Adobe Illustrator (ai) from the Format menu (macOS), or choose Adobe Illustrator (*.AI) from the Save As Type menu (Windows). Click Save.
In the Illustrator Options dialog box, leave the default settings and then click OK.
Choose View > Fit All In Window.
 Note
NoteIf you don’t see Reset Essentials in the menu, choose Window > Workspace > Essentials before choosing Window > Workspace > Reset Essentials.
Choose Window > Workspace > Reset Essentials.
Understanding curved paths
In the previous chapter, you created curved and straight paths with the Curvature and Pencil tools. With the Pen tool (![]() ) you can also create curved and straight paths, but you have even more control over the shape of the paths you draw. The Pen tool is one of the main drawing tools in Illustrator and can be used for creating new vector artwork as well as for editing artwork you create both with, as well as with the other drawing tools.
) you can also create curved and straight paths, but you have even more control over the shape of the paths you draw. The Pen tool is one of the main drawing tools in Illustrator and can be used for creating new vector artwork as well as for editing artwork you create both with, as well as with the other drawing tools.
The Pen tool can be found in other Adobe apps, such as Photoshop and InDesign. Understanding how to create and edit paths with it will give you more creative freedom not only in Illustrator but in those other apps as well.
Learning and mastering the Pen tool takes plenty of practice. So go through the steps in this lesson and practice, practice, practice.

A direction line and direction point together are called the direction handle.
With the Pen tool you can click to create corner anchor points. If you create two corner points, you’ve made a straight path. In order to create a curve with the Pen tool, you press and drag to create an anchor point with direction lines. Anchor point direction lines control the length and slope of the shape of the path before and after that anchor point.
When you create curves with the Curvature tool or Pencil tool, you are also creating direction lines, but when drawing with those tools you don’t see the direction lines and you can’t (and don’t need to) interact with them.
An introduction to drawing with the Pen tool
In this section, you’ll open a practice file and get the work area set up so you can begin to explore drawing with the Pen tool.
Choose 1 from the Artboard Navigation menu in the lower-left corner of the Document window, if it’s not already chosen. If the artboard does not fit in the document window, choose View > Fit Artboard In Window.
Select the Zoom tool (
 ) in the toolbar, and click once in the bottom half of the artboard to zoom in.
Choose View > Smart Guides to turn off Smart Guides.
Smart Guides can be useful when you draw, helping you align anchor points, among other things, but you won’t need them now.
Getting started with the Pen tool
Now you’ll start drawing straight lines with the Pen tool to create the main path for a royal crown, like the one you see at the top of the first artboard.
Select the Pen tool (
 ) in the toolbar.
In the Properties panel to the right of the document, click the Fill box, make sure the Swatches option (
 ) is selected, and choose None (
 ). Then, click the Stroke box, and make sure that the Black swatch is selected. Make sure the stroke weight is also 1 pt in the Properties panel.
When you begin drawing with the Pen tool, it’s usually best to have no fill on the path you draw because the fill can cover parts of the path you are trying to create. You can add a fill later, if necessary.
NoteIf you see
 instead of the Pen icon (
 ), the Caps Lock key is active. Caps Lock turns the Pen tool icon into for increased precision. After you begin drawing with the Caps Lock key active, the Pen tool icon looks like this:
  .
.Move the pointer into the area labeled “Work Area” on the artboard, and notice the asterisk next to the Pen icon (
), indicating that you’ll create a new path if you begin drawing.
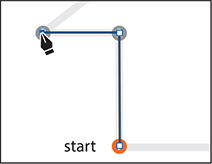
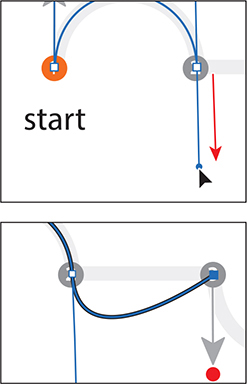
Click and release on the orange start point “1” to set the first anchor point.

Move the pointer away from the point you just created, and you’ll see a line connecting the first point and the pointer, no matter where you move the pointer.
That line is called the Pen tool preview (or the rubber band). Later, as you create curved paths, it will make drawing them easier because it is a preview of what the path will look like. Also notice that the asterisk has disappeared from next to the pointer, indicating that you are now drawing a path.

Move the pointer over the gray dot labeled “2.” Click and release to create an anchor point.
You just created a straight path. A path is composed of two anchor points and a line segment connecting those anchor points.

Continue clicking points 3 through 7, releasing the mouse button after every click to create anchor points.
Unlike the Curvature tool, the Pen tool creates corner points and straight lines when you click to create anchor points.
Selecting paths
The type of anchor point you created in the previous section is called a corner point. Corner points are not smooth like a curve; instead, they create an angle at the anchor point. Now that you can create corner points, you’ll learn how to create smooth points with the Pen tool, which generate curves for a path.
In Lesson 2, “Techniques for Selecting Artwork,” you were introduced to selecting content with the Selection and Direct Selection tools. Next, you’ll explore a few more options for selecting artwork with those same selection tools.
![]() Tip
Tip
You can also drag across a path to select it with the Selection tool.
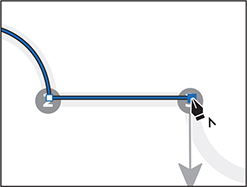
Select the Selection tool (
 ) in the toolbar, and move the pointer over a straight line in the path you just created. When the pointer shows a solid black box (
 ) next to it, click.
This selects the path and all of its anchor points.
Move the pointer over one of the straight lines in the path. When the pointer changes appearance (
 ), drag the path to a new location anywhere on the artboard and release the mouse button.
The anchor points all travel together, maintaining the shape of the path.
Choose Edit > Undo Move to move the path to its original position.
Click an empty area of the artboard to deselect the path.
 Note
NoteWhen you move the pointer over a line segment that isn’t already selected, a black, solid square appears next to the Direct Selection tool pointer, indicating that you will select a line segment.
 Tip
TipIf the Pen tool (
) were still selected, you could Command-click (macOS) or Ctrl-click (Windows) in an empty area of the artboard to deselect the path. This temporarily selects the Direct Selection tool. When you release the Ctrl or Command key, the Pen tool is selected again.Select the Direct Selection tool (
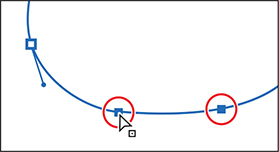
 ) in the toolbar. Move the pointer anywhere over the path between anchor points. When the pointer changes (
 ), click the path to reveal all of the anchor points.
You just selected a line segment (path). If you were to press Delete or Backspace (don’t), only that part of the path between two anchor points would be removed.
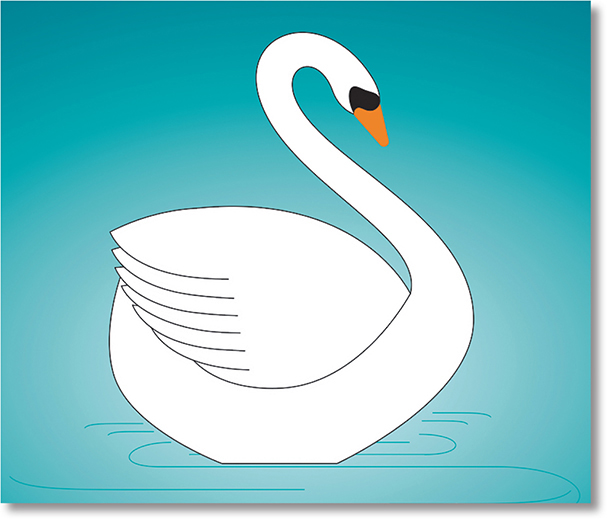
Move the pointer over the anchor point labeled 4; the anchor point will become a little larger than the others, and the pointer will show a small box with a dot in the center (
 ) next to it, as you see in the figure. Both of these indicate that if you click, you will select the anchor point. Click to select the anchor point, and the selected anchor point is filled (appears solid), whereas the other anchor points are still hollow (deselected).
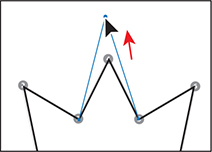
Drag the selected anchor point up to reposition it.
The anchor point moves, but the others remain stationary. This is one method for editing a path, as you saw in Lesson 2.
Click in an empty area of the artboard to deselect.
 Note
NoteIf the entire path disappears, choose Edit > Undo Cut, and try selecting the line segment again.
Move the Direct Selection pointer over the path between points 5 and 6. When the pointer changes (
), click to select. Choose Edit > Cut.This removes the selected segment between anchor points 5 and 6. Next you’ll learn how to connect the paths again.
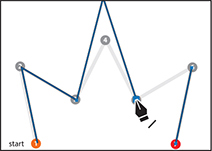
Select the Pen tool (
), and move the pointer onto the blue anchor point labeled 5. Notice that the Pen tool shows a forward slash ( ), indicating that if you click, you will continue drawing from that anchor point. Click the point.
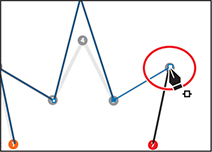
Move the pointer over the other anchor point (point 6) that was connected to the cut line segment. The pointer now shows a merge symbol next to it (
 ), indicating that, if you click, you are connecting to another path. Click the point to reconnect the paths.
Choose Select > Deselect. Leave the file open for the next section. Choose File > Save.
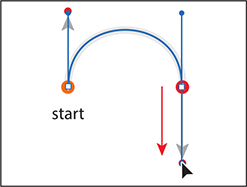
Drawing straight lines with the Pen tool
In previous lessons, you learned that using the Shift key as well as Smart Guides in combination with shape tools constrains the shape of objects. The Shift key and Smart Guides can also constrain paths drawn with the Pen tool, allowing you to create straight paths with 45-degree angles. Next, you’ll learn how to draw straight lines and constrain angles as you draw.
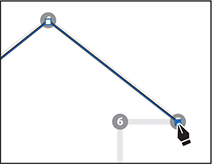
Choose 2 from the Artboard Navigation menu in the lower-left corner of the Document window.
Select the Zoom tool (
) in the toolbar, and click in the bottom half of the artboard to zoom in.Click the View menu and choose Smart Guides to turn them on.
With the Pen tool (
) selected, in the area labeled “Work Area,” click the point labeled 1, where you see “start,” to set the first anchor point.The Smart Guides most likely are attempting to “snap” the anchor point you create to other content on the artboard, possibly making it difficult to add an anchor point exactly where you want it. This is expected behavior and is why you might sometimes turn off the Smart Guides when drawing.
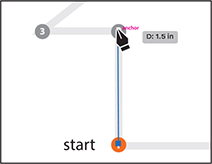
Move the pointer above the original anchor point to the point labeled 2. When you see approximately 1.5 inches in the gray measurement label that appears next to the pointer, click to set another anchor point.
As you’ve learned in previous lessons, the measurement label and alignment guides are part of the Smart Guides. The measurement labels showing distance can be useful when you’re drawing with the Pen tool.
Choose View > Smart Guides to turn off the Smart Guides.
With Smart Guides turned off, you’ll need to press the Shift key to align points, which is what you’ll do next.
Press the Shift key, and click the point labeled 3. Release the Shift key.
With Smart Guides turned off, there is no measurement label, and the point is only aligning with the previous point because you are pressing the Shift key.
Click to set point 4 and then click to set point 5.
As you’ve already seen, without pressing the Shift key, you can set an anchor point anywhere. The path is not constrained to angles of 45°.
Press the Shift key, and click to set point 6 and then click to set point 7. Release the Shift key.
Move the pointer over point 1 (the first point). When the pointer shows a small circle next to it (
 ), click to close the path.
Choose Select > Deselect.
Starting with curved paths

In this part of the lesson, you’ll learn how to draw curved paths with the Pen tool. To create a curve, you set (create) anchor points and drag out direction handles to define the shape of the curve. This type of anchor point, with direction handles, is called a smooth point.
Drawing curves this way gives you some of the greatest control and flexibility in creating paths. However, mastering this technique does take some time. The goal for this exercise is not to create anything specific but to get accustomed to the feel of creating curves. First you’ll just get a feel for creating a simple curved path.
Choose 3 from the Artboard Navigation menu in the lower-left corner of the Document window. You will draw in the area labeled “Practice.”
Select the Zoom tool (
) in the toolbar, and click twice in the bottom half of the artboard to zoom in.Select the Pen tool (
) in the toolbar. In the Properties panel, make sure that the fill color is None (), the stroke color is Black, and the stroke weight is still 1 pt.
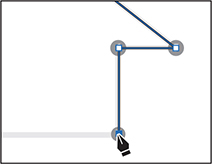
With the Pen tool selected, click and release in an empty area of the artboard to create a starting anchor point. Move the pointer away.
In an empty area, press and drag to create a curved path. Release the mouse button.
As you drag away from the point, direction handles appear. Direction handles are direction lines that have a round direction point at the end of each. The angle and length of direction handles determine the shape and size of the curve. Direction handles do not print.

Move the pointer away from the anchor point you just created to see the rubber banding. Move the pointer around a bit to see how it changes.
Continue pressing, dragging, and releasing in different areas to create a series of points.
Choose Select > Deselect. Leave the file open for the next section.
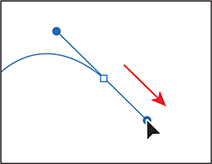
Drawing a curve with the Pen tool
In this part of the lesson, you’ll use what you just learned about drawing curves to trace a curved shape with the Pen tool. This will require a little more precision to follow a template path.
Press the spacebar to temporarily select the Hand tool (
 ), and drag down until you see the curve at the top of the current artboard (on Artboard 3). Note
The artboard may scroll as you drag. If you lose visibility of the curve, choose View > Zoom Out until you see the curve and anchor point. Pressing the spacebar allows you to use the Hand tool to reposition the artwork.
With the Pen tool (
) selected, move the pointer over the point labeled 1. Press and drag up to the red dot, and then release the mouse button.
So far you haven’t drawn anything yet; you’ve simply created a direction line going in the same general direction as the path (up). Dragging out a direction line on the very first anchor point can be done to create a more “curved” path.
 Note
NotePulling the direction handle longer makes a steeper curve; when the direction handle is shorter, the curve is flatter.
Press and drag from point 2 down toward the red dot. Drag the pointer around to see how the path reacts. When the pointer is over the red dot, release the mouse button and the path you are creating should follow the gray template path.
If the path you created is not aligned exactly with the template, select the Direct Selection tool (
), and select the anchor points one at a time to show the direction handles. You can then drag the ends of the direction handles (called direction points) until your path follows the template more accurately. TipWhile drawing with the Pen tool, to deselect objects, you can press the Command (macOS) or Ctrl (Windows) key to temporarily switch to the Direct Selection tool and then click the artboard where there are no objects. Another way to end a path is to press the Escape key when you are finished drawing.
Select the Selection tool (
), and click the artboard in an area with no objects, or choose Select > Deselect.Deselecting the first path allows you to create a new path. If you click somewhere on the artboard with the Pen tool while the path is still selected, the new path connects to the last point you drew.
If you want to try drawing the curve for more practice, scroll down to the Practice area in the same artboard and trace the different curves.
Drawing a series of curves with the Pen tool
Now that you’ve experimented with drawing a curve, you will draw a shape that contains several continuous curves.
Choose 4 from the Artboard Navigation menu in the lower-left corner of the Document window. Select the Zoom tool (
), and click several times in the top half of the artboard to zoom in.Select the Pen tool (
). In the Properties panel to the right of the document, make sure that the fill color is None (), the stroke color is black, and the stroke weight is still 1 pt.Press and drag up from point 1, labeled “start,” in the direction of the arc, stopping at the red dot. This is exactly how you started the last path.
 Note
NoteDon’t worry if the path you draw is not exact. You could correct the path by selecting it with the Direct Selection tool (
) when the path is complete. TipAs you drag out the direction handles for an anchor point, you can press and hold the spacebar to reposition the anchor point. When the anchor point is where you want it, release the spacebar and continue drawing.
Move the pointer over the point labeled 2 (to the right), and drag down to the red dot, adjusting the first arc (between points 1 and 2) with the direction handle before you release the mouse button.
When it comes to smooth points (curved), you’ll find that you spend a lot of time focusing on the path segment behind the current anchor point you are creating. Remember, by default there are two direction lines for an anchor point. The trailing direction line controls the shape of the segment behind the anchor point.
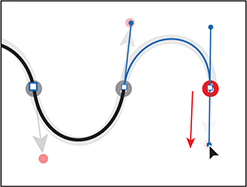
Continue along the path, alternating between dragging up at point 3, down at point 4, and up at point 5. Put anchor points only where there are numbers, and finish with the point labeled 6.
If you make a mistake as you draw, you can undo your work by choosing Edit > Undo Pen and then draw the last point again. If your direction lines don’t match the figures, that’s okay.
When the path is complete, select the Direct Selection tool (
), and click to select any anchor point in the path.When an anchor point is selected, the direction handles appear, and you can readjust the curve of the path, if necessary. With a curve selected, you can also change the stroke and fill. When you do this, the next line you draw will have the same attributes. If you want to try drawing the shape again for more practice, scroll down to the bottom half of the same artboard (labeled “Practice”), and trace the shape there.
Choose Select > Deselect and then choose File > Save.
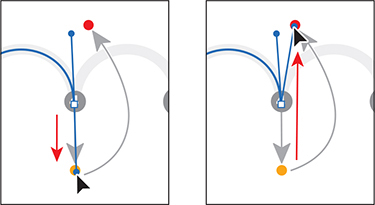
Converting smooth points to corner points
When you create curves, the direction handles help to determine the shape and size of the curved segments, as you’ve seen. If you want to create a curved path followed by a straight line, for instance, you can remove the direction lines from an anchor point to convert a smooth point into a corner point. In this next part of the lesson, you’ll practice converting between smooth points and corner points.
Choose 5 from the Artboard Navigation menu in the lower-left corner of the Document window.
On the top of the artboard, you can see the path that you will trace. You’ll use the top artboard as a template for the exercise, creating your paths directly on top of those.
Select the Zoom tool (
), and click several times in the top part of the artboard to zoom in.Select the Pen tool (
). In the Properties panel, make sure that the fill color is None (), the stroke color is Black, and the stroke weight is still 1 pt.
Pressing the Shift key, press and drag up from point 1, labeled “start,” in the direction of the arc, stopping at the red dot. Release the mouse button and then release the Shift key.
Pressing the Shift key when dragging constrains the direction handles to multiples of 45°.
From point 2, press and drag down to the gold dot. As you drag, press and hold the Shift key. When the curved path between 1 and 2 looks correct, and the pointer reaches the gold dot, release the mouse button and then release the Shift key. Leave the path selected.

Now you need the curve to switch directions and create another arc. You will split the direction lines, or move them in different directions from each other, to convert a smooth point to a corner point. When you press and drag to create a smooth anchor point with the Pen tool, you create a leading direction line and a trailing direction line. By default, they are equal and paired together.
NoteThe Option (macOS) or Alt (Windows) key essentially allows you to split the direction lines so that they are independent of each other for that anchor point.
Press the Option (macOS) or Alt (Windows) key, and move the pointer over the anchor point you just created (on point 2). When a convert-point icon (^) appears next to the Pen tool pointer (
 ), press and drag a direction line up to the red dot above. Release the mouse button and then release the modifier key. If you do not see the caret (^), you might end up creating an additional loop.
You can also Option-drag (macOS) or Alt-drag (Windows) the end of the direction handle (called the direction point). An arrow is pointing to it in the first part of the figure. Either method “splits” the direction handles so they can go in different directions.
Move the Pen tool pointer over point 3 to the right on the template path, and drag down to the gold dot. Release the mouse button when the path looks similar to the template path.
Press the Option (macOS) or Alt (Windows) key, and move the pointer over the last anchor point you created (at 3). When a convert-point icon (^) appears next to the Pen tool pointer (
), press and drag a direction line up to the red dot above. Release the mouse button and then release the modifier key.For the next point, you will not release the mouse button to split the direction handles, so pay close attention.
TipYou can watch these steps in a video! Check out the videos that are a part of the Web Edition. For more information, see the “Web Edition” section of “Getting Started” at the beginning of the book.
For anchor point 4, press and drag down to the gold dot until the path looks correct. This time, do not release the mouse button. Press the Option (macOS) or Alt (Windows) key, and drag up to the red dot for the next curve. Release the mouse button and then release the modifier key.
Continue this process using the Option (macOS) or Alt (Windows) key to create corner points. Keep doing this until the path is completed.
Use the Direct Selection tool to fine-tune the path and then deselect the path.
If you want to try drawing the same shape again for more practice, scroll down to the Practice area in the same artboard, and trace the shape down there.
Combining curves and straight lines
When you’re drawing your own artwork with the Pen tool, you’ll need to transition easily between curves and straight lines. In this next section, you’ll learn how to go from curves to straight lines and from straight lines to curves.
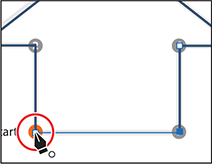
Choose 6 from the Artboard Navigation menu in the lower-left corner of the Document window. Select the Zoom tool (
), and click several times in the top half of the artboard to zoom in.Select the Pen tool (
). Move the pointer over point 1, labeled “start,” and press and drag up, stopping at the red dot. Release the mouse button.Up to this point, you’ve been dragging to a gold or red dot in the templates. In the real world those obviously won’t be there, so for the next point you will drag to create a point without much guidance. Don’t worry, you can always choose Edit > Undo Pen and try again!
Press and drag down from point 2, and release the mouse button when the path between 1 and 2 roughly matches the gray template path.
This method of creating a curve should be familiar to you by now.
If you were to continue drawing by clicking point 3, even pressing the Shift key (to produce a straight line), the path would be curved (don’t do either). The last point you created is a smooth anchor point and has a leading direction handle (the one you pulled out). The figure to the right shows what the path would look like if you clicked with the Pen tool on the next point.
You will now continue the path as a straight line by removing the leading direction handle.
Move the pointer over the last point created (point 2). When the convert-point icon appears (
), click. This deletes the leading direction handle from the anchor point (not the trailing direction handle), as shown in the second part of the following figure.
Move the pointer over point 3. Pressing the Shift key, click and release to create the next point. Release the Shift key after clicking, and you’ve created a straight line.
For the next arc, move the pointer over the last point created. When the convert-point icon appears (
), press and drag down from that point to the red dot. This creates a new, independent direction line.
For the rest of this section, I’m going to ask you to complete the path, following the remaining part of the template. I don’t include any figures, so go through the figures in the previous steps if you need guidance.
For the next point (point 4), press and drag up to complete the arc.
Click the last anchor point you just created to remove the direction line.
Shift-click the next point to create the second straight segment.
Press and drag up from the last point you created to create a direction line.
Press and drag down on the end point (point 6) to create the final arc.
If you want to try drawing the same shape for more practice, scroll down to the Practice area in the same artboard, and trace the shape down there. Make sure you deselect the previous artwork first.
Choose File > Save and then choose File > Close.
Remember, you can always go back and work on those Pen tool templates in the L7_practice.ai file as many times as you need. Take it as slowly as you need and practice, practice, practice.
Creating artwork with the Pen tool
![]() Tip
Tip
Don’t forget, you can always undo a point you’ve drawn (Edit > Undo Pen) and then try again.
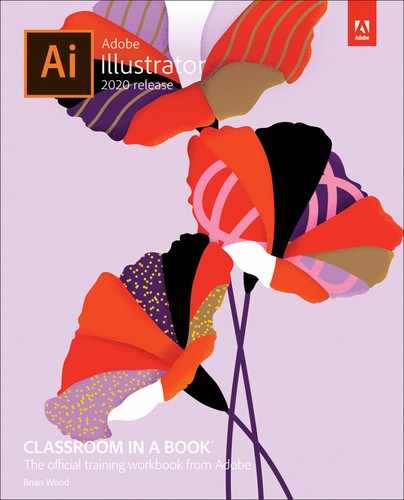
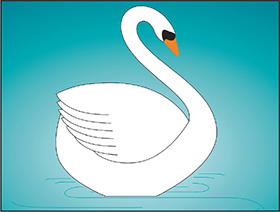
Next, you’ll take what you’ve learned and create some artwork to be used in your project. To start you’ll draw a swan, which combines curves and corners. Take your time as you practice with this shape, and use the template guides provided.
Choose File > Open, and open the L7_end.ai file in the Lessons > Lesson07 folder to see the final artwork.

Choose View > Fit Artboard In Window to see the finished artwork. If you don’t want to leave the artwork open, choose File > Close.

Choose File > Open, and open the L7_start.ai file in the Lessons > Lesson07 folder to open the file you’ll be working in.
Choose File > Save As, name the file Swan.ai, and select the Lessons > Lesson07 folder in the Save As dialog box. Leave Adobe Illustrator (ai) chosen from the Format menu (macOS) or Adobe Illustrator (*.AI) chosen from the Save As Type menu (Windows), and click Save.
In the Illustrator Options dialog box, leave the options set at the defaults and then click OK.
Choose View > Fit Artboard In Window to ensure that you see the entire artboard.
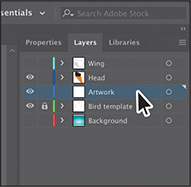
Open the Layers panel (Window > Layers), and click to select the layer named “Artwork.”
Select the Pen tool (
) in the toolbar.In the Properties panel (Window > Properties), make sure that the fill color is None (
), the stroke color is Black, and the stroke weight is 1 pt.
Drawing the swan
Now that you have the file open and ready, you’re going to put the Pen tool practice you did in previous sections to use by drawing a beautiful swan. This next section has more than the average number of steps, so take your time.
![]() Note
Note
You do not have to start at the blue square (point A) to draw this shape. You can set anchor points for a path with the Pen tool in a clockwise or counterclockwise direction.
With the Pen tool (
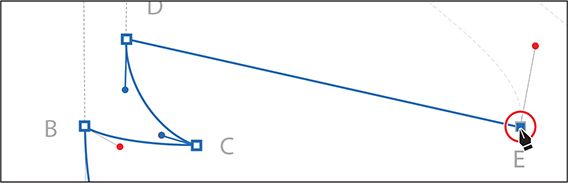
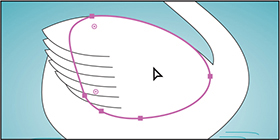
) selected, press and drag from the blue square labeled “A” on the swan body template, to the red dot to set the starting anchor point and direction of the first curve.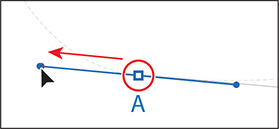
Move the pointer over point B. Press and drag, stopping at the gold dot. Release the mouse button.
Remember to pay attention to how the path looks as you drag the direction line. It’s easier when dragging to color dots on a template, but when you’re creating your own content, you’ll need to be aware of the path you are creating! Next, you’ll split the direction handles so the path can go in a different direction.

Move the pointer over point B again and when the pointer changes (
), press Option (macOS) or Alt (Windows) and drag away from the point to the red dot to create a new direction line. Release the mouse button and then the key.
Move the pointer over point C. Click and release to add a point.
To make the next path a curve, move the pointer over the anchor point you just created at point C—press and drag to the red dot to add a direction handle.


Move the pointer over point D. Press and drag to the red dot.
The next part of the path needs to be straight, so the direction line on point D needs to be removed.

Move the Pen tool pointer over point D again. When the convert-point icon appears (
) next to the pointer, click point D to remove the leading direction handle (the handle pointing up).Click and release on point E to make a straight line.
As you draw with the Pen tool, you may want to edit part of a path you previously drew. Pressing a modifier key with the Pen tool selected, you can move the pointer over a previous path segment and drag to modify it, which is what you’ll do next.
TipYou can also press the Option+Shift (macOS) or Alt+Shift (Windows) keys to constrain the handles to a perpendicular direction, which ensures that the handles are the same length.
Move the pointer over the path between points D and E. Press the Option (macOS) or Alt (Windows) key. The pointer changes appearance (
 ). Drag the path up to make it curved, as you see in the figure. Release the mouse button and then the key. This adds direction handles to the anchor points at both ends of the line segment.
After releasing the mouse button, notice that as you move the pointer, you can see the Pen tool rubber banding, which means you are still drawing the path.

The path that continues from point E needs to be curved, so you’ll need to add a leading direction handle to the point.
NoteAfter releasing the mouse button in the previous step, if you move the pointer away and then bring it back to point E, the convert-point icon [^] will appear next to the pointer.
With the Pen tool pointer over point E, press and drag up to the red dot to create a new direction handle.

This creates a new leading direction handle and sets up the next path to be a curve.
Continue drawing by dragging from the anchor point at F to the red dot.
Drag from point G to the red dot.
The next part of the path needs to be straight, so you’ll remove the leading direction handle from the point at G.
Move the pointer back over point G. When the convert-point icon appears (
) next to the pointer, click to remove the direction handle.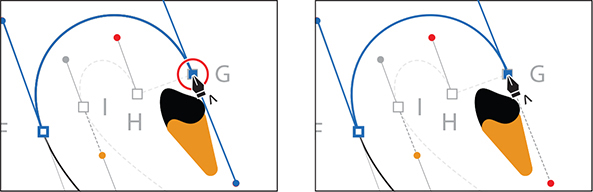
Click point H to create a new anchor point.
The next part of the path needs to be curved, so you will need to add a leading direction handle to point H.
Move the Pen tool pointer over point H again. When the convert-point icon appears (
) next to the pointer, press and drag from point H up to the red dot to add a leading direction handle.
Continue drawing the point at I by dragging from the anchor point to the gold dot. Release the mouse button.
Press Option (macOS) or Alt (Windows), and when the pointer changes (
 ), drag the end of the direction handle down to the red dot from the gold dot.
Drag from point J to the red dot.
Next, you’ll complete the drawing of the swan by closing the path.

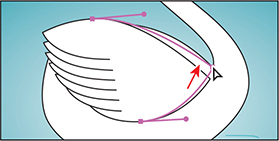
Move the Pen tool pointer over point A without clicking.
Notice that an open circle appears next to the Pen tool pointer (
), indicating that the path would close if you were to click the anchor point (don’t click yet). If you were to drag, the direction handles on either side of the point would move as a single straight line. You need to extend one of the direction handles to match the template. TipWhen creating an anchor point, you can press the spacebar to move the point as you create it.
Drag left and a little up. Notice that a direction handle shows but is going in the opposite direction (it’s going down and to the right). Drag until the curve looks right.

Normally, as you drag away from a point, direction lines appear before and after the point. Without the modifier key, as you drag away from a closing point, you are reshaping the path before and after the anchor point. Pressing the Option (macOS) or Alt (Windows) modifier key on the closing point allows you to edit the previous direction handle independently.
Click the Properties panel tab. Click the Fill color and select white.
NoteThis is a shortcut method for deselecting a path while keeping the Pen tool selected. You could also choose Select > Deselect, among other methods.
Command-click (macOS) or Ctrl-click (Windows) away from the path to deselect it, and then choose File > Save.
Editing paths and points
Next you’ll edit a few of the paths and points for the swan you just created.
Select the Direct Selection tool (
), and click the anchor point labeled J to select it. Drag the anchor point to the left so it roughly matches the figure.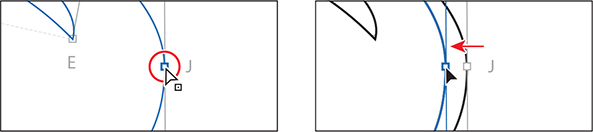 Tip
TipAs you are dragging a path with the Direct Selection tool, you can also press the Shift key to constrain the handles to a perpendicular direction, which ensures that the handles are the same length.
Move the pointer over the part of the path between points F and G (at the top of the swan). When the pointer looks like this:
, drag the path up and to the left a little to change the curve of the path. This is an easy way to make edits to a curved path without having to edit the direction handles for each anchor point.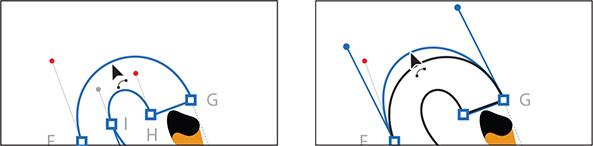
Notice that the pointer changes appearance (
) with the pointer over the path. This indicates that you can drag the path, which will adjust the anchor points and direction handles as you drag.Choose Select > Deselect and then choose File > Save.
Deleting and adding anchor points
Most of the time, the goal of drawing paths with a tool like the Pen tool or Curvature tool is to avoid adding more anchor points than necessary. You can reduce a path’s complexity or change its overall shape by deleting unnecessary points (and therefore gain more control over the shape), or you can extend a path by adding points to it. Next you’ll delete anchor points from, and add anchor points to, different parts of the swan path.

Open the Layers panel (Window > Layers). In the Layers panel, click the eye icon (
 ) for the layer named “Bird template” to hide the layer contents.
With the Direct Selection tool (
) selected, click the swan path to select it.To start you’ll delete a few points in the tail to simplify the swan path.
TipWith an anchor point selected, you can also click Remove Selected Anchor Points (
 ) in the Properties panel to delete the anchor point.
Select the Pen tool (
) in the toolbar, and move the pointer over the anchor point you see in the first part of the following figure. When a minus sign (–) appears to the right of the Pen tool pointer ( ), click to remove the anchor point.
Move the pointer over the anchor point in the second part of the following figure. When a minus sign (–) appears to the right of the Pen tool pointer (
), click to remove the anchor point.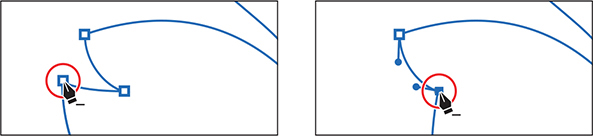
Next you’ll reshape the remaining path. With the Pen tool selected, you can press Command (macOS) or Ctrl (Windows) to temporarily select the Direct Selection tool so you can edit a path and then release the key and continue drawing.

Press Command (macOS) or Ctrl (Windows) to temporarily select the Direct Selection tool. With the key held down, move the pointer over the anchor point shown in the figure. When the pointer shows a box next to it (
), click to select the anchor point if it isn’t already. Note
NoteIt can be tricky to drag the end of a direction line. If you wind up missing and deselecting the path, with the modifier key still held down, click the path and then click the anchor point to see the direction handles and try again.
With the key still held down, drag the direction line pointing down from the selected anchor point to reshape the path, and release the key.
With that part of the path reshaped, now you’ll add a new anchor point to the path so you can reshape it further.

Move the pointer over the left side of the swan path, below the selected anchor point. When a plus sign (+) appears to the right of the Pen tool pointer (
 ), click to add an anchor point.
Press Command (macOS) or Ctrl (Windows) to temporarily select the Direct Selection tool and drag the new anchor to the left to reshape the path. Release the key.
Lastly, you’ll add a new anchor point to the bottom of the swan path so that in the next section you can reshape the bottom.

Move the pointer over the bottom part of the path. When a plus sign (+) appears to the right of the Pen tool pointer (
), click to add an anchor point.
Converting between smooth points and corner points
To more precisely control the path you create, you can convert points from smooth points to corner points and from corner points to smooth points, using several methods.
Select the Direct Selection tool (
). With the last point you added still selected, Shift-click the anchor point to the left (formerly labeled “A”) to select both. TipYou could also convert between corner and smooth points by double-clicking an anchor point (or Option-clicking [macOS] or Alt-clicking [Windows]) with the Curvature tool, as you’ll see later.
In the Properties panel to the right, click the Convert Selected Anchor Points To Corner button (
 ) to convert the anchor points to corners.
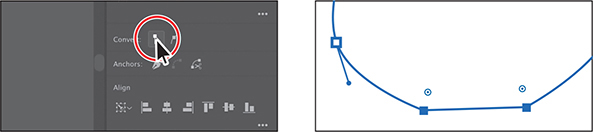 Note
NoteIf the points align to the artboard after clicking the align button, try again. Make sure that Align To Key Anchor is selected in the Properties panel first.
Click the Vertical Align Bottom button (
 ) in the Properties panel to align the point you first selected to the second point you selected.
As you saw in Lesson 2, selected anchor points align to the last selected anchor point, which is known as the key anchor.
Choose Select > Deselect and then File > Save.
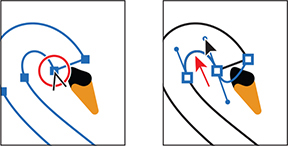
Working with the Anchor Point tool
Another way to convert anchor points between smooth and corner points is using the Anchor Point tool (![]() ). You’ll do that next to finish the head of the swan.
). You’ll do that next to finish the head of the swan.
Select the Selection tool and click the swan path to select it.
Press and hold on the Pen tool (
) in the toolbar to reveal more tools. Select the Anchor Point tool ().If you click an anchor point with the Anchor point tool, the direction lines are removed and it becomes a corner point. The Anchor point tool is also used either to remove both or one of the direction handles from an anchor point, converting it to a corner point, or to drag out direction handles from an anchor point. Dragging handles out with the Anchor point tool can be a great way to restore handles that have been split.
 Note
NoteDon’t drag if the pointer looks like this:
 . This means that the pointer is not over the anchor point, and if you drag, you will reshape the curve. Tip
If you move the Anchor Point tool pointer over the end of a direction handle that is split, you can press the Option (macOS) or Alt (Windows) key and, when the pointer changes (
), click to make the direction handles a single straight line again (not split).Move the pointer over the point in the swan’s head in the figure. When the pointer looks like this:
, press and drag up from the corner point to drag the direction handles out. Drag until the neck looks similar to how it did before you started dragging.Depending on which direction you drew the path in, dragging in one direction may reverse the direction handles.

Move the pointer over the anchor point to the right of the anchor point you just edited. Press and drag down when the pointer looks like this:
. Make sure the top of the swan’s head looks similar to the way it did.
Select the Direct Selection tool, and drag the end of the bottom direction handle up to shorten it and make the line less curvy.
The direction handles for an anchor point are split when you create them with the Anchor Point tool, which means you can move them independently. Next you’ll convert an anchor point from a smooth point (with direction handles) to a corner point.
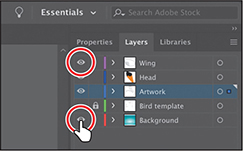
Open the Layers panel (Window > Layers). In the Layers panel, click the visibility column for the layer named “Wing” and the layer named “Background” to show the content for both.
You should now see the wing of the swan on top of the swan shape you drew. It’s made up of a series of simple paths that are overlapping each other. You need to make the right edge of the wing a corner point, not a smooth point.
Select the Direct Selection tool in the toolbar. Click the larger wing shape to select it and see the anchor points.
NoteAnother way to convert a smooth anchor point to a corner anchor point is to click the Convert Selected Anchor Points To Corner button (
) in the Properties panel.Select the Anchor Point tool (
) in the toolbar. Move the pointer over the point circled in the first part of the following figure. Click to convert the point from a smooth point (with direction handles) to a corner point.
Select the Direct Selection tool, and drag the anchor point you converted. Snap it to the anchor point at the base of the swan’s neck.

Move the pointer over the end of the direction handle coming from the top anchor point, and drag to change the shape of the path.
Choose Select > Deselect.
Choose View > Fit Artboard In Window.
Save and close the file by choosing File > Save and then File > Close.
Review questions
1. Describe how to draw straight vertical, horizontal, or diagonal lines using the Pen tool (![]() ).
).
2. How do you draw a curved line using the Pen tool?
3. What are the two types of anchor points you can create with the Pen tool?
4. Name two ways to convert a smooth point on a curve to a corner point.
5. Which tool would you use to edit a segment on a curved line?
Review answers
1. To draw a straight line, click with the Pen tool (![]() ) and then move the pointer and click again. The first click sets the starting anchor point, and the second click sets the ending anchor point of the line. To constrain the straight line vertically, horizontally, or along a 45° diagonal, press the Shift key as you click to create the second anchor point with the Pen tool.
) and then move the pointer and click again. The first click sets the starting anchor point, and the second click sets the ending anchor point of the line. To constrain the straight line vertically, horizontally, or along a 45° diagonal, press the Shift key as you click to create the second anchor point with the Pen tool.
2. To draw a curved line with the Pen tool, click to create the starting anchor point, drag to set the direction of the curve, and then click to end the curve.
3. With the Pen tool, you can create corner points or smooth points. Corner points allow the path to change direction and have either no direction lines or split direction lines. Smooth points have direction lines that are paired together.
4. To convert a smooth point on a curve to a corner point, use the Direct Selection tool (![]() ) to select the anchor point and then use the Anchor Point tool (
) to select the anchor point and then use the Anchor Point tool (![]() ) to drag a direction handle to change the direction. Another method is to choose a point or points with the Direct Selection tool and then click the Convert Selected Anchor Points To Corner button (
) to drag a direction handle to change the direction. Another method is to choose a point or points with the Direct Selection tool and then click the Convert Selected Anchor Points To Corner button (![]() ) in the Properties panel.
) in the Properties panel.
5. To edit a segment on a curved line, select the Direct Selection tool and drag the segment to move it; or drag a direction handle on an anchor point to adjust the length and shape of the segment. Pressing the Option (macOS) or Alt (Windows) key and dragging a path segment with the Pen tool is another way to reshape a path.