16. Sharing Projects
Lesson overview
In this lesson, you’ll learn how to do the following:
Package a file.
Create a PDF.
Create pixel perfect drawings.
Use the Export For Screens command.
Work with the Asset Export panel.

This lesson will take about 30 minutes to complete. To get the lesson files used in this chapter, download them from the web page for this book at www.adobepress.com/IllustratorCIB2020. For more information, see “Accessing the lesson files and Web Edition” in the Getting Started section at the beginning of this book.

You can use various methods to share and export your projects as PDFs or to optimize your Illustrator content for use on the web, in apps, and in onscreen presentations.
Starting the lesson
Before you begin this lesson, you’ll restore the default preferences for Adobe Illustrator and open the first lesson file.
![]() Note
Note
If you have not already downloaded the project files for this lesson to your computer from your Account page, make sure to do so now. See the “Getting Started” section at the beginning of the book.
![]() Note
Note
The projects for this lesson were designed by Meng He (www.mynameismeng.com).
To ensure that the tools function and the defaults are set exactly as described in this lesson, delete or deactivate (by renaming) the Adobe Illustrator preferences file. See “Restoring default preferences” in the “Getting Started” section at the beginning of the book.
Start Adobe Illustrator.
Choose File > Open. In the Open dialog box, navigate to the Lessons > Lesson16 folder. Select the L16_start1.ai file, and click Open.
In the warning dialog that appears, select Apply To All and then click Ignore.
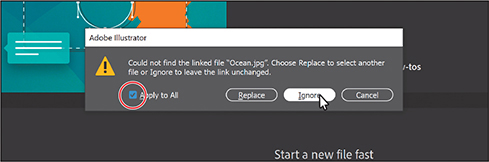
There is at least one image, Ocean.jpg, linked to the Illustrator document that Illustrator can’t find on your system. Instead of replacing the missing image(s) from this dialog box, you will open the Links panel so you can see which are missing, and replace them there.

If you skipped Lesson 15, the Missing Fonts dialog box will most likely appear. Click Activate Fonts to activate all missing fonts (your list may not match the figure). After they are activated and you see the message stating that there are no more missing fonts, click Close.
 Note
NoteIf you don’t see Reset Essentials in the Workspace menu, choose Window > Workspace > Essentials before choosing Window > Workspace > Reset Essentials.
Choose Window > Workspace > Reset Essentials to ensure that the workspace is set to the default settings.
Choose View > Fit All In Window.
Choose Select > Deselect, if available.
To open the Links panel, choose Window > Links.
In the Links panel, you can see which linked images Illustrator cannot find on your system by the icon (
 ) to the right of the name.
In the Links panel, select the Ocean.jpg image; it has an icon (
) to the right of its name. At the bottom of the panel, click the Relink button ( ) to link the missing image to the original.
In the dialog box that opens, navigate to the Lessons > Lesson16 > images folder, select the Ocean image, and click Place.
Choose Select > Deselect and then choose File > Save.
Close the Links panel group.
Packaging a file
When you package a file, you create a folder that contains a copy of the Illustrator document, any necessary fonts, copies of the linked graphics, and a report that contains information about the packaged files. This is an easy way to hand off all necessary files for an Illustrator project. Next you’ll package the open file.
![]() Note
Note
If the file needs to be saved, a dialog box will appear to notify you.
Choose File > Package. If you are asked to save the file, save it. In the Package dialog box, set the following options:
Click the folder icon (
 ), and navigate to the Lesson16 folder, if you are not already there. Click Choose (macOS) or Select Folder (Windows) to return to the Package dialog box.
Folder name: Social
Options: Leave at default settings.
NoteThe Create Report option, when selected, will create a package report (summary) as a .txt (text) file, which is placed in the package folder by default.
The Copy Links option duplicates all of the linked files to the new folder it creates. The Collect Links In Separate Folder option creates a folder called Links and copies the links into it. The Relink Linked Files To Document option updates the links within the Illustrator document to link to the new copies.

Click Package.
In the next dialog box, which discusses font licensing restrictions, click OK.
Clicking Back would allow you to deselect Copy Fonts (Except Adobe Fonts and non-Adobe CJK Fonts).

In the final dialog box to appear, click Show Package to see the package folder.

In the package folder there should be a copy of the Illustrator document and a folder named Links that contains all of the linked images. The L16_start1 Report text file contains information about the document contents.
Return to Illustrator.
Creating a PDF
Portable Document Format (PDF) is a universal file format that preserves the fonts, images, and layout of source documents created on a wide range of applications and platforms. Adobe PDF is the standard for the secure, reliable distribution and exchange of electronic documents and forms around the world. Adobe PDF files are compact and complete and can be shared, viewed, and printed by anyone with the free Adobe Acrobat Reader or other PDF-compatible software.
You can create different types of PDF files from within Illustrator. You can create multi-page PDFs, layered PDFs, and PDF/x-compliant files. Layered PDFs allow you to save one PDF with layers that can be used in different contexts. PDF/X-compliant files ease the burden of color, font, and trapping issues in printing. Next you’ll save this project as a PDF so you can send it to someone else to view.
Choose File > Save As. In the Save As dialog box, choose Adobe PDF (pdf) from the Format menu (macOS) or Adobe PDF (*.PDF) from the Save As Type menu (Windows). Navigate to the Lessons > Lesson16 folder, if necessary. At the bottom of the dialog box, you can choose to save all of the artboards in the PDF or a range of artboards. Select All, then click Save.
When creating a PDF, to save all of the artboards to one PDF, select All, or to save a subset of the artboards to one PDF, select Range and type the range of artboards. For example, in a document with three artboards, a range can be “1-3” to save all three artboards or “1,3” to save the first and third artboards.
NoteIf you want to learn about the options and other presets in the Save Adobe PDF dialog box, choose Help > Illustrator Help and search for “Creating Adobe PDF files.”
In the Save Adobe PDF dialog box, click the Adobe PDF Preset menu to see all of the different PDF presets available. Ensure that [Illustrator Default] is chosen, and click Save PDF.

There are many ways to customize the creation of a PDF. Creating a PDF using the [Illustrator Default] preset creates a PDF in which all Illustrator data is preserved. PDFs created with this preset can be reopened in Illustrator without any loss of data. If you are planning on saving a PDF for a particular purpose, such as viewing on the web or printing, you may want to choose another preset or adjust the options.
NoteYou may notice that the file currently open is the PDF (L16_start1.pdf).
Choose File > Save, if necessary, and then choose File > Close to close the PDF.
Creating pixel perfect drawings
When creating content for use on the web, in mobile apps, in onscreen presentations, and more, it’s important that images saved from vector art look sharp. To enable designers to create pixel-accurate designs, you can align artwork to the pixel grid using the Snap To Pixel option. The pixel grid is a grid of 72 squares per inch, vertically and horizontally, that is viewable when you zoom to 600% or higher with Pixel Preview mode enabled (View > Pixel Preview).
Pixel-aligned is an object-level property that enables an object to have its vertical and horizontal paths aligned to the pixel grid. This property remains with the object when the object is modified. Any vertical or horizontal path in the object gets aligned to the pixel grid as long as the property is set for it.
Previewing artwork in Pixel Preview
When you export assets in a format such as GIF, JPEG, or PNG, any artwork that was vector is rasterized in the resulting file. Turning on Pixel Preview is a great way to be able to see what the artwork will look like when it’s rasterized. First you’ll view artwork with Pixel Preview on.
Choose File > Open. In the Open dialog box, navigate to the Lessons > Lesson16 folder. Select the L16_start2.ai file, and click Open.
Choose File > Document Color Mode, and you will see that RGB Color is chosen.
 Tip
TipAfter you create a document, you can change the document color mode using File > Document Color Mode. This sets the default color mode for all new colors you create and the existing swatches. RGB is the correct color mode to use when creating content for the web, for apps, or for onscreen presentations.
When designing for onscreen viewing (web, apps, etc.), RGB (Red, Green, Blue) is the preferred color mode for documents in Illustrator. When you create a new document (File > New), you can choose which color mode to use with the Color Mode option. In the New Document dialog box, choosing any document profile except Print sets Color Mode to RGB by default.
Select the Selection tool (
 ), and click to select the Earth icon in the middle of the page. Press Command and + (macOS) or Ctrl and + (Windows) several times to zoom in closely to the selected artwork.
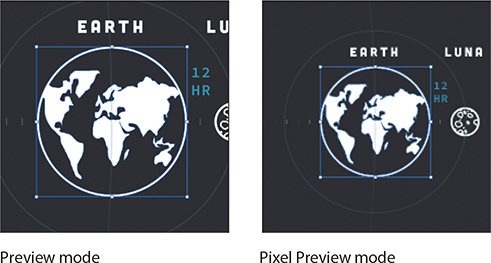
Choose View > Pixel Preview to preview a rasterized version of the entire design.
Aligning new artwork to the pixel grid
With Pixel Preview on, you’ll be able to see the pixel grid and also align artwork to the pixel grid. When Snap To Pixel (View > Snap To Pixel) is enabled, shapes that are drawn, modified, or transformed snap to the pixel grid and appear crisp. This makes most artwork, including most Live Shapes, align to the pixel grid automatically. In this section, you’ll view the pixel grid and learn how to align new content to it.
Choose View > Fit Artboard In Window.
With the Selection tool (
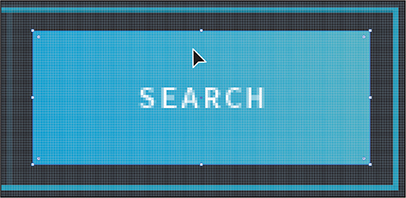
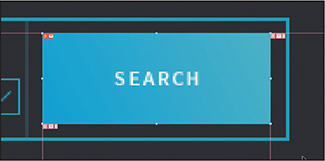
) selected, click to select the blue button shape with the text “SEARCH” on it. TipYou can turn off the pixel grid by choosing Illustrator CC > Preferences > Guides & Grid (macOS) or Edit > Preferences > Guides & Grid (Windows) and deselecting Show Pixel Grid (Above 600% Zoom).
Press Command and + (macOS) or Ctrl and + (Windows) several times until you see 600% in the View menu in the lower-left corner of the Document window (in the Status bar).
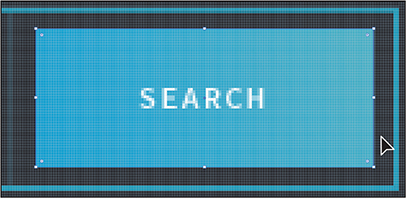
By zooming in to at least 600% and with Pixel Preview turned on, you can see a pixel grid appear. The pixel grid divides the artboard into 1-pt (1/72-inch) increments. For the next steps, you need to see the pixel grid (zoom level of 600% or greater).
Press Delete or Backspace to remove the rectangle.
NoteAs of this writing, the creation tools affected by Snap To Pixel are the Pen tool; the Curvature tool; shape tools, like the Ellipse tool and the Rectangle tool; the Line Segment tool; the Arc tool; the grid tools; and the Artboard tool.
Select the Rectangle tool (
 ) in the toolbar. Draw a rectangle roughly the size of the one you just deleted.
You might notice that the edges of the rectangle look a little fuzzy. That’s because Snap To Pixel is turned off in this document, so the straight edges of the rectangle aren’t snapping (aligning) to the pixel grid by default.
Press Delete or Backspace to remove the rectangle.
TipYou can also click the Snap To Pixel option in the Properties panel with nothing selected and the Selection tool selected, or you can select the Snap To Pixel option (
 ) on the right end of the Control panel (Window > Control).
Choose View > Snap To Pixel to turn on Snap To Pixel.
Now, any shapes that are drawn, modified, or transformed will snap to the pixel grid, if possible. By default, Snap To Pixel is turned on when you create a new document that uses the Web or Mobile document profile.
With the Rectangle tool selected, draw a simple rectangle to make the button, and notice that the edges appear cleaner.

The vertical and horizontal segments of the drawn artwork snap to the pixel grid. In the next section, you’ll see that you can snap existing artwork to the pixel grid. In this case, I had you redraw the shape just to see the difference.
Click the Arrange button in the Properties panel and choose Send To Back to arrange it behind the “SEARCH” text.
TipYou can press the arrow keys to move the selected artwork. The artwork will snap to the pixel grid.
Select the Selection tool, and drag the rectangle into position as you see in the figure.
As you drag, you may notice that the artwork is snapping to the pixel grid.
Aligning existing artwork to the pixel grid
You can also align existing artwork to the pixel grid in several ways, which is what you will do in this section.
Press Command and – (macOS) or Ctrl and – (Windows) once to zoom out.
Select the Selection tool (
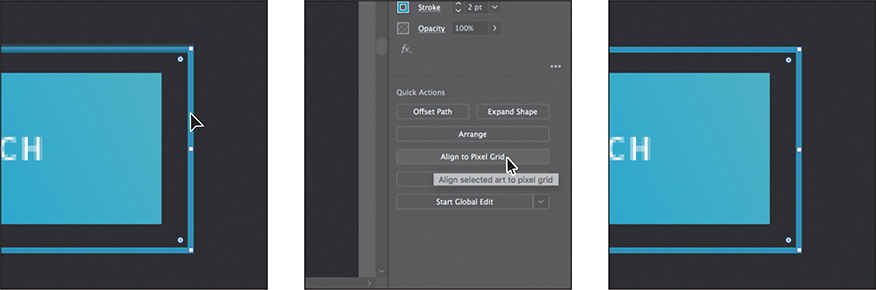
), and click to select the blue stroked rectangle surrounding the rectangle you drew. NoteIn this instance, the Align To Pixel Grid button in the Properties panel and the Object > Make Pixel Perfect command will do the same thing.
Click the Align To Pixel Grid button in the Properties panel to the right (or choose Object > Make Pixel Perfect).
The rectangle was created when View > Snap To Pixel wasn’t selected. After you aligned the rectangle to the pixel grid, the horizontal and vertical straight edges were snapped to the closest pixel grid lines. Live Shapes and Live Corners are preserved when this is done.
Objects that you pixel-align that have no straight vertical or horizontal segments are not modified to align to the pixel grid. For example, because a rotated rectangle does not have straight vertical or horizontal segments, it is not moved to produce crisp paths when the pixel-aligned property is set for it.
 Note
NoteThe Align To Pixel Grid button does not appear in the Properties panel when an open path is selected.
Click to select the blue “V” to the left of the button. You may need to scroll to the left. Choose Object > Make Pixel Perfect.
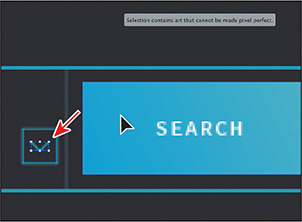
You will see a message in the Document window: “Selection Contains Art That Cannot Be Made Pixel Perfect.” In this case, this means there are no vertical or horizontal straight edges to align.
Click the blue square surrounding the “V” (see the figure). Press Command and + (macOS) or Ctrl and + (Windows) several times to zoom in closely to the selected artwork.
Drag the top bounding point up to make the square a bit larger.

After dragging, notice that resizing the shape using the corner or side handles only fixes the corresponding edges (snaps them to the pixel grid).
Choose Edit > Undo Scale so it remains square.
NoteMoving artwork is constrained to whole pixels when transforming via the Selection tool, Direct Selection tool, Live Shape center widget, arrow keys, and Artboard tool. The Direct Selection tool snaps anchor points and handles to pixel or subpixel locations depending on the stroke settings of the path. This snap is similar to how the Pen tool snaps when you’re creating artwork with it.
Click the Align To Pixel Grid button in the Properties panel to ensure that all of the vertical or horizontal straight edges are aligned to the pixel grid.
Unfortunately, when aligning something that small, it may move. In this case, it is no longer aligned with the center of the “V.” You will need to align the “V” with the square.
Press the Shift key, and click the “V” to select it as well. Release the Shift key, and click the edge of the square to make it the key object.
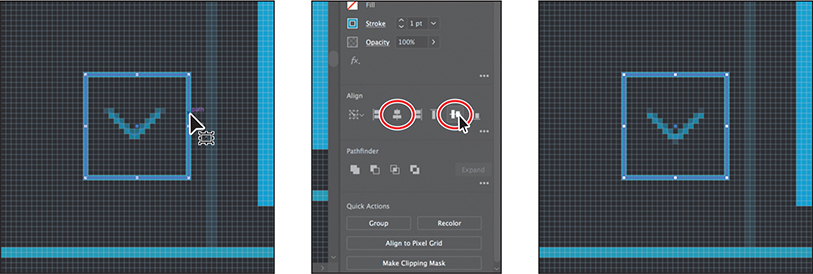
Click the Horizontal Align Center button (
 ) and the Vertical Align Center button (
 ) to align the “V” to the square.
Choose Select > Deselect (if available) and then choose File > Save.
Exporting artboards and assets
![]() Tip
Tip
To learn more about working with web graphics, search for “File formats for exporting artwork” in Illustrator Help (Help > Illustrator Help).
In Illustrator, using the File > Export > Export For Screens command and the Asset Export panel, you can export entire artboards, perhaps to show a design in progress, or just selected assets. The exported content can be saved in several file formats such as JPEG, SVG, PDF, and PNG. These formats are optimized for use on the web, on devices, and in onscreen presentations and are compatible with most browsers, yet each has different capabilities. Once selected, the artwork is automatically isolated from the rest of the design and saved as an individual file.
Slicing content
Before the Export For Screens command and the Asset Export panel existed, you had to isolate artwork that you wanted to export. This was done by placing the artwork on its own artboard or by slicing the content. (In Illustrator, you can create slices to define the boundaries of different web elements in your artwork.) When you save the artwork using the File > Export > Save For Web (Legacy) command, you can choose to save each slice as an independent file with its own format and settings.
It is no longer necessary to isolate artwork by slicing when using the File > Export > Export For Screens command or the Asset Export panel, since artwork is now isolated automatically.
Exporting artboards
In this section, you’ll see how to export artboards in your document. This can be useful when you want to show someone a design you are working on, or to capture a design for use in a presentation, website, or app, among other uses.
Choose View > Pixel Preview to turn it off.
Choose View > Fit Artboard In Window.
Choose File > Export > Export For Screens.
In the Export For Screens dialog box that appears, you can choose between exporting artboards and exporting assets. Once you decide what to export, you can set the export settings on the right side of the dialog box.
With the Artboards tab selected, on the right side of the dialog box, ensure that All is selected.

You can choose to export all or a specific range of artboards. This document has only one artboard, so selecting All is the same as selecting a range of 1. Selecting Full Document will export all artwork in a single file.
Click the folder icon (
 ) to the right of the Export To field. Navigate to the Lessons > Lesson16 folder, and click Choose (macOS) or Select Folder (Windows). Click the Format menu, and choose JPG 80.
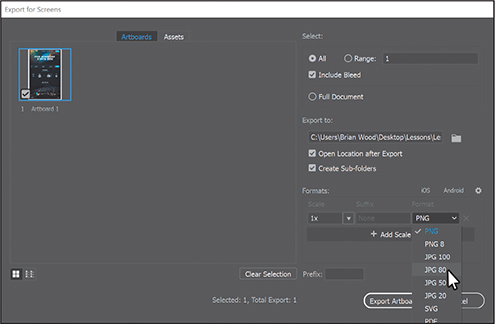
In the Formats section of the Export For Screens dialog box, you can set a Scale factor for the exported asset, create (or in this case edit) a suffix for the filename, and change the format. You can also export multiple versions with different scale factors and formats by clicking the + Add Scale button.
Click Export Artboard.
TipTo avoid creating subfolders, like the folder “1x,” you can deselect Create Sub-folders in the Export For Screens dialog box when exporting.
The Lesson16 folder should open, and you should see a folder named “1x” and, in that folder, the JPEG image.
Close the folder, and return to Illustrator.
Exporting assets
![]() Note
Note
There are several methods for exporting artwork in a variety of formats. You can select artwork in your Illustrator document and choose File > Export Selection. This adds the selected artwork to the Asset Export panel and opens the Export For Screens dialog box. You can choose from the same formats you saw in the previous section.
You can also quickly and easily export individual assets in file formats such as JPEG, PNG, PDF, and SVG using the Asset Export panel. The Asset Export panel lets you collect assets that you might export frequently and can be a great tool for web and mobile workflows because it allows for the export of multiple assets with a single click. In this section, you’ll open the Asset Export panel and see how to collect artwork in the panel and then export it.
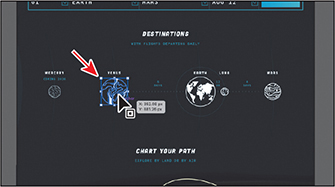
With the Selection tool (
) selected, click to select the artwork labeled “VENUS” toward the middle of the artboard.Press Command and + (macOS) or Ctrl and + (Windows) several times to zoom in to the artwork.
Press the Shift key, and click to select the artwork labeled “EARTH” to the right of the selected artwork.
With the artwork selected, choose Window > Asset Export to open the Asset Export panel.
The Asset Export panel is where you can save content for export now or later. It can work in conjunction with the Export For Screens dialog box to set export options for the selected assets, as you’ll see.
TipTo add artwork to the Asset Export panel, you can also right-click the artwork in the Document window and choose Collect For Export > As Single Asset (or As Multiple Assets) or choose Object > Collect For Export > As Single Asset (or As Multiple Assets).
TipTo delete an asset from the Asset Export panel, you can either delete the original artwork in the document or select the asset thumbnail in the Asset Export panel and click the Remove Selected Assets From This Panel button.
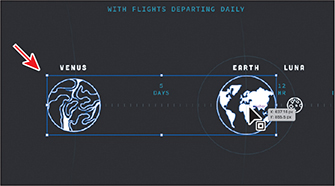
Drag the selected artwork into the top part of the Asset Export panel. When you see a plus sign (+) appear, release the mouse button to add the artwork to the Asset Export panel.
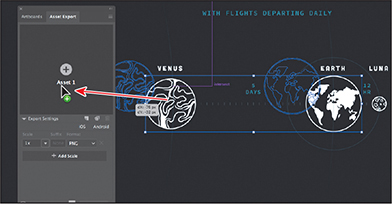
The assets are tied to the original artwork in the document. In other words, if you update the artwork in the document, the corresponding asset is updated in the Asset Export panel. Every asset you add to the Asset Export panel is saved with the panel and will stay there until you delete it from either the document or the Asset panel.
TipIf you Option-drag (macOS) or Alt-drag (Windows) multiple objects into the Asset Export panel, the selected content will become a single asset in the Asset Export panel.
Click the name of the item in the Asset Export panel corresponding to the VENUS graphic and rename it Venus. Click the name of the item in the Asset Export panel corresponding to the EARTH graphic and rename it Earth. Press Return or Enter to accept the last name.
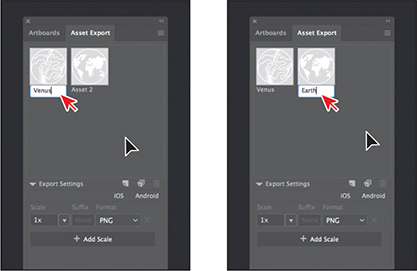
The asset name that appears is based on what the artwork is named in the Layers panel if you drag the asset into the panel. Also, how you name assets in the Asset Export panel is up to you. I name them so I can more easily keep track of what each asset is used for.
Click the Venus asset thumbnail to select it in the Asset Export panel.
As you add assets to the panel using various methods, you will need to first select the assets you’d like to export.
 Note
NoteIf you are creating assets for use on iOS or Android, you could click iOS or Android to display a list of scaled export presets appropriate to each platform.
In the Export Settings area of the Asset Export panel, choose SVG from the Format menu, if necessary.
SVG is perfect for a website, but sometimes a co-worker may ask for a PNG version or other format of the same logo as well.
NoteThe first part of the figure shows after clicking the + Add Scale button.
Click the + Add Scale button to export the artwork in another format (in this case). Choose 1x from the scale menu so the asset is exported at 100% of the size of the artwork on the artboard and ensure that Format is set to PNG.

In this case, an SVG file and a PNG file will be created for every selected asset in the Asset Export panel. You can also set a scale (1x, 2x, etc.) if you need multiple scaled versions of the selected assets—perhaps for Retina and non-Retina displays for raster formats like JPEG or PNG. You can also add a suffix to the exported filename. A suffix could be something like “@1x” to indicate the 100% scaled version of an exported asset.
TipYou can also click the Launch The Export For Screens Dialog button (
 ) at the bottom of the Asset Export panel. This will open the Export For Screens dialog box, where you can adjust all the same settings, including a few more.
With the Venus thumbnail selected at the top of the Asset Export panel, click the Export button at the bottom of the Asset Export panel to export the selected asset. In the dialog box that appears, navigate to the Lessons > Lesson16 > Asset_Export folder, and click Choose (macOS) or Select Folder (Windows) to export the assets.

Both the SVG file (Venus.svg) and the PNG file (Venus.png) will be exported to the Asset_Export folder in separate folders.
Review questions
1. Describe what packaging an Illustrator document does.
2. Why do you align content to the pixel grid?
3. Describe how you export an artboard.
4. Name image file types that can be chosen in the Export For Screens dialog box and Asset Export panel.
5. Describe the generic process for exporting assets with the Asset Export panel.
Review answers
1. Packaging is used to gather all of the necessary pieces of an Illustrator document. Packaging creates a copy of the Illustrator file, the linked images, and the necessary fonts (if desired), and gathers those copies into a folder.
2. Aligning content to the pixel grid creates a crisp appearance at the edges of artwork. When Snap To Pixel is enabled for supported artwork, all the horizontal and vertical segments in the object are aligned to the pixel grid.
3. To export an artboard, choose File > Export > Export As (not covered in the lesson) or File > Export > Export For Screens. In the Export For Screens dialog box that appears, you can choose between exporting artboards and exporting assets. You can choose to export all or a specific range of artboards.
4. The image file types that can be chosen in the Export For Screens dialog box and the Asset Export panel are PNG, JPEG, SVG, and PDF.
5. To export assets using the Asset Export panel, the artwork to be exported needs to be collected in the Asset Export panel. Once it’s in the panel, you can select the asset(s) to be exported, set the export settings, and then export.