3. Setting Up a Document and Working with Pages
Lesson overview
In this lesson, you’ll learn how to do the following:
Save custom document settings as a document preset.
Create a new document and set document defaults.
Lay out a master page.
Create an additional master page.
Apply a master page to document pages.
Add pages to a document.
Rearrange and delete pages.
Change the size of pages.
Create sections and specify page numbering.
Lay out document pages.
Prepare artwork to print to the edge of the paper.
Rotate a document page.

This lesson will take about 90 minutes to complete. To get the lesson files used in this chapter, download them from the web page for this book at www.adobepress.com/InDesignCIB2020. For more information, see “Accessing the lesson files and Web Edition” in the Getting Started section at the beginning of this book.
By taking advantage of features that help you set up the publications you create, you can ensure consistent page layout, simplify your production process, and work as quickly and efficiently as possible.
Getting started
In this lesson, you’ll set up an eight-page newsletter with an insert and then place text and graphics on one of the document’s facing-page spreads.
To ensure that the preferences and default settings of your Adobe InDesign program match those used in this lesson, move the InDesign Defaults file to a different folder following the procedure in “Saving and restoring the InDesign Defaults file” on pages 4–5.
 Note
NoteIf you have not already downloaded the project files for this lesson to your computer from your Account page, make sure to do so now. See “Getting Started” at the beginning of the book.
Start InDesign. To see what the finished document looks like, open the 03_End.indd file in the Lesson03 folder, located inside the Lessons folder within the InDesign CIB folder on your hard drive.
 Note
NoteIf an alert informs you that the document contains links to sources that have been modified, click Update Links.
Scroll through the document to view other pages. To see the guidelines and placeholder frames on the pages, choose View > Screen Mode > Normal. Navigate back to pages 2–3, which are the only document pages you’ll lay out in this lesson. You will also lay out a pair of master page spreads.
Close the 03_End.indd file after you have finished examining it.
NoteThe screen captures in this book show the Medium Light interface. Interface elements such as panels and dialog boxes will be darker on your screen if you are using the default interface.
To ensure that the panels and menu commands match those used in this lesson, choose Window > Workspace > [Advanced], and then choose Window > Workspace > Reset Advanced. To begin working, you’ll learn how to create a new document.
Creating a new document
Choose File > New > Document or click the Create New button on the InDesign home page.
Notice the categories: Recent, Saved, Print, Web, and Mobile. The Print, Web, and Mobile categories store document settings, called presets, that are appropriate for each purpose. The presets store settings such as commonly used page sizes and different measurement units (such as pixels for Web and Mobile). Your first choice to make is governed by the intent of your layout. The Recent category stores your recently used settings so that you can use them again. The Saved category stores presets that you make. Choosing one of these saved document presets when you’re creating a new document saves time and ensures consistency. This feature allows you to store the setup for many different projects so that they are always ready to use.

Choose Print and click Create. Examine the workspace.
Choose File > New > Document, click Mobile, and then click Create. Notice the differences between this new document and the first one you created. For example, look at the colors in the Swatches panel and the units of measurement on the rulers.
To close both files without saving, choose File > Close and click Don’t Save.
Creating and saving custom document settings
Now you will create a preset for an eight-page newsletter. Part of the preset includes frequently used document settings, such as the number of pages, page size, columns, and margins. Make sure you have closed all files first.
![]() Note
Note
You can use any supported unit of measurement in any dialog box or panel. If you want to use a measurement unit that differs from the default, simply type the indicator for the unit you want to use, such as p for picas, pt for points, cm for centimeters, mm for millimeters, and either in or " (inch marks) for inches, after the value you enter in a box.
Choose Edit > Preferences > Units & Increments (Windows) or InDesign > Preferences > Units & Increments (macOS). Change the Horizontal and Vertical settings to Inches to follow along with the steps in this lesson.
Choose File > Document Presets > Define.
Click New in the Document Presets dialog box.
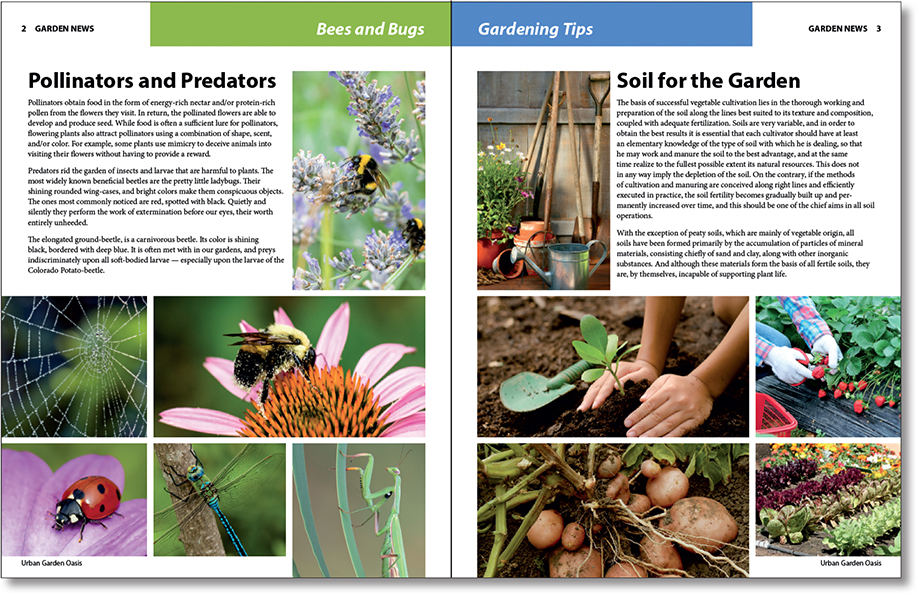
In the New Document Preset dialog box, set the following:
In the Document Preset box, type Newsletter.
For Intent, choose Print.
In the Number Of Pages box, type 8.
Make sure that the Facing Pages option is selected.
Choose Letter for Page Size.
NoteGutter is the term for the space between columns.
In the Columns section, type 3 for Number, and for Gutter, click the down arrow once to set the gutter at .125 inches.
In the Margins section, make sure that the Make All Settings The Same icon in the center of the margin settings is deselected (
 ) (broken chain) so that you can enter custom settings for each margin. Type 1.3125 for Top, .375 for Bottom, .5 for Inside, and .25 for Outside.
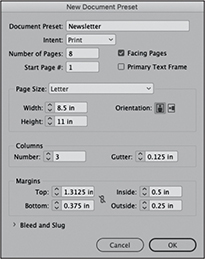
Click the triangle to the left of Bleed And Slug to display additional controls. Highlight or delete the text (0 in) in the Top box of the Bleed option, and then enter 0p9 (the picas measurement system). Then ensure that the Make All Settings The Same icon (
 ) is selected (unbroken chain) so that the same value is used for the Bottom, Inside, and Outside. Press the Tab key and notice that InDesign automatically converts measurements expressed using other measurement units (in this case, picas and points) to the default equivalents (in this case, inches). (The default Bleed value is one-eighth of an inch [.125], or 0p9.)
 Tip
TipThe bleed values specify an area outside the perimeter of each page that is used to print design elements, such as pictures or a colored background, that extend to the edge of the paper. The bleed area is trimmed and discarded after the printing process.
Click OK in both dialog boxes to save the document preset.
Creating a new document from a preset
Each time you create a new document, the New Document dialog box lets you choose a document preset as the starting point, or you can specify several document settings, including the number of pages, the page size, the number of columns, and more. In this section, you’ll use the Newsletter preset that you just created.
Choose File > New > Document.
In the New Document dialog box, click Saved at the top and then click the Newsletter preset.

Click Create at the bottom right of the dialog box.
InDesign creates a new document using all of the specifications from the document preset, including the page size, margins, columns, and number of pages.
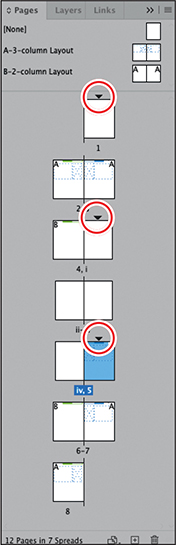
Open the Pages panel by clicking its icon in the panel dock (
 ) or choosing Window > Pages. If necessary, drag the bottom of the panel downward until all eight document page icons are visible. Tip
You can also create a new document based on a document preset by choosing File > Document Presets > [Preset_Name]. If you press the Shift key when selecting a preset, the New Document dialog box is bypassed and a new document based on that preset opens.
In the Pages panel, the icon for page 1 is highlighted, and the page number below the icon is displayed within a highlighted rectangle to indicate that page 1 is currently displayed in the document window.
The Pages panel is divided into two sections by a horizontal line. The upper section displays thumbnails of the document’s master pages. A master page is like a template that you can apply to any page in a document. Master pages contain elements, such as headers, footers, and page numbers, that appear on all document pages. (You’ll work with master pages later in this lesson.) The section below the line of the Pages panel displays thumbnails of document pages.

Choose File > Save As, name the file 03_Setup.indd, navigate to the Lesson03 folder, and click Save.
About page numbering
There are two kinds of page numbering in any kind of multipage print publication. One is a result of the way paper folds to create the physical pages, regardless of anything printed on the pages. The other is the label placed on the pages. The label, or folio, that appears on the document pages can have many possible configurations and can differ from the physical pages. For example, the label can have sections that restart the numbering with each section, such as Roman numerals in the front of a publication. The page thumbnails in the Pages panel show the physical structure of a document, and the numbers below the thumbnails show the label.

Any printed material that has a spine, such as a magazine or a book, follows a structure dictated by folding paper. The simplest example is to fold a piece of paper in half. Each resulting rectangle is a page. If you nest two folded pieces of paper into each other and staple them at the fold (the spine), you have created an eight-page booklet. The first page (the cover) of this booklet is to the right of the fold (the spine). Open the first page and you have one page to the left of the spine (or fold), page 2, and one page to the right of the spine, page 3.
When you create a document with facing pages, InDesign shows you this structure in the Pages panel. Page 1 is to the right of the center line, which represents the spine. Page 2 is to the left. All odd number pages are to the right, and all even number pages to the left.
Working with master pages
Before you add graphics and text frames to a document, you may want to set up the master pages, which serve as templates for your document pages. Any object that you add to a master page automatically appears on the document pages to which the master page has been applied.
In this document, you’ll create two master page spreads to contain elements such as headers, footers, and placeholder frames for text and graphics. By creating multiple master pages, you allow for variation within a consistent design theme.
Adding guides to the master page
Guides are nonprinting lines that help you lay out a document precisely. Guides placed on a master page appear on any document pages to which that master is applied. For this document, you’ll add several guides that, along with the existing column guides, act as a grid to help you position graphics frames, text frames, and other objects.
In the upper section of the Pages panel, double-click the name A-Master. The master spread’s left and right pages are displayed in the document window.
TipIf the two pages of the master page spread are not centered in the document window, double-click the Hand tool in the Tools panel to center them.
Choose Layout > Create Guides.
Select Preview to display your changes as you make them.
For the Rows option, type 4 in the Number box and .125 in the Gutter box.
For the Columns option, type 2 in the Number box and 0 in the Gutter box.
For Fit Guides To, select Page and notice how the horizontal and vertical guides appear on your master pages, along with the margin and column guides that you established when you created the Newsletter preset.
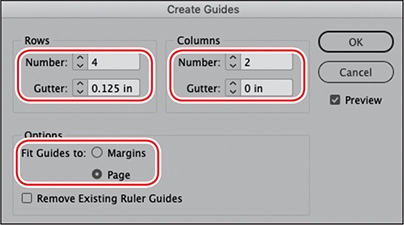
Selecting Margins instead of Page causes the guides to fit within the margin boundaries rather than the page boundaries. One choice may work better with a particular design than the other.
TipGuides can also be added to a spread in a facing-page document by using the Create Guides command (Layout menu) when working on a document page rather than a master page.
Click OK.
Dragging guides from rulers
You can drag guides from the horizontal (top) and vertical (left side) rulers at the edge of the document window to provide additional alignment assistance.
In this exercise, you will place headers above the top margin of the page and footers below the bottom margin. To position the headers and footers accurately, you will add two horizontal guides and two vertical guides.
Open the Transform panel (Window > Object & Layout > Transform). Without clicking in your document, move the pointer around the document window and watch the horizontal and vertical rulers as the pointer moves. Notice how the hairline indicators in the rulers correspond to the pointer’s position. Also notice that the dimmed X and Y values in the Control panel and the Transform panel indicate the position of the pointer.
TipYou can also drag a ruler guide without the Ctrl or Command key and release the guide over the pasteboard to have a guide appear across all pages in a spread as well as on the pasteboard.
Press Ctrl (Windows) or Command (macOS) and position your pointer on the horizontal ruler anywhere above the spread. Drag a ruler guide down to .375. The Y value is displayed next to the pointer while you drag and is also displayed in the Y box in the Control panel and the Transform panel. Pressing Ctrl (Windows) or Command (macOS) when you create a guide causes the guide to extend across both pages of the spread, as well as across the pasteboard on either side. If you don’t press Ctrl or Command, the guide will extend only across the page on which you release the mouse button.
NoteThe controls in the Transform panel are similar to those in the Control panel. You can use either panel to make many common modifications, such as changing position, size, scale, and angle of rotation.

Press Ctrl (Windows) or Command (macOS) and drag one more ruler guide from the horizontal ruler to 10.75.
Press Ctrl (Windows) or Command (macOS) and drag a ruler guide from the vertical ruler to the .5 position. Watch the X value in the Control panel as you drag. If the X value doesn’t display .5 as you drag, place the guide as close as you can, and then—with the guide still selected—highlight the X value in the Control panel or Transform panel, enter .5, and then press Enter or Return.
TipPressing Alt (Windows) or Option (macOS) while dragging a guide from the horizontal ruler changes it to a vertical guide and, likewise, changes a vertical guide to a horizontal guide when dragging a guide from the vertical ruler.

Press Ctrl (Windows) or Command (macOS) and drag another guide from the vertical ruler to the 16.5 position.
TipTo snap guides to ruler tick marks, press Shift while dragging the ruler.
Close or dock the Transform panel, and then choose File > Save.
Step and repeat, paste, color, and delete guides
A key concept to understand about guides in InDesign is that they behave like other objects. You can use many of the same techniques with guides that you use for working with any objects. One powerful technique is Step And Repeat.
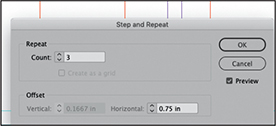
Navigate to page 6 by double-clicking the icon for page 6 in the Pages panel. Drag a guide from the vertical ruler to 1 inch from the left.
With this guide still selected, choose Layout > Ruler Guides. Under the Color menu, click to see the color list and choose Red. It can be quite helpful to use a different color for guides that are for different purposes or on different layers. (You’ll learn about layers in the next lesson.) Click OK.
Open the Step And Repeat dialog box (Edit > Step And Repeat). Click Preview to see the changes while you work. Enter 3 for the repeat count and .75 for the Horizontal offset. Click OK.
 Note
NoteIf you accidentally deselect this new guide, drag across the guide to select it (with the Selection tool). When selected, the color of the guide will be darker.
Using the Selection tool, drag across all four guides you just created to select them. Choose Copy from the Edit menu.
Double-click page 8 in the Pages panel. Choose Paste In Place from the Edit menu. Click an empty area of the page so that you can see the red guides. The guides will be in the same place on page 8 as they are on page 6. This technique can be useful when you want to duplicate a design but not on enough pages to warrant creating another master page. You can also copy and paste guides between documents.
If you decide to change your layout, it’s helpful to delete guides you no longer need. Unneeded guides become clutter. Again, using the Selection tool, drag across the four guides you just pasted onto page 8 to select them. Choose Edit > Clear.
Creating a text frame on the master page
Any text or graphic that you place on a master page appears on document pages to which the master is applied. To create a header, you’ll add a publication title (“Garden News”) and a page number marker to the top of the verso (left) and recto (right) pages of the document’s facing-page master spread.
![]() Tip
Tip
A header is text placed at the top of a page and is separate from the main body text. A header can include information such as page number, publication name, or issue date. When placed at the bottom of a page, such text is called a footer.
Navigate to the left master page by double-clicking it in the Pages panel, and make sure that you can see the top of the page. If necessary, zoom in and use the scroll bars or Hand tool (
 ).
).Select the Type tool (
 ) in the Tools panel. On the left master page, click near where the two ruler guides intersect above the leftmost column and drag to create a text frame, as shown here. You’ll position it exactly in a later step.
With the insertion point in the new text frame, choose Type > Insert Special Character > Markers > Current Page Number.
The letter A appears in your text frame. This is the placeholder character on the master page. On document pages based on this master page, the correct page number is displayed, such as “7” on the document’s page 7.
TipAn em space is the width of the current font size. For example, when working with 12-point text, an em space is 12 points wide. The term originated in the days of metal type and described the width of the capital letter M.
To add an em space after the page number, right-click with the insertion point in the text frame to display a context menu, and then choose Insert White Space > Em Space. Or choose Type > Insert White Space > Em Space.
Type Garden News after the em space. Notice that the text frame displays with a dotted line rather than a solid line. Objects on master pages display with dotted lines to distinguish them from objects on document pages.
NoteYou can apply text attributes with the frame selected rather than selecting text with the cursor. This is a very useful feature. For example, you can select several text frames and apply the same attributes to all of them at the same time.

Press the Escape key to change to the Selection tool while keeping the text frame selected. Choose the Type tool and click the Character Formatting Controls icon (
 ) in the Control panel. Choose Myriad Pro from the Font menu, and from the Style menu, select Bold. Then choose Type > Change Case > UPPERCASE.
With the frame still selected, choose Object > Text Frame Options. Under Inset Spacing, turn off the same settings icon (
) and set the Left and Right insets to .125. Under Vertical Justification, choose Center from the Align menu, and click OK.To size and position the text frame, click the Selection tool (
 ). Set the reference point on the Control panel to the center left position, and type these settings: X .25, Y .5, W 3, and H .3125.
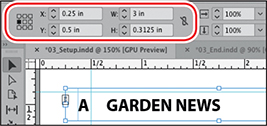
Next, you’ll duplicate the header on the left master page, position the copy on the right master page, and adjust the text so that it’s a mirror opposite of the left header.
Choose View > Fit Spread In Window to display both master pages.
TipIf you also press the Shift key while Alt-dragging (Windows) or Option-dragging (macOS) a text frame, movement is constrained to vertical, horizontal, and 45-degree angles.
Using the Selection tool (
), select the header text frame on the left master page. Hold down the Alt key (Windows) or Option key (macOS), and drag the text frame to the right master page so that it approximately mirrors the left master page, as shown here.
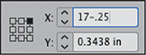
InDesign can do math for you. When you have to move something an exact amount, or position something in an exact location, type the math in the control panel. The reference point controls which side of the frame gets the new position. In this case, we want the frame to end one-quarter inch (.25) from the edge of the paper on the right page, so we want to target the right side of the frame. With this duplicate text frame still selected, change the reference point in the Control panel to a right position. Type 17–.25 for the X value and press the Tab key. (17 is the width of the spread, minus .25 to move it .25 to the left of the edge.) The right edge of this text frame is now at 16.75 inches.
Select the Type tool (
), click the Paragraph Formatting Controls ( ) in the Control panel, and then click the Align Right button.
Click Paragraph Formatting Controls at the left side of the Control panel to see the alignment options.
The text is now right-aligned within the header frame on the right master page. Now you’ll modify the text on the right master page, placing the page number on the right side of the words “Garden News” so that the page numbers will print on the outside edges of the pages, not toward the spine.
Delete the em space and the “A” at the beginning of the right page header.
Place the insertion point at the end of “Garden News” and then choose Type > Insert White Space > Em Space. (Note: You won’t see this change until you add the Current Page Number character in the next step.)
Choose Type > Insert Special Character > Markers > Current Page Number to insert the Current Page Number character after the em space.

Left and right headers.
To create footers, select both headers with the Selection tool (
) and choose View > Fit Spread In Window to display both master pages. Press Alt (Windows) or Option (macOS), and drag down to the guide at the bottom of the page. This creates a copy of both text frames.With both frames still selected, select the Type tool (
) and change the font from Bold to Regular and change the size to 10 points. Then choose Type > Change Case > Title Case. Switch back to the Selection tool () and, in the alignment area of the Control panel, click the Align Bottom button. Note
NoteOn smaller screens, fewer tools are available in the Control panel. If you don’t see the text alignment tools in the Control panel, choose Object > Text Frame Options and in the Vertical Justification area choose Bottom.
Switch back to the Type tool and place the insertion point in the left footer. Triple-click to select all of the text and replace it by typing Urban Garden Oasis. Select and copy this new text, move to the right footer, select all of the text there, paste the new text (Urban Garden Oasis), and then click the Align Right button.

Left and right footers.
Choose Edit > Deselect All, and then choose File > Save.
Renaming the master page
When a document contains multiple master pages, you may want to assign a descriptive name to each master page to make them easier to identify, rather than leaving the default names. You will rename this first master page “3-column Layout.”
![]() Tip
Tip
In addition to changing the names of master pages, you can use the Master Options dialog box to change other properties of a master page, such as the prefix, number of pages in the master page spread, and whether or not the master page is based on another master.
Choose Window > Pages if the Pages panel is not open. Confirm that the A-Master page is still selected. Choose Master Options For “A-Master” from the Pages panel menu (
 ).
).In the Name box, type 3-column Layout, and click OK.

Adding placeholder frames for text
Each document page in the newsletter will contain text and graphics. Because the main text frame and graphics frame are the same on each page, one technique is to create a placeholder text frame and a placeholder graphics frame on the left and right pages of the master page.
![]() Tip
Tip
To set up a master page spread with different margin and column settings for the left and right pages, you can double-click the individual page in the master page spread and then change the selected page’s settings by choosing Layout > Margins And Columns.
Double-click the left page icon of the A-3-column Layout master in the Pages panel to center the left page in the document window.

Select the Type tool (
). Click where the top margin guide intersects the .5 inch guide you drew in the upper-left area of the page, and drag to create a text frame that extends horizontally across two columns and vertically down to the third horizontal guide.
Choose Fit Spread In Window.
With the Selection tool (
), click the text frame you just created and then press Alt (Windows) or Option (macOS), and drag across to the right page to create a copy. Position this text frame so that it begins at the second column. The left position will be 11.625.Click a blank area of the page or pasteboard, or choose Edit > Deselect All.
Choose File > Save.
Adding placeholder frames for graphics
You have now created placeholder text frames for the main text on each page. Next, you’ll add two graphics frames to the A-3-column Layout master. Similar to the text frames you created, these frames act as placeholders for graphics you’ll later place on document pages, helping you to maintain a consistent design.
![]() Note
Note
It’s not necessary to add placeholder frames to every document you create. For example, one-page documents, such as posters, business cards, and ads, may not benefit from master pages and placeholder frames.
Although the Rectangle tool (![]() ) and the Rectangle Frame tool (
) and the Rectangle Frame tool (![]() ) are more or less interchangeable, the Rectangle Frame tool, which includes nonprinting diagonal lines within that form an X, is commonly used to create placeholders for graphics that will be imported.
) are more or less interchangeable, the Rectangle Frame tool, which includes nonprinting diagonal lines within that form an X, is commonly used to create placeholders for graphics that will be imported.
Select the Rectangle Frame tool (
 ) in the Tools panel.
Position the crosshair pointer at the intersection of the top margin guide and the first column guide on the right page.
Drag down and to the left to create a frame that extends horizontally one column width and vertically to the ruler guide at 5.4375 in (the third horizontal guide). The resulting frame will be 2.5 inches wide (W) and 4.125 inches tall (H).
Create an identical placeholder graphics frame in the mirror position on the left page either by drawing another frame or duplicating this frame.

Use the Selection tool to click a blank area of the page or pasteboard, or choose Edit > Deselect All.
TipThe ability to create parent–child master pages is ideal for publications like newsletters and magazines with folios that include the date of publication. Each time you create a new publication, begin by changing the date on the parent master page, which automatically changes the date on all children master pages.
Choose File > Save.
Creating an additional master page
You can create multiple master pages within a document. You can build them independently or base one master page on another master page. If you base a master page on another master, any change made to the parent master is automatically applied to the child master.
For instance, the A-3-column Layout master page is useful for most pages in the newsletter and can be used as the basis for another set of master pages that share key layout elements, such as margins and the current page number character.
To accommodate different layouts, you will create a separate master page spread that uses a two-column format, and then you’ll modify the two-column layout.
In the Pages panel, choose New Master from the Pages panel menu.
In the Name box, type 2-column Layout.
From the Based On Master menu, choose A-3-column Layout, and click OK.
In the Pages panel, click the horizontal bar that separates the master page icons from document page icons and drag down until the B-2-column master page icons are visible.
Notice that the letter A is displayed on the B-2-column Layout master page thumbnails in the Pages panel. This letter indicates that the A-3-column Layout master serves as the foundation (parent) for the B-2-column Layout master (child). If you change the A-3-column Layout master, the changes will also apply to the B-2-column Layout master. You may also notice that you cannot easily select objects, such as the footer frames, that came from the parent master page. You’ll learn about selecting and overriding master page items in the next exercise.

Choose Layout > Margins And Columns. In the Margins And Columns dialog box, set the number of columns to 2, and then click OK.
Overriding master items
The document pages that will use the two-column layout do not require placeholder frames, which means that only the footer text frames and the ruler guides from the A-3-column Layout master are required. Next, you’ll remove the placeholder frames from the B-2-column Layout master.
![]() Tip
Tip
To override multiple master page items, hold down Shift+Ctrl (Windows) or Shift+Command (macOS) and with the Selection tool, drag a marquee around the objects you want to override.
Using the Selection tool (
), click within the graphics frame on the left page of the B-2-column Layout master. Nothing happens. Because this frame is inherited from the parent master, you can’t select it with a simple click.Hold down Shift+Ctrl (Windows) or Shift+Command (macOS), and then click within the graphics frame. The frame is now selected, and you have overridden its status as a master item. Press Backspace or Delete to delete the frame.
Use the same method to delete the placeholder graphics frame on the right page, as well as the placeholder text frames on the left and right pages.
Choose File > Save.
Modifying a parent master
To complete your work laying out the newsletter’s master pages, you’ll add several header elements to the top of the A-3-column Layout master. Then you’ll view the B-2-column Layout master and see how the new objects are automatically added to that master page spread.
Rather than manually laying out the additional header and footer frames, you’ll import a snippet that contains several objects that are already formatted. A snippet is a file that contains InDesign objects, including their location relative to one another on a page or spread. Snippets can be imported into a layout with the Place command (File menu) the same way you import graphic files. You’ll use snippets again later in this lesson, and you’ll learn more about snippets in Lesson 10, “Importing and Modifying Graphics.”
Double-click the name of the A-3-column Layout master in the Pages panel to display the spread.
TipTo create a snippet, select one or more objects on a page or spread. Choose File > Export, and then choose InDesign Snippet from the Save As Type menu (Windows) or the Format menu (macOS). Choose the location of the file, assign a name, and then click Save.
Choose File > Place. Open the Links folder in the Lesson03 folder, located inside the Lessons folder within the InDesign CIB folder. Click the file named Header-Snippet.idms, and then click Open.
Position the loaded snippet icon (
 ) outside the upper-left corner of the spread, where the red bleed guides meet. Click to place the snippet.
The snippet adds to the header at the top of the page. It includes an empty blue graphics frame and a text frame with white placeholder text on both the left and right master pages.

Double-click the name of the B-2-column Layout master in the Pages panel to navigate to that master page. Notice how the new elements you just applied to the A-3-column Layout parent master have been automatically applied to this child master.
Navigate back to the A-3-column Layout master. Click the left blue graphics frame to select it. Open the Swatches panel by clicking the icon (
 ) in the panel dock, choose Fill color (
 ), and click the Green-Bright-Medium swatch. Navigate to the B-2-column Layout master in the Pages panel again, and see that the color of the left header box is now green as well. Tip
The parent–child master structure enables you to quickly apply design changes to common elements, without having to make the same change to several items.

Choose File > Save.
Applying master pages to document pages
Now that you have created all of the master pages, it’s time to apply them to the pages in the document. By default, all of the document pages are formatted with the A-3-column Layout master. You will apply the B-2-column Layout master to several pages in the newsletter, and then you’ll apply the None master page to the cover page, which doesn’t require header or footer information and thus does not require a master page.
![]() Tip
Tip
In long documents, you may find it easier to display the page icons horizontally in the Pages panel. To do this, choose View Pages > Horizontally from the Pages panel menu.
You can apply master pages to document pages by dragging master page icons onto document page icons in the Pages panel or by using an option from the Pages panel menu.
Double-click the name of the B-2-column Layout master in the Pages panel. Make sure that all master pages and document pages are visible in the panel.
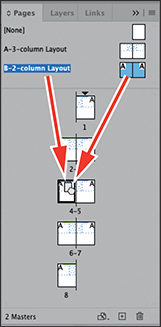
Drag either the highlighted master page name or the accompanying spread icon of the B-2-column Layout master onto the icon of document page 4. When page 4 is displayed with a black border, indicating it’s the page to which the selected master will be applied, release the mouse button.
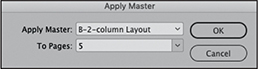
Select page 5 in the Pages panel. From the Pages panel menu, choose Apply Master To Pages. From the Apply Master menu, choose B-2-column Layout. 5 will already be entered for To Pages because you selected the page first. Click OK.
Double-click the page numbers 4–5 (below the page icons) in the Pages panel to display this spread. Notice that both pages have the two-column layout of the applied master page, as well as the header and footer elements that you placed on the parent master page. Also notice that the correct page numbers are displayed on each page as a result of the Current Page Number characters you placed on the A-3-column Layout master page spread, which was inherited by the B-2-column Layout master.
Double-click the icon for document page 1. Because it’s based on the A-3-column Layout master, it includes header and footer elements, which aren’t required on the cover of the newsletter.
Drag the master page icon [None] onto the icon of document page 1. All of the master page objects are no longer visible on page 1.
Choose File > Save.
Adding new document pages
You can add new pages to an existing document. Next, you’ll add six additional pages to the newsletter. Later in this lesson, you’ll use four of these pages for a special section within the newsletter that uses a different page size and separate page numbering.
From the Pages panel menu, choose Insert Pages.
In the Insert Pages dialog box, type 6 in the Pages box, choose After Page from the Insert menu, enter 4 in the accompanying (page number) box, and then choose [None] from the Master menu.
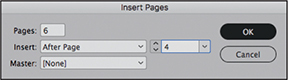
Click OK. Six blank pages are added in the middle of the document. Lengthen the Pages panel so that you can see as many document pages as possible.
Rearranging and deleting document pages
You can use the Pages panel to rearrange the sequence of pages and delete extra pages.
In the Pages panel, click page 12 to select it. Notice that it’s based on the A-3-column Layout master. Drag the page 12 icon upward onto the icon for page 11, which is based on the B-2-column Layout master. When the small arrow near the hand is pointing to the right, indicating that page 11 will be “pushed” in that direction, release the mouse button.
Notice that page 11 is now based on the A-3-column Layout master, and the page that had previously been page 11 is now page 12. Pages 13 and 14 remain unchanged.
Click page 5, and then press the Shift key and click page 6.
Click the Delete Selected Pages button (
 ) at the bottom of the panel. Pages 5 and 6 are deleted from the document, leaving it with 12 pages.
Choose File > Save.
Changing the size of pages within one InDesign document
Next, you’ll create an insert within the newsletter by changing the size of four pages in a “special section” of the publication. This section will be slightly narrower and shorter than the newsletter.
Select the Page tool (
 ). Click page 5 in the Pages panel, and then press the Shift key and click page 8. The icons for pages 5–8 are highlighted in the panel. These are the pages whose size you will change.
In the Control panel, set the reference point to the center left position (
 ), and enter 7.5 for W (Width) and 10.5 for H (Height). Choose Edit > Deselect All.
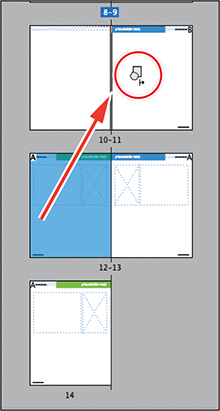
Double-click page 8 in the Pages panel, and then choose View > Fit Spread In Window. Notice that the spread now contains pages of unequal size.
Using the Measure tool
Notice that the outside margins on the narrower page look the same as on the original, wider page. InDesign maintained the original margin and column settings, resulting in narrower columns on the narrower pages. To understand this adjustment, we’ll use the Measure tool (
 ) to compare column widths. Note
Hold down the Shift key as you drag the Measure tool to constrain the direction to horizontal, vertical, or a 45-degree angle.
Both pages show three columns within the outer margins. Press K on the keyboard to select the Measure tool (
), and then press the Shift key and drag the tool from left to right within one column on page 9. The Shift key constrains the direction to exactly horizontal. The Info panel pops up. Note the measurement for W (Width). Now measure a column on page 8. Now you can see that InDesign has made the columns on page 8 narrower than the original to fit on a narrower page, while keeping the margins the same.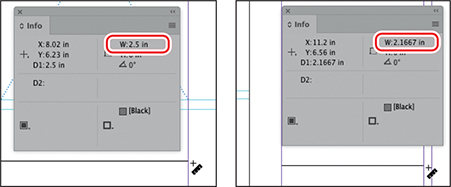
Original column width (left) and narrow column width (right).
NoteThe Measure tool is also available from the Tools panel. It’s grouped with the Color Theme tool and the Eyedropper tool. Press and hold the Color Theme tool to activate the hidden tools menu and choose the Measure tool.
Choose File > Save.
Adding sections to change page numbering
The special section you just created will use its own page numbering system. You can use different kinds of page numbering within a document by creating sections. Next, you’ll start a new section on the first page of the special section, and then you’ll adjust the page numbering of the subsequent newsletter pages so that they continue the original numbering.
Choose the Selection tool (
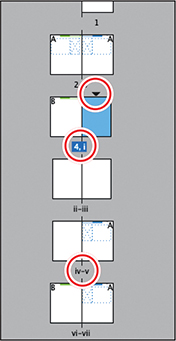
). In the Pages panel, double-click the page 5 icon to select and display it. This is the start of the special section with the smaller pages.Choose Numbering & Section Options from the Pages panel menu, or choose Layout > Numbering & Section Options. In the New Section dialog box, make sure that Start Section and Start Page Numbering At are selected and that the Start Page Numbering At value is 1.
Choose i, ii, iii, iv… from the Style menu in the Page Numbering section of the dialog box. Click OK.

Examine the page icons in the Pages panel. Starting with the fifth document page, the numbers below the page icons now appear as Roman numerals. The numbers in the footers of the remaining document pages that contain footers also appear as Roman numerals.
Now you’ll learn how to return to original numbering style for the newsletter pages that follow the special section and to continue the numbering from the page prior to the first page of the special section.
Select page v in the Pages panel by clicking its icon once. This is the first page that returns to the original page size.
NoteSingle-clicking a master page icon or a document page icon targets the page for editing purposes but does not cause that page to be displayed in the document window. If you want to navigate to a page, double-click its icon in the Pages panel.
Choose Numbering & Section Options from the Pages panel menu.
In the New Section dialog box, make sure that Start Section is selected.
Select Start Page Numbering At and specify a value of 5 in the accompanying box. This resumes the numbering from the document pages (1–4) that precede the special section.
Make sure that 1, 2, 3, 4… is selected in the Style menu, and then click OK.
Now the pages are correctly renumbered. Notice that a small black triangle is displayed above pages 1, i, and 5 in the Pages panel. These triangles indicate the start of a new section. In this document, we returned to the original page numbering at page 5, but the numbering could be another pattern. The important point to note is that whenever you see the triangle above a page in the Pages panel, it indicates a section change, regardless of the particular numbering pattern in that file.
Choose File > Save.
Adjust Layout
The Adjust Layout feature enables InDesign to do some of the work of scaling and realigning elements automatically when the size of a document is changed.
For example, you might have to publish in different regions of the world where standard page sizes are different. An A4 size is the standard in many areas, and it’s narrower and taller than an American Letter size. The specifications of a project might change after you have already created many of the pages. Or you might have to make a poster-size version of a magazine advertisement, or different sizes of the same ad for different publications. There are many situations where this feature will save you a lot of time.
Adjust Layout is available in the Document Setup dialog box, from the File menu, in the Properties panel, and in the Margins And Columns dialog box. When you use Adjust Layout from the Margins And Columns dialog box, it affects only the current page or selected pages. When you use Adjust Layout from any of the other locations, it applies to the entire document.
Note that you can choose to prevent InDesign from changing font sizes by keeping the Adjust Font Size option unchecked. When making smaller page size changes, you probably don’t want to change your type styling. But when making a large change, you probably do want the fonts to scale with the rest of the objects.
Switch to the 03_End.indd file, or open it.
Choose File > Adjust Layout and explore the options. Try changing the newsletter to A4 size, click OK, and then examine how the objects have changed.
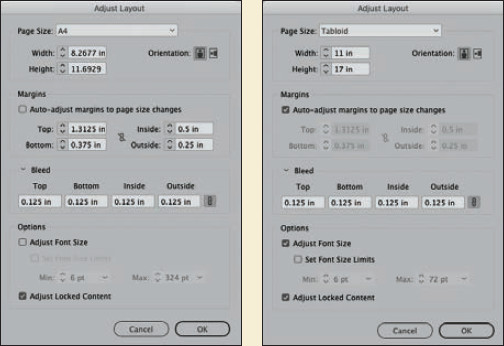
Choose File > Document Setup again. In the Document Setup dialog box, click the Adjust Layout button—and this time make a dramatic change. Choose Tabloid from the Page Size menu and select Adjust Font Size. Examine the results.
Choose File > Revert or close the document without saving changes.
Overriding master page items and placing text and graphics
Now that the framework of the 12-page publication (the eight-page main section and four-page narrow section) is in place, you’re ready to lay out document pages. You’ll learn more about creating and modifying objects in Lesson 4, so for this lesson, we’ve simplified the layout process to minimize your work.
Choose File > Save As, name the file 03_Newsletter.indd, navigate to the Lesson03 folder, and click Save.
In the Pages panel, double-click the page numbers 2–3 below the page icons and choose View > Fit Spread In Window (if necessary).
TipDouble-clicking the page number label below a page or spread in the Pages panel is another way to navigate to a page or spread. The view magnification is not changed.
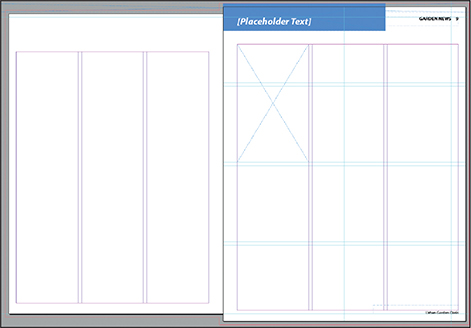
Notice that because the A-3-column Layout master is assigned to pages 2 and 3, these pages include the guides, headers and footers, and placeholder frames from the A-3-column Layout master.
To import text and graphics created with other applications, such as a text file from Microsoft Word or an image from Adobe Photoshop, you use the Place command or the Quick Action from the Properties panel (you’ll learn about other ways to import in later lessons).
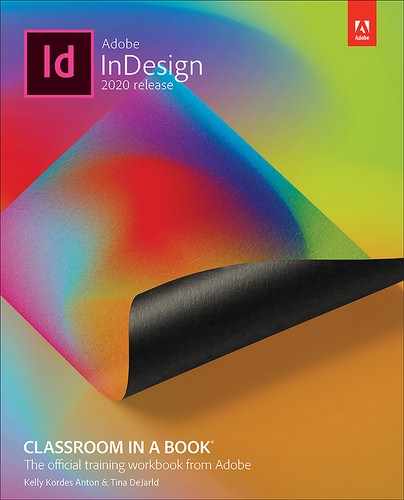
Choose File > Place. If necessary, open the Links folder in the Lesson03 folder, located inside the Lessons folder within the InDesign CIB folder. Click the Article1.txt file, and then Ctrl-click (Windows) or Command-click (macOS) Article2.txt, Graphic_1_HoneyBee-1.jpg, and Graphic_2_GardenTools.jpg to select these four files. Click Open.
The pointer changes to a loaded text icon (
 ), with a preview of the first few lines of the Article1.txt text file that you are placing.
Position the loaded text icon over the placeholder text frame on page 2 (not directly on the guides). Notice that the icon changes to a type block with parentheses around it when you hover over the text frame from the master page, and that there’s a (4) after the loaded text icon, indicating that you have four items to place. (It’s hard to see the change to parentheses unless you zoom in to around 150–200% or more.) Click to place the Article1.txt text into the frame.
NoteParentheses are displayed when InDesign recognizes a preexisting frame beneath the loaded text icon or the loaded graphics icon when importing text or graphics into a layout. If you click within an existing frame, InDesign uses that frame rather than creating a new text or graphics frame.
To place the three remaining files, click within the text frame on page 3 to place the Article2.txt text file, then click within the graphics frame on page 2 to place Graphic_1_HoneyBee-1.jpg, and then click within the graphics frame on page 3 to place Graphic_2_GardenTools.jpg.

Choose Edit > Deselect All.
To save time, you’ll import a snippet with the remaining objects to complete the layout of the spread.
Choose File > Place. Click the Snippet2.idms file, and then click Open.
Position the loaded snippet icon (
) outside the upper-left corner of the spread, where the red bleed guides meet. Click to place the snippet.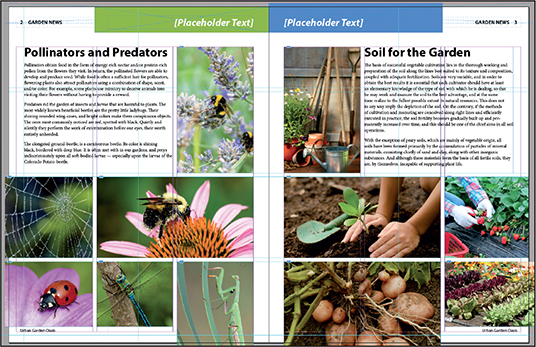
Choose Edit > Deselect All, or click an empty area of the page or pasteboard to deselect all objects.
Choose File > Save.
Next, you’ll override two master items on your spread—the two text frames that contain the header text—and then replace the placeholder text with new text.
Replacing placeholder text
Graphic designers will often use placeholder text to establish the look of a publication, and then replace that text with the actual text when it’s available. An advantage of using the master page to do this is that consistency of those objects is maintained throughout the document. You will replace the placeholder text now.
Select the Type tool (
). Hold down Shift+Ctrl (Windows) or Shift+Command (macOS), and then click within the placeholder text frame on page 2 that contains “[Placeholder Text].” Replace the placeholder text with Bees and Bugs.Repeat step 1 to change the header text on page 3 to Gardening Tips.

Notice that the frame boundaries of these two text frames are no longer dotted lines but solid, indicating that the frames are no longer master page objects. Choose Edit > Deselect All.
Choose File > Save.
Printing to the edge of the paper: using the bleed guides
A very important concept to keep in mind when setting up a document is whether any elements will print all the way to the edge of the paper. If so, you need to account for how that is accomplished in commercial printing. The bleed guides that we set up in the newsletter template are there to enable you to do that.
In commercial printing, pages are printed on large paper, rather than on single sheets as on an office printer, and pages are arranged to fold correctly on bindery machines. For example, the pages could be printed two-up on a small digital press, or eight-up on a typical large offset press. Throughout the printing process, tolerances are built in to allow for slight variations in the manufacturing process—for example, during the trimming process (cutting the pages to exact size). Adding bleed is a strategy to compensate for these slight variations.
Sheets of printed material are cut while in large stacks, and even with a very sharp industrial blade, it’s impossible to cut exactly to the edge of an image hundreds or thousands of times. Therefore allowance must be made for the slight movement of stacked paper as the blade cuts. To get a perfect edge every time while allowing for the mechanics of cutting paper in stacks, you must ensure that any artwork that will print to the edge extends past where the blade will cut the printed sheet. The blade must cut through printed artwork. That extra artwork is in the bleed area.
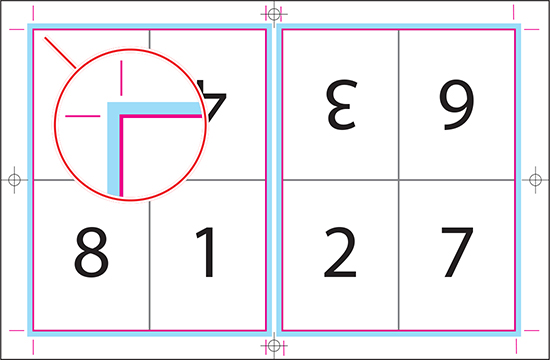
Diagram of a press sheet. The pink line is where the blade will cut the piece to the final size. The blue represents the bleed. Notice that the bleed extends past where the blade will cut.
![]() Tip
Tip
A best practice is to consider bleed requirements right from the beginning of the design and production process. There might be a photo that has to be enlarged or have the background extended so that it can bleed. These issues are best dealt with early in the process, and not just before a deadline.
Bleed guides help you make sure artwork is large enough because they show the minimum distance the items must extend. Using bleed produces a clean edge because the blade cuts through printed image, not unprinted paper. It’s best to add bleed while you are building a file because you may have a photo or other art that is not big enough to extend past the page edge, and it’s better to deal with that early in the process, not right before it’s due to print. You will now learn how to check that design elements extend sufficiently beyond the page edge and how to fix them if they do not.
Using the Selection tool (
), double-click the page 2 icon in the Pages panel to display it.Choose View > Screen Mode > Normal and focus on the red bleed guides.
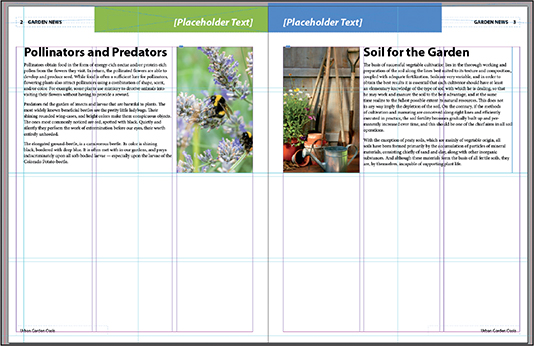
First look at the bottom photos on the left and right. Notice that the photos on the left of the spider web and the ladybug extend to the red bleed guide, which means there is enough image to get a clean edge when the paper is cut.
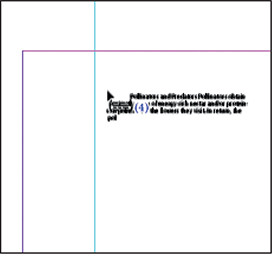
Now look at the photo of the strawberries on the far right of page 3. See that the image ends exactly at the edge of the page. This needs to be extended at least up to the red bleed guide. Click this photo with the Selection tool. Pull the right handle of the frame farther to the right to make the graphic frame big enough to meet or pass the red bleed guide.

Next look across the top of the spread. See how the green graphics frame on the left is lower than the blue graphics frame on the right. It ends at the top trim but actually needs to bleed up.
Click it with the Selection tool. You won’t be able to select it since this item is on a master spread. Navigate to the A-3-column Layout master by double-clicking it in the Pages panel. Now you can select the green box. Pull the center handle upward to make the box bigger. Stop either at the red bleed guide or slightly past it.
 Tip
TipYou can choose View > Screen Mode > Bleed and page through an entire document to check if bleed has been applied throughout a document where needed. This is a best practice during the production cycle and especially before sending a file to a print service provider.
Navigate back to page 2 and notice that the green box is now big enough to bleed off the top. Every document page that uses this master page will now bleed correctly without you having to fix each one. This demonstrates another advantage of using master pages: make a correction once and it’s automatically done on all pages using that master page. Imagine how much time you save if there are many pages that need the same correction (or any type of change).

Choose File > Save.
Viewing the completed spread
At this point you’re ready to hide guides and frames and see what the completed spread looks like.
Choose View > Fit Spread In Window, and hide any panels if necessary.
TipTo hide all panels, including the Tools panel and Control panel, press Tab. Press Tab again to redisplay all panels. (You can’t do this when you’re working with text using the Type tool.)
Choose View > Screen Mode > Preview to hide the pasteboard and all guides, grids, invisible characters, and frame edges. Preview is the closest onscreen view that shows best how the pages will look when printed and trimmed to size.

Choose File > Save.
Congratulations! You have finished the lesson.
Rotating spreads
In some cases, you may want to rotate a page or spread to make it easier to view and work on its content. For example, a standard-sized magazine with portraitoriented pages might require a calendar page with a landscape orientation. You could lay out such a page by rotating all objects 90 degrees, but then you would have to turn your head or rotate your monitor to modify the layout and edit text. To make editing easier, you can rotate—and unrotate—spreads. This rotation is a view only; it’s not changing the page setup.
For an example of this feature, open the 03_End.indd document in the Lesson03 folder (if it’s not already open).
In the Pages panel, double-click page ii to display it in the document window.
Choose View > Fit Page In Window to center the page within the document window.
Select the title, July 2020, and try editing the text. It feels awkward to work with the text rotated this way.
Choose View > Rotate Spread > 90° CW.
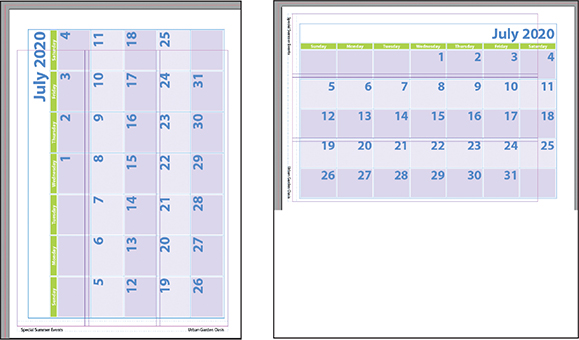
After you rotate the spread (clockwise), it’s easier to work with the objects on the page. For example, editing or adding text is much easier. Now try editing the title again and notice that now selecting and editing text feels normal and easy, rather than awkward.
Choose View > Rotate Spread > Clear Rotation.
Close the document without saving changes.
Exploring on your own
A good way to reinforce the skills you’ve learned in this lesson is to experiment with them. Try some of the following exercises. They’ll give you more practice with InDesign techniques.
![]() Tip
Tip
Choose View > Screen Mode > Normal to return to your normal display as you explore on your own.
Create another master page for the document. Base it on the A-3-column Layout master, name it C-4-column Layout, and then modify it so that it contains four columns instead of three. Apply the new master page to any of the document’s full-sized pages that don’t contain objects (folios 1, 4 or 5–8, not the smaller insert pages).
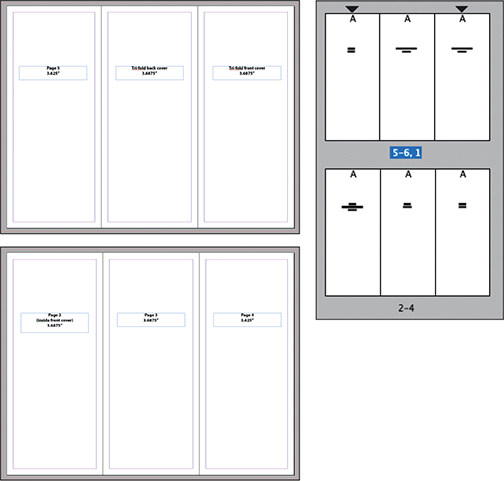
Not all types of printed materials have a spine like the newsletter example in this lesson. Another common type is a trifold (or six-panel), where there are three panels that fold into the size of one panel. The panel that folds behind the cover must actually be slightly narrower so that the paper will lay flat when the trifold is closed. This example is also a good illustration of when it’s very helpful to use different page sizes within one InDesign document.

A sample file of a trifold is included with this lesson. Open the file named 03_Trifold_Template.indd in the Lesson03 folder, located inside the Lessons folder within the InDesignCIB folder on your hard disk. Click the pages with the Pages tool and notice which ones are narrower. Also examine the Pages panel, which shows three pages next to each other and the page numbering. This layout is also an example of a document setup where Facing Pages is turned off.
Try making a master page for the special section in the newsletter. This time, make it an independent master page (not a based-on or child master page) because the special section will look different. Make the page size 7.5 x 10.5 to match the size of the pages in the special section. Add elements, such as a footer, that might be included. Apply this master page to pages i through iv in the newsletter.
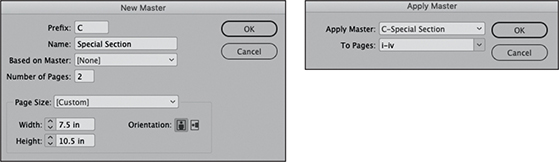
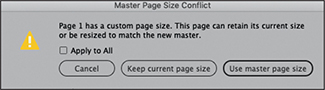
InDesign will display a warning about the master page size. In this case the special section is the same size as the new master, so there really isn’t an issue. Select Apply To All and click Use Master Page Size.
The following example shows a footer added to the new master page.

Review questions
1. What are the advantages of adding objects to master pages?
2. How do you change the page-numbering scheme within a document?
3. How do you select a master page item on a document page?
4. What’s the advantage of basing a new master page on an existing master page?
5. How do you set up InDesign to automatically place page numbers on document pages?
6. How do you handle items that print to the edge of the paper?
Review answers
1. By adding objects such as guides, footers, and placeholder frames to master pages, you can maintain a consistent layout on the pages to which the master is applied. Also, you can make changes on the master page once, and that change will be applied to all pages based on that master page.
2. In the Pages panel, select the page icon where you want new page numbering to begin. Then, choose Numbering & Section Options from the Pages panel menu, or choose Layout > Numbering & Section Options and specify the new page-numbering scheme.
3. Hold down Shift+Ctrl (Windows) or Shift+Command (macOS), and then click the object to override it from the master page and select it. You can then edit, delete, or manipulate the object.
4. By basing a new master page on an existing master page, you create a parent–child relationship between the new master page and the existing one. Any changes you make to the parent master page are automatically applied to the child master.
5. Use the Current Page Number marker character on a master page. Create a text frame on a master page and go to Type > Insert Special Character > Markers > Current Page Number.
6. Objects that will print up to the edge of paper must extend past the edge of the page in the file, into the pasteboard area at least up to the bleed guides. The bleed guides show the minimum amount that they must extend past the page edge.