
10. Painting with the Mixer Brush
Lesson overview
In this lesson, you’ll learn how to do the following:
• Customize brush settings.
• Clean the brush.
• Mix colors.
• Use an erodible tip.
• Create a custom brush preset.
• Use wet and dry brushes to blend color.

This lesson will take about an hour to complete. Please log in to your account on peachpit.com to download the lesson files for this chapter, or go to the Getting Started section at the beginning of this book and follow the instructions under “Accessing the Lesson Files and Web Edition.” If you need to restore the start files, download them from your Account page.
The Mixer Brush tool gives you flexibility, color-mixing abilities, and brush strokes as if you were painting on a physical canvas.
PROJECT: DIGITAL PAINTING
About the Mixer Brush
In previous lessons, you’ve used brushes in Photoshop to perform various tasks. The Mixer Brush is unlike other brushes in that it lets you mix colors with each other. You can change the wetness of the brush and how it mixes the brush color with the color already on the canvas.
Photoshop brushes have realistic bristles, so you can add textures that resemble those in paintings you might create in the physical world. While this is a great feature in general, it’s particularly useful when you’re using the Mixer Brush. You can also use an erodible tip to achieve the effects you might get with charcoal pencils and pastels in the physical world. Combining different bristle settings and brush tips with different wetness, paint-load, and paint-mixing settings gives you opportunities to create exactly the look you want.
Getting started
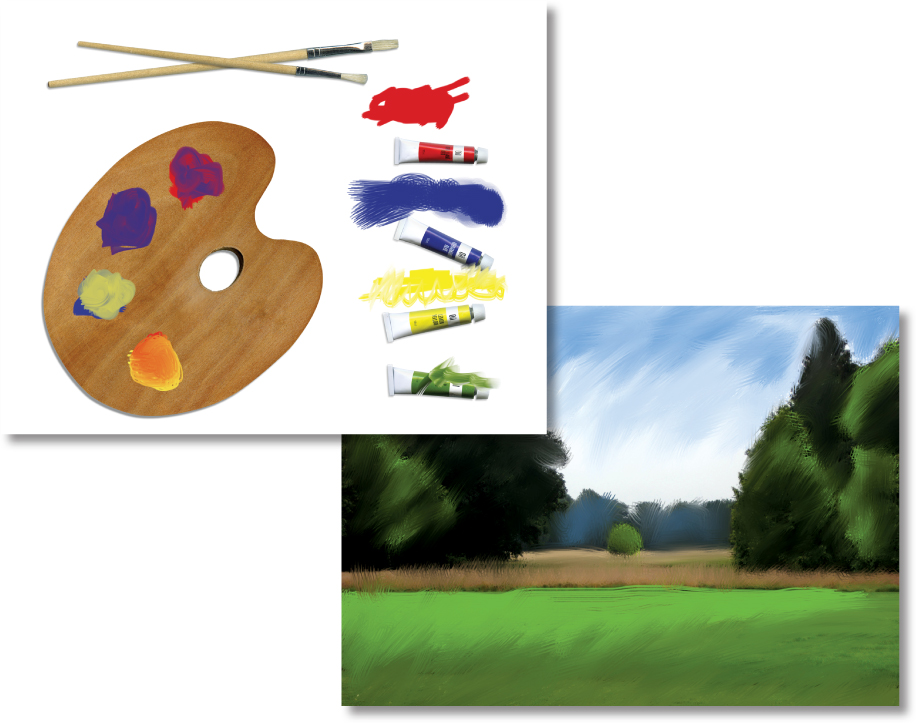
In this lesson, you’ll get acquainted with the Mixer Brush as well as the brush tip and bristle options available in Photoshop. Start by taking a look at the final projects you’ll create.
![]() Note
Note
If Bridge isn’t installed, you’ll be prompted to install it when you choose Browse In Bridge. For more information, see page 3.
1 Start Photoshop, and then immediately hold down Ctrl+Alt+Shift (Windows) or Command+Option+Shift (Mac) to restore the default preferences. (See “Restoring Default Preferences” on page 5.)
2 When prompted, click Yes to delete the Adobe Photoshop Settings file.
![]() Note
Note
If you plan to do a lot of painting in Photoshop, think about using a graphics tablet with a pressure-sensitive stylus, such as a Wacom Intous. Unlike with a mouse, Photoshop can sense how you change the pressure, angle, and rotation as you paint with a stylus.
3 Choose File > Browse In Bridge to open Adobe Bridge.
4 In Bridge, click Lessons in the Favorites panel. Double-click the Lesson10 folder in the Content panel.
5 Preview the Lesson10 end files.
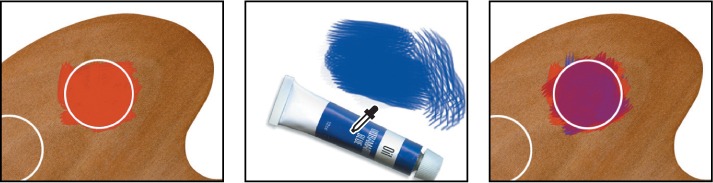
You’ll use the palette image to explore brush options and learn to mix colors. You’ll then apply what you’ve learned to transform the landscape image into a watercolor.
6 Double-click 10Palette_Start.psd to open the file in Photoshop.
7 Choose File > Save As, and name the file 10Palette_Working.psd. Click OK if the Photoshop Format Options dialog box appears.
Selecting brush settings
The image includes a palette and four tubes of color, which you’ll use to sample the colors you’re working with. You’ll change settings as you paint different colors, exploring brush tip settings and wetness options.
1 Select the Zoom tool (![]() ), and zoom in to see the tubes of paint.
), and zoom in to see the tubes of paint.
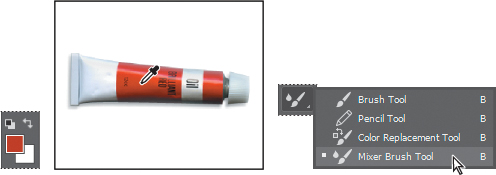
2 Select the Eyedropper tool (![]() ), and click the red tube to sample its color.
), and click the red tube to sample its color.
The foreground color changes to red.
3 Select the Mixer Brush tool (![]() ), hidden under the Brush tool (
), hidden under the Brush tool (![]() ).
).
![]() Note
Note
When you hold down the Eyedropper tool on the image, Photoshop displays a sampling ring that previews the color you’re selecting. The sampling ring is available if Photoshop can use the graphics processor on your computer (see the Performance panel in Photoshop preferences).
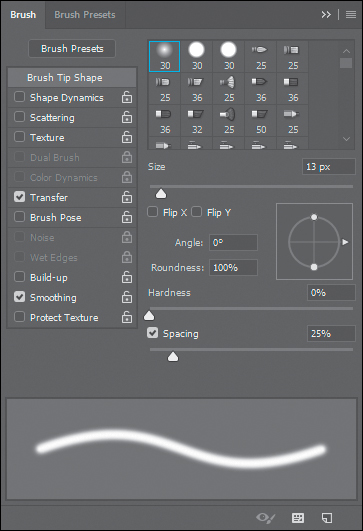
4 Choose Window > Brush to open the Brush panel. Select the first brush.
The Brush panel contains brush presets and several options for customizing brushes.
![]() Note
Note
If the brushes in your Brush panel don’t match the ones shown in this chapter, click the Brush Presets tab, click the Brush Presets panel menu, choose Preset Manager, click the gear icon menu, choose Reset Brushes, and click OK.
Experimenting with wetness options and brushes
The effect of the brush is determined by the Wet, Load, and Mix fields in the options bar. Wet controls how much paint the brush picks up from the canvas. Load controls how much paint the brush holds when you begin painting (as with a physical brush, it runs out of paint as you paint with it). Mix controls the ratio of paint from the canvas and paint from the brush.
You can change these settings separately. However, it’s faster to select a standard combination from the pop-up menu.
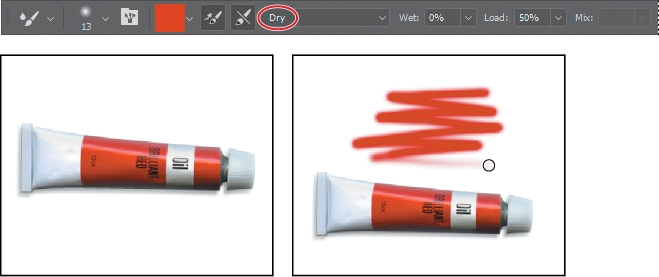
1 In the options bar, choose Dry from the pop-up menu of blending brush combinations.
When you select Dry, Wet is set to 0%, Load to 50%, and Mix is not applicable. With the Dry preset, you paint opaque color; you cannot mix colors on a dry canvas.
2 Paint in the area above the red tube. Solid red appears. As you continue painting without releasing the mouse, the paint eventually fades and runs out.
![]() Note
Note
You can also sample paint by Alt-clicking or Option-clicking the Mixer Brush tool. This samples the area within the brush size as an image, unless you selected Load Solid Colors Only in the Current Brush Load menu in the options bar.
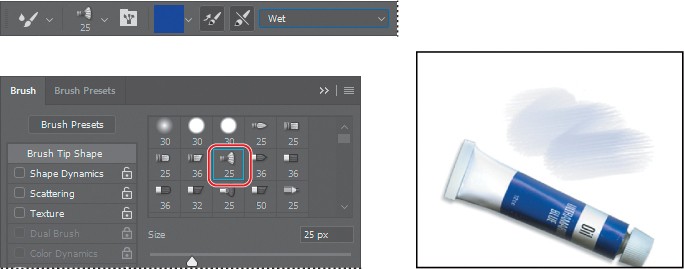
3 With the Eyedropper tool, sample the blue color from the blue tube of paint.
4 Select the Mixer Brush, and then in the Brush panel, select the round fan-shaped brush. Choose Wet from the pop-up menu in the options bar.
5 Paint above the blue tube. The paint mixes with the white background.
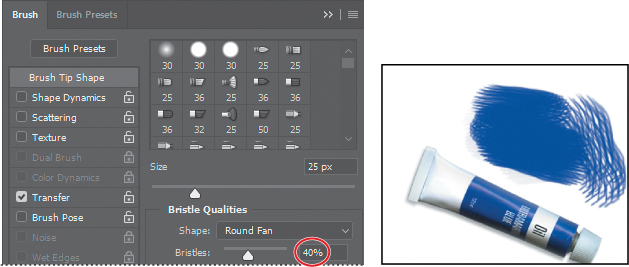
6 Choose Dry from the menu in the options bar, and then paint again above the blue tube. A much darker, more opaque blue appears, and doesn’t mix with the white background.
The bristles from the fan brush you selected are much more apparent than the bristles you used originally. Changing bristle qualities makes a big difference in the texture you paint.
![]() Note
Note
If you aren’t getting the same results from the brushes, make sure the Background layer is selected in the Layers panel.
7 In the Brush panel, decrease the number of bristles to 40%. Paint a little more with the blue brush to see the change in texture. The bristles are much more obvious in the stroke.
![]() Tip:
Tip:
The Live Tip Brush Preview helps you visualize interactive brush attributes such as the direction of the bristles as you paint, especially when using a stylus. To show or hide the Live Tip Brush Preview, click the Toggle The Live Tip Brush Preview button at the bottom of the Brush or Brush Presets panel.
![]() Note
Note
The Live Tip Brush Preview is available if Photoshop supports the graphics processor on your computer (see the Performance panel in Photoshop preferences).
8 Sample the yellow color from the yellow paint tube. In the Brush panel, select the flat-point brush with fewer bristles (the one to the right of the fan brush). Choose Dry from the menu in the options bar, and then paint in the area over the yellow paint tube.
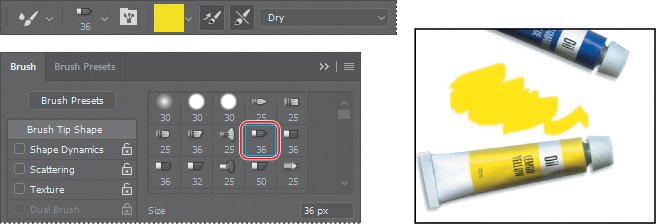
9 Choose Very Wet from the menu in the options bar, and then paint some more. Now the yellow mixes with the white background.
Using an erodible tip
When you use an erodible tip, the width of the brush changes as you paint. Erodible tips are represented in the Brush panel by pencil icons, because in the physical world, pencils and pastels have erodible tips. You’ll experiment with erodible point and triangle tips.
1 Sample the green color from the green paint tube, and choose Dry, Heavy Load in the options bar.
2 Select one of the erodible tips (any tip with a pencil icon), and then choose Erodible Point from the Shape menu. Change the brush’s Size to 30 px and Softness to 100%.
The Softness value determines how quickly the tip erodes. A higher value results in faster erosion.
3 Draw a zigzag line above the green paint tube.
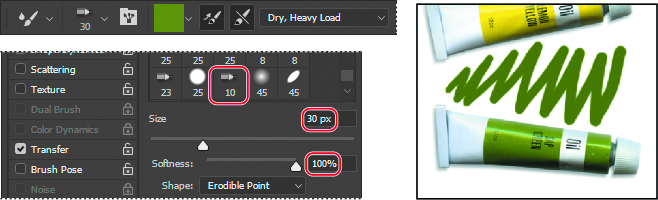
The line gets thicker as the tip erodes.
4 Click Sharpen Tip in the Brush panel, and then draw a line next to the one you just drew.
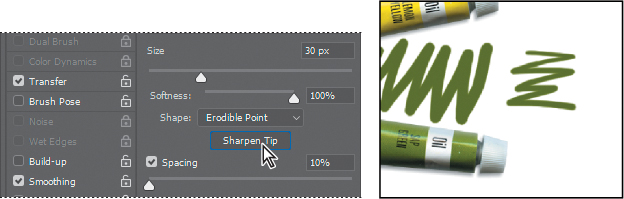
The sharper tip draws a much narrower line.
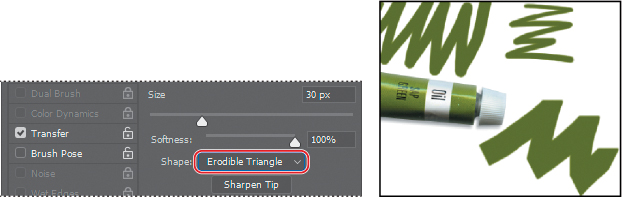
5 Choose Erodible Triangle from the Shape menu in the Brush panel, and draw a zigzag line with it.
You can choose from several erodible tips, depending on the effect you want.
Mixing colors
You’ve used wet and dry brushes, changed brush settings, and mixed the paint with the background color. Now, you’ll focus more on mixing colors with each other as you add paint to the painter’s palette.
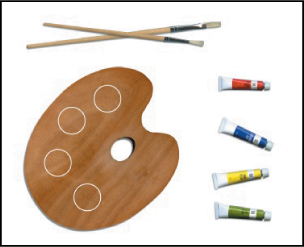
1 Zoom out just enough to see the full palette and the paint tubes.
2 Select the Paint mix layer in the Layers panel, so the color you paint won’t blend with the brown palette on the Background layer.
The Mixer Brush tool mixes colors only on the active layer unless you select Sample All Layers in the options bar.
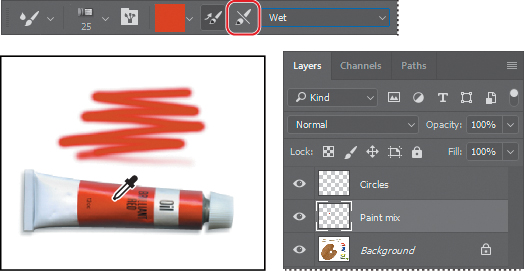
3 Use the Eyedropper tool to sample the red color from the red paint tube. Then, with the Mixer Brush tool selected, select the round blunt brush in the Brush panel (the fifth brush). Then choose Wet from the pop-up menu in the options bar, and paint in the top circle on the palette.
![]() Note
Note
Depending on the complexity of your project and the performance of your computer, you may need to be patient. Mixing colors can be an intensive process.
4 Click the Clean The Brush After Each Stroke icon (![]() ) in the options bar to deselect it.
) in the options bar to deselect it.
![]() Tip:
Tip:
Use the Eyedropper tool to sample the color, since it’s on a different layer. You can press I to select the Eyedropper tool.
5 Use the Eyedropper tool to sample the blue color from the blue paint tube, and then use the Mixer Brush tool to paint in the same circle, mixing the red with the blue until the color becomes purple.
You can use the Eyedropper tool to sample a color when the layer that contains the color (in this case, the Background layer) isn’t selected.
6 Paint in the next circle. You’re painting in purple because the paint stays on the brush until you clean it.
7 In the options bar, choose Clean Brush from the Current Brush Load pop-up menu. The preview changes to indicate transparency, meaning the brush has no paint loaded.
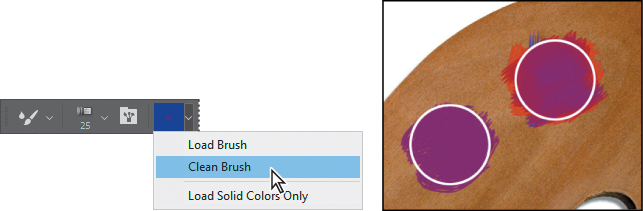
To remove the paint load from a brush, you can choose Clean Brush in the options bar. To replace the paint load in a brush, sample a different color.
If you want Photoshop to clean the brush after each stroke, select the Clean Brush After Each Stroke icon (![]() ) in the options bar. To load the brush with the foreground color after each stroke, select the Load Brush After Each Stroke icon (
) in the options bar. To load the brush with the foreground color after each stroke, select the Load Brush After Each Stroke icon (![]() ) in the options bar. By default, both of these options are selected.
) in the options bar. By default, both of these options are selected.
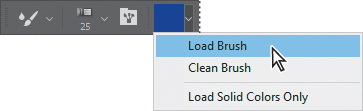
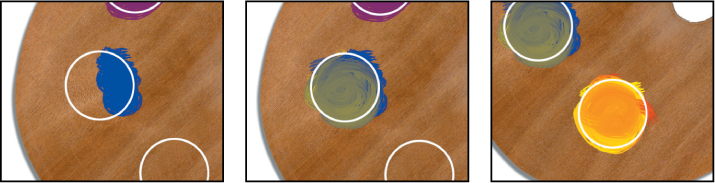
8 Choose Load Brush from the Current Brush Load pop-up menu in the options bar to load the brush with blue, the current foreground color. Paint blue in half of the next circle.
9 Sample the yellow color from the yellow paint tube, and paint over the blue with a wet brush to mix the two colors.
10 Fill the last circle with yellow and red paint, mixing the two with a wet brush to create an orange color.
11 Hide the Circles layer in the Layers panel to remove the outlines on the palette.

12 Choose File > Save.
Tool tips from the Photoshop evangelist

1 Choose Edit > Keyboard Shortcuts.
2 Choose Tools from the Shortcuts For menu.
3 Scroll down to the bottom of the list.
4 Select a command, and then enter a custom shortcut. You can create shortcuts for the following commands:
• Load Mixer Brush
• Clean Mixer Brush
• Toggle Mixer Brush Auto-Load
• Toggle Mixer Brush Auto-Clean
• Toggle Mixer Brush Sample All Layers
• Sharpen Erodible Tips
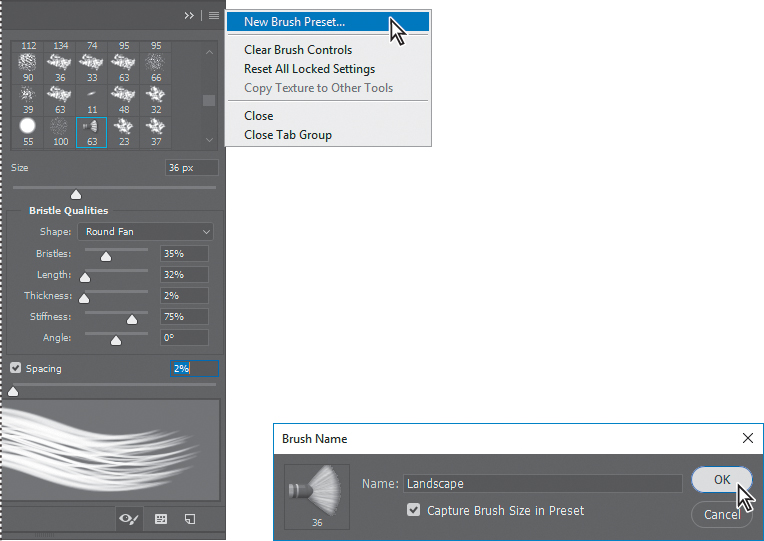
Creating a custom brush preset
Photoshop includes numerous brush presets, which are very handy. But if you need to tweak a brush for your project, you might find it easier to create your own preset. You’ll create a brush preset to use in the following exercise.
![]() Note
Note
Due to an anomaly, numbers you enter in the Size, Bristles, Thickness, and Stiffness fields may not appear in the correct order. To avoid the issue, select only the digits (not the px units or percentage sign) in the field before entering a new value.
1 In the Brush panel, select the following settings:
• Size: 36 px
• Shape: Round Fan
• Bristles: 35%
• Length: 32%
• Thickness: 2%
• Stiffness: 75%
• Angle: 0°
• Spacing: 2%
2 Choose New Brush Preset from the Brush panel menu.
3 Name the brush Landscape, and click OK.
4 Click Brush Presets in the Brush panel to open the Brush Presets panel.
The Brush Presets panel displays samples of the strokes created by different brushes. If you know which brush you want to use, it can be easier to find by name. You’ll list them by name now, so you can find your preset for the next exercise.
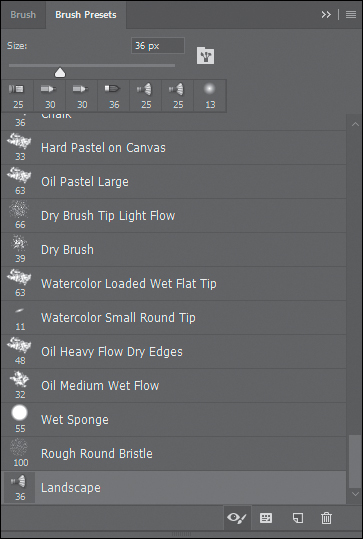
5 Choose Large List from the Brush Presets panel menu.
6 Scroll to the bottom of the list. The preset you created, Landscape, is the last preset in the list.
7 Close the 10Palette_Working.psd file. If asked to save changes, click Save.
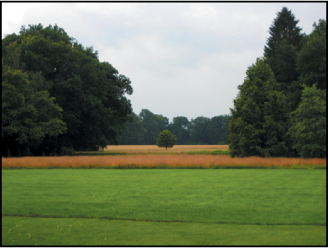
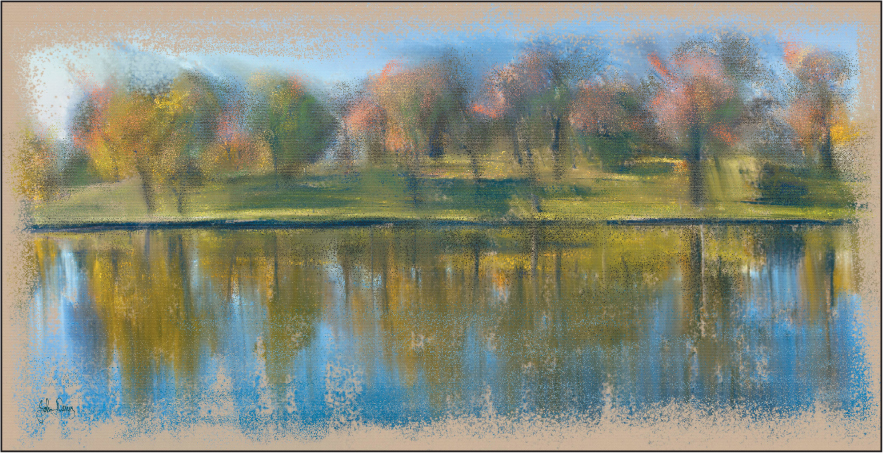
Mixing colors with a photograph
Earlier, you mixed colors with a white background and with each other. Now, you’ll use a photograph as your canvas. You’ll add colors and mix them with each other and with the background colors to transform a photograph of a landscape into a watercolor.
1 Choose File > Open. Double-click the 10Landscape_Start.jpg file in the Lesson10 folder to open it.
2 Choose File > Save As. Rename the file 10Landscape_Working.jpg, and click Save. Click OK in the JPEG Options dialog box.
You’ll paint the sky first. Start by setting up the color and selecting the brush.
3 Click the Foreground color swatch in the Tools panel. Select a medium-light blue color (we chose R=185, G=204, B=228), and then click OK.
4 Select the Mixer Brush tool (![]() ), if it isn’t already selected. Choose Dry from the pop-up menu in the options bar. Then select the Landscape brush from the Brush Presets panel.
), if it isn’t already selected. Choose Dry from the pop-up menu in the options bar. Then select the Landscape brush from the Brush Presets panel.
Presets are saved on your system, so they’re available when you work with any image.
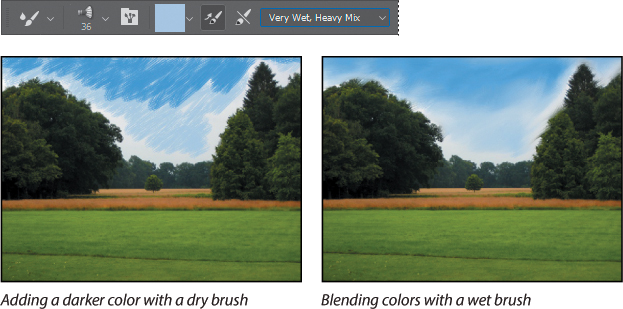
5 Paint over the sky, moving in close to the trees. Because you’re using a dry brush, the paint isn’t mixing with the colors beneath it.
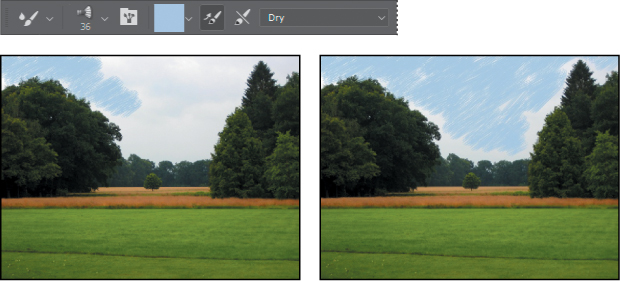
6 Select a darker blue color (we used R=103, G=151, B=212), and add darker color at the top of the sky, still using the dry brush.
7 Select a light blue color again, and choose Very Wet, Heavy Mix from the pop-up menu in the options bar. Use this brush to scrub diagonally across the sky, blending the two colors in with the background color. Paint in close to the trees, and smooth out the entire sky.
When you’re satisfied with the sky, move on to the grass and trees.
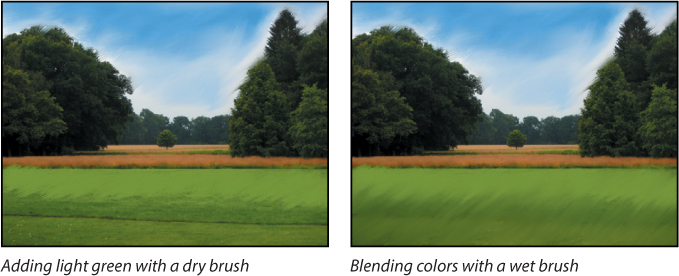
8 Select a light green (we used R=92, G=157, B=13). Choose Dry from the pop-up menu in the options bar. Then paint along the top section of the grass to highlight it.
9 Sample a darker green from the grass itself. Choose Very Wet, Heavy Mix in the options bar. Then paint using diagonal strokes to blend the colors in the grass.
![]() Tip:
Tip:
Remember that you can Alt-click (Windows) or Option-click (Mac) to sample a color instead of using the Eyedropper tool. To sample only solid colors using the keyboard shortcut, choose Load Solid Colors Only from the Current Brush Load pop-up menu in the options bar.
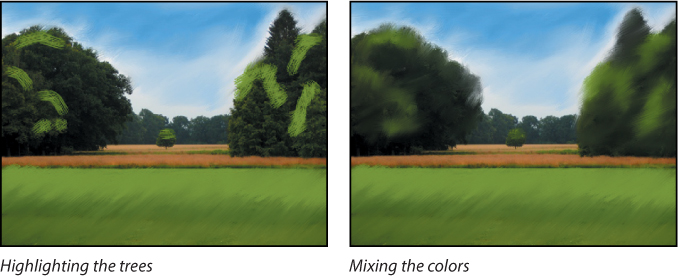
10 Sample a light green, and then use a dry brush to highlight the lighter areas of the trees and the small tree in the middle of the landscape. Then select a dark green (we used R=26, G=79, B=34), and choose Very Wet, Heavy Mix in the options bar. Paint with the wet brush to mix together the colors in the trees.
![]() Tip:
Tip:
For different effects, paint in different directions. With the Mixer Brush tool, you can go wherever your artistic instincts lead you.
So far, so good. The background trees and the brown grasses are all that remain to be painted.
11 Select a bluer color for the background trees (we used R=65, G=91, B=116). Paint with a dry brush to add the blue at the top. Then choose Wet in the options bar, and paint to mix the blue into the trees.
12 Sample a brown color from the tall grasses, and then select Very Wet, Heavy Mix in the options bar. Paint along the top of the tall grass with up-and-down strokes for the look of a field. Across the back area, behind the small center tree, paint back and forth to create smooth strokes.
13 Choose File > Save, and close the document.
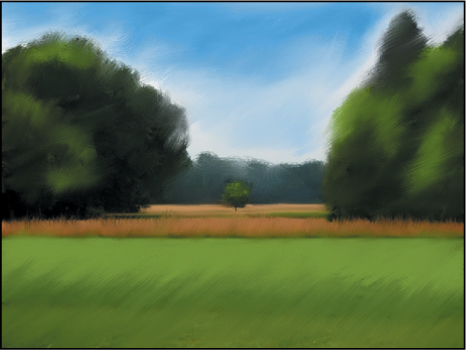
Voilá! You’ve created a masterpiece with your paints and brushes, and there’s no mess to clean up.
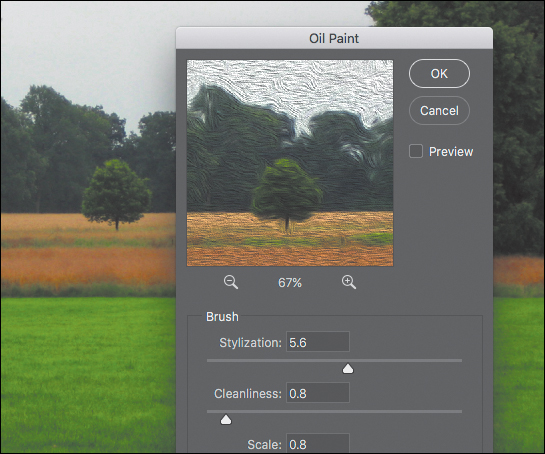
Another option: the Oil Paint filter
Review questions
1 What does the Mixer Brush do that other brushes don’t?
2 How do you load a mixer brush?
3 How do you clean a brush?
4 How can you display the names of brush presets?
5 What is the Live Tip Brush Preview, and how can you hide it?
6 What is an erodible tip?
Review answers
1 The Mixer Brush mixes the color of the paintbrush with colors on the canvas.
2 You can load a mixer brush by sampling a color, either by using the Eyedropper tool or keyboard shortcuts (Alt-click or Option-click). Or, you can choose Load Brush from the pop-up menu in the options bar to load the brush with the foreground color.
3 To clean a brush, choose Clean Brush from the pop-up menu in the options bar.
4 To display brush presets by name, open the Brush Presets panel, and then choose Large List (or Small List) from the Brush Presets panel menu.
5 The Live Tip Brush Preview shows you the direction the brush strokes are moving. To hide or show the Live Tip Brush Preview, click the Toggle The Live Tip Brush Preview icon at the bottom of the Brush panel or the Brush Presets panel.
6 An erodible tip erodes, changing thickness, as you paint or draw. It’s similar to the way a pencil or pastel tip changes shape as it erodes.