
12. Working with Camera Raw
Lesson overview
In this lesson, you’ll learn how to do the following:
• Open a proprietary camera raw image in Adobe Camera Raw.
• Adjust tone and color in a raw image.
• Sharpen an image in Camera Raw.
• Synchronize settings for multiple images.
• Open a Camera Raw image as a Smart Object in Photoshop.
• Apply Camera Raw as a filter in Photoshop.

This lesson will take about an hour to complete. Please log in to your account on peachpit.com to download the lesson files for this chapter, or go to the Getting Started section at the beginning of this book and follow the instructions under “Accessing the Lesson Files and Web Edition.” As you work on this lesson, you’ll preserve the start files. If you need to restore the start files, download them from your Account page.

Raw images give you greater flexibility, especially in setting color and tone. Camera Raw lets you tap into that potential. It can be a useful tool even when you’re starting with a JPEG or TIFF image, or when you apply it as a filter in Photoshop.
PROJECT: ADVANCED PHOTO RETOUCHING
Getting started
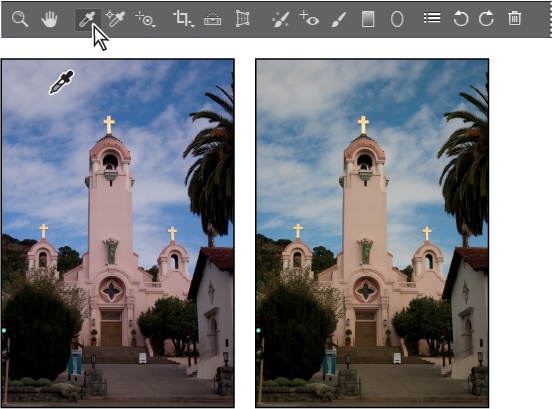
In this lesson, you’ll edit several digital images using Photoshop and Adobe Camera Raw, which comes with Photoshop. You’ll use a variety of techniques to touch up and improve the appearance of digital photographs. You’ll start by viewing the before and after images in Adobe Bridge.
![]() Note
Note
We used Adobe Camera Raw 9.7, which was the current version at the time of publication. Adobe updates Camera Raw frequently; if you’re using a later version, some of the steps in this lesson may not match what you see.
1 Start Photoshop, and then immediately hold down Ctrl+Alt+Shift (Windows) or Command+Option+Shift (Mac) to restore the default preferences. (See “Restoring Default Preferences” on page 5.)
2 When prompted, click Yes to delete the Adobe Photoshop Settings file.
3 Choose File > Browse In Bridge to open Adobe Bridge.
4 In the Favorites panel in Bridge, click the Lessons folder. Then, in the Content panel, double-click the Lesson12 folder to open it.
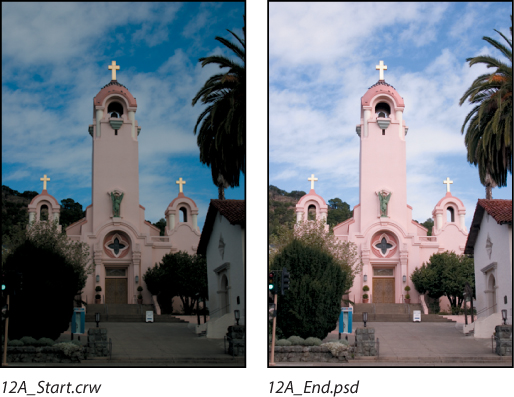
5 Adjust the thumbnail slider, if necessary, so that you can see the thumbnail previews clearly. Then look at the 12A_Start.crw and 12A_End.psd files.
![]() Note
Note
If you haven’t installed Bridge, you’ll be prompted to do so when you choose Browse In Bridge. For more information, see page 3.
The original photograph of a Spanish-style church is a camera raw file, so it doesn’t have the usual .psd or .jpg file extension you’ve worked with so far in this book. It was shot with a Canon Digital Rebel camera and has the Canon proprietary .crw file extension. You’ll process this proprietary camera raw image to make it brighter, sharper, and clearer, and then save it as a JPEG file for the web and as a PSD file so that you could work on it further in Photoshop.
6 Compare the 12B_Start.nef and 12B_End.psd thumbnail previews.

This time, the start file was taken with a Nikon camera, and the raw image has an .nef extension. You’ll perform color corrections and image enhancements in Camera Raw and Photoshop to achieve the end result.
About camera raw files
A camera raw file contains unprocessed picture data from a digital camera’s image sensor. Raw sensor data has not yet been converted to a standard RGB color image file. Many digital cameras can save images in camera raw format. The advantage of camera raw files is that they let the photographer—rather than the camera—interpret the image data and make adjustments and conversions. (In contrast, shooting JPEG images with your camera locks the camera’s processing into the image.) Because the camera doesn’t do any image processing when you shoot a camera raw photo, you can use Adobe Camera Raw to set the white balance, tonal range, contrast, color saturation, and sharpening more freely than you can after the raw image is converted to a standard RGB image. Think of camera raw files as photo film negatives: You can go back and reprocess the file any time you like to achieve the results you want. To create camera raw files, set your digital camera to save files in its own, possibly proprietary, raw file format. When you download the file from your camera, it has a filename extension such as .nef (from Nikon) or .crw (from Canon). In Bridge or Photoshop, you can process camera raw files from a myriad of supported digital cameras from Canon, Kodak, Leica, Nikon, and other makers—and even process multiple images simultaneously. You can then export the proprietary camera raw files to DNG, JPEG, TIFF, or PSD file format.
![]() Note
Note
Camera raw files are typically unique to each camera model’s sensor. If you have CRW files from three different Canon camera models and NEF files from three Nikon models, chances are those represent six different formats. If you buy a new camera, you might need an Adobe Camera Raw update that adds support for its raw format.
You can process camera raw files obtained from supported cameras, but you can also open TIFF and JPEG images in Camera Raw, which includes some editing features that aren’t in Photoshop. However, you won’t have the same flexibility with white balance and other settings if you’re using a TIFF or JPEG image. Although Camera Raw can open and edit a camera raw image file, it cannot save a camera raw format image back to a proprietary camera raw format. However, Adobe Camera Raw can save to the open Adobe DNG camera raw format.
Processing files in Camera Raw
When you make adjustments to an image in Camera Raw, such as straightening or cropping the image, Photoshop and Bridge preserve the original file data. This way, you can edit the image as you desire, export the edited image, and keep the original intact for future use or other adjustments.
Opening images in Camera Raw
You can open Camera Raw from either Bridge or Photoshop, and you can apply the same edits to multiple files simultaneously. This is especially useful if you’re working with images that were all shot in the same environment, and which therefore need the same lighting and other adjustments.
Camera Raw provides extensive controls for adjusting white balance, exposure, contrast, sharpness, tone curves, and much more. In this exercise, you’ll edit one image and then apply the settings to similar images.
1 In Bridge, open the Lessons/Lesson12/Mission folder, which contains three shots of the Spanish church you previewed earlier.
2 Shift-click to select all of the images—Mission01.crw, Mission02.crw, and Mission03.crw—and then choose File > Open In Camera Raw.
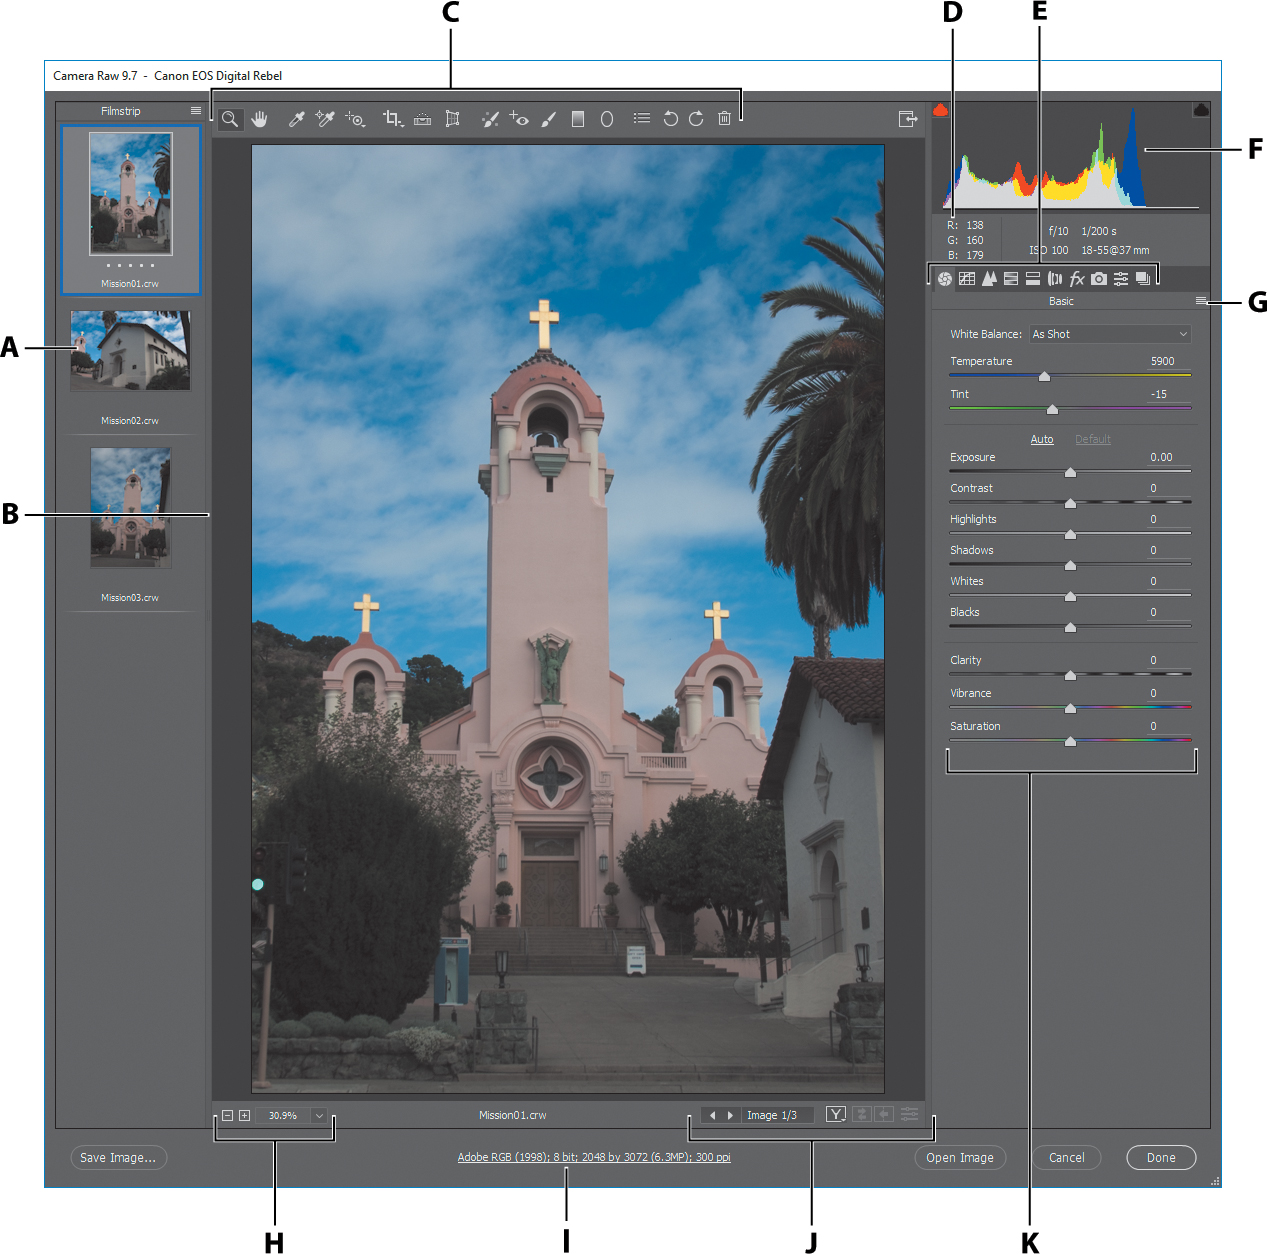
A. Filmstrip
B. Filmstrip divider (drag to adjust)
C. Toolbar
D. RGB values
E. Image adjustment tabs
F. Histogram
G. Camera Raw Settings menu
H. Zoom levels
I. Click to display workflow options
J. Multi-image navigation controls
K. Adjustment sliders
The Camera Raw dialog box displays a large preview of the first image, and a filmstrip down the left side displays all open images. The histogram in the upper right corner shows the tonal range of the selected image; the workflow options link below the preview window displays the selected image’s color space, bit depth, size, and resolution. Tools along the top of the dialog box let you zoom, pan, straighten, and make other adjustments to the image. Tabbed panels on the right side of the dialog box give you more nuanced options for adjusting the image: You can correct the white balance, adjust the tone, sharpen the image, remove noise, adjust color, and make other changes. You can also save settings as a preset, and then apply them later.
For the best results using Camera Raw, plan your workflow to move from left to right and top to bottom. That is, you’ll often want to use the tools across the top first, and then move through the panels in order, making changes as necessary.
You will explore these controls now as you edit the first image file.
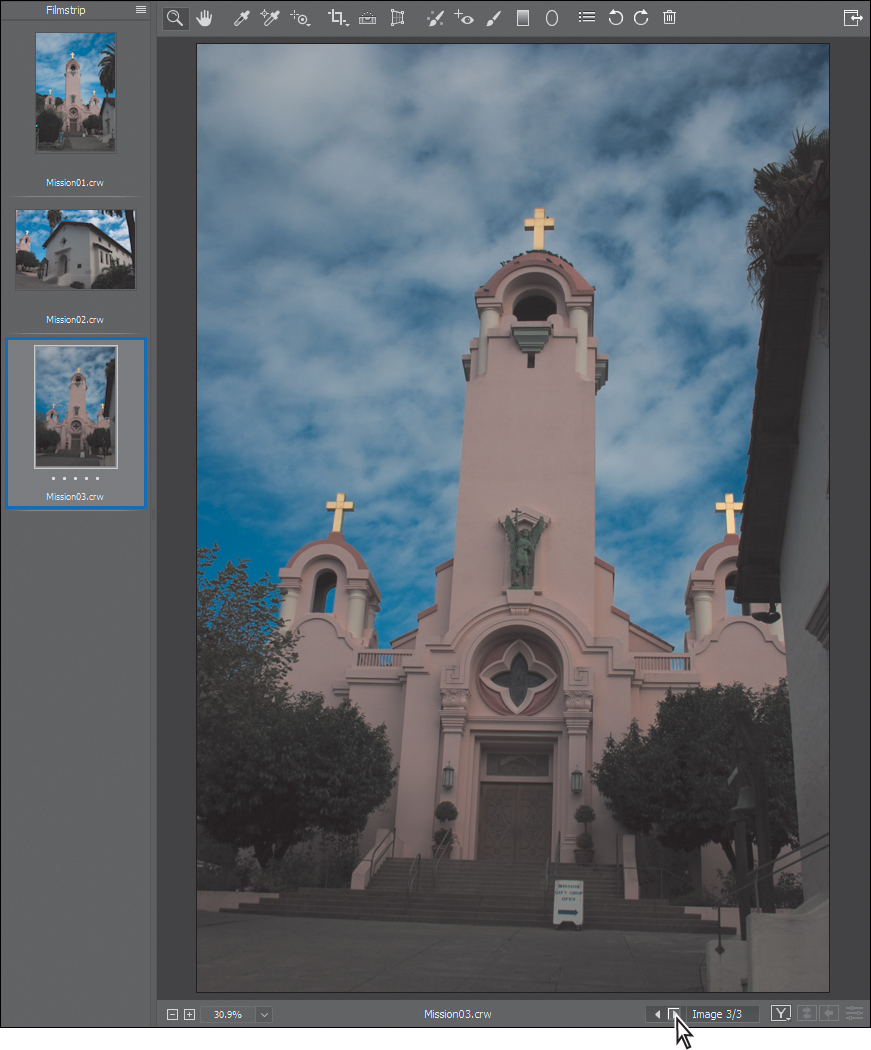
3 Click each thumbnail in the filmstrip to preview all the images before you begin. Or, you can click the Forward button under the main preview window to cycle through them. When you’ve seen all three, select the Mission01.crw image again.
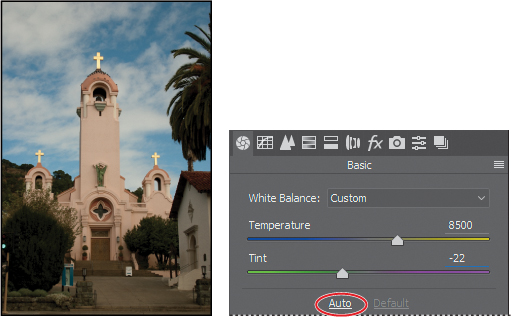
Adjusting white balance
An image’s white balance reflects the lighting conditions under which it was captured. A digital camera records the white balance at the time of exposure; this is the value that initially appears in the Camera Raw dialog box image preview.
White balance comprises two components. The first is temperature, which is measured in kelvins and determines the level of “coolness” or “warmness” of the image—that is, its cool blue-green tones or warm yellow-red tones. The second component is tint, which compensates for magenta or green color casts in the image.
Depending on the settings you’re using on your camera and the environment in which you’re shooting (for example, if there’s artificial light or mixed light sources), you may want to adjust the white balance for the image. If you plan to modify the white balance, make that the first thing you do, as it will affect all other changes in the image.
1 If the Basic panel isn’t already displayed on the right side of the dialog box, click the Basic button (![]() ) to open it.
) to open it.
![]() Tip:
Tip:
As long as an image is in raw format, you can adjust settings such as white balance with a lot of freedom. After a raw image is converted to a standard format (such as JPEG), its adjustment range is more limited before image quality starts to break down.
By default, As Shot is selected in the White Balance menu. Camera Raw applies the white balance settings that were in your camera at the time of exposure. Camera Raw includes several White Balance presets, which you can use as a starting point to see different lighting effects.
2 Choose Cloudy from the White Balance menu.
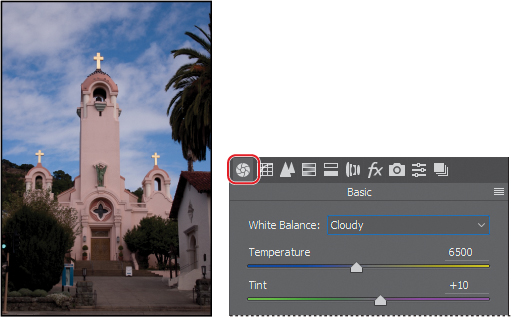
Camera Raw adjusts the temperature and tint for a cloudy day. Sometimes a preset is an instant fix. In this case, though, there’s still a blue cast to the image. You’ll adjust the white balance manually.
3 Select the White Balance tool (![]() ) at the top of the Camera Raw dialog box.
) at the top of the Camera Raw dialog box.
To set an accurate white balance, select an object that should be white or gray. Camera Raw uses that information to determine the color of the light in which the scene was shot, and then adjusts for scene lighting automatically.
4 Click the white clouds in the image. The lighting of the image changes.
5 Click a different area of the clouds. The lighting shifts.
You can use the White Balance tool to find the best lighting for the scene quickly and easily. Clicking different areas changes the lighting without making any permanent changes to the file, so you can experiment freely.
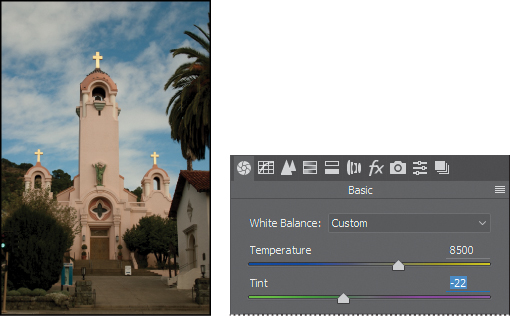
6 Click the clouds directly to the left of the steeple. This selection removes most of the color casts and results in realistic lighting.
7 Move the Tint slider to −22 to intensify the greens.
![]() Tip:
Tip:
To undo the settings, press Ctrl+Z (Windows) or Command+Z (Mac).
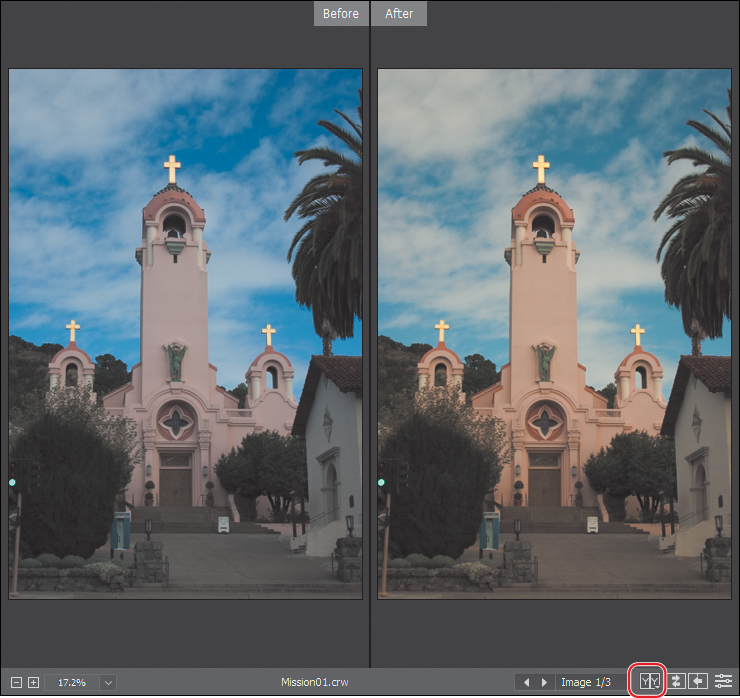
8 To see the changes you’ve made, click the preview mode button (![]() ) at the bottom of the window, and choose Before/After Left/Right from the pop-up menu.
) at the bottom of the window, and choose Before/After Left/Right from the pop-up menu.
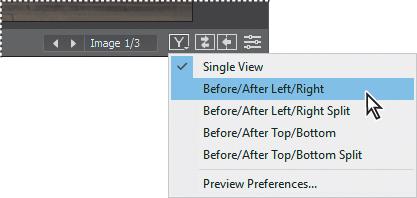
Camera Raw displays the Before image on the left and the After image on the right so you can see the changes you’ve made.
![]() Tip:
Tip:
To expand Camera Raw to fill the screen, click the Toggle Full-Screen Mode button (![]() ) on the far right side of the toolbar, or press F.
) on the far right side of the toolbar, or press F.
9 To see only the After image again, choose Single View from the preview mode pop-up menu. If you prefer, you can leave both views visible so you can see how the image changes as you continue to alter it.
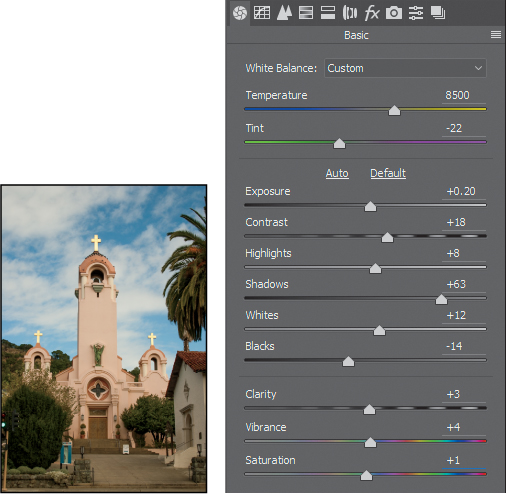
Making tonal adjustments in Camera Raw
The group of sliders in the middle of the Basic panel affects the tonal distribution of the image. Except for Contrast, moving a slider to the right lightens the affected areas of the image, and moving it to the left darkens those areas. Exposure sets the overall brightness of the image. The Whites slider defines the white point, or the lightest point of the image. Conversely, the Blacks slider sets the black point, or the darkest point in the image. The Highlights and Shadows sliders increase detail in the highlights and the shadows, respectively.
![]() Tip:
Tip:
For the best effect, increase the Clarity slider until you see halos near the edge details, and then reduce the setting slightly.
Dragging the Contrast slider to the right moves darker and lighter midtones away from the midtone; dragging left moves those tones toward the midtone. For more nuanced contrast adjustments, you can use the Clarity slider, which adds depth to an image by increasing local contrast, especially around the midtones.
The Saturation slider adjusts the intensity of all colors in the image equally. The Vibrance slider has a greater effect on undersaturated colors. You can use it to bring life to a background without oversaturating any skin tones in the image, for example.
You can use the Auto option to let Camera Raw attempt to correct the image tone, or you can select your own settings.
1 Click Auto in the Basic panel.
Camera Raw increases the exposure and changes several other settings. You could use this as a starting point. However, in this exercise, you’ll return to the default settings and adjust them yourself.
2 Click Default in the Basic panel.
3 Change the sliders as follows:
• Exposure: +0.20
• Contrast: +18
• Highlights: +8
• Shadows: +63
• Whites: +12
• Blacks: −14
• Clarity: +3
• Vibrance: +4
• Saturation: +1
These settings help pump up the midtones of the image so that it looks bolder and more dimensional without being oversaturated.
About the Camera Raw histogram

![]() Tip:
Tip:
Indications of clipped shadows or highlights don’t always mean you’ve overcorrected an image. For example, a clipped specular highlight (such as a reflection of the sun or a studio light on metal) is acceptable because a specular highlight has no detail to lose.
Applying sharpening
Photoshop offers several sharpening filters, but when an image is in raw format it’s often a good idea to use the Sharpening controls in Camera Raw. The Sharpening controls are in the Detail panel. To see the effect of sharpening in the preview panel, you must view the image at 100% or greater.
1 Double-click the Zoom tool (![]() ) on the left side of the toolbar to zoom in to 100%. Then select the Hand tool (
) on the left side of the toolbar to zoom in to 100%. Then select the Hand tool (![]() ), and pan the image to see the cross at the top of the mission tower.
), and pan the image to see the cross at the top of the mission tower.
2 Click the Detail button (![]() ) to open the Detail panel.
) to open the Detail panel.

The Amount slider determines how much sharpening Camera Raw applies. Typically, you’ll want to exaggerate the amount of sharpening at first, and then adjust it after you’ve set the other sliders.
3 Move the Amount slider to 100.
The Radius slider determines the pixel area Camera Raw analyzes as it sharpens the image. For most images, you’ll get the best results if you keep the radius low, even below one pixel. A larger radius can begin to cause an unnatural look, almost like a watercolor.
4 Move the Radius slider to 0.9.
The Detail slider determines how much detail you’ll see. Even when this slider is set to 0, Camera Raw performs some sharpening. Typically, you’ll want to keep the Detail setting relatively low.
5 Move the Detail slider to 25, if it isn’t already there.
The Masking slider determines which parts of the image Camera Raw sharpens. When the Masking value is high, Camera Raw sharpens only those parts of the image that have strong edges.
6 Move the Masking slider to 61.
After you’ve adjusted the Radius, Detail, and Masking sliders, you can lower the Amount slider to finalize the sharpening.
7 Decrease the Amount slider to 70.
![]() Tip:
Tip:
Press Alt (Windows) or Option (Mac) as you move the Masking slider to see what Camera Raw will sharpen.
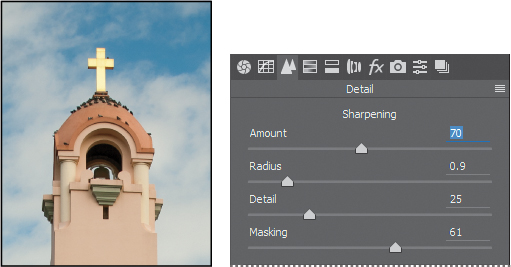
Sharpening the image gives stronger definition to the details and edges. The Masking slider lets you target the sharpening effect to edges and lines in the image, so that artifacts don’t appear in unfocused or solid areas.
When you make adjustments in Camera Raw, the original file data is preserved. Your adjustment settings for the image are stored either in the Camera Raw database file or in “sidecar” XMP files that accompany the original image file in the same folder. These XMP files retain the adjustments you made in Camera Raw when you move the image file to a storage medium or another computer.
![]() Tip:
Tip:
If you have difficulty seeing the effects of sharpening, change the zoom level to 100%.
Synchronizing settings across images
All three of the mission images were shot at the same time under the same lighting conditions. Now that you’ve made the first one look stunning, you can automatically apply the same settings to the other two images. You do this using the Synchronize command.
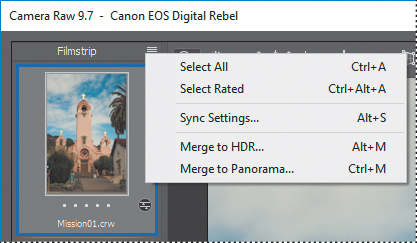
1 In the upper left corner of the Camera Raw dialog box, click the Filmstrip menu button, and choose Select All to select all of the images in the filmstrip.
2 Click the Filmstrip menu button again, and choose Sync Settings.
The Synchronize dialog box appears, listing all the settings you can apply to the images. By default, all options except Crop, Spot Removal, and Local Adjustments are selected. You can accept the default for this project, even though you didn’t change all the settings.
3 Click OK in the Synchronize dialog box.
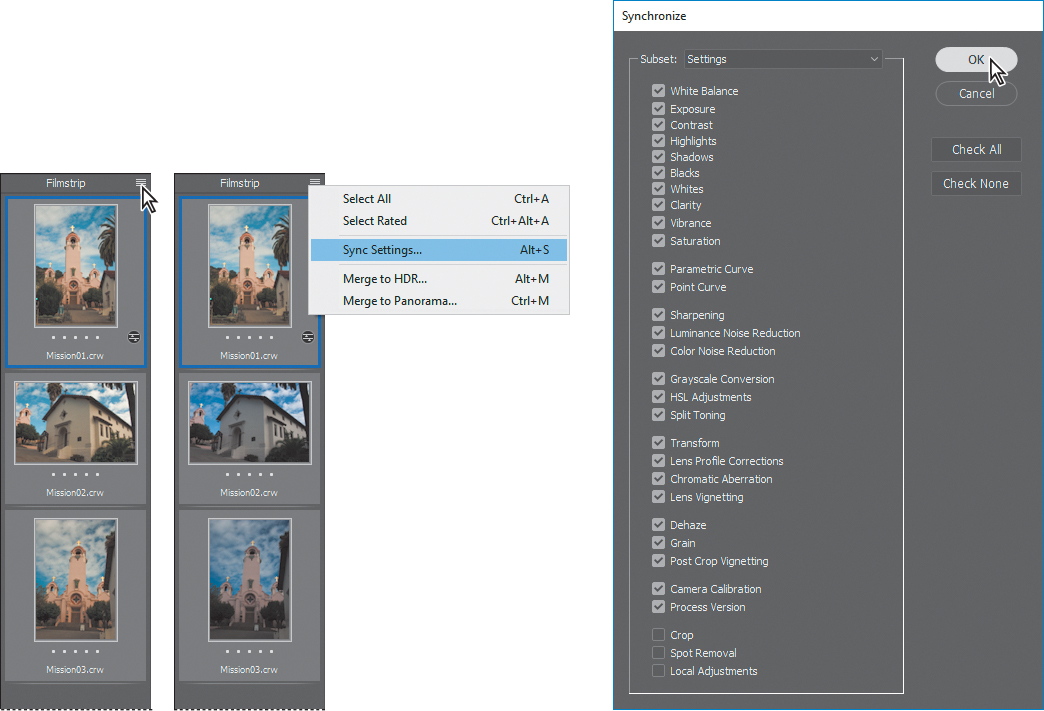
When you synchronize the settings across all of the selected images, the thumbnails update to reflect the changes you made. To preview the images, click each thumbnail in the filmstrip.
Saving Camera Raw changes
You can save your changes in different ways for different purposes. First, you’ll save the images with adjustments as low-resolution JPEG files that you can share on the web. Then, you’ll save one image, Mission01, as a Photoshop file that you can open as a Smart Object in Photoshop. When you open an image as a Smart Object in Photoshop, you can return to Camera Raw at any time to make further adjustments.
![]() Note
Note
A yellow alert triangle may temporarily appear over an preview or thumbnail image while Camera Raw is synchronizing settings to that image. When the triangle goes away, the preview or thumbnail is up to date.
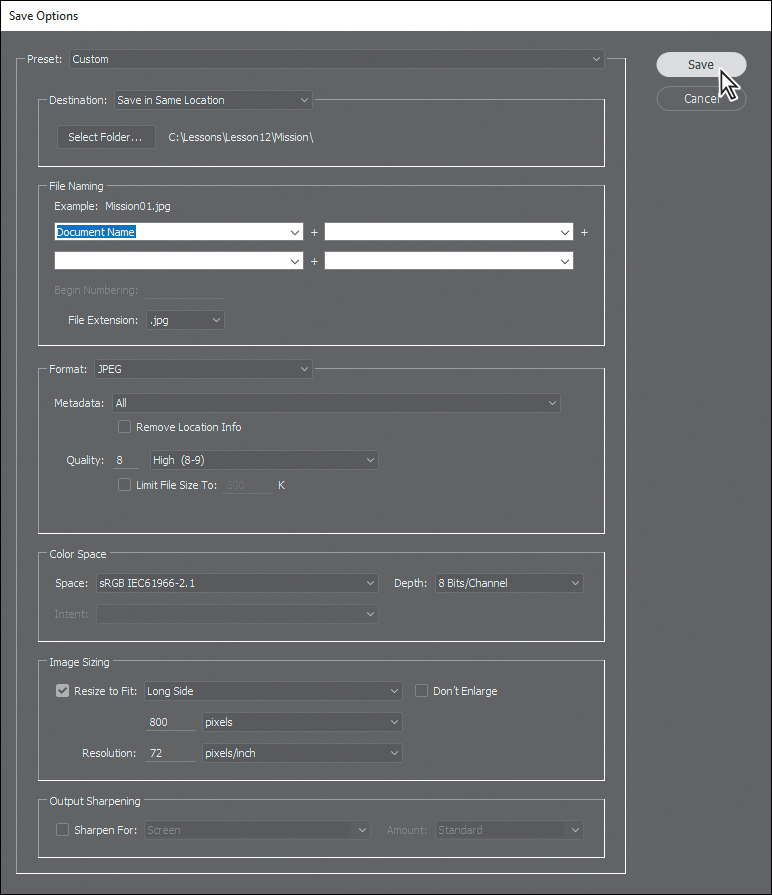
1 In the Camera Raw dialog box, click the Filmstrip menu button, and choose Select All to select all three images.
2 Click Save Images in the lower left corner.
3 In the Save Options dialog box, do the following:
• Choose Save In Same Location from the Destination menu.
• In the File Naming area, leave “Document Name” in the first box.
• Choose JPEG from the Format menu, and set the Quality level to High (8–9).
• In the Color Space area, choose sRGB IEC61966-2.1 from the Space menu.
• In the Image Sizing area, select Resize To Fit, and then choose Long Side from the Resize To Fit menu.
• Enter 800 pixels. This will set the long side of an image to 800 pixels whether it’s a portrait (tall) or landscape (wide) image. When you choose Long Side, the dimension of the short side will automatically be adjusted proportionally.
• Type 72 pixels/inch for the Resolution value.
These settings will save your corrected images as smaller, downsampled JPEG files, which you can share with colleagues on the web. They’ll be resized so that most viewers won’t need to scroll to see the entire image when it opens. Your files will be named Mission01.jpg, Mission02.jpg, and Mission03.jpg.
4 Click Save.
Bridge returns you to the Camera Raw dialog box, and a readout in the bottom left corner indicates how many images have been processed until all the images have been saved. The CRW thumbnails still appear in the Camera Raw dialog box. In Bridge, however, you now also have JPEG versions as well as the original CRW image files, which you can continue to edit or leave for another time.
Now, you’ll open a copy of the Mission01 image in Photoshop.
![]() Note
Note
If you see a message that says “Skip loading optional and third-party plug-ins?” click No. The message appears if the Shift key is held down when Photoshop starts up.
5 Select the Mission01.crw image thumbnail in the filmstrip in the Camera Raw dialog box. Then press the Shift key, and click Open Object at the bottom of the dialog box.
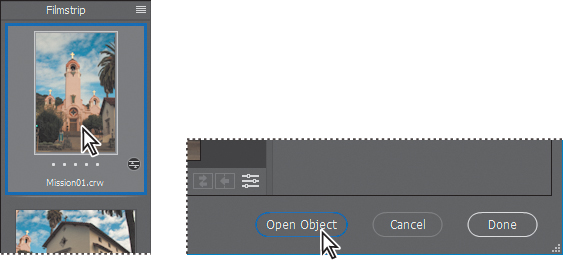
The Open Object button opens the image as a Smart Object layer in Photoshop; you can double-click the Smart Object thumbnail in the Layers panel to open Camera Raw and continue making raw-format-based-adjustments at any time.
If, instead, you had clicked Open Image, the image would open as a standard Photoshop layer, and no more raw format edits would be possible. The Open Image button changes into the Open Object button when you Shift-click it.
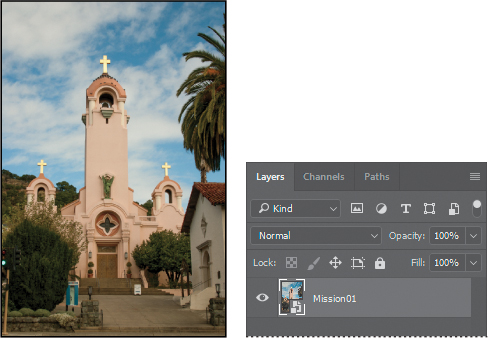
6 In Photoshop, choose File > Save As. In the Save As dialog box, choose Photoshop for the format, rename the file Mission_Final.psd, navigate to the Lesson12 folder, and click Save. Click OK if the Photoshop Format Options dialog box appears. Then close the file.
![]() Tip:
Tip:
To make the Open Object button the default, click the underlined workflow options link at the bottom of the Camera Raw dialog box, select Open In Photoshop As Smart Objects, and click OK.
Applying advanced color correction
You’ll use Levels, the Healing Brush tool, and other Photoshop features to enhance the image of this model.
Adjust the white balance in Camera Raw
The original image of the bride has a slight color cast. You’ll start your color corrections in Camera Raw, setting the white balance and adjusting the overall tone of the image.
1 In Bridge, navigate to the Lesson12 folder. Select the 12B_Start.nef file, and choose File > Open In Camera Raw.
2 In Camera Raw, select the White Balance tool (![]() ), and then click a white area in the model’s dress to adjust the temperature and remove a green color cast.
), and then click a white area in the model’s dress to adjust the temperature and remove a green color cast.

3 Adjust other sliders in the Basic panel to brighten and intensify the image:
• Increase Exposure to +0.30.
• Increase Contrast to +15.
• Increase Clarity to +8.

4 Press the Shift key, and click Open Object.
The image opens in Photoshop as a Smart Object.
![]() Note
Note
Your Temperature and Tint values may vary slightly from what is shown in the figure for step 3, because the exact values depend on where you clicked.
Adjusting levels
The tonal range of an image represents the amount of contrast, or detail, in the image and is determined by the image’s distribution of pixels, ranging from the darkest pixels (black) to the lightest pixels (white). You’ll use a Levels adjustment layer to fine-tune the tonal range in this image.
1 In Photoshop, choose File > Save As. Name the file Model_final.psd, and click Save. Click OK if you see the Photoshop Format Options dialog box.
2 Click the Levels button in the Adjustments panel.
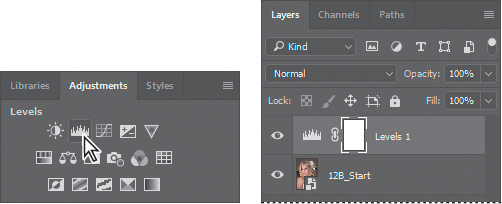
Photoshop adds a Levels adjustment layer to the Layers panel. The Levels controls and a histogram appear in the Properties panel. The histogram displays the range of dark and light values in the image. The left (black) triangle represents the shadows; the right (white) triangle represents the highlights; and the middle (gray) triangle represents the midtones, or gamma. Unless you’re aiming for a special effect, the ideal histogram has its black point at the beginning of the data and its white point at the end of the data, and the middle portion has fairly uniform peaks and valleys, representing adequate pixel data in the midtones.
3 Click the Calculate A More Accurate Histogram button (![]() ) on the left side of the histogram. Photoshop replaces the histogram.
) on the left side of the histogram. Photoshop replaces the histogram.
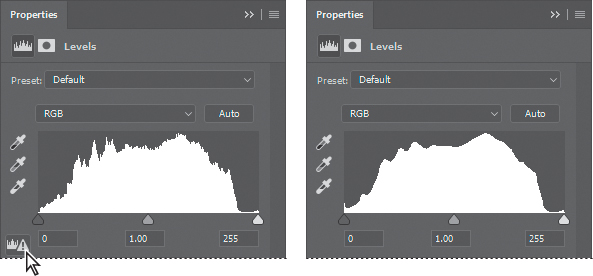
There is a small bump on the far right side of the histogram, representing the current white point, but the bulk of the data ends further to the left. You want to set the white point closer to where most of the data ends.
Pro photo workflow


Graham uses Adobe Photoshop Lightroom® to organize thousands of images.
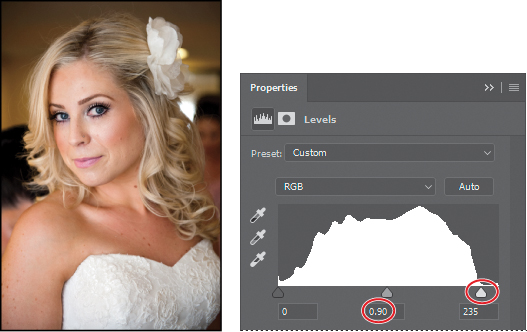
4 Drag the right (white) triangle toward the left to the point where the histogram indicates the lightest colors begin.
As you drag, the third Input Levels value (beneath the histogram graph) changes, and so does the image itself.
5 Pull the middle (gray) triangle a little bit to the right to slightly darken the midtones. We moved it to a value of .90.
![]() Tip:
Tip:
As you drag the white Input Levels triangle to the left, watch carefully to make sure highlight detail is not lost. If you’re wondering which highlights on the image are being clipped by the white triangle, hold down the Alt/Option key as you drag it. This tip also works with the black Input Levels triangle.
Editing the saturation in Camera Raw
The Levels adjustments helped significantly, but our bride looks a little sunburned. You’ll adjust the saturation in Camera Raw to even out her skin tone.
![]() Tip:
Tip:
Here you’re opening Camera Raw in Photoshop, while earlier you opened Camera Raw in Bridge. It’s even possible to have Camera Raw open in both Photoshop and Bridge at the same time, working on different raw images in each.
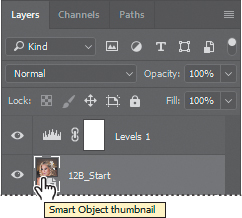
1 Double-click the 12B_Start layer thumbnail to open the Smart Object in Camera Raw.
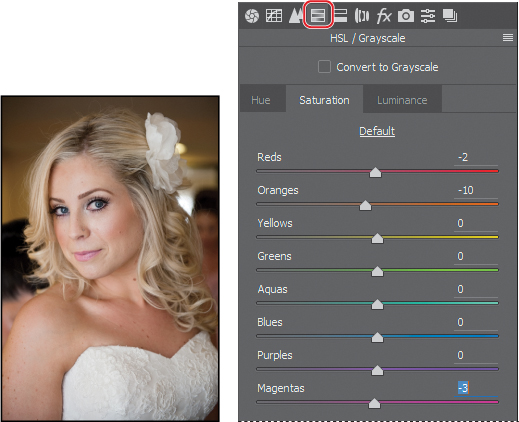
2 Click the HSL/Grayscale button (![]() ) to display that panel.
) to display that panel.
3 Click the Saturation tab.
4 Move the following sliders to reduce the amount of red in the skin:
• Reduce Reds to −2.
• Reduce Oranges to −10.
• Reduce Magentas to −3.
5 Click OK to return to Photoshop.
Using the healing brush tools to remove blemishes
Now you’re ready to give the model’s face some focused attention. You’ll use the Healing Brush and Spot Healing Brush tools to heal blemishes, smooth the skin, remove red veins from the eyes, and even hide the nose jewelry.
1 In the Layers panel, select the 12B_Start layer. Then, choose Duplicate Layer from the Layers panel menu.
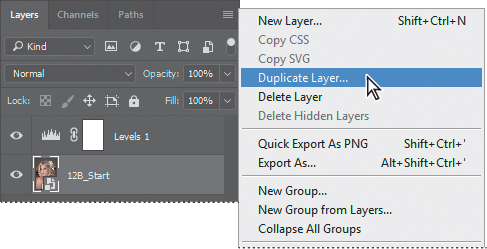
2 Name the new layer Corrections, and click OK.
Working on a duplicate layer preserves the original pixels so you can make changes later. You can’t make changes using the healing brush tools on a Smart Object, so first you’ll rasterize the layer.
3 Choose Layer > Smart Objects > Rasterize.
4 Zoom in on the model’s face so that you can see it clearly.
5 Select the Spot Healing Brush tool (![]() ).
).
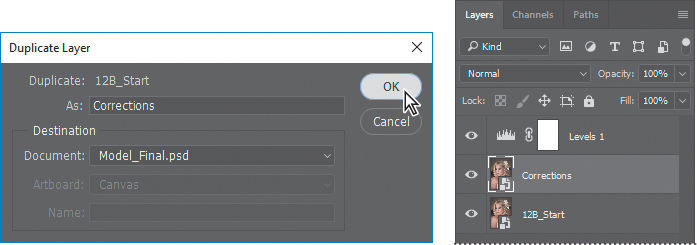
6 In the options bar, select the following settings:
• Brush size: 35 px
• Mode: Normal
• Type: Content-Aware
7 With the Spot Healing Brush tool, brush out the nose jewelry. A single click may be enough.
Because you’ve selected Content-Aware in the options bar, the Spot Healing Brush tool replaces the nose stud with skin that is similar to that around it.
8 Paint over fine lines around the eyes and mouth. You can also brush away freckles and moles on her face, neck, arms, and chest. Experiment with simply clicking, using very short strokes, and creating longer brush strokes. You can also experiment with different settings. For example, to soften the lines around the mouth, we selected Proximity Match in the options bar and the Lighten blending mode. Remove obtrusive or distracting lines and blemishes, but leave enough that the face retains its character.
The Healing Brush tool may be a better option for larger blemishes. With the Healing Brush tool, you have more control over the pixels Photoshop samples.
9 Select the Healing Brush tool (![]() ), hidden under the Spot Healing Brush tool (
), hidden under the Spot Healing Brush tool (![]() ). Select a brush with a size of 45 pixels and a hardness of 100%.
). Select a brush with a size of 45 pixels and a hardness of 100%.
10 Alt-click (Windows) or Option-click (Mac) an area on her cheek to create the sampling source.
11 Brush over the large mole on her cheek to replace it with the color you sampled. You’ll smooth out the texture later.

12 Use the Healing Brush tool to heal any larger blemishes that remain.
13 Choose File > Save to save your work so far.
Enhancing an image using the Dodge and Sponge tools
You’ll use the Sponge and Dodge tools to brighten the eyes and lips.
1 Select the Sponge tool (![]() ), hidden under the Dodge tool (
), hidden under the Dodge tool (![]() ). In the options bar, make sure Vibrance is selected, and then select the following settings:
). In the options bar, make sure Vibrance is selected, and then select the following settings:
• Brush size: 35 px
• Brush hardness: 0%
• Mode: Saturate
• Flow: 50%
2 Drag the Sponge tool over the irises in the eyes to increase their saturation.

3 Change the brush size to 70 px and the flow to 10%. Then brush the Sponge tool over the lips to saturate them.
You can use the Sponge tool to desaturate color, too. You’ll reduce the red in the corner of the eye.
4 Change the brush size to 45 px, and the flow to 50%. Then choose Desaturate from the Mode menu in the options bar.
5 Brush over the corner of the eye to reduce the red.
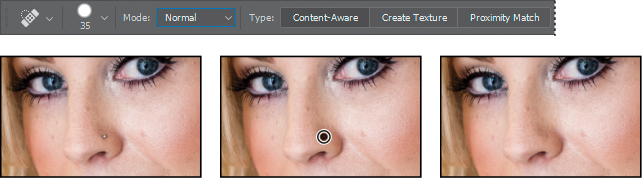
6 Select the Dodge tool (![]() ), hidden beneath the Sponge tool.
), hidden beneath the Sponge tool.
7 In the options bar, change the brush size to 60 px and the Exposure to 10%. Choose Highlights from the Range menu.
8 Brush the Dodge tool over the eyes—the whites and the irises—to brighten them.

9 With the Dodge tool still selected, select Shadows from the Range menu in the options bar.
10 Use the Dodge tool to lighten the shadow area above the eyes and the areas around the irises to bring out the color.
Adjusting skin tones
In Photoshop, you can select a color range that targets skin tones so that it’s easier to adjust the levels and color tone of skin without affecting the entire image. The skin tone color range selects other areas of the image with a similar color, but if you’re making slight adjustments, this is usually acceptable.
1 Choose Select > Color Range.
2 In the Color Range dialog box, choose Skin Tones from the Select menu.
The preview shows that much of the image has been selected.
3 Select Detect Faces.
The preview in the selection changes. Now the face, hair highlights, and lighter areas of the dress are selected.
4 Decrease the Fuzziness slider to 10 to refine the selection. Then click OK.
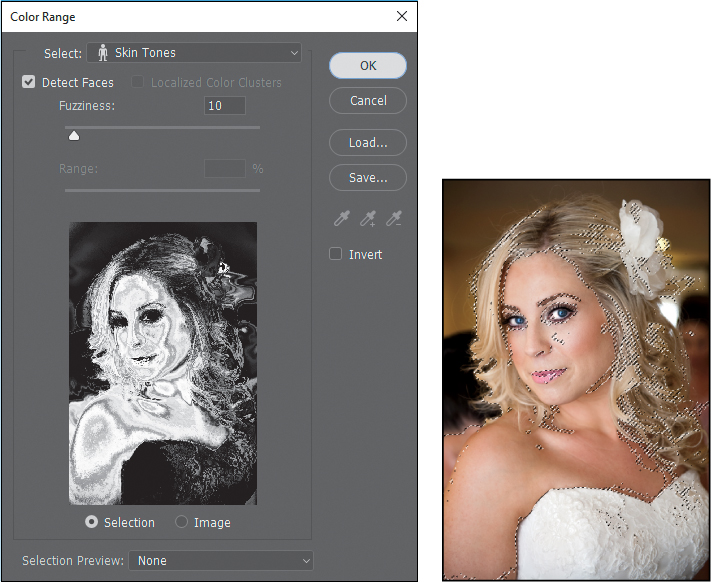
The selection appears on the image itself as animated dotted lines (sometimes called marching ants). You’ll apply a Curves adjustment layer to the selection to reduce the overall red in the skin tone of the image.
5 Click the Curves icon in the Adjustments panel.
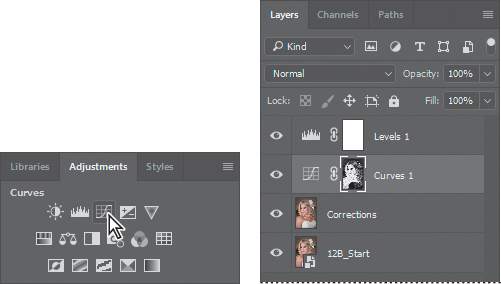
Photoshop adds a Curves adjustment layer above the Corrections layer.
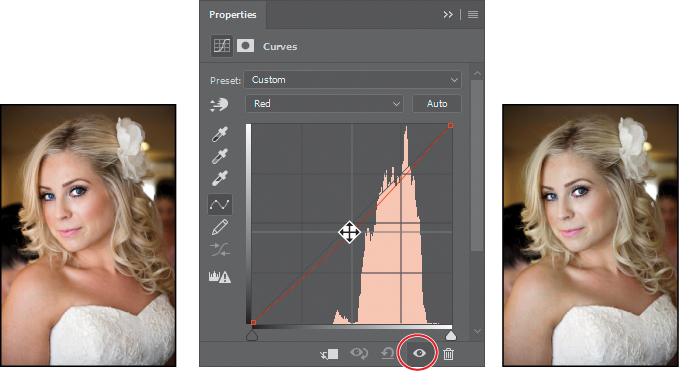
6 Choose Red from the color channel menu in the Properties panel. Then click in the middle of the graph, and pull the curve down very slightly. The selected areas become less red. Be careful not to pull the curve down too far, or a green cast will appear. You can see the difference you’ve made by clicking the Toggle Layer Visibility button.
Because you selected the skin tones before applying the Curves adjustment layer, the skin color shifts but the background is unchanged. The adjustment affects slightly more of the image than the skin itself, but the effect blends well and is subtle.
Applying surface blur
You’re almost done with the model. As a finishing touch, you’ll apply the Surface Blur filter to give her a smooth appearance.
1 Select the Corrections layer, and choose Layer > Duplicate Layer. Name the layer Surface Blur, and click OK in the Duplicate Layer dialog box.
2 With the Surface Blur layer selected, choose Filter > Blur > Surface Blur.
3 In the Surface Blur dialog box, leave the Radius at 5 pixels, and move the Threshold to 10 levels. Then click OK.
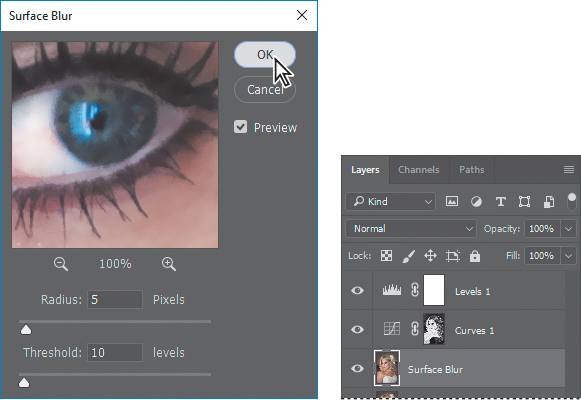
The Surface Blur filter has left the model looking a little glassy. You’ll reduce its effect by reducing the opacity of the blur.
4 With the Surface Blur layer selected, change the Opacity to 40% in the Layers panel.

She looks more realistic now, but you can target the surface blur more precisely using the Eraser tool.
5 Select the Eraser tool (![]() ). In the options bar, select a brush between 10 and 50 pixels, with 10% hardness. Set the opacity to 90%.
). In the options bar, select a brush between 10 and 50 pixels, with 10% hardness. Set the opacity to 90%.
6 Brush over the eyes, eyebrows, the defining lines of the nose, and the detail in the dress. You’re erasing part of the blurred layer to let the sharper layer below show through in these areas.

7 Zoom out so you can see the entire image.
8 Save your work.
9 Choose Layer > Flatten Image to flatten the layers and reduce the image size.
10 Save the image again, and then close it.
You’ve taken advantage of features in both Camera Raw and Photoshop to help this bride look her best. As you’ve seen, you can move between Photoshop and Camera Raw to perform different tasks as you enhance and improve an image.
About HDR and panoramas in Camera Raw
Extra credit
1 In Photoshop, choose File > Open. Navigate to the Lessons/Lesson12 folder, and double-click the Fruit.jpg file to open it.
2 Choose Filter > Convert for Smart Filters. Click OK in the informational dialog box.
3 Choose Filter > Camera Raw Filter. The image opens in Camera Raw.
4 Select the Adjustment Brush in the toolbar.
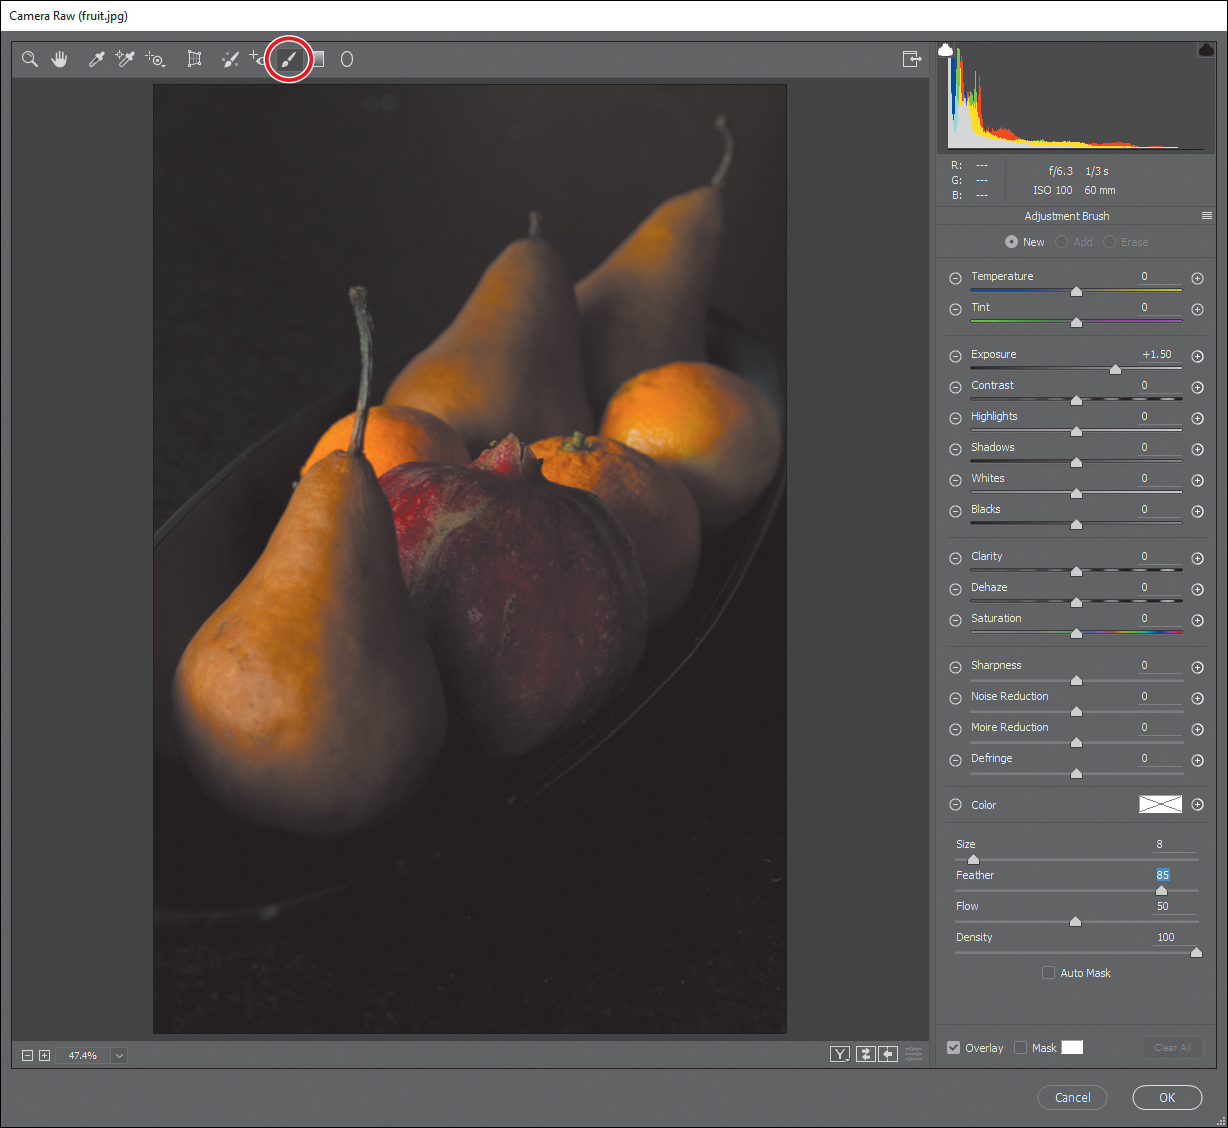
With the Adjustment Brush tool in Camera Raw, you can apply Exposure, Brightness, Clarity, and other adjustments to specific areas of a photo by painting them directly onto those areas. The Graduated Filter tool is similar, but it applies the same types of adjustments gradually across a region of the photo that you define.
5 In the Adjustment Brush panel, change Exposure to +1.50. Then, at the bottom of the panel, change Size to 8 and Feather to 85.
6 Brush the fruit where you want to increase the exposure, which reveals more of the color. Continue brushing until the fruit is too bright.
7 Once you’ve brushed all the fruit, reduce the Exposure setting in the Adjustment Brush panel so the image looks more realistic.
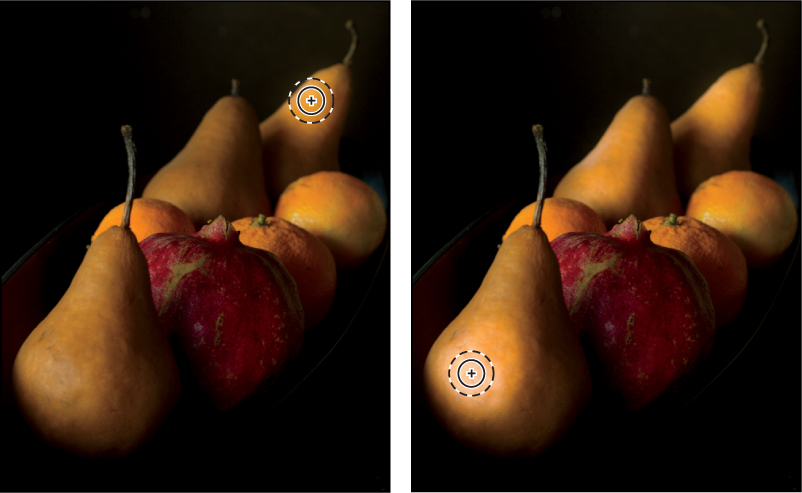
8 To see how your changes have affected the image in Camera Raw, click the Before/After Views button at the bottom of the image window, and choose Before/After Left/Right from the pop-up menu.
9 When you’re satisfied with the changes, click OK.
Review questions
1 What happens to camera raw images when you edit them in Camera Raw?
2 What is the advantage of the Adobe Digital Negative (DNG) file format?
3 How can you apply the same settings to multiple images in Camera Raw?
4 How can you apply Camera Raw as a filter?
Review answers
1 A camera raw file contains unprocessed picture data from a digital camera’s image sensor. Camera raw files give photographers control over interpreting the image data, rather than letting the camera make the adjustments and conversions. When you edit the image in Camera Raw, it preserves the original raw file data. This way, you can edit the image as you desire, export it, and keep the original intact for future use or other adjustments.
2 The Adobe Digital Negative (DNG) file format contains the raw image data from a digital camera as well as metadata that defines what the image data means. DNG is an industry-wide standard for camera raw image data that helps photographers manage proprietary camera raw file formats and provides a compatible archival format.
3 To apply the same settings to multiple images in Camera Raw, select the images in the filmstrip, click the Filmstrip menu button, and choose Sync Settings. Then select the settings you want to apply, and click OK.
4 To apply Camera Raw as a filter, choose Filter > Camera Raw Filter in Photoshop. Make the changes you want to make in Camera Raw, and then click OK. If you want to be able to edit the changes later, apply Camera Raw as a Smart Filter.