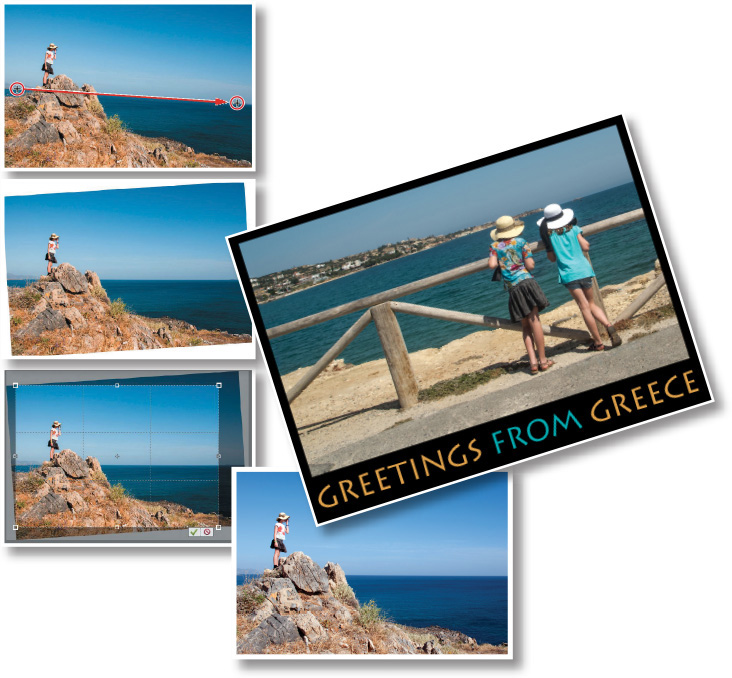
7. Reframing, Retouching, and Recomposing Images
Lesson overview
For some photos, you’ll need to deal with image flaws other than color or lighting problems.
A picture that was taken hurriedly might be spoiled by being tilted or poorly composed; even a technically perfect exposure can be stymied by an extraneous object that clutters an otherwise striking composition, by dust or water spots on the lens, or by blemishes on a portrait subject’s skin.
In this lesson, you’ll learn a range of techniques for cropping, retouching, and rearranging the composition of such flawed images:
• Using the Straighten tool
• Using the Crop tool to re-frame an image
• Creating a photo border
• Improving the impact of an image with the Recompose tool
• Enhancing composition by repositioning objects in the frame
• Retouching skin with the Healing Brush tool
• Removing unwanted objects with content-aware healing
• Reinventing an image with creative effects
You’ll probably need between one and two hours to complete this lesson. If you haven’t already done so, download the Lesson 7 work files from the Lesson & Update Files tab of your Account page at www.peachpit.com.
Photoshop Elements delivers a range of tools to help you bring out the potential in a photo, despite its flaws. The same tricks and techniques that enable you to remove or reposition an inconveniently placed object, retouch spots and blemishes in a portrait, or restore a treasured keepsake by repairing creases and tears can also be used creatively to manipulate reality in order to produce exactly the image you want.
1. Start Photoshop Elements and click Organizer in the Welcome Screen.
2. In the Organizer, check the lower right corner of the workspace to make sure that your CIB Catalog is loaded—if not, choose File > Manage Catalogs and select it from the list.
3. Click the Import button at the upper left of the Organizer workspace and choose From Files And Folders from the drop-down menu. In the Get Photos And Videos From Files And Folders dialog box, locate and select your Lesson 7 folder. Disable the automatic processing options; then, click Get Media.
4. In the Import Attached Keyword Tags dialog box, click Select All; then, click OK.
![]() Note
Note
Before you start this lesson, make sure that you’ve set up a folder for your lesson files and downloaded the Lesson 7 folder from your Account page at www.peachpit.com, as detailed in “Accessing the Classroom in a Book files” in the chapter “Getting Started” at the beginning of this book. You should also have created a new work catalog (see “Creating a catalog for working with this book” in Lesson 1).
Improving the composition of a photo
When you’re hurried, distracted by movement, or shooting in awkward conditions, the result is often a photo that could have been great—if only it had been framed better. The Crop tool and the Straighten tool in the Full Edit mode toolbar will help you turn the shot you got into the photo you should have captured.
Sometimes you’re just too busy fitting everything you want into frame to notice a crooked horizon. The Straighten tool makes it easy to quickly correct a tilted image. The Crop tool can be customized, by choosing from a range of preset aspect ratios and cropping overlays to help you bring out the visual potential of your image.
Using the Straighten tool
You can use the Straighten tool to designate a feature in your crooked photo that should be either horizontal or vertical; then, Photoshop Elements will rotate the image to straighten it in relation to your reference line.
1. Select the image 07_01.jpg in the Media Browser, and then click the Editor button (![]() )—not the arrow beside it—in the Taskbar. Alternately, you could select the file and choose Edit > Edit With Photoshop Elements Editor. If the Editor doesn’t open to Expert mode, click Expert in the mode picker.
)—not the arrow beside it—in the Taskbar. Alternately, you could select the file and choose Edit > Edit With Photoshop Elements Editor. If the Editor doesn’t open to Expert mode, click Expert in the mode picker.
2. Choose Window > Reset Panels; then use the Window menu again to hide the Panel Bin. If either the Photo Bin or the tool options pane is currently open, click the corresponding button at the left of the Taskbar to hide it; then, choose View > Fit On Screen, or double-click the Hand tool to see the entire image at the highest magnification possible. Hold down the Ctrl / Command key and press the minus sign (−) key once to zoom out just enough to see a little of the blank artboard (colored gray by default) surrounding the photo in the Edit pane.
3. Select the Straighten tool (![]() ) in the toolbar; then, click the Tool Options button (
) in the toolbar; then, click the Tool Options button (![]() ) in the Taskbar, if necessary, to open the tool options pane. Make sure that the Straighten tool is set to Grow Or Shrink Canvas To Fit mode and the Autofill Edges option is disabled; then, hide the tool options pane.
) in the Taskbar, if necessary, to open the tool options pane. Make sure that the Straighten tool is set to Grow Or Shrink Canvas To Fit mode and the Autofill Edges option is disabled; then, hide the tool options pane.

![]() Tip
Tip
Choose Grow Or Shrink Canvas To Fit when you wish to crop the rotated image manually; the other options will trim it automatically.
This photo features a sea horizon—the most reliable of reference levels. In the absence of a natural horizon, you can often use a horizontal architectural feature.
4. Drag a long line along the horizon in the right half of the photo (at the left the horizon is hidden by the land in the middle distance). When you release the mouse button, Photoshop Elements straightens the image relative to the line you drew. Note the newly enlarged canvas surrounding the rotated image.

You could crop the straightened image manually to trim away the angled edges, but for the purposes of this exercise, you’ll look at a couple of alternative options.
5. Press Ctrl+Z / Command+Z to undo the Straighten tool. Show the tool options pane and click the second of the three icons at the left to activate the Remove Background mode; then, use the Straighten tool to trace the horizon again. Photoshop Elements crops the largest area possible within the angled edges. Hide the tool options pane to examine the results.
6. Undo the operation; then, reset the Straighten tool to the Grow Or Shrink mode and activate the Autofill Edges option. Trace the horizon, and then inspect the results; rather than trimming the angled edges, Photoshop Elements has used content-aware image analysis to fill the white extended canvas that you saw in step 4 with detail that matches the image.

As you can see in the illustration at the right, this method has preserved all the detail of the original photo—especially important along the bottom, where cropping would affect the composition.
7. Choose Layer > Flatten Image; then, choose File > Save As. Name the new file 07_01_Straight, to be saved to your My CIB Work folder in JPEG format and included in the Organizer, but not in a Version Set. Click Save; then, click OK to accept the settings in the JPEG Options dialog box. Keep the file open.
8. Staying in the Editor, choose File > Open; then, navigate to and open your Lesson 7 folder, select the file 07_02.jpg, and click Open.
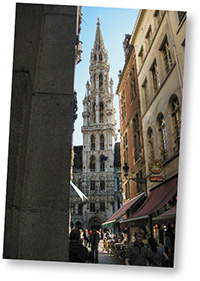
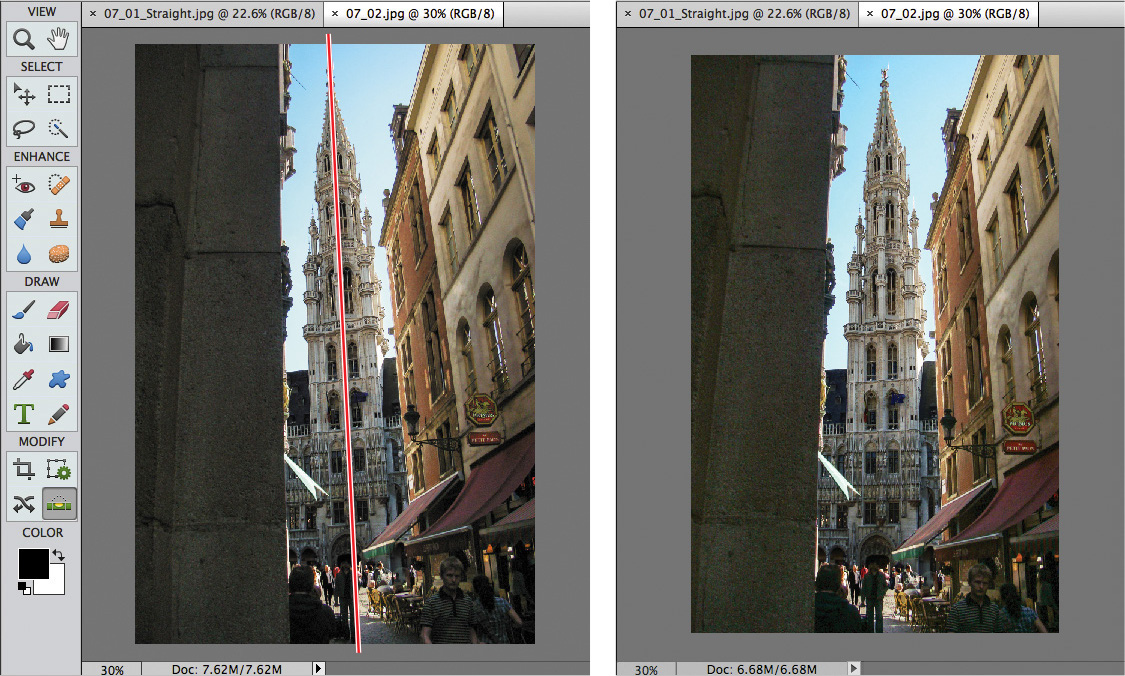
In many photos it’s difficult to identify a reliable horizontal reference; in these cases, you can look for a vertical feature such as a signpost or any structural element that isn’t too obviously affected by perspective or lens distortion. For this image, where the horizon is not visible and almost every man-made horizontal is pictured in perspective, the tower provides the strongest reference.
9. With the Straighten tool (![]() ) selected, open the tool options pane. Click the second of the three icons at the left to activate the Remove Background mode.
) selected, open the tool options pane. Click the second of the three icons at the left to activate the Remove Background mode.
In Remove Background mode, the Autofill Edges option is disabled; for our lesson photo, Autofill Edges is likely to produce unwanted artifacts, especially in the cluttered detail of the lower right corner. The composition is unlikely to be diminished by trimming away the tilted edges after rotation, as the tower is the primary focus.
![]() Tip
Tip
In Photoshop Elements 14, the Straighten tool is also available in Quick edit mode, with simplified controls in the tool options pane. When you’ve completed this exercise, try straightening the same images in Quick edit mode to see which you prefer.
10. Starting at the tip of the tower, drag a line down through the center of the structure. As the tower is stepped in towards the top and pictured in slight perspective, the bottom of your reference line should pass through the entrance arch a little to the right of center. When you’re done, release the mouse button.
![]() Note
Note
For some tilted images, you can achieve good results by choosing either Straighten Image, or Straighten And Crop Image from the Image > Rotate menu. Both of these commands perform straightening functions automatically.
11. Choose File > Save As. Name the file 07_02_Straight.jpg, to be saved to your My CIB Work folder in JPEG format and included in the Organizer, but not in a Version Set. Click Save; then, click OK to accept the settings in the JPEG Options dialog box. Choose File > Close.
Re-framing a photo with the Crop tool
Composing your photo well can make the difference between an ordinary snapshot and a striking, memorable image; framing too much irrelevant detail can detract from your intended focus, and an awkward arrangement of forms within the frame can make your picture appear unbalanced.
In practice, there’s often just not enough time while you’re shooting to frame a photo carefully; fortunately, you can use the Crop tool to improve the composition once you get home.
1. With the image 07_01_Straight.jpg open in the Editor, select the Crop tool (![]() ).
).
2. Inspect the settings in the tool options pane.

![]() Tip
Tip
Remember that you can use cropping not only to trim an image or change its aspect ratio, but also as a way to draw attention to your subject or improve the balance of your composition.
By default, the aspect ratio is set to No Restriction, which means that you’re free to change the proportions of the crop, and the Grid Overlay is set to Rule Of Thirds, a layout guide based on the principle that a composition looks balanced when its elements are aligned with the lines and intersections of a grid that divides the image into three equal parts on both axes.
Photoshop Elements has analyzed the content of the photo and offers cropping suggestions accordingly, to help you make a start.
3. Hover the pointer over each crop suggestion in turn to see the effect.
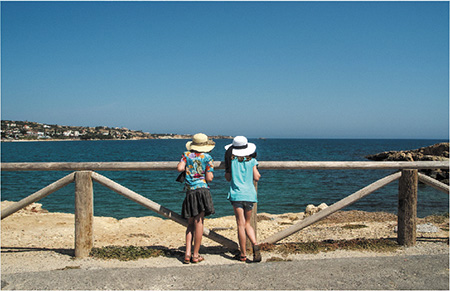
4. Change the crop aspect ratio from No Restriction to Use Photo Ratio. Drag the corner handles of the cropping rectangle to set up a crop with the upper horizontal guide aligned with the horizon, the lower guide aligned with the top of the sea wall, and the vertical guide at the right passing between the girls. Click the Commit button (![]() ) to execute the crop.
) to execute the crop.

5. Choose File > Save As. Make sure that the new file will be included in the Organizer, but not in a Version Set. Name the file 07_01_Cropped.jpg, to be saved to your My CIB Work folder in JPEG format. Click Save; then, set the highest quality in the JPEG Options dialog box and click OK. Keep the saved file open for the next exercise.
Working with the image canvas
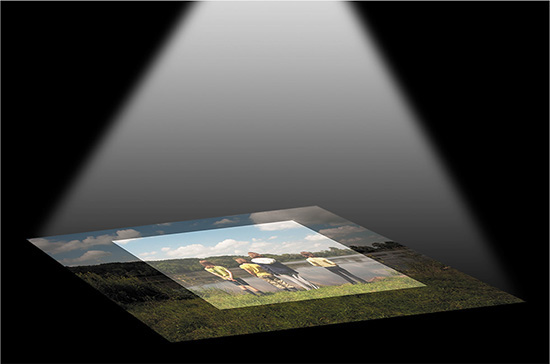
You can think of the image canvas as the equivalent of the paper on which a photo is printed. While you’re working with a digital photo, image data may temporarily lie outside the canvas space, but it will be clipped to the canvas boundary as soon as the image is flattened. To extend our limited analogy just a little further, think of the layer data as the image projected by a photographic enlarger in the darkroom. Although the projected image may be offset or enlarged so that it falls outside the borders of the paper, the data still exists; you can continue to work with it right up until the moment that the photographic paper is exposed.
Adding a border to a photo
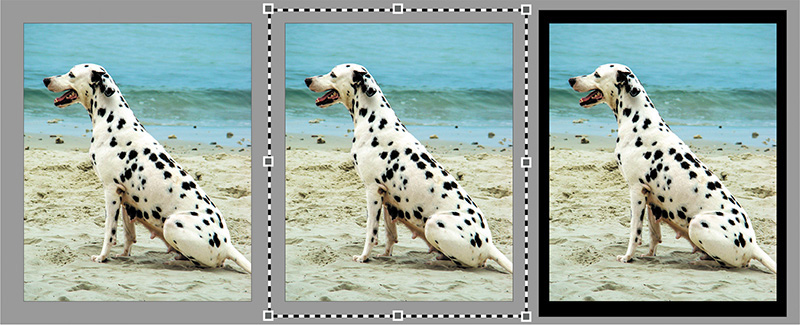
By default, the canvas is the same size as the image and is therefore not visible. If you increase the size of the image file, the canvas is enlarged automatically; however, you can also choose to enlarge the canvas independently of the image size, effectively adding a border around your photo—just as if you printed a photo on a sheet of paper larger than the image.
By default, the extended canvas, and therefore the border, takes on the Background color as set in the color swatches at the bottom of the toolbar.
1. With the image 07_01_Cropped.jpg still open and the Editor in Expert mode, double-click the Hand tool (![]() ) or choose View > Fit On Screen. Use the Window menu to hide the Panel Bin, if necessary; then, hide the tool options pane by clicking the Tool Options button (
) or choose View > Fit On Screen. Use the Window menu to hide the Panel Bin, if necessary; then, hide the tool options pane by clicking the Tool Options button (![]() ) at the left of the Taskbar.
) at the left of the Taskbar.
2. If you don’t see a reasonable amount of the blank gray background surrounding the image, hold down the Ctrl / Command key and press the Minus key (-) on your keyboard or choose View > Zoom Out.
3. Choose Image > Resize > Canvas Size. If necessary, move the Canvas Size dialog box aside so that you can see at least the left half of the image.
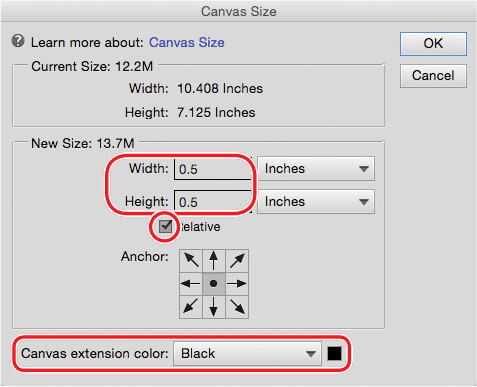
4. Set the Canvas Size dialog box as shown in the illustration at the right. Activate the Relative option; then, set the units menus to Inches, if necessary, and type a new value of 0.5 for both Width and Height. Leave the Anchor control at the default centered setting. Choose Black from the Canvas Extension Color menu, and then click OK.
The new black border appears around the photo in the image window. For the purposes of this exercise, we’ll take it one step further, and extend the canvas again to turn the border into an asymmetrical frame.
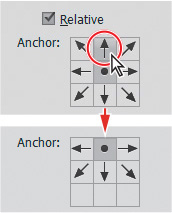
5. Choose Image > Resize > Canvas Size. In the Canvas Size dialog box, confirm that the Relative check box is still activated. Leave the Width value at 0 and set the Height value to 1 inch. In the Anchor control grid diagram, click the central arrow in the top row. With this Anchor setting, the one-inch increase to the height of the canvas will be applied at the bottom edge of the image only. Leave the Canvas Extension Color setting unchanged and click OK.
6. If you can’t see the entire border framing the image, double-click the Hand tool or choose View > Fit On Screen.
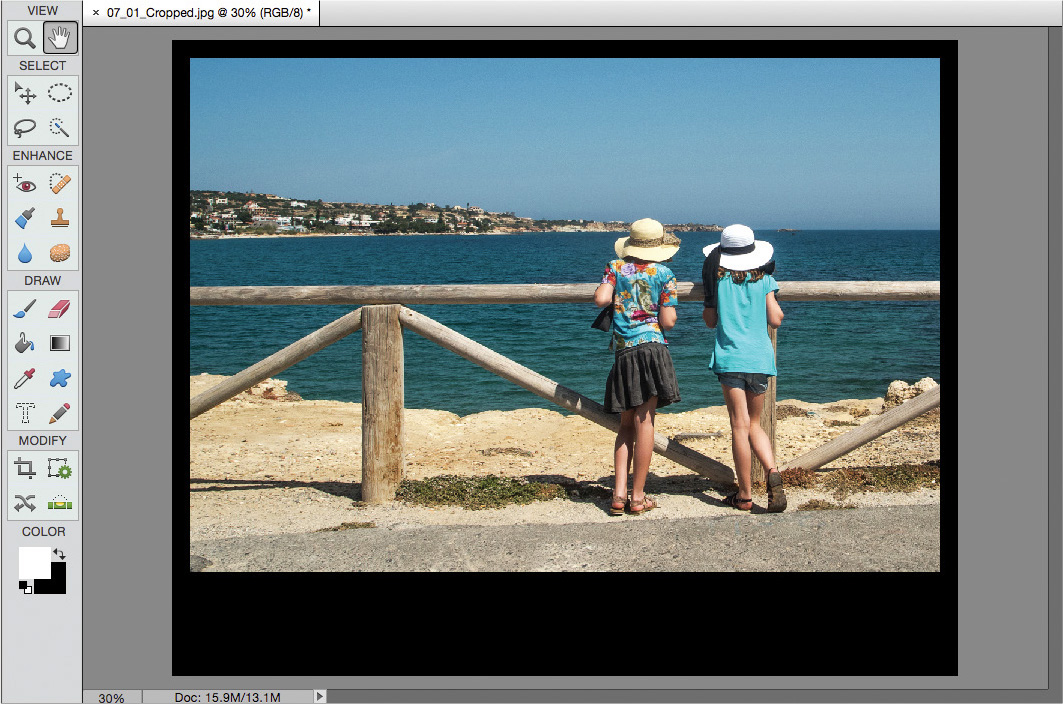
The extended border gives you space to add text to the image, making it an easy and effective way to create a postcard, a stylish cover page for a printed document, or a title screen for a slideshow presentation.
Working with text
Whether you wish to fit an image to a specific purpose, or simply add a message, the Photoshop Elements type tools make it easy to create good-looking text.
1. In the toolbar, click to select the Horizontal Type tool (![]() ). In the tool options pane, choose Lithos Pro Regular from the Font menu. Type 57 pt in the Font Size box; then, press Enter / Return. Choose Center Text (
). In the tool options pane, choose Lithos Pro Regular from the Font menu. Type 57 pt in the Font Size box; then, press Enter / Return. Choose Center Text (![]() ) from the text alignment options.
) from the text alignment options.

![]() Tip
Tip
You can open the tool options pane by clicking the Tool Options button (![]() ) in the Taskbar, or by double-clicking a tool in the toolbar.
) in the Taskbar, or by double-clicking a tool in the toolbar.
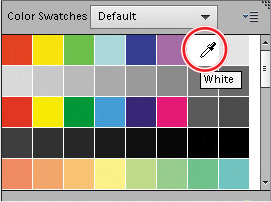
2. In the Tool Options bar, click the text color swatch below the font menus. As you move the pointer over the Color Swatches picker, it becomes an eye-dropper cursor. Use the eyedropper cursor to select the white swatch in the top row; then, press the Esc key to close the Color Swatches picker.
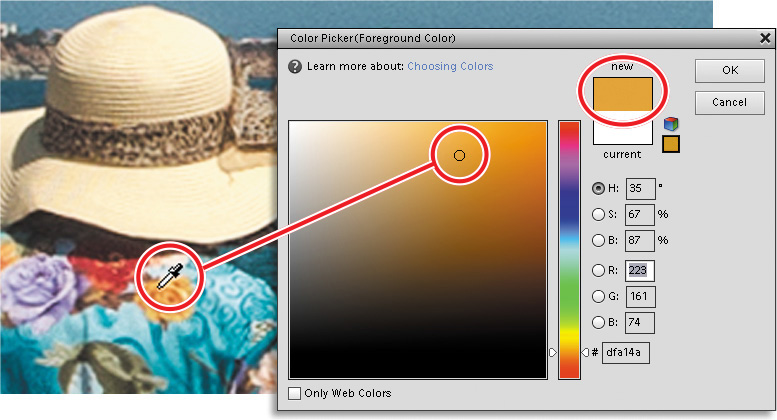
3. With the Type tool, click below the center of the black space beneath the photo and type GREETINGS FROM GREECE. Swipe over the text to select it. Click the foreground color swatch (now white) below the tools in the toolbar to open the Color Picker. Move the pointer over the image window; the cursor becomes an eyedropper.
4. Move the eyedropper over the orange flower near the girl at the left’s shoulder. Refer to the illustration at the right; then, sample an ochre-gold and click OK in the Color Picker to close it.
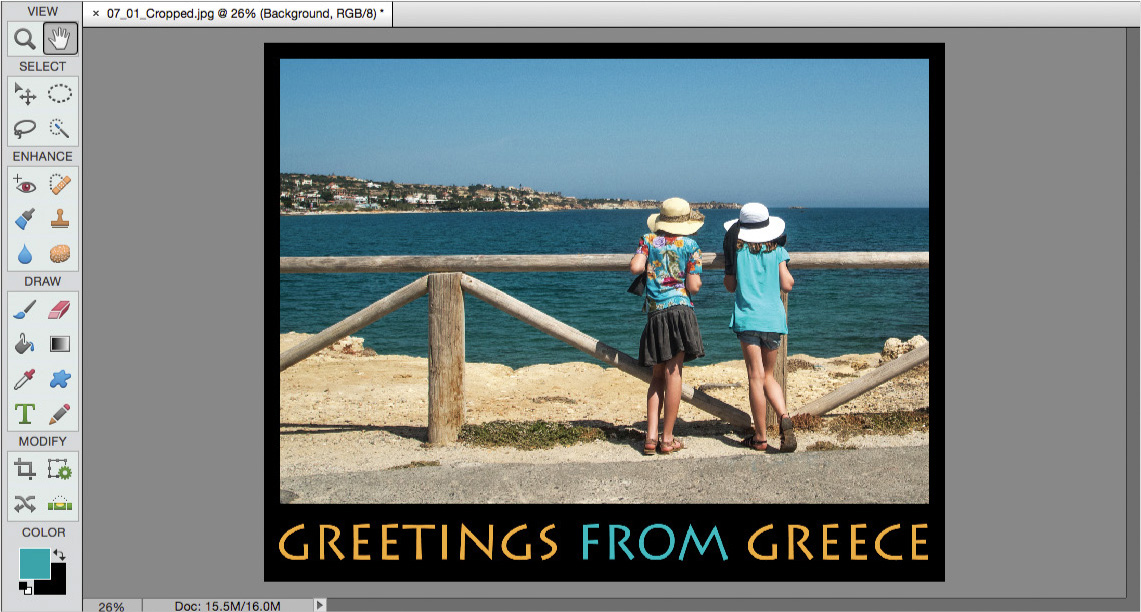
5. Swipe over the word FROM to select it; then, click the foreground color swatch and use the eyedropper to sample a bright turquoise from the other girl’s shirt. Click OK in the Color Picker to close it.

6. Click the green Commit button (![]() ) at the lower right corner of the new text. Drag the text with the Move tool to center it. Use the handles on the text bounding box to resize it slightly if necessary; then commit the changes.
) at the lower right corner of the new text. Drag the text with the Move tool to center it. Use the handles on the text bounding box to resize it slightly if necessary; then commit the changes.
7. Choose File > Save As. Name the file 07_01_Greece and save it to your My CIB Work folder in Photoshop format with Layers activated, to be included in the Organizer, but not in a Version Set. Choose File > Close.
Recomposing an image within its frame
Do you have a group shot where you wish the group had stood closer together? Or a photo where a walk-on extra draws attention away from the stars? With the Recompose tool you can fix these image composition problems in a few easy steps.
Essentially, the Recompose tool enables you to crop your photo from the inside, rather than at the edges. Whether you want to bring people closer together, fit a horizontal image to a vertical space, or remove extraneous elements that spoil the composition, the Recompose tool puts image editing magic at your fingertips. In this exercise, you’ll use the Recompose tool to tighten the arrangement of a group photo and reframe the landscape format to create a square composition.
![]() Tip
Tip
As with the Healing brushes and the Clone Stamp tool that are covered later in this chapter, and the Photomerge tools that you’ll use in Lesson 8, the Recompose tool is also a lot of fun to use creatively, enabling you to manipulate reality in order to produce the image you want.
1. If you’re still in the Editor, click the Organizer button (![]() ) in the Taskbar. If necessary, click the check box beside the Lesson 07 tag in the Tags panel to isolate the images for this lesson. Right-click / Control-click the image 07_03.jpg and choose Edit With Photoshop Elements Editor.
) in the Taskbar. If necessary, click the check box beside the Lesson 07 tag in the Tags panel to isolate the images for this lesson. Right-click / Control-click the image 07_03.jpg and choose Edit With Photoshop Elements Editor.
2. Make sure the Editor is in Expert mode; then, choose Window > Reset Panels. Hide the Panel Bin and the tool options pane, if it’s visible. Double-click the Hand tool, or choose View > Fit On Screen; then, press Ctrl / Command together with the minus sign (–) key to zoom out just enough to see a little empty gray space around the photo in the Edit window.
![]() Tip
Tip
You can also open the tool options pane by double-clicking a tool in the toolbar.
3. Click the Recompose tool (![]() ) in the toolbar, and then click the Tool Options button (
) in the toolbar, and then click the Tool Options button (![]() ) in the Taskbar to open the tool options pane.
) in the Taskbar to open the tool options pane.
A live bounding box now surrounds the image, with control handles at the corners and at the mid-point of each side. For simple recomposing operations, all you need to do is drag the handles; the Recompose tool makes use of content-aware scaling technology that distinguishes people and other featured objects and attempts to prevent them from being distorted as the background is compressed around them. For this exercise, however, we’ll use the special Recompose brushes instead. For more complex images, this generally produces better results.
![]() Note
Note
The Threshold control lets you adjust the degree to which content-aware scaling is applied as the image is “squeezed.” At 100%, protected areas will be completely free of distortion when the photo is scaled. At a Threshold of 0%, the content-aware feature is turned off; scaling on one axis will “squash” pictured objects.
4. Select the Mark For Protection brush—the brush with a plus sign (+)—at the left of the tool options pane. Either type in the brush size text box or use the slider to increase the brush size to about 300 px. Make sure that the Threshold and aspect ratio are set to the default 100% and No Restriction, respectively.

As its name suggests, you can use the Mark For Protection brush to define those areas in the image that you want shielded from any scaling operation.
5. Click the Tool Options button (![]() ) in the Taskbar to hide the tool options pane.
) in the Taskbar to hide the tool options pane.
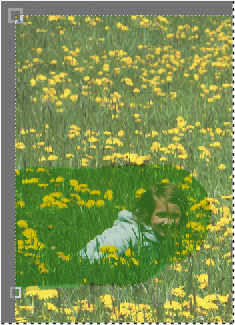
6. Paint over the girl at the left of the photo. Extend your strokes to the left edge of the image, as shown at the right: the girl is already very to the edge of the frame and unless this area is protected it will be compressed during the recompose operation. If you find you’ve over-painted, use the eraser with the plus sign, beside the protection brush in the tool options pane to modify your strokes. Use the left and right bracket keys ( [ , ] ) to reduce or increase the size of the eraser as you work.
![]() Note
Note
The green protection-brush over-lay is difficult to see against the grassy field in our lesson photo. For the sake of clarity, the surrounding image has been dimmed in these illustrations.
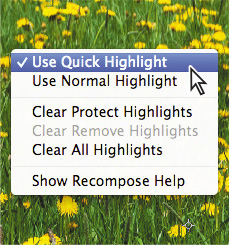
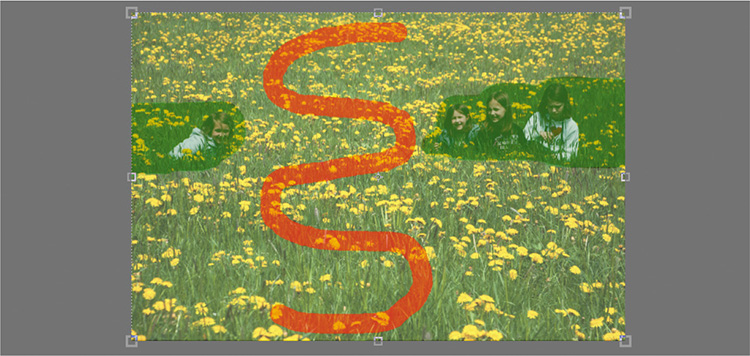
7. Right-click / Control-click the image and change the brush mode from the default Use Normal Highlight to Use Quick Highlight. In Quick Highlight mode you can mark an area for protection by simply drawing a line around it. Show the tool options pane for a moment to set the brush size to 50 px. Draw an outline to surround the three girls at the right, including the space between the group and the right edge of the photo. When you’re done, release the mouse button; Photoshop Elements fills the area inside the outline automatically.

8. Right-click / Control-click the image and reset the Recompose tool to the Use Normal Highlight mode. Show the tool options pane and select the Mark For Removal brush (the brush with a minus sign). Set the brush size to 100 px. Scribble through the space between the girl at the left and her sisters to mark the area for removal—rather than compression—during the scaling process.
![]() Tip
Tip
If necessary, you can modify your Mark For Removal brush strokes with the associated eraser. Use the left and right bracket keys ( [ , ] ) to reduce or increase the brush size as you work.
9. Now for the fun part! Move the pointer over the handle on the left side of the bounding box and, when the double-arrow cursor appears, drag the handle slowly in towards the center of the photo. Watch the photo as you drag; some areas of the image are removed while others are compressed and merged with their surroundings. As the proportions of the image become closer to a square, keep an eye on the width (W) and height (H) values in the tool options pane; stop dragging and release the mouse button when the two values are equal.

![]() Tip
Tip
As this was a rather extreme editing operation, you may find some image artifacts, especially near the seam between areas that were removed or protected. If these are noticeable enough to worry you, a few strokes with the Clone Stamp or the Healing Brush will fix the problem. You’ll learn more about those tools later in this lesson. Zoom in to inspect the seam. Try recomposing the image differently, marking a smaller area for removal, limiting your strokes to the patch separating the sisters, rather than the larger vertical strip.
10. Click the green Commit button at the lower right of the recomposed photo or press Enter / Return to accept and render the new composition.
11. Choose Image > Crop. A cropping box appears on the image; drag the handles to crop the file to the new square format, trimming away the transparent area. The edges of the cropping box snap to the edges of the image to make the operation very easy. Click the green Commit button or press Enter / Return.
12. Choose File > Save As. Name the image 07_03_Recomposed, to be saved to your My CIB Work folder and included in the Organizer, but not as part of a Version Set. Change the file format to JPEG. Click Save; then click OK to accept the JPEG quality settings. The recomposed image is saved as a copy. Choose Edit > Revert to restore the original photo, keeping it open for the next exercise.
The Recompose tool is as easy to use as it is powerful—with creative possibilities that are virtually limitless. Play with as many pictures as you can; you’ll learn how content-aware scaling works and what to expect from different types of images as you have fun finding creative new ways to make the most of your photos.
Moving objects to enhance a composition
From Photoshop Elements 12, the Content-Aware Move tool lets you reposition an object within the frame, and then uses content-aware photo magic to cover your tracks, blending the object with its new surroundings and patching the hole it left.
The Content-Aware Move tool is perfect for dealing with objects that are too close to the edge of a photo or separated from the main action, enabling you to improve an unbalanced composition and turn a bystander into a star. In the first part of this exercise, you’ll use the Content-Aware Move tool on the image from the previous project—this time, reuniting the sisters without altering the photo’s proportions.
1. With the image 07_03.jpg still open in Expert mode in the Editor, double-click the Hand tool, if needed, to see the whole photo as large as possible; then, select the Content-Aware Move tool (![]() ), beside the Straighten tool in the Toolbar.
), beside the Straighten tool in the Toolbar.
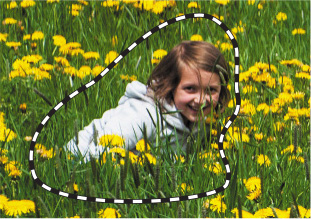
2. Open the tool options pane and make sure that the tool is set to Move mode, rather than Extend, and the Healing slider is set to the central stop. Draw loosely around the girl at the left. Include some of her surroundings in your selection, but draw the line closer at the right of the girl’s form.
3. Click and hold inside the selection; then, hold down the shift key as you drag the girl close to her sisters. The Shift key will constrain the movement horizontally, maintaining the girl’s distance from the viewpoint. Release the mouse button, and then release the Shift key; Photoshop Elements blends the girl into her new position and fills the hole she left with detail that matches the surroundings. Click outside the selected area to deselect it.
![]() Tip
Tip
If the area from which the girls were moved is filled without any flowers at all, undo and vary the shape and size of your selection.
4. Draw around the reunited group. Include a reasonable amount of the surrounding detail, except at the right where your line should follow the older girl’s form quite closely. Click and hold inside the selection; then, hold the Shift key as you drag the sisters to the left to center them horizontally in the frame. Release the mouse button before the Shift key; then deselect the repositioned group.
5. Choose File > Save As. Name the new image 07_03_Move-1, to be saved to your My CIB Work folder with all the usual settings. Activate the option Save > As A Copy; then, click Save. Click OK to accept the JPEG quality settings, and then choose Edit > Revert to restore the original photo, keeping it open for the next part of the exercise.
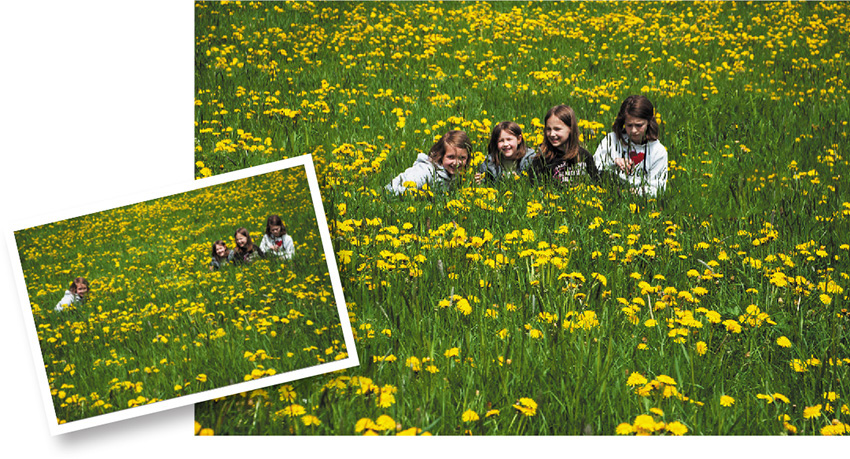
6. Draw around the girl at the left of the photo with the Content-Aware Move tool, just as you did in step 2, except that this time you can include the same amount of the surrounding area all of the way around her form.
7. Drag the selection on a downwards diagonal to the right. Position the girl about half as far from her sisters and the bottom edge of the photo as her original position.
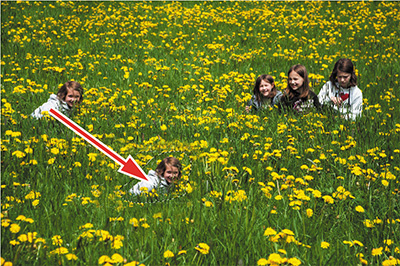
8. Choose Image > Resize > Scale. Hold down the Alt / Option key as you drag a corner handle to scale the selection up from its center. Watch the width and height values in the tool options pane and stop when they are close to 200%. Click the green check mark to commit the transformation. Click and hold inside the selection; then, hold the shift key as you drag to center the girl below her three sisters. Click outside the selected area to deselect it.
9. Choose Image > Crop. Starting outside the upper right corner of the photo, drag downwards and to the left to produce a balanced, portrait-format crop of the same height as the original image; then, commit the operation.
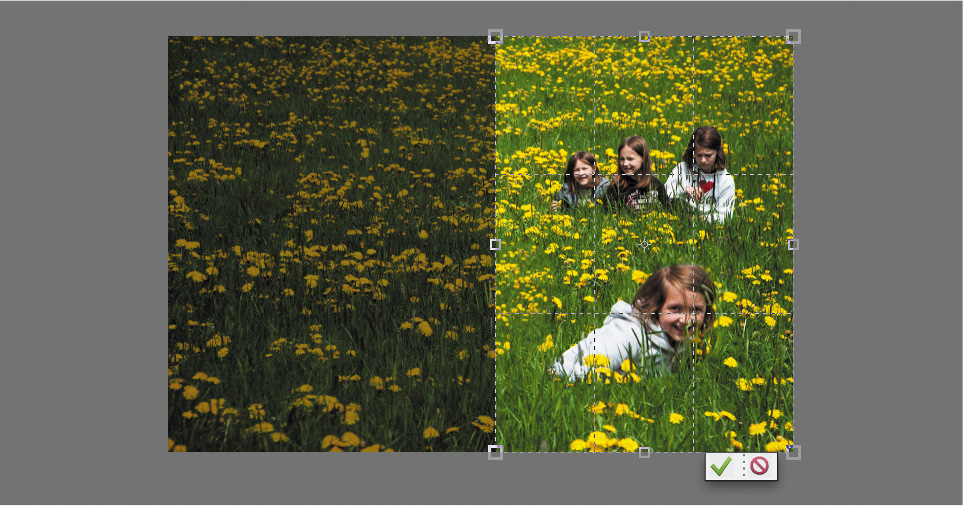
10. Choose File > Save As. Name the new image 07_03_Move-2, to be saved with all the usual settings. There is no need to save the image as a copy. Click Save; then, click OK to accept the JPEG settings and choose File > Close.
Experiment on your own photos with the Content-Aware Move tool to get a feel for its capabilities. Switch from Move to Extend mode to copy your selection, rather than merely move it. Tweak the Healing slider to improve a blend that is too obvious or produces artifacts; move the slider to the right to prioritize the selected content in the blend, or to the left to introduce more detail from the surroundings.
Removing wrinkles and spots
Retouching skin to improve a portrait photograph can be a real art, but fortunately Photoshop Elements provides several tools that make it easy to smooth out lines and wrinkles, remove blemishes, and blend skin tones—even for a novice.
1. If you’re still in the Editor, click the Organizer button (![]() ) in the Taskbar. If necessary, click the check box beside the Lesson 07 tag in the Tags panel to isolate the images for this lesson. Right-click / Control-click the image 07_04.jpg and choose Edit With Photoshop Elements Editor.
) in the Taskbar. If necessary, click the check box beside the Lesson 07 tag in the Tags panel to isolate the images for this lesson. Right-click / Control-click the image 07_04.jpg and choose Edit With Photoshop Elements Editor.
2. Make sure that the Editor is in Expert mode. Choose Window > Reset Panels. If you don’t see tabs for the Layers, Effects, Graphics and Favorites panels at the top of the Panel Bin, click the arrow beside the More button (![]() ) in the Taskbar and choose Custom Workspace. Drag the Layers panel out of the Panel Bin; then, hide the Panel Bin by un-checking its name in the Window menu. Hide the Photo Bin or tool options pane, and then choose View > Fit On Screen.
) in the Taskbar and choose Custom Workspace. Drag the Layers panel out of the Panel Bin; then, hide the Panel Bin by un-checking its name in the Window menu. Hide the Photo Bin or tool options pane, and then choose View > Fit On Screen.
3. Drag the Background layer to the New Layer button (![]() ) at the top of the Layers panel to create a duplicate layer. Repeat the process, dragging the new layer to create a third layer. Resize the Layers panel by dragging its lower edge so that you can see your three layers. Use the Zoom tool (
) at the top of the Layers panel to create a duplicate layer. Repeat the process, dragging the new layer to create a third layer. Resize the Layers panel by dragging its lower edge so that you can see your three layers. Use the Zoom tool (![]() ) to zoom in on the upper half of the photo, as you’ll be retouching the skin around the woman’s eyes first.
) to zoom in on the upper half of the photo, as you’ll be retouching the skin around the woman’s eyes first.
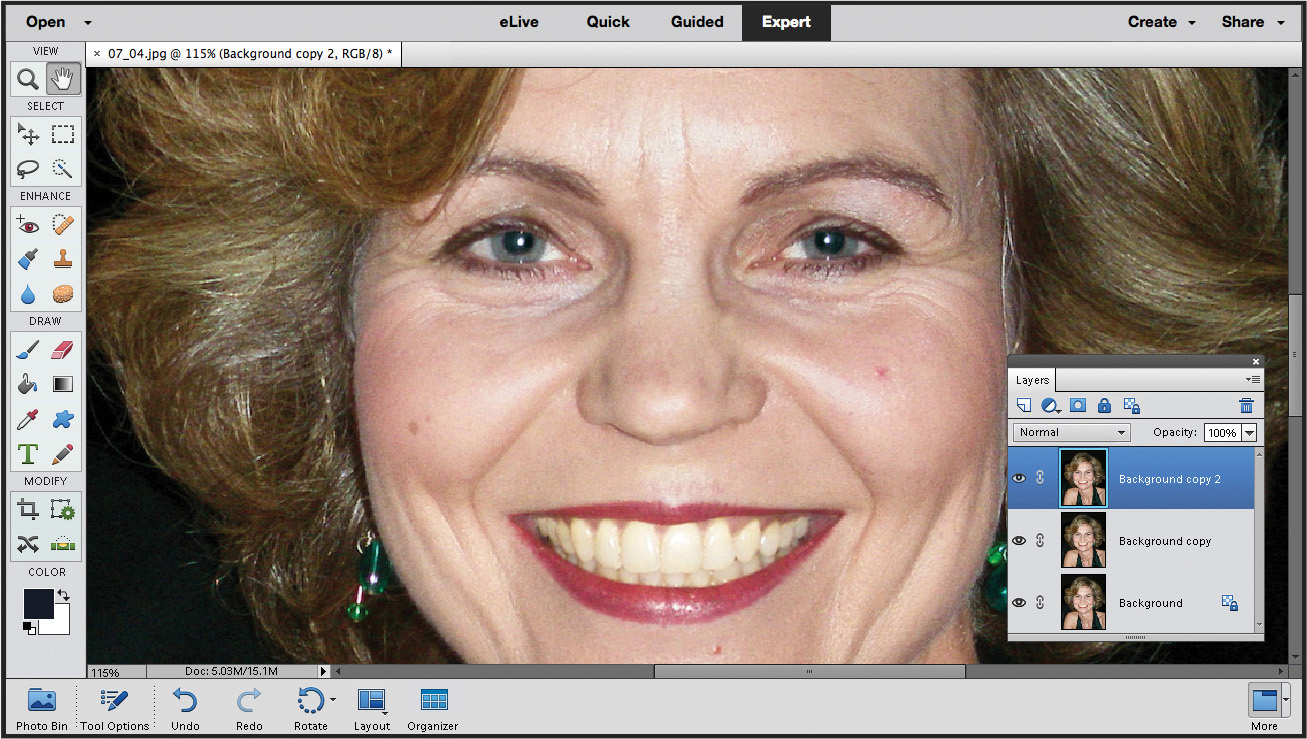
This photo is quite a challenging candidate for retouching; the harsh flash lighting has caused strong reflections on the skin that only serve to accentuate the wrinkles.
Using the Healing Brush tool
You’ll begin by using the Healing Brush to smooth the texture of the subject’s skin.
1. Click to select the Healing Brush tool (![]() ) or its variant, the Spot Healing Brush tool (
) or its variant, the Spot Healing Brush tool (![]() )—whichever is currently visible beside the Red Eye Removal tool in the toolbar—then, open the tool options pane at the bottom of the workspace.
)—whichever is currently visible beside the Red Eye Removal tool in the toolbar—then, open the tool options pane at the bottom of the workspace.
2. Make sure that the tool is in Healing Brush mode, and then set the brush size to 20 px. The Source option should be set to Sampled and the Mode to Normal. Make sure that the Aligned and Sample All Layers options are both disabled.

3. Make sure that the top layer, Background copy 2, is still active (selected). First, you need to define the area in the image that will be sampled as a reference texture for the Healing Brush operation; Alt-click / Option-click a smooth area on the left cheek. If you were to switch to another tool and then back to the Healing Brush, you would need to repeat this step.
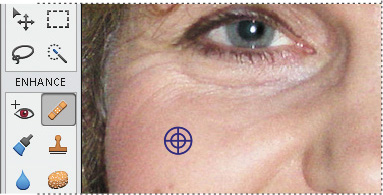
4. Draw a short horizontal stroke under the left eye. As you drag, it may appear that the brush is creating a strange effect, but when you release the mouse button, the color will be blended and natural skin tones will fill the area.

![]() Tip
Tip
Use short brush strokes. Try just clicking rather than dragging, taking care to overlap your clicks to avoid a spotty effect. If you see results you don’t like, check that the Aligned option is disabled in the tool options pane.
5. Continue to smooth the skin on the face with the Healing Brush. Avoid areas very close to the eyes, shadowed areas, and the hairline. You can also reduce the worst of the shine caused by the harsh flash. As you work, re-establish the reference area occasionally by Alt-clicking / Option-clicking in new areas of the face to sample appropriate skin tone and texture. Press the left and right bracket keys ( [ , ] ) to decrease or increase the brush size as you work. Be sure to remove the moles on the woman’s right cheek and the spots on her left cheek and just below the lower lip. You can use the same techniques on the neck.
Long strokes may produce unacceptable results—especially near shaded areas where the darker tones may spread. If that happens, choose Edit > Undo Healing Brush. Try setting the brush to a smaller size or reversing the direction of your strokes. If the problem is related to the shadowed areas beside the nose or at the sides of the face, try stroking towards the shadows rather than away from them, or temporarily changing the mode for the Healing Brush tool from Normal to Lighten in the tool options pane.
6. Choose Window > History. In the History Panel, every action you perform is recorded in chronological order, from the earliest at the top to the most recent at the bottom of the list. You can use the History panel to quickly undo a series of steps or to assess the success of your edits. To restore the file to an earlier state, simply select an earlier (higher) action in the History list.
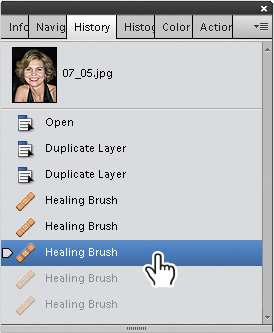
Until you make further changes to the file, you can still return the image to a more recent state by selecting a step lower in the list. Once you’ve used the History panel to restore a photo to an earlier state, any change you make to the image will replace all the actions in the more recent history.
Refining the Healing Brush results
The Healing Brush tool copies texture from the source area, not color. It samples the colors in the target area—the area that you’re brushing—and arranges those colors according to the texture sampled from the reference area. Consequently, the Healing Brush tool appears to be smoothing the skin. So far however, the results are not convincingly realistic.
In this exercise, you’ll make your retouching work look a little more natural by altering the opacity of the layer you’ve been working on, and then use another of the texture tools to refine the resulting blend.
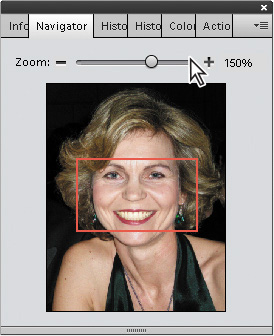
1. Click the Navigator tab, beside the History tab in the floating panel group. In the Navigator panel, use the zoom slider and drag the red frame in the preview to focus the view in the image window on the area around the woman’s eyes and mouth.
Extensive retouching can leave skin looking artificially smooth, looking a little like molded plastic. Reducing the opacity of the retouched layer will give the skin a more realistic look by allowing some of the wrinkles on the un-edited Background layer to show through.
2. In the Layers panel, change the Opacity of the layer “Background copy 2” to about 50%, using your own judgment to set the exact percentage.
We opted for quite a low setting, intending a fairly natural look for this photo of a friend, but the opacity value you set will depend on the extent of your retouching and the purpose for which the edited image is intended.
The opacity change restores some realism, but three noticeable blemishes have also made a reappearance—one on each cheek and one just below the lower lip.
3. In the Layers panel, select the layer “Background copy” to make it active.
![]() Tip
Tip
To remove spots and small blemishes in your photo, try the Spot Healing Brush in Proximity Match mode as an alternative to the Healing Brush. With the Spot Healing Brush, you can either click or drag to smooth away imperfections without needing to set a reference point.
4. Set the brush size for the Healing Brush tool to 20 px and click once or twice on each blemish. Gone!
5. In the toolbar, select the Blur tool (![]() ). In the tool options pane, set the brush size to approximately 13 px and set the Blur tool’s Strength to 50%.
). In the tool options pane, set the brush size to approximately 13 px and set the Blur tool’s Strength to 50%.
6. With the layer “Background copy” still active, drag the Blur tool over some of the deeper lines around the eyes and brow. Use the Navigator panel to change the zoom level and shift the focus as needed. Reduce the Blur tool brush diameter to 7 px and smooth the lips a little, avoiding the edges.
Compare your results to those below—the original, the version retouched with the Healing Brush, and final refined version. Toggle the visibility of your retouched layers to compare the original image in your Background layer with the edited results.

![]() Tip
Tip
For a quick and easy solution to portrait retouching, try the Perfect Portrait procedure listed under Special Edits in the Guided edit mode, where you’ll be stepped through smoothing skin, removing spots, fixing red eye, increasing definition in facial features, whitening teeth, and even slimming your subject!
7. Choose File > Save As. Make sure that the new file will be included in the Organizer, but not in a Version Set. Name the edited image 07_04_Retouch, to be saved to your My CIB Work folder in Photoshop (PSD) format.
8. Make sure that the Layers option is activated, and then click Save.
9. Choose File > Close.
In this exercise, you’ve learned how to set an appropriate source reference for the Healing Brush tool, and then sample the texture of the source area to repair flaws in another part of the photograph. You also used the Blur tool to smooth textures, and an opacity change to achieve a more realistic look. You’ve also gained a little experience in working with both the History and Navigator panels.
Removing unwanted objects from images
The impact of a photo can easily be spoiled by an unwanted object in the frame. In the modern world, it’s often difficult to photograph even a remote landscape without capturing a fence, power lines, satellite dishes, or litter—mundane clutter that can reduce the drama of an otherwise perfect shot.
Photoshop Elements offers several tools to help you improve an image by getting rid of extraneous detail. As you’ve seen, the Recompose tool lets you remove areas as you scale a photo. In this set of exercises you’ll use the Spot Healing Brush tool to remove an object without altering the overall composition.
1. If you’re still in the Editor, switch to the Organizer by clicking the Organizer button (![]() ) in the Taskbar at the bottom of the workspace. If necessary, click the check box beside the Lesson 07 tag in the Tags panel, to isolate the Lesson 7 images in the Media Browser. Right-click / Control-click the photo 07_05.jpg and choose Edit With Photoshop Elements Editor.
) in the Taskbar at the bottom of the workspace. If necessary, click the check box beside the Lesson 07 tag in the Tags panel, to isolate the Lesson 7 images in the Media Browser. Right-click / Control-click the photo 07_05.jpg and choose Edit With Photoshop Elements Editor.
2. Make sure the Editor is in Expert mode; then, choose Window > Reset Panels. Hide the Panel Bin and the Photo Bin. Select the Healing Brush tool (![]() ) or its variant, the Spot Healing Brush tool (
) or its variant, the Spot Healing Brush tool (![]() )—whichever is currently visible in the toolbar—then, click the Tool Options button (
)—whichever is currently visible in the toolbar—then, click the Tool Options button (![]() ) in the Taskbar open the tool options pane.
) in the Taskbar open the tool options pane.
Using the Content-Aware healing feature
In the last project, you may have used the Spot Healing Brush in Proximity Match mode to help smooth skin blemishes in a portrait photo. In this exercise you’ll set the Spot Healing Brush to Content-Aware mode.
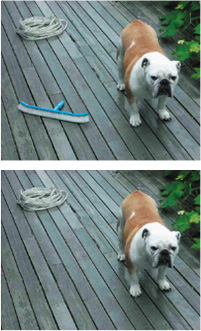
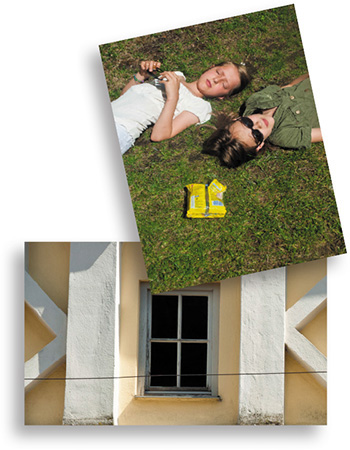
In Content-Aware mode, the Spot Healing Brush tool compares nearby image content to fill the area under the pointer, seamlessly matching details such as shadows, object edges, and even man-made patterns like brick-work or wooden decking shot in perspective, as shown in the illustration at the left.
1. In the tool options pane, check the header and buttons at the left to make sure the Spot Healing Brush tool (![]() ) is the active variant, and see that the tool is set to Content-Aware mode. Set the brush size to 100 pixels.
) is the active variant, and see that the tool is set to Content-Aware mode. Set the brush size to 100 pixels.

![]() Note
Note
Depending on your operating system and whether you have a graphics tablet, your brush shape may differ from that illustrated.
2. Press the Z key to switch to the Zoom tool, and then drag a zoom marquee to zoom in on the signpost and a little of the sky above it. Press the J key to reactivate the Spot Healing Brush. Center the circular cursor over the top of the signpost and drag downwards, stopping just before you reach the yellow sign.

3. Press the right bracket key ( ] ) six times to increase the brush size to 300 pixels. Center the cursor over the yellow sign (the horizon should bisect the circle) and click once; then, center the cursor over the smaller sign and click again.

4. Press the left bracket key ( [ ) ten times to reduce the brush size to 60 pixels; then, make a short downward stroke to remove the remnants of the signpost, stopping just before you reach the top of the litter bin.
![]() Tip
Tip
Try to limit yourself to as few of these repairs as possible; two or three should suffice. The more you interfere, the more likely you are to introduce problems.
5. Use the Zoom and Hand tools to focus on the area previously occupied by the late signpost. If you see any noticeable artifacts, such as blurring or misaligned texture, press the J key to reactivate the Spot Healing Brush and click or make very short strokes to remove them. If a stroke fails, or makes things worse, undo and try again, resizing the brush and varying the stroke direction as needed.
6. In the tool options pane, set the brush size to 100 pixels. Focus your view on the shadow of the litter bin. Starting at the right, make a series of overlapping clicks, keeping the brush on the grass. Don’t be concerned about a little repeated detail, but undo and try again if you introduce any of the rocky foreshore.

![]() Note
Note
It may take more than the six spot healing clicks illustrated here to clear the litter bin’s shadow smoothly; we used ten overlapping clicks to achieve a satisfactory result.
7. If your overlapping spots have produced noticeable smears or obvious repetition of detail, reduce the brush size to around 50 pixels and remove them; very short strokes should do the trick, if single clicks are not enough. You can remove the scraps of white litter at the roadside while you’re at it, if you don’t mind.
8. In the tool options pane, set the brush size to 350 pixels. Drag down over the litter bin, starting below the crest of the wave behind it and ending your stroke before you reach the gold band near the base as shown at the left, below.
9. Make a short horizontal stroke with a 250-pixel brush to remove the base of the bin; then break up any misplaced detail using a few clicks with a smaller brush.
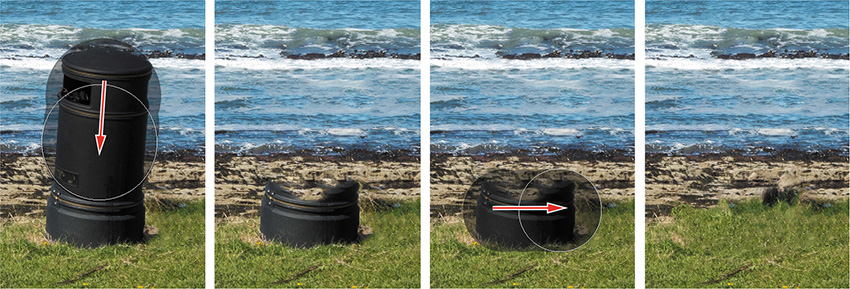
As you’ve just discovered, the Spot Healing Brush in content-aware mode enables you to remove even a very prominent, irregularly shaped, shadowed object from a complex background quickly and easily, without the need to make fussy selections.
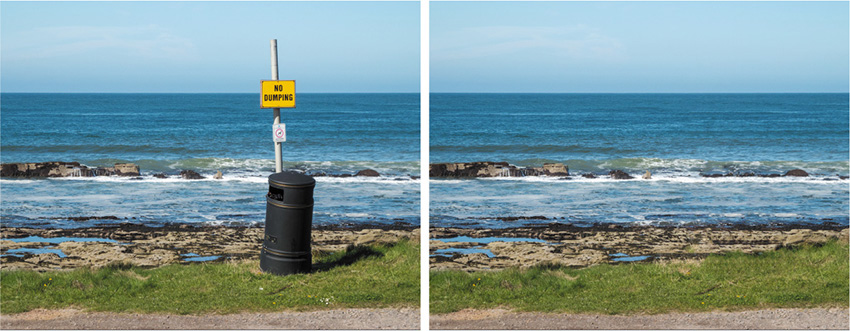
10. When you’re done, choose View > Fit On Screen. Choose File > Save As. Name the new file 07_05_DumpingOK, to be saved to your My CIB Work folder in JPEG format, and included in the Organizer, but not in a Version Set. Click Save. Click OK to accept the JPEG Options settings; then, close the file.
Creative fun with Guided edits
The Guided edit mode offers far more than just correction, adjustment, and retouching tasks. In the Fun Edits and Special Edits categories you’ll find guided procedures that let you experiment with a range of striking and unusual creative treatments for your photos—all presented with step-by-step instructions.
1. In the Media Browser, isolate the Lesson 7 images, if necessary, and select the image 07_06.jpg, a photograph of two girls riding unicycles. Click the Editor button (![]() ) in the Taskbar.
) in the Taskbar.
2. In the Editor, switch to Guided edit mode by clicking Guided in the mode picker at the top of the workspace; then, choose the Fun Edits category from the bar above the preview pane. Hide the Photo Bin, if it’s open, and then click the second preview to launch the Out Of Bounds effect.

3. Follow the instructions in the Out Of Bounds pane at the right. Start by clicking Add Frame, and then let Guided Edit step you through the process of setting up the frame as you see in the illustration below. When you’re happy with the frame, click the green Commit button (![]() ) at the lower right corner.
) at the lower right corner.
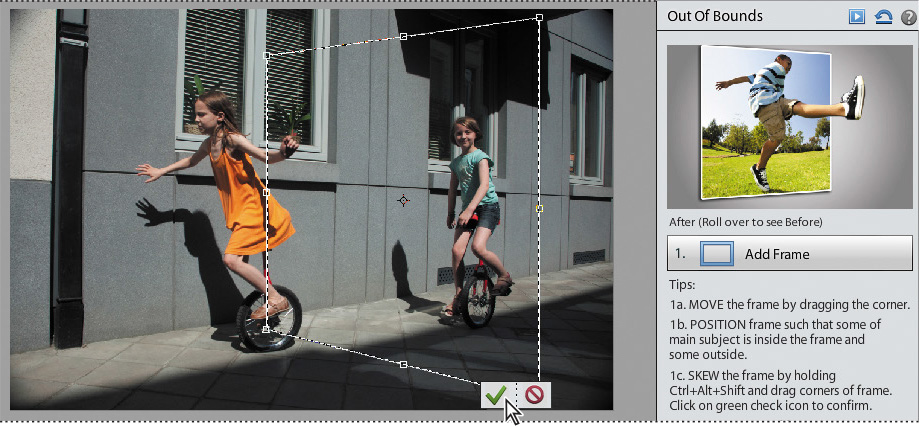
Remember these pointers when you’re using the Quick Selection tool during this guided edit:
• Use Ctrl / Command+[ to decrease the brush size, Ctrl / Command+] to increase it.
• Hold down the Alt / Option key to subtract from the selection.
• Difficult selections can be made much easier by making use of the Auto-Enhance and Refine Edge options in the tool options pane below the Edit window.
4. Continue with the guided steps until you can replicate something similar to what you see in the illustration below; then, click Done. Don’t be discouraged if you need a few attempts—with a little practice you’ll get great results.
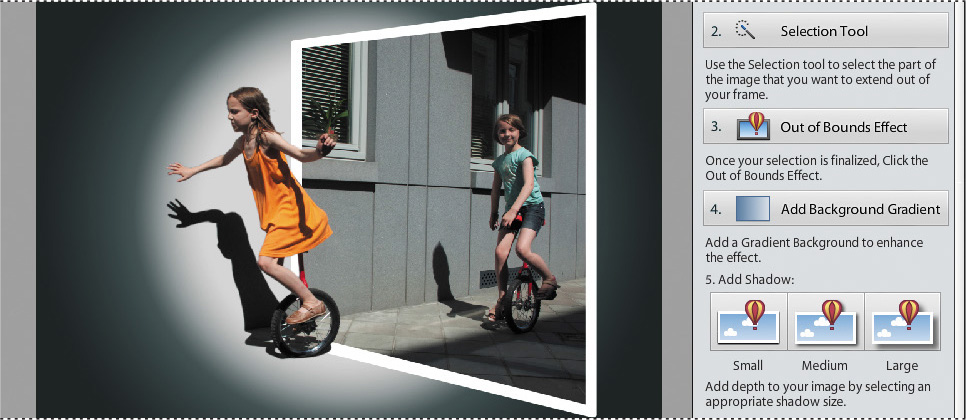
5. Choose the Next button; then, click Save As. Activate the option Include In The Elements Organizer and disable Save In Version Set With Original. Name the file appropriately, and then save it to your My CIB Work folder. Close the file.
Adding motion to a static shot
From Photoshop Elements 12, the Guided Edit mode offers a Zoom Burst effect, which you’ll now find in the Fun Edits category. Traditionally produced by manually zooming in on a subject while the shutter is open, the Zoom Burst effect creates an impression of speedy motion, while the limited area of focus draws attention to the subject. While the Zoom Burst effect emphasizes movement towards—or away from—the camera, the Speed Effect, the latest addition to the Fun Edits category in Photoshop Elements 14, creates the illusion of motion across the picture plane.

1. In the Organizer, select the image 07_07.jpg; then, click the Editor button (![]() ). If you’re not in Guided edit mode from the last exercise, switch modes now and click the Fun Edits tab above the preview pane.
). If you’re not in Guided edit mode from the last exercise, switch modes now and click the Fun Edits tab above the preview pane.
2. Click the Speed Effect—the second-last guided project on the Fun Edits tab.
Despite the absence of motion in the photo, the wind in the girl’s hair, and her animated pose and expression, will work well towards creating the impression of forward movement; now, let’s see if we can add a sense of speed. The Speed Effect consists of four steps: designating the object to which you wish to add movement; applying the motion-blur effect; defining an area of focus where the effect is to be reduced; and refining the effect by adding to or subtracting from the motion blur.
3. In the panel at the right, click the Quick Selection Tool button. By default, the tool opens in Add mode. Begin by moving the pointer over the girl’s windswept hair; make drag over her head, arms, and body to make a rough selection, and then extend the selection to include her legs and the yellow buoy.
![]() Tip
Tip
Your selection does not need to be precise; in this step, you are merely defining the area that will be “smeared” to generate the motion-blur effect.
4. Zoom in for a clearer view of the girl’s hands using the Zoom slider; if you need to pan the view, press the spacebar to temporarily activate the Hand tool. The default brush size should be small enough to add the girl’s fingers. While you’re still zoomed in, switch the Quick Selection tool to Subtract mode to deselect any parts of the background you may have included accidentally, including the shadow on the sand beneath the yellow buoy.
5. Click the Add Speed Effect button; then, click the Decrease button once, so that it’s easier to see both of the girl’s legs through the blur. For our lesson image, the motion will be horizontal, so you won’t need to change the angle of the effect.
6. Click the Add Focus Area button. Hold down the Shift key to constrain your movement to the horizontal as you drag from a point near the right edge of the photo, at the level of the girl’s waist, to the small of her back. Repeat this step, and then drag from the ring at the pint of the buoy to the same end point.
7. Click the Refine button; by default, the tool opens in Subtract mode, ready to clear the motion blur from areas where it’s not wanted. Use the sliders to increase the brush size to around 100 (pixels) and its opacity to 100%; then clear the remnants of the motion blur from the area in front of the girl and buoy. Reduce the brush size to 75 and paint over the girl; you don’t need to be very accurate—especially around the “trailing” edges of her figure. Zoom in using the Zoom slider, and reduce the brush to 12 pixels to clear her hands and fingers.
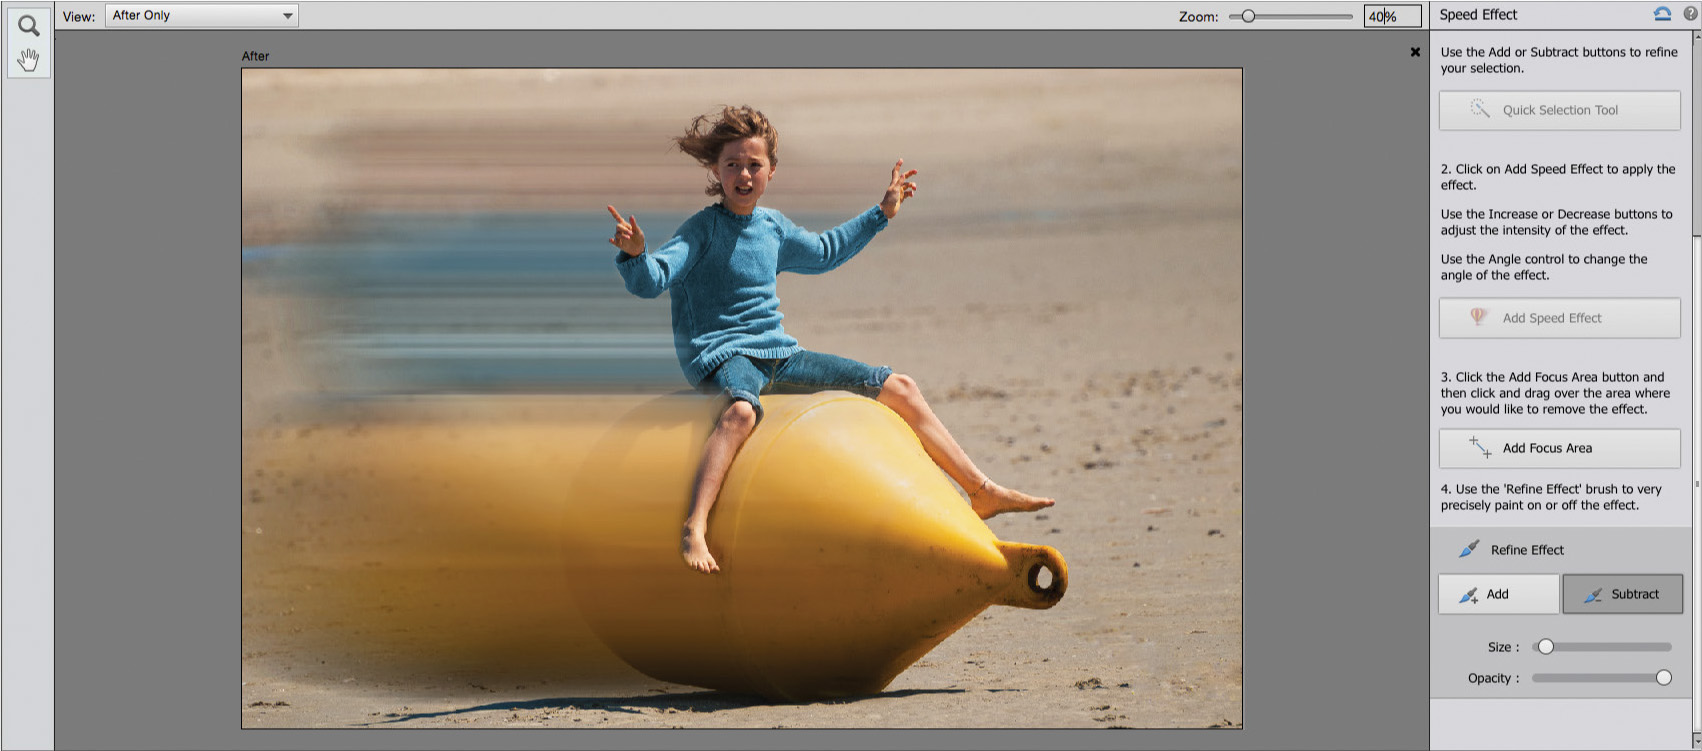
8. Click Next at the bottom of the panel; then, click the Save As button. Name the file 07_07_Speed, and save it to your My CIB Work folder in Photoshop (PSD) format, with the Layers option enabled. Include the new image in the Organizer but not in a Version Set. Choose File > Close, or click the Close button (X) at the upper right of the Guided Edit preview pane.
Making a picture into a puzzle
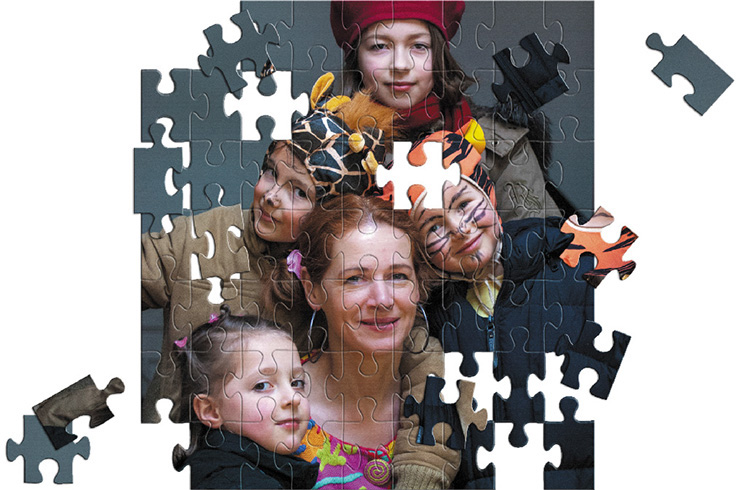
Also available from the Fun Edits category, the Puzzle Effect Guided Edit lets you turn a photo into a jigsaw puzzle; you can even move the pieces around to make it look as though the puzzle has not yet been completed.
1. In the Organizer, select the image 07_08.jpg; then, click the Editor button (![]() ). If you’re not in Guided edit mode from the last exercise, switch modes now.
). If you’re not in Guided edit mode from the last exercise, switch modes now.
2. Click the Puzzle Effect preview in the Fun Edits category to start the project.
3. At the top of the Puzzle Effect pane, click the Large puzzle piece button.
4. Click the Select Puzzle Piece button and click inside a piece you’d like to move; then, click the Extract Piece button. Your selected piece is extracted from the image and the Move tool becomes active.
5. Drag the extracted piece to a new position. Move the cursor just outside any of the handles on the bounding box surrounding the repositioned piece and drag to rotate it. Click the green check mark to confirm the transformation.
6. Repeat the process with as many puzzle pieces as you wish, to create a pleasing arrangement. You can’t delete a piece, but you can drag it off the image, behind the gray artboard, which serves the same purpose. If you remove adjacent pieces, you’ll need to use the Eraser tool to remove the outlines that remain. Use the square bracket keys on your keyboard to change the size of the eraser.
7. When you’re happy with the arrangement, click the Next button at the lower right; then, click Save As. Name the file 07_08_Jigsaw, and save it to your My CIB Work folder in Photoshop (PSD) format, with Layers enabled. Include the new image in the Organizer but not in a Version Set; then, close the file.
![]() Tip
Tip
To produce this effect, with puzzle pieces scattered outside the borders of the photo, open your saved file in the Expert mode, increase the canvas size, and then experiment with the separate layers. Have fun!
Creating effects with filters
The guided edits in the Photo Effects and Photo Play category give an image a completely new look by applying several adjustments and filters in combination. You can have a lot of fun devising your own special effects and sophisticated photo treatments in the Filter Gallery, where you can combine multiple filters and tweak the way that they work together to create unique new custom effects.
You can use the Filter Gallery to reinterpret an image and present it in an entirely new light. This can be a great way to redeem a technically inferior photo, enabling you to turn even a flawed or uninteresting image into a work of art. The possibilities are limitless!
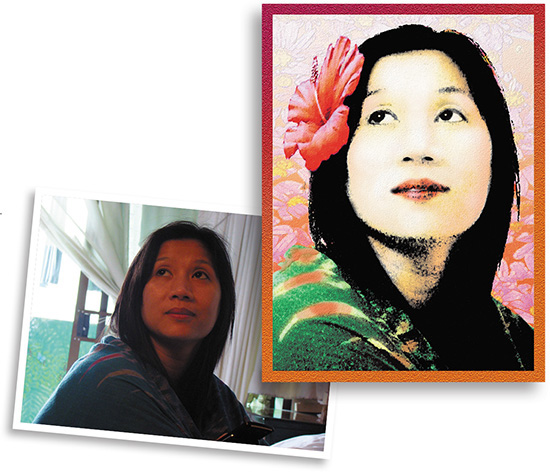
Before exploring the Filter Gallery, you can set up a work file with some extra layers for working copies of the image.
1. In the Organizer, isolate the images for this lesson, if necessary, by clicking either the Lesson 7 folder in the left panel’s My Folders list or the check box beside the Lesson 07 keyword in the Tags panel. Right-click / Control-click the image 07_09.jpg in the Media Browser and choose Edit With Photoshop Elements Editor from the context menu. Make sure that the Editor is in Expert mode, and then choose Window > Reset Panels.
2. Many filters make use of the foreground and background colors set in the toolbar to create effects, so you can start by resetting them to the default black and white. Click the Default Foreground And Background Colors button beside the overlapping swatches at the bottom of the toolbox; then, click the arrows to switch the foreground and background colors.

3. Drag the Background layer to the New Layer button (![]() ) at the left of the Layers panel’s header to create a second layer. Drag the Background copy layer to the New Layer button to create a third layer. Click the eye icon (
) at the left of the Layers panel’s header to create a second layer. Drag the Background copy layer to the New Layer button to create a third layer. Click the eye icon (![]() ) beside the top layer, Background copy 2, to hide it from view in the image window. Click the middle layer, Background copy, to make it active for editing.
) beside the top layer, Background copy 2, to hide it from view in the image window. Click the middle layer, Background copy, to make it active for editing.
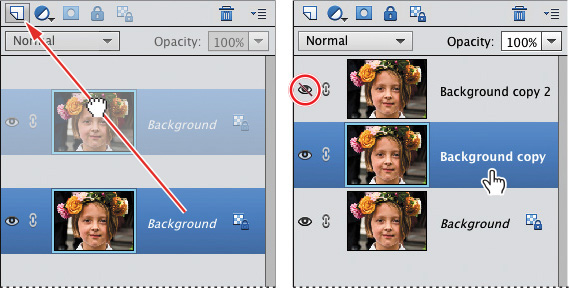
4. If you don’t see the Quick Selection tool (![]() )at the right of the Lasso tool in the toolbar’s Select category, Alt-click / Option click whichever tool is currently active to cycle through the variants until the Quick Selection tool is foremost.
)at the right of the Lasso tool in the toolbar’s Select category, Alt-click / Option click whichever tool is currently active to cycle through the variants until the Quick Selection tool is foremost.
5. With the Quick Selection tool, select the girl’s lips, and also the wreath of flowers and leaves on her head. Use the left and right square bracket keys ( [ , ] ) to decrease or increase the brush size as you work. Hold down the Alt / Option key as you paint to subtract from your selection.
6. When the selection is complete, choose Select > Refine Edge or click the Refine Edge button in the tool options bar. In the Refine Edge dialog box, set both the Smooth and Contrast values to 0, the Feather amount to 1 px, and the Shift Edge value to 1%. These settings will soften the edges of the selection, without reducing its effective area. Click OK.
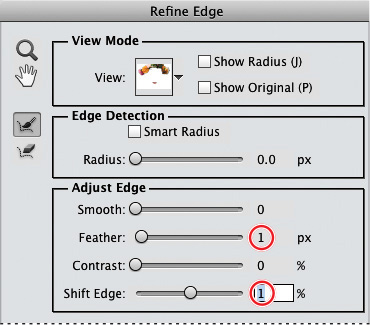
7. Choose Select > Save Selection. Name the new selection color details. Under Operation, activate New Selection; then, click OK. Choose Select > Deselect.
8. Choose File > Save As. Name the file 07_09_Work, to be saved to your My CIB Work folder in Photoshop format, with layers intact. Make sure the image will be included in the Organizer, but not as part of a Version Set; then, click Save.
Using the Filter Gallery
1. Choose Filter > Filter Gallery. If necessary, use the menu at the lower left of the Filter Gallery window to set the magnification to 100%. If you can’t see the whole photo, drag in the preview pane so that most of the girl’s face is visible.
![]() Tip
Tip
The most reliable way to assess the effects of the filters as you work is to set the zoom level to 100%.
2. If you don’t see the center pane with its list of filter categories, click the arrow beside the OK button at the upper right.

3. If you see more than one filter listed in the right pane, select the top filter and click the Trash icon to delete it. In the center pane, expand the Artistic category and choose the Watercolor filter. Experiment with the full range of the sliders. Set the Brush Detail to 5, the Shadow Intensity to 3, and the Texture to 2.

![]() Tip
Tip
If you try a filter and see little effect, your image may be too big; although many of the filters include a brush size control, or a slider affecting the magnitude at which the filter is applied, if your file has too high a resolution the effect may not be discernible even at the maximum setting. Use the File > Image Size command to create a smaller copy of your file; then, try the filter again.
4. Click the New Effect layer button (![]() ) below the right pane in the Filter Gallery dialog box. Collapse the Artistic category; then, expand the Texture category and choose the Texturizer filter. The Watercolor and Texturizer filters are applied simultaneously. Choose Canvas from the Texture menu; then, set the Scaling value to 100% and the Relief to 4. From the Light menu, choose Top Left.
) below the right pane in the Filter Gallery dialog box. Collapse the Artistic category; then, expand the Texture category and choose the Texturizer filter. The Watercolor and Texturizer filters are applied simultaneously. Choose Canvas from the Texture menu; then, set the Scaling value to 100% and the Relief to 4. From the Light menu, choose Top Left.

![]() Tip
Tip
In the Filter Gallery, you can combine as many filters as you wish, building up your own complex custom effects.
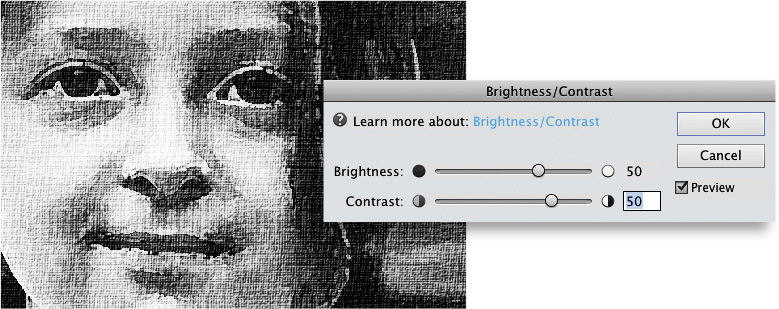
5. Click OK. The combined Watercolor and Texturizer filters are applied to the layer Background copy. From the Enhance menu, choose Adjust Color > Remove Color; then, choose Adjust Lighting > Brightness/Contrast. Set the values for both Brightness and Contrast to 50, and then click OK.
Layering filters and effects
Although the Filter gallery offers endless possibilities for combining filters, you can achieve even more sophisticated results by using the Filter Gallery in tandem with the Layers panel—applying combinations of filters to multiple duplicate layers, and then blending the layers using partial transparency, blending modes, or masks.
1. Click the eye icon beside the layer Background copy 2 to make it visible; then, click the layer thumbnail to make it active. Reverse the swatches at the bottom of the toolbar so that the background color is white. Choose Filter > Filter Gallery. Be careful to choose the second listing for the Filter Gallery—the first listing simply applies the previous settings without opening the Filter Gallery.
![]() Tip
Tip
If you’ve set up an effect that looks great in the background, but makes the faces of your subjects unrecognizable, use layer masks to separate the subjects from the background, and then apply the same set of filters to each part of the image at different settings.
The stacking order of filters in the list in the Filter Gallery will alter the way they interact, though this may be more noticeable with some filters than others. You can change the order of the filters by simply dragging them in the list.
2. The Filter Gallery window opens with your previous filters, and all their settings, exactly as you left them. Click the New Effect Layer button again. Expand the Distort category and choose the Diffuse Glow filter. Set the Graininess value to 10, and both the Glow Amount and Clear Amount to 15. Click OK.
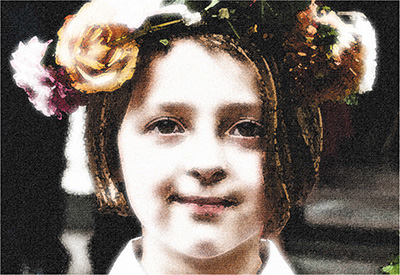
3. In the Layers panel, select the layer Background copy. At the top of the panel, decrease the layer’s opacity to 70%. Select the top layer, Background copy 2. Choose Overlay from the Blending Mode menu and then set the opacity to 30%.
4. Right-click / Control-click the layer Background copy 2 and choose Duplicate Layer from the context menu. In the Duplicate Layer dialog box, type Color Details as the name for the new layer, and then click OK. Change the new layer’s blending mode to Multiply, and its opacity to 70%.
5. Choose Select > Load Selection. In the Load Selection dialog box, choose your saved selection, color details, from the Selection menu under Source. Make sure the New Selection option is activated under Operation, and then click OK. With the top layer selected in the Layers panel, click the Add Layer Mask button (![]() ) at the top of the panel. The selection is converted to a layer mask.
) at the top of the panel. The selection is converted to a layer mask.
In the Layers panel, a layer mask icon is added to the top layer, color details, which is now masked so that only the girl’s lips and the flowers on her head remain visible.
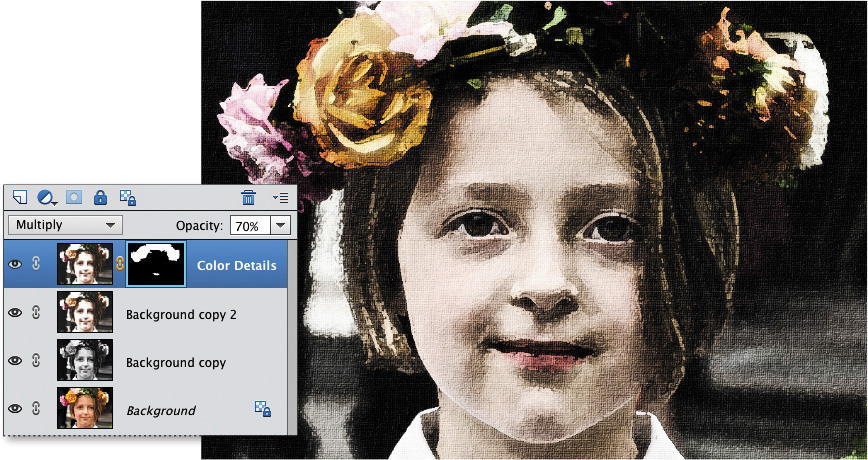
6. Toggle the visibility of each layer in turn, watching the effect in the Edit window. Choose File > Save, and then close the file.
Review questions
1. Dragging in a tilted image with the Straighten tool designates a reference in relation to which your photo will be rotated. What are the best references to look for?
2. What is the purpose of the grid overlays offered in the tool options pane when you select the Crop tool?
3. How do you use the different brushes and erasers that appear in the tool options pane when you select the Recompose tool?
4. How can you quickly undo a whole series of edit steps at once?
5. What are the similarities and differences between the Healing Brush tool and the Spot Healing Brush tool for retouching photos?
Review answers
1. The most reliable reference for straightening a tilted photo is a sea horizon line. In the absence of a natural horizon, you can often use either horizontal or vertical architectural features—or structural elements such as signposts and flag poles—as long as they are not pictured in perspective, or too obviously affected by lens distortion.
2. The Crop tool’s grid overlays can guide you in framing a balanced composition. The Rule of Thirds overlay divides the image horizontally and vertically into three equal parts; according to this rule, objects look more balanced when aligned with the lines and intersections of the grid.
3. Use the Mark for Protection brush to define areas in the image that you wish to protect from a scaling operation. Use the Mark for Removal brush to define any areas that you want removed from the image; the Recompose tool will cut those areas before compressing others. Each of the Recompose brushes has its associated eraser.
4. The History panel lists every action performed in chronological order. To restore the file to an earlier state, select an action higher in the list. Until you make further changes, you can restore the image to a later state by selecting a step lower in the list.
5. Both healing tools blend pixels from one part of an image into another. Although the Spot Healing Brush tool enables you to remove blemishes more quickly than is possible with the Healing Brush, the Healing Brush can be customized, and enables you to specify the source reference area, giving you more control.

