
3. Tagging, Grouping, and Searching Photos
Lesson overview
As your image collection grows larger and larger, keeping track of your photos can be a daunting task. Photoshop Elements delivers sophisticated, intuitive organizing tools that make the job enjoyable.
When the time comes to search and filter your photo library for that special shot that you know is in your catalog somewhere, the same sophisticated, intuitive tools will make it just as much fun to find it.
In this lesson, you’ll learn a few more techniques for sorting and grouping your photos, and a variety of ways to search your catalog:
• Using ratings to classify images by quality or usefulness
• Working with keyword tags and categories
• Using version sets and stacks to organize the thumbnail grid
• Grouping photos in albums
• Searching for people, places, and events
• Managing files in the My Folder list
• Filtering by date or import batch with the Timeline
• Finding photos by similarity, metadata, and text search
You’ll probably need between one and two hours to complete this lesson. If you haven’t already done so, you’ll need to download the combined work files for Lessons 2 and 3 from the Lesson & Update Files tab of your Account page at www.peachpit.com.

It’s time to reap the rewards for all that sorting, reviewing, tagging, and organizing! Revisit the People, Places, and Events views in search-and-filter mode, where locating the photo you want is as easy as asking “Who, where, and when?” Find out how to set up complex, multi-criteria filters that can be saved and run again whenever you import new images, making it easy to keep your albums up to date.
Getting started
Before you begin this lesson you should complete the Lesson 1 setup exercises “Creating a catalog for working with this book” and “Getting photos from files and folders” and all of the exercises in Lesson 2.
Most of the exercises in Lesson 3 work with sample photos that were imported in the two preceding lessons, and require that your catalog be already organized with the People, Places, and Events tags applied in Lesson 2.
Making it easier to find your photos
In Lesson 2, you made a start on organizing your image library by sorting and tagging the photos in terms of faces, locations, and events. In Lesson 3, you’ll learn more ways to order and “mark” your images, and discover how organizing your catalog can pay dividends by making it quick and easy to find the photos you want using the Organizer’s search capabilities.
It’s a good idea to make several sorting and tagging passes through each batch of photos you import while they’re still fresh in your mind, so that they don’t get lost in forgotten corners of your hard disk. This becomes an increasingly important strategy as you add more images to your library.
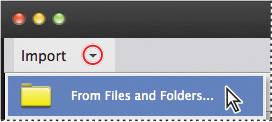
1. In the Organizer, click the Import button at the upper left of the workspace and choose From Files And Folders from the menu.
2. In the Get Photos And Videos From Files And Folders dialog box, navigate to and open the folder Lesson 2-3 and select the subfolder Zoo. Make sure that the option Get Photos From Subfolders is activated and the other automatic processing options are disabled; then, click Get Media.
3. In the Import Attached Keyword Tags dialog box, click Select All; then, click OK.
4. The newly imported images appear in the Media Browser. Click the Clear button at the right of the bar above the thumbnails to clear the Last Import filter and view all of the photos in your catalog.
Rating photos
Rating your photos is a simple, yet effective way to add another level of organization to your catalog. With a single click or keystroke, you can mark a photo as one of your best, or relegate it to the bottom drawer—even while you’re reviewing your images as a full-screen slideshow. You might choose from your five-star collection for a creative project, select from photos with a rating of three stars or higher for a presentation, or trim your catalog by removing all your un-rated rejects.
1. Make sure that Media is selected in the view picker at the top of the workspace. Click All Media or Back, if either is visible in the actions bar above the Media Browser, so that you see all the images in your catalog, rather than a filtered selection or the contents of a single folder.
2. Click the Import 1 folder in the My Folders list in the left panel.

3. In the Media Browser, move the pointer slowly from left to right over the stars beneath your favorite photo in this folder. When you see five yellow stars, click to apply that rating.
4. Select one of the other images in the Media Browser, and then press a number from 1 to 4 on your keyboard to apply that rating. Rate the remaining photos in the Import 1 folder, using whichever method you prefer.
5. To filter the Media Browser to display only those images from the Import 1 folder with three or more stars, click the third star in the Ratings filter at the right of the bar above the thumbnails and choose the appropriate qualifier from the adjacent menu.

![]() Tip
Tip
The more photos you rate, the better for the demonstration of search features later in this lesson.
6. Click the third star in the Ratings filter once more to deactivate the filter. Select each of the other folders in the My Folders list in turn and rate about half of the photos in each folder. For the folders Import 3 and Import 4, try to rate a selection of images from each of the photo series in each folder.
7. When you’re done, click All Media—at the left above the thumbnail grid—to show all the images in your catalog, rather than the contents of a single folder.
Tagging photos with keywords
Keyword tags are custom labels that you can attach to your photos and other media files, making it possible to sort them—and later, search for them—by personalized associations other than people, places, and events.
Keyword tags make it unnecessary to set up subject-specific folders or rename files with content-specific names. Both of these solutions are inflexible, confining a given photo to a single group. In contrast, you can assign multiple keyword tags to a single photo, associating it with several different groups of images simultaneously, and then use a keyword search to quickly retrieve any of those collections, even if the image files are scattered through different folders on your hard disk.
Keywords provide a perfect solution for tagging images that don’t feature people you know, or where the location or event at which the photos were captured is not a particularly relevant association.
For photos that are already tagged for People, Places, and Events, keywords can be used to refine a search. For example, you could use People and Places tags to quickly isolate all your photos of Kat and Tom together in New York, and then use keywords to filter for winter shots captured at night.
Organizing keyword tags and categories
1. If necessary, click the Keyword/Info button at the far right of the Taskbar to open the right panel group.
2. If you don’t see a list of keywords—or at least, the collapsed Keywords header—at the top of the right panel group, click the Tags tab to bring the Tags panel to the front. If necessary, click the arrow at the left of the Keywords header to expand the Keywords list.

Photoshop Elements ships with a few default keywords to help get you started. In this exercise you’ll convert two of the default keywords to keyword categories by creating sub-categories inside them, and then make a start on organizing your keywords by moving them into a hierarchical arrangement.
3. Select the Nature tag at the top of the Keywords list; then, click the small arrow beside the green plus-sign button (![]() ) to the right of the Keywords header. Examine the options available in the menu; then, choose New Sub-Category.
) to the right of the Keywords header. Examine the options available in the menu; then, choose New Sub-Category.

4. In the Create Sub-category dialog box, the selected Nature keyword has been automatically set as the parent category inside which your new tag will be nested. Name the new sub-category Animals, and then click OK to create the new Keywords listing and close the Create Sub-category dialog box.

5. Right-click / Control-click the Nature tag and choose Create New Sub-category. Name the new sub-category Scenic, confirm that Nature is set as the parent category, and then click OK.
6. Expand the Imported Keyword Tags category, if necessary, to see all the keyword tags that you’ve imported together with the lesson images.
![]() Tip
Tip
Although this procedure does not add the Nature or Animals keywords to the Zoo photos as tags, searching your catalog for either “parent” keyword will return any image tagged with any of the keywords nested inside these categories.
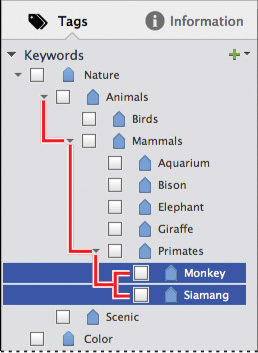
7. Ctrl-click / Command-click to group-select the Aquarium, Birds, Bison, Elephant, Giraffe, Monkey, and Siamang keywords that were imported with the photos from the Zoo folder. Drag the seven selected keyword tags to the Animals tag in the expanded Nature category.

The seven relocated tags are now nested inside the Animals keyword sub-category.
8. Select the Animals category; then, click the small arrow beside the green plus-sign button (![]() ) at the upper right of the panel and choose New Sub-Category from the menu. In the Create Sub-category dialog box, name the new sub-category Mammals. The selected Animals keyword has been automatically set as the parent sub-category. Click OK.
) at the upper right of the panel and choose New Sub-Category from the menu. In the Create Sub-category dialog box, name the new sub-category Mammals. The selected Animals keyword has been automatically set as the parent sub-category. Click OK.
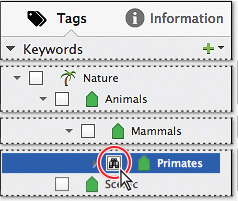
9. Drag all of the tags in the Animals category other than the Birds keyword to the new Mammals sub-category. Right-click / Control-click the Mammals keyword and choose Create New Sub-Category. Name the new sub-category Primates, and then click OK. Drag the Monkey and Siamang tags into the new sub-category.
Customizing the Keywords list
You can see that the keyword list will soon become quite complex. Color-coding the categories you use most often, and assigning thumbnail images to the tags in place of the generic tag icons, may make navigating the hierarchy easier.
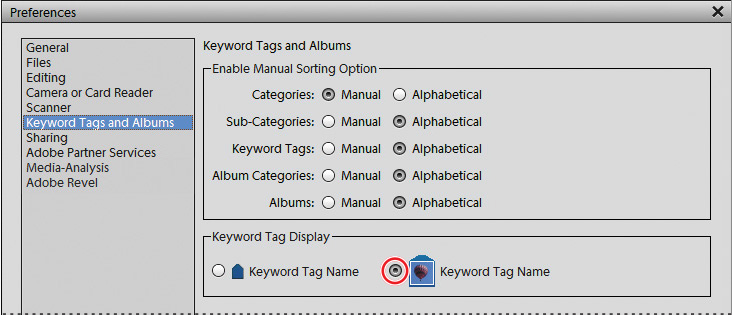
1. Choose Preferences > Keyword Tags And Albums from the Edit menu on Windows or Preferences from the Elements Organizer menu on Mac OS. In the Keyword Tags And Albums pane of the Preferences dialog box, activate the picture tag option under Keyword Tag Display. Click OK to save the setting.
2. In the Keywords list, right-click / Control-click the Nature category and choose Edit from the Context menu. In the Edit Category dialog box, click Choose Color and choose a color from the picker. Leave the category name unchanged. Scroll the Category Icon menu and click to select an icon; then, click OK to close the Edit Category dialog box.
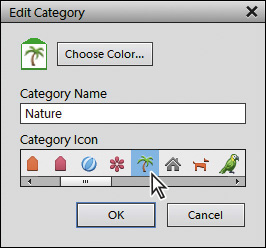
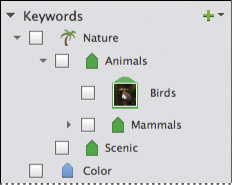
The Nature category now has a distinctive icon and color-coded badges on its sub-categories and keywords, making it stand out in the list. If you can’t see the full keyword names, drag the left edge of the panel group to make it wider. If the edited Nature category changes position in the Keywords list, drag it back to the top.
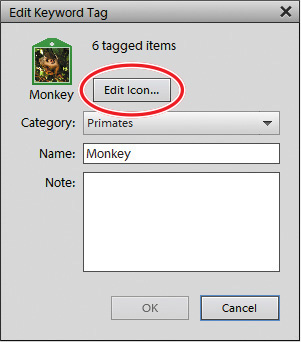
3. Right-click / Control-click the Monkey tag and choose Edit from the menu. In the Edit Keyword Tag dialog box, click Edit Icon.
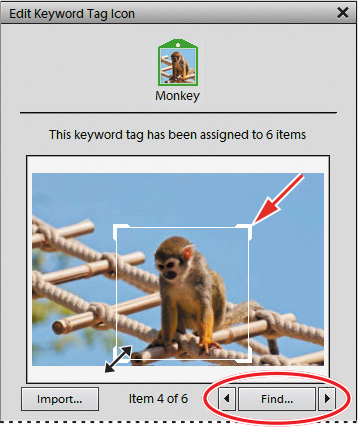
4. Use the arrows at the sides of the Find button in the Edit Keyword Tag Icon dialog box to cycle through all the photos tagged with the Monkey keyword. When you see the image you want, drag the handles of the bounding box to set a new keyword badge. A thumbnail at the top of the dialog box shows how the image will look applied to a tag icon. Click OK to confirm the new badge image; then click OK to close the Edit Keyword Tag dialog box.
5. Click the arrow beside the plus-sign button (![]() ) to the right of the Keywords header and choose New Category. In the Create Category dialog box, name the new category Travel. Choose a tag badge color and category icon, and then click OK. Right-click / Control-click the new category in the Keywords list and choose Create New Sub-Category. Name the nested sub-category Family Trips.
) to the right of the Keywords header and choose New Category. In the Create Category dialog box, name the new category Travel. Choose a tag badge color and category icon, and then click OK. Right-click / Control-click the new category in the Keywords list and choose Create New Sub-Category. Name the nested sub-category Family Trips.
Creating and applying keyword tags
You can also work with keywords in the People, Places, and Events views.
1. Click People in the view picker at the top of the Organizer workspace. Make sure that you’re in the Named people mode.
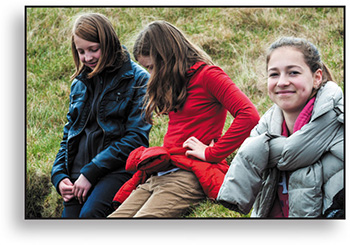
2. If necessary, click All People at the top of the Groups panel, to see all your People stacks. Click the Emma stack to expand it. If necessary, click Photos below Emma’s stack to switch from the Faces view to the Photos view. Double-click the photo shown in the illustration at the left. If you don’t see that image in Emma’s stack, check the other People stacks to locate the photo and select it.
3. With People_12.jpg selected in the expanded People stack, click the Info button at the right of the Taskbar; then, type Hill Walking in the text box at the top of the Image Tags panel. Click Add to apply the new keyword. Click Back above the thumbnails grid.
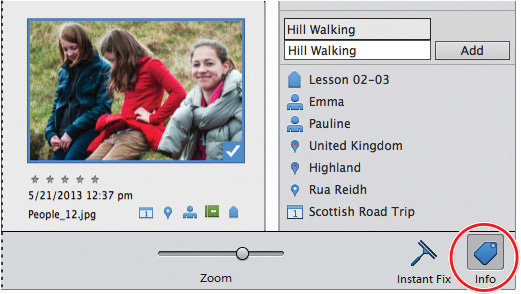
Now, you’ll use the Places view to locate the other photos shot at the same location.
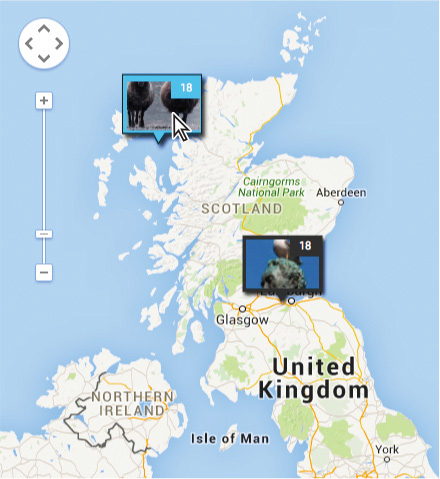
4. Click Places in the view picker at the top of the workspace. If necessary, pan the map to focus on the Scotland marker, and then zoom in until the marker divides to show two location pins. Double-click the northern pin to see all of the photos that are pinned at that location; then, choose Edit > Select All.
5. Click the Info button, beside the Instant Fix button in the Taskbar, and then type the letter H in the text box at the top of the Image Tags panel. Choose the newly created Hill Walking tag from the pop-up menu. Click Add to apply the new keyword to all the selected photos.
6. Deselect all the photos, then Ctrl-click / Command click to select just the four scenic landscape shots featuring the rocky Scottish coastline.

7. Type the letter S in the Image Tags panel text box; then, choose the Scenic tag from the tagging suggestions. Click Add to apply the new keyword to the four selected photos; then, deselect them. Click Back above the thumbnail grid to return to the Map view, and then click Media in the view picker to switch to the Media Browser, where you can organize your new tags.
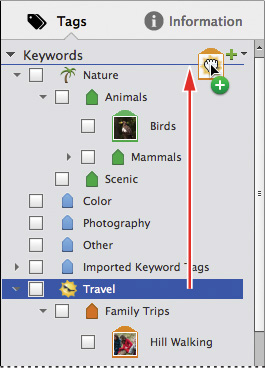
8. Expand the Travel keyword category, if necessary; then, drag the Hill Walking tag from the Other category into the subcategory Family Trips.
9. Drag the Travel category to the top of the Tags panel, and release the mouse button when you see a blue line indicating an insertion point just below the Keywords header.
10. Right-click / Control-click the Hill Walking tag, and choose Edit from the context menu; then, customize the tag thumbnail as you did in the previous exercise.
You’ll end your keyword-tagging expedition in the Events view, where you’ll tag all the images from one event, and just a selection of photos from another.
![]() Tip
Tip
If you don’t see names on the image stacks in the Events view, click the switch above the thumbnails to move from Smart Events view to the regular Events mode.
11. Click Events in the view picker. Make sure you’re in the Named events view; then, double-click the Annie’s Wedding stack to expand it. Press Ctrl+A / Command+A to select all the photos in this Event; then click the Info button at the right of the Taskbar, and type Milestones in the text box at the top of the Image Tags panel. Click Add to apply the new keyword to all of the selected photos. Click the Back button in the actions bar above the thumbnail grid to collapse the Annie’s Wedding stack and see all of the Events in your catalog.
12. Expand the Scottish Road Trip stack by double-clicking it. Select the six images in this Event that feature the Rua Reidh lighthouse. In the Image Tags panel, type Lighthouse in the text box; then, click Add to apply the tag.
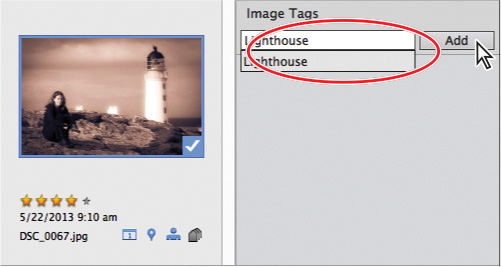
13. Click Media in the view picker to return to the Media Browser and see your new tags listed in the Keywords list. Press Ctrl+Shift+A (Windows) or Command+Shift+A (Mac) to deselect all of the images in the current selection. Set a new thumbnail for the Lighthouse and Milestones keyword tags as you did for the other new tags.

Grouping photos
As the number of files in your photo library increases, it can be more difficult to spot the image you want amongst the thumbnails displayed in the Media Browser.
Simply grouping some of your images in stacks and version sets can reduce the clutter in the thumbnails grid, effectively simplifying the view by hiding collections of related shots behind a single thumbnail until they’re needed.
Working with version sets
A version set groups a photo in its original state with any edited copies that you’ve generated, so you can find all the edited versions of the image stacked behind a single thumbnail in the Media Browser, rather than scattered through your catalog.
Photoshop Elements automatically creates a version set whenever you edit a photo in the Elements Organizer. When you edit an image from your catalog in the Editor, you can choose whether to create a version set or not in the Save As dialog box.
Grouping your edited files in this way not only makes it much easier for you to find the version you want, but also lets you keep your original, unedited photo intact, easy to find and ready for a different treatment whenever you want to re-use it.
1. If the All Media button is visible in the actions bar above the thumbnails, click it to ensure that the Media Browser is showing all of the images in your catalog.
2. To isolate the zoo images, click the search box beside the Nature > Animals sub-category in the Keywords list. Scroll down in the Media Browser, if necessary, and select the image DSC_0736.jpg.
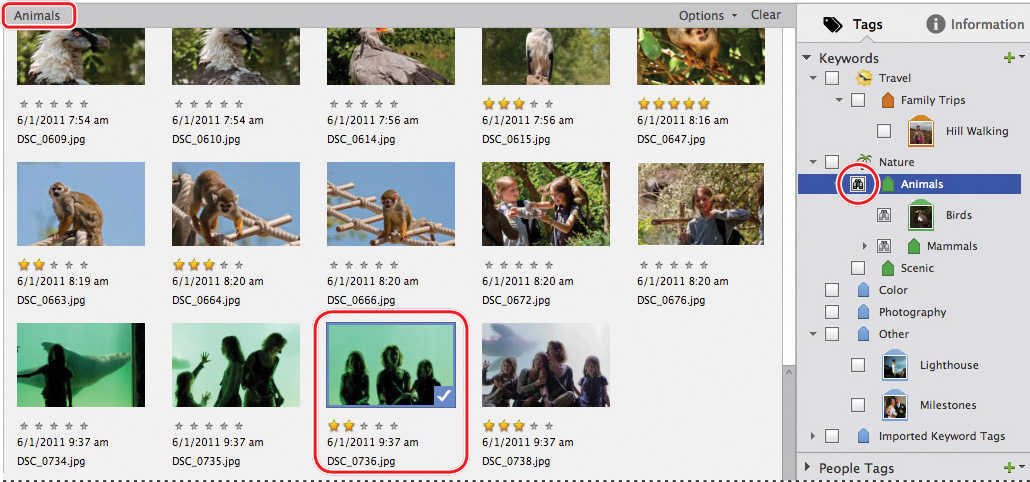
You have just made your first keyword search. With one click, you’ve retrieved all the photos from your last import, despite the fact that they are spread across seven folders and are tagged with as many separate keywords. The search results bar above the thumbnails grid displays the single search term: Animals.
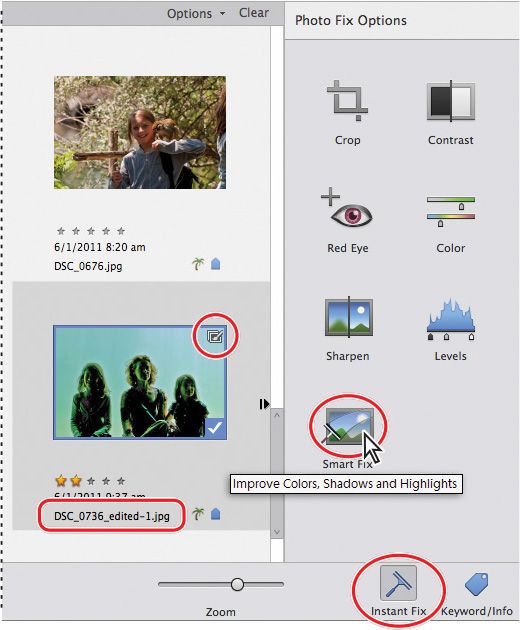
3. Click the Instant Fix button at the right of the Taskbar to open the Photo Fix Options panel. Make sure that the image DSC_0736.jpg is still selected; then, click Smart Fix.
![]() Note
Note
The Smart Fix edit corrects the overall color balance and also enhances detail in the brightest and darkest areas of the image.
The edited copy is stacked on top of the original photo in a version set.
A version set can be identified by a badge (representing a stack of photos overlaid by a paint brush) in the upper right corner of the thumbnail, and by a file name extension indicating that the photo has been edited.
4. Click the Crop button in the Photo Fix Options panel. Drag the handles of the cropping box to crop the image closer around the subjects; then, click Done.

5. Click the expand button (![]() ) to the right of the thumbnail image to see the original and edited images in the version set displayed side by side. Select the original image, DSC_0736.jpg, and click Smart Fix once again.
) to the right of the thumbnail image to see the original and edited images in the version set displayed side by side. Select the original image, DSC_0736.jpg, and click Smart Fix once again.
6. There are now three photos in the version stack, with the most recent copy on top. Select the first copy, DSC_0736_edited-1.jpg—the center image in the version set—and choose Edit > Version Set > Set As Top Item. The two edited copies change places in the stack; the older version is now the “cover photo.”
![]() Tip
Tip
If you applied a star rating to this photo earlier, you’ll notice that the edited copies have inherited the same rating. If you think the Smart Fix and Crop operations represent an improvement, increase the rating for your preferred version.
7. To see only the topmost photo in the version set, click the collapse button to the right of the original image, or right-click / Control-click any photo in the set and choose Version Set > Collapse Items In Version Set from the context menu. Note the other commands available from the same context menu; these commands can also be found in the Edit > Version Set menu.

About stacks
Scrolling past rows and rows of images of the same subject—when it’s not the one you’re looking for—can be time-consuming and frustrating. You can reduce clutter in the thumbnail grid and make browsing for photos more enjoyable, and far more productive, by stacking related shots behind a single, distinctive thumbnail.
![]() Tip
Tip
Stacks are particularly useful for managing long series of related images, such as shots taken at sports events with your camera’s burst mode or auto-bracket feature. When you take photos this way you end up with many variations of what is essentially the same image—if you stack the series, you’ll see only the best shot in the Media Browser.
Glancing along just one row of stacks in the thumbnails grid could save you the effort of scrolling through screen after screen of distracting images.
1. In the Media Browser, Ctrl-click / Command-click to select the four images shot at the aquarium, including the version set you created in the previous exercise.
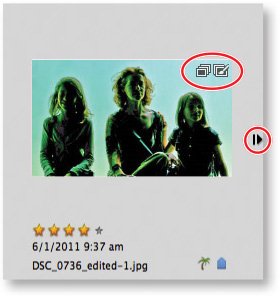
2. Right-click / Control-click the photo you edited earlier and choose Stack > Stack Selected Photos. The images are stacked, with the edited copy on top, now marked with a stack icon beside its version set badge. Click the arrow at the right side of the stack frame to expand and collapse the stack.
3. Select the four images of elephants, and then right-click / Control-click the photo you’d like to set as the top image and choose Stack > Stack Selected Photos from the context menu. Repeat the process for the four photos of black siamangs from Thailand and the six images of American bison.
Stacking photos automatically
You can automate the process of grouping related photos in your catalog by having Photoshop Elements suggest stacks, based on visual similarities between images.
1. Press Ctrl+A / Command+A to select all of the photos in the Media Browser; then, choose Edit > Stack > Automatically Suggest Photo Stacks.
In the Visual Similarity Photo Search dialog box, Photoshop Elements presents four groups as potential stacks. Before you go ahead and stack these groups, let’s look at the options for tweaking the automatic stacking process manually.
![]() Tip
Tip
Experiment with as many of your own photos as possible, so that you’ll get a feel for the kind of images that perform best with this feature.
2. To merge the first and second suggested groups—both of which contain photos that feature squirrel monkeys—Shift-click to select the images in either group and drag them to the other.
3. Click Unique Photos at the lower left of the Visual Similarity Photo Search dialog box. The Unique Photos pane shows any photos from the selection in the Media Browser for which Photoshop Elements has been unable to suggest a stack.

![]() Tip
Tip
You can simply reverse this process to remove a photo from a group suggested for stacking.
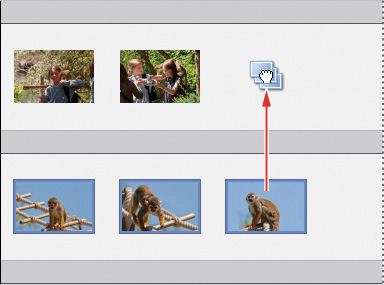
4. Drag the first image in the Unique Photos pane to the top group of five shots featuring squirrel monkeys. Drag the next four images to group them with the two other photos featuring birds, and then add the last two images to the two photos of giraffes in the bottom group.
5. When you stack these groups, the first image in each group will become the top image in the stack. Drag your favorite photo from each group to the first position in that group, and then click the Stack button at the right of the divider bar above the group. Each of the new stacks displays the stacked photos badge.

6. Click Done. In the Media Browser, the 34 photos with keywords from the Animals category are now displayed as just seven stack thumbnails. Click the Keyword/Info button in the Taskbar to reopen the Tags and Image Tags panels. Click Media in the view picker; then click the Back button in the actions bar, if it’s visible, to see all of the photos in your catalog.
• Combining two or more stacks merges them to form one new stack, with the most recent photo on top of the stack. The original groupings are not preserved.
• Many actions applied to a collapsed stack, such as editing and printing, are applied to the top item only. To apply an action to multiple images in a stack, either expand the stack and group-select the images, or unstack them first.
• If you edit a photo that you’ve already included in a stack, the photo and its edited copy will be grouped as a version set nested inside the stack.
• If you apply a keyword tag to a collapsed stack, the keyword tag is applied to all items in the stack. When you run a search on the keyword tag, the top photo in the stack appears in the search results marked with the stack icon. If you want to apply a keyword tag to only one photo in a stack, expand the stack first.
![]() Tip
Tip
To access stack commands, right-click / Control-click any image in a stack and choose from the Stack submenu. Alternatively, select a photo in the stack and choose from the Edit > Stack menu.
Creating albums
Another way of grouping your photos is to organize them into albums. An album is like a virtual folder where you can assemble a collection of images that may be drawn from any number of actual folders on your hard disk. You might create a new album to collate and arrange the pictures that you intend to include in a creative project such as a photo book or a slideshow, or to group your images of a special interest subject such as flowers, classic cars, or macro photography.
A photo can be included in more than one album—the same image might be the first in a New York Architecture album and the last in a National Monuments album. You can also group albums; for example, you might group your New York and San Francisco albums together inside a Vacations album; while your Road Trips album includes the San Francisco album, but not the New York album.
![]() Tip
Tip
You can achieve similar groupings and sub-groups by using keywords tags, but your Road Trips album may contain only a sub-set of the photos you’ve tagged with the keyword Road Trips.
The principal advantage to grouping photos in an album rather than using a shared keyword tag is that in an album you can rearrange the order of the photos as you wish. In the Media Browser, each photo in an album displays a number in the upper left corner, representing its place in the order. You can drag photos to change their position within the album, which will affect the order in which they appear in a slideshow or their placement in a project layout.
1. If necessary, click the Keyword / Info button in the Taskbar to show the Tags panel. In the Keywords list, select the Animals > Mammals > Primates sub-category; then, click the search box at the left of the Primates tag to isolate all the images with tags that are included in that category. The grid displays two stacks that you created earlier.
In albums, stacks are a special case; you can include a stack in an album, but only the top photo from the stack will appear in a slide show, for instance, unless you expand the stack and select all the photos inside it before you start the slideshow.
You can’t rearrange the order of stacked photos in an album, add a selection of photos from a stack to an album without adding the entire stack, or remove a stacked image from your album without removing the rest of the stack.
So, you can start by unstacking the photos in the Primates category.
2. Shift-click to select both of the stacks in the Media Browser, and then choose Edit > Stack > Unstack Photos.
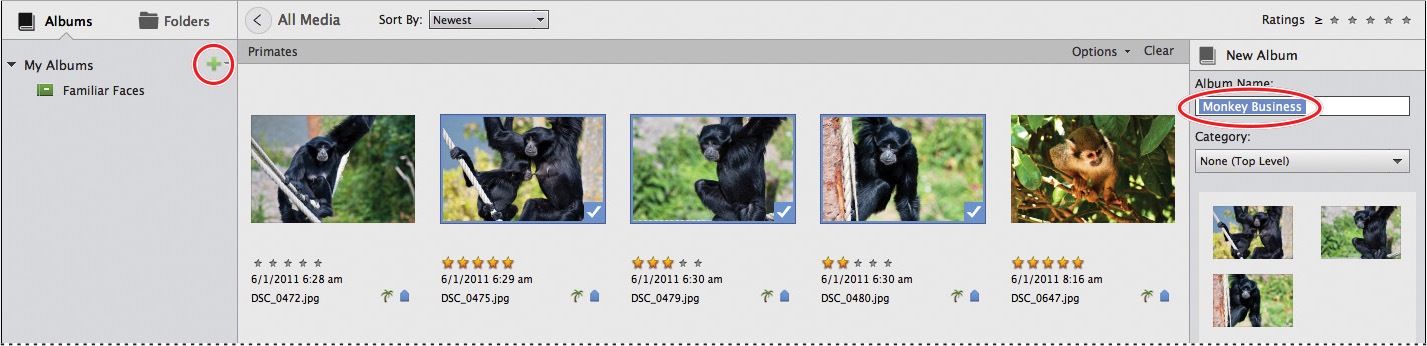
3. Select the best three shots of the black siamangs; then, click Albums at the top of the left panel. Click the green plus sign (![]() ) to the right of the My Albums header; make sure you click the green plus sign, not the small arrow beside it.
) to the right of the My Albums header; make sure you click the green plus sign, not the small arrow beside it.
4. In the New Album panel at the right, type Monkey Business as the name for the new album; then, click OK in the Taskbar below the panel.
![]() Tip
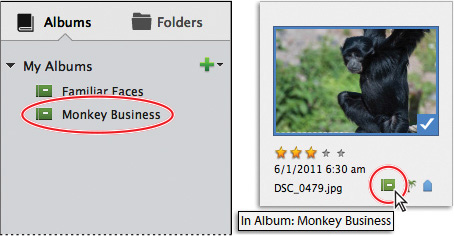
Tip
If you don’t see the album badges below the thumbnails in the Media Browser, use the Zoom slider in the Taskbar to increase the size of the thumbnails. Hold the pointer over the album badge to see which album or albums a photo belongs to.
5. Your new album appears in the My Albums list, and the three siamang photos that you selected for inclusion in the album are now marked with green album badges.
Adding more photos to an album
As you add more images to your catalog, you may have new photos that you’d like to add to existing albums—an easy way to sort and organize a fresh import—or perhaps you’re assembling a collection for a photo book over several work sessions.
1. With the Media Browser still filtered to show photos with keywords in the Primates category, right-click / Control-click the new album and choose Edit from the context menu. The Edit Album panel opens at the right.
2. Ctrl-click / Command-click to select the best three of the six photos featuring squirrel monkeys. Drag the selected photos into the Content pane in the Edit Album panel; then, click OK in the Taskbar.

3. If necessary, click Clear in the search results bar above the thumbnails to clear the Primates filter. You can now view all of the photos in your catalog. Click the Keyword/Info button at the right of the Taskbar to close the right panel group, if necessary.
![]() Tip
Tip
You can drag selected photos directly to an album’s entry in the My Albums list, and vice versa, but using the Edit command has the advantage of providing the opportunity to rename the album, or to change its place in the list hierarchy.
4. Click the Monkey Business album in the My Albums list. Set the sorting order in the actions bar above the thumbnails grid to Album Order. Notice the counter in the top left corner of each image, denoting its order in the album.

5. Drag the thumbnails to rearrange their order in the album, alternating the photos of siamangs and squirrel monkeys. When you’re done, click All Media in the actions bar above the thumbnail grid so that the Media Browser displays all of the photos in your catalog.
Creating albums from People, Places, and Events
In Lesson 2, you used the People, Places, and Events views as aids to organizing your catalog—and your effort is already paying off. Now you can take advantage of the search and filter aspects of those views to help find the photos you need.
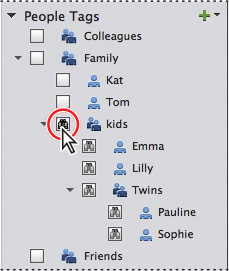
1. Click People in the view picker at the top of the workspace; then, make sure you’re in the Named people view. If necessary, click the Groups button (![]() ) in the Taskbar to show the Groups panel at the right; then, expand the Family group. Expand the Kids group, and then click the listing for the Twins group to show the People stacks for Pauline and Sophie.
) in the Taskbar to show the Groups panel at the right; then, expand the Family group. Expand the Kids group, and then click the listing for the Twins group to show the People stacks for Pauline and Sophie.
2. Click the Sophie stack, and then click Photos below Sophie’s stack thumbnail to display full photos, rather than just faces. Double-click the photo track to expand it to a grid view; then, Ctrl-click / Command-click to select the photos of the twins together without their sisters, and any images of Sophie alone.
3. In the Albums panel, click the green plus sign (![]() ) (not the small arrow beside it) to the right of the My Albums header. In the New Album panel at the right of the workspace, name the new album Double Trouble; then, click OK in the Taskbar.
) (not the small arrow beside it) to the right of the My Albums header. In the New Album panel at the right of the workspace, name the new album Double Trouble; then, click OK in the Taskbar.

Your new album appears in the Local Albums list, and the selected photos are now marked with green album badges.
![]() Tip
Tip
This is a good demonstration of the advantages of grouping photos in albums, rather than relying on keywords alone; a People tags search in this case returns photos with Sophie together with any number of other people, whereas an album could isolate a subset made up of pictures of Sophie alone.
4. Click the Back button in the actions bar to return to the Group view, and then double-click the Pauline stack to expand it. Ctrl-click / Command-click to select any images of Pauline alone and drag them directly to the Double Trouble album in the Albums list. The added photos are marked with green album badges.

You’ve successfully leveraged the People tags that you attached to your photos in Lesson 2 to perform a simple People search, making use of the various viewing modes in the People view to help locate the photos you needed for the new album.
![]() Tip
Tip
If you don’t see the map or the pins (or Scotland), see the first few steps in “A short trip to the Places view” in Lesson 2.
5. Click Places in the view picker. In the Places view, double-click the northern map pin of the two pins positioned on Scotland to show the photos pinned at that location. Select all eighteen photos.
6. Click the Create New Album Or Album Category button (![]() ) at the top of the left panel, making sure you click the button, not the small arrow beside it. In the New Album panel at the right of the workspace, type Highlands Hike as the name for the new album; then, click OK in the Taskbar below the panel.
) at the top of the left panel, making sure you click the button, not the small arrow beside it. In the New Album panel at the right of the workspace, type Highlands Hike as the name for the new album; then, click OK in the Taskbar below the panel.
7. Click Back to return to the map view, and then double-click the southern pin. Select the image DSC_0330.jpg (a rear view of a Scotsman wearing a green kilt) and drag it to the newly created Highlands Hike album in the My Albums list. The selected photo is now marked with a green album badge.
8. Click Back to return to the map view, and then click Media in the view picker at the top of the workspace. In the Media view, click the Highlands Hike album in the Albums panel. The image count at the lower left of the workspace shows that the album contains nineteen photos—eighteen from a trip to the northwest coast of Scotland, and one shot in Edinburgh. You’ve just used the Places view to filter your catalog by location to find the photos for this album. Click All Media in the actions bar to return to an unfiltered view of your catalog.
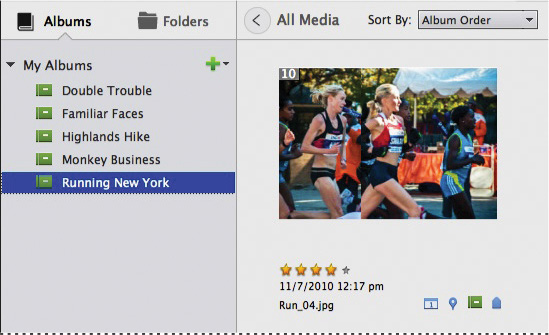
9. Click Events in the view picker. In the Named events view, shift-click to select the event stacks NY Marathon 2010 and NY Marathon 2011; then, click the green plus sign (![]() ) beside the My Albums header.
) beside the My Albums header.
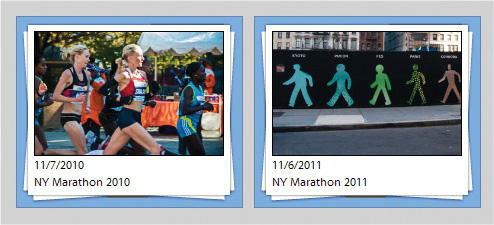
10. In the New Album panel, type Running New York as the name for the album. Before you click OK to create the new album, Ctrl-click / Command-click in the New Album panel’s content pane to select three or four images that you’d like to exclude from the album, and then click the trash-can icon at the bottom of the panel to remove them. Click OK in the Taskbar.
The new Running New York album appears in the Local Albums list in the left panel, grouping the marathon photos that you located by filtering for Events tags.
11. Click Media in the view picker. In the Media view, click each of the albums Double Trouble, Highlands Hike, and Running New York. If you wish, you can rearrange the order of the thumbnails in the grid for each of your newly created albums.
![]() Tip
Tip
If you’re unable to re-order the photos in an album, check the Sort By setting at the left of the bar above the thumbnails grid. To customize the order of photos in an Album, the sorting order should be set to Album Order.
12. When you’re done, click All Media in the actions bar to see the unfiltered contents of your catalog in the Media Browser.
Filtering and finding photos
In this lesson, you’ve begun to take advantage of the Organizer’s search and filter capabilities—even while you’ve been concentrating on using it to mark and manage your images. Most of the search and filter tools are so well integrated into the Elements Organizer workspace that you’re barely aware of using them.
![]() Tip
Tip
This is what’s referred to as an “And” search: “Show me items that are in the Import 1 folder and have a rating of three stars or higher.”
At the start of this lesson you learned how to apply ratings to your photos. By the time you reached step 5, you had already performed a two-term search—with just two clicks. You filtered your catalog so that you could look at the images in a single folder (by choosing from the list in the left panel), and then refined the search to show only the photos with the highest ratings (by clicking a star in the actions bar).
![]() Tip
Tip
This is referred to as an “Or” search: “Show me any item that is tagged with this keyword or that one ... or any of these five.”
In the next exercise, you tidied up your keywords list by dragging keyword tags into a hierarchy of categories and subcategories. This simple housekeeping task made it possible to find the images for the exercises that followed by running a seven-term search—this time with just one click! A single click on the Animals category filtered your catalog for all the images of birds, bison, elephants, giraffes, monkeys, seals, and siamangs—retrieving photos found in seven separate folders.
Finding people, places, and events
The first time you visited the Places, People, and Events views, you were learning how to sort and tag your photos. During the last exercise you discovered that each of these workspaces also serves as a filter, capable of presenting your images in a variety of different arrangements to help you locate the photos you’re looking for. In this section, you’ll take another look at finding people, places, and events.
Looking for somebody?
1. Click People in the view picker. You should be in the Named people view.

2. If you don’t see stacks for all six people you tagged in Lesson 2, the People view is either displaying images of just one of the people in your catalog, or whatever people it can find in just a selected part of your catalog. To see all of the tagged people in the whole of your catalog, click the Back button or the All People button at the upper left.
3. To quickly skim through all the photos in any of your People stacks, move the pointer slowly across the stack thumbnail. Stop moving the pointer, and then right-click / Control-click whichever image is currently visible to see the commands that can be applied to the stack. Skim through each People stack.
Even the All People view is a search result—the stacks displayed are the answer to the question “What people are in my catalog?”
4. Click the Lilly stack to show all the images in the catalog tagged with Lilly’s People tag. Toggle the setting below the stack thumbnail to shift between the Photos and Faces views. In the Faces view, hover over any of the face thumbnails to see the full photo from which the thumbnail was extracted.

5. Double-click either a face or full photo from Lilly’s stack to see all the photos in the stack displayed in the thumbnail grid view. Double-click a photo in the grid view to see it enlarged in a single-image view. Click Grid, and then Back, in the Actions bar to return to the named people stacks.
Your catalog is still small, so there are not so many pictures of any of the people you’ve tagged, but as your photo library grows, you may see hundreds of photos of a given person in each stack. Scanning these thumbnails may be preferable to looking through every photo in your catalog, but it can still be daunting. You can effectively filter the view by selecting individual albums or folders as the image source.
6. Note the image counts for the Pauline and Sophie stacks; then, click to select Double Trouble from the Albums list in the left panel. The image count drops, as this album contains only those images of each twin alone, or the pair without their parents or sisters. To see exactly which pictures of Pauline and Sophie are in this album, move the pointer slowly across each of the stack thumbnails.
![]() Note
Note
When you skim the contents of a People stack with a single album or folder selected as the image source, rather than the entire catalog, remember that the photo that you set as the profile picture (the image you see at the top of the People stack) may not be present in that album or folder.
7. Click each of the other albums to see who’s inside; then, switch the left panel from the Albums list to Folders and click between the Import 3 and Import 4 folders. All six people appear in both of these folders, but as you switch between the folders you’ll notice that the image count for each stack changes. Click the All People button in the actions bar to deselect the current folder as the image source and see the image counts for the entire catalog.
The Groups mode provides yet another way to find and filter your photos in the People view.
![]() Note
Note
All of the tagged people in your CIB catalog are included in groups. Once you’re working with your own catalog, people that you’ve tagged but not added to any group will appear in the Ungrouped listing.
8. If you don’t see the Groups panel at the right, click the Groups button (![]() ) in the Taskbar to see the Groups list; then, expand all the Family and Kids groups. Click down the Family hierarchy to the Twins listing. Note the image counts for each stack; then select the Double Trouble album at the left to filter the search. Click the Double Trouble album again to clear the filter.
) in the Taskbar to see the Groups list; then, expand all the Family and Kids groups. Click down the Family hierarchy to the Twins listing. Note the image counts for each stack; then select the Double Trouble album at the left to filter the search. Click the Double Trouble album again to clear the filter.
To move a person from one group to another; simply drag her People stack to a different entry in the Groups list. To remove someone from a group, right-click/Control-click his stack, and choose Move To Ungrouped from the context menu.
9. Click All People at the top of the Groups panel; then, click Media in the view picker to return to a view of your entire catalog.
Finding people from the Media view
You can also work with your People tags in the Media view, making it quick and easy to leverage all that tagging and grouping to find the photos you want.
1. If necessary, click the Keyword/Info button at the far right of the Taskbar to open the right panel group.

2. In the Tags panel, expand the People Tags category; then, expand the Family group, and the two groups nested inside it.
3. Click the search box to the left of the Kids tag.
Depending on the accuracy of your face tagging and grouping, this search could return up to 23 photos. The search results bar above the thumbnails lists the Kids tag as the single search term.
4. Right-click / Control-click the Emma tag and choose Exclude From Search. The binoculars icon in Emma’s search box is replaced by a barred circle and the number of images displayed in the Media Browser is reduced. The search results bar now lists the search terms: Kids, Emma.
5. Click the Clear button at the right of the search results bar to clear the filter.
6. In the People Tags list, click the search box for the Emma tag. The Media Browser should display ten photos. Click the search box for the Sophie tag. The thumbnails in the grid are reduced to those images with both People tags. Click the search box for the Pauline tag; the search results bar lists the Emma, Sophie, and Pauline tags as search terms.
The search returns only five images including all four girls; in other words, there are no photos of Emma together with the Sophie and Pauline, but without Lilly.
7. Expand the Events Tags list and click the box beside the Annie’s Wedding tag. The grid displays only three photos of all four girls taken on that occasion. Annie’s Wedding has been added to the terms listed in the search results bar.
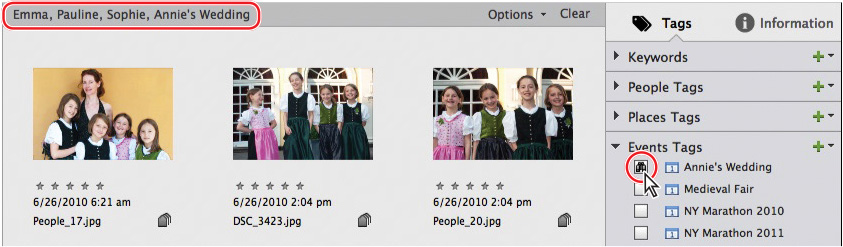
8. Click the Clear button in the search results bar to clear the filter.
Searching every place
Now you’ll revisit the Places view to pin some more photos to the map before you do some searching by location.
1. Click Places in the view picker; then, click UnPinned in the bar below the view picker. The preview pane shows all the images in the catalog that do not yet have location information. Toggle the Group By Time option in the Actions bar to filter this simple search by date. Set the Number Of Groups to maximum.
2. Scroll down the preview pane to find the wedding pictures dated June 26, 2010. Click the checkmark beside the date to select all the photos in the group; then, click Add Location beside the header. In the Add A Location dialog, type martha’s vi, and then press Enter / return. Click the location suggestion Martha’s Vineyard, Massachusetts, USA, and then click Apply/

3. Reset the Number Of Groups to maximum, if necessary; then, locate and select the group dated July 15, 2012: photos of a Medieval Fair parade. Click Add Location and type Kaufbeuren in the Add A Location dialog; then, press Enter / return and accept the location Kaufbeuren, Bavaria, Germany. Click Apply.
4. Repeat the process to place the selection of photos shot on June 1, 2011 at the Los Angeles Zoo. Accept and apply the location, Los Angeles Zoo and Botanical Gardens, 5333 Zoo Dr, Los Angeles, CA 90027, USA.
5. Switch the Places view to Pinned mode; then zoom out enough to see all your pins from LA to Kaufbeuren on the map.
6. Zoom the map until you see the marker on the East Coast of the US divide to show separate pins for the marathon images and the wedding photos. Hover over the Martha’s Vineyard pin and use the arrows at the sides of the pin preview to see the images pinned to this location.

7. Double-click the preview to expand the location stack to the thumbnail grid view where you can select photos, see them enlarged, tag faces, apply keywords, add captions, assemble albums, edit images, or view a slideshow.
8. Click Media in the view picker to return to the Media Browser. In the Tags panel, collapse the Keywords pane and the People Tags list and expand the Places Tags pane. Collapse the Germany and United Kingdom hierarchies and click the search box for the United States.
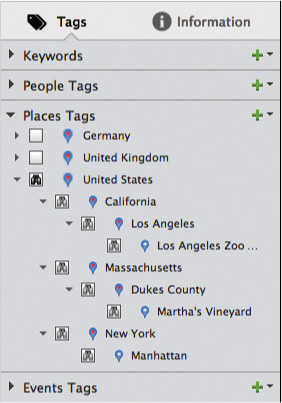
Every Places tag in the United States hierarchy is included in the search. The Media Browser displays all the images returned by this search.
9. Right-click / Control-click the search box for California and choose Exclude From Search from the context menu. The image count in the Media Browser drops to 37 items.
10. Expand the People Tags list and the Family hierarchy nested inside. Click the search box for Kat, the mother in the group. The number of photos returned by the search has been narrowed to three—two from the wedding in Dukes County, and one shot before start of the New York marathon.
11. Right-click / Control-click Tom’s search box and choose Exclude From Search from the context menu. (Nothing against Tom, you understand; some of my best friends are Tom.) This search for all images captured in the US, but not from LA, that show Kat—but only without Tom—returns only two photos.

1. Click Events in the view picker. If the Events view is set to Suggested Events click Named in the actions bar to shift to the Named Events view. The grid displays an Event stack for each of the five Events you created in Lesson 2.
2. If you don’t see the calendar, click the Calendar button (![]() ) at the right of the Taskbar. The calendar’s header currently reads “All Years,” indicating that the Events view is displaying all the Events in your catalog, regardless of their dates.
) at the right of the Taskbar. The calendar’s header currently reads “All Years,” indicating that the Events view is displaying all the Events in your catalog, regardless of their dates.
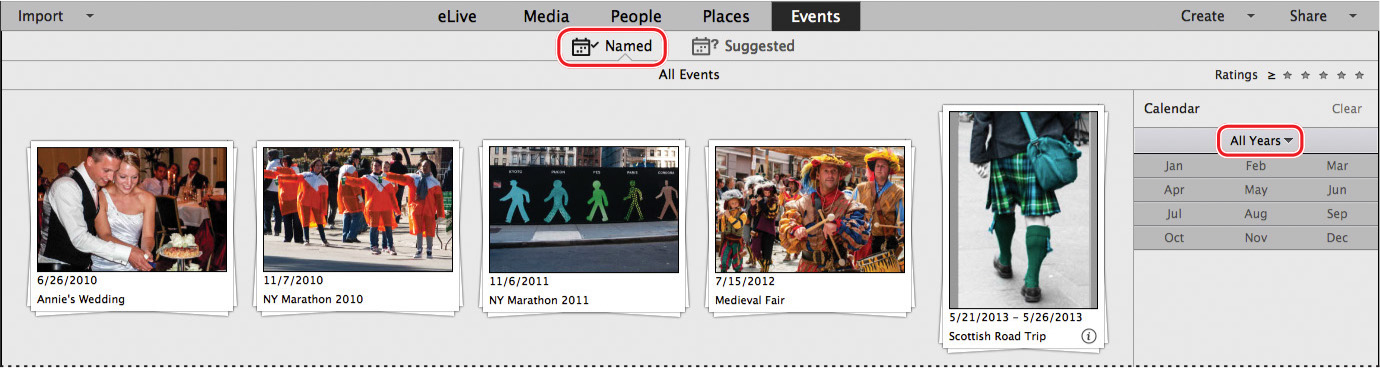
3. Click the All Years heading; the drop-down menu shows that your catalog contains Events from each year from 2010 to 2013. Choose 2013 from the menu. The Events view is now filtered to show only one named event, which takes place over a six-day period in May.

4. Click Suggested in the actions bar to shift to Suggested Events mode. Use the calendar menu to switch from the All Years view to focus on 2013. Click the month of May on the calendar. In this view, the photos are separated into two groups, each captured over consecutive days, with a one-day break between them.

5. Select the group dated May 22-21, 2013; then, click Add Event. Name the Event Touring the Highlands; then, click OK. Choose Edit > Deselect, and then switch to the Named Events view to see the new named event stack.
The six-day Scottish Road Trip has not been split up; Suggested Events has merely enabled you to designate a subset based on grouped capture dates as an event in its own right. The Scottish Road Trip event still covers the original six-day period.
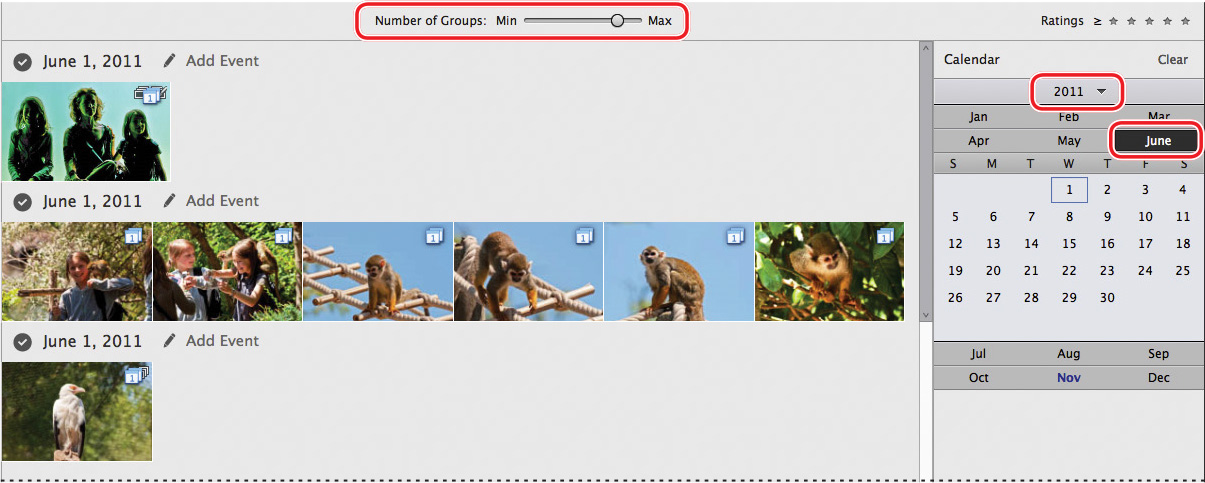
6. Switch to the Suggested Events view. With the calendar set to display All Years, increase the Number Of Groups to the maximum; then, select the stack dated June 1, 2011. Click Add Event and name the new event A trip to the zoo.
7. Choose Edit > Deselect. Choose 2011 from the calendar menu, and then click to focus on the month of June. Drag the Number Of Groups slider to a setting one stop less than the maximum, and then scroll down the preview pane; this one-day event is now divided into clusters based on capture time. These suggested sub-events correspond to the different animals encountered during a walk around the zoo; four of the six sub-events are represented in the preview pane by stacks that you created earlier.
8. Select the second group, click Add Event, and type Meeting the monkeys; then, click OK. Choose Edit > Deselect. Switch back from Suggested Events mode to the default Named Events view to see your new Event stacks.
9. Click Media in the view picker, and then expand the Events Tags pane in the Tags Panel. Click the search box for the event “A trip to the zoo;” then, select one of the spider monkey pictures. The Image Tags pane reveals that the photo is also part of the event “Meeting the monkeys.”
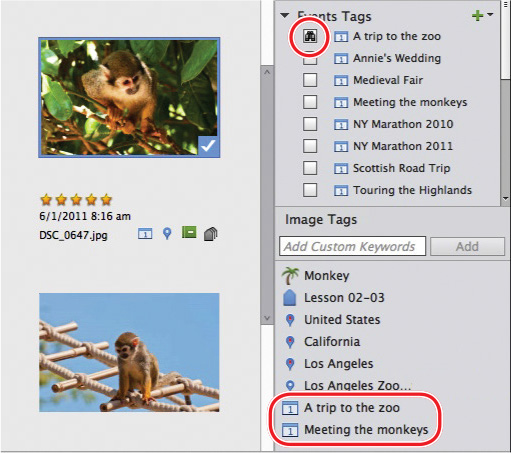
10. Click All Media in the Actions bar to clear the search, and then click the search box for the six-day event “Scottish Road Trip.” Select one of the lighthouse images; the Image Tags pane shows that the photo is also tagged with the two-day event, “Touring the Highlands”.
Locating files in the folder list
Most of us have our own strategies for organizing and searching for files among the folders on our hard disks. In the folders list you can do everything you’re used to doing in the familiar Windows Explorer or the Mac OS Finder—the important difference is that your actions in the folders list are tracked by the Organizer, so that you’ll never need to locate and reconnect files that are no longer recognized by the catalog, having been moved or renamed outside Photoshop Elements.
1. If necessary, clear any active filters and deselect any album or folder selected in the left panel by clicking click Back and/or All Media in the actions bar.
The My Folders list is the default folders view, listing only your managed folders: folders containing media files that have already been imported to your catalog.
![]() Tip
Tip
You can identify a managed folder in the hierarchy, (a folder that contains media files that are already part of your catalog) by the picture icon on the folder (![]() ). Watched folders (on Windows only) display a binoculars icon (
). Watched folders (on Windows only) display a binoculars icon (![]() ).
).
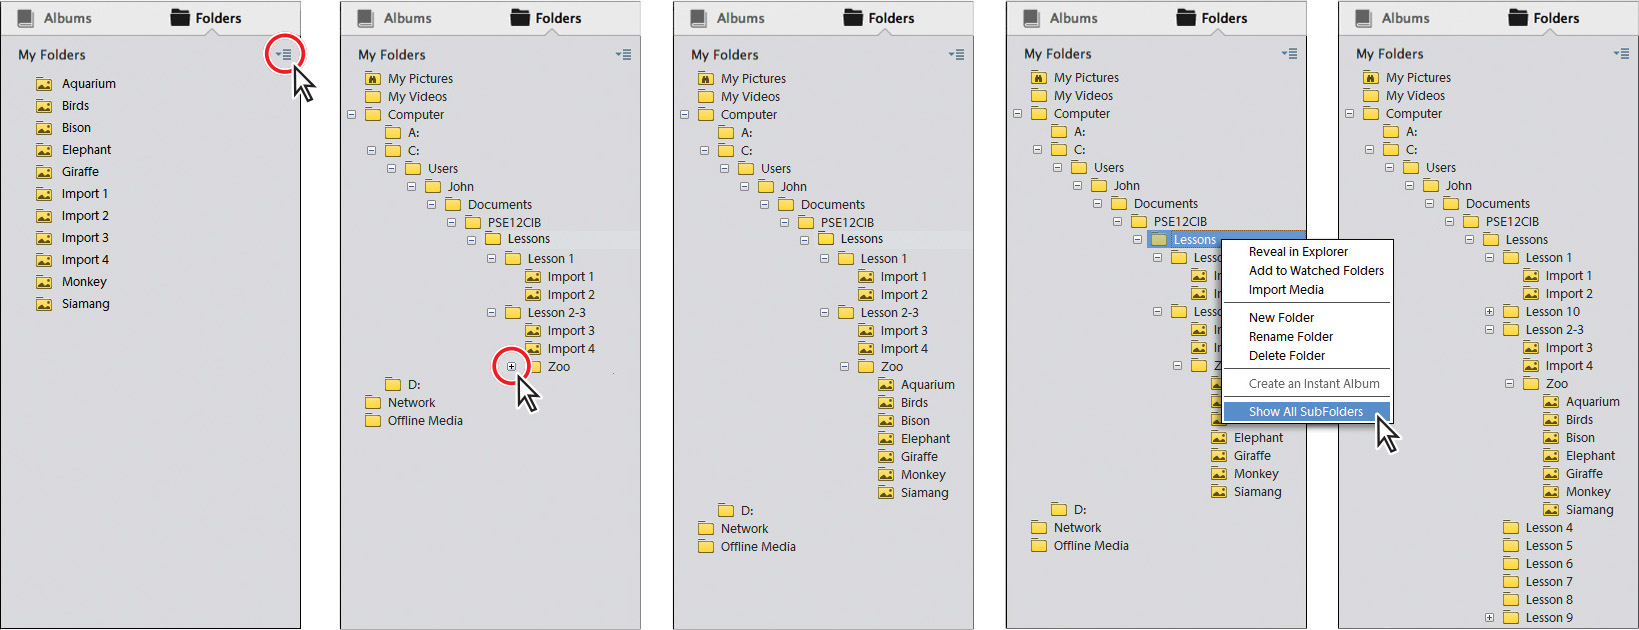
2. Click the menu icon (![]() ) at the right of the My Folders header, and choose View As Tree. The Folders list reveals the folder structure on your hard disk. By default, only those branches of the hierarchy that lead to managed folders are expanded. Click the plus sign (+) or minus sign (-) beside any folder to expand or collapse it. Right-click / Control-click the PSE14CIB > Lessons folder and choose Show All Subfolders from the context menu to see those subfolders not yet managed by Photoshop Elements.
) at the right of the My Folders header, and choose View As Tree. The Folders list reveals the folder structure on your hard disk. By default, only those branches of the hierarchy that lead to managed folders are expanded. Click the plus sign (+) or minus sign (-) beside any folder to expand or collapse it. Right-click / Control-click the PSE14CIB > Lessons folder and choose Show All Subfolders from the context menu to see those subfolders not yet managed by Photoshop Elements.
3. Select any managed folder in the Folders list to filter the thumbnails grid so that you see only the contents of that folder. Right-click / Control-click the folder to see the options available in the context menu. Click the All Media button in the actions bar to see all the images in your catalog once more.
4. Right-click / Control-click any image in the Media Browser, and then choose Go To Folder from the context menu. The folder in which that photo is stored is selected in the folders list and the Media Browser displays only the managed files inside it. Click the All Media button to see all the images in your catalog. Click the menu icon in the My Folders header and choose View As List.
Using the Timeline to refine a search
The Timeline is an effective search tool in its own right, but you can also use it in combination with any of the other search and filter tools to help you to refine a search or to navigate the results. You might search for photos with a particular keyword tag, and then use the Timeline to narrow the search to the files from a particular import batch, or images captured within a specific date range.
![]() Note
Note
The height of the bars indicates the relative number of files captured in each month.
1. Make sure that the Sort By option in the actions bar is set to Oldest; then, choose View > Timeline to show the timeline above the Media Browser. The Timeline breaks your catalog down by import date; you can see that your catalog contains images captured in six different years over a ten-year span, from the oldest entry in September 2003, to the most recent in August 2013.

2. Click any of the bars in the Timeline, or drag the sliding frame; the thumbnails grid scrolls, if necessary, to show you the first image in the grid with a capture date that falls within that month.
3. Drag the markers at the ends of the timeline inwards to define a range of six or eight months. The grid now displays only the images captured in that period.

4. In the actions bar, set the Sort By option to Import Batch. The bars in the Timeline now represent import batches arranged in chronological order.

5. Click a bar in the Timeline; the view scrolls to show you the first image imported in that batch. In the thumbnail grid, the photos are grouped under batch headers. You can select all the images in a batch by clicking the header. Choose View > Timeline to hide the Timeline, and then reset the sorting order to display the oldest images first.

Finding photos by searching for keywords
There are several ways to locate photos that are tagged with a particular keyword, or with a given combination of keywords. We’ll start with a basic text search.
1. Press Ctrl+Shift+A / Command+Shift+A to make sure you have no files selected, and then choose View > Expand All Stacks.
2. Click in the text search box at the top of the workspace and type the letter “A.” A drop-down menu offers shortcuts drawn not only from the keywords in your catalog, but also from any People, Places, and Events tags that match the letters you type. Press Backspace / Delete, and then type the letter “B.” This time, the menu shows only keywords: one tag from the default Smart Tags, and two that you created earlier. Add the letter “i.” The choice is narrowed to Birds and Bison and the thumbnail grid is already filtered to show all of your images of birds and bison. Click a menu shortcut, or finish typing whichever keyword you prefer.

![]() Tip
Tip
Though they will not appear in the shortcut suggestions, a text search will also find matches in file names, album names, captions, notes, dates, and other text embedded in your photos’ metadata.
3. Click the Back button in the actions bar above the thumbnail grid to clear the text search. Try typing Birds and Bison; are there any images tagged with both of these keywords? Click Back, and then try Birds or Bison; how many photos are tagged with at least one of these keywords? Try walk not lighthouse. When you’re done, clear the keyword search by clicking the Back button.
For a list of supported operators (and, or, not, etc.) for text searches, please refer to Photoshop Elements Help.
4. Now you’ll run a keyword search from the Tags panel. If necessary, click the Keyword / Info button at the far right of the Taskbar to see the right panel and expand the Other keywords category. Click the empty search box to the left of the Lighthouse tag. The Media Browser displays six photos with this tag.
![]() Tip
Tip
You can refine a keywords search by choosing a folder or album from the left panel to limit the search to that source, or by defining a date range in the Timeline.
5. At the far right of the Actions bar, click the second star in the Ratings filter to refine the search.

Saving complex searches
It’s unlikely that the results of the search you’ve set up will ever change, no matter how many photos you add to your library; the Scotland vacation and the walk in the Highlands are done. However, when you set up search with more generalized criteria, it can return more images each time new matches are added to the catalog.
1. Click Clear at the right of the search results bar to clear the current search terms. In the Tags panel, click the search boxes for the Family Trips tag (in the Travel category), the Kids People tag, and the United States Places tag. Set a rating of three stars or higher in the actions bar.
There are no photos in your catalog that match these criteria—but that may well change after the next school break. You can save this search and run it periodically to find the best shots to add to your happiest family album.
2. Click the Options button at the right of the search result bar and choose Save Search Criteria As Saved Search. In the Create Saved Search dialog box, name the saved search Best of Kids US Vacations, and then click OK.
3. Click the Back button in the actions bar to clear the search; then, click the magnifying-glass icon at the left of the text search box at the top of the workspace and choose Saved Searches from the menu.

4. Select your saved search in the Saved searches dialog box, and then click Open. The search results bar lists your saved search criteria. Click clear in the search results bar.

![]() Tip
Tip
To modify the criteria that define a saved search, and even change it from an “and” search to an “or” search, select the search in the Saved searches dialog box, and then click New Search Query.
Finding photos by searching their metadata
Some metadata attached to an image file is generated automatically by the camera; more is added when you spend time organizing your catalog. Searchable metadata includes file attributes, tags, ratings, albums, version sets, captions, notes, capture date, and a range of camera model, lens, and exposure details—to mention just a few!
The Details (Metadata) search lets you leverage all that information to find exactly the files you want; run any search, and then filter for just the shots taken with a wide-angle lens.
1. Choose Find > By Details (Metadata). Choose the criteria you want from the menus provided. Any metadata search you define can be saved as a saved search by simply activating that option below the search rules. Set up a few search rules of your own, and examine the criteria menus to see the many searchable categories.
2. Click Cancel to dismiss the Find by Details (Metadata) dialog.
Finding photos by visual similarity
In Lesson 2, you used the People Recognition feature and saw how easy it makes the task of tagging the faces in large numbers of photos. In this section you’ll look at another set of tools that harness the power of Photoshop Elements’ automatic image analysis software.
1. In the Tags panel, click the checkbox to the left of the Animals keyword to isolate all the photos with that tag.
2. Click the magnifying-glass icon beside the text search box, and choose Visual Similarity Search from the menu.
3. Choose Edit > Deselect, and then drag the image DSC_0609.jpg to the Find bar.
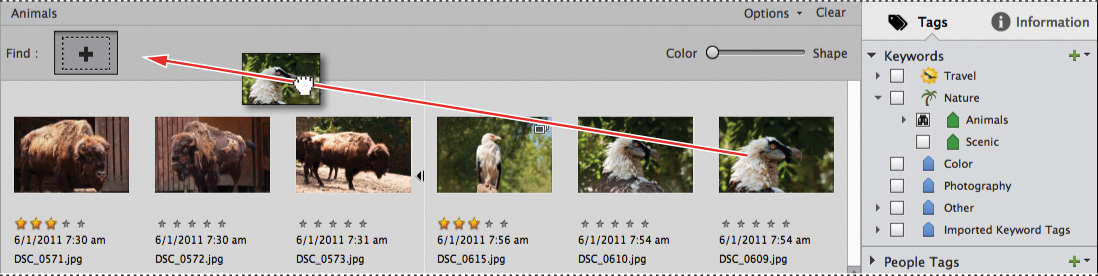
The search returns images displayed in the Media Browser in descending order of visual similarity to the photo you dragged to the Find bar. A marker displaying the calculated percentage of visual similarity for each image appears in the bottom left corner of its thumbnail, and a slider appears at the Find bar for tweaking the search results. The optimum position for the slider will vary for each image searched.

![]() Note
Note
The search results you see on screen may vary from those illustrated here, depending on your operating system.
4. Experiment with the Color / Shape slider. A move to the left weights the analysis towards similarities in color, texture, and pattern; moving the slider to the right returns images that share more in terms of shape, proportion, and composition.
5. Right-click / Control-click the thumbnail in the Find bar and choose Remove From Search. Make another image the object of a new search. Experiment with the Color–Shape slider, then repeat the process for several more images.
In some cases it may be helpful to add a second reference photo to your visual search. You can either drag a second image to the find bar, or click the plus sign (+) to the right of the first reference photo in the Find bar and select a second image from the Media Browser. The search will look for a combination of visual attributes.
6. Click Clear at the right of the actions bar; then, repeat step 1.
Finding objects in photos
You can search your photo library for a specific object.
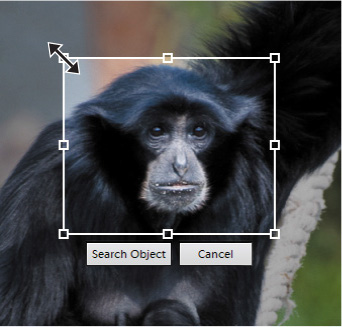
1. In the Media Browser, select the image DSC_0472.jpg, a photo of a Siamang.
2. Choose Find > By Visual Searches > Objects Appearing In Photos.
3. In the enlarged view, drag the bounding box to the ape’s head. Use the handles at the corners of the bounding box to fit it neatly around the shape, and then click Search Object.
Once again, the results are ranked by similarity to the reference object. As for all visual searches, you can refine the search results by tweaking the Color–Shape slider.
4. When you’re done, click the Back button at the left of the actions bar.
Finding and removing duplicate photos
The last of the visual search options finds and groups duplicated, or very similar images, and then gives you the opportunity to either stack them or delete them from your catalog—great for housekeeping as your image library gets bigger.
![]() Tip
Tip
The Duplicate Photos search can be particularly helpful for dealing with long series of photos captured with a camera set to the auto-bracketing or multi-burst mode.
The process is very similar to the automated stacking workflow (see “Stacking photos automatically” earlier in this lesson). You’ll be presented with groups of similar photos; for each group, you can stack the photos and keep them in the catalog, confirm them for removal, or do nothing.
You can search an individual folder for duplicates, or run the search on a selection of images in the Media Browser. If there is no folder or album selected as the image source, no filter in operation, and no active selection in the media Browser, Photoshop Elements searches your entire catalog for duplicates.
Congratulations—you’ve reached the end of Lesson 3! In this lesson, you’ve created version sets, stacks, and albums, and discovered more techniques for finding and managing your files.
Review questions
1. Do you need to be in the Media view to add keyword tags to an image?
2. What are version sets and stacks?
3. What is the main difference between grouping files using shared keyword tags and grouping them in an album?
4. What is the purpose of the Timeline view?
5. Why would you save search criteria as a saved search?
Review answers
1. Though the Tags panel in the Media view offers the most keyword tagging options, you can add keywords to your photos in any of the other three Organizer views by typing in the text box in the Image Tags panel. To show the Image Tags panel in the People and Events views, you’ll first need to expand a stack, and then click the Info button at the right of the Taskbar. In the Places view, the Info button is available at all times.
2. A version set automatically groups an original photo and its edited versions. Stacks can be created manually or automatically to group similar or related photos. A version set can be nested inside a stack: if you edit a photo that’s in a stack, the photo and its edited copy are put in a version set nested inside the stack. Both version sets and stacks make it easier to locate photos by reducing the clutter in the thumbnail grid.
3. The main difference between grouping files in an album, rather than with a shared keyword tag, is that in an album you can rearrange the order of the files.
4. The Timeline is an effective search tool in its own right, but it’s very useful in combination with other search and filter tools to help you to refine a search or to navigate the results. You might use the Timeline to narrow search results to files from a particular import batch, or images captured within a specific date range.
5. For many searches, you can easily “save” the results—in other words, preserve the grouping of images that match the search criteria—by creating an album or by tagging all the photos returned by the search with the same keyword, Place, or Event tag. Once established, these groupings are static; their content will not change over time unless you manually add or remove photos or tags. A saved search, on the other hand, can be more versatile; you can run the same complex search again and again, returning more images that match the search criteria each time you add photos to your catalog.