10 Printing, Sharing, and Exporting
Lesson overview
In previous lessons you’ve imported images from a range of sources, explored a variety of ways to organize and find your files, learned how to correct and enhance photos, and then created projects and presentations to showcase them.
In this lesson, you’ll learn about outputting your images and creations so that you can share them with family, friends, or the world at large:
Printing a contact sheet
Printing a picture package
Printing individual photos
Fine-tuning the composition of an image in the print preview
Sharing photos by email
Backing up your catalog and media files
Sharing your photos online
Exporting images for use on the web

This lesson will take about 45 minutes to complete. Please log in to your account at peachpit.com to download the lesson files for this lesson, or go to the “Getting Started” section at the beginning of this book and follow the instructions under “Accessing the lesson files and Web Edition.” Store the files on your computer in a convenient location. Your Account page is also where you’ll find any updates to the lesson files. Look on the Lesson & Update Files tab to access the most current content.
Getting started
You’ll begin by importing the sample images for this lesson to your CIB Catalog.
![]() Note
Note
Before you start this lesson, make sure you’ve set up a folder for your lesson files and downloaded the Lesson 10 folder from your Account page at www.peachpit.com, as detailed in “Accessing the lesson files and Web Edition” and “Creating a work folder” in the “Getting Started” section at the beginning of this book. You should also have created a new work catalog (see “Creating a catalog for working with this book” in Lesson 1).
Start Photoshop Elements, and click Organizer in the Home screen. In the Organizer, check the lower-right corner of the workspace to make sure that your CIB Catalog is loaded—if not, choose File > Manage Catalogs, and load it.
Click the Import button at the upper left of the workspace, and choose From Files And Folders from the drop-down menu; then, locate and select the Lesson 10 folder. Activate the option Get Photos From Subfolders, and disable all of the automatic processing options; then, click Get Media.
In the Import Attached Keyword Tags dialog, click Select All; then, click OK.
Thumbnails of the images you’ve just imported appear in the Media Browser. The bar above the thumbnails indicates that you are viewing newly imported files.
About printing
Photoshop Elements offers a range of options for printing your photographs as well as projects such as photo books, greeting cards, and photo collages. You can output any Photoshop Elements print job from your home printer or take advantage of Adobe partner services to order professional prints online.
You can print photos individually (in batches or one at a time), have Photoshop Elements generate a picture package layout that repeats the same image at a variety of sizes on the same page, or preview a selection of photos as thumbnail images arranged on a printed contact sheet.
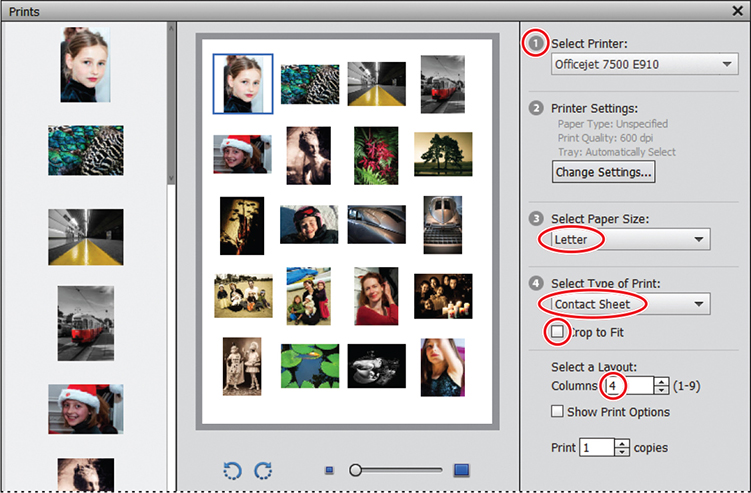
Printing a contact sheet
Before the advent of digital photography, a contact sheet or contact proof was produced by laying strips of film negatives directly onto a sheet of photographic paper, which was then exposed in the darkroom to create a printed preview of every shot on the roll. Photoshop Elements offers the option of printing a digital contact sheet—an effective and economical way to print-preview a selection of images at thumbnail size, arranged in a grid layout on a single sheet of paper.
To learn how to set up a contact sheet on macOS, skip ahead to the next exercise.
Printing a contact sheet on Windows
Click the Back button (
 ) at the left of the actions bar above the thumbnail grid, so that the Media Browser displays all the images in your catalog.
At the top of the left panel, click Folders, and then, in the My Folder list, select the folder To_Print. Press Ctrl+A to select all the images in the source folder.
Choose File > Print.
![]() Tip
Tip
You can also open the Prints dialog in contact-sheet mode from the Create tab above the right panel group. Choose Photo Prints from the Create menu, and then click Contact Sheet. If you cancel a print job that was launched from the Create menu, you’ll also need to click Cancel in the taskbar below the Create panel.
The Prints dialog opens. The column on the left displays thumbnails of all the photos you selected for this print job. At center stage is the print preview.
In the Prints dialog, choose a printer from the Select Printer menu. For the purposes of this demonstration, set the paper size to Letter. From the Select Type Of Print menu, choose Contact Sheet; make sure the Crop To Fit option is deselected. Under Select A Layout, the number of columns should be set to 4, so that all 20 photos will fit neatly on a single page.
![]() Tip
Tip
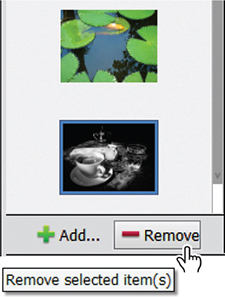
To remove a photo from the contact sheet, select its thumb-nail in the column at the left, and click the Remove button (![]() ) below the menu pane.
) below the menu pane.
The contact sheet layout includes all the images in the thumbnail column at the left. A page count below the print preview indicates that you are viewing page 1 of 1.
Under Select A Layout, click the down arrow button beside the Columns number, or type 3 in the text box. With only three columns, the images are larger, but only nine photos will fit on a single page at this paper size, so the page count below the print preview now indicates that you are viewing page 1 of 3. Use the Next Page and Previous Page buttons on either side of the page count to navigate between the pages. Change the number of columns to nine, which is the maximum. You can see that a single letter-size page can accommodate many photos at this setting. Return the layout to four columns.
Click to select any photo in the print preview; then, use the slider below the preview pane to zoom in. Drag the photo to reposition it within the frame of its image cell. Select another image, and then use the Rotate buttons to the left of the zoom slider to change the photo’s orientation.
 Note
NoteSome words in the text label may be truncated, depending on the page setup and column layout.
To print information extracted from the images’ metadata below each photo on the contact sheet, first click to activate Show Print Options (just below the Columns setting), and then select any or all of the text label options.
Click Print or Cancel, and skip to “Printing a picture package” on the next page.
Printing a contact sheet on macOS
On macOS, you initiate a contact-sheet print from the Editor. For this demonstration, we’ll use all the photos in a single folder; it will be quicker to open the Editor without first making a selection in the Organizer. If you want to print a contact sheet with photos drawn from multiple folders, you’ll need to select the images in the Media Browser, and then switch to the Editor.
Press Shift+Command+A to deselect any images that are currently selected in the Media Browser; then, click the Editor button (
 ) in the taskbar. If necessary, click Expert in the mode picker to switch the Editor to Expert mode.
 Tip
TipThe alternative option in the Use menu under Source Images fills your contact sheet with whatever images are already open in the Editor. You would use this setting if you had made a selection of images in the Media Browser before switching to the Editor.
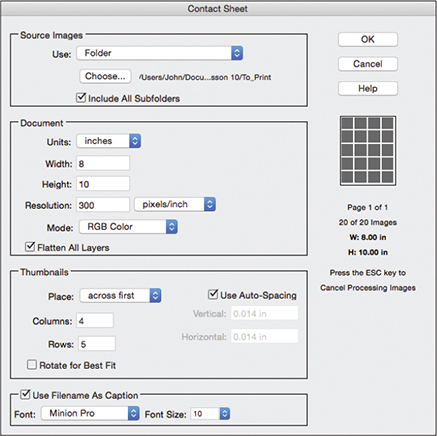
Choose File > Contact Sheet II. Set up the Contact Sheet dialog as shown in the illustration at the right. Choose Folder from the Use menu under Source Images. Click Choose, and locate your Lesson 10/To_Print folder. Click Open. In the Document settings, specify a size for your contact sheet. Under Thumbnails, specify the order in which the images will be placed. Select Use Auto-Spacing; then, type 4 and 5 in the Columns and Rows boxes, respectively. Your Columns and Rows settings are reflected in the layout preview at the right. Deselect Rotate For Best Fit, and select Use Filename As Caption.
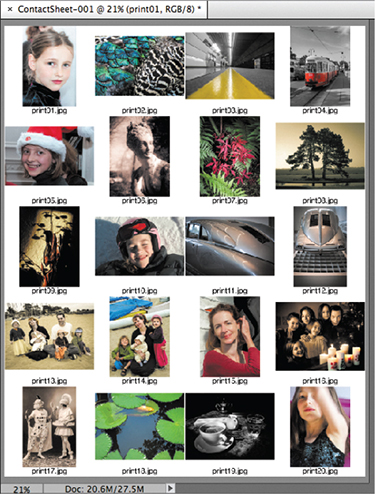
Click OK, and then wait while Photoshop Elements places the images and captions.
In our example, all 20 images fit onto a single page. When the number of images selected for printing exceeds the capacity of a single page at the layout settings specified, Photoshop Elements generates more pages to accommodate the extra photos.
![]() Tip
Tip
You can also open the Prints dialog in contact-sheet mode from the Create tab above the right panel group. Choose Photo Prints from the Create menu, and then click Contact Sheet. If you do this from the Organizer, you’ll see a message asking if you’d like to open the Editor to initiate printing. If you cancel a print job that was launched from the Create menu, you’ll also need to click Cancel in the taskbar below the Create panel.
Select the contact-sheet page(s) in the Photo Bin. Choose File > Print if you wish to print the contact sheet. If not, choose File > Close; then, click Don’t Save.
Printing a picture package
A picture package layout lets you print a photo repeated at a choice of sizes on the same page, much as professional portrait studios do. You can choose from a variety of layout options and a range of image sizes to customize your picture package print.
To set up a picture package print on macOS, skip ahead to the next exercise.
Printing a picture package on Windows
Select two or more pictures in the Media Browser, and then choose File > Print.
In the Prints dialog, choose a printer from the Select Printer menu. Your choice of paper size will determine which layout options are available for your picture package; for the purposes of this exercise, choose Letter from the Select Paper Size menu.
TipYou can also open the Prints dialog in picture package mode from the Create tab. Click Photo Prints, and then click the Picture Package button. If you cancel a print job that was launched from the Create menu, you’ll also need to click Cancel in the taskbar below the Create panel.
Choose Picture Package from the Select Type Of Print menu. If a Printing Warning dialog appears, cautioning against enlarging pictures, click OK; for this exercise, you’ll print multiple images at smaller sizes.
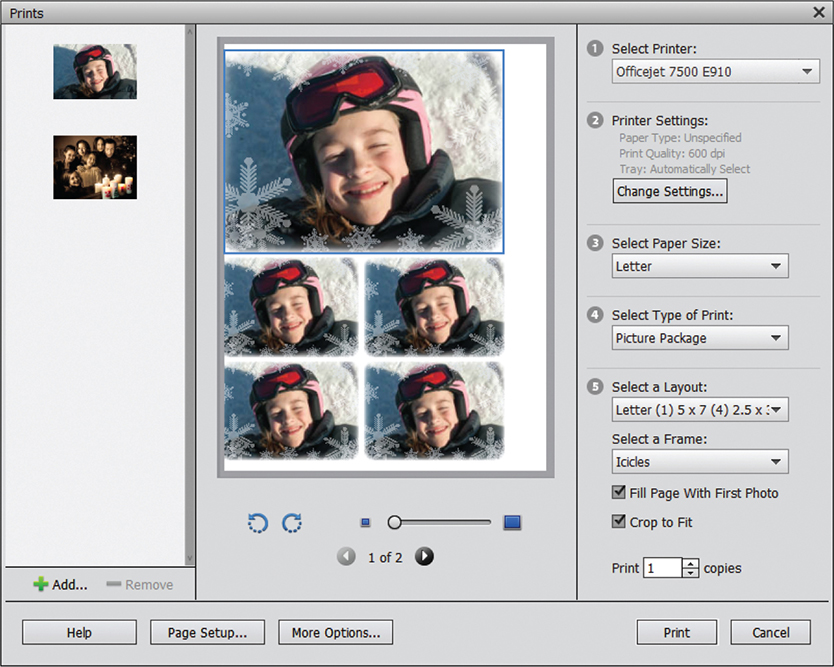
Choose a layout from the Select A Layout menu, and then select the option Fill Page With First Photo. This will result in a page with a single photo repeated at a variety of sizes, according to the layout you’ve chosen. If you selected more than one photo in the Media Browser, a separate Print Package page will be generated for each photo selected; you can see the print preview for each page by clicking the page navigation buttons below the preview pane.
The layout options available for a picture package depend on the paper size specified in the Prints dialog, the page setup, and the printer preferences. To change the paper size, choose from the Select Paper Size menu, or click either the Page Setup button at the lower left of the Prints dialog or the Change Settings button under Printer Settings. Depending on your printer, you may need to look for the paper size options in the Advanced preferences settings.
Try some of the options in the Select A Frame menu. We selected the Icicles border to suit the winter holiday theme of our selection. You can choose only one frame per picture package; it will be applied to every picture in the layout.
Toggle the Crop To Fit option, and assess the result; the Crop To Fit option may fit the multiple images more closely to the layout to better fill the printable area, especially when your photo is of nonstandard proportions.
 Note
NoteThe images in a picture package layout are automatically oriented to make the best use of the print-able paper area for the layout you have chosen. You can’t manually rotate the image cells (or photo holders) in a picture package layout; however, you can still zoom or rotate each image within its print well using the zoom slider and orientation buttons below the preview. Drag any image in the picture package to adjust its position within its print well.
Click the Add button (
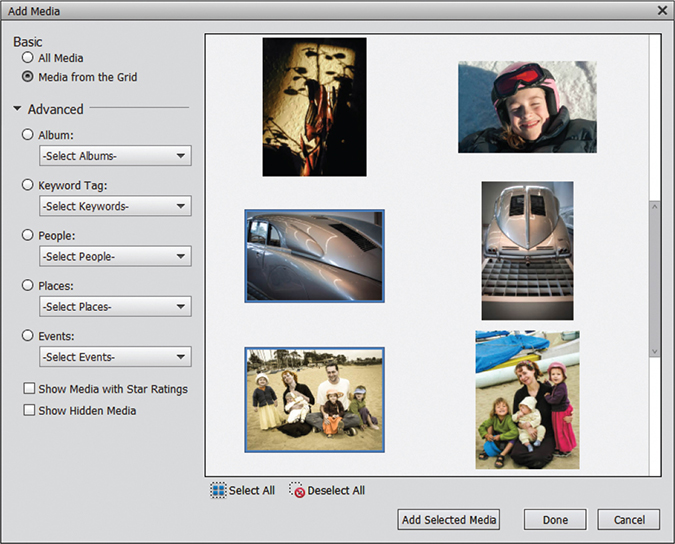
 ) below the thumbnail menu at the left. In the Add Media dialog, you can choose from your entire catalog or from those photos currently visible in the Media Browser. More sources can be accessed by expanding the Advanced options. Choose one or more photos from any of these sets, and then click Done; the selected images are added to the print job and now appear in the thumbnails column in the Prints dialog.
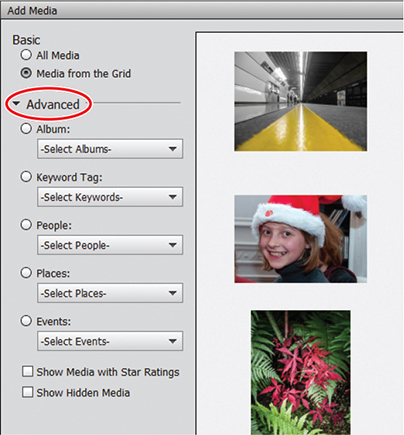
Drag the thumbnail of one of your newly acquired photos from the thumbnails column onto any image cell in the print preview; the original image is replaced.
Click Print or Cancel, and skip ahead to the exercise “Printing individual photos.”
Printing a picture package on macOS
If necessary, switch to the Organizer by clicking the Organizer button (
 ) in the taskbar, leaving the Editor window open. Select two or more photos in the Media Browser; then, click the Editor button () in the taskbar. If necessary, click Expert in the mode picker to switch the Editor to Expert mode. Tip
You can open the Picture Package dialog from the Create tab. Click Photo Prints, and then click the Picture Package button. If you do this from the Organizer, you’ll see a message asking if you’d like to open the Editor to initiate printing.
In the Photo Bin, click whichever photo you’d like to print first to make it the active (foremost) image; then, Choose File > Picture Package.
In the Picture Package dialog, under Document, make a selection from the Page Size menu and the Layout menu, and then click the Edit Layout button below the Layout preview.
In the Picture Package Edit Layout dialog, click to select an image in the Edit Layout preview, and then click the Delete Zone button in the Image Zones area at the left. Select another image in the preview, and drag it to a new position on the page preview. Drag the handles on the image’s bounding box to scale it or to change its orientation; the image automatically rotates to fit the frame.
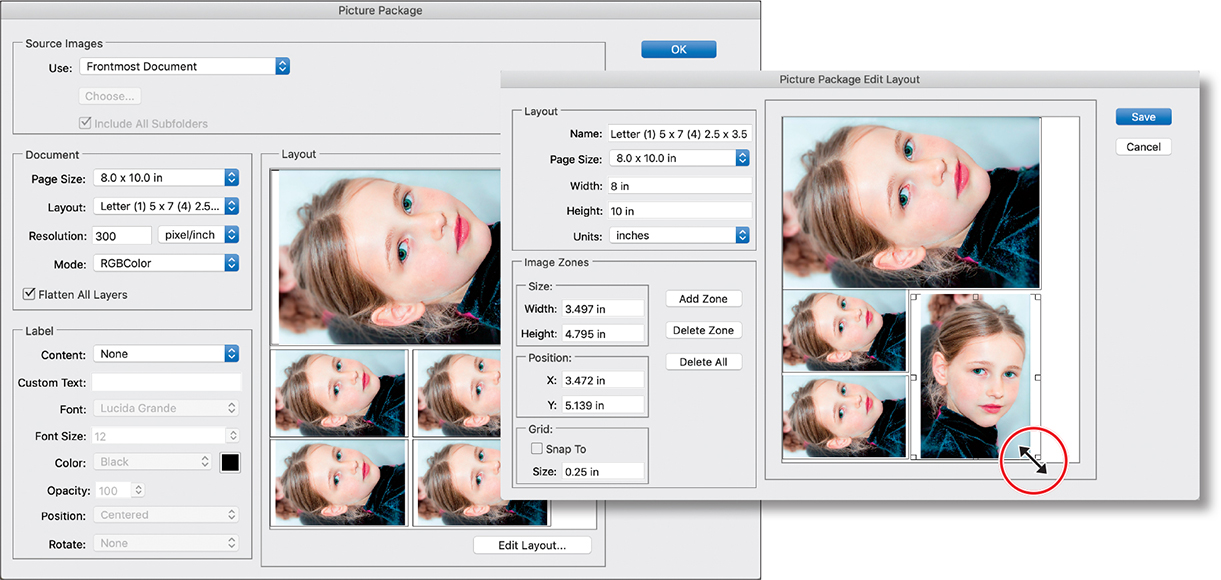
Right-click an image in the Edit Layout preview and try out some of the menu choices; then experiment with the other settings and buttons in the Image Zones options. Click Cancel, and then click No to avoid overwriting the default settings for the layout preset you selected.
TipIf you cancel a print job that was launched from the Create menu, you’ll also need to click Cancel in the taskbar below the Create panel.
Click OK in the Picture Package dialog, and then wait while Photoshop Elements creates a new document and places the images for your picture package. If you wish to see the picture package printed, choose File > Print; otherwise, choose File > Close All, and then click Don’t Save.
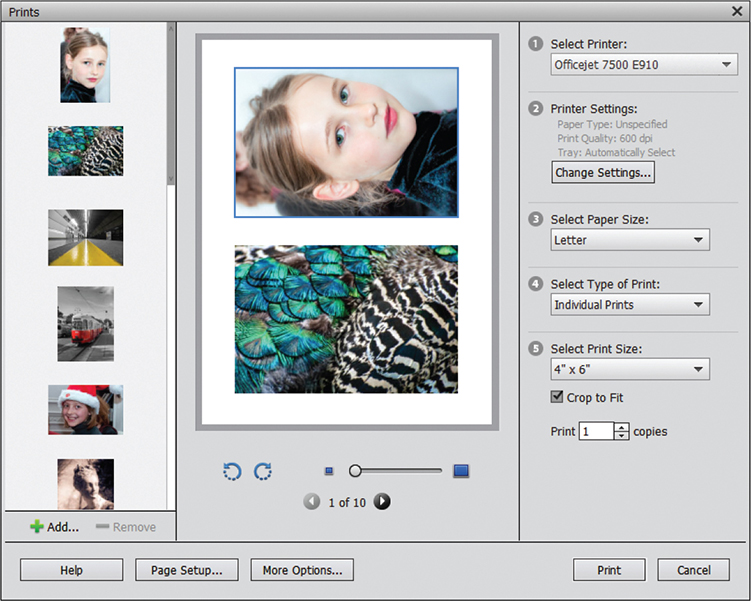
Printing individual photos
The Photoshop Elements Prints / Print dialog presents all your printing options in one convenient place, and also enables you to fine-tune the placement of each image within its own photo holder (its frame in the print preview). You can zoom or rotate an image with the controls beneath the preview and drag to reposition it, so you can get the image placed just right for printing without first editing it.
In the Organizer, Ctrl-click / Command-click to select eight or more images.
Choose File > Print. Alternatively, click the Create tab, click Photo Prints, and then click the Local Printer button. On macOS, click Yes to continue to the Editor, where printing will be initiated.
NoteOn macOS, the options in the Print dialog differ from those illustrated here. For more detailed information on printing on macOS, please refer to Photoshop Elements Help, and search other online resources in Community Help.
In the Prints / Print dialog, select a printer, paper size, and print size from the menus at the right. On Windows, choose Individual Prints from the Select Type Of Print menu. If you see a print-resolution alert, click OK to dismiss it.
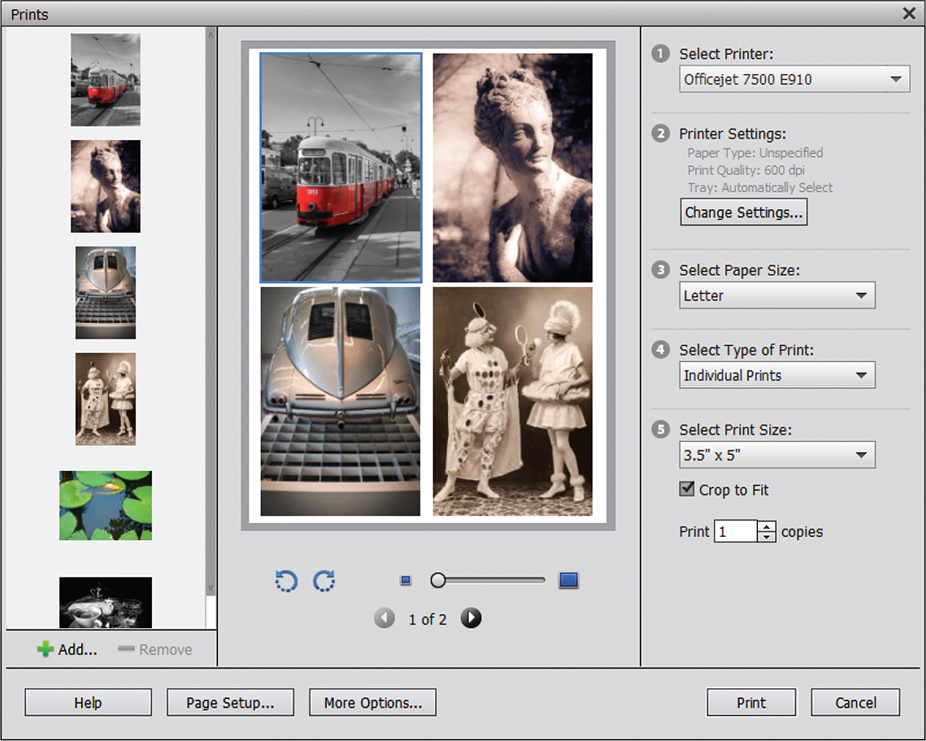
Experiment with the controls below the Print preview. Click to select an image in the preview, and zoom in and out inside the image cell using the zoom slider. Use the Rotate Left and Rotate Right buttons beside the zoom slider to change the orientation of the image within its print well. Drag the selected image to reposition it within the frame. Toggle the Crop To Fit option below the Select Print Size menu, and observe the effect in the print preview.
Select any image thumbnail in the menu column on the left side of the dialog, and click the Remove button (
 ). Tip
You can add images to the selection to be printed only if they are part of the currently active catalog.
Click the Add button (
) below the thumbnails menu. In the Add Media / Add Photos dialog, select an image source; you can choose from your entire catalog, or from those photos currently visible in the Media Browser. Choose one or more photos from any of these sets, and then click Add Selected Media / Add Selected Photos. The selected images are added to the thumbnails column in the Prints / Print dialog, and the Add Media / Add Photos dialog remains open. Expand the Advanced source options, and choose a different source. Select one or more photos; then, click Done to add the photos to your print job and dismiss the dialog. NoteOn macOS, many (not all) of the Advanced source options are visible by default in the Add Media dialog.
If you’ve selected more pictures than will fit on one page at the image dimensions you specified, Photoshop Elements automatically generates extra pages.
Check the page count below the print preview. If your print job has more than one page, preview the other pages by clicking the arrow buttons at either side of the page count.
Click the More Options button at the bottom of the dialog, and explore the settings available in the More Options dialog. In the Printing Choices section, you can choose to print text details with your images, add image borders or a background color, flip the image for iron-on transfers, and print crop marks to help you trim your images. The More Options dialog also offers Custom Print Size and Color Management settings. Click Cancel to close the dialog.
In the Prints / Print dialog, click Print if you wish to see these images printed; otherwise, click Cancel to save your ink and paper for your own prints. On macOS, choose File > Close All.
Sharing photos and videos online
In this section, we’ll look at a variety of ways to share your pictures with friends, family, clients, or the world at large. From within Photoshop Elements, you can email photos or upload your images, videos, and presentations directly to social networking or photo- and video-sharing websites by choosing from the Share tab menu in either the Organizer or the Editor. You can also use these services to download media.
Depending on whether you already have an account with the service you wish to use, you may first need to sign up. Some services, such as Flickr and Twitter, will ask you to authorize Photoshop Elements to connect to your online account.
Although the procedure for logging in and sharing may differ slightly for each of these services, the process is essentially similar, and you’ll be guided step by step.
Sharing photos by email
Perhaps the most basic way to share a photo is by attaching it to an email. The Organizer’s email function makes it easy, automatically optimizing your images specifically for sending via email.
![]() Note
Note
The first time you access this feature, you may be presented with the Email section of the Organizer’s preferences. Choose your email client (such as Microsoft Outlook or Apple Mail) from the menu, and then click OK. You can review or change your settings later by choosing the Email pane in the Preferences dialog.
In the Media Browser, select a photo to attach to an email. Click the Share tab; then click the Email button.
Drag another image from the Media Browser to the Email Attachments pane to add it to the selection to be emailed.
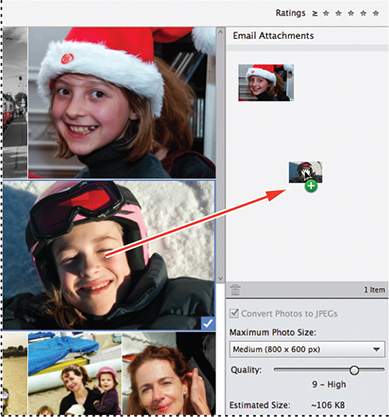
Choose one of the smaller size options from the Maximum Photo Size menu, and then adjust the image quality using the Quality slider. The higher the quality setting, the larger the file size will be— and therefore, the longer the download time. The estimated file size is displayed for your reference at the bottom of the Email Attachments panel. Click Next.
Exporting copies of your photos for the web
The Save For Web dialog box previews the effects of different optimization options; you can choose from a range of file formats for your exported files, resize them, specify color and compression options, and enable transparency or background matting. Use an export preset as a starting point, and then tweak the settings to fine-tune the optimization.
In this exercise you’ll optimize and export a copy in JPEG format, which reduces the file size and looks good in the majority of web browsers.
In the Organizer, click the All Media button (
 ) if it’s visible in the actions bar above the thumbnail grid. Select any photo in the Media Browser, and then click the Editor button () in the taskbar.
In the Editor, choose File > Save For Web. In the Save For Web dialog box, choose Fit On Screen from the Zoom menu, just above the Preview button in the lower-left corner of the dialog box.
TipWhile you’re previewing photos in the Save For Web dialog, you can magnify the view with the Zoom tool (
 ) in the toolbox at the upper left of the dialog. To zoom out, hold the Alt / Option key and click the image with the Zoom tool. While you’re zoomed in, drag in either window with the Hand tool (
 ); the images pan in unison so that both views show the same part of the photo.
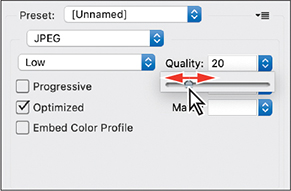
Watch the change in the file-size information displayed below the export preview on the right as you choose JPEG Medium from the Preset menu at the upper right of the dialog.
Select the JPEG Low preset; the file size is reduced even further. Tweak the Quality setting to set a level between the two presets; the default values for the JPEG Low and JPEG Medium settings are 10 and 30, respectively.
Under New Size, type 500 in the Width field. The Height is adjusted automatically to retain the image’s original proportions. Once again, notice the change in the file size displayed beneath the optimized export preview. Choose Fit On Screen from the Zoom menu to compare the reduced image to the original.
NoteThe JPEG format reduces the file size using compression, which discards some of the image data. The amount of information lost, and the resulting image quality, will vary depending on the photo you’re working with and the quality settings.
Click the Preview button in the lower-left corner of the Save For Web dialog to see the image displayed in your default browser at the current export settings. Scroll down the browser page, if necessary, to see a summary of the optimization settings that were applied. Return to Photoshop Elements.
Click Save. Add the extension _Work to the original, and save the file to your My CIB Work folder. In the Editor, choose File > Close, without saving changes.
Backing up your catalog and media files
The importance of a good backup strategy is often only understood too late. You can’t prevent a disaster from happening, but you can reduce the risk of loss— and the time and effort needed for recovery—by backing up regularly.
Backing up the catalog file
The catalog file stores not only the locations of your image files, but the metadata attached to them, including titles, captions, tags, ratings, and album groupings. One technique to protect this information is to save as much as possible back to your original image files. This process serves as a partial distributed backup of the catalog.
In the Organizer, click the All Media button (
) if it’s visible. Press Ctrl+A / Command+A to select all of the media files in your catalog; then, choose File > Save Metadata To Files. Click OK to dismiss any notification.
Next, you’ll make a full backup of your catalog and all the associated media files.
Choose File > Backup Catalog. Make sure that Full Backup is selected in the Backup Options; then, click Next. Select a destination drive, and then click the Browse button beside Backup Path to specify a destination folder. When you have chosen a destination folder, click New Folder and name the new folder CIB Backup [current date]; then, click Create. Click OK, and then click Save Backup. Photoshop Elements will notify you when the backup is complete; click OK to dismiss the message.
Doing incremental backups
An incremental backup saves you time by replacing only the catalog entries and images that have been modified since the last backup.
In the Media Browser, add ratings to several unrated photos by clicking the rating stars below the thumbnails. This will serve as the incremental change to the catalog since your full backup.
Choose File > Backup Catalog. This time, select Incremental Backup in the Backup Options; then, click Next.
Select the same destination drive, and then click the Browse button beside Backup Path to specify the same destination folder. When you have selected the destination folder, click New Folder and type CIB Backup Incremental [current date]. Click Create; then, click OK.
Click the Browse button beside Previous Backup File. Navigate to the folder containing your full backup, and select the file Backup.tly. Click Open, and then click Save Backup. Click OK to dismiss the completion message.
Should you ever need to restore a damaged catalog file or start fresh after a hard disk failure, simply choose File > Restore Catalog, and locate your backup files.
What is a contact sheet?
What is a picture package?
How can you fine-tune the composition of a photo for printing?
Is the Save For Web command available only in Expert mode?
What is an incremental backup?
A contact sheet is an effective and economical way to print-preview a selection of images at thumbnail size, arranged in a grid layout on a single sheet of paper.
A picture package lets you print a photo repeated at a choice of sizes on the same page. You can choose from a variety of layout options, with a range of image sizes, to customize your picture package print.
You can fine-tune the placement of each image within its own photo holder frame in the print preview, enabling you to get the image placed just right for printing without first editing it. Zoom or rotate an image with the controls beneath the print preview, and drag to reposition it in the frame.
The Save For Web command is available from the File menu in all three edit modes: Expert, Quick, and Guided.
An incremental backup copies only those images and catalog entries that have changed since the last full backup.