
9 Getting Creative
Lesson overview
Once you’ve adjusted and polished your photos, Photoshop Elements offers a multitude of ways to add your own artistic touches; you’ve already experimented with some of the creative possibilities of the Recompose and Photomerge tools and designed your own custom effects in the Filter Gallery.
In this lesson you’ll have some fun with the type tools and explore the Create mode, where Photoshop Elements makes it simple to create stylish, professional-looking projects to showcase your photos, from greeting cards and photo books to calendars and slideshows.
Locating artwork in the Graphics library
Setting up a photo project in Create mode
Adding a creative touch with text and graphics
Fitting text to an image
Building a slideshow
Working with layers, blend modes, layer styles, and effects
Creating layer masks and type masks

This lesson will take between 90 and 120 minutes to complete. Please log in to your account at peachpit.com to download the lesson files for this lesson, or go to the “Getting Started” section at the beginning of this book and follow the instructions under “Accessing the lesson files and Web Edition.” Store the files on your computer in a convenient location. Your Account page is also where you’ll find any updates to the lesson files. Look on the Lesson & Update Files tab to access the most current content.

Getting started
Begin by importing the sample images for this lesson to your CIB Catalog.
![]() Note
Note
Before you start this lesson, make sure you’ve set up a folder for your lesson files and downloaded the Lesson 9 folder from your Account page at www.peachpit.com, as detailed in “Accessing the lesson files and Web Edition” and “Creating a work folder” in the “Getting Started” section at the beginning of this book. You should also have created a new work catalog (see “Creating a catalog for working with this book” in Lesson 1).
Start Photoshop Elements, and click Organizer in the Home screen.
In the Organizer, check the lower-right corner of the workspace to make sure that your CIB Catalog is loaded—if not, choose File > Manage Catalogs, and select it from the list.
Click the Import button at the upper left of the Organizer workspace, and choose From Files And Folders from the drop-down menu. In the Get Photos And Videos From Files And Folders dialog, locate and select the Lesson 9 folder.
Disable the option Get Photos From Subfolders; then, click Get Media.
In the Import Attached Keyword Tags dialog, click Select All; then, click OK.
On the arty side of the Editor
The Photoshop Elements Editor is much more than just a digital darkroom; when you’re ready to go beyond simply improving your photos technically, you’ll find that the Editor is also a versatile desktop design studio equipped with everything you’ll need to give free rein to your creativity.
In Lessons 4, 5, and 6, you saw how even the standard tools for correcting color and lighting can also be used to achieve striking, evocative effects. In Lessons 7 and 8, you discovered ways to reinvent and reinterpret your photos with the image-editing magic of state-of-the-art content-aware editing and Photomerge technologies and by creating your own unique photo effects in the Filter Gallery.
In this lesson, you’ll have a little fun with the type tools, practice some interesting creative techniques using layers and masks, and take a look at the Editor’s Create mode, where Photoshop Elements can guide you through the process of designing stylish photo projects and presentations, from slideshows and photo books to calendars, greeting cards, and even customized CD or DVD labels.
Exploring the artwork library
Whether you’re working with a preset project template in Create mode or building a photo-illustration layer by layer in Expert mode, Photoshop Elements makes it quick and easy to create distinctive photo projects by providing an extensive collection of backgrounds, frames, text styles, clip-art shapes, and graphics in the Graphics library. Although this artwork is also available in the Create mode, we’ll start by exploring the Graphics panel in Expert mode.
In the Organizer, press Ctrl+Shift+A / Command+Shift+A, or choose Deselect from the Edit menu, to make sure you have no images selected in the Media Browser, and then click the Editor button (
 ) in the taskbar.
If the Editor is not already in Expert mode, click Expert in the mode picker at the top of the workspace, and then choose Window > Reset Panels. If you don’t see tabs for the Layers, Effects, Filters, Styles, and Graphics panels at the top of the Panel Bin, click the arrow beside the More button (
 ) at the right of the taskbar, and choose Custom Workspace at the bottom of the menu.
Click the Graphics tab at the top of the Panel Bin to bring the Graphics panel to the front.
Click the menu icon (
 ) at the far right of the Panel Bin’s header bar, and make sure the option Large Thumbnail View is selected.
Move the pointer over the left edge of the Graphics panel; when the double-arrow cursor appears, drag the edge of the Panel Bin to the left to increase it to its maximum width.
What you see displayed in the Graphics panel depends on the options set in the sorting menus above the thumbnail swatches. By default, the sorting menu at the left is set to “By Type.” At this setting, the content of the library is sorted by functional category. The second sorting menu lists the categories: Backgrounds, Frames, Graphics, Shapes, and Text.
In the header of the Graphics panel, choose each category in turn from the second menu, and scroll down to see thumbnails of the artwork available.

Using the Favorites panel
At first, the large number of choices in the Graphics panel may seem a little overwhelming, but you can easily locate the artwork you need by using the sorting and filtering menus at the top of the panel. These search functions are not available on the Graphics tab in Create mode, so it can save you time to do a little advance planning and assemble the items you want for a project while you’re in Expert mode, using the Graphics and Favorites panels in tandem.
Choose Window > Favorites. Drag the Favorites tab from the header of the floating panel group to the bottom of the Panel Bin, and release the mouse button when you see a blue line indicating an insertion point below the Graphics panel. Close the floating panel group. Move the pointer over the upper edge of the Favorites panel; then, drag upward with the double-arrow cursor until the Favorites panel occupies about half of the space in the Panel Bin.
The Favorites panel already contains a small sample selection of popular graphics and image effects. To clear these items, select each swatch in turn and click the trash can icon in the Favorites panel header. Alternatively, you can right-click each swatch in turn and choose Remove From Favorites from the context menu.
 Tip
TipHold the pointer over a swatch to see the item’s name. If you can’t find some of the graphics referred to in steps 3 through 7, Photoshop Elements has not yet finished downloading all of the project content that was not installed with the software. Make sure that you are connected to the internet; then, wait for a few minutes before working through these steps again.
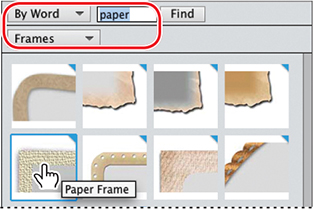
Choose By Word from the sorting menu in the header of the Graphics panel. If you don’t see the filter menu below the sorting menu and the Find button, change the sorting option temporarily to By Style, and then switch back to By Word. Type paper in the search box. Choose Backgrounds from the filter menu in the bar below the sorting menu, and then click Find. Drag the backgrounds Handmade Paper 03 and Handmade Paper 04 into the Favorites panel. You’ll need these items later in this lesson for your Create mode project.

Set the filter to Frames. Locate the Paper Frame swatch and drag it into the Favorites panel. Swipe over the word “paper” in the search box and type travel. Choose Graphics from the filter menu, and then click Find. Drag the graphics Compass 02 and Cruise Ship into the Favorites panel.
Choose By Color from the sorting menu, and then select Black from the colors menu. Set the filter to Backgrounds and add Black Folded Paper to your Favorites. Reset the filter to Frames and collect the Basic Black 40px frame.

From the sorting menu, choose By Style; then, select Comic Book from the adjacent styles menu. Set the filter for Graphics; then drag the graphic named Speech Bubble 05 to the Favorites panel.

 Note
NoteAt installation, the Graphics library contains only a small selection of items. Swatches marked with blue in the upper-right corner are “online assets” that will be downloaded to your computer automatically as soon as you place them in a project, so that your hard disk is not cluttered with unwanted items.
Change the style from Comic Book to Vintage. Collect the frames Gold Frame Ornate, Gold Frame Round 2, and Old Black & Gold Frame and the background Blue Swirly. Change the style filter from Vintage to Decorative, and add the graphics Gold Flourish Corner and Silver Flower Spray to your Favorites. Check through the preceding steps to make sure that you’ve added all 14 of the artwork items in the illustration at the right.
The Favorites panel can also store items from the Effects and Styles panels. To complete this exercise, you can now add some layer style effects that you’ll use to refine your photo projects later.
Click the Styles tab at the top of the Panel Bin. Choose Drop Shadows from the style categories menu and drag both the High and Low drop shadow effects to the Favorites panel.

Click the Organizer button (
 ) in the taskbar to return to the Organizer.
Producing a photo book
Our exploration of the Create mode will focus on the Photo Book project—the most involved of those offered in the Create menu. The skills and techniques you’ll learn for your photo book are applicable to all of the other Create mode projects.
A sophisticated, attractive way to present and share your memories, and an ideal output medium for digital scrapbooking, a photo book can make the perfect personalized gift for a loved one. You can either export your photo book in PDF format and have it printed and bound professionally, or print it yourself at home. For home printing, you’ll need high-quality double-sided paper, and depending on the capabilities of your printer, you may need to scale your layout in the print dialog to fit within the printable area.
![]() Tip
Tip
If you don’t see file names below the thumbnails in the Media Browser, select the Details and File Names options in the View menu.
Click the Lesson 9 folder in the My Folder list to isolate the images for this lesson. Make sure that the Sort By menu in the actions bar above the thumbnails is set to Oldest. In the Media Browser, select the image photobook_01.jpg; then Shift-click the image photobook_26.jpg to select all the images in the series.
Click the Create tab above the right panel group, and choose Photo Book from the Create menu. The Photo Book setup dialog opens.
TipYou can change the units of measurement used in the Photo Book setup dialog on the Units & Rulers tab in the Editor’s preferences dialog. If you don’t see all of the themes shown in the illustration at right (the Themes menu should contain more than 30 templates in all), wait a few minutes while Photoshop Elements downloads project content that was not installed with the software.
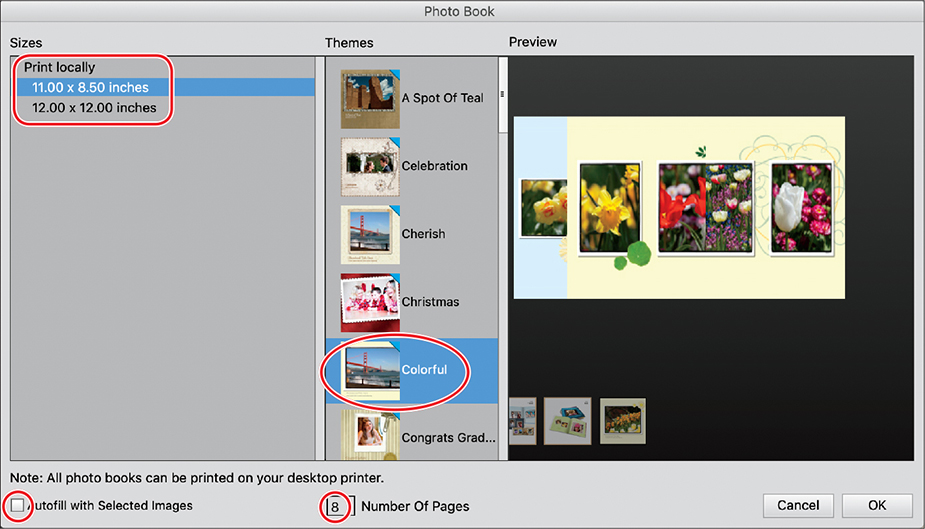
The Sizes pane shows the size options available for your printer; choose the size closest to that shown in the illustration below. Scroll the Themes menu to see the design templates offered; then, choose the Colorful template. At the bottom of the dialog, set the number of pages for the photo book to 8. For the purposes of this exercise, deselect the option Autofill With Selected Images; then, click OK.
You’ll see a series of progress bars as Photoshop Elements downloads online artwork assets, builds pages, and generates previews, and then the title page of the photo book appears in the Edit window. The Pages panel at the right displays thumbnail previews for the title page and four two-page spreads.
![]() Tip
Tip
If you don’t see thumbnails for a cover page and four two-page spreads in the Pages panel at the right, you may need to refresh the view. Click the Layouts button (![]() ) at the right of the taskbar; then, click the Pages button (
) at the right of the taskbar; then, click the Pages button (![]() ) to reopen the Pages panel.
) to reopen the Pages panel.
Show the Photo Bin by clicking the Photo Bin button (
 ) in the taskbar. The Photo Bin displays the images currently selected in the Organizer.
Changing page layouts
When Photoshop Elements generates Photo Book pages automatically, it applies a different layout to each page randomly, varying the number, size, and positioning of photos so that every spread has a unique design, as reflected in the Pages preview.
You can either accept the automatic layout as is or use it as a starting point and customize the design page by page. For the purpose of saving time in this project, we’ve prepared a tweaked layout designed to fit the lesson images, leaving it up to you to replace the page layout for the title page.
![]() Tip
Tip
You may see a warning that text layers need to be updated for output. If so, select the option Don’t Show Again, and then click Update.
Choose File > Close, and then click No / Don’t Save to discard the default layout. Choose File > Open. Navigate to and open your Lesson 9 folder; then, select the file Venice_Book.pse, and click Open. On Windows, you’ll need to select the nested file Venice_Book.pse and then click Open.
In the Pages panel at the right, make sure that the title page is selected.
Click the Layouts button (
 ) in the taskbar below the right panel. Scroll down in the Layouts menu to examine the variety of page design templates available. Hold the pointer over a layout preview thumbnail to see its name displayed in a tooltip. When you’re done, click the arrow at the right of the Different Layouts header to collapse that category.
In the One Photo category, locate the template Photobook Landscape Grey-text and drag the layout preview thumbnail to the title page in the Edit window.

Click the Pages button (
 ) in the taskbar below the right panel, and examine the completed base layout in the Pages preview. Including the cover page, the design now has the correct number of placeholders for our 26 lesson photos. Three of the placeholder frames may be hard to spot, as they fill whole pages, with smaller frames arranged on top of them (pages 2, 4, and 5).
Rearranging the order of images in a project
When you create a photo book—or any other photo project—and have Photoshop Elements place your photos automatically, the images are arranged in the layout template in the same order in which they appear in the Photo Bin.
For a multiple-page project such as a photo book, you can save time and effort by arranging your photos before you begin. In the Organizer, you can establish a custom sorting order by creating an album. Once you’re in the Editor, the easiest way to change the order of your images is by simply shuffling them in the Photo Bin.
If necessary, click the Photo Bin button (
) in the taskbar to show the Photo Bin. Make sure the menu at the left of the Photo Bin header is set to Show Files Selected In Organizer. If you don’t see file names, right-click in the Photo Bin, and choose Show Filenames from the context menu. TipIf you accidentally open the image photobook_05.jpg, simply close it, and then try again, dragging in a single action, rather than first clicking and then dragging.
Drag the image photobook_05.jpg to a new position to the left of the image photobook_02.jpg so that it becomes the second image in the Photo Bin.

Scroll the Photo Bin until you can see some empty gray space at the end of the series of lesson photos. Right-click in this empty space and choose Autofill With Photo Bin Photos. Wait while Photoshop Elements places the images and regenerates the page previews.

Hide the Photo Bin by clicking the Photo Bin button at the left of the taskbar. Choose File > Save.
Working with backgrounds
You can change the page background, like any other element in a preset theme template, as easily as you changed the layout. You can move, rotate, scale, or delete the preset background, just as you can with a frame or clip-art graphic. Unlike with an image in a frame, however, you can’t simply select and drag the background image . As the “foundation” of the file, the locked Background layer is a special case: for some operations, it will need to be “simplified”—unlocked and converted to standard bitmapped data—before it can be edited as other layers can.
![]() Tip
Tip
If the layer names are truncated, move the pointer over the edge of the Layers panel and drag with the double-arrow cursor to make the panel wider.
In the Pages panel, click the first two-page spread, pages 1 and 2; then, click the Advanced Mode button at the left of the actions bar above the Edit window. Click the Layers button (
 ) in the taskbar to open the Layers panel. From the panel options menu at the right of the Layers panel header, choose Collapse All Groups. Choose Window > Favorites to open the Favorites panel. Drag the Favorites panel to position it where it won’t obstruct your view.
Double-click the Black Folded Paper background swatch in the Favorites panel. Wait while Photoshop Elements downloads this online asset to your computer; then, watch both the Layers panel and the preview spread in the Edit window as the Background layer is updated.
The new background graphic has been scaled to fit across the width of the two-page spread, but the right half is hidden by the full-page image on page 2. The gray strip at the center of the layout is part of the frame around that image.

![]() Note
Note
As this edition of the book went to press, the Mac version of Photoshop Elements crashes the Editor when it first downloads one of the online assets. After you restart the Editor, the asset has been downloaded and can be added to the project. For now, the only workaround is to save the project each time before you click an online asset in the Favorites panel. Hopefully, the issue will be resolved by the time you read this.
With the Move tool (
 ) selected in the toolbar, right-click the full-page image on the right page of the spread, and choose Clear Frame from the context menu. You now have a clear view of the line where the inside edges of the facing pages meet at the center of the spread.
We could make more of the subtle textural detail in this background by reducing it to cover only the left page. To move, scale, or rotate the background, you first need to use the Move Background command to unlock it on the Background layer.
Right-click the background where it’s visible on the left page, and choose Move Background from the context menu. A bounding box now surrounds the back ground graphic, though most of it is out of view because the image is larger than the two-page spread. Test this by dragging the background downward; then, drag the image back to its original position.
In order to scale or rotate the background manually, you could drag the image to access the control handles, but in this case it will be more convenient to use the controls in the tool options pane. Click the Tool Options button (
 ) in the taskbar, if necessary. In the tool options pane, type 50% in the Width (W) text box; with the Constrain Proportions option activated, the Height (H) value will be updated automatically. The background image is scaled by 50% from its center.
Drag the reduced background artwork, and position it flush with the left edge of page 1. Move the image up and down until you’re pleased with the placement of the detail, and then click the Commit button (
 ) to commit the changes.
Without the background covering the entire spread, a thin margin of white shows around the large photo on the right page. Click the image; then, click once on any of the bounding box handles. Rather than drag the handles to scale the image and its containing frame, type 101% in either the W or H text box in the tool options pane; then, commit the change.
Drag the Basic Black 40px frame swatch from the Favorites panel onto each of the five smaller, framed photos in the layout; then, click on the background.

Choose File > Save. Click the Pages button (
) in the taskbar to open the Pages panel. In the Pages preview, click the third spread in the photo book: pages 5 and 6. Alternatively, you can navigate to the page 5/6 spread by clicking twice on the right-facing arrow above the Edit window.
Working with photos and frames
You’ve already replaced photo frames in a page layout by substituting artwork from the Graphics library; in this exercise, you’ll learn how to manipulate a photo and its frame as a single grouped design element, and how to modify a photo’s position and orientation independently of the frame with which it’s grouped.
You can start by replacing all seven frames in the page 5/6 spread. If necessary, choose Window > Favorites to reopen the Favorites panel, and then drag the Old Black & Gold Frame from the Favorites panel onto each of the four small images on the left page, and the Paper Frame onto the three photos on the right.

Double-click the Handmade Paper 04 swatch to replace the background; then, right-click the full-page image on the left of the spread, and choose Clear Frame from the context menu.
TipWhen the Move tool is active, you can use the arrow keys on your keyboard to move selected project elements in small steps instead of dragging them with the mouse.
To move a framed photo, simply drag it with the Move tool (
). Shift-click each of the four small images on the left page to select them. Start dragging the row of photos downward; then, hold the Shift key to constrain the movement as you position them halfway between the girl’s eyes and the mouth of her mask.Click the background to deselect the four photos, and then reselect the image at the left. Hold the Shift key as you drag the framed photo about halfway to the left edge of the page. Move the photo on the right end of the row the same distance in the opposite direction. Select all four images; then, click the Tool Options button (
), if necessary, to show the tool options pane. Click the Middle button in the right-hand column under Distribute to automatically space the second and third photos evenly between the first and fourth images.
Right-click each of the three photos on the right page in turn, and choose Fit Frame To Photo from the context menu for each. The frames are resized so that their outside borders conform to the edges of the images.

Click to select the image at the right; then, drag the handle at the lower right of the bounding box to enlarge it—together with its frame—until the right edge of the image extends beyond the boundary of the page. You don’t need to use the Shift key; the proportions of the frame group are constrained by default. Click the Commit button (
).Drag or nudge the three tilted photos into a pleasing arrangement, scaling or rotating them as you wish. To rotate a framed photo manually, select the photo and move the pointer close to one of the corner handles, staying just outside the bounding box; when the curved double-arrow cursor appears, drag to rotate the image. Hold the Shift key as you drag to constrain the rotation to 15° increments. Always click the Commit button (
) to commit the changes. TipIf a photo does not fill its frame properly when scaled or rotated, right-click the photo and choose Fit Frame To Photo. Alternatively, double-click the photo, and resize it within its frame by using the slider, as discussed in the next exercise, “Adjusting a photo inside a frame.”

Choose File > Save. Click the right-facing arrow above the Edit pane to move to pages 7 and 8.
Adjusting a photo inside a frame
Although a photo frame appears to be overlaid on the image it surrounds, the two elements actually occupy the same layer (by default, a layer for a framed photo even takes its name from the frame graphic). As a result, the standard moving, scaling, and rotating operations affect the photo and frame as if they were a single object. In this exercise, you’ll learn how to transform a photo independently of its frame; but first, you’ll change the background and frames for the last spread in your book.
Reopen the Favorites panel and double-click the Handmade Paper 03 swatch in the Favorites panel to replace the background for the page 7/8 spread; then, drag the Basic Black 40px frame swatch onto each of the four images on page 7. You can keep the default frame for the large photo on page 8.
There are two text frames, at the lower left of page 8, that were part of the preset layout. The white placeholder text is a little difficult to see, but even on a white background, you could easily locate and select the text frames in the Layers panel.
If necessary, show the Layers panel. From the Layers panel options menu, choose Collapse All Groups. Shift-click to select both _TXTFrame layers, and press Backspace / Delete on your keyboard. Click Yes to confirm the deletion.
When you move a framed photo, or use its bounding box handles to scale or rotate it, the photo and frame are transformed together.
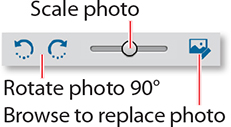
To move or transform a photo inside its frame, right-click the image and choose Position Photo In Frame from the menu—or alternatively, double-click the photo with the Move tool (![]() ). A control bar appears above the photo, with a scaling slider and buttons to reorient the image or replace it with another.
). A control bar appears above the photo, with a scaling slider and buttons to reorient the image or replace it with another.
Right-click the image on the right page, and choose Position Photo In Frame from the context menu. Hold down the Shift key to constrain the movement as you drag the image to the left within its frame so that the border no longer cuts off the gondolier on the right. Commit the change.

Use the Zoom tool (
 ) to focus on the photos on the left page. We’ll deal with the image at the lower right in the next step; for the other three, right-click each image in turn with the Move tool and choose Position Photo In Frame. Use the slider to reveal as much of each image as possible, without resizing the frames. Drag each photo within its frame to arrange the most interesting crop; then commit the changes.
You can rotate the last of the four photos within its frame to straighten the blue and white gondola poles. Right-click the image, and choose Position Photo In Frame. To rotate the photo inside its frame, move the pointer close to any bounding box handle; when the pointer becomes a curved double-arrow cursor, drag the handle in either direction. Scale and position the photo within its frame as you did with its three neighbors; then, commit the changes.

Move the large photo on the right downward to align the lower edge of its frame with the group on the left. Double-click the Hand tool to see the entire spread.

Click the left-facing arrow above the Edit pane twice to move to pages 3 and 4.
Refining your photo book layout using layers and effects
In this exercise, you’ll begin to polish your photo book design while you refresh some of the skills that you’ve picked up in the course of this lesson.
You’ll start by customizing pages 3 and 4—the last untreated spread—then, you’ll add some sophistication to the layout using a little layer magic.
![]() Tip
Tip
After you’ve cleared the frame from the large image, you can enlarge the image by 1% to remove the pale border, as you did in step 7 on page 256.
Double-click the Handmade Paper 03 swatch in the Favorites panel to replace the background; then, drag the Paper Frame swatch onto each of the three images on the left page. Drag the Gold Frame Ornate swatch onto the photo of an antique interior on the right page and the Gold Frame Round 2 swatch onto the photo of the couple. Right-click the large backing image on the right, and choose Clear Frame from the context menu. From the Layers panel options menu, choose Collapse All Groups.

Right-click each of the three photos on the left page, and choose Fit Frame To Photo from the context menu. Drag or nudge the three tilted photos to position them, and scale or rotate them as you wish. If you want to change the stacking order of a photo, right-click the image, and choose Bring To Front, Bring Forward, Send Backward, or Send To Back from the context menu. Scale, move, or rotate each photo within its frame as needed, referring to the previous exercises if you need to refresh your memory.
For each of the two gold-framed photos, first make sure you are happy with the scaling and placement; then, select the framed image, right-click its layer in the Layers panel, and choose Simplify Layer. Without this step, it would not be possible to apply layer styles to these particular framing groups.

Drag the High drop shadow swatch from the Favorites panel onto both of the gold-framed images on page 4. In the Layers panel, double-click the fx icon at the right of the listing for each of the simplified layers in turn to open the Style Settings dialog, where you can adjust the settings for the drop shadow effect. For both of the simplified gold-framed images, reduce the Distance setting to 55 px, and then click OK.

Click to select the full-page backing image on the right of the spread. At the top of the Layers panel, use the slider to reduce the selected layer’s opacity to 40%.
Although this image is no longer grouped with a frame graphic, it is still contained in an invisible photo-holder frame, within which it can be moved, scaled, and rotated, just as you did with the other photos.

Reordering the pages in a photo book
If you feel that a particular spread would look better placed at a different point in your photo book, it’s easy to change the page order.
You can start by revisiting the first spread: pages 1 and 2. Move, tilt, and scale the upper-right photo of the group on page 1 to add variety by breaking up the regular arrangement a little (see the illustration below step 3).

Double-click the smaller image on page 2; then, click the Rotate Right button to rotate this portrait-format photo to suit its horizontal frame. Use the slider to reduce it to fit the frame. When you’re done, click the green check mark to commit the change.
Rotate and move the image, together with its frame, to reveal more of the full-page image and hide the out-of-focus foliage at the bottom. Commit the changes.
 Tip
TipWhile you’re working on a complex project like a photo book, you should save regularly to avoid losing time and effort.
Click the Pages button (
) in the taskbar to show the Pages preview. Drag the first spread downward. Release the mouse button when you see an insertion line appear between the page 3/4 and page 5/6 spreads. The first and second spreads change places, and the pages are renumbered. If the Pages panel previews are slow to redraw, click each of the thumbnails in turn.
Adding graphics to a project
It’s easy to liven up a page design with a judicious use of graphics from the content library. You’ll start by adding some atmosphere to the title page, so the front cover of your photo book will create an evocative first impression.
Use the left arrow button in the bar above the Edit pane, or click the top thumbnail in the Pages preview, to move to the title page; then, click the Layers button (
) in the taskbar to open the Layers panel. Collapse the layer groups.
The preset text frames included in many page-layout templates are useful for simple titles and captioning, but for this project you’ll create your own text layers from scratch. Shift-click to select both of the text frames below the framed image, or select the two TXTFrame layers in the Layers panel; then, press Backspace / Delete on your keyboard, and click Yes to confirm the deletions.
Click the Tool Options button (
), if necessary, to show the tool options pane. Select the framed photo, and then click any of the bounding box handles. In the tool options pane, type 30% in the Width (W) text box; with Constrain Proportions activated, the Height (H) value is updated automatically. Click the Commit button under the image frame.
While the framed photo is still selected, double-click the Gold Frame Ornate swatch in the Favorites panel; then, right-click the image, and choose Fit Frame To Photo.
In the Favorites panel, double-click the Blue Swirly swatch to replace the background. In the Layers panel, right-click the Background layer, and choose Duplicate Layer from the context menu. Click OK to accept Background Copy as the default name for the duplicate layer.

At the top of the Layers panel, set the layer blending mode to Multiply and the opacity to 50%. In the Edit window, hold the Shift key to constrain the movement as you drag the new layer downward until it covers a little more than one third of the cover page.
Drag the swatch for the graphic Cruise Ship from the Favorites panel to the right side of the page. Watch the W (Width) and H (Height) values in the tool options pane as you drag one of the corner bounding box handles to enlarge the graphic to around 200%. Choose Image > Rotate > Flip Layer Horizontal; then, click the check mark below the bounding box to commit the change.
Drag the ship to position it as shown in the illustration at the right. To move the ship behind the photo frame, right-click the graphic and choose Send Backward from the context menu.

Drag the graphic Compass 02 from the Favorites panel to the upper left of the page, placing it as shown below. At the top of the Layers panel, change the blending mode for the new layer to Difference, and set the layer’s opacity to 70%. Change the opacity for the Cruise Ship layer to the same value.

Placing text in a layout
In this exercise, you’ll add a title on the cover and a message on the last page.
![]() Tip
Tip
If your Color Swatches picker looks different from the one in the illustration, resize it to show 12 swatches per row.
Select the Horizontal Type tool (
 ); then, choose Bickham Script Pro from the font menu in the tool options pane. Set the style to Regular, and type 460 pt in the font size text box. Click the Center Text option, and ensure that Anti-aliasing is selected so that the letters are smoothed. Click the text color swatch below the font menus, and sample Light Green Cyan.
Click below the photo, and type Venice; then commit the text. At the top of the Layers panel, change the blending mode for the text layer to Difference and the opacity to 90%; then, drag the text layer downward in the layer order to position it below (behind) the framed photo. Drag the title, or use the arrow keys on your keyboard, to center it horizontally. Select the compass and the photo together and drag them to the right to center the frame above the “n” in Venice.
3 Right-click the layer _DZGold Frame Ornate 1 in the Layers panel, and choose Simplify Layer from the context menu; then, drag the High drop shadow effect from the Favorites panel onto the framed photo. In the Layers panel, double-click the fx icon on the frame layer, and reduce the drop shadow’s Distance setting to 55 px; then, click OK.

Navigate to the last spread in the layout. Drag the Speech Bubble 05 swatch from the Favorites panel onto page 8. Use the handles on the bounding box to scale and stretch the shape; then, position it as shown in the illustration at the right. Commit the changes.

With the speech bubble graphic still selected, switch to the Type tool. Use the same font and text alignment setting you chose in step 1, but change the font size to 40 pt, the font style to Bold, and the text color to black. Click the arrow beside the Leading text box and change the Leading setting from Auto to 30 pt. Click in the center of the speech bubble, and type Gondola: mid 16th century; then, Press Enter / Return, and type “to rock and roll.” (including the quote marks and period). Click the Confirm button, and drag the text to adjust its position.
Use the navigation buttons above the Edit window preview to move to the page 1/2 spread. Drag the graphic Silver Flower Spray onto the left page. Rotate the artwork 90° counterclockwise, and scale it to almost the width of the page. Move the flower spray so that it extends off the top edge of the page, and commit the change. In the Layers panel, collapse all layer groups; then, move the layer Silver Flower Spray down in the stacking order so that it lies below (behind) at least one of the paper-framed photos and above (in front of) at least one other.

Drag the Gold Flourish Corner graphic onto the right page of the page 5 and 6 spread. Choose Image > Rotate > Flip Layer Horizontal, and then Image > Rotate > Flip Layer Vertical. In the Layers panel, collapse all layer groups; then, change the blending mode for the new layer to Screen. Move the Gold Flourish Corner layer below (behind) all of the Paper Frame layers. Scale the graphic and position it as shown below; then, commit the changes.

The photo book is complete; choose File > Save. By default, photo projects are saved in Photo Project format, a multipage document format that preserves text and layers so that they can be edited later. You could also choose to save the project as a PDF file that can be shared as an email attachment.

Choose File > Export Photobook. In the Export Photobook dialog, choose the PDF format. Click Browse to specify your My CIB Work folder as the Save To Location; then, click OK. Choose File > Close, and close without re-saving.

Creating a slideshow
Whether you’re sharing memories at home with family and friends, presenting your work to a client, or posting to a social media or sharing site, a slideshow makes a compelling and dynamic way to showcase your photos.
For this project, we’ll use a set of photos captured in New York, but if you prefer, you can import a selection of your own photos and then improvise a little as you follow the exercise steps.
In the Organizer, isolate the Lesson 9 images, and then set the Sort By option to Name. Shift-click to select just the first nine photos in the Slideshow series. Click the Create tab and choose Slideshow from the menu; then, watch as the default slideshow plays through.
When playback has finished, click the Themes button (
 ) in the actions bar at the left.
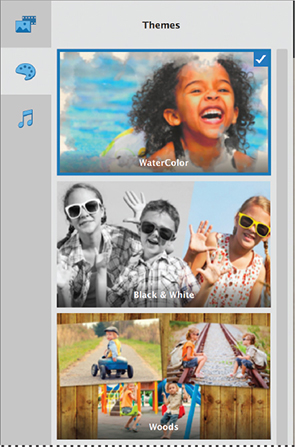
On the Themes tab, the Slideshow Editor offers a choice of preset templates with a variety of slide layouts and transition styles. Once you choose a theme, you can edit the titles, add captions, and change the default soundtrack.
Try a few of the templates by double-clicking the thumbnails on the Themes tab. You can interrupt playback at any time by clicking the Themes button. When you’re done, double-click to apply the City Lights template.
Pause and resume playback by pressing the spacebar, or use the pause and play controls on the playback bar. Use the slider to adjust the volume of the soundtrack music. Click the Media button (
 ) in the actions bar.
The Media pane shows the nine photos that you selected, and a preset title screen.

Click the Add Photos And Videos button at the upper right of the Media pane and choose Add Photos And Videos From Organizer.

Activate the Media From The Grid option under Basic to view only the Lesson 9 images. Scroll down and Shift-click to select the last three of the New York images. Click the Add Selected Media button; then, click Done.
The three new images appear in the Media pane of the Slideshow Editor.
In the Media pane, Shift-click to select the last two images in the second row, and then drag them to the left; release the mouse button when you see a blue line in front of the first image.

Activate the option Add Captions, at the right above the Media preview. Add a caption to every second or third photo in the Media pane by clicking in the text box below the image and typing a short phrase.

Another way to add text to your presentation is to add a title slide that can help introduce a theme, provide information, or create atmosphere.
![]() Tip
Tip
For a more involved title screen, such as the cover of the photo book in the previous project, create a new slide in the Editor, where you can work with layers, effects, extras from the graphics library, and a full suite of text tools.
In the Media pane, right-click / Control-click the default title slide and choose Edit; then, click the arrow at the right of the text screen preview twice to select the third layout option. Type Seeing the Sights in the Title text box, and then click in the Subtitle text box and type in the Big City. Click Save to apply the changes.
Each theme includes a music track; to replace the default soundtrack, click the Audio button (
 ) in the actions bar; then click the minus sign at the right of the track Citylights in the Selected Tracks list.
Click the Add Audio button at the upper right of the Audio list. Navigate to and open the Extras folder inside your Lesson 9 folder. Select the file Backslider.m4a and click Open. Click the plus sign to the right of the new track in the Audio list to add it to the Selected Tracks list; then, click the Audio button in the actions pane to launch the slideshow preview. Watch until playback is complete.
NoteFor our lesson project, the presentation includes only twelve photos; for a large selection of images, you can add as many music tracks as you wish.
Click the Save button (not the arrow beside it) above the preview pane. Type NY Sights as the name for the slideshow, and then click Save. Leave the Slideshow Editor open for the next exercise.
You can open and edit your saved slideshow at any time from the Media browser to add photos, change the slide order or the music, or update titles and captions.
Export the slideshow to YouTube, Vimeo, or disk
Once you’ve saved your slideshow, you can share it as a video to YouTube or Vimeo—or export it to your hard disk as a high-definition video file. By way of example, we’ll share the slideshow to YouTube.
![]() Tip
Tip
The procedure for sharing to Vimeo is similar; if necessary, you will first be required to sign in or create an account.
In the Slideshow Editor, click the Export button at the upper right. Choose YouTube and wait while Photoshop Elements converts your slideshow to video. In the YouTube dialog, sign in if necessary; then enter a title and description and specify a sharing audience. For now, click Cancel rather than posting the video to your YouTube channel.
Click the Export button again, and choose Export Video To Local Disk so that you have a finished version ready to play. In the Export dialog, type a name for your slideshow, specify your My CIB Work folder as the destination, and choose either 720p HD or 1080p HD from the Quality settings; then, click OK to save the slideshow in .mp4 video format.
Making your own meme
At some point early in the rise of social media, memes developed a specific visual style: a photo or illustration surrounded by a saying or clever quip overlaid in blocky white letters. They’re easy to read, especially as people are scrolling their Facebook, Twitter, or Instagram timelines. You could put one together in the Editor easily, but that would involve a bit of work. Instead, with the Meme Maker guided edit, new in Photoshop Elements 2019, you can create a viral image that could spread worldwide—or at least put a grin on the faces of family and friends.
In the Organizer, isolate the Lesson 9 photos, if necessary; then, click to select the image 09_meme.jpg. Click the Editor button (
) in the taskbar.In the Editor, switch to the Guided Edit mode and click the Fun Edits category. Click the Meme Maker option.

Click the Create Meme Template button, which resizes the photo and puts it inside a colorful border; you’ll have the chance to change the border soon.
NoteIf you can think of a more memetastic phrase, by all means enter that instead. Your version is no doubt much bunnier than this one.
Click the Type Tool button, or double-click the top block of text to select it. In the tool options pane, set the Size to 96 pt and type KEEP TALKING (in all caps). Although you can type in normal sentence case, memes are usually written upper case to grab attention. When you’re done, click the Commit button (
). In the bottom text block, which is automatically selected next, set the size to 72 pt, type I CAN EAR YOU JUST FINE, and commit the change. Next, drag the top text down so it’s not hugging the top of the border.In the actions pane at the right, drag the Zoom control to 130 to make the rabbit more prominent within the frame.
A border isn’t necessary for a meme—click the Fit Photo To Canvas check box to see what the text looks like overlaid on the photo. Since we want to explore more border options, un-check the option.
Click the left-hand box under step 4, (Optional) Choose A New Border. Click any style to preview it, then select the second-to-last version. Click OK.

Choose File > Save As. Name the new file 09_Meme_Bunny, to be saved to your work folder in Photoshop format with layers enabled. Include the image in the Organizer but not as part of a version set. Click Save; then, click Next and then Done. Close the file.
Creative framing with layer masks
There are endless ways to use layer masks to edit, blend, and combine photos. In this exercise you’ll paint directly into a layer mask to produce a free-form cutout frame—another great way to add creative flair to an everyday image.
In the Organizer, isolate the images for this lesson, if necessary, by clicking the Lesson 9 folder in the My Folders list. Select the image 09_Girls.jpg in the Media Browser; then, click the Editor button (
) in the taskbar.If the Editor is not in Expert mode, click Expert in the mode picker, and then choose Window > Reset Panels. If you don’t see tabs for the Layers, Effects, Filters, Styles, and Graphics panels at the top of the Panel Bin, click the arrow beside the More button (
) at the right of the taskbar and choose Custom Workspace from the menu. Drag the Layers panel out of the Panel Bin by its name tab and position it where it won’t block your view of the Edit pane.
Right-click the image’s single layer, the Back ground layer, and choose Duplicate Layer from the context menu. In the Duplicate Layer dialog box, click OK to accept the default layer name, Background Copy.

Click the eye icon (
 ) beside the Background layer to hide it. With the new layer, Background Copy, selected in the Layers panel, click the Add Layer Mask button (
 ) at the top of the panel.
The new Layer Mask thumbnail on the Background Copy layer is highlighted by a blue border, indicating that it is selected—or active—ready for editing.
Choose Edit > Fill Layer. In the Fill Layer dialog box, choose Black From the Use menu, and then click OK.
The solid black fill in the layer mask obscures the photo on the Background Copy layer completely. With the Background layer also hidden from view, the image window shows only the checkerboard pattern that indicates layer transparency.
Click the barred eye icon (
 ) beside the Background layer to make the layer visible again. Hold the Shift key, then Alt-click / Option-click the layer mask thumbnail to show the mask as a semi-transparent red overlay.
Click the Eraser tool (
 ) in the toolbar to select the tool and access the tool settings. In the tool options pane, make sure that Brush is selected in the eraser’s Type options at the right and that the Opacity is set to 100%.
Click the arrow beside the sample brush stroke to open the Brush Picker and choose Thick Heavy Brushes from the Brushes menu. The name of each brush appears in a tooltip when you hold the pointer over the swatch. Double-click the second brush in the set, the Rough Flat Bristle brush; then, press the right bracket key ( ] ) six times to increase the brush size to 300 pixels.
With the Eraser tool, scribble a rough line in the image window to quickly clear the red overlay from the faces of all four girls.

Hold down Shift+Alt / Shift+Option and click the layer mask thumbnail to hide the mask overlay; then, click the eye icon to hide the Background layer again. As you can see, the Rough Flat Bristle brush is partly transparent. In the image window, make another short stroke or two over each girl’s face.
![]() Tip
Tip
When you wish to make a hard-edged mask, you can use any of the mechanical selection tools (either the Rectangular or Elliptical Marquee tool, or the Polygonal Lasso tool) rather than a brush or an eraser. You could also use any of the bitmapped Shapes from the Graphics library as the basis for your clipping mask.

You could place a new background on a lower layer, either by pasting from another photo or by choosing from the background artwork in the Graphics library. For now, you’ll save your work and look at a related Guided Edit effect.
Choose File > Save As. Name the new file 09_Girls_BrushMask, to be saved to your work folder in Photoshop format with layers enabled. Include the image in the Organizer but not as part of a version set. Click Save; then, close the file.
Making a photo look like a painting
The Painterly guided edit uses layer masks to make a photo look like a work of art, complete with brush strokes, texture, and effects.
Open the same image that you used in the previous exercise in the Editor, 09_Girls.jpg, and then switch to the Fun Edits tab in the Guided Edit mode. Click the preview for the Painterly project.
Click the Paint Brush button and choose Bold Strokes from the preset menu. Reduce the brush size to 155 pixels and click two faces that are not beside each other. Increase the brush to 170 pixels and use the Brush Angle control to rotate the brush at least 45 degrees; then, click the other two faces. Make a few more clicks to pick up as much of the photo as you like, changing the brush size, angle, and opacity each time. Switch the brush to Hide mode, and vary the size, angle, and opacity as you make a few more clicks around the edges of the image.
Choose a basic black or white canvas, or click the Select Custom Color button and use the eyedropper to pick up a color from the image.
Choose a texture and an artistic effect to finish the project.

Click the Next button; then, click Save As. Activate the option Include In The Elements Organizer and disable Save In Version Set With Original. Name the file appropriately, and then save it to your My CIB Work folder. Close the file.
Applying a watercolor effect
A photo that is turned into a painting can take on an abstract look, as in the previous project, or a more subtle—but no less beautiful—treatment. The Watercolor Effect guided edit turns photos into watercolors that you’d swear were created with paint.
In the Organizer, select the image 09_Mediterranean.jpg and click the Editor button (
) in the taskbar. In the Editor, switch to Guided mode. Click the preview in the Special Edits category to launch the Watercolor Effect project.In the actions pane at the right, the first step is to select from three preset watercolor effect styles; for our lesson image, choose Effect 1, the softest of the three styles.

Click Watercolor Paper and sample a few of the simulated paper styles; the options range from wet paper styles to distressed and antique surfaces, boosting the watercolor effect by adding the look of natural materials. When you’re done, click the second thumbnail in the second row, a wet paper with inky, pastel hues.

Set the opacity of the simulated surface to 80%; as you drag the slider, the numerical value appears in a tooltip above the pointer.
Now click Canvas Texture and select the second thumbnail to apply the coarsest of the texture options. You can leave the intensity setting at the default.
Click the Refine Effect Brush. Make sure the brush is in Subtract mode and set its size and opacity to 50 pixels and 80%, respectively. The Refine Effect Brush softens or removes the effect of the watercolor paper overlay in areas where it interferes with the image. Soften the wet paper detail on the crown of the girl’s hat and the front of its brim. Set the brush opacity to 100%; then remove the inky stains from the girl’s bare back and arms, and the sunlit parts of her legs.
Click the Type tool; the tool options pane opens below the preview. Set the type options as shown below. Choose the font Lithos Pro Regular, and then set the color to white and the size to 48 pt. Type in the text box to set the leading to 40 pt. Click the third of the alignment buttons to right-align the text.

Click to set a text insertion point that is centered vertically in the image and a little inside the right edge. Type dreaming of; then, press Enter / Return and type the islands. Click the green check mark to commit the text; then, drag the text to center it between the girl and the right edge of the image. Align the top of the text with the point where the hat brim intersects the girl’s neck.
Click the Text Style button in the actions pane and choose Style 2; then, click the Advanced button. In the Style Settings dialog, set the lighting angle to 135°. Use the Drop Shadow controls to set the size of the shadow to 10 pixels, the distance to 20 pixels, and the shadow opacity to 25%; then, click OK.
Click Next at the lower right of the workspace; then, under Continue Editing, choose In Expert. In the Layers panel, use the eye icon beside each layer in turn to hide and show the layer. Select each layer in turn and inspect its blending mode and opacity settings. Experiment with the layered image in any way that interests you, remembering to undo each change.

Choose File > Save As. Save the file with all its layers in Photoshop format, with an appropriate name and all the usual settings; then, choose File > Close.
Making part of a photo look like a sketch
If you can make an entire photo look like it was created using a different medium, why not apply an effect to just portions of it? The Partial Sketch guided edit, new in Photoshop Elements 2019, uses the Editor’s selection and filter tools to make it easy for you to get creative with a sketched photo.
In the Organizer, select the image 09_Kayak.jpg and click the Editor button (
) in the taskbar. In the Editor, switch to Guided mode. Click the preview in the Fun Edits category to launch the Partial Sketch project.In the actions pane at the right, select one of the four sketch types.
Doing so activates the Add selection brush below them, but the effect isn’t visible until you make a selection. Ultimately, we want the vibrant kayak to remain photographic against the sketched background, but waving the selection brush around the image is more work than you need to do. So at this point, we will apply the effect to the kayak and then invert the selection at the end of the project.
Set the Brush Size to 75 and drag within the kayak to select it; the sketch effect is immediately applied to the selected area. Adjust the diameter of the brush using the bracket keys ( [ , ] ) as needed to select fine details, such as the handles at the front and back. Use the Zoom slider to zoom the image and get in close to the detail areas. For selections that extend beyond the kayak itself, such as the sand in shadow in the foreground, switch to the Subtract brush or hold Alt / Option as you click. While you’re working on the selection, click each of the four effect styles to preview them, ending up at the original Pencil Sketch option.

If the selection brush isn’t giving you the results you want, such as the corners of sand revealed within the front handle, click the Detail Brush button. This brush paints pixels, not selections, which can sometimes help in tight spots like that.

Drag the Soften Edge slider to 3.
Choose View > Fit On Screen to view the entire image, if necessary. Next, click the Flip Effect button at the bottom of the actions pane to invert the selection.

Click Next at the lower right of the workspace; then, under Continue Editing, choose In Expert.

In the Layers panel, click the layer mask in the Pencil Sketch 1 layer to select it. Switch to the Brush tool (
 ) and make sure the foreground color is set to Black. If there are still any areas you want to touch up or display as the original photograph, such as the beach or the sky, paint those areas using the brush.
Choose File > Save As. Save the file with all its layers in Photoshop (PSD) format, with an appropriate name and all the usual settings; then, choose File > Close.
Creating a photo collage
Photoshop Elements has long been the tool of choice for scrapbookers and people who like to build collages. The revamped Photo Collage project in Photoshop Elements 2019 makes it easy to assemble and edit a collage using several templates, including ones for Facebook cover photos and Instagram posts.
In the Organizer, select the images Slideshow_01.jpg through Slideshow_04.jpg; then, click the Editor button (
).Click the Create tab above the right panel group, and choose Photo Collage from the Create menu. The Editor opens and builds a simple two-by-two collage.
In the pane at right, double-click the Landscape 2 variant to rebuild the layout.

Click any photo to select it and then drag to reposition it in its frame if needed. To change the placement of any of the photos, right-click one and choose Drag To Swap Photo. Then, drag it to another space in the layout.
TipYou can change the background and frame styles for each photo by clicking the Graphics button in the side panel and dragging an item to the layout.
You can add or remove photos; the Editor automatically changes the layout to accommodate. To add one, click Organizer under Add Photo From at the top of the pane. In the Add Photos dialog box, make sure Photos Currently In Browser is active, select the image of the Brooklyn Bridge, and then click Done.
When you’re happy with the results, click the Save button at the lower right. Name the file 09_Photo_Collage, and save it to your My CIB Work folder in Photo Project (PSE) format, with Layers enabled. Include the new image in the Organizer but not in a version set; then, close the file. Also close the slideshow images you opened.
Making an instant effects collage
Many of the guided edit procedures enable you to apply creative touches that can add style, impact, or humor to any image in just a few clicks. You can highlight your subject with a graphic shape overlay or even make it look like an unfinished jigsaw puzzle! In this exercise, you’ll try the Effects Collage project.

In the Organizer, select the image 09_fountain.jpg; then, click the Editor button (
). If you’re not in Guided Edit mode from the last exercise, switch modes now. Click the Effects Collage preview in the Fun Edits category to start the project.
The first step is to choose a layout for your collage. In the Effects Collage pane, the layout presets are grouped by number of sections. Click through a few of the options to see how the layouts fit with the lesson photo; then, select a preset. We chose the 4 Sections, Horizontal layout.
Click the colored preview thumbnail and sample a few of the style presets, each of which will apply a different effect to each section of your design. Choose a style preset; then, experiment with the Opacity slider.
NoteEvery photo responds differently to the effects applied by the various style presets. If you would prefer to replace one or more sections of your collage with an effect you saw in another style preset, run this exercise again using a different style with the same layout, making sure to name the saved file differently. Open both saved files in Expert mode; then, cut and paste from one collage to the other.

When you’re happy with the results, click the Next button at the lower right; then, click Save As. Name the file 09_Effects_Collage, and save it to your My CIB Work folder in Photoshop (PSD) format, with Layers enabled. Include the new image in the Organizer but not in a version set; then, close the file.
Getting creative with text
Adding a title or caption is a great way to fit an image to a specific purpose, such as a cover page for a printed document or a title screen for a slideshow, but text can also be used imaginatively to suggest meaning, emphasize context, add humor, or evoke emotion. Photoshop Elements delivers a suite of type tools that provide limitless creative possibilities for fitting text to your images, whatever the purpose.
Fitting text to a selection
One of several type tool variants that enable you to shape your text creatively to image elements in your photos, the Text On Selection tool makes it easy to wrap your message around any pictured object.
In the Organizer, select the images 09_Type1.jpg and 09_Type2.jpg in the Media Browser, and then click the Editor button (
) in the taskbar. Make sure the Editor is in Expert mode; then, choose Window > Reset Panels. If you don’t see tabs for the Layers, Effects, Filters, Styles, and Graphics panels at the top of the Panel Bin, click the arrow beside the More button () at the right of the taskbar and choose Custom Workspace from the menu. At the top of the Edit pane, click the name tab for 09_Type1.jpg to bring its image window to the front.
The Text On Selection tool (![]() ) can make its own selections, but it can also be used with a selection that is already established. For this exercise, you’ll first create and fine-tune a selection so that you can have your text follow a path well outside the edge of the selected object, rather than wrapping tightly to its outline.
) can make its own selections, but it can also be used with a selection that is already established. For this exercise, you’ll first create and fine-tune a selection so that you can have your text follow a path well outside the edge of the selected object, rather than wrapping tightly to its outline.
In the toolbar, click the Quick Selection tool (
 ), beside the Lasso tool. If you don’t see the Quick Selection tool, Alt-click / Option-click its variant, the Selection Brush (
 ), to switch tools; then drag inside the sculpture to select the figure, together with his seat. You don’t need to be very precise, but if you go too far, hold down the Alt / Option key as you paint to subtract from the selection.
When you’re done, choose Select > Modify > Expand. In the Expand Selection dialog box, set the Expand By value to 40 pixels; then click OK. Alt-click / Option-click the Quick Selection tool to switch to the Selection Brush (
). Use a medium brush to round out any tight angles on the selection outline. Hold the Alt / Option key as you paint to remove any obvious lumps and bumps along the edge.
For the sake of comparison, the illustration at right shows the expanded Quick Selection as a dashed line, and the smoothed outline as a red overlay, which is just as you’ll see it if you switch the Selection Brush to Mask mode.
In the toolbar, click whichever variant of the Type tool is currently visible. In the tool options pane, select the Text On Selection tool (
 ) from the seven tool variants at the left. Set the font to Arial, the style to Bold, and the size to 18 pt; change the text color to white.
Move the tool over the image in the Edit window; the pointer changes to the Quick Selection cursor. Click inside the active selection; then click the green check mark to convert the selection into a path for your text.
Move the tool over the newly created path; the pointer becomes a text insertion cursor. Click above the figure’s neck and type this quote from Leonardo da Vinci: men of lofty genius are most active when they are doing the least work.
The tool options pane now shows the full suite of options for horizontal type. If necessary, activate the Center Text (
 ) alignment option. Tip
When you’re dragging to reposition the text, be careful to keep your cursor on the outside of the outline; otherwise, the text will flip to wrap around the inside of the path. You can add extra spaces between words or letters, where needed, to reduce clumping.
Click in the text near your starting point with the text insertion tool. Release the mouse button; then, hold the Ctrl / Command key and drag the text left or right to fine-tune its placement on the path, referring to the illustration below. When you’re happy with the result, click the green check mark to commit the text.

Choose File > Save. Name the file 09_Thinker, to be saved to your work folder in Photoshop format with Layers enabled, and included in the Organizer but not as part of a version set. Click Save, and then close the file.

Wrapping text around a shape
The Text On Shape tool (![]() ) works in much the same way as the Text On Selection tool, except that the first step is to draw a vector shape with one of a selection of shape tools, rather than to make a selection.
) works in much the same way as the Text On Selection tool, except that the first step is to draw a vector shape with one of a selection of shape tools, rather than to make a selection.
With the image 09_Type2.jpg in the Edit pane, hold Ctrl / Command and press the minus sign key three or four times so you can see a lot of empty gray space around the photo, as shown in the illustration for step 3.
TipIf you don’t have the Brush Script font, choose another script typeface, or any font of comparable weight that has a similarly organic feel.
In the toolbar, click the Text On Selection tool, or whichever type tool variant is currently active. In the tool options pane select the Text On Shape tool (
 ) from the variants at the left. Set the font to Brush Script Std and the size to 36 pt. Choose the Ellipse tool from the shape options. You’ll apply color to the type in the next exercise.
Hold down the Alt / Option key so that your shape will be drawn from the center outward. Drag with the Ellipse tool, starting from a point in the gray “artboard” well below the image, and a little right of center. Match the ellipse to the upper curve of the rainbow, making sure to allow clearance so that your text will run parallel to the rainbow, rather than interfering with its edge.

Hold Ctrl / Command and press the plus sign key three or four times so that the photo fills your view. Move the Text On Shape tool over the upper edge of the ellipse and click with the text insertion cursor at the highest point of the curve. Type Somewhere, under the Rainbow. Click the green check mark.
Once you’ve committed the text, the Move tool becomes active by default, and the text becomes selected as an object that can be moved, scaled, and rotated on its own layer, just like any other graphic. To edit the content of the text, you would first need to activate one of the type tools.
Drag the text, or use the arrow keys on your keyboard, to adjust its placement.
Using preset text styles
You can apply any of the filters and layer styles from the Effects panel to your text, adding bevels, shadows, glows, textures, and gradients to create your own text effects. Some editing operations require that you first “simplify” the text layer to a bitmapped graphic that can no longer be edited as live text. In this exercise, you’ll apply a preset text style from the Graphics panel instead.

Click the Graphics tab at the top of the Panel Bin. Set the Graphics panel’s sorting menu to By Type, and then choose Text from the adjacent categories menu. Scroll down through the swatches to see the many preset styles available in the Graphics library.
Drag the Gradient Blue Medium style from the fourth row of text presets onto the text in the Edit pane; then, click the green check mark to commit the change.

Click the Layers tab at the top of the Panel Bin to show the Layers panel. Double-click the fx icon on the text layer to open the Style Settings dialog box. Set the Lighting angle to -90. Select the box to activate the Drop Shadow effect. Increase the drop shadow Size to 10 px, and the Opacity to 85%. Click the small color swatch beside the Drop Shadow settings and change the color from black to a deep, saturated blue; then, click OK to close the Style Settings dialog box.
TipYour text is still “live” and editable. Simply double-click the text to activate the text tool; then swipe over the words you wish to edit, or place the text insertion point and start typing to add to the message.
As a final touch, you can soften the effect a little by using the slider at the upper right of the Layers panel to reduce the opacity of the text layer to 85%.

Save the file as 09_Somewhere, and then close it.
More fun with type
As its name suggests, the Text On Custom Path tool—the last of this group of type tools—lets you draw and tweak a freehand path for your text to follow, providing the perfect solution for images like the example at the right, where creating a path automatically from a selection is not an option.

Try clicking the Create Warped Text button at the right of the Type tool controls in the tool options pane to discover how you can warp, bloat, pinch, twist, and otherwise torture your type.
Creating a type mask
The Type Mask tool (![]() ) turns text outlines into a layer mask through which an underlying image is visible, effectively filling the letter shapes with image detail. This can create far more visual impact than using plain text filled with a solid color.
) turns text outlines into a layer mask through which an underlying image is visible, effectively filling the letter shapes with image detail. This can create far more visual impact than using plain text filled with a solid color.
![]() Note
Note
The Type Mask tool has one variant for horizontal type and another for vertical type.
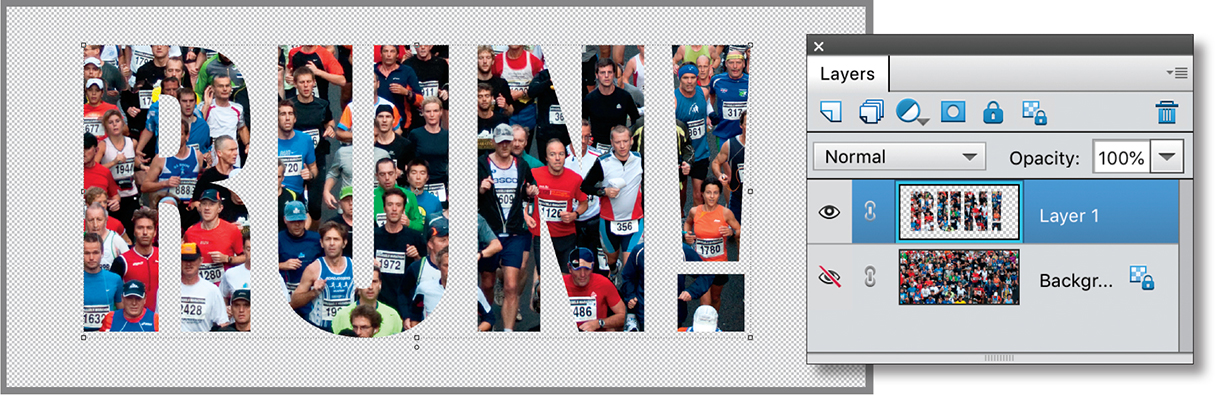
In the Organizer, isolate the lesson images by clicking the Lesson 9 folder in the My Folders list. Right-click the image 09_Runners.jpg and choose Edit With Photoshop Elements Editor from the context menu.
Make sure the Editor is in Expert mode; then, choose Window > Reset Panels. If you don’t see tabs for the Layers, Effects, Filters, Styles, and Graphics panels at the top of the Panel Bin, click the arrow beside the More button (
) at the right of the taskbar and choose Custom Workspace from the menu.Drag the Layers panel out of the Panel Bin by its name tab and position it where it won’t block your view of the Edit pane. Choose Window > Favorites and drag the Favorites panel to a convenient position. Choose Window > Panel Bin to hide the Panel Bin; then, double-click the Hand tool or choose View > Fit On Screen.
In the toolbar, click whichever variant of the Type tool is currently visible in the bottom row of the Draw category. In the tool options pane, click to select the Horizontal Type Mask tool (
 ) from the tool variants at the left.
Set up the text attributes in the tool options pane: Choose a font from the Font Family menu. We chose Impact Regular, but if you don’t have that font, choose any typeface that’s blocky enough to let plenty of the image show through the letter forms. Type a new value of 950 pt for the font Size (you may need to adjust that for a different font). Choose Center Text (
) from the paragraph alignment options. You don’t need to worry about a color for the text; the type will be filled with detail from our marathon image.Click at a horizontally centered point low in the image and type RUN!

Hold down the Ctrl / Command key on your keyboard; a bounding box surrounds the text in the image window. Drag inside the bounding box to reposition the type mask.
If you wish to resize the text, hold the Ctrl / Command key and drag a corner handle of the bounding box. The operation is automatically constrained so that the text is scaled proportionally. Alternatively, you can double-click the text with the Type Mask tool to select it, and then type a new font size in the tool options bar.
When you’re satisfied with the result, click the green Commit button in the tool options bar. The outline of the text becomes an active selection. If you’re not happy with the placement of the selection, use the arrow keys on your keyboard to nudge it into place.
Choose Edit > Copy, and then Edit > Paste. In the Layers panel, you can see that the cutout type image has been placed onto a new layer, surrounded by transparency.

Hide the Background layer by clicking the eye icon beside the layer thumbnail.
Adding impact to a type mask
The text is no longer live—the mask was converted to a selection outline, so it can no longer be edited with a text tool; however, you can still apply a layer style or an effect to enhance it or make it more prominent.
If necessary, select Layer 1 in the Layers panel to make it active. With the Move tool (
), drag the type to center it in the image window; then, press the up arrow and right arrow keys eight times each.
In the Favorites panel, click the swatch for the High drop-shadow effect.

In the Layers panel, double-click the fx icon on Layer 1. In the Style Settings dialog box, set the Lighting Angle to 45°. Increase the Drop Shadow Size to 40 px, the Distance to 50 px, and the Opacity to 80%; then, click OK.
In the Layers panel, select the Background layer. Make the layer visible; then, choose Image > Rotate > Flip Layer Horizontal. Click OK to confirm the conversion of the background, and then click OK to accept the default name.

Choose Enhance > Adjust Color > Adjust Hue/Saturation. In the Hue/Saturation dialog box, reduce the Saturation value to –60, increase the Lightness to +60, and then click OK.
 Tip
TipThe Photo Text guided edit automates the process of producing a type mask. Try taking the image from this exercise through the Photo Text project to see which method you prefer. When you’re done, inspect the new layers in Expert mode.
Choose File > Save As. In the Save As dialog box, choose Photoshop (PSD) as the file format, enable layers, and save the file to your My CIB Work folder. Make sure that the new file will be included in the Organizer but not in a version set; then, name the file 09_runners_mask and click Save. Close the file.
Congratulations! You’ve completed the lesson. You’ve explored the Graphics library and become familiar with a variety of methods for locating the artwork you need. You’ve also learned how to set up a project in Create mode, how to replace and manipulate backgrounds, frames, and text, and the basics of working with layers and layer styles. You’ve had some fun with type and gained more experience with layer masks.
Before you move on to the next lesson, take a moment to refresh your new skills by reading through the review on the facing page.
How do you begin a new project, such as a greeting card or photo book?
How do you scale and reposition a photo in a photo project?
How can you find the items you want amongst all the choices in the Graphics library?
What are layers, how do they work, and how do you work with them?
To create a project, select the photos you want to use in the Organizer, or open them from the Editor; then, choose a project option in the Create tab at the upper right of either workspace. Once you’ve chosen a theme, the right panel group presents page previews and provides access to layers, layout templates, graphics, and effects.
You can scale or rotate a framed photo by dragging the bounding box handles, and move it by dragging. To scale, rotate, or move a photo within its frame, you need to double-click the image to isolate it before using the same techniques, so that the changes affect the photo independently of its frame.
You can sort and search the items in the Graphics library by using the menus and text box at the top of the Content panel. You can sort the content by type, activity, mood, season, color, keywords, and other attributes. Use the Favorites panel to assemble a collection of the items you’re most likely to use, rather than looking through the entire library every time you want to add an artwork item to a project.
Layers are like transparent overlays on which you can paint or place photos, artwork, or text. Each element in a photo project occupies its own layer—the background is at the bottom, and the other elements are overlaid in the order in which they are added to the project. You work with layers in the Layers panel, where you can toggle their visibility, drag to change their order, and add layer styles, effects, and masks. To make changes to a layer mask rather than to the image on that layer, first select the black-and-white mask thumbnail to the right of the image thumbnail. The checkerboard grid areas in the layer thumbnails represent the transparent parts of the layers through which you can see the layers below.