
1 A Quick Tour of Photoshop Elements
Lesson overview
This lesson provides an overview of Photoshop Elements that will familiarize you with the basic components of the workspace while introducing many of the tools and procedures you’ll use to import, manage, and edit your digital images.
The exercises in this lesson will step you through some of the skills and concepts basic to the Photoshop Elements workflow:
Creating and loading catalogs
Importing media
Reconnecting missing files
Reviewing and comparing photos
Switching between the Organizer and the Editor
Switching modes in the Editor
Working with panels and the Panel Bin
Customizing the workspace
Using Photoshop Elements Help

This lesson will take about 90 minutes to complete. Please log in to your account at peachpit.com to download the lesson files for this lesson, or go to the “Getting Started” section at the beginning of this book and follow the instructions under “Accessing the lesson files and Web Edition.” Store the files on your computer in a convenient location. Your Account page is also where you’ll find any updates to the lesson files. Look on the Lesson & Update Files tab to access the most current content.

How Photoshop Elements works
Photoshop Elements has two primary workspaces: the Elements Organizer and the Editor. You can think of the Organizer as a library and browser for your photos and other media files, and the Editor as a digital darkroom and workshop where you can adjust and enhance your images and create presentations to showcase them.
![]() Note
Note
Before you start this lesson, make sure that you’ve set up a folder for your lesson files and downloaded the Lesson 1 folder from your Account page at www.peachpit.com, as detailed in “Accessing the lesson files and Web Edition” and “Creating a work folder” in the “Getting Started” section at the beginning of this book.
Start Photoshop Elements.
By default, the Home screen opens whenever you start Photoshop Elements, serving as a convenient entry point to either of the workspace modules.
This tour—like the Photoshop Elements workflow—begins in the Organizer, where you can import, sort, group, search, and share your photos. It’s also where you’ll find links to helpful tutorials and Auto Creations built from your media (which are covered at the end of this lesson).
Click the Organizer button to launch the Elements Organizer module.

If you see the walkthrough screen with tips on using the Organizer, click Skip in the lower right corner to dismiss it. As with the Home screen, you can always access the walkthrough screen from the Help menu. You may also need to dismiss (or respond to) an update notification.
The library catalog file
Behind the scenes, Photoshop Elements stores information about your images in a library catalog file, which enables you to conveniently manage all the media files on your computer without ever leaving the Organizer. When you import photos from a camera or memory card, the files are copied to your hard disk, but from there, Photoshop Elements simply registers their locations in the catalog. Or, if you add a photo that already exists on disk, wherever it is stored, the Organizer creates a new catalog entry—a link to the original file, or source file; the image itself is not moved or copied. All the work you put into organizing your growing photo library is recorded in the catalog file; whenever you assign a tag or a rating to a photo, or group images in a stack or an album, the catalog is updated.
As well as digital photographs, a catalog can include video and audio files, scans, PDF documents, and any presentations and layouts you might create in Photoshop Elements, such as slideshows, photo collages, and CD jacket designs.
Creating a catalog for working with this book
The first time you launch Photoshop Elements, a default catalog file (named My Catalog) is automatically created on your hard disk. Although a single catalog can efficiently handle thousands of files, you can also establish separate catalogs for different purposes—if that’s the way you prefer to work. In this exercise you’ll create and load a dedicated catalog to handle the sample files used for the lessons in this book, making it easy to keep them separate from your own photos.
When the Organizer has opened, choose File > Manage Catalogs. In the Catalog Manager dialog box, click New. Don’t change the location setting, which specifies who can access the catalog file and where it is stored.

 Note
NoteOn macOS, you may see a slightly different set of location options from those shown in this illustration.
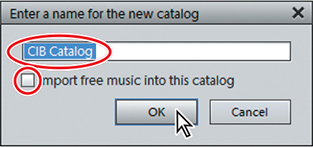
Type CIB Catalog in the Enter A Name For The New Catalog dialog box. Disable the Import Free Music Into This Catalog option, if necessary, and then click OK.
If you see an animated walkthrough screen with tips on getting started, click Skip in the lower-right corner to dismiss it for now. You can acess the walkthrough tips at any time by choosing Help > Show Walkthrough Screens.
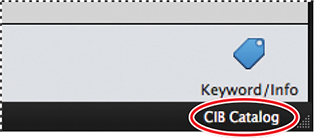
Your new catalog is loaded in the Organizer. If you are ever unsure which catalog is currently loaded, you can always check the catalog name displayed in the lower-right corner of the Organizer workspace.
![]() Tip
Tip
You can launch the Catalog Manager without using the menu command by simply clicking the name of the current catalog in the lower-right corner of the Organizer workspace.
Now that you have a catalog created specifically to manage the sample files that you’ll use for the lessons in this book, you’re ready to put some photos into it.
Importing media
Before you can view, organize, and share your photos and other media files in Photoshop Elements, you first need to import them into the Organizer in order to link them to your catalog.
You can bring photos into Photoshop Elements from a variety of sources and in a number of different ways.
Click the Import button, at the upper left of the Organizer workspace. The options in the Import menu vary slightly, depending on your operating system.

Click the Import button again to close the menu.
Getting photos from files and folders
If your image files are already on your computer hard disk—as is the case for the Classroom in a Book sample photos—you can either drag them directly into the Elements Organizer workspace from Windows Explorer or the macOS Finder, or import them from within Photoshop Elements using a menu command.
The import options that are listed in the Import button menu can also be accessed from the File menu.
Choose File > Get Photos And Videos > From Files And Folders.

Navigate to and open the Lessons folder inside your PSE2019CIB folder. Open the Lesson 1 folder; then, click once to select the subfolder Import 1.
Make sure that the options Automatically Fix Red Eyes and Automatically Suggest Photo Stacks are disabled (see the illustration on the next page); then, click Get Media.

The Getting Media dialog box displays a progress bar as the photos are imported (though, if you have a fast computer, you may barely notice it).

The Import Attached Keyword Tags dialog box appears, indicating that the photos you’re importing have already been tagged with keywords. Select the box beside the Lesson 01 tag in the Keyword Tags list to confirm it for import, and then click OK.
NoteYou’ll learn more about keyword tags in Lesson 3.

Thumbnails of the six imported photos appear in the Organizer’s Media Browser pane. Choose View > Details. Note that each image’s capture time is now displayed below its thumbnail, together with a blue tag badge indicating that the photo has attached keywords. (If you don’t see the blue tag, increase the Zoom slider to make the tag appear.)
Repeat steps 1 through 4 for the folder Lessons / Lesson 1 / Import 2, but this time, choose From Files And Folders from the Import button menu.
Exploring the Organizer workspace
The Elements Organizer is an integral part of both Adobe Photoshop Elements and Adobe Premiere Elements video editing software. You can import, manage, and view both photos and video in the Elements Organizer, which serves as a hub, allowing seamless integration of the two editing applications.
In the Organizer, the main work area is the Media Browser pane. This is where you’ll review, sort, organize, and search your photos and other media files. The bars just above the image thumbnails display information about the selection of photos currently displayed; in this case, the lower bar displays the date and time of the last import. If the Media Browser were showing the results of a catalog search, the lower bar would detail the search criteria shared by that selection of images.
To clear the Last Import filter and view all twelve photos in your catalog, click the Clear button at the right of the search results bar above the thumbnails.

The search results bar closes. The Last Import header changes to All Media, to show that the Media Browser is now displaying all of the files in your catalog. By default, the images are sorted by capture date, arranged from newest to oldest.
Choose Oldest from the Sort By menu at the left of the actions bar to reverse the order. Note that you can also sort your photos by name or import batch.

Once you’ve spent a little time organizing your catalog by tagging your photos, you can use the view picker above the sorting bar to move between the People, Places, and Events views, quickly filtering the images in the Media Browser so that it displays only those photos that feature the faces, locations, or occasions that matter to you. The currently active view is the Media view, which is unfiltered.
![]() Note
Note
You’ll learn more about the People, Places, and Events views, and explore a variety of ways to search the images in your photo library, in Lessons 2 and 3.
You can use the Search button (located in the menu bar on Windows, or in the application window header on macOS) to conduct a search of all the images in your catalog, or just a subset, based on text, tags, dates, folders, albums, ratings, and file type—or combine filters to set up a complex multi-criterion search.

The left panel will list any albums that you create to group your photos, and also provides quick and easy access to all the files and source folders on your computer.
Click Folders at the top of the left panel. The default My Folders view lists only your managed folders: those folders that contain files you’ve already imported to your catalog.
To see your folders in hierarchy view, click the menu icon (
 ) to the right of the My Folders header and choose View As Tree. You can expand folders in order to drill down in the hierarchy by clicking the boxes beside them. To expand the tree even further, right-click the Lessons folder and choose Show All Subfolders from the context menu. You can now see all of the subfolders inside the Lessons folder, rather than just those that contain files already managed by your catalog.
![]() Tip
Tip
If the left panel is not wide enough to display the folder names in the tree hierarchy, move the pointer over the panel’s right edge and drag to the right with the double-arrow cursor.

In the Folders view, you can drag and drop files and folders to new locations on your hard disk, and create, rename, and delete folders on your computer without leaving the Organizer. The catalog tracks all your work in the Folders view, making it easy to manage your media library from the ground up, and helping to avoid the hassle of locating and reconnecting missing files.
![]() Note
Note
You can identify a managed folder in the hierarchy by the photo folder icon (![]() ). Watched folders display a binoculars icon (
). Watched folders display a binoculars icon (![]() ).
).
When you select a folder in the Folders view, that folder becomes the image source, rather than your entire catalog, so the Media Browser displays only the photos contained in the selected folder. Any filter or search—including the People, Places, and Events views—will be applied only to the images in the selected folder. The Media view will display the unfiltered contents of the selected folder.
Click the menu icon (
) at the upper right of the My Folders list and choose View As List. Click between your two managed folders to see their contents isolated in turn in the Media Browser. Click All Media, at the left of the Sort By menu above the image thumbnails, to view all of the photos in your catalog.
The taskbar across the bottom of the workspace presents an array of tools, giving you one-click access to some of the most common Organizer tasks.

Toggle the button at the far left of the taskbar to hide and show the left panel. The Undo / Redo and Rotate buttons are self-explanatory; click the arrow beside each of these tools to see the variant. Experiment with the full range of the Zoom slider to change the size of the image thumbnails. Leave the thumbnails set to a large enough size to see the blue keyword tag badges.
NoteThe Instant Fix, Editor, and Slideshow buttons are covered later in this lesson. You’ll learn how to use the Add Location and Add Event buttons in Lesson 2.
Select any thumbnail in the Media Browser; then, click the Keyword/Info button at the right of the taskbar to open the right panel group. The Image Tags panel at the bottom shows that the selected image is tagged with the Lesson 01 keyword. Expand the Keywords list at the top of the Tags panel; then, expand the Imported Keyword Tags category to see the Lesson 01 tag nested inside.

At the upper right of the Organizer workspace, above the right panel, are the Create and Share buttons.
![]() Tip
Tip
This illustration shows the Create and Share menus as they appear on Windows. You may see a slightly different set of options on macOS.

Click the Create and Share buttons in turn and examine the options.
You can choose from the Create menu to begin a variety of photo projects to share and showcase your images, from personalized greeting cards to stylish photo books and slideshows.
The Share menu offers a range of ways to share your photos and videos with friends, family, and clients, or show them off to the world at large. Burn a DVD, publish to online sharing sites, attach your images to an email, or export media as a PDF slideshow.
Double-click any thumbnail in the grid, or select it and press Ctrl+Shift+S (Windows) or Command+Shift+S (macOS) to see the image enlarged. Use the arrow keys on your keyboard to cycle through the photos in the single-image view. Double-click the enlarged image to return to the thumbnail grid view.

Reviewing and comparing images
Photoshop Elements provides several options for quickly and easily reviewing and comparing your photos in the Organizer. The Full Screen and Side By Side views let you examine images at any level of magnification—without the distraction of image windows, panels, and menus. In both of these views you can apply keywords, add photos to albums, and even perform a range of one-click editing tasks.
Viewing photos in Full Screen mode
You can use the Full Screen view to inspect and assess your photos in detail, or to effortlessly present a selection of images as an instant slideshow.
Click to select a single thumbnail image in the Media Browser, and then choose View > Full Screen. Avoid moving the pointer for a few moments until the control bar and the Quick Edit and Quick Organize panels disappear.
Move the pointer over the full-screen image to see the control bar again. Move the pointer over the gray tabs at the left of the screen to open the Quick Edit and Quick Organize panels. Move the pointer into the center of the screen; the control bar and panels disappear again after a few moments’ inactivity.
 Tip
TipIf you don’t see the Film Strip, press Ctrl+F / Command+F on your keyboard, or click the Film Strip button in the Full Screen view’s control bar.

The Film Strip below the main image shows all the photos from the Media Browser; if you had entered Full Screen mode with multiple images selected, the Film Strip would display only the selected photos. Use the arrow keys on your keyboard, and then the Previous Media and Next Media buttons (flanking the triangular Play button at the left of the control bar), to move backwards and forwards through the images in the Film Strip.
NoteThe Slideshow button (
 ) in the standard Media view taskbar launches a slideshow with playback options as set in the Create mode’s Slideshow Editor (see Lesson 9).
To view your images in a Full Screen view slideshow, press the spacebar, or show the control bar by moving the pointer over the image, and then click the Play button. To stop the slideshow, press the spacebar again, or click the Pause button in the control bar.
In the control bar, click the Theme and Settings buttons in turn to set a variety of options for the slideshow and the Full Screen view. Choose a style for transitions between slides, select an audio file to replace the default sound track, and set the slideshow to repeat. Play the slideshow to see the effects of your settings.
 Tip
TipIf you choose either Pan and Zoom or 3D Pixelate transitions in the Theme dialog box, you’ll need to press the Esc key on your keyboard to stop the slideshow, rather than the spacebar or the Pause button in the control bar.
Stop the slideshow. Toggle the Film Strip, Fix, and Organize buttons to show and hide the Film Strip and the Quick Edit and Quick Organize panels.
Comparing photos side by side
The Side By Side viewing mode lets you keep one image fixed on one side of a split screen while you cycle through a selection of photos on the other—great for comparing composition and detail or for choosing the best of a series of similar shots.
Show the Film Strip, if necessary, and then click to select the first photo in the series. Click the View button in the control bar to see the alternative view options; then, choose the Side By Side view.

The photo you selected is displayed at the left of the screen, and the next photo in the series is shown on the right. By default, the image on the left—image #1—is active, as indicated by the blue border around the photo in the split-screen view. Any organizing or editing operation you perform will affect only the active image.

With the photo on the left—image #1—still active, click the first photo of the lighthouse in the Film Strip. The new selection becomes the new #1 image.
Press the Tab key to make image #2 (the photo on the right) the active image. Click the forward navigation (Next Media) button (
 ) in the control bar, or press the right arrow key on your keyboard, to cycle the #2 preview to the second lighthouse photo, while the image on the left remains fixed.
Click either image repeatedly to toggle between fit-to-view and 100% magnification. To compare detail at higher magnification, zoom in and out in the active image using the scroll-wheel on your mouse—or by pressing the Ctrl / Command key together with the plus (+) or minus (–) key. Drag the zoomed photo with the hand cursor to see a different portion of the image.

To synchronize panning and zooming between the two photos, click the lock icon to the right of the View button in the full screen view control bar.

Click the View button and select the second split-screen layout from the fly-out menu—the horizontally divided Above And Below view.

Click the Exit button (
 ) at the right of the control bar, or press the Esc key on your keyboard to close the split-screen view and return to the Organizer.
Reconnecting missing files to a catalog
When you bring a photo into Photoshop Elements, the name and location of the file is recorded in the catalog. If you wish to move, rename, or delete a photo that is already in your catalog, it’s best to do so from within the Elements Organizer.
![]() Tip
Tip
To avoid the problem of files missing from your catalog, use the Move and Rename commands from the File menu, and the Delete From Catalog command from the Edit menu, to move, rename, or delete files from within Photoshop Elements, rather than doing so outside the application.
If you move, rename, or delete a file in the Windows Explorer / macOS Finder after it has been added to the catalog, Photoshop Elements searches your computer for the missing file automatically, and will usually do a great job finding it—even when the file has been renamed; however, you need to know what to do if the automatic search fails. If a file cannot be located, the missing file icon (![]() ) appears in the upper-left corner of its thumbnail in the Media Browser to alert you that the link between the file and your catalog has been broken.
) appears in the upper-left corner of its thumbnail in the Media Browser to alert you that the link between the file and your catalog has been broken.
Switch to the Windows Explorer / macOS Finder by doing one of the following:
On Windows, minimize the Elements Organizer by clicking the Minimize button (
 ) at the right of the menu bar, or simply click the Elements Organizer application button on the Windows taskbar.
On macOS, click the Finder icon in the Dock, or hold down the Command key and then press and release the Tab key, repeatedly if necessary, to select the Finder icon in the Application Switcher.
Open an Explorer / Finder window, if there’s not one already available. Navigate to and open your Lessons folder. Drag the Lesson 1 folder out of the Lessons folder to the Recycle Bin / Trash. Do not empty the Recycle Bin / Trash.
Switch back to the Organizer, and then choose File > Reconnect > All Missing Files. Photoshop displays a message to let you know it’s busy searching for the missing files. We don’t expect the files to be found in the Recycle Bin / Trash, so you can stop the automatic search by clicking the Browse button.

The Reconnect Missing Files dialog box opens—as it would have done, had the search run its course without Photoshop Elements locating the missing files.
For this exercise, you won’t follow the re-linking process through to completion, but you should take this opportunity to inspect the dialog box thoroughly (see the illustration on the next page).
At the upper left of the Reconnect Missing Files dialog box is a list of all missing files. Below the list, a preview displays a thumbnail of the currently selected missing file. To the right, you can browse the contents of your computer.
When you select a candidate, you’ll see a preview thumbnail below the Locate The Missing Files pane, opposite the missing file preview, enabling you to visually verify the photo as a match, even if its name has been changed.

Once you’ve verified a file or series of files to be reconnected, you can click the Reconnect button. For now, click Close to cancel the operation. Note that all of the thumbnails in the Media Browser now display the missing file icon (
 ).
).Switch back to the Explorer / Finder; then, drag the Lesson 1 folder out of the Recycle Bin / Trash and return it to your Lessons folder.
NoteThe missing file icons may persist until you next change the view or execute another command.
Switch back to the Organizer and choose File > Reconnect > All Missing Files. Photoshop briefly displays a message to let you know that there are no missing files to reconnect.
Switching between the Organizer and the Editor
Although the Instant Fix panel in the Organizer and the Quick Edit panel in the Full Screen view offer one-step tools for some of the most common editing tasks, you’ll switch to the Editor for more sophisticated editing.
Select any two photos in the Media Browser.
TipAlternatively, right-click either of the selected images, and choose Edit With Photoshop Elements Editor from the context menu.
To open the selected images in the Editor, either choose Edit > Edit With Photoshop Elements Editor, or click the Editor button (
 ) in the taskbar.

You can switch back to the Organizer from the Editor just as easily, by clicking the Organizer button (![]() ) in the taskbar at the bottom of the Editor workspace.
) in the taskbar at the bottom of the Editor workspace.
The Editor workspace
The Editor provides a comprehensive yet intuitive editing environment, with a choice of editing modes to satisfy users of any level of expertise, and a flexible workspace that can be customized to suit the way you prefer to work.
If your workspace arrangement differs from the illustration below, click the word Expert in the mode picker at the top of the workspace, and then choose Window > Reset Panels. If you don’t see the photo thumbnails below the main image, click the Photo Bin button in the lower-left corner of the Editor window.

The central work area in the Editor is the Edit pane, where you’ll adjust and enhance your images, and preview the projects and presentations that you create to showcase them.
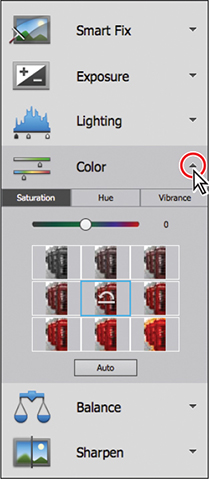
In the edit mode picker immediately above the Edit pane, click Quick to enter Quick Edit mode. Note the simplified toolbar at the left. The right panel presents easy-to-use controls for six common image editing operations; click the small arrow beside each of the Quick Edit options in turn to expand and collapse the controls.
Click Guided in the edit mode picker above the Edit pane to switch to Guided Edit mode. The work area now shows an interactive preview for each guided edit offered. Hover the pointer back and forth over a preview to see before and after views for that procedure.
 Tip
TipIf you’re new to digital imaging, the Guided Edit mode is a great place to start; you can learn new tricks and techniques as you step through each editing procedure.
In the bar below the mode picker, click each category in turn to see the range of guided edits available. Click to launch a procedure from the Basics category, noting the tools and tips in the right panel. Click Cancel at the lower right, and then repeat the process for two or three edits from each of the first three groups.
Click Expert in the edit mode picker to switch back to the Expert mode.
Below the Edit pane is the Photo Bin, which provides easy access to the images you’re working with, no matter how many files you have open. Click each of the thumbnails in the Photo Bin in turn to bring that photo to the front in the Edit pane and make it the active image.
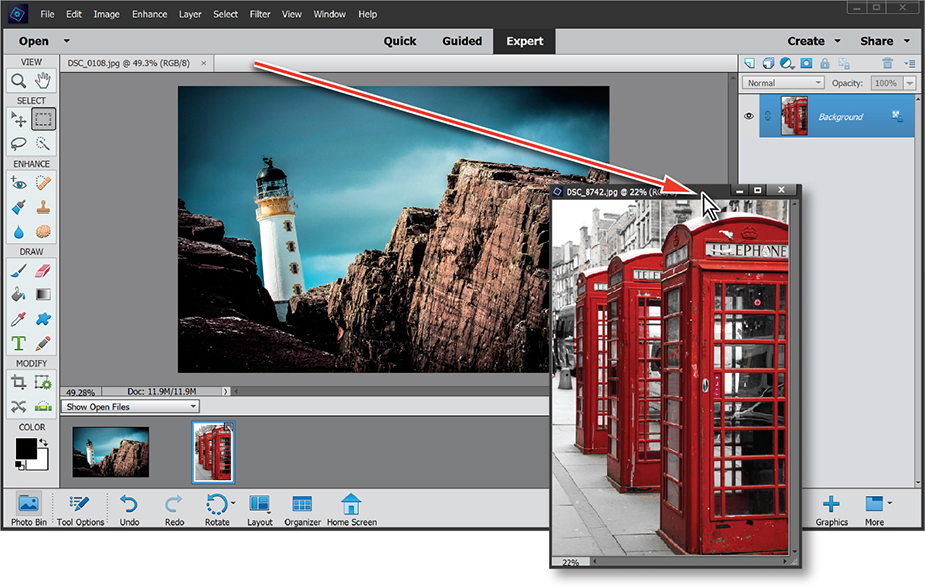
Choose Preferences > General from the Edit / Adobe Photoshop Elements Editor menu. On the General tab of the Preferences dialog box, click the check box to activate the option Allow Floating Documents In Expert Mode; then, click OK.
Drag whichever image is foremost by its name tab, away from its docked position to float above the Editor workspace.
 Note
NoteOnce you’ve activated the option to allow floating document windows, this becomes the default for any image opened in Expert Edit mode. Throughout the rest of this book however, it is assumed that you are working with tabbed image windows docked (consolidated) in the Edit pane, unless otherwise specified. Before you complete this exercise you’ll disable floating document windows so that it’ll be easier for you to follow the exercises as written.
Explore the options for arranging image windows that are available from the Window > Images menu, and from the menu on the Layout button (
 ) in the taskbar at the bottom of the Editor workspace. You may wish to go back to the Organizer and open more files to develop a feel for the way you prefer to work with your image windows.
When you’re done, choose Preferences > General from the Edit / Adobe Photoshop Elements Editor menu and disable floating documents in expert mode; then, click OK to close the Preferences dialog box.
The Edit mode toolbar includes tools for making precise selections, fixing image imperfections, drawing, painting, adding text, and creating special effects, conveniently grouped by function. You can hide and show the toolbar to free up screen space as you work by choosing Tools from the Window menu.
Click the Tool Options button in the taskbar at the bottom of the Editor work-space to hide the Photo Bin and show the Tool Options pane in its place. In the toolbar at the left of the workspace, click to activate several of the tools in turn, noting the settings and controls available for each in the Tool Options pane.

Click the Photo Bin button at the left of the taskbar to show the Photo Bin.
Working with panels and the Panel Bin
To the right of the Edit pane is the Panel Bin. In its default Basic mode, the Panel Bin displays one panel at a time.
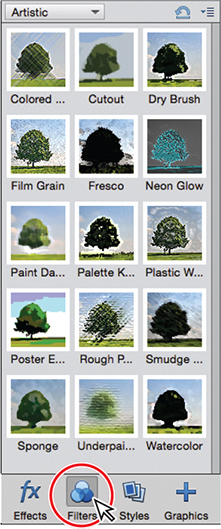
Use the buttons in the taskbar below the Panel Bin to switch the Panel Bin between the Layers, Effects, Filters, Styles, and Graphics panels. The illustration at the right shows the Artistic category in the Filters panel.
Click the More button (not the triangle beside it) at the far right of the taskbar. The rest of the Editor panels appear in a tabbed group floating “above” the workspace. Click the More button again to hide the floating panels; then, click the small triangle beside the More button and choose the Histogram from the menu. The floating panels group appears once more: this time, with the Histogram panel foremost.
You can also show and hide the floating panels by choosing any panel other than the Layers, Effects, Graphics, and Favorites panels from the Window menu.
Drag the Histogram panel out of the tabbed panel group by its name tab, and then drag the Navigator panel onto the tab bar of the Histogram panel, releasing the mouse button when the Histogram’s tab bar is highlighted in blue.

To close the Color Swatches panel, drag it free of the original group and click the close button (x) in its header bar (at the right on Windows, at the left for macOS), or click the small menu icon to the right of the name tab and choose Close from the Options menu. Collapse the grouped Info, Favorites, History, and Actions panels by double-clicking the name tab of any panel in the group.
To dock the two floating panel groups, drag the collapsed group onto the lower edge of the Histogram / Navigator group and release the mouse button when you see a blue line highlighting the connection between the two groups. To expand the lower group, click the name tab of any of the collapsed panels.
TipSingle floating panels can also be grouped by docking them one above the other in this manner.
 Note
NotePhotoshop Elements remembers which panels you have dismissed, and the way you’ve grouped those that you use most often; your arrangement will persist until you use the Reset Panels command or switch between Basic and Custom modes.
To separate the two tabbed panel groups again, drag the lower group away by its tab bar (not by any of the three name tabs).
Customizing the Panel Bin
If you’re a dedicated user of the Expert editing mode, you may prefer to switch the workspace from Basic to Custom mode. The most important difference between the two working modes is that in Custom mode the Panel Bin can store and display more than one panel at a time—so you can dock your favorite floating panels in the Panel Bin, keeping them clear of the work area and ready at your fingertips without the need to use menu commands. You can group and arrange the panels you use most often in the Custom mode Panel Bin just as you did with floating panels in Basic mode. Panels left floating behave in the same way they do in Basic mode.
Click the small arrow beside the More button at the far right of the taskbar and choose Custom Workspace from the pop-up menu.

In Custom mode, the Layers, Effects, Filters, Styles, and Graphics buttons disappear from the taskbar below the Panel Bin. The panels accessed by those buttons in the Basic mode—the Layers, Effects, Filters, Styles, and Graphics panels—are now docked in the Panel Bin by default, accessible by clicking their name tabs at the top of the Panel Bin. Other panels can be opened from the Window menu or from the menu on the More button at the far right of the taskbar.
Click the More button at the far right of the taskbar. Drag the floating panel group to the bottom edge of whichever panel is currently foremost in the Panel Bin and release the mouse button when you see a blue line indicating the new position.

Drag the Info and Color Swatches panels out of the lower panel group by their name tabs, and then close each of them by clicking the close button (x) in the header bar.
Choose File > Close All to close both of the open images. Bring the Editor window back to the front; then, close it by clicking the Close button (in the top right corner of the workspace on Windows, at the upper left on macOS).
Getting help and inspiration
Help is available in several ways, each one useful in different circumstances:
Help in the application The complete user documentation for Adobe Photoshop Elements is available from the Help menu, in the form of HTML content that displays in your default browser. This documentation provides quick access to information on using the various features in Photoshop Elements.
Depending on which module you’re working in, choose Elements Organizer Help or Photoshop Elements Help from the Help menu, or simply press the F1 key.

The Help menu also offers links to online community forums, video tutorials, and product support. If you’re new to digital photography and image editing, choose Help > Key Concepts for explanations of basic terms and tasks, presented as an easy-to-understand visual dictionary. Click any thumbnail for an illustrated definition of a key concept and links to online Help with step-by-step instructions.

Help on the Web Even without using the Help menu, you can access up-to-date documentation and community discussions via your default browser. Point your browser to helpx.adobe.com/elements-organizer/user-guide.html (Organizer) or helpx.adobe.com/support/photoshop-elements.html (Editor).
![]() Note
Note
Help manuals are also available as PDF documents; look for the “Help manual (PDF)” links at the bottom of the Elements Organizer Help and Photoshop Elements Help pages listed here.
Links in the application Within the Photoshop Elements application there are links to additional help topics, such as the hot-linked tips associated with specific panels and tasks. Look for the question mark icons.
Exploring the Home screen
In addition to being a launch pad for the Organizer and the Editor, the Home screen gives you access to useful and inspirational content and resources and lets you connect with the community of Photoshop Elements users.
You can switch to the Home screen at any time as you work by clicking the link in the taskbar at the bottom of the Organizer and Editor workspaces.


In the top row, click the button at the right side of the screen to browse available content; click any item to view tips and tutorials about features and what’s new in Photoshop Elements.
The Search box draws content from Photoshop Elements Help, user community forums, online articles, and more; the Home screen makes it easy with a natural language search engine, so that you’ll find the help you need, even when you’re unsure of the correct terminology.
Try typing the word trim in the Search box; it offers several topics, including “Trim to a selection boundary,” “Trim an image,” and “Trim image Guided Edit.” Choosing any of these search topics returns a choice of articles and tutorials dealing with the Crop tool and various procedures for cropping photos.
Auto Creations
Need inspiration to get started? Photoshop Elements looks at your photo library and automatically creates collages, slideshows, and Candid Moments based on when your images and videos were captured. A group of shots taken around the same time, for instance, is likely to be an event, so Photoshop Elements assembles creations that include them.

When creations appear at the lower-left corner of the Home screen, click Open to edit one in the Organizer or the Editor. From there you can save it as a new creation or share it with others, as described in Lesson 10. Click the View All button to browse all available creations. If one doesn’t interest you, click the trash icon (![]() ). You may not see Auto Creations right away; as you add more media to the Organizer, it will have more material to work with while your computer is idle.
). You may not see Auto Creations right away; as you add more media to the Organizer, it will have more material to work with while your computer is idle.
Additional resources
Adobe Photoshop Elements 2019 Classroom in a Book is not meant to replace the documentation that comes with the program, nor to be a comprehensive reference for every feature. Additional resources are listed in detail at the end of the “Getting Started” lesson in this book; please refer to these resources for comprehensive information and tutorials about program features.
You’ve reached the end of the first lesson. Now that you know how to import images, understand the concept of the catalog, and are familiar with the essentials of the Photoshop Elements interface, you’re ready to start organizing and editing your photos in the next lessons.
Before you move on, take a few moments to read through the review questions and answers on the next page.
What are the primary workspaces and working modes in Adobe Photoshop Elements?
What is a catalog file?
What are keyword tags?
How can you select multiple thumbnail images in the Media Browser?
Photoshop Elements has two primary workspaces: the Elements Organizer and the Editor. You’ll work in the Organizer to locate, import, manage, and share your photos, and use the Editor to adjust your images and to create presentations to showcase them. The Editor offers three editing modes: Quick Edit, Guided Edit, and Expert Edit mode. Both the Organizer and the Editor provide access to the Create and Share modes.
A catalog file is where Photoshop Elements stores information about your images, enabling you to conveniently manage the photos on your computer from within the Organizer. For each image you import, Photoshop Elements creates a new entry in the catalog file. Whenever you assign a tag or a rating to a photo, or group images in an album, the catalog file is updated. All your work in the Organizer is recorded in the catalog file.
As well as digital photographs, a catalog can include video and audio files, scans, PDF documents, and any presentations and layouts you might create in Photoshop Elements, such as slideshows, photo collages, and CD jacket designs. A single catalog can efficiently handle thousands of files, but you can also create separate catalogs for different types of work.
Keyword tags are labels with personalized associations that you attach to photos, creations, and video or audio clips in the Media Browser so that you can easily organize and find them.
To select images that are in consecutive order in the Media Browser, click the first photo in the series, and then hold down the Shift key and click the last. All the photos in the range that you Shift-clicked will be selected. To select multiple non-consecutive files, hold down the Ctrl / Command key as you add files to the selection.