
8 Combining Images
Lesson overview
Although you can do a lot to improve a photo with tonal adjustments, color corrections, and retouching, sometimes the best way to produce the perfect image is simply to fake it! Photoshop Elements delivers powerful tools that enable you to do just that by combining images.
Merge ordinary scenic photos into a stunning panorama that truly recaptures the feel of the location—or blend differently exposed pictures to conquer difficult lighting conditions. Move objects from one image to another—or combine a series of shots to produce the perfect group photo, where everybody is smiling with open eyes.
In this lesson, you’ll learn some of the tricks you’ll need for combining images to put together the perfect shot that you didn’t actually get:
Merging a series of photos into a panorama
Assembling the perfect group shot
Removing unwanted elements
Blending differently exposed photographs
Combining images using layers, selections, and masks

This lesson will take about 90 minutes to complete. Please log in to your account at peachpit.com to download the lesson files for this lesson, or go to the “Getting Started” section at the beginning of this book and follow the instructions under “Accessing the lesson files and Web Edition.” Store the files on your computer in a convenient location. Your Account page is also where you’ll find any updates to the lesson files. Look on the Lesson & Update Files tab to access the most current content.

Getting started
Begin by importing the sample images for this lesson to your CIB Catalog.
![]() Note
Note
Before you start this lesson, make sure you’ve set up a folder for your lesson files and downloaded the Lesson 8 folder from your Account page at www.peachpit.com, as detailed in “Accessing the lesson files and Web Edition” and “Creating a work folder” in the “Getting Started” section at the beginning of this book. You should also have created a new work catalog (see “Creating a catalog for working with this book” in Lesson 1).
Start Photoshop Elements, and click Organizer in the Home screen.
Click the Import button at the upper left of the Organizer and choose From Files And Folders from the drop-down menu. In the Get Photos And Videos From Files And Folders dialog box, locate and select your Lesson 8 folder. Disable the option Get Photos From Subfolders and the automatic processing options; then, click Get Media.
In the Import Attached Keyword Tags dialog, click Select All; then, click OK.
Combining images automatically
The Photomerge tools offer a variety of ways to combine photos. These tools not only deliver effective solutions to some tricky photographic problems, but are also great fun to use creatively, enabling you to produce striking and unusual images.
In this lesson, you’ll use the Photomerge Exposure tool to combine exposures made in difficult lighting conditions into a composite image that would have been virtually impossible to capture in a single shot. You’ll compose a group photo from two single-subject images with the Photomerge Group Shot tool, and combine a number of photos from a busy scene to produce an unobstructed view using the Photomerge Scene Cleaner. Let’s start by blending a series of scenic photographs into a dramatic panorama using the Photomerge Panorama tool.
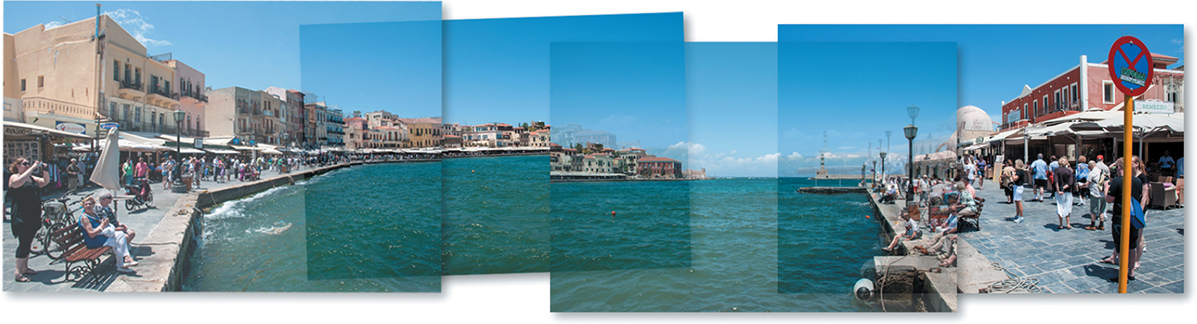
Merging photos into a panorama
A common problem for many of us when taking photos at a scenic location is that standard lenses don’t have a wide enough angle to capture the entire scene. The Photomerge Panorama tool provides the solution: You can capture a series of overlapping shots, and then merge them to create a panorama. In the following pages, you’ll learn how to have Photoshop Elements do most of the work for you.
You could start the Photomerge Panorama process from the Organizer by choosing Photomerge > Photomerge Panorama from the Edit menu, but for this exercise, you’ll switch to the Editor and launch the operation from the Guided Edit mode.
![]() Tip
Tip
If you don’t see file names displayed below the thumbnails in the Media Browser, make sure that the Details and File Names options are selected in the View menu.
In the Organizer, Ctrl-click / Command-click to select the images 08_01a.jpg through 08_01d.jpg in the Media Browser; then, right-click any of the selected thumbnails, and choose Edit With Photoshop Elements Editor.
If necessary, switch the Editor to Guided mode by clicking Guided in the picker at the top of the workspace. Click the Photomerge tab above the preview pane.
Shift-click to select all four photos in the Photo Bin, and then click the Photomerge Panorama preview to launch the process.
Setting up Photomerge Panorama options
The Photomerge dialog offers a choice of layout methods that will affect the way the source images are aligned and stitched together to create your panorama.
In the Photomerge Panorama pane at the right, click the arrow to the right of the projection preview diagram under Panorama Settings, and then select Cylindrical from the layout options.

Not all of the panorama layout options—methods for matching, aligning, and blending your source images—will work well for every series of photos. Experiment with your own photos to get a feel for the differences between the layout options and which will work best for a given set of source images.
Expand the Settings options and make sure Blend Images Together is activated.
With the Blend Images Together option activated, Photoshop Elements will color match the source photos, align overlapping detail, and automatically create layer masks to define the areas from each image that will contribute to the panorama.
![]() Tip
Tip
You might disable the Blend Images Together option if you want to control precisely which part of each photo is to be included in the panorama, by creating the layer masks manually.
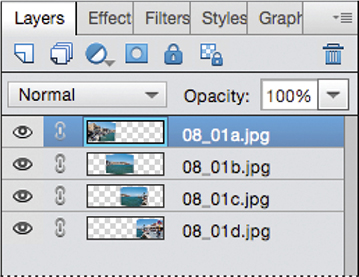
Click the Create Panorama button at the right of the taskbar; then watch the Layers panel while Photoshop Elements creates a new file for the panorama and places each source image on its own layer. Photomerge calculates the overlaps, masks each image layer accordingly, and then color matches adjacent images as it blends the seams.
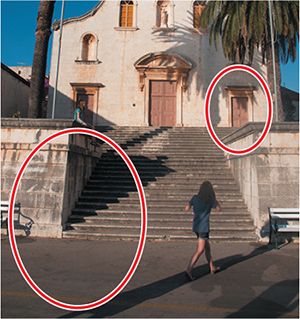
The Clean Edges dialog appears, asking if you’d like to automatically fill in the edges of your panorama. If you were to click No, Photoshop Elements would automatically crop away any areas of transparency surrounding the composite image. These transparent areas, as indicated by a checkerboard pattern in the illustration below, result from the process of aligning the separate source images.

For this combination of photos, cropping away the transparent areas would not remove any significant detail; however, substantial slices of the image would be lost, making the composition somewhat cramped. Instead, Photoshop Elements can help you solve this problem by using content-aware healing to fill in the missing areas.

In the Clean Edges dialog, click Yes.
The content-aware fill usually does a great job with nonspecific or organic content such as clouds, water, or foliage, and even with regular patterns like brickwork, but can’t deal with too much man-made detail. Let’s check over the results.
In the Photomerge Panorama pane, under Continue Editing, select In Expert.
In Expert mode, you can use the Zoom and Hand tools (
 ,
,  ) to examine the extended image; the active “marching ants” selection border will help you look in the right places to spot any anomalies.
The results at the top of the photo are very good, but the content-aware fill has produced artifacts in the lower corners of the merged image. You may see different results than those pictured in the illustration below; the content-aware fill operates with a degree of randomness in selecting areas for sampling in its attempt to avoid repetition of image detail.

(Optional) If you wish to see if Photomerge will produce a better result on its second attempt, choose Edit > Undo Fill, and then choose Edit > Fill Selection. In the Fill Layer dialog, choose Content-Aware from the Use menu; then, click OK. If you wish, you can retouch the unwelcome blend artifacts using the Spot Healing Brush and the Clone Stamp tool before moving on.
When you’re done, press Ctrl+D / Command+D, or choose Select > Deselect.
Now let’s have a closer look at how well Photoshop Elements matched the areas where the source images are overlapped.
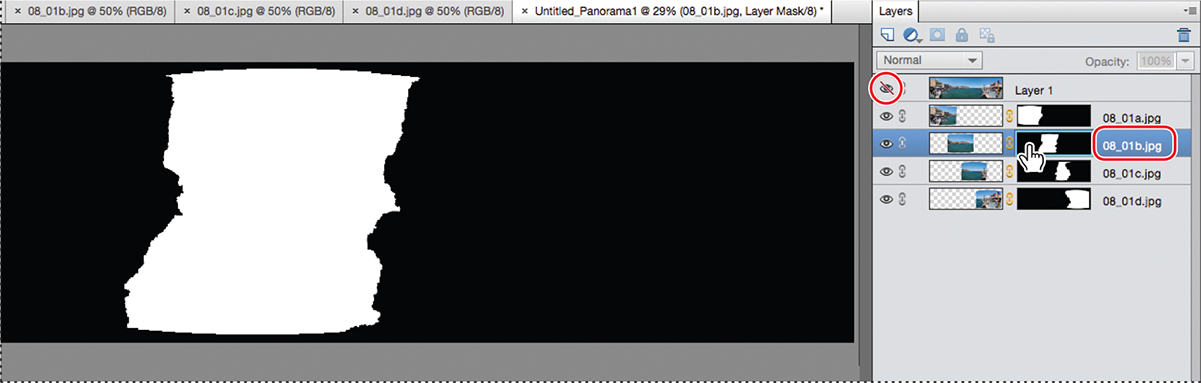
In the Layers panel, click the eye icon (
 ) for the layer with the merged panorama to hide it. Hold Alt+Shift / Option+Shift, and click the black-and-white layer mask thumbnail for the third layer. In the Edit window, the mask associated with the layer appears as a semitransparent red overlay, enabling you to see which part of the image 08_01b.jpg has contributed to the panorama. The unused portions are hidden by the layer mask.

Use the Zoom and Hand tools to focus on the area where the blend border passes through the waterfront buildings. Hold Alt+Shift / Option+Shift, and click the layer mask thumbnail to toggle the overlay as you inspect the seams. Hide the red mask overlay.
 Note
NoteFor our lesson images, you probably won’t find noticeable blend problems, but some source photos can produce misaligned edges or displaced, floating details along the blended seams.
Alt-click / Option-click the black-and-white layer mask thumbnail. The layer mask is displayed in opaque black and white. Black represents the masked portions of the layer; white represents the areas that have contributed to the blend.
If you wished to edit any portion of a seam between images, you could alternate between the opaque and semitransparent views of the layer mask, and adjust the blend by painting (or erasing) directly onto the mask. If your panorama is extended by content-aware fill, you’ll need to erase the corresponding area of the top layer, creating a “window” so that your changes to the lower layers are visible.
![]() Tip
Tip
If you do find artifacts along seams in a panorama, try recombining the source images using a different layout method. Alternatively, you can adjust the placement of the seams by retouching the layer blending masks manually.
Use the same technique to inspect the blended seams between the other source layers. When you’re done, make the merged panorama layer visible once more.
Choose View > Fit On Screen. If you didn’t repair the content-aware fill in step 7, choose Image > Crop. Drag the handles of the cropping rectangle to make it as large as possible without including the blurred image artifacts in the lower corners of the photo; then, click the Commit button (
 ) at the lower right to commit the crop.
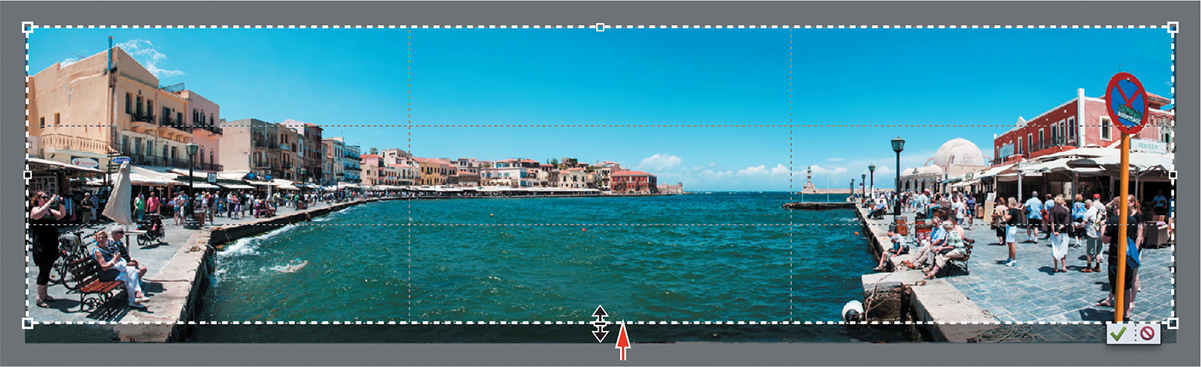
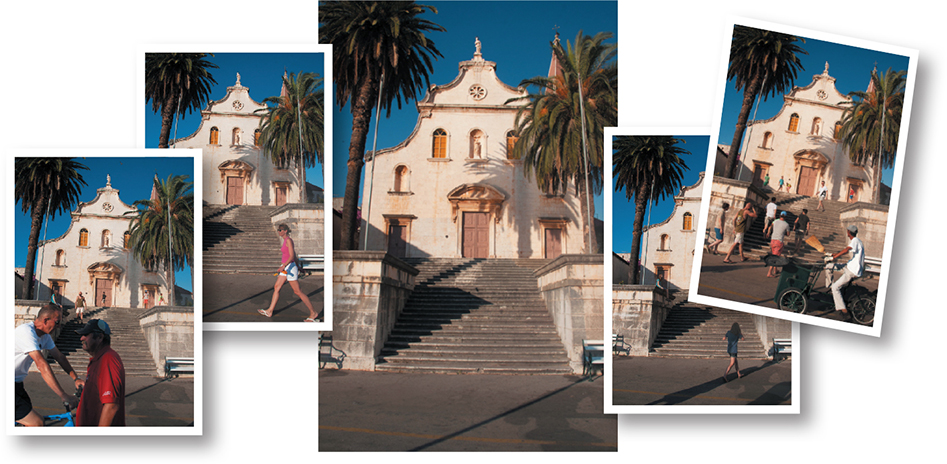
The finished composite panorama presents a well-composed, natural-looking view, with no more distortion than is apparent at the outside edges of the source series.

Choose File > Save. Name the merged image 08_01_Panorama, to be saved to your My CIB Work folder in Photoshop format with Layers activated. Saving your file in Photoshop format enables you to preserve the layers so that you can always return to adjust them if necessary. If you saved in JPEG format, the image would be flattened, and layer information lost. Make sure that the file will be included in the Organizer. Click Save; then, choose File > Close All.
Not every set of images will perform the same way in a Photomerge panorama. Different sets of source images can produce very different results, even with the same layout option settings. The way a given series of photos will combine to form a panorama depends on many factors, from lighting that varies markedly across the series to issues of perspective, foreshortening, and lens distortion.
Our sample photos feature even lighting and few foreground elements, but a series of images taken close to a building or other large object—like photos shot indoors or in a confined urban space—would present different challenges. Try creating panoramas in a variety of locations; the results can be both striking and surprising.

Creating a composite group shot
Shooting the perfect group photo is a difficult task, especially if you have a large family of squirmy kids. Fortunately, Photoshop Elements offers a solution: a powerful photo-blending tool called Photomerge Group Shot.
No longer do you need to put up with family photos where someone has turned away, frowned, or closed their eyes at the wrong moment. Photomerge Group Shot lets you merge the best parts of several images to create the perfect group photo.
Photomerge Group Shot also makes a great solution to another common group photo problem: It lets you put the person behind the camera back in the frame.
If you’re still in the Editor, click the Organizer button (
 ) in the taskbar.
If necessary, use the Lesson 08 tag in the Tags panel to isolate the images for this lesson, and then Ctrl-click / Command-click to select the images 08_02a.jpg and 08_02b.jpg in the Media Browser.
Choose Edit > Photomerge > Photomerge Group Shot. Open the Photo Bin.
The Photomerge Group Shot panel opens at the right, with tools and tips for merging photos; the toolbox now offers only the Zoom and Hand tools. By default, Photoshop Elements has designated the first photo in the Photo Bin as the source image and placed it in the Source pane on the left. The Photomerge tools will let you extract the figure from the Source image and blend it into the Final image.
![]() Tip
Tip
If you don’t see checkerboard transparency around the default source image, as shown in the illustration at the right, click Cancel, close both images without saving, and quit the Editor; then, start again from step 2.

Before you begin merging photos for a composite group shot, you need to consider your choice for the Final image—the “target” image into which the figures from your source images will be blended. You may choose the image with the most balanced composition, a photo with more background detail than the others, or the image with the most room for the additions you’re planning.
![]() Note
Note
Photoshop Elements begins the Photomerge process by finding matching detail; the checkerboard areas, and any skewing in either image, show what has been done to align the two photos.
Click the second thumbnail in the Photo Bin to replace the default source photo with the image 08_02b.jpg. Drag the first thumbnail (08_02a.jpg) from the Photo Bin into the Final image pane on the right.

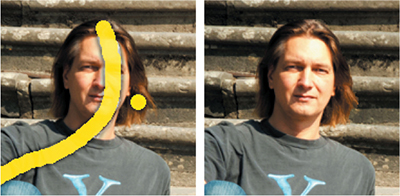
For this demonstration, with only two images in the operation, we chose the image 08_02a.jpg as the Final image (the base for the composite) because the exposure and composition are better, with more clearance at the subjects’ feet. Also, you’ll notice that the other shot has been skewed slightly in the alignment process. In the Photomerge Group Shot panel at the right, select the Pencil tool (
 ), if it’s not already active. Click the Size slider to see a numerical value displayed; if necessary, reset the Pencil tool to its default size of 13 pixels. Make sure that the Show Strokes option is activated and Show Regions is disabled.
In the Source image, start at the top of the man’s head, and draw an uninterrupted line as shown in the illustration below, passing through his face, looping across the chest, and then tracing the outside line of his leg as closely as possible from the knee down, making sure that you stay just inside the edge of his jeans. If you go off track, press Ctrl+Z / Command+Z, and start again.
![]() Tip
Tip
Try to copy the yellow line in the illustration as closely as you can so that you’ll see results very similar to those described in this exercise. In normal circumstances, you can be much more casual with your pencil stroke.
When you release the mouse button, the figure of the man is copied into the Final image, together with a patch of the stone stairs that hides parts of the woman’s right forearm and leg, as well as her shadow. Some of the hair at the right of the man’s face has been left behind. Note that the color and contrast of the area copied from the Source image has been adjusted to match the Final image.

With a practiced stroke, it’s actually possible to merge the man to the Final image without the unwelcome extras and missing detail; however, one objective of this exercise is to demonstrate techniques that will help you combine more complex source images, where it can be challenging to make the perfect selection.
Whenever you have difficulty defining the element you wish to copy from the Source image, it’s preferable to make a stroke that picks up extra detail from the background, rather than one that leaves portions of the subject behind. The missing hair will be easy to deal with, but where objects touch or overlap, it’s much easier to remove extraneous elements than it is to add missing detail.
With the Pencil tool, click once in the Source image to pick up the area of hair that was not merged to the Final image.
Press Ctrl / Command together with the plus sign key (+) to zoom in; then hold the spacebar and drag the Source image to center your view on the man’s left leg. Make sure you have a clear view from the knee to the foot.
Press the left bracket key ( [ ) twice to reduce the default brush (or pencil) size; then, draw a short stroke just a little outside the line of the knee, as shown in the illustration at the right.
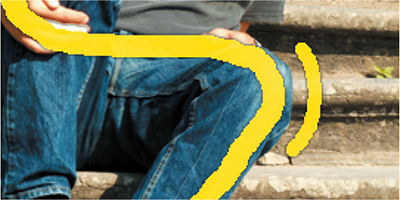
In the Photomerge Group Shot panel, select the Eraser tool (
 ) (you may need to click twice); then, press the left bracket key ( [ ) twice to reduce the brush size. Carefully erase the short line, taking care to keep the Eraser tool cursor clear of the edge of the blue jeans. The original line will protect the edge of the man’s jeans while the extraneous detail is removed, revealing the woman’s leg and its shadow, and reinstating the hidden part of her right forearm.

When you’re working with an object that’s particularly difficult to isolate, try varying your strokes with the Pencil and Eraser tools. Use a combination of long lines, short strokes, and clicks. Both the brush size and the stroke direction can also make a difference to the area that will be affected by either tool.
The Advanced Options button in the Photomerge Group Shot panel gives you access to controls that let you edit a blended composite by adjusting the way the images are aligned. You’ll look at the Show Regions option in the next exercise.
Click the Next button at the right of the taskbar; then, under Continue Editing, click In Expert. The merged image needs cropping; choose Image > Crop, and then drag the handles of the cropping rectangle to trim off the empty areas. Click the green check mark icon at the lower right to commit the crop.

Choose File > Save. Name the merged image 08_02_GroupMerge, to be saved to your My CIB Work folder in Photoshop (PSD) format with Layers activated, and included in the Organizer. Click Save; then, choose File > Close All.

Removing unwelcome intruders
The Photomerge Scene Cleaner enables you to combine the unobstructed areas from several photos of the same scene to produce a clear view—without the tourists, traffic, or uninvited extras that can draw attention away from your subject.
![]() Tip
Tip
Sequences shot with burst mode are ideal for use with the Scene Cleaner tool.
When you’re sightseeing, it’s a great idea to take extra shots of any busy scene so that you can use the Scene Cleaner to put together an uncluttered image later. It’s not necessary to use a tripod; as long as all your photos were shot from roughly the same viewpoint, Photoshop Elements will align the static content in the images.
You can use up to ten images in a single Scene Cleaner operation; the more source images, the more chance that you’ll produce a perfect result. In this exercise, you’ll clear a busy scene completely by combining just four photos.
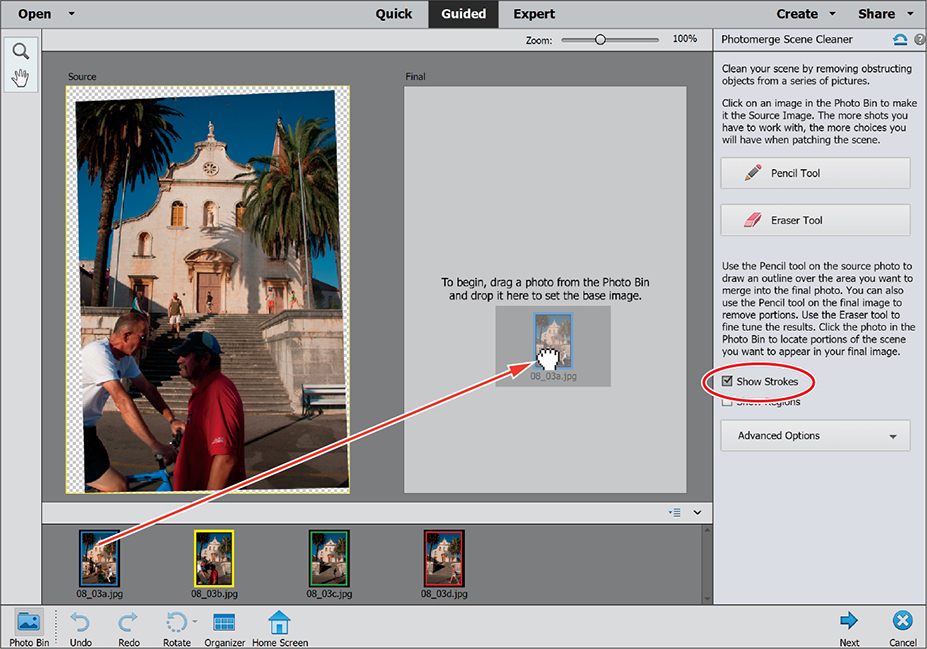
Select the images 08_03a.jpg, 08_03b.jpg, 08_03c.jpg, and 08_03d.jpg in the Media Browser; then, choose Edit > Photomerge > Photomerge Scene Cleaner.
If necessary, open the Photo Bin; then, double-click the Hand tool to re-fit the previews to the work area. By default, 08_03a.jpg (framed in blue) is loaded as the Source image. Click the thumbnail framed in yellow (08_03b.jpg) to replace it; then drag the thumbnail with the blue frame to the Final pane. This is the photo you will “clean”—the base image for your composite. In the Photomerge Scene Cleaner panel, make sure that Show Strokes is activated.
![]() Tip
Tip
If what you see onscreen differs from the illustration at the right, click Cancel, close the images, quit the Editor, and then start again from step 1.
The tools and options in the right panel are very similar to those in the Photomerge Group Shot panel. The principal difference is that in the Scene Cleaner, the Pencil and Eraser tools can be used in both the Source image and the Final image.
Compare the photos in the Source and Final panes. Use the Zoom and Hand tools to focus on the lower-right quadrant of the image. Note that the Source image (08_03a) has several clear areas where the Final image has obstructions. Select the Pencil tool (
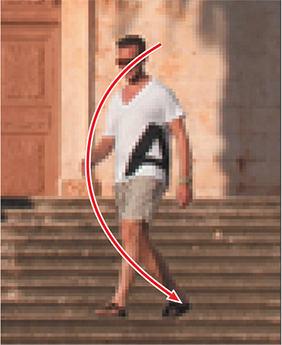
) in the Photomerge Scene Cleaner panel.In the Final image, draw a line through the man in the white shirt near the top of the steps, as shown at the right. Make sure your stroke covers both the leading hand and the trailing foot, but try not to extend it beyond his form. When you release the mouse button, the man is removed from the Final image—replaced by detail copied from the Source image. Move the pointer off the Final image onto the surrounding gray background; the yellow line remains visible only in the Source image.
In the Final image, draw a second line through the man on the tricycle. Clip the arms and gloves, but don’t move further forward or you’ll copy the man in red from the Source image. If that happens, or you don’t remove as much of the tricycle as is shown at the right below, undo your stroke and try again.

 Tip
TipDon’t worry about the disembodied head of the broom; you’ll remove that with another Source image.
If necessary, choose View > Fit On Screen to see the entire image. You can see that this Source image has nothing more to contribute to our composite scene; the left of the photo and the area at the top of the steps are as populated as the Final image. In the Photo Bin, click the third photo (the thumbnail with the green border) to make it the new Source image.
The new Source image has a clear area at the lower left that will enable you to remove three (and a half) more figures from the Final image. You can also copy the area in front of the church door at the right to clear another, but we won’t use this Source photo to remove the people at the left of the facade—any stroke in that area of this image picks up the girl sitting on the wall.
In the Final image, draw a line down through the young man at the far left, extending your stroke to catch the trailing foot, as shown below. A mirror of the same stroke should remove the next customer. Draw a short line straight down through the third man; don’t go too far at this point or you’ll introduce new problems. Click once to remove the extraneous shadow at the lower left, and once more to clear the figure from in front of the church door at the right.

Choose View > Fit On Screen to see the entire image. In the Photo Bin, click the thumbnail with the red border to make it the new Source image.
Draw in either image to remove the one-and-a-half people from the central foreground, together with the wreckage of the street-sweeper’s tricycle. If you intend to draw in the Source image, refer to the illustration below before making your stroke. A short horizontal stroke will get rid of the stragglers loitering at the top of the stairs, and a single click will clear the heavy shadow in the foreground. If you need to edit a stroke, use the Eraser tool (
) in the right panel.
Double-click the Hand tool, or choose View > Fit On Screen. To see which part of each image has contributed to the cleared and blended composite, select the Show Regions option in the Photomerge Scene Cleaner panel.

Click the Next button at the right of the taskbar; then, under Continue Editing, click In Expert.
The image has empty and patched areas around the edges, resulting from the alignment process. Choose Image > Crop. Drag the handles of the cropping rectangle to trim the image; then, click the check mark to commit the crop.
Choose File > Save. Name the file 08_03_Depopulated, to be saved to your My CIB Work folder, in Photoshop (PSD) format. Make sure that the Layers option is selected and that the file will be included in the Organizer. Click Save, and then close all five files.
Blending differently exposed photos
There are many common situations where we (or our cameras in automatic mode) are forced to choose between properly exposing the foreground or the background.
Interior shots often feature overexposed window views where the scene outside is washed out or lost completely. Subjects captured in front of a brightly lit scene or backlit by a window are often underexposed, and therefore appear dull and dark.
Capturing outdoor night shots is another problematic situation; we need to use a flash to light our subject in the foreground, but a background such as a neon-lit street scene, a city skyline, or a moonlit vista is usually better exposed without it.
Photomerge Exposure provides a great new way to deal with photos captured in difficult lighting conditions, enabling you to combine the best-lit areas from two or more images to make a perfectly exposed shot.
For this exercise, you’ll work with two photos of a mother and daughter posed in front of stained-glass windows in a dim interior, captured with and without flash.

The photo shot with flash has been correctly exposed to capture the figures in the foreground, but the windows appear “burnt out”—all color and detail have been lost. The second photo has captured the glowing colors in the stained glass reasonably well, but the rest of the image is too dark, dull, and lacking in detail.
If you’re still in the Editor, switch to the Organizer now by clicking the Organizer button (
) in the taskbar.Click the check box beside the Lesson 08 tag in the Tags panel, if necessary, to isolate the images for this lesson. Ctrl-click / Command-click to select the images 08_04a.jpg and 08_04b.jpg.
Choose Edit > Photomerge > Photomerge Exposure. When the Editor has opened, show the Photo Bin.
Using the Photomerge Exposure tool
Whenever you’re faced with difficult lighting conditions, you should keep the Photomerge Exposure tool in mind; make a point of shooting two or more photos at different exposure settings, and then let Photoshop Elements align them and blend them together when you get home.
Photoshop Elements can detect whether the images you’ve chosen to combine are a pair shot with and without flash or photos taken with different exposure settings—for example, a series captured using your camera’s exposure-bracketing feature.
The Photomerge Exposure tool has two working modes; it will default to Manual mode for photos captured with and without flash, or open in Automatic mode for a series of exposure-bracketed shots.
Merging exposures manually
The Photomerge tools let you extract content from the Source image and blend it into the Final image. By default, Photoshop Elements places the first photo in the Photo Bin in the Source pane at the left of the Photomerge Exposure workspace.
![]() Tip
Tip
If what you see onscreen differs from the illustration below, click Cancel, close both images without saving, and quit the Editor; then, start again from step 2 on the previous page.
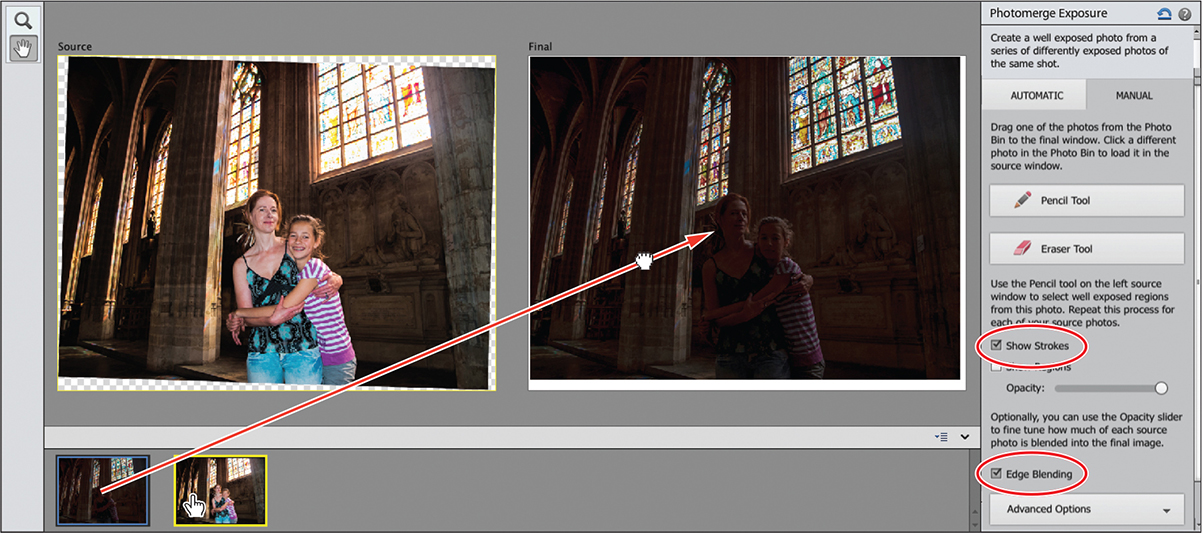
Click the Manual tab in the right panel if it’s not selected. Next, click the second thumbnail in the Photo Bin to replace the default source photo with the image 08_04b.jpg. Drag the first thumbnail (08_04a.jpg) from the Photo Bin into the Final image pane on the right. Make sure that the option Show Strokes is activated, and then activate the Edge Blending option.
Use the Zoom and Hand tools to focus your view on the figures in the foreground; then, select the Pencil tool (
) in the right panel. You won’t need to change the default brush diameter.Starting near the woman’s right eye, draw carefully around the top of her head, staying as close to the outline of the hair as possible without moving the brush outside it, and then drag down the line between mother and daughter.
TipIf you’ve copied unwanted background detail from around the woman’s head into the Final image, use the Eraser tool from the right panel to remove that part of the line. Reduce the brush size for the Pencil tool by pressing the left bracket key ( [ ) and try again, making sure that you stay within the outline of the woman’s hair.

Zoom in on the daughter’s head. Reduce the brush size a little, if you haven’t done so already, and draw around the top of the girl’s head, taking care not to move the brush outside of the outline, but making sure that you pick up the highlighted areas of the hair. If your stroke introduces unwanted background detail, click or make short strokes with the Eraser tool (
) to correct it.
Double-click the Hand tool, or choose View > Fit On Screen. Don’t be concerned about the legs of our subjects’ jeans—you’ll crop that part of the image in the next step. Click the Next button at the right of the taskbar, and then, under Continue Editing, click In Expert.
TipTo more easily move the cropping handles by small increments, zoom in: press Ctrl / Command with the plus sign key to zoom, and press the spacebar to switch to the Hand tool.
Double-click the Hand tool; then choose Image > Crop. Drag the handles of the cropping rectangle to trim the image; then, commit the crop.
The merged image is a far better exposure than either of the original photos, but there is still plenty of room for improvement.

If we had much more time, we could add some detail from the flash-lit photo to the wall and columns, or try reversing the process by making the underexposed shot the Source image and copying the stained glass into the flash-lit photo instead.
Choose File > Save. Name the file 08_04_Merge_Manual, to be saved to your My CIB Work folder, in Photoshop (PSD) format with Layers activated, and included in the Organizer. Click Save. Keep the file open for the moment.
Merging exposures automatically
Even in Automatic mode, Photomerge Exposure gives you a degree of control over the way that the source images are combined.
Click an empty area in the Photo Bin to deselect all the thumbnails. Ctrl-click / Command-click to select the two original photos in the Photo Bin, and then switch to the Photomerge category in Guided Edit mode. Click the interactive preview for Photomerge Exposure.
Click the Automatic tab at the top of the Photomerge Exposure panel; then, drag the Shadows slider all the way to the right to set a value of 100. This will lighten the shadows in the blended image, improving definition. Click the Next button at the right of the taskbar, and then, under Continue Editing, click In Expert.
Crop the image; then, choose File > Save. Name the file 08_04_Merge_Auto, to be saved to your My CIB Work folder, in Photoshop (PSD) format with Layers activated, and included in the Organizer. Click Save. Keep the file open.
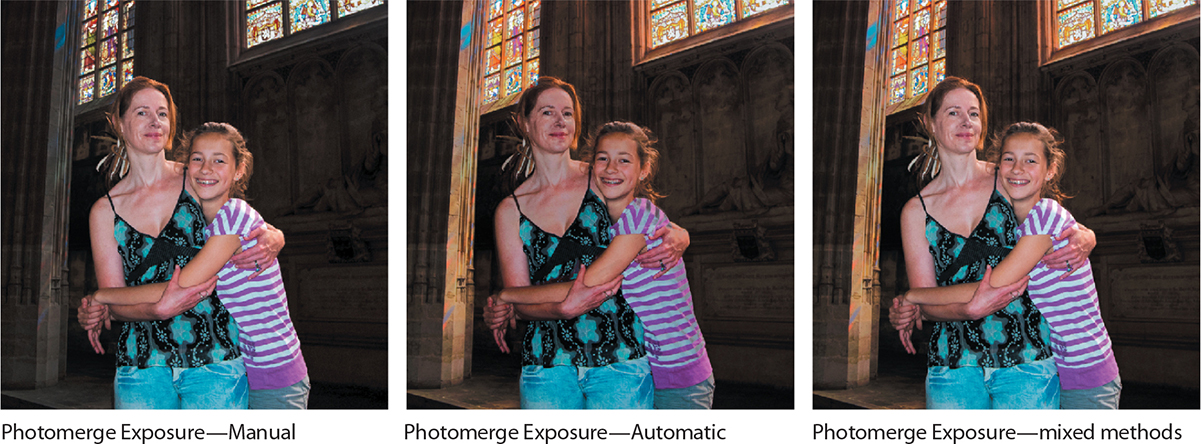
At the top of the Edit pane, click back and forth between the name tabs for the two merged images, 08_04_Merge_Manual and 08_04_Merge_Auto, to compare the results of the two blending modes. For our base images, the manual blend achieved a better exposure for the foreground subjects, while the automatically merged image reveals much more of the architectural detail.

In the Photo Bin, deselect all the thumbnails; then, Ctrl-click / Command-click to select the last two images, 08_04_Merge_Manual and 08_04_Merge_Auto. Switch to the Photomerge category in Guided Edit mode and click the preview to launch the Photomerge Exposure process once more.
Click the Manual tab at the top of the Photomerge Exposure panel; then, drag the image 08_04_Merge_Auto into the Final pane. Use the Pencil tool to copy the figures from the manually merged photo to the automatically generated image; you won’t need to be as careful as you were earlier. When you’re done, click Next, move to Expert mode, crop the file, and save it as 08_04_Merge_Remix.
Click back and forth between the name tabs for the three merged images you’ve produced to compare them. When you’re done, choose File > Close All.
Using layers to combine photographs
In this lesson so far, you’ve used some of the Photomerge tools to automate the process of combining photos. In this project, you’ll take a more hands-on approach, using layers, selections, and masks to take full control over the way several source photos are combined to create a complex composite image.
In the Organizer, locate and select the images 08_05b.jpg and 08_05c.jpg: a scenic view of the ruins of a Scottish castle and a photo of a seagull in flight.
Click the Editor button (
 ) in the taskbar. In the Editor, click in the mode picker at the top of the workspace, if necessary, to switch to Expert mode.
Arranging the image layers
In the first part of this project, you’ll arrange these two images on their separate layers, and then blend them to create a composite background.
Click the Layout button (
 ) in the taskbar, and choose the All Row layout to tile the open image windows horizontally. Click the name tab of the image 08_05c.jpg (the seagull) to make it the active window.
Select the Move tool (
 ), and hold down Alt / Option as you drag the seagull onto the coastal view. Release the mouse button and then the Alt / Option key. Holding the Alt / Option key as you drag a layer to another file ensures that the layer is aligned the same way in the target file as it is in the source, so that the image appears in the same position in the window. Close the image 08_05c.jpg.
 Note
NoteDepending on your operating system, the seagull layer may be named “Layer 1,” rather than “Background copy,” as illustrated here.
If the Layers panel is not already visible, choose Window > Layers. In the Layers panel, make sure the layer with the gull is selected, and then choose Image > Resize > Scale. If necessary, click the Tool Options button (
 ) to show the tool options pane; then, choose View > Fit On Screen.
In the tool options pane, make sure that the option Constrain Proportions is selected, and then type 50% in the W (width) field.

Position the pointer in the middle of the seagull photo and drag it to the upper-right corner of the image; then, drag the lower-left handle of the bounding box upward and to the right to reduce the image further. Keep your eye on the width (W) and height (H) values in the tool options pane; stop when both values reach 40%. Click the green Commit button on the bounding box to accept the changes.

Creating a feathered layer mask
A layer mask allows only part of the image on a layer to show, and hides the rest by making it transparent. Layers lower in the stacking order will be visible through the transparent areas in the masked layer. In the next steps, you’ll make a feathered selection and use it to create a soft-edged mask that will make it possible to blend the seagull into the sky in the background scene without a visible edge.
Select the Rectangular Marquee tool (
 ) in the toolbar. In the tool options pane, activate the elliptical variant of the marquee selection tool, and then use the slider, or type over the default value, to set the Feather amount to 50 px.
Starting from a point below the bird’s body, drag an elliptical selection marquee, holding down the Alt / Option key as you drag to draw the marquee from its center. Release the mouse button when you have as much clearance around the seagull as is shown at the right. If necessary, drag the selection in the image window to center it on the bird.

With the seagull layer selected, click the Add Layer Mask button (
 ) at the top of the Layers panel to convert the selection to a layer mask. In the Layers panel, the layer with the gull now has a black-and-white mask icon; only the part of the image corresponding to the white area still shows in the image.
To see the layer mask displayed in the image window as a semitransparent overlay, hold down the Shift key and then Alt-click / Option-click the layer mask thumbnail. Repeat the action to hide the overlay.

Although the feathered mask blends the image smoothly into the layer below it, the color in our wildlife photo still needs to be adjusted to match the background.
Matching the colors of blended images
Every color matching problem requires its own solution, but this exercise should at least give you an idea of what kinds of things you can try. In this case, you’ll use a blending mode together with several different adjustments to color and lighting.
Double-click the colored thumbnail (not the layer mask) on the seagull layer to select the image rather than the mask; then, choose Enhance > Adjust Color > Adjust Hue/Saturation. In the Hue/Saturation dialog, use the sliders or type new values to set both the Hue and the Saturation to –12 and the Lightness to –2.
Use the menu above the sliders to switch from the Master channel to the Cyans channel. Set the Saturation value for the Cyans channel to –20. Switch to the Blues channel, and set the Saturation to –20; then click OK.

As you can see in the before and after illustration below, this combination of adjustments has not only matched the colors in the blended images but has also reduced the contrast and made the seagull a little brighter, helping it to fit in better with the slightly hazy aerial perspective in the background image.
![]() Tip
Tip
If you wish to tweak the position of the seagull, make sure its layer is active; then, select the Move tool, and drag the bird by its center. The Move tool will not work if you try to drag a part of the image that is masked (invisible). Alternatively, once the Move tool is activated, you can nudge the selected layer with the arrow keys on your keyboard.

Choose File > Save As. Save the file to your work folder, in the Photoshop format with Layers enabled. Make sure that the image will be included in the Organizer but not in a version set. Name the new file 08_05_Composite, and then click Save. Keep the blended image open for the next exercise.
Cleaning up selection edges
Defringing removes the halo of residual color that often surrounds a selection copied and pasted from one image to another. In this exercise, you’ll add a foreground image of four sisters, select and delete the background from that photo, and use the Defringe feature to blend the selection halo into the background.
Choose View > Fit On Screen; then, choose File > Open. Navigate to and open your Lesson 8 folder. Select the file 08_05a.jpg, and then click Open.
With the image 08_05a.jpg selected as the active window, choose Select > All. Choose Edit > Copy, and then File > Close. Make sure the top layer of the composite image is still selected; then, choose Edit > Paste. The image of the four sisters is placed on a new layer, right above the layer that was selected.
With the new layer selected in the Layers panel, select the Move tool (
), and drag the photo of the girls to the lower-right corner of the image.Click any of the handles on the bounding box. In the tool options pane, make sure that Constrain Proportions is selected; then, drag the upper-left handle of the bounding box upward and to the left to meet the left border of the image.
Click the Commit button at the lower right of the bounding box; then, use the right and down arrow keys to nudge Layer 1 just a fraction down and to the right.
 Tip
TipThe Magic Wand tool (
 ) is grouped together with the Quick Selection tool (
 ) and the Selection Brush (
 ) in the Select category at the top of the toolbar.
Click the Quick Selection tool, or whichever of its variants is currently visible at the right of the Lasso tool (
 ) in the Select tools category. At the left of the tool options pane, activate the Magic Wand tool (). Set the Tolerance to 5, activate Anti-aliasing, and disable the Contiguous and Sample All Layers options. Select the yellow background on Layer 1 with the Magic Wand tool.
Press the Delete key to delete the yellow background, and then press Ctrl+D / Command+D, or choose Select > Deselect, to clear the selection.
Zoom in to the space between the heads of the two sisters in the middle of the group. A yellowish fringe or halo is clearly visible around the girls’ hair.
Choose Enhance > Adjust Color > Defringe Layer. In the Defringe dialog, type 5 pixels for the width, and click OK. Most of the fringe is eliminated.

Double-click the Hand tool in the toolbox, or choose View > Fit On Screen, to see the whole image in the Edit window.
Select the Magic Wand tool (
) once more, and click anywhere in the cleared area surrounding the girls. Choose Select > Modify > Border, and set a border width of 4 pixels; then, click OK.Choose Filter > Blur > Blur More, and then repeat the command to soften the harder edges of the pasted image. Press Ctrl+D / Command+D, or choose Select > Deselect, to clear the selection.

Choose File > Save, and then close the document.
Combining layers in Guided Edit mode
Now that you know what’s involved in layering a composite image, you’ll appreciate another of the latest additions to the Guided Edit mode; the Replace Background guided edit automates much of the process.
In the Organizer, select the image 08_06.jpg and click the Editor button (
) in the taskbar. In the Editor, switch to Guided mode. Click the preview in the Special Edits category to launch the Replace Background project.Choose the Auto Selection tool from the options presented in step 1 in the actions pane at the right. In the tool options pane below the image preview, make sure the Auto Selection tool is set to the Rectangle selection style; then, drag a rectangular marquee around the girl.

Switch to the Selection Brush. In the tool options pane, make sure the Selection Brush is set to Subtract From Selection mode. Set the brush size to 80 pixels and its hardness to 97%. Paint out any unwanted areas that have been selected; pay attention to the outline of the arm at the left, and the top of the girl’s head.

Set the Selection Brush to Add To Selection mode. Paint over any unselected areas that need to be included; pay particular attention to the bottom edge of the image, the girl’s right shoulder, and the top of her head, left of the parting. You don’t need to select the fly-away wisps of hair.
In the actions pane, click Import A Photo. Navigate to and open the Extras folder inside your Lesson 8 folder; then, select the image 08_06_Background.jpg and click Place. Switch to the Move tool and drag the background downward as far as you can, without exposing the upper edge. Drag the girl just a little to the right, stopping before the frame of the door behind her becomes visible.
If necessary, use the Refine Selection tool in either mode to tidy up the girl’s outline; look for fringes of the original background around her arms and hair.
Click Auto Match Color Tone, the last step in the guided actions pane. Wait while Photoshop Elements analyzes the photos and makes the adjustment.
Photoshop Elements applies a slightly “harder” contrast to the image of the girl, but the color tone still looks a little cool and out of place against the afternoon sunshine in the new background. You can adjust that easily in Expert mode.
Click Next at the lower right of the workspace; then, under Continue Editing, choose In Expert. Click to select the image thumbnail—not the black and white mask—on the top layer in the Layers panel.
Choose Enhance > Adjust Color > Adjust Color For Skin Tone. Click a neutrally lit area of the girl’s skin—neither a highlight nor a shadow; then, drag the Ambient Light > Temperature slider a little to the right, moving it no more than the width of the slider button itself. Click OK.
In the Layers panel, click to select the middle layer, 08_06_Background. Choose Layer > Simplify Layer. Choose Filter > Blur > Gaussian Blur; then, set the blur radius to 8 pixels and click OK. The blurred background competes less with the subject and simulates a depth-of-field effect.

Choose File > Save As. Save the file with all its layers in Photoshop format, with an appropriate name and all the usual settings; then, choose File > Close.
Congratulations, you’ve completed the last exercise in this lesson. You’ve learned how to create a stunning composite panorama, merge multiple photos into the perfect group shot, remove obstructions from a view, combine elements from two photos, and compose several photos into a single image by arranging layers and using a selection to define a layer mask. You’ve also gained some experience with solving difficult lighting problems by combining shots taken at different exposures.
Take a moment to work through the lesson review on the next page before you move on to the next chapter, where you’ll explore opportunities for unleashing your creativity with Photoshop Elements.
What does the Photomerge Group Shot tool do?
How does the Photomerge Scene Cleaner work?
Why is it that sometimes when you think you’re finished with a transformation in Photoshop Elements you can’t select another tool or perform other actions?
Why does Photomerge Exposure sometimes open in Automatic mode and at other times in Manual mode?
What is a fringe, and how can you remove it?
What are the Photomerge tools that are not covered in this lesson?
With the Photomerge Group Shot tool, you can pick and choose the best parts of several similar photos and merge them together to form one perfect picture.
The Photomerge Scene Cleaner helps you improve a photo by removing passing cars, tourists, and other unwanted elements. The Scene Cleaner works best when you have several shots of the same scene so that you can combine the unobstructed areas from each source picture to produce a photograph free of traffic and tourists.
Photoshop Elements is waiting for you to confirm the transformation by clicking the Commit button or by double-clicking inside the transformation boundary.
Photomerge Exposure detects whether your source photos were taken with exposure bracketing or with and without flash, and defaults to Automatic or Manual mode accordingly. Manual mode works better for source files taken with flash / no flash.
A fringe is the annoying halo of color that often surrounds a selection pasted into another image. When the copied area is pasted onto another background color, or the selected background is deleted, pixels of the original background color show around the edges of your selection. The Defringe Layer command (Enhance > Adjust Color > Defringe Layer) blends the halo away so you won’t see an artificial-looking edge.
The Photomerge Faces and Photomerge Compose tools are not treated in this lesson. Photomerge Faces works similarly to the Photomerge Group Shot tool, except that it’s specialized for working with faces. The Photomerge Compose tool enables you to extract an object from one image and compose it realistically into another.